Studiomaster Professional MINI Series User manual

Mini8U
STEREO I/P & L-R O/P
MIC/LINE I/P
High Performance
Compact Mixer...
6 7
MIC/LINE I/P
STEREO I/P
L-R O/P
High Performance
Compact Mixer...
Mini8
6 7
MINI SERIES
1...............................................................................................................................................................Introduction
2................................................................................................................................................Features at a Glance
3.............................................................................................................................................................Input Section
4..........................................................................................................................................................Output Section
5.............................................................................................................................................................Effect section
6...................................................................................................................................... USB Media player Section
7...........................................................................................................................................................Block Diagram
8...........................................................................................................................................Technical Specifications
9...........................................................................................................................................Product Care Instruction
Index:
MINI 6, 6U, 8 and 8U
Mini6U
STEREO I/P & L-R O/P
MIC/LINE I/P
High Performance
Compact Mixer...
MIC/LINE I/P
STEREO I/P
L-R O/P
High Performance
Compact Mixer...
Mini6
Thank you for buying the Studiomaster Professional MINI series Mixer. To ensure maximum performance and safety,
please follow this instruction manual carefully. Please retain this manual for future reference. For any complaint,
feedback or testimonials please contact our distributor/dealer. Retain the cartons for future use should the product
require servicing/maintenance.
1. Introduction
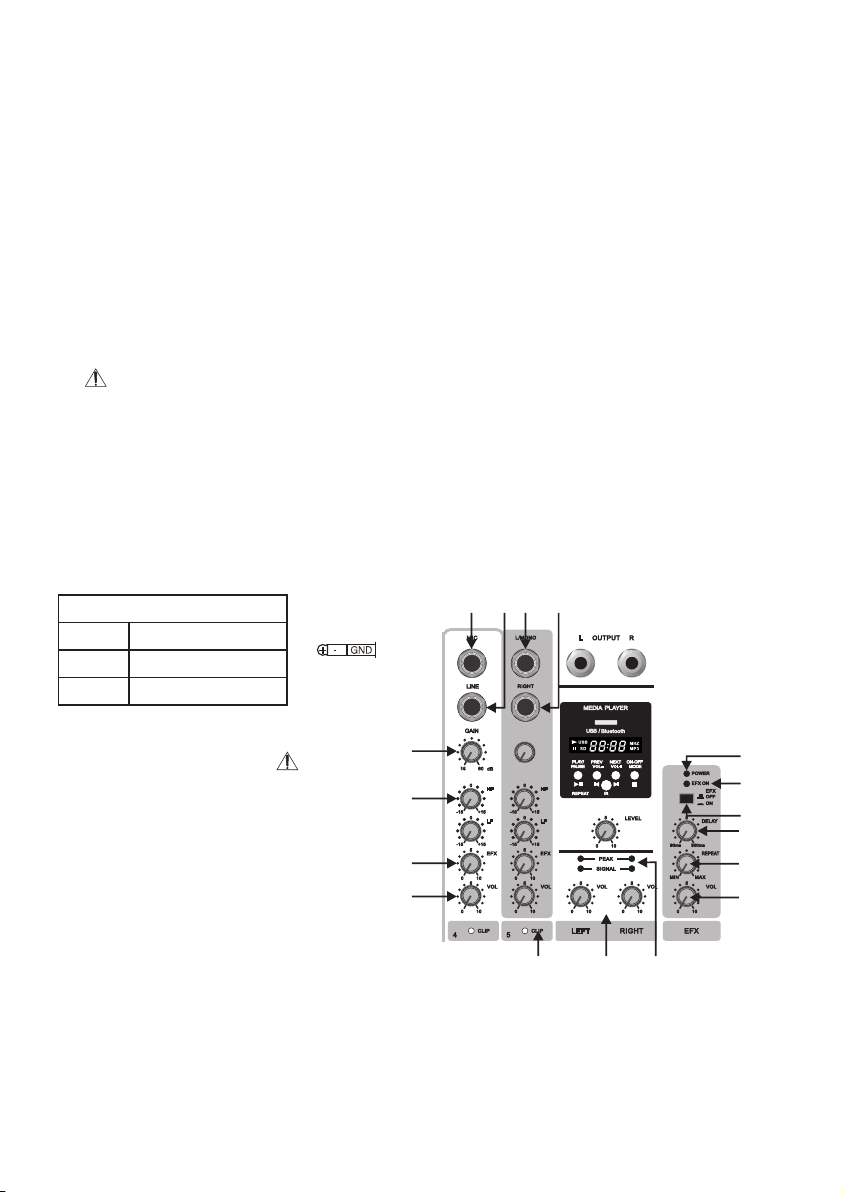
3. Input Section
2. Features at a Glance
• Gain control with 2band EQ per channel. • Built-in echo/delay processor with unique e- delay.
• MP3 music player with USB & Bluetooth. • Clip LED indication per channel.
• Signal & clip LED indication for master level. • 1/4 TS Unbalanced L/R main output.
The input sections of the MINI series mixer have two connectors for ¼”MIC & Jack inputs.
Please do not use both the inputs at the same time. Doing this may permanently damage the mixer.
1. MIC Inputs: This electrically balanced jack input (¼” stereo (TRS) jack) is designed to accept low impedance
balanced signals from microphones.
2. Line Inputs: The line input will accept line level balanced signal using ¼” stereo (TRS) Jack. The line input is
designed for instruments like Keyboards, Guitars, Drum Machines & other electronic instruments.
3. Gain Control: This knob is used to control gains
of both MIC & Line input signals. Please do
not operate at high gain levels as this distorts
the signal & leads to audio clipping.
4. EQ Section: The MINI series has 2 Band
Equalizer .The EQ is designed to be easy yet
effective to use. It can be used to cut or boost
certain frequencies to achieve a particular tone,
or to eliminate any unpleasant characteristics.
2
• HF Control: The HF control can be used to cut or boost up to +/- 15dB at 10kHz.
Tip: This frequency band can be used to brighten up high frequencies.
• LF Control: The LF control can be used to cut or boost up to +/- 15dB at 100Hz
Tip: This frequency band can be used to get a punchy bass response.
15
14
13
16
16
17
7 12 11
1 2 8 9
3
4
5
6
Balanced TRS
Tip
Ring
Sleeve
+ve Phase
-ve Phase
Ground
Note: Both above jacks can accept unbalanced input also with quasi-balanced cable
(pin 2-signal, pin 1 & 3 shorted-GND)

7. Clip LED: This clip LED glows when the incoming audio signal is clipping. Please reduce gain levels to
avoid distortion of clip Led is glowing.
4. Output Section
9. Master (L/R) Output: This output is used to connect the master output of the mixer to the amplifier or powered
speakers using ¼”TS Unbalanced jack connector. The output level is determined by the master control.
Wiring configuration is as follows :
10. Power LED: This Blue LED Indicates that unit is powered ON.
11. Signal/Peak LED: Signal LED(green) glows when output is below clip level.
Clip LED glows when the output signal is clipping. Please reduce avoid distortion clip led is glowing.
levels to reduce clipping.
12. Master (L/R) Control : The Left & Right Control are the master output level control.
They determine the level of all signals going to output connector.
3
6. Channel control: This control is used to set the level going to the master output.
5. EFX: This knob is used to control the send level to the built in EFX section.
13. Delay Time Control: This control adjusts the delay time.
Turning the knob clock wise, will make the delay time longer.
14. Repeat Control: This control adjusts the feedback amount [the number of
repetition for the delay sound (echo)].
Turning the knob clock wise increases the number of repetition.
As you turn up the repeat knob clock wise, oscillations may occur. If this happens,
turn the knob down until the oscillation stops.
EFX Level Control15. : To Control the output level of Effect signal.
16. : To switch ON/OFF the Effects.Effect ON/OFF Switch
17. : This LED glass when EFX is selected.EFX ON LED
5. Effects Section
8. Sterea i/p:
A. Stereo INPUT/MONO: It is Unbalanced 1/4” Mono jack input suitable for high impedance sources.
This input may also be used as mono line input by plugging into the left/mono socket only.
B. RIGHT: It is same as for left channel above except input fed to this channel is routed to right channel only.
Un-Balanced TRS
Tip
Sleeve
Signal +ve Phase
Ground

4
18. USB Input : USB input channel.
Terms of use : Studiomaster Professional respects intellectual
property rights and we request our users to do the same.
Please use MP3 downloads only for program which you have
legally purchased.
PLEASE DO NOT USE PIRATED MUSIC OR PROGRAM.
19. Display: The seven segment display is provided to visualize all
media player operation.
6. Media Player Section
/
PREV/
VOL-
NEXT/
VOL+
ON-OFF/
MODE
PLAY/
PAUSE
REPEAT IR
OFF
Media Player Off
/
PREV/
VOL-
NEXT/
VOL+
ON-OFF/
MODE
PLAY/
PAUSE
REPEAT IR
MP.3
00:04
Media Player On/
USB Mode
21. Next/Vol+:
• Single press this switch to go next track.
• Long press will increase volume of media player.
/
PREV/
VOL-
NEXT/
VOL+
ON-OFF/
MODE
PLAY/
PAUSE
REPEAT IR
MP.3
00:05
Next Track
/
PREV/
VOL-
NEXT/
VOL+
ON-OFF/
MODE
PLAY/
PAUSE
REPEAT IR
MP.3
U 15
Volume +
22. Prev./Vol-:
• Single pressing the switch will go to previous track.
• Long pressing the switch decrease the volume of media player.
/
PREV/
VOL-
NEXT/
VOL+
ON-OFF/
MODE
PLAY/
PAUSE
REPEAT IR
bt
Bluetooth Mode
20. On-Off/Mode Selection:
• Long press to switch On/Off the media player.
• USB is default mode.
• Single pressing will switch USB and Bluetooth mode (BT).
20
19
18
22 24 21
/
PREV/
VOL-
NEXT/
VOL+
ON-OFF/
MODE
PLAY/
PAUSE
REPEAT IR
MP.3
02:00
23
25
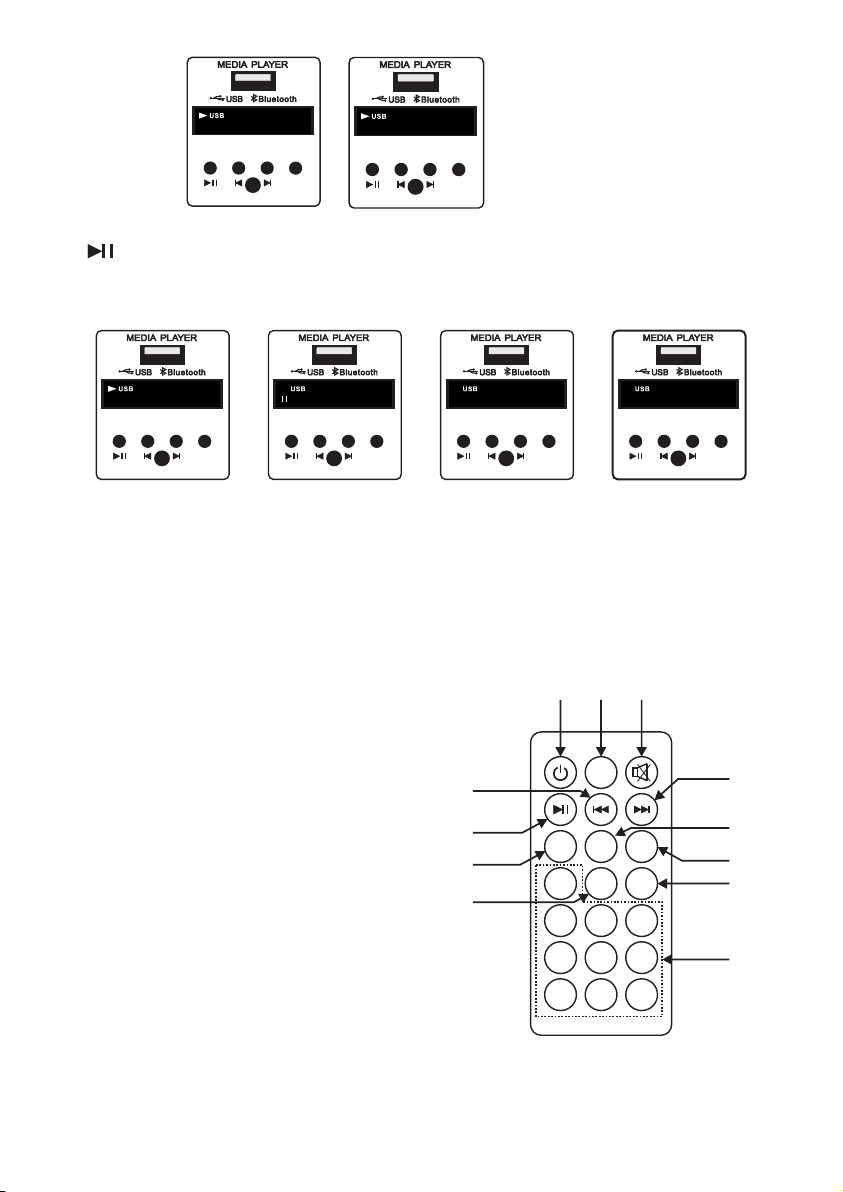
23. Play/Pause/Repeat:
• Single press will switch media player between play and pause state.
• Long pressing this switch will change repeat selection from single track to all track.
/
PREV/
VOL-
NEXT/
VOL+
ON-OFF/
MODE
PLAY/
PAUSE
REPEAT IR
ALL
All Track Repeat
/
PREV/
VOL-
NEXT/
VOL+
ON-OFF/
MODE
PLAY/
PAUSE
REPEAT IR
ONE
Single Track Repeat
/
PREV/
VOL-
NEXT/
VOL+
ON-OFF/
MODE
PLAY/
PAUSE
REPEAT IR
MP.3
PA U5
Pause ModePlay Mode
/
PREV/
VOL-
NEXT/
VOL+
ON-OFF/
MODE
PLAY/
PAUSE
REPEAT IR
MP.3
02:00
5
/
PREV/
VOL-
NEXT/
VOL+
ON-OFF/
MODE
PLAY/
PAUSE
REPEAT IR
MP.3
00:03
Previous Track
/
PREV/
VOL-
NEXT/
VOL+
ON-OFF/
MODE
PLAY/
PAUSE
REPEAT IR
MP.3
U 09
Volume -
24. IR Sensor: The IR sensor is provided for remote operation.
25. Gain Control: This knob is used to adjust media player.
1
0
23
456
7 8 9
RPT
U/SD
EQ
VOL-
VOL+
SCN
Mode
28
21
21
23
23
22
22
2020 26
27
29
26. Mute: Press the switch to mute the audio track.
27. EQ: Press the switch to select below effects to the audio track.
• Jazz (JAZ)
• Pop (POP)
• Classic (CLA)
• Rock (rOC)
• Normal (Nor)
• Cut (Cut) - Bypass low frequencies
28. U/SD: Not Active.
29. 0-9: Press switches to directly play track within the library.
Note: Remote control range is about it 6-8 meters insight
(Please insure that the remote batteries are fully charged).
Remote Features:
6
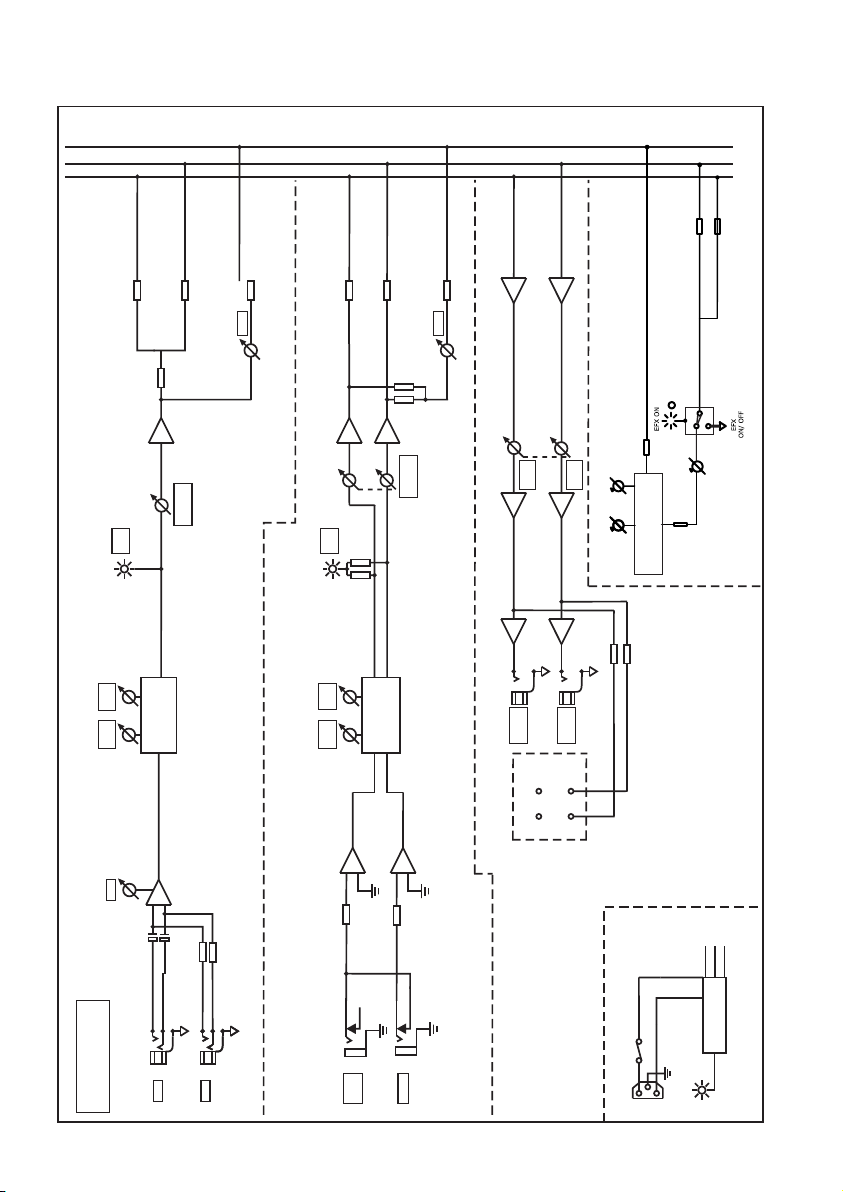
7. Block Diagram
Block Diagram
BASIC CUB
BLOCK DIAGRAM
BALANCED
LED INDICATION
LEFT
RIGHT
EFX
PEAK
SIGNAL
BALANCEED
BALANCEED
+
MIC / LINE
INPUT
-
LF
100Hz
E.Q.
+-16dB
E.Q.
+-15dB
GAIN
MIC
LINE
EFX
HF
10KHz
HF
10KHz
LF
100Hz
PEAK
ON
+
+
+
LEFT
OUTPUT
RIGHT
OUTPUT
+
+--
--
LEFT
VOL.
RIGHT
VOL.
FUSE
POWER ON
+15VDC
-15VDC
POWER SUPPLY
EFX SECTION
L
E
N
230V T500mA
EFX
CHANNEL
VOLUME
CHANNEL
VOLUME
PEAK
ON
Delay
RepeatRepeat
EFX CONTROL
EFFECT BOARD
1 - 4
SECTION
+5VDC
UNBALANCEED
+
+
STEREO INPUT
-
-
RIGHT
LEFT/
MONO
7
8. Technical Specifications
Maximum Gain
Mic Input
Line Input
Stereo Input
T.E.I.N
Mic Input (150Ω Source)
Line Input (40Ω Source)
Signal/Noise Ratio
Clip Indication
Equalisation
Treble
Bass
Left/Right Outputs Unbalance
Nominal Level
Maximum Level (1kHz/600Ω Load)
Frequency Response
Impedances
Mic Input
Line Input
L/R Outputs
48dB
48dB
30dB
-128dBm (DIN AUDIO)
-98.5dBm (DIN AUDIO)
-64dB
-4dB prior to true clip.
±15dB @ 10kHz
±15dB @ 100Hz
0dBu (0.775 VRMS)
+15dBu (4.35 VRMS)
25Hz to 19KHz (+0/-1dB)
Typically 5KΩ
20KΩ ( Balanced ) / 10KΩ (Unbalanced)
Less than 50Ω
Model
Mini 6
Mini 6U
Mini 8
Mini 8U
AC Mains
150-240V
150-240V
Fuses
T500mA 250V
F1AL/250V
Dimensions
(L x B x H) mm
264 X 180 X 57
320 X 180 X 57
Net Weight (Kg)
1.7
1.94
9. Product Care Instructions
• Do not drop the mixer; this could severely damage the products.
• Please keep this product away from direct sunshine & rain.
• Please keep this product away from heavy magnetic or electromagnetic fields, it could affect the product
performance.
• Please disconnect from power supply when the product is not being used for a long time.
• Do not open any of the components yourself, for repairs please get in touch with your Studiomaster dealer.
• It is recommended to place product in flight case while transportation.

A1/A2, Giriraj Industrial Estate, Mahakali Caves Road, Andheri (East), Mumbai - 400 093 India Tel.: +91-22-42869000/001
Whats App.: +91-8879028079 E [email protected] W www.studiomasterprofessional.com / www.audioplus-india.com
E:\R Drive Data (AUDIOPLUS)\CHINA\Mini Series\Mini-6\MANUAL\MINI SERIES. REV 1.
Range of Studiomaster Professional Products.
~ DJA Series
DJA 800
DJA 1600
DJA 2500
DJA 3200
DJA 4000
DJA 5000
~ Arena Series
Arena 20
Arena 30
~ Industrial Amplifier
ARC 120A
ARC 240A
ARC 120UB
ARC 240UB
~ S-Series
SWF 18120
SWF 18140
SWF 18100
SWF 1880
SWF 1560
SMB 1565
SMB 1545
SMB 1530
SMB 1250
SMB 1230
SMB 1220
SHF 0104
SHF 0106
SHF 0210
~ E-Series
EMB 1225
EMB 1530
EMB 1535
~ TITAN Series
TWF 2115
TWF 1815
TWF 1810
TWF 1580
TWF 1570
TMB 1555
TMB 1535
THF 0208
~ FURY Series
F18.120
F15.70
F15.40
F15.50X
F15.40X
F12.30X
~ S-Series
S8018
S8118
S8218
S8128
S8028
~ Fire Series
Fire 21/ Fire 51
Fire 51A
Fire 55
Fire 57
Fire 82
Fire 84
SM 100XLR
TRIO 100
SM 200XLR
TRIO 200
SM 300I
SM 400XLR
SM 450XLR
SM 500XLR
SM 600XLR
SM 650XLR
SM 800C
SM 900C
SBM 10
Flex 3
Flex 4
BR 28 Series
BR 48 Series
ER 11 Series
ER 31 Series
ER 58 Series
NT 50 Series
NT 60 Series
TR 47 Series
XR 20 Series
XR 40 Series
XR 80 Series
XR 100 Series
Vak 10 System
Vak 10d / Vak 10c
Vak 20
Vak 30
Vak 30d / Vak 30c
SX-2
SX-321
SX-341
SEQ 152
SEQ 302F
SEQ 312 / SEQ 341
Multi 3 / Multi 6
SFX 8
SPS 8
SDX 4
Phantom 11
~ Mini Series
Mini 6 / Mini 6U
Mini 8 / Mini 8U
~ Air Series
AiR 2
AiR 4
AiR 4F
AiR 6
AiR 6R
AiR 8
AiR 12
AiR 16
AiR 24
AiR 2U
AiR 4U
AiR 6U
~ XVP Series
XVP 1540
XVP 1540M
XVP 1560
XVP 2550
XVP 2585MK2
XVP 25A6
XVP 1808
XVP 1810
XVP 2820
~ ELAN Series
ELAN 151
ELAN 155
ELAN 181
EKS 151
Q 400
~ ARIA Series
Aria 8
Aria 12
Aria 15
~ A Series
A 400
A 500
H 400
H 510
Clio 154
~ B Series
B 200
B 400V2
B 410
~ OP Series
OP 415
OP 515
~ SUB Series
12SUB
15SUB
Muse 61
FIRE 92
SLA-40 T
SLA-40 Kit
SLA 30
S 9022
SVC - S1000
SVC - S2000
SVC - S3000
SVC - S5000
SVC - S5001
SVC - S8000
SVC - S10000
SVC - S12000
Wired Microphones
Wireless Microphones
Conference System
Processors
Mixers
Passive Speakers
Stabilizers
Speaker Component
Line Array System
Powered Speaker
Crossovers
Mixers
~ Air Series
AiR 8U
AiR 12U
AiR 16U
AiR Pro 18
AiR Pro 28
AiR Pro 36
~ AQUA Series
Aqua 6
Aqua 8
Aqua 10
Aqua 14
~ Digital Mixer
D. Mix 20
~ Diamond Club Series
Diamond Club 6.2
Diamond Club 8.2
Diamond Club 8.2 EFX
Diamond Club 12.2
Diamond Club 12.2EFX
Diamond Club 12.2UX
Diamond Club 16.2
Diamond Club 16.2EFX
~ Diamond Supreme Series
Diamond Supreme 12
Diamond Supreme 12U
Diamond Supreme 16U
~ Club 2000 Series
Club 2000 142
Club 2000 182
~ Platinum Series
Platinum 16Fx
~ Diamond Pro-3 Series
Pro-3 12.3
Pro-3 16.3
~ DJ Mixers
DJX 300
DJX 325
Playmix 300
DJX 825
DJX 925
DJX 975
~ P - Series
PA 1.5
PA 2.0
PA 3.0
PA 4.5
PA 6.0
PA 7.5
~ DPA Series
DPA 2000
DPA 3200
DPA 4500
~ DJA Series
DJA 100
DJA 500
Amplifiers
Passive Speakers
Portable PA
This manual suits for next models
4
Table of contents


