SubGear Buoyancy Compensator User manual

Buoyancy Compensator
Tarierjackets
Gilets stabilisateurs
Giubbetti equilibratori
Chaleco compensador

2
Important information on assembly, use and maintenance of your BC is designated throughout this
manual with the "IMPORTANT" graphic above.
This owner’s manual uses signal words to designate levels of hazard seriousness.
These signal words and their designations are as follows:
!
Indicates an imminently hazardous situation which, if not avoided, will result in death or serious
injury. This signal word is limited to the most extreme situations.
!
Indicates a potentially hazardous situation which, if not avoided, could result in death or serious injury.
!
Indicates a potentially hazardous situation which, if not avoided, may result in minor or moderate
injury. It may also be used to alert against unsafe practices.
ENGLISH

3
!
• Do not use this Buoyancy Compensator until you have carefully and completely read,
understood and followed all instructions and safety precautions found in this manual, all
inserts that accompanied this manual, and all tags and markings found on the Buoyancy
Compensator.
• Proper training in swimming, SCUBA diving, buoyancy control and emergency buoyancy
skills is required to safely use this product. A Buoyancy Compensator is not a substitute for
these skills. The user must have successfully completed a course of training in SCUBA diving,
buoyancy control and emergency buoyancy skills. This instruction should be from a certified
SCUBA instructor of a recognized educational organization, such as YMCA, PADI, NAUI, SSI,
BSAC or CMAS.
• Retain this manual for your reference.
• Review this manual periodically and prior to diving.
• If you have any questions or are unclear about any instructions contained within contact your
SUBGEAR dealer or see our website for individual country contact information: subgear.com.
!
Excess weight may impair or prevent the proper operation of the BC. Proper weight for typical
sport diving provides neutral buoyancy at the shallow ascent stop performed before surfacing,
with a deated BC and tanks low on air. Failure to establish proper weighting that is not excessive
may result in injury or death.
!
• THIS IS NOT A LIFE JACKET. Emergency face up flotation may not be provided for all wearers
and in all conditions.
• Do not rely on the BC to create emergency positive buoyancy or initiate or sustain an ascent
in an emergency situation.
• Be prepared to deal with emergency buoyancy conditions.
• Uncontrolled ascents, descents, or loss of buoyancy control may result from misuse,
unfamiliarity with operation and function of the BC, improper training, stress or panic. See
topics under “Intended Use” and “Valve Set up and Operation” in this manual.
• Do not dive with a BC that is damaged, leaks air or does not function properly. Before each
use, inspect for proper operation, leakage or damage. Terminate any dive as safely and
quickly as possible if the BC becomes damaged, leaks air or does not function properly. See
“BC Examination and Procedures” in this manual.
• Always perform a pre-dive and post-dive inspection of the BC. Have your dive partner
perform a cross check as well. The pre-dive, dive and post-dive BC examinations help identify
equipment problems before unsafe conditions exist. See “BC Examination and Procedures”
in this manual.
• This BC is a system for adjusting a diver's buoyancy. It is not a life support system or
breathing device.
ENGLISH

4
1. GENERAL INFORMATION ........................................................................................................ 6
Primary Purpose of the Buoyancy Compensator .......................................................................... 6
Intended Use ............................................................................................................................... 6
Weighting for Neutral Buoyancy at the End of the Dive ................................................................ 6
Surface Flotation .......................................................................................................................... 6
Descent Control ........................................................................................................................... 6
Maintaining Neutral Buoyancy at Depth ....................................................................................... 6
Ascent Control ............................................................................................................................. 7
Unintended Ascent ...................................................................................................................... 7
2. INITIAL SET UP ......................................................................................................................... 7
Low Pressure (LP) Hose ............................................................................................................... 7
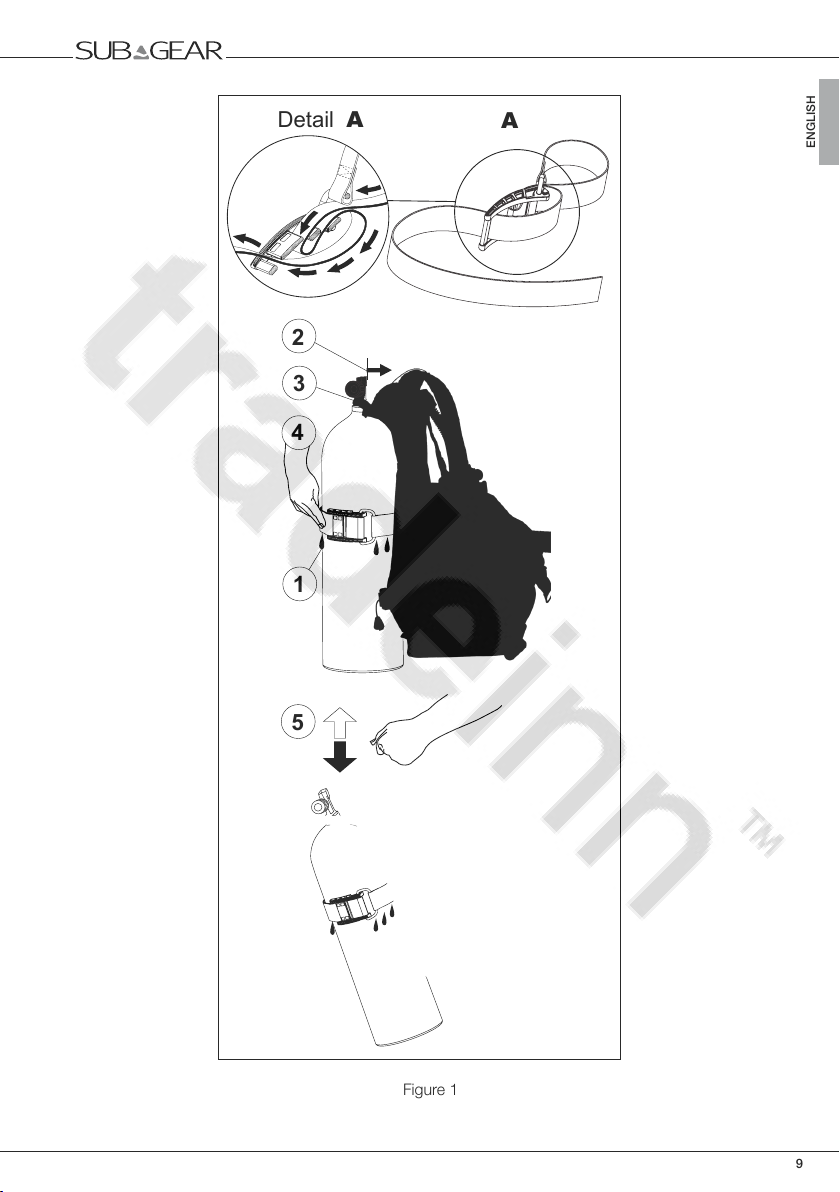
Adjustable weave through Cylinder Strap Set up and Attachment ................................................ 8
Tank Locator Strap....................................................................................................................... 8
Attaching your SUBGEAR BC to the SCUBA cylinder: ................................................................. 8
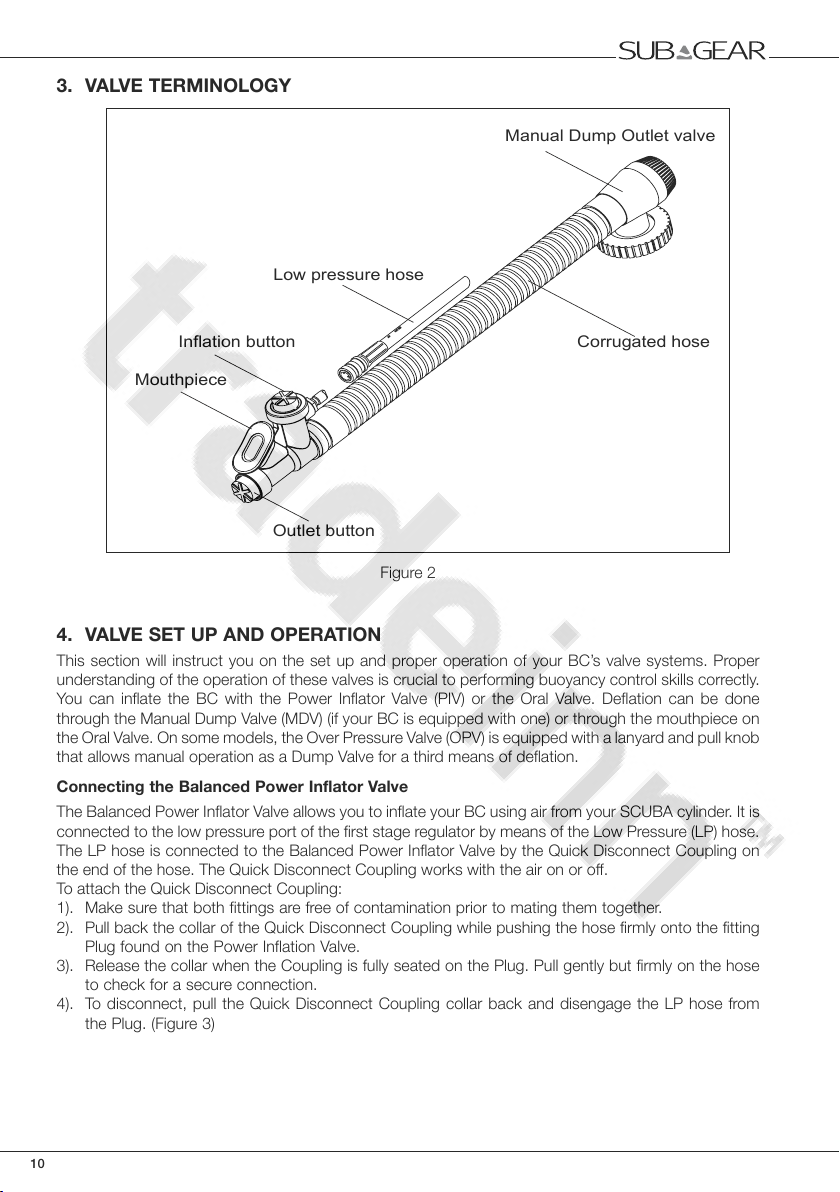
3. VALVE TERMINOLOGY ........................................................................................................... 10
4. VALVE SET UP AND OPERATION .......................................................................................... 10
Connecting the Balanced Power Inflator Valve ........................................................................... 10
Inflating the BC with the Balanced Power Inflator Valve .............................................................. 11
Inflating the BC with the Oral Valve ............................................................................................ 11
Deflating the BC with the Oral Valve ........................................................................................... 12
Deflating the BC with the Manual Dump Valve (when present) ................................................... 12
Over Pressure Valve (Outlet Valve)Operation ............................................................................... 13
Shoulder Dump Valve ................................................................................................................. 13
Lower Dump Valve ..................................................................................................................... 13
5. GENERAL INFORMATION ON ADJUSTMENTS .................................................................... 13
Waist and Front (Chest) Closures ............................................................................................... 13
Adjustable Shoulder BCs ........................................................................................................... 13
6. INTEGRATED WEIGHT SYSTEM ............................................................................................ 14
General Information .................................................................................................................... 14
Primary Purpose of the Integrated Weight System ..................................................................... 14
Intended use of integrated weight systems ................................................................................ 14
Weighting for Neutral Buoyancy at the End of the Dive .............................................................. 15
Quick Generation of Buoyancy to assist in a Swimming Ascent ................................................. 15
Important ................................................................................................................................... 15
Weight Pouch Capacity .............................................................................................................. 15
Weight System Styles ................................................................................................................ 15
7. WEIGHT QUICK RELEASE WITH HANDLE ........................................................................... 16
Inserting weight into pouches..................................................................................................... 16
Insert weight pouch into BC retainer .......................................................................................... 17
Operation of weight system with handle ..................................................................................... 17
8. GRAVITY QUICK RELEASE POCKETS ................................................................................. 18
Putting weights into the pockets ................................................................................................ 18
Operation of weight system using gravity ................................................................................... 19
9. PRE-DIVE INSPECTION PROCEDURES ............................................................................... 20
10. POST-DIVE INSPECTION PROCEDURES ............................................................................. 21
11. BC EXAMINATION AND PROCEDURES ............................................................................... 21
Pre-Dive Visual Inspection and Valve Test: ................................................................................. 21
Final Inspection Just Before Diving ............................................................................................. 22
Post-Dive: BC Cleaning and Examination ................................................................................... 22

5
12. STORAGE ..................................................................................................................................23
13. MAINTENANCE ........................................................................................................................23
Inspection and Service Interval ................................................................................................... 23
Cleaning and Lubrication............................................................................................................ 23
Locating Service and Support .................................................................................................... 23
14. GENERAL SPECIFICATIONS ...................................................................................................23
Shelf Life .................................................................................................................................... 23
Operating Temperature Range ................................................................................................... 23
SCUBA Cylinder Selection and Configuration ............................................................................. 24
Maximum dimensions for SCUBA cylinders: .............................................................................. 24
15. WARRANTY ..............................................................................................................................25
16. CE CERTIFICATION..................................................................................................................25
EN250:2000 norm regulations and what they mean ............................................................... 26
Definition of ‘SCUBA’ according to EN 250: 2000 ...................................................................... 26
Limitations provided by EN 250: 2000 ....................................................................................... 26
ENGLISH

6
Congratulations on the purchase of your new Buoyancy Compensator (BC). SUBGEAR has designed,
engineered and tested your new BC with extreme care in order to provide you with a product that
provides performance, dependability and comfort.
We hope you enjoy many years of diving pleasure with it.
This information has been developed for your safety. Please read and understand this manual completely
before using your new Buoyancy Compensator.
The primary purpose of a Buoyancy Compensator is to make you more comfortable by enabling you to
maintain neutral buoyancy at depth.
You are neutrally buoyant when you maintain a specic depth without expending signicant physical
effort to prevent an ascent or descent from that depth.
!
. Emergency face up otation may not be provided for all wearers
and in all conditions.
This will explain how your Buoyancy Compensator should be used for maximum safety, comfort and
enjoyment.
Your overall buoyancy will typically vary from the start to the end of the dive, especially as SCUBA
cylinders become more buoyant as you consume air. Weighting for neutral buoyancy at the of the
dive with a SCUBA cylinder low on air (typically 500 psi/35 bar) allows you to comfortably stop during
your ascent at 10 – 15 feet (3m – 5m), as recommended by SCUBA certication agencies.
Start on the surface of the water with all gear in place, oating without kicking. Your BC should be
deated and your SCUBA cylinder should be full. You will add weight to be neutrally buoyant at the
of the dive, so add the proper amount of weight to become because of the full
SCUBA cylinder. You should sink while you breathe normally. Do not add air to the BC, only
add or subtract weight. Consult your SCUBA instructor for additional help in setting up your equipment
and weight.
The BC can add to your surface buoyancy, making surface swimming easier. The BC alone, however,
will not necessarily provide adequate surface otation.
Your BC can be used to control the rate of descent. Once you have started your descent, you can add
air to the BC to compensate for any loss of buoyancy caused by water pressure compressing your
exposure suit or other gear.
Adjusting your buoyancy during the descent, you will arrive at your desired diving depth neutrally
buoyant. Adding or releasing the correct amount of air will assist in maintaining neutral buoyancy as you
change depth during the dive.

7
!
This could result in loss of
buoyancy control or a buoyant ascent at a time or speed that could result in injury or death.
These
objects may be lost during the ascent, creating a sudden increase in buoyancy and loss of
buoyancy control.
Successfully complete a course of training in
SCUBA diving, buoyancy control and emergency buoyancy skills from an internationally recognized
educational organization.
By maintaining neutral buoyancy throughout the dive you will not need to add air to start an ascent.
Locate the valve you intend to vent air from prior to ascent. Assume a head up position and begin
kicking to initiate an ascent from a neutrally buoyant condition. As you ascend, the air in the BC will
expand, increasing your buoyancy and rate of ascent. Vent small amounts of air frequently during ascent
to remain neutrally buoyant and control your rate of ascent.
Vent air from the BC before becoming signicantly buoyant or exceeding the normal ascent rate. It is
preferable to visually conrm that air is venting from the valve. Continue the ascent with a comfortable,
slow kick.
Make sure that the valve you intend to use for venting air is higher than the air bubble in your BC.
Positioning the valve below the air bubble may prevent the bubble from being vented.
Should you experience a sudden, unintended increase in buoyancy that might occur from a loss of
weight or free owing Balanced Power Inator Valve (PIV), immediately assume an upright position
and vent air from the Manual Dump Valve of the BC, or Oral Ination Valve. Practice this skill under the
supervision of a certied SCUBA instructor.
This section instructs you on the procedures required to initially set up your BC. For best performance
and safety, it is recommended that your BC be rst congured by a SUBGEAR authorized dealer.
Additional parts or accessories may have detailed instructions not covered in this section or manual.
Read and follow all instructions not covered in this section or manual. Read and follow all instructions
included with parts and accessories you intend to set up on this BC.
Current model SUBGEAR regulators have 3/8-24 UNF threaded low pressure ports and 7/16-20
UNF threaded high pressure ports. Some older regulators may have 3/8-24 UNF threads on both
low pressure and high pressure ports. If you are unsure as to which port is low pressure, connect
your underwater pressure gauge to the port, if the threads on the port and hose are compatible.
When pressurized, the low pressure port should not read more than 200 psi (13.8 bar) with a full
SCUBA cylinder. Some modern high performance regulators may have 1/2-20 threads on the low
pressure ports. An adapter may be required to attach the 3/8-24 threaded tting on the LP Hose to
these ports.
ENGLISH

8
!
This may result in damage or explosive failure of the Pneumatic Ination Valve or Low Pressure
Hose, which could result in injury or death. Read the SCUBA regulator manufacturer's instructions
concerning connection locations and procedures.
The LP hose connects the Balanced Power Inator Valve to the rst or primary stage of the SCUBA
regulator. To install the LP hose to the SCUBA regulator, rst read the Owner’s manual for the SCUBA
regulator to determine the location of the ports that feed low pressure air. Select an unused Low
Pressure Port on the regulator rst stage and unscrew the port plug. Check that the threads on the plug
match in size and number to the threaded tting of the LP hose (thread size of the LP hose is 3/8-24
UNF). If the thread on the regulator port is different, an adapter plug will be required. Clean the O-ring on
the threaded end of the LP Hose, then screw the threaded tting into the regulator port. Use a wrench
to snugly tighten the threaded tting.
The SUBGEAR Adjustable cylinder strap allows you to easily fasten your BC to a single SCUBA cylinder.
The Adjustable weave through buckle is designed to allow fast release and removal of SCUBA cylinders
between dives. Most popular SCUBA cylinder sizes are easily accommodated with the simple but
effective adjustment system. See detail “A” on Figure 1.
Soak the webbing of the SCUBA air cylinder strap and then tighten prior to each use of the BC.
Webbing may stretch when initially exposed to water. Failure to soak the webbing may allow the
cylinder strap to loosen around the SCUBA air cylinder. This could result in injury or death.
Some SUBGEAR BCs have a Tank Locator strap. This strap is used to encircle the valve neck of the
SCUBA cylinder. It prevents the cylinder strap and backpack from sliding down the SCUBA cylinder
while connecting and tightening the cylinder strap. Once the proper position of SCUBA cylinder and
backpack has been determined adjust the strap so that the preferred positioning can always be found.
Set up for a SCUBA cylinder can be accomplished following these steps:
1). Soak the webbing of the tank strap so as to prevent it from stretching when exposed to water.
2). Place the tank strap over the tank. The tank valve opening should point in the direction of the BC.
3). If present, place tank locator strap on back of BC over tank valve.
4). Tighten the tank strap and then rotate it closed against the tank. Secure with the help of the hook
and loop strip.
5). Check and confirm that the tank is securely attached to the BC jacket by lifting the BC up by the
shoulder straps or backpack handle and shaking it up and down. If the tank moves or slides in the
holder then tighten the strap once again.
Once the tank band has been set for a given tank size, it does not need to be readjusted unless a tank of
different size is used. However, even when the same tank is used over and over again, verify the tension
of the tank band as per step (5) prior to every dive. Failure to do so may result in a loose tank which
could result in serious injury or death.

9
Figure 1
5
2
1
4
3
Detail A A
ENGLISH

10
Figure 2
This section will instruct you on the set up and proper operation of your BC’s valve systems. Proper
understanding of the operation of these valves is crucial to performing buoyancy control skills correctly.
You can inate the BC with the Power Inator Valve (PIV) or the Oral Valve. Deation can be done
through the Manual Dump Valve (MDV) (if your BC is equipped with one) or through the mouthpiece on
the Oral Valve. On some models, the Over Pressure Valve (OPV) is equipped with a lanyard and pull knob
that allows manual operation as a Dump Valve for a third means of deation.
The Balanced Power Inator Valve allows you to inate your BC using air from your SCUBA cylinder. It is
connected to the low pressure port of the rst stage regulator by means of the Low Pressure (LP) hose.
The LP hose is connected to the Balanced Power Inator Valve by the Quick Disconnect Coupling on
the end of the hose. The Quick Disconnect Coupling works with the air on or off.
To attach the Quick Disconnect Coupling:
1). Make sure that both fittings are free of contamination prior to mating them together.
2). Pull back the collar of the Quick Disconnect Coupling while pushing the hose firmly onto the fitting
Plug found on the Power Inflation Valve.
3). Release the collar when the Coupling is fully seated on the Plug. Pull gently but firmly on the hose
to check for a secure connection.
4). To disconnect, pull the Quick Disconnect Coupling collar back and disengage the LP hose from
the Plug. (Figure 3)
Low pressure hose
Corrugated hose
Mouthpiece
Inflation button
Outlet button
Manual Dump Outlet valve

11
Figure 3
To inate the BC, press the Inlet button on the Balanced Power Inator Valve. Air should enter the BC.
For better control during ination use short bursts of air by repeatedly pressing and releasing the PIV
button.
!
Your BC may contain gas residue, liquid or contamination that may
result in injury or death if inhaled.
Repeated use of the Oral Valve or the
Overpressure Valve (Dump Valve) may allow water inside the BC, reducing the amount of buoyancy
provided by the BC. This could result in injury or death. Drain all water out of the BC prior to every use.
The Oral Valve is typically found on the end of the airway. It allows you to inate your BC with your
exhaled breath. Use of this valve for ination is recommended on the surface, or on land prior to diving.
It may be used when you cannot, or do not wish to add air to the BC with the Power Inator Valve.
1). First exhale a small amount of air into the mouthpiece of the valve to purge any water that may be
trapped there.
2). With the same breath, continue to exhale while depressing the Outlet Button.
3). Release the Outlet Button immediately prior to the end of the exhalation.
4). Repeat steps 2 and 3 until the desired amount of buoyancy is reached.
!
.
Description and training of this skill is beyond the scope of this manual. Improper performance of
this buoyancy skill may result in serious injury or death.
You must successfully complete a course
in SCUBA diving, buoyancy control, and emergency buoyancy skills from an internationally
recognized educational organization.
ENGLISH

12
Assume a head up position in the water. Raise the Oral Valve above and in front of your face (this
ensures the Oral Valve will be positioned above the air bubble in the BC). Depress the Outlet button and
visually conrm that air is escaping from the mouthpiece. For best control, let air out in a series of short,
measured amounts while observing the effects on your buoyancy.
!
Under certain conditions, contamination can cause the Oral Valve to not close completely. If this
occurs while diving, shake the valve while depressing it several times. If the valve leaks or remains
inoperable, terminate the dive. Diving with a leaking Buoyancy Compensator or with valves that do
not operate properly may result in a loss of buoyancy control that could result in injury or death.
Stop and assume an upright position in the water. When in position, open the Manual Dump Valve
by gently pulling downward on the Oral Valve/Power Ination Valve Assembly. It is not necessary to
use excessive pressure to pull on the hose assembly. Valve travel is limited and pulling harder will not
increase the air ow. To close the Manual Dump Valve, stop pulling downward, and release. (Figure 4)
Figure 4

13
!
If the air
bubble in the BC is above the Manual Dump Valve, as when the diver is in a horizontal or head
downward position, then the air may not escape from the valve. Failure to vent air from the BC may
cause an ascent at a time or speed that could cause injury or death. Make sure that the valve you
use to vent the BC is at the highest point of the air bubble.
The Over Pressure Valve prevents over-ination of the BC. If the internal pressure exceeds the spring
pressure in the Over Pressure Valve, the valve automatically opens and releases air to prevent damage
to the BC. The valve will automatically close when the internal pressure goes below the spring pressure
in the Over Pressure Valve. These valves have a lanyard cord and pull knob that allows manual dumping
of air and are referred to as Dump Valves.
SUBGEAR Buoyancy Compensators have an Over Pressure Valve located on the shoulder of the BC.
To operate this style of Over Pressure Valve, orient the valve to a position higher than the air bubble in the
BC. Pull gently on the Pull-Dump Assembly until the desired amount of buoyancy is reached. Stop pulling
to close the valve.
Over Pressure Valves located at the lower rear of the BC may be equipped with lanyards and pull knobs.
These Lower Dump Valves can be manually activated when the diver operates them in a horizontal or
head down orientation in the water, positioning them at the highest point of the air bubble.
!
Restriction of
normal breathing while wearing your BC could result in injury or death. Before each use, check
all bands, straps, quick-connect clips and/or cummerbund for proper adjustment to the user.
Consult a certied SCUBA instructor or the retail facility where the BC was purchased for help.
Waist closures may use an, Adjustable Front Closure Buckle with a “squeeze to release” feature, a hook-
and-loop closure on a cummerbund, or both. Hook-and-loop closures are fastened by placing the hook
and loop panels on top of each other and applying moderate pressure. Waist closures may need to be
adjusted at depth if a neoprene suit is worn by the diver.
Front (chest) closures on the BC are used to keep the BC in a low drag conguration. These front
closures adjust with webbing tails located in the front of the BC.
Shoulder straps may be adjustable on your BC. These straps adjust by a length of webbing passing
through a locking feature on a quick release buckle. Tighten buckles by grasping the free end of the
adjustment webbing and pulling rmly downward. Lift the front of the buckle upwards while wearing the
BC to loosen.
ENGLISH

14
!
• Do not rely on the BC or Weight Pouches to create emergency positive buoyancy or initiate
or sustain an ascent in an emergency situation.
• Be prepared to deal with emergency buoyancy conditions.
• Uncontrolled ascents, descents, or loss of buoyancy control may result from misuse,
unfamiliarity with operation and function of the BC, improper training, stress or panic.
• Always perform a pre-dive and post-dive inspection of the BC. Have your dive partner
perform a cross check as well. The pre-dive, dive and post-dive BC examinations help identify
equipment problems before unsafe conditions exist. See “BC Examination and Procedures”
in this manual.
• Receive proper training in the use of this equipment from a certified instructor prior to use in
open water.
• Ensure that you are proficient with emergency ascent procedures using this system.
• Ensure that your diving companion is familiar with and proficient in the operation of this
system prior to diving.
Please read and understand this information
completely before using your new Buoyancy Compensator.
This section explains the proper installation and use of the quick release integrated weight system for
SUBGEAR Buoyancy Compensators.
The primary purpose of the integrated weight system is to provide additional comfort to the diver by
moving the weights from the weight belt to the Buoyancy Compensator (BC). This reduces the number
of straps that the diver must adjust, while maintaining control of the release and retention of the released
weights with the diver. Creation of positive buoyancy change as a part of an emergency ascent can be
performed in a manner similar to that performed with a weight belt.
This will explain how your integrated weight system should be used for maximum safety, comfort, and
enjoyment.
!
You must successfully complete a course in SCUBA diving, buoyancy control, and emergency
buoyancy skills from an internationally recognized educational organization.
Proper weight for typical
sport diving provides neutral buoyancy at the shallow ascent stop performed before surfacing,
with a deated BC and tanks low on air. Failure to establish proper weighting that is not excessive
may result in injury or death.

15
Your overall buoyancy will typically vary from the start to the end of the dive, especially as SCUBA
cylinders become more buoyant as you consume air. Weighting for neutral buoyancy at the end of the
dive with a SCUBA cylinder low on air (typically 500 psi/35 bar) allows you to comfortably stop during
your ascent at 10-15 feet (3m-5m), as recommended by SCUBA certication agencies.
Start on the surface of the water with all gear in place, oating without kicking. Your BC should be deated
and your SCUBA cylinder should be full. You will add weight to be neutrally buoyant at the end of the dive,
so add the proper amount of weight to become slightly negative because of the full SCUBA cylinder. You
should very slowly sink while you breathe normally. Do not add air to the BC, only add or subtract weight.
Consult your SCUBA instructor for additional help in setting up your equipment and weight.
Weight pouches are designed to be removed with a simple motion, allowing the diver to increase
buoyancy in a manner similar to releasing a weight belt. In an emergency the diver releases and removes
the weight pouches individually, holds them in front of the body to visually ensure that they are free from
entanglement, then drops them to increase buoyancy.
!
Properly set up, this integrated weight system allows the creation of a large change in (positive)
buoyancy by removing and releasing weight pouches lled with weight. An improper equipment
conguration with improper weighting may not initiate an ascent when a positive buoyancy
change occurs as a result of releasing the weight pouches. This may result in serious injury or
death. Review the correct equipment conguration with your SCUBA instructor prior to using this
equipment in open water.
Your particular model of SUBGEAR buoyancy compensator may also have non-releasable weight
pockets in the back, near the tank straps or backpack. Weights placed in these pouches help achieve
a perfect trim, but cannot be released. Weight must be distributed so that sufcient amounts can be
jettisoned from the integrated, releasable weight pouches to guarantee positive buoyancy.
!
By using both the releasable and non-releasable weight pockets built into your SUBGEAR
buoyancy compensator, it may be possible to overload your unit beyond its capacity to provide
neutral or positive buoyancy. An inability to initiate neutral or positive buoyancy may result in serious
injury or death. Please refer to the label attached to your buoyancy compensator for lift capacities.
The capacity of each removable weight pouch in SUBGEAR systems is 10 lbs/5kg.
SUBGEAR Integrated Weight systems are designed to use several types of weights, including solid
lead, vinyl coated and shot pouch style weights.
The specic type of weight that is used will affect
the capacity of the pouch.
Your SUBGEAR BC may a intergreted weight release system. Each system has its own unique operation.
The rst style uses individual weight pouches with attached handles that slide into dedicated pockets
of the jacket.
ENGLISH

16
The second style utilizes a dedicated pocket with a bottom ap on the jacket that holds the individual
weights. You must study, understand, and practice the use of the weight system for your individual
jacket. Failure to do so may result in injury or death.
1). Hold the handle of the pocket with one hand and press the sides of the buckle with the other.
Figure 5
2). Open the hook and loop closure by pulling strongly away from the BC on the handle. Figure 6
3). Pull the weight pocket out of the BC
4). Open the pockets hook and loop closure. Figure 7
5). Put the required amount of weight into the pocket. Figure 8
6). Securely close the hook and loop flap. Figure 9
Figure 5 Figure 6
Figure 7 Figure 8
Figure 9 Figure 10

17
!
1). The weight pouch must be properly in place inside the BC retainer, pushed all the way toward
the back.
2). The buckle clip on the weight pouch must be fully engaged with the clip on the BC. Double
check that it’s secure by trying to pull it apart when engaged.
Inserting pouches into the retainers can be done before or after donning the BC.
1). Turn the pouch so the handle is on the top. Figure 10
2). Insert the pouch into the pocket on the BC.
3). Close the hook and loop closure.
4). Insert the handle on the pouch into the holder on the jacket. Figure 11
5). Press the release buckle closed until it is firmly and securely mated.
6). Confirm that the weight pouch is securely held in the BC.
Figure 11
!
Ensure that each weight pouch, buckle and handle is unobstructed. Check the ability to release
weight pouches prior to diving.
Failure to generate positive buoyancy in an emergency situation may result in serious injury or
death.
To drop weights during a dive to begin an emergency ascent, do the following:
1). Bring your body into an upright position
2). Grasp the handles of the weight pockets simultaneously and pull strongly until the weight pockets
have been removed from the jacket opening. Figure 12
ENGLISH

18
Figure 12
3). Hold weight pouch in front of you to check for entanglements before releasing and then drop the
pockets.
4). Depending on your depth and circumstances, you may need to kick to begin your ascent.
!
Properly set up, this integrated weight system allows the creation of a large change in (positive)
buoyancy by removing and releasing weight pouches lled with weight. An improper equipment
conguration with improper weighting may not initiate an ascent when a positive buoyancy change
occurs as a result of releasing the weight pouches.
The diver must be in an upright position for weights to fall from pouch. Weights may not fall from
pouch even if the buckle and aps are open if not in upright position. This may result in serious
injury or death.
Do not release the weights via the buckle and strap with weights inside the pocket while wearing
out of water or standing on a surface. The weights could fall and strike the diver or equipment
resulting in serious injury.
The second style of Weight Systems used by SUBGEAR consist of a pocket and buckle on the jacket.
Weight are put into the pockets and secured by a ap and buckle. To release the weight the buckle is
opened and the weights fall out using gravity.
1). Unzip the loading zipper on the top of the pocket. Figure 13
2). Place the weights into the pocket and close the zipper. Figure 14

19
To release the weight the diver must be in an upright position and do the following steps
1). In an upright position squeeze the sides of the buckles. Figure 15.
2). Pull the buckle downward to disengage the hook and loop and open the flap.
3). The weights will fall free of the jacket. Figure 16.
!
4). Depending on your depth and circumstances, you may need to kick to begin your ascent.
Figure 13 Figure 14
Figure 15 Figure 16
ENGLISHENGLISH

20
!
1). The weights must be properly in place inside the BC weight pocket.
2). The buckle clip on the weight pocket flap must be fully engaged with the clip on the BC.
Double check that it’s secure by trying to pull it apart when engaged.
!
Properly set up, this integrated weight system allows the creation of a large change in (positive)
buoyancy by removing and releasing weight pouches lled with weight. An improper equipment
conguration with improper weighting may not initiate an ascent when a positive buoyancy change
occurs as a result of releasing the weight pouches.
The diver must be in an upright position for weights to fall from pouch. Weights may not fall from
pouch even if the buckle and aps are open if not in upright position. This may result in serious
injury or death.
The weights or weight pouches may either be inserted prior to or after putting on the BC. In either case,
perform the following checks prior to starting the dive.
1). If using a system with weight pouches visually inspect the weight pouches and their position in the
BC retainer. Ensure that the pouches sit firmly in the retainer and that the buckles are well mated.
If using a system with free weights and pockets make sure the flap and buckles are securely
connected and that the loading zipper is fully closed.
2). Check that the buckle clips or handles are unobstructed and can be easily grabbed with one hand.
3). IMPORTANT: With the weights or weight pouches in place and while wearing the BC, practice
finding the buckles or handles. Practice unclipping the buckles or grabbing the handles and pulling
to remove the weight pouches. Practice doing both actions with one hand and then with two
hands. Have your dive buddy also practice releasing the buckles and removing a weight pouch
completely from your BC.
4). Just prior to diving, always check to make sure the buckles, flaps, and handles are firmly secure.
Table of contents
Languages:
Other SubGear Diving Instrument manuals