A
A
B
B
C
D
F
E
GH
I
J
J
K
L
M
Historical Background
The EuroDual is a dual-mode locomotive designed with both an electric and
a diesel-electric drive, which means that it can be used on both electrified
and non-electrified railway lines. These locomotives are built by Stadler Rail
Valencia and heavily derive from the diesel Euro4000 and EuroLight series
by Vossloh Rail Vehicles, a company purchased by Stadler Rail back in
2015.
The EuroDual comes in a four or six-axle configuration for standard, broad
and narrow gauges. Since it is often necessary that locomotives may have to
run on non-electrified lines in order to operate on branches and secondary
routes, the EuroDual has been developed for that very purpose as it
possesses a high tractive force in both drive modes and can reach a
maximum speed of 160 km/h. As the EuroDual can be deployed on all
railway lines, it gives rail operators the chance to plan with greater flexibility
and to save on transport costs. The EuroDual meets all the requirements of
the TSI (Technical Specification for Interoperability), as well as European
emissions limits at stage IIIB.
In 2017, private German operator Havelländische Eisenbahnen (HVLE)
ordered 10 locomotives from Stadler with an option of further 10 units.
Through this order, HVLE became the launch first customer for the
EuroDual. Designated as the Class 159, these locomotives have traction on
all six axles, a maximum continuous power of 7 MW (electric) and 3 MW
(diesel) and the starting tractive effort can be as much as 500 kN. This
variant features AC traction motors and separate IGBT converters for each
axle. The diesel engine is a Caterpillar CAT C175-16 rated at 2800 kW. It
features the latest ETCS Baseline 3 train protection system and legacy PZB
for the German network.
Shortly thereafter HVLE contract, a major order for 30 EuroDual,
accompanied by an option for 70 more, was placed by the Swiss rolling stock
leasing company European Loc Pool (ELP). The first batch of ten
locomotives is configured initially to be certified for use in Germany, although
there are plans to seek approval for operations in other countries, including
Norway and Sweden. Their maximum speed is to be restricted to 120 km/h,
although it shall be possible to regear them for 160 km/h if the operator
desires to do so.
During late 2018, another operator, ITL Eisenbahngesellschaft GmbH
(Captrain Deutschland), placed an order for 10 EuroDual configured for use
on the German railways.
Length over buffers: 23020 mm
Height: 4290 mm
Width: 2900 mm
Axle Configuration: Co’Co’
Gauge: 1435 mm/1668 mm
Wheel diameter: 1067 mm
Loco weight: 123 t
Power: 6150 kW (AC+3 kV DC)
4100 kW (1,5 kV DC)
6000 kW (DC+Diesel)
2800 kW (Diesel)
Starting tractive effort: 500 kN
Max Speed: 120 – 160 km/h
Prime mover: Caterpillar CAT C175-16
Transmission: electrical AC/AC type, ABB
Fuel capacity: 3500 l
Electric system: 15 kV, 16,7 Hz ~
25 kV, 50 Hz ~
1,5 kV =
3 kV =
Initial Handling
Read the instructions carefully before using the model.
Carefully remove the locomotive from the plastic blister and wrapping. Keep
the box and instruction sheets for future reference.
Use a transformer as power supply (not included) which corresponds to the
EN 61558-2-7 standard.
Let the model run for approximately 30 min, both ways, at half speed, to
make the motor and gears run smoother.
Please make sure, that your tracks are correctly mounted and well cleaned.
Otherwise the model may not run properly.
The smallest curve radius the model can run on is 358 mm.
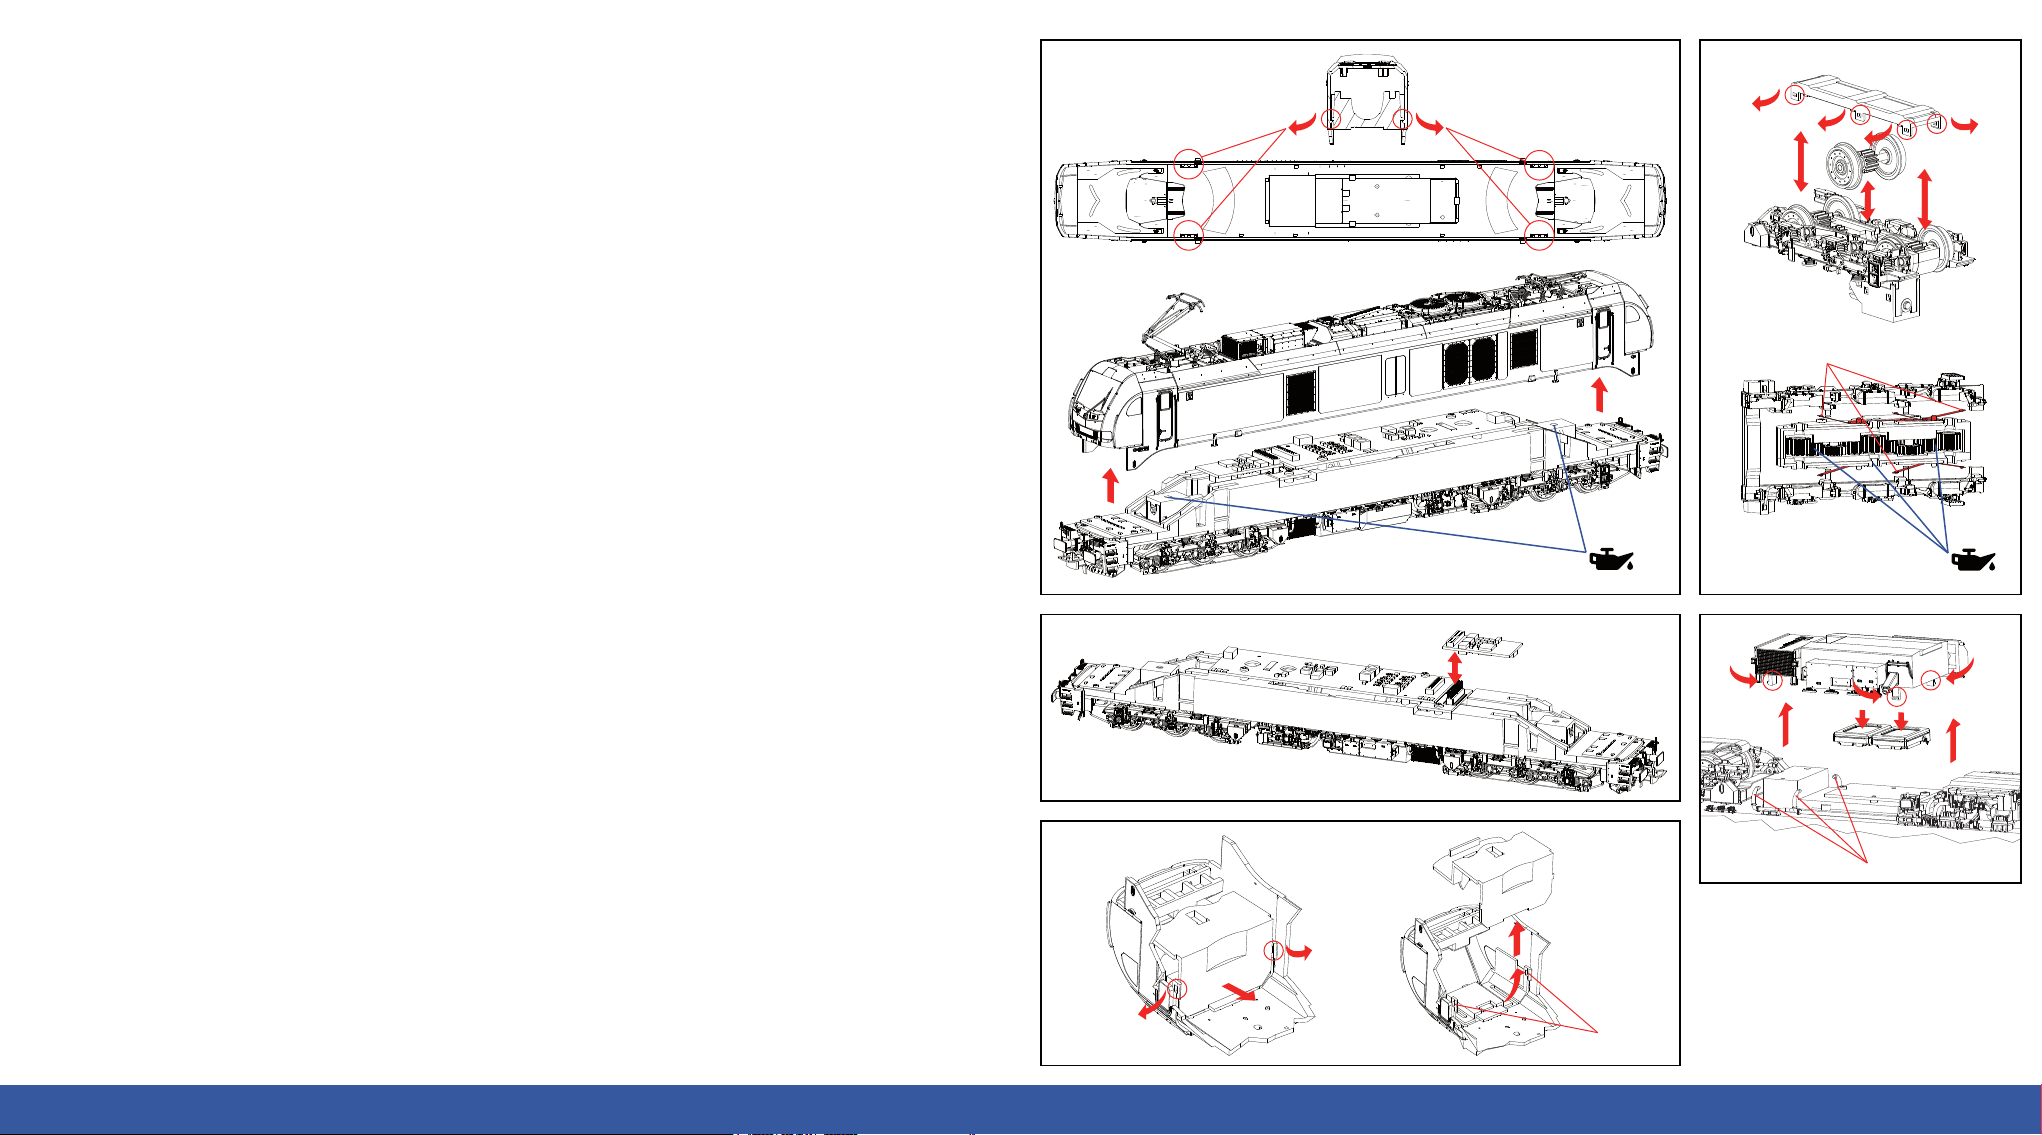
Disassembly
Gently release the body shell tabs “A” from the metal chassis like shown in
fig. 1. Remove the body in an upward movement like shown in “B”.
In order to replace wheel-set, release the 6 tabs of the bogie cover, marked
with “C” in fig. 2. When reassembling the wheel-sets please be sure not to
damage the pickup contacts “D”.
All models have factory installed speakers. How to access the speakers is
shown in fig. 3. Please disconnect tubes “E” from the tank assembly and
release the 3 tabs “F”. Carefully pull out the tank assembly like shown in “G”.
Take off the glued speakers “H” from the tank interior.
Converting to Digital
Have you bought a DCC model with sound or an AC model? Then the loco
comes already with a decoder installed (LokPilot in case of AC Models). Our
factory decoder is already setup and fully functioning, so no extra work or
steps are required.
Decoder Installation
Remove the body first (fig. 1), then remove the installed dummy decoder and
replace it with a 21 pin MTC decoder like shown in “I” (fig. 4).
Maintenance
It is recommended to service the loco on a regular basis after every 40 hours
of usage.
When servicing, carefully clean the rails and wheels with adequate cleaning
products. Also clean the inside contour of the wheels and use a small brush
to remove dirt from the pickup contacts “D” if necessary (fig. 2). Lubricate
the axle bearings using oil and apply grease to the gears (fig. 1 and fig. 2).
All the required products for maintenance can be found at any model shop.
Cabin Disassembly
Carefully release the tabs “J” from the glass part and
then pull out the cab as first shown in “K” and then up
like in “L” (fig. 5). Please use extreme caution to
avoid breaking the small assembly lugs ”M” of the
cabin glass part.
1. 2.
4. 3.
5.


