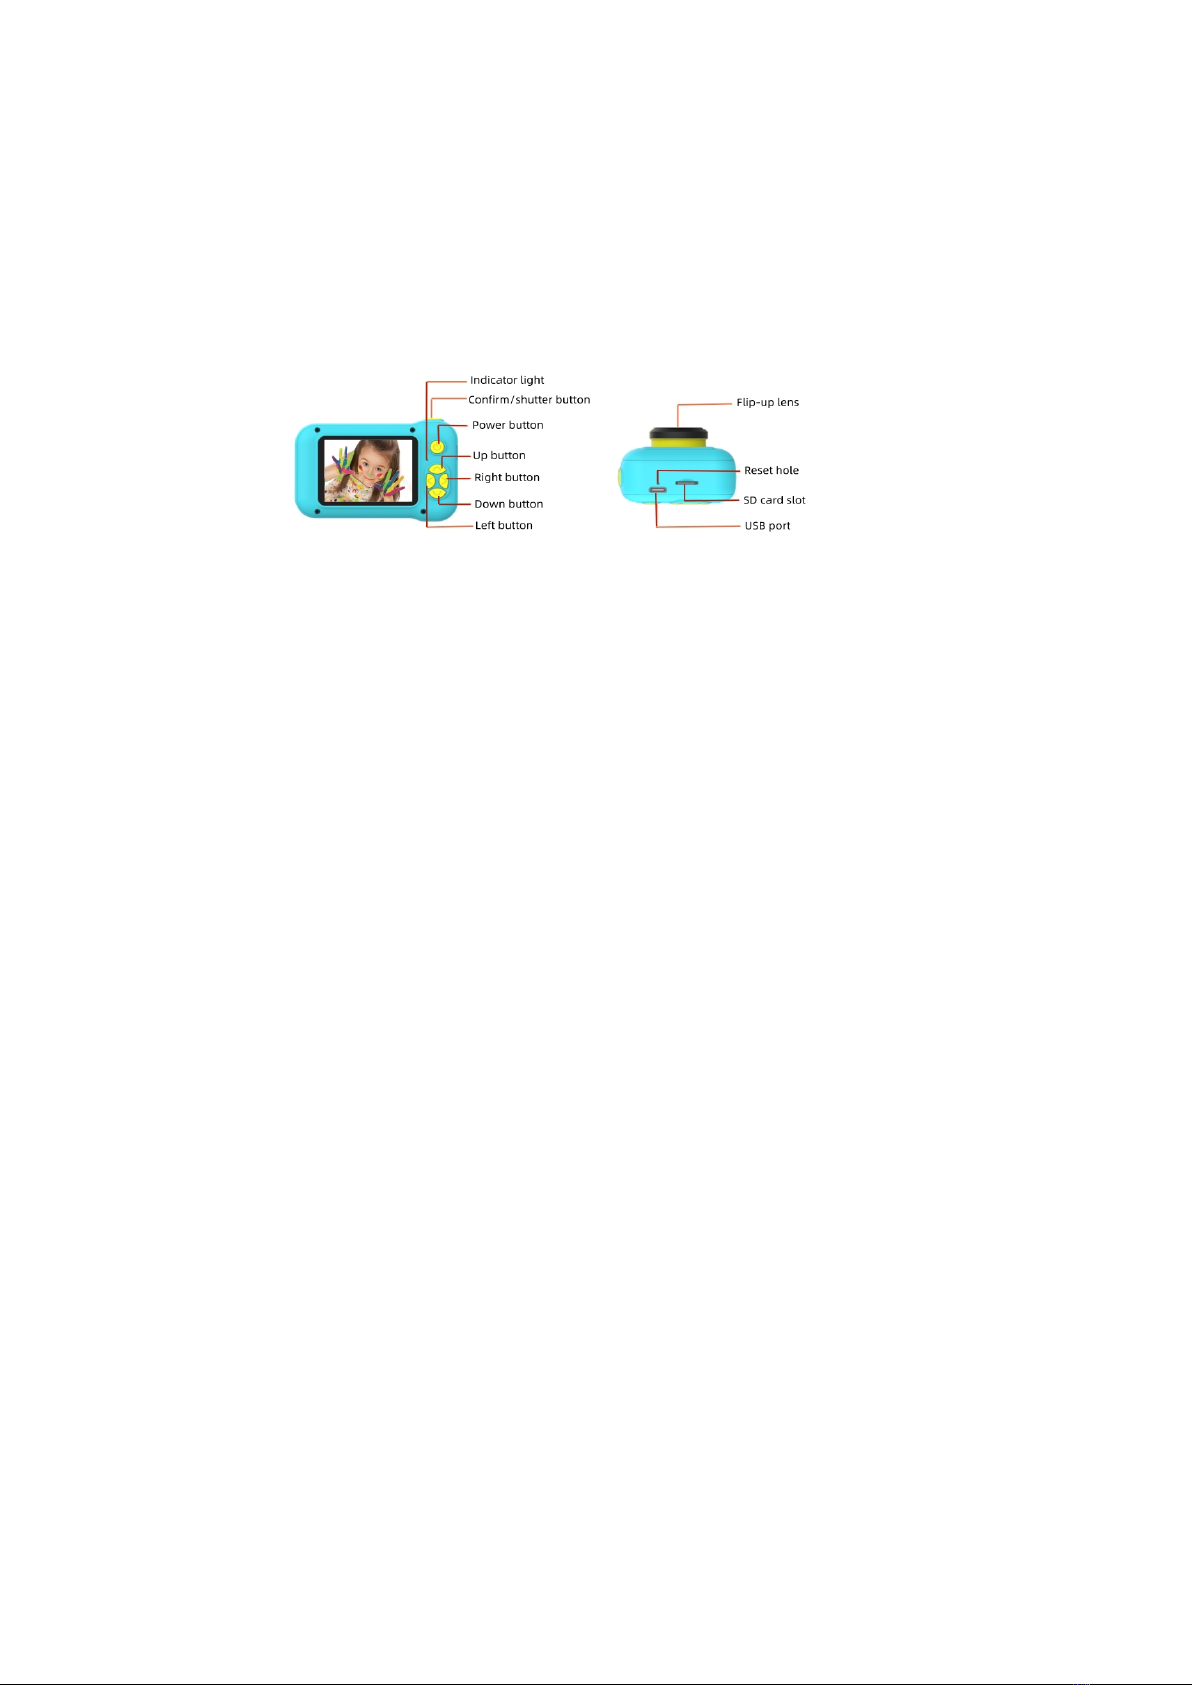
Denver KCA-1351 User manual

ENG - 1

ENG - 2
Safety information
Please read the safety instructions carefully before using the product for the
first time and keep the instructions for future reference.
1. Warning: This product includes lithium polymer batteries.
2. Warning: Choking Hazard –Children under 3 yrs. can choke or suffocate on
camera because of its small size. Adult supervision required. Keep camera away
from toddlers and pets to avoid chewing and swallowing. Discard broken buttons
or parts at once.
3. Product operating and storage temperature is from 0 degree Celsius to 40 degree
Celsius. Under and over this temperature might affect the function.
4. Never open the product. Touching the inside electrics can cause electric shock.
Repairs or service should only be performed by qualified personnel.
5. Do not expose to heat, water, moisture, direct sunlight!
6. The unit is not waterproof. If water or foreign objects enter the unit, it may result in
fire or electric shock. If water or a foreign object enters the unit, stop use
immediately.
7. Only charge with supplied USB cable.
8. Do not use non original accessories together with the product as this can make
the product functionality abnormal.

ENG - 3
CAMERA USER GUIDE
Product description
Press and hold to turn on/off the device; press to exit the mode and return to the home
screen.
3. Up/
①Photo/video mode: Press to release the shutter and take a photo/video.
②Playback/MP3 mode: Press to play or pause playback.
③Game mode: Press to confirm the selection.
④Setting Mode: Press to save the setting.
1. Confirm/Shutter button
2. Power button
down button
In photo mode, press the button to turn on/off the 5-second photo delay function.
In video mode, press the button to select the special effects.
4.Right button
In photo mode, press the button to select the photo frame, special effects and other
functions.
5.Left button
In photo mode, press the button to select the frame, special effects and other functions.
In camera mode, you can choose slow motion, time-lapse camera, normal camera and
other functions.
6. Down button
In video mode, press the button to select the special effects camera.

ENG - 4
7. Zoom in and out
Press and hold the up/down buttons in photo mode for image zoom in and out.
8. Lens
Camera viewfinder window. 180°flip-up lens.
9. Indicator light
Two-color light, blue light is always on when the power is switched on. Red light is the
charging indicator, always on when charging and off when fully charged.
10.SD card slot
Supports memory card up to 64GB.
Note: To reinstall or replace the card, insert the card (or any new micro SD card) into
the card slot with the contacts facing the display side.
11.USB port
For connecting to PC (data transfer) and external power supply to charge the battery.
12. Reset switch
If there is a dead situation, press the reset button to restore the device to the factory
settings.
Home page icons:
Basic operating instructions
1. Power on and off
Press the power button to turn on the camera, the blue indicator will light up when the
power is on.

ENG - 5
Press the power button again to turn off the camera, the blue light turns off.
2. Video mode
Press the direction buttons to select the video icon on the home screen, then press
the "confirm/shutter" button enter the video mode.
Press the "confirm/shutter" button to start recording, and press "confirm/shutter"
again to stop recording. In the video mode, press the up/down buttons to switch
between different special effects scenes. Press the left button to switch between
slow motion, time-lapse, and normal video.
3. Photo mode
Press the direction buttons to select the photo icon on the home screen, then press
the "confirm/shutter" button enter the photo mode.
Press the "confirm/shutter" button to take pictures, the camera will sound a beep
indicating that the photo is complete. In the photo mode, press the left/right buttons
to switch between different photo frames and special effects, or press the up/down
buttons to switch the time-lapse photo function on or off.
4. Playback
Press the direction buttons to select the playback icon on the home screen, then
press the "confirm/shutter" button to enter the playback mode.
Press the left/right buttons to select the previous or the next playback file.
Press the up button to delete a single video or photo. Press the down button to
delete all videos or photos.
5. Game mode
Press the direction buttons to select the games icon on the home screen, then
press the "confirm/shutter" button enter the game mode. To start a game, press the
left/right buttons to select the desired game, then press the "confirm/shutter"
button.
In the game mode screen:
Press the up button to move upwards;
Press the down button to move downwards;
Press the left button to move to the left;
Press the right button to move to the right.

ENG - 6
6. Menu settings
Press the direction buttons to select the settings icon on the home screen, then
press the "confirm/shutter" button to enter setting mode.
You can scroll up and down through the settings by pressing the up/down buttons,
and enter the submenu by pressing the "confirm/shutter" button; use the up/down
buttons to select the setting item you want to change, and press "confirm/shutter"
to confirm.
To exit the setting status, press the power button.
7. Music mode
Press the direction buttons to select the music icon on the home screen, then press
the "confirm/shutter" button to enter the music mode.
In the music mode:
Use the left/right buttons to select the previous/next song.
Press "Down" to decrease the volume, or press "Up " to increase the volume.
*Note: Music files in MP3 format should first be copied to the MP3 folder in the camera's
memory SD card. Adult operation is recommended.
8. USB mode
Connect the USB cable to the computer. If no SD card is connected, the camera will
enter the PCCAM mode; if the camera is equipped with an SD card, it will enter the U
disk mode.
9. Instructions for battery use
*Note: Adult operation is recommended.
Plug the supplied USB cable into the camera's USB port.
Plug the large end of the USB cable into your computer or a standard USB power
adapter.
After successful connection, you will see a battery charging symbol appearing on
the camera screen.
For battery level indication, see icons below:
Sufficient power Low power Insufficient power
Note: The red and blue alternating lights are on when charging, and the red light goes
off when the battery is full.

ENG - 7
Product Specifications
Display
2.4" IPS display
Lens
180°Flip lens for taking selfies
Storage Media Micro SD card, up to 64GB (micro card must be formatted in
FAT32)
Photo format JPG
Video format AVI
Video resolution 1920*1080 1280*720 (Interpolated)
Time Markers On/off
Photo resolution 40M 20M 18M 16M 12M 8M 5M 3M 2M (Interpolated)
Photo Frame Multiple photo frames + special effects
MP3 Playback Support
Games Greedy snake / go maze / airplane / push box / 2048 number
game
Warning: lithium battery inside

ENG - 8
Please notice - All products are subject to change without any notice. We take
reservations for errors and omissions in the manual.
ALL RIGHTS RESERVED, COPYRIGHT DENVERA/S
Electric and electronic equipment and included batteries contains materials,
components and substances that can be hazardous to your health and the
environment, if the waste material (discarded electric and electronic equipment and
batteries) is not handled correctly.
Electric and electronic equipment and batteries is marked with the crossed out trash
can symbol, seen above. This symbol signifies that electric and electronic equipment
and batteries should not be disposed of with other household waste, but should be
disposed of separately.
As the end user it is important that you submit your used batteries to the appropriate
and designated facility. In this manner you make sure that the batteries are recycled in
accordance with legislature and will not harm the environment.
All cities have established collection points, where electric and electronic equipment
and batteries can either be submitted free of charge at recycling stations and other
collection sites, or be collected from the households. Additional information is
available at the technical department of your city.
DENVER A/S
Omega 5A, Soeften
DK-8382 Hinnerup
Denmark
www.facebook.com/denver.eu

Version 1.1
Contact
Nordics
Headquarter
Denver A/S
Omega 5A, Soeften
DK-8382 Hinnerup
Denmark
Phone: +45 86 22 61 00
(Push “1” for support)
E-Mail
For technical questions, please write to:
support.hq@denver.eu
For all other questions please write to:
contact.hq@denver.eu
Benelux
DENVER BENELUX B.V.
Barwoutswaarder 13C+D
3449 HE Woerden
The Netherlands
Phone: 0900-3437623
E-Mail: [email protected]u
Spain/Portugal
DENVER SPAIN S.A
Ronda Augustes y Louis Lumiere, nº 23 – nave 16
Parque Tecnológico
46980 PATERNA
Valencia (Spain)
Spain
Phone: +34 960 046 883
Mail: support.es@denver.eu
Portugal:
Phone: +35 1255 240 294
E-Mail: denver.service@satfiel.com
Germany
Denver Germany GmbH Service
Max-Emanuel-Str. 4
94036 Passau
Phone: +49 851 379 369 40
E-Mail
support.de@denver.eu
Fairfixx GmbH
Repair and service
Rudolf-Diesel-Str. 3 TOR 2
53859 Niederkassel
(for TV, E-Mobility/Hoverboards/Balanceboards,
Smartphones & Tablets)
Tel.: +49 851 379 369 69
E-Mail: [email protected]
Austria
Lurf Premium Service GmbH
Deutschstrasse 1
1230 Wien
Phone: +43 1 904 3085
E-Mail: denver@lurfservice.at
If your country is not listed above,
please write an email to
support@denver.eu
DENVER A/S
Omega 5A, Soeften
DK-8382 Hinnerup
Denmark
denver.eu
facebook.com/denver.eu
This manual suits for next models
2
Table of contents
Other Denver Toy manuals
Popular Toy manuals by other brands

Eduard
Eduard Mosquito B Mk.XVI Assembly instructions

BABY born
BABY born Zapr Creation Puppy Doodle manual

BNF
BNF Blade mCP X instruction manual

3D AEROWORKS
3D AEROWORKS Pilatus PC-21 Assembly manual and user guide

Fisher-Price
Fisher-Price M9523 instruction sheet

Hachette
Hachette ALIEN spectacular Assembly

Mattel
Mattel DC Super Hero Girls Series instructions

Eduard
Eduard MiG-23 Flogger armament quick start guide

Eduard
Eduard Zoom Hurricane Mk.I quick start guide

LEGO
LEGO Teenage Mutant Ninja Turtles 79120 Instructions for use

Eduard
Eduard Sea Hurricane Mk.Ib landing flaps manual

Top Flite
Top Flite Gold Edition Nobler manual