Sulion DAIQUIRI XL User manual

Calle Verano, 51 - Polígono Industrial Las Monjas -28850 Torrejón de Ardoz - Madrid (ESPAÑA)
CIF A28763647
www.sulion.es
DAIQUIRI XL
Ante cualquier pregunta, incidencia o falta de componentes, antes de consultar con su tienda habitual, contacte con nuestro departamento de atención al cliente teléfono 916749481
email: [email protected] o con nuestro departamento de atención técnica teléfono 916749483 email: [email protected]. Antes de llamar tome nota de la referencia, nombre, IMP (ubicado en la
pegatina del producto o al lado del código de barras en la caja) y descripción del problema. Si tiene fotos o vídeos, puede ayudar a una rápida resolución. Nuestro horario de atención es
de 9:00 a 18:00 (hora española) de lunes a jueves y de 9:00 a 14:00 (hora española) los viernes. También puede consultarnos a través de nuestra web www.sulion.es donde encontrarás
un acceso a vídeos, instrucciones y una guía de preguntas frecuentes
In the event of any questions, incidents, or missing parts, before consulting with your retailer, call our customer service department at 916749481 email: [email protected] or with technical
department at 916749483 email: [email protected]. Before calling, note of the reference, name, IMP (located on the product sticker or next to the barcode on the box) and description of the
problem. If you have photos or videos, fast resolution can help. Customer service opening times is from 9 a.m.- 6:30 p.m. from Monday-Thursday or 9 a.m.-2 p.m. on Fridays. You can also
contact us via email at [email protected] or our technical service at [email protected] and on our web www.sulion.es, where you will find videos, instruction manuals and our FAQs.
Ref. 075750
Video de instalación

2
ESPAÑOL
Calle Verano, 51 - Polígono Industrial Las Monjas -28850 Torrejón de Ardoz - Madrid (ESPAÑA)
CIF A28763647 +34 916774540

Descargue el manual en su idioma en nuestra web:
sulion.es/ean/8426107020246
ES
Download the userguide in our web:
sulion.es/ean/8426107020246
EN
Téléchargez le guide de l’utilisateur sur notre site Web
sulion.es/ean/8426107020246
FR
Baixe o guia do usuário em nossa web:
sulion.es/ean/8426107020246
PT
DE
Laden Sie die Bedienungsanleitung in unserem Web herunter:
sulion.es/ean/8426107020246
Scarichi il manuale nella sua lingua sul nostro sito web:
sulion.es/ean/8426107020246
IT

5
ESPAÑOL
www.sulion.es
Precauciones de seguridad
La información contenida en las siguientes páginas ha
sido preparada para asegurarle disfrutar de su ventilador
de forma totalmente exenta de problemas:
Siga detenidamente estas instrucciones
para disfrutar de la máxima seguridad en la
instalación y funcionamiento de este equipo.
Cualquier actuación sobre el conexionado
eléctrico del aparato, así como para su
limpieza, debe ser solamente realizado tras
asegurarse de que la alimentación eléctrica
general de la instalación está desconectada,
por medio del desmontaje del correspondiente
fusible o el “desarmado” del interruptor
protector de la instalación para garantizar
total aislamiento del suministro eléctrico.
Español 02
English 09
Instalación del ventilador / Fan installation 13
Índice / Indice / Index1
Repuestos / Spares
Herramientas requeridas / Required tools
Enhorabuena por su compra
Enhorabuena por adquirir lo último en ventiladores de techo.
Eficiencia energética: Los motores SULION pertenecen
a la última tecnología de diseño en ventiladores, ahorrando
hasta el 70% de la energía consumida en el caso de los
motores DC.
Operación silenciosa: Gracias a los avances en I+D de
nuestros motores hemos reducido eficazmente el ruido en
su funcionamiento en todos los modelos.
Confort: Los ventiladores con motor DC incorporan un
control remoto de hasta 6 velocidades lo que aporta una
variedad superior de niveles de confort disponibles en su
uso.
x1 x1 x1
Pala / Blade - Ref. 2173245 Kit receptor + mando / Kit receiver + RC - Ref. 2173221
PCB Led - Ref. 2173238 Difusor / Diffuser - Ref. 2173269
OFFOFF
x2

6
ESPAÑOL
Calle Verano, 51 - Polígono Industrial Las Monjas -28850 Torrejón de Ardoz - Madrid (ESPAÑA)
CIF A28763647 +34 916774540
un interruptor seccionador de acuerdo con
las reglamentaciones de instalación, que
asegure el corte omnipolar, directamente
conectado a los bornes de alimentación
y debe tener una separación de contacto
en todos sus polos, que suministre
desconexión total bajo condiciones de
sobretensión de categoría III. Use sólo el
controlador del ventilador para ponerlo en
marcha o detenerlo.
Se recomienda no usar en la misma
sala este tipo de ventiladores junto a
instalaciones de gas de forma simultánea.
No insertar nada que pueda golpear con
las aspas del ventilador mientras gira, pues
podría provocar daños a las personas,
dañar las aspas y descompensar la unidad
causando vibraciones y bamboleo.
Tras el montaje del ventilador, asegúrese
de que todas las fijaciones están seguras
y apretadas para evitar cualquier ruido
originado por elementos sueltos.A causa
del movimiento del ventilador, algunas
fijaciones pueden aflojarse. Compruebe
todas las fijaciones dos veces al año,
al menos, para asegurarse que están
correctamente apretadas. En caso
necesario, deben ser apretadas de nuevo.
Sí el cable de alimentación está dañado,
debe ser sustituido por el fabricante, por su
servicio posventa o por personal cualificado
similar, con el fin de evitar un peligro.
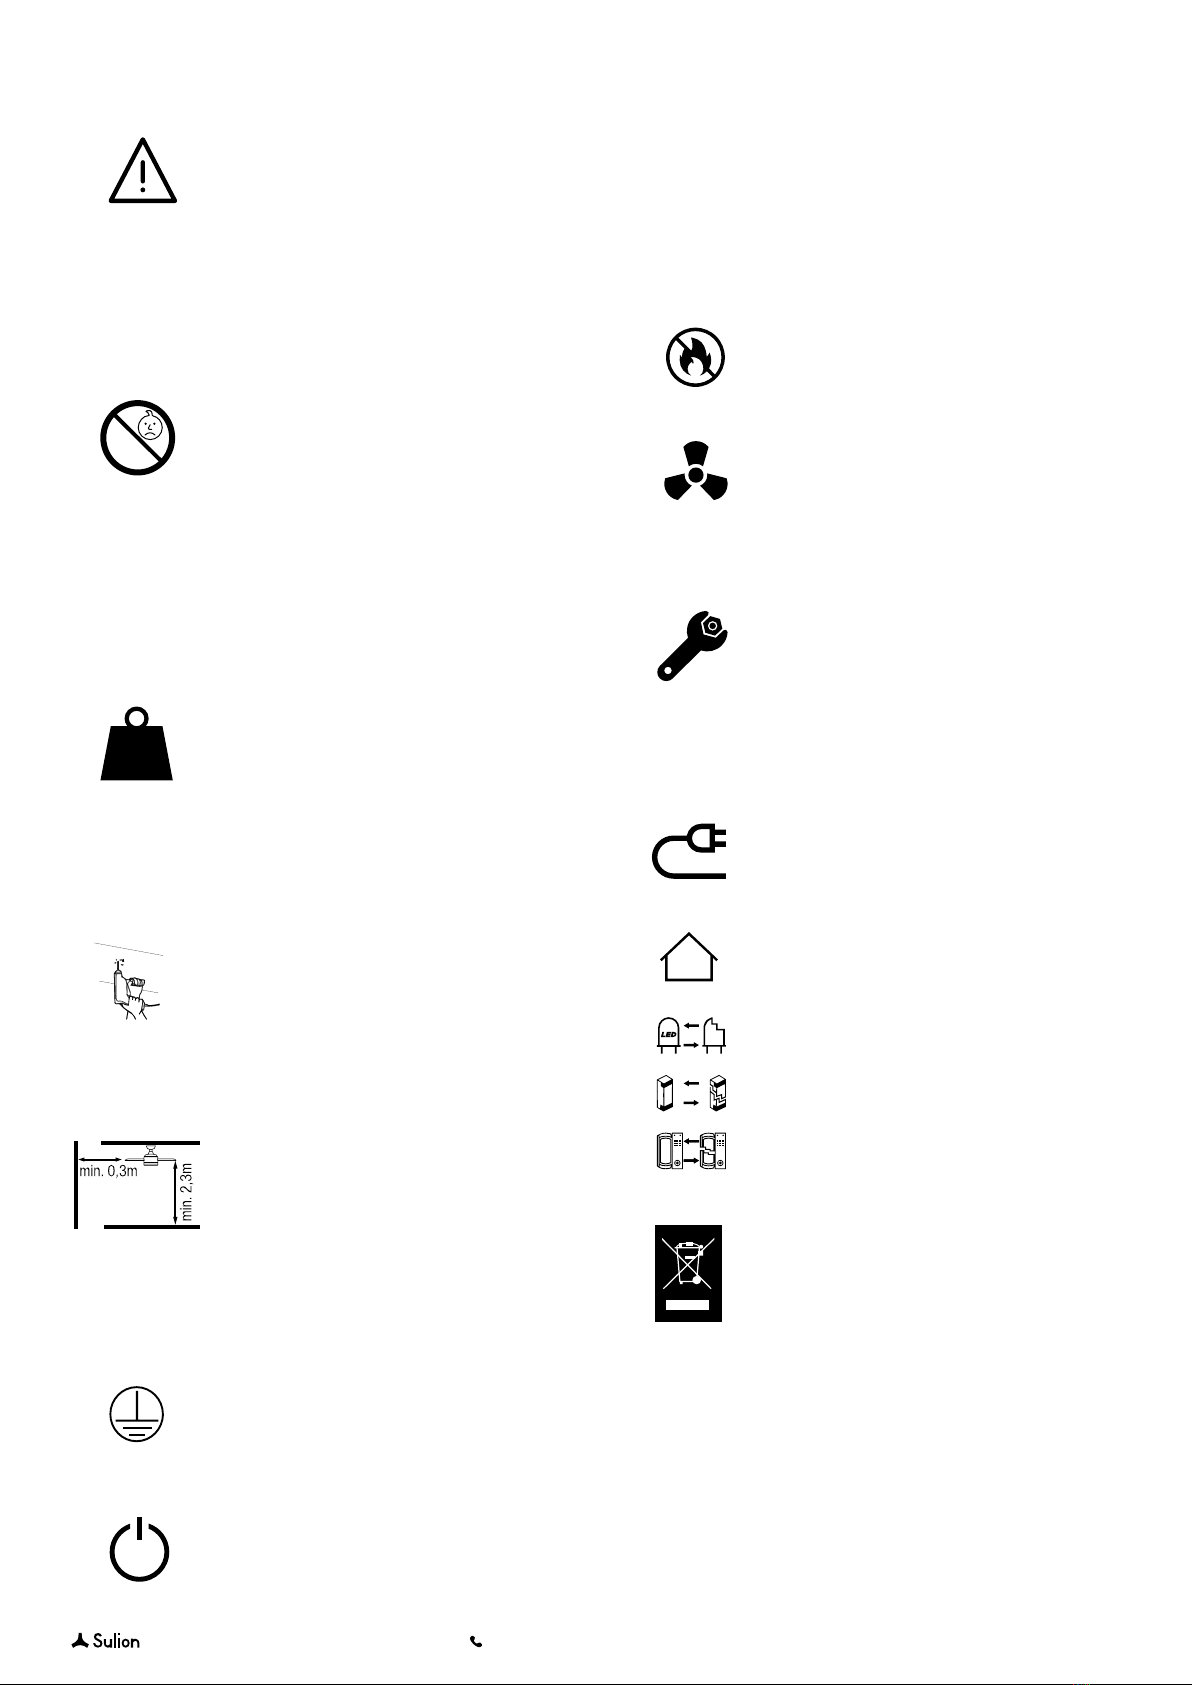
Sola apto para interior
LED reemplazable
Driver reemplazable
Receptor y mando reemplazables
No se deben tirar los productos eléctricos
junto con los residuos domésticos. Le
rogamos reciclar el embalaje en los puntos
de recogida previstos a tal efecto. Contacte
con las autoridades locales o su proveedor
para obtener consejos de reciclaje. Gracias
por reciclarlos en los puntos de recogida
previstos a tal efecto.
Nota: Las importantes advertencias e instrucciones
indicadas en este manual no garantizan cubrir todas las
posibles condiciones y situaciones que pueden ocurrir.
Debe ser entendido que el sentido común, la precaución
y el cuidado son factores que no pueden ser incluidos en
todos los productos. Estos factores sólo pueden y deben
ser aportados por el usuario que cuida y disfruta de este
ventilador.
La instalación debe de ser realizada
por personal cualificado para realizar
instalaciones eléctricas de acuerdo a la
norma vigente en el país de instalación.
Recuerde exigir a su instalador la prueba
de todas las funciones del ventilador
antes de irse. Ante cualquier duda del
instalador no duden en contactarnos.
Este aparato pueden utilizarlo niños con
edad de 8 años y superior y personas
con capacidades físicas, sensoriales
o mentales reducidas o falta de
experiencia o conocimiento,si se les
ha dado la supervisión o formación
apropiadas respecto al uso del aparato
de una manera segura y comprenden
los peligros que implican. Los niños no
deben jugar con el aparato. La limpieza
y mantenimiento a realizar por el
usuario no deben realizarlo los niños sin
supervisión.
Debe asegurarse de que el soporte
de montaje se fije a una estructura
del techo que sea capaz de soportar
no menos de 30 kg por medio de los
tornillos suministrados. Debe asegurarse
de que al menos 30 milímetros de la
longitud de los tornillos queda roscada
dentro del techo. Si el montaje se realiza
sobre una caja de unión al techo, debe
asegurar el soporte del ventilador de
forma suficiente para evitar que se afloje
o se gire.
El sistema de anclaje del soporte del
ventilador al techo dependerá del
tipo de techo en el que se realiza la
instalación. La decisión de que sistema
de fijación utilizar así como la cantidad
es responsabilidad del instalador.
El ventilador debe ser instalado de
tal forma que las palas estén a más
2,3m del suelo. Asegúrese de que en
la ubicación de montaje del ventilador
existe un espacio de, al menos, 30cm,
respecto de cualquier pared u otro
obstáculo contra el que pudieran chocar
sus aspas. Es importante resaltar que
cuanto mayor sea dicha distancia, más
eficaz será el flujo de aire producido.
El cable de tierra del ventilador debe
estar conectado a la red de tierra de
la instalación, para evitar cualquier
derivación con riesgo para las personas.
No conectar la alimentación del motor
del ventilador a ningún elemento de
regulación, potenciómetro, pues se
produciría mal funcionamiento del
ventilador y/o daños en su motor. Para la
conexión eléctrica es preciso incorporar
<8
Kg

7
ESPAÑOL
www.sulion.es
Características del aparato
Generales
Tensión y frecuencia nominal 220-240V~AC 50/60Hz
Clase de protección Clase I
Indice de protección IP20
Temperatura de trabajo -5 ↔40ºC
Inclinación máxima del techo en el que se puede instalar 0º
Peso 5Kg
Consumo de energía en modo de espera (W) <0,5
Norma de medición del valor de servicio EN 62879:2020
LED
Potencia 55W
Flujo 5500lm
Temperatura de color 3000 - 6000K
RGB No
Medición datos luz Esfera 360º
Nº de ciclos ON/OFF 10000
Nº de horas de vida 30000h
Dimable Si
Ángulo 120º
CRI >80
Este producto contiene una fuente luminosa de la clase de eficiencia energética E
Ventilador
Velocidades 6
Potencia máx. (W) 23
RPM máx. 1050
Flujo de aire máx.(m³/min) 200
Flujo de aire máx.(m³/h) 12000
Nivel sonoro máx. (dB) 54
Valor de servicio SV máx. ((m³/min)/W) 11,91
Velocidad máxima del aire máx. (m/seg) 6,63m/s
Bluetooth
Versión 4.0
Altavoz
Potencia 5W
Control Bluetooth

8
ESPAÑOL
Calle Verano, 51 - Polígono Industrial Las Monjas -28850 Torrejón de Ardoz - Madrid (ESPAÑA)
CIF A28763647 +34 916774540
Control remoto
Instrucciones para sincronizar el
receptor y el control remoto
El control remoto y el receptor de este ventilador vienen
sincronizados ya de fábrica.
Asegúrese de que todas las conexiones estén
correctamente realizadas.
Asegúrese de que el mando a distancia contenga
baterías.
Asegúrese de que todos los interruptores (principales y
de aislamiento) están encendidos.
Este ventilador dispone de dos modos de sincronización;
Modo Universal y Modo Unitario:
- Modo Unitario:
Este tipo de sincronización le permite controlar dos o más
ventiladores próximos de manera independiente, cada uno con
su control remoto.
Sincronización:
El mando de este ventilador no precisa de sincronización
con el receptor, el mando ya viene vinculado de fábrica con
su receptor.
- Modo Universal:
Este tipo de sincronización le permite controlar uno o más
ventiladores próximos con el mismo control remoto.
Sincronización:
1.- Conectar la corriente (interruptor de la pared) del los
ventiladoresque se quieran controlar,yjustoacontinuación,
dentro de los siguientes 15 segundos, pulsar la tecla
del control remoto 3 veces.
2.- Un sonido de tipo “beep” indica que la conexión ha sido
ejecutada y el equipo puede funcionar normalmente.
3.- Ahora, control remoto y receptores de los ventiladores
habrán quedad sincronizados. Quite la corriente de los
ventiladores mediante el interruptor o el automático y acto
seguido vuelva a encenderlos, este paso es el que cierra el
proceso de sincronización.
Nota: No es posible que un control remoto olvide un
receptor/es una vez ha sido vinculado, si se quiere que un
receptor deje de obedecer a un control remoto, se debe
vincular otro para “sobreescribirlo”.
Preparación para el montaje
Nota: El tiempo estimado de montaje es de 120 minutos.
Este producto sólo puede ser instalado por un electricista
cualificado.
Desembalar el ventilador de forma cuidadosa, evitando el uso
de “cutters” o navajas que podrían rayar cualquier parte del
mismo.
Extraer todos los componentes. Situar el motor sobre un
trapo o superficie blanda para evitar dañar su acabado
superficial. Manipular cuidadosamente el conjunto para
evitar que su carcasa se doble o arañe.
El ventilador debe de montarse en el suelo o en una mesa lo
suficientemente grande para que no se pueda caer ningún
componente.
Cambio de temperatura de color de la
luz.
Podrá cambiar la temperatura de color de la luz, apagando
y encendiendo, con el interruptor de la pared, el mando o
en caso de ser un ventilador IoT desde su terminal.
CÁLIDO
NEUTRO
FRÍO
ON
ON
OFF
OFF
OFF
ON
Velocidades
Temporizador
Cambiar
intensidad de
la luz
Cambio
temperatura
de color fijo
3000/4000/6000K
Cambio
temperatura de
color dimable
Encender / Apagar
Ventilador
Encender / Apagar
luz
Encender/
Apagar todo
Cambio sentido
de giro
Reproduzca la música de su terminal a
través del altavoz del ventilador.
Modo de empleo:
1. Asegúrese de que el ventilador está conectado.
2. Active la función Bluetooth de su terminal (teléfono móvil,
ordenador, tablet, etc).
3. Busque el dispositivo “Speaker Light” en la lista de
dispositivos disponibles y emparéjelo.
4. Reproduzca la música y disfrútela.

9
ESPAÑOL
www.sulion.es
CÁLIDO
CÁLIDO
NEUTRO
CÁLIDO
ON
ON
>20”
OFF
OFF
Función memoria.
Sentido de giro. Opción invierno / verano
El conmutador del control remoto controla la dirección,
sentido horario y anti-horario.
Opción verano - La corriente de aire descendente crea un
efecto refrescante como indica la ilustración.
Opción invierno - Una corriente ascendente aleja el aire
caliente del área del ventilador como lo indica la ilustra-
ción. Esto le permite ajustar la calefacción a un nivel más
bajo.

10
ESPAÑOL
Calle Verano, 51 - Polígono Industrial Las Monjas -28850 Torrejón de Ardoz - Madrid (ESPAÑA)
CIF A28763647 +34 916774540
Mantenimiento e información de garantía
Mantenimiento y limpieza:
1. El movimiento natural del ventilador podría hacer que
se aflojen algunas conexiones. Verifique las conexio-
nes de soporte, las piezas de fijación y los accesorios
de las aspas dos veces al año. Cerciórese de que es-
tén fijadas.
2. Limpie el ventilador periódicamente para ayudar a
mantener su apariencia nueva con el correr de los
años. No use agua para limpiarlo, ya que podría dañar
el motor o la madera o causar descarga eléctrica.
3. Use sólo un cepillo blando o un trapo sin pelusa para
no rayar el acabado. El enchapado está sellado con
una capa de laca para minimizar la decoloración o
pérdida del brillo.
4. No hay necesidad de aceitar el ventilador. El motor
tiene cojinetes de lubricación permanente.
Nota: El hecho de no respetar estas instrucciones provoca
la pérdida de la garantía del equipo.
Servicio de garantía:
La garantía del fabricante cubre fallos reales que puedan
producirse, pero no quejas menores como el ruido que ge-
nera el equipo, pues todos los motores eléctricos generan
un cierto ruido.
El funcionamiento del ventilador con los componentes li-
geramente sueltos (tornillos no suficientemente apretados)
o la deformación de las aspas por limpieza excesivamente
vigorosa puede producir ruidos y balanceo excesivo que
no podrán ser cubiertos bajo garantía. Un cuidado periódi-
co del apriete de los elementos y una limpieza no agresiva
son suficientes para prevenir estos problemas.
Controlador:
La garantía del equipo será anulada si se usa en su ins-
talación un control a través de un interruptor de pared o
regulador (dimmer) de estado-sólido. Solo debe ser usado
el control remoto suministrado con la unidad.
Instalación del ventilador:
Según nuestros términos y condiciones de garantía, este
ventilador solo puede ser instalado por parte de un elec-
tricista autorizado. Los ventiladores instalados de forma
incorrecta pueden ser peligrosos para las personas y muy
caros de reparar y perderán la garantía. Este ventilador
está diseñado de forma exclusiva para su uso en interior,
protegido y alejado del agua y la humedad, pues en caso
contrario perderá su garantía.
El sistema de anclaje del soporte del ventilador al techo
dependerá del tipo de techo en el que se realiza la insta-
lación. La decisión de que sistema de fijación utilizar así
como la cantidad es responsabilidad del instalador.
Balanceo:
Todos los ventiladores de techo tienden a balancearse du-
rante su funcionamiento. El balanceo de dos centímetros
es totalmente aceptable y no sugiere ningún mal funciona-
miento ni originar su caída si se montó siguiendo este ma-
nual de forma adecuada al techo. Este ventilador de techo
dispone de un sistema de montaje totalmente seguro, por
medio de soportes de acero y esferas de unión para permi-
tir su giro y evitar transmitir vibraciones a la estructura del
techo. Note por favor, que, aun siendo del mismo modelo,
dos ventiladores pueden presentar balanceo diferente to-
talmente aceptable pues no supone ningún malfunciona-
miento o defecto de fabricación.
Mayor percepción de ruidos durante el funcio-
namiento nocturno:
La garantía del fabricante no cubre el hecho de que duran-
te la noche, cuando todo el ambiente circundante está más
silencioso y tranquilo, se perciba con mayor notoriedad el
ruido de funcionamiento del ventilador. Incluso, durante la
noche, la alimentación eléctrica puede sufrir alteraciones
que pueden producir mayor nivel sonoro del aparato, lo
cual no significa ningún malfuncionamiento o defecto de
fabricación del mismo.
Sistema de iluminación del ventilador:
A excepción de defecto de fabricación, extremadamente
excepcionales, las lámparas del ventilador no están cu-
biertas bajo la garantía del ventilador. Ruidos y vibraciones
pueden ser superiores cuando el sistema de iluminación
está encendido. Por ejemplo, el difusor de la luminaria no
adecuadamente fijado puede producir ligero rumor. De nue-
vo, cuidado no agresivo y revisión periódica de que todos
los elementos están adecuadamente fijados evitará estos
inconvenientes. Los difusores de cristal de las luminarias
están garantizados hasta el almacén de los distribuidores y
sujetas a su verificación durante el suministro.
Garantía:
El fabricante garantiza el correcto funcionamiento del equi-
po y posibles reparaciones o suministro de recambios del
modelo debidos a defectos de fabricación durante 3 años
desde la fecha de entrega, 8 años exclusivamente en el
caso del motor del ventilador, pero no puede responsabili-
zarse de daños y/o perjuicios causados por un mal empleo
del mismo. Para cualquier reclamación, se deberá adjuntar
a esta garantía el ticket de compra. La empresa se com-
promete a la reparación total gratuita de los vicios o de-
fectos originados y de los daños y perjuicios directamente
ocasionados por ellos. Así mismo, si la reparación no es
satisfactoria y el objeto no reviste las condiciones óptimas
para cumplir el uso al que está destinado, el titular de la
garantía tendrá derecho a la sustitución del objeto adquiri-
do por otro de idénticas características o la devolución del
precio pagado. Términos y condiciones de garantía
www.sulion.es

11
ENGLISH
www.sulion.es
Congratulations on your purchase
Congratulations on your purchase of the latest in energy
efficient ceiling fans.
Energy efficiency: SULION motors belong to the latest
design technology in fans, saving up to 70% in energy
consumption with DC motors.
Silent operation: Thanks to R&D advances in our motors,we
have effectively reduced their operating noise in all models.
Comfort: DC motor fans include up to 6-speed remote
control which provides superior comfort levels in their use.
Safety precautions
Follow these instructions carefully to enjoy
maximum safety in the installation and
operation of this equipment.
The electrical installation of the ceiling fan must
be carried out by an authorized electrician
in order to be covered by our warranty.
Please remember to require your installer to
test all the fan functions before you leave.
In case of any doubt from the installer, do not
hesitate to contact us.
This device can be used by children aged 8
years and above and people with reduced
physical, sensory or mental abilities or lack
of experience or knowledge, if they have
been given appropriate supervision or training
regarding the use of the device and they
understand the dangers of its use. Children
should not play with the device. The cleaning
and maintenance of the device should not be
carried out by children without supervision.
The fan must be installed in such a way that
the blades are more than 2,3m above the
ground. Make sure that there is a space of at
least 30cm between the fan’s blades and any
wall or other obstacle that they could hit. It is
important to note that the greater the distance,
the more efficient the air flow produced will
be.
Any action performed for the electrical
connection of the device, such as its cleaning,
must be carried out after ensurin that the
general power supply is disconnected, by
removing the corresponding fuse or disarming
the protective switch in order to ensure total
isolation of the power supply.
The system of attaching the fan bracket to the
ceiling will depend on the type of ceiling where
the installation is to be done. The decision
on which attachment system to use and the
quantity is the installer’s responsibility.
The fan must be installed at a location on
the ceiling sch that the blades are at least
2.3 m above the floor and 300 mm from any
object or wall. The mounting bracket must be
attached to a ceiling structure that is capable
of supporting a minimum of 30 kg using the two
screws provided. At least 30 mm of the length
of the screws must be screwed into the bracket.
When deciding where to mount the fan, be sure
that there is at least 30 cm of space between the
fan and any wall or other obstruction that the fan
blades could collide with.The greater this distance,
the more effective the air flow produced.After the
fan is mounted, be sure that the blades are no less
than 2.3 m above the ground
The ground wire of the fan must be connected to
the earth network of the installation, to avoid any
derivation that may put people in danger.
Do not connect the fan’s power supply to any
dimmers, potentiometers, or light switches, as
it will cause the fan to malfunction and/or will
damage the motor. For the electrical connection it
is necessary to incorporate a switch disconnector
in accordance with the installation regulations,
which ensures an omnipolar cut, directly
connected to the power terminals and must
have a contact separation at all its poles, which
provides total disconnection under conditions of
Category III overvoltage. The fan must be directly
connected to a properly protected installation
circuit (magnetothermal differential switch with
the adequate size for the fan’s consumption and
technical specifications). Only use the fan’s control
to turn it on or stop it.
It is recommended to not use these types of fans
along with gas installations simultaneously in the
same room.
Do not insert anything that could hit the fan’s
blades into its pathway while it is moving, as this
could cause damage to people, can damage the
blades, and can offset the balance of the unit,
causing vibrations and wobbling.
After installing the fan, ensure that all fastenings
are secure and tightened in order to avoid any
noise caused by loose elements.Due to the fan’s
movement, certain fastenings may become loose.
Check all fastenings twice per year at a minimum
in order to ensure that they are sufficiently tight. If
necessary, they must be retightened.
If the power cord is damaged, it must be replaced
by the manufacturer, its after-sales service or
similar qualified personnel in order to avoid any
malfunction.
Only suitable for indoors.
Replaceable LED
Replaceable driver
Replaceable receiver and remote control
Do not throw away electrical products together
with household waste. We ask you to recycle the
packaging at the collection points provided for this
<8
Kg
OFFOFF

12
ENGLISH
Calle Verano, 51 - Polígono Industrial Las Monjas -28850 Torrejón de Ardoz - Madrid (ESPAÑA)
CIF A28763647 +34 916774540
Device technical spectifications
General
Nominal voltage and frequency 220-240V~AC 50/60Hz
Protection category Clase I
Protection index IP20
Work temperature -5 ↔40ºC
Maximun ceiling slope on which it can be installed 0º
Weight 5Kg
Power consumption in standby mode (W) <0,5
Service value measurement standard EN 62879:2020
LED
Wattage 55W
Flux 5500lm
Color temperature 3000 - 6000K
RGB No
Data measurement 360º Sphere
Nº of ON/OFF cycles 10000
Nº of hours of lifespan 30000h
Dimmable Yes
Angle 120º
CRI >80
This product have a light source of energy efficiency class E
Fan
Speed 6
Power (W) 23
RPM 1050
Airflow (m³/min) 200
Airflow (m³/h) 12000
Max noise level (dB) 54
Service value SV ((m³ / min) / W) 11,91
Maximum air speed (m / sec) 6,63m/s
Bluetooth
Version 4.0
Speaker
Wattage 5W
Control Bluetooth
purpose. Contact local authorities or your provider
for recycling advice. Thank you for recycling at
the collection points provided for this manual.
Note: The important warnings and instructions
indicated in this manual are not guaranteed
to cover all possible conditions and situations
that may occur. It must be understood that common sense,
precaution, and care are factors that cannot be included in all
products.These factors can and must only be provided by the
user who maintains and enjoys this fan.

13
ENGLISH
www.sulion.es
Remote control
Instructions for synchronizing the
receiver and the remote control
The control is already factory-linked with its receive.
Make sure all connections are correctly made.
Make sure that the remote control contains batteries.
Make sure that all switches (main and isolation) are on.
The control of this fan have two mode of synchronization,
Universal mode and Unit mode:
- Unit Mode:
This type of synchronization allows you to control two or
more nearby fans independently, each with its remote con-
trol.
Synchronization:
The control of this fan does not require synchronization
with the receiver, the control is already factory-linked with
its receiver
- Universal Mode:
This type of synchronization allows you to control one or
more nearby fans with the same remote control.
Synchronization:
1.-Connect the power (wall switch) of the fan or fans that
you want to control, and then just within the following
15 seconds, press the key of the remote control 3 times.
2.-A “beep” sound indicates that the connection has been
executed and the equipment can function normally.
3.-Now, transmitter and receiver of the fan / s will have
been synchronized. Turn off the fan / s current using the
switch or automatic and then turn it back on / s, this step
is the one that closes the synchronization process.
It is not possible for a controller to forget a fan once it has
been linked, if you want a fan to leave
to obey a command, another one must be linked to
“overwrite it”.
Preparing for installation
Note: The estimated installation time is 120 minutes. This
product can only be installed by a certified electrician Ca-
refully separate the fan’s parts, avoiding the use of cutters
or blades that could scratch any part of it.
Remove the fan from the packaging carefully, avoiding the
use of knives which could scratch any part of it.
Remove all the components. Place the motor on a cloth or
wet surface so as not to damage its surface finish. Carefully
handle the unit to make sure that its casing does not bend
or get scratched.
The fan must be mounted on the floor or a large enough
table to prevent any component from falling off.
Light color temperature change
You can change the color temperature of the light, turning
off and on, with the wall switch, the remote control or in
case of being an IoT fan from your terminal.
WARM
NEUTRAL
COLD
ON
ON
OFF
OFF
OFF
ON
Speeds
Timer
Change light
intensity
Change color
temperature
3000/4000/6000K
Dim color
temperature Turn On/Off Fan
Turn On/Off Light
Turn On/Off All
Change direction
rotation
Play the music on Sulion fan.
How to connect you device:
1. Make sure the fan is connected
2. Activate the Bluetooth from your device (phone, laptop
or Tablet).
3. Search the device “Speaker Light” in the list of available
devices and pair it.
4. Enjoy the music

14
ENGLISH
Calle Verano, 51 - Polígono Industrial Las Monjas -28850 Torrejón de Ardoz - Madrid (ESPAÑA)
CIF A28763647 +34 916774540
Rotation direction: summer and winter
The sliding switch controls the direction, whether clockwi-
se or counterclockwise.
Summer option/down - he downwards air current creates
a refreshing effect as indicated in diagram A.
Winter option/up - An ascending air current pushes hot
air away from the fan area near the ceiling, as indicated
in diagram B. This allows you to use less central heating.
WARM
WARM
NEUTRAL
WARM
ON
ON
>20”
OFF
OFF
Memory function

15
ENGLISH
www.sulion.es
Maintenance and information of warranty
Maintenance and cleaning:
1. The fan‘s natural movement can cause certain con-
nections to loosen. Check mounting connections,
fastening parts, and blade accessories twice a year.
Check that they are well fastened.
2. Clean the fan periodically to help maintain its new
appearance. Do not use water to clean it, as this may
damage the motor or the wood, or could cause elec-
trical shock.
3. Use only a soft brush or microfiber cloth as to not
scratch the finish. The veneer is sealed with a layer
of lacquer to minimize discoloration or loss of shine.
4. It is not necessary to oil the fan. The motor contains
bearings with permanent lubrication.
5. Note: Failure to comply with these instructions results
in the loss of the equipment warranty.
6. Warranty service:
The manufacturer’s warranty covers real failures that may
occur but not minor complaints such as the noise genera-
ted by the device, as all electric motors generate a certain
amount of noise.
Operating the fan with slightly loose components (screws
not adequately tightened) or the deformation of blades
due to excessively vigorous cleaning may cause exces-
sive noise and wobbling, which will not be covered by the
warranty. Taking regular care to retighten elements and
clean carefully is enough to prevent these problems.
Control:
The device’s warranty will be invalid if it is installed for use
with a solid-state wall switch or dimmer. It must only be
used with the remote control provided with the unit.
Fan installation:
According to the terms and conditions of our warranty, this
fan can only be installed by a certified electrician. Fans
that are installed incorrectly can be dangerous to people
and very expensive to repair, and will lose their warranty.
This fan is designed for interior use only, excluding moist
areas and bathrooms. The supplier does not assume any
liability for physical or bodily damage caused by the in-
correct use or installation of the fan. If you are unsure,
consult an electrician.
Wobbling:
All ceiling fans tend to wobble during their operation. A
wobble of 2 cm is perfectly acceptable and does not indi-
cate any malfunction nor will it cause the fan to fall, as long
as it was mounted to the ceiling correctly following the
instructions in this manual. This ceiling fan has a comple-
tely secure mounting system that uses steel brackets and
connecting spheres to allow it to rotate and to prevent the
transmission of vibrations to the ceiling structure. Please
note that even fans of the same model can have different
wobbles, which is totally acceptable and does not imply
any malfunction or manufacturing defect.
Increased perception of noise during
nighttime operation:
The manufacturer’s warranty does not cover the fact that
during the night, when the surrounding environment is
quieter, the fan’s operating noise is more apparent. In ad-
dition, during the night, the power supply may experience
alterations that may produce increased noise generated by
the device, which does not indicate any malfunctioning or
manufacturing defect in the device.
Fan lighthing system:
Noises and vibrations can be greater when the lighting sys-
tem is turned on. For example, the light diffuser can pro-
duce a slight buzz if not adequately attached. Once again,
non-aggressive care and regular check to ensure that all
elements are properly fastened will prevent these distur-
bances. Glass light diffusers are covered by the warranty to
the distributor warehouses, and are subject to verification
during delivery.
Warranty:
Manufactures guarantees the proper functioning of this
equipment, repairs or spare parts of the model owing to
faulty manufacture during 3 years after the surrender date,
8 years exclusively in the case of the fan motor. Responsi-
bility will not be accepted, however, for damages or injury
caused through misuse. For any claims the sale ticket must
be presented. The company agrees to repair any defect or
malfunction found in the item and any damages said de-
fect or malfunction might directly provoke. If the repara-
tion should fail to satisfy the customer and/or the object
fail to present the optimum condition for the use to which
it is destined the guarantee holder will have the right to
the substitution of the acquired item for another identical
characteristics or a complete refund of the purchase price.
Terms and conditions of warranty www.sulion.es

16
Calle Verano, 51 - Polígono Industrial Las Monjas -28850 Torrejón de Ardoz - Madrid (ESPAÑA)
CIF A28763647 +34 916774540
NO INCLUIDOS NOT INCLUDED
OFF
L N
Instalación ventilador / Fan installation
x3
01
03 05
06
02
04

18
Calle Verano, 51 - Polígono Industrial Las Monjas -28850 Torrejón de Ardoz - Madrid (ESPAÑA)
CIF A28763647 +34 916774540

19
www.sulion.es
SULION declara bajo su propia responsabilidad que los productos abajo
indicados han sido fabricados en conformidad con los siguientes están-
dares europeos.
SULION declare under our own responsibility that the products listed be-
low have been manufactured in accordance with the following European
standards.
DECLARACIÓN DE CONFORMIDAD CE
DECLARATION OF CONFORMITY
Madrid, 16 / 06 / 2020
C. Schuller
CEO
RED 2014/53/EU
Article 3.1a
EN 60598-1:2015 + A1:2018
EN 60598-2-1:1989
EN 60335-1:2012 + A11:2014 + A13:2017
EN 60335-2-80:2003 + A1:2004 + A2:2009
EN 62233:2008
EN 62471:2008
EN 62493:2010
Article 3.1b
EN 55014-1:2006 + A1:2009 + A2:2011
EN 55014-2:1997 + A1:2001 + A2:2008
EN 55015:2013
EN 61000-3-2:2014
EN 61000-3-3:2013
EN 61547:2009
EN 301 489-1 V2.1.1
EN 301 489-17 V3.1.1
Article 3.2
EN 300 328 V2.1.1
RoHS 2015/863/EU
ErP Directive 2009/125/EC
Regulation 2015/1428
Regulation 2019/2020

www.sulion.es
This manual suits for next models
1
Table of contents
Languages:
Other Sulion Fan manuals

Sulion
Sulion TICO 075722 User manual

Sulion
Sulion 075743 User manual

Sulion
Sulion ANNE User manual

Sulion
Sulion SIRO 2181776 User manual

Sulion
Sulion DENIM User manual

Sulion
Sulion ALAN MOVE User manual

Sulion
Sulion ROAD AQUA 1003864 User manual

Sulion
Sulion LIA User manual

Sulion
Sulion FENIX User manual

Sulion
Sulion BORGIA 1004823 User manual

Sulion
Sulion BALOO User manual

Sulion
Sulion ROC User manual

Sulion
Sulion CADILLAC 072139 User manual

Sulion
Sulion WIPA CURVO 2183305 User manual

Sulion
Sulion RODAN S User manual

Sulion
Sulion 075356 User manual

Sulion
Sulion MARINA User manual

Sulion
Sulion RUBIK User manual

Sulion
Sulion BEACH User manual

Sulion
Sulion BOMBAY S User manual