Summer Garden Buildings Octagonal Summerhouse 272 User manual

Octagonal Summerhouse 272
English SS024M
AssemblyInstructions Summer Garden Buildings – Octagonal Summerhouse 272
Before assembly
•
We recommend that time is taken to read the
instructionsbeforestartingassembly,then
followtheeasystepbystepguide.
Theinstructionsheet is only aguide to
theassembly. Certainitemsmay not be
shownto scale.
•
Checkallcomponentspriortoassembly
•
This product should be assembled by no
lessthan2people.
•
Never attempt to erect the assembly in
highwinds.
•
Some of the components may have sharp
edges wear protective work gloves while
handlingcomponents.
•
Drill components where indicated.
x 2
Gloves
Drill
Recommended tools for assembly
•
Cross headscrewdriver
•
Hammer
•
Sharpknife
•
Drill with 4mm diameter drill bit
•
Spirit level
•
Siliconsealant
•
Stepladder
•
Hacksaw
No. Components
1 Floorsection
2
Backpanel
3
Plainpanel
4 WindowPanel
5 Door panel
6 Roof centre support
7 Large roof section
8
Smallroofsection
9
Left-handLargeroofingfeltpiece
10 Right-handLargeroofingfelt piece
11 Small roofing felt piece
12
Roof toppiecewith finials
13
Shortbargeboard
14 Longbargeboard
15 Cover strips
16
Window box
17 Window glazing
(615x390mm)
18 Door glazing
(500x390mm)
19
Beading
(10x10x615mm)
20
Beading
(10x10x500mm)
21
Beading
(10x10x371mm)
No. Fixing Kit
22
Door lock
23
Door handle kit
24
Door handlespindle
25
Towerbolt
26 63mm screws
27 32mm screws
28 30mm black countersunk screws
29 25mm brass screws
30 19mm roundheadscrews
31 65mm nails
32 38mm nails
33 25mm nails
34 20mm nails
35 10mm feltnails
Caution
This product
containsglass.
Wear protective
work gloves while
handlingthese
components.
Qty.
1
1
4
2
1
1
2
7
6
2
2
6
1
6
2
8
21
2
6
25
8
12
24
16
28
23
22
Qty.
1
1
1
2
48
8
8
4
8
30
24
32
140
5
200
8
14 13
18 17
20 19
16
4
12
11 6
15
9 10
3
2
1
Our Help Line provides support and advice to
customers of Summer Garden Buildings after
ordering. For advice before you buy phone us
free 7 days a week on 0800 9777828 or visit
www.summergarden
buildings.co.uk

1. Floor Summer Garden Buildings – Octagonal Summerhouse 272
PreparealevelareaofconcreteorslabsfortheSummerhouse.Positionthebaseand ensurelevel
2.Wall panels
Position 2 plain panels on the floor as shown in the first diagram. Note how the panel frames sit on the floor with the panel cladding overhanging the floor edge. Ensure
square and secure using 4 x 63mm screws, screw through the frame of the first panel into the frameof the second panel..Align theback panel next to the second panel and
secure in the same wayusing 4x 63mm screws. Continue to add therest of thepanels in thesameway.
Drill the holes in the panel
framing with a 4mm drill bit
Drill
beforeassembly.
63mm
Windowpanels
63mm
Panel cladding Panel framesrest Doorpanel
overhangsflooredge on thefloor
3. Door handle and towerbolts
Push the door lock into the rebate on the edge of the right-hand door as shown and secure using 2 x 25mm brass screws. Push the metal handle bar through the door latch
mechanism. Fit adoorhandletothemetalhandlebar on eachsideofthedoor and securethem inplaceusing 4x 30mmblackcountersunk screwsperhandle.Onthe
otherdoorfitthelockplateusing 2x25mmbrassscrews.Attachthetower
Lockplate
attached with
2x25mm
brassscrews
bolts tothe inside of the left door as shown using 4 x19mm round head screws per bolt.
Spindlemay need to
be cut to 88mm
25mm
19mm
30mm
4.Walls to floor
With all the wall
panels
in
position
secure
the
wallstothefloorsusing2x65mmnailsperpanel,nail
throughtheshiplapcladding ofthepanelintothesidesofthefloor.
65mm
65mm
For sales advice before you buy phone Summer Garden Buildings free 7 days a week on 0800 9777828

5. Roof Summer Garden Buildings – Octagonal Summerhouse 272
Lift 1 large roof panel onto the back wall panel and the other large roof panel onto the door panel. Position between the top of the 2 roof panels the roof centre support. With
a second person holding the centre support start adding the small roof panels. With all the roof panels in position move the centre support slightly up and down for the
panels to settle. Making sure all the panels are level, nail through the roof segments into the top frame of the wall panels using 2 x 65mm nails per panel. From inside the
building secure the framing of the roof panels together using 2 x 63mm screws per join.
63mm
65mm
6.Roofing felt
Over a small roof panel lay a triangular felt piece. Align the left-hand felt edge with the edge of the roof panel. Along the bottom edge allow enough felt to fold over and
cover the felt batten. The right-hand edge should overlap the next panel round. Once in position secure down the left edge using 4 x 10mm felt nails evenlyspaced. Lift back
the right-hand edge of the felt and attach another piece of felt in the same way as the first to the next panel round. Roll back into position the first felt. Repeat this forall the
small roof panels and in the same way on the left side of each large roof panel with the large left-hand felt piece. Position a Right-hand large on the right side of each large
roof panel, ensure it overlaps the felt pieces either side and secure down 1 edge using 10 x 10mm felt nails evenly spaced. For each piece of felt, tension across the roof and
secure down the edge using 10 x 10mm felt nails evenly space. Fold down the bottom edge of the felt and secure to the felt batten using 5 x 10mm felt nails per felt piece
evenly spaced. If necessary trim of anyexcess feltalong thebottom edge.
10mm
Felt
nails
10mm
Felt
nails
roll back first
felt piece
10mm
Felt
nails
10mm
Felt
nails
10mm 10mm
Felt Felt
nails nails
10mm
Felt
nails

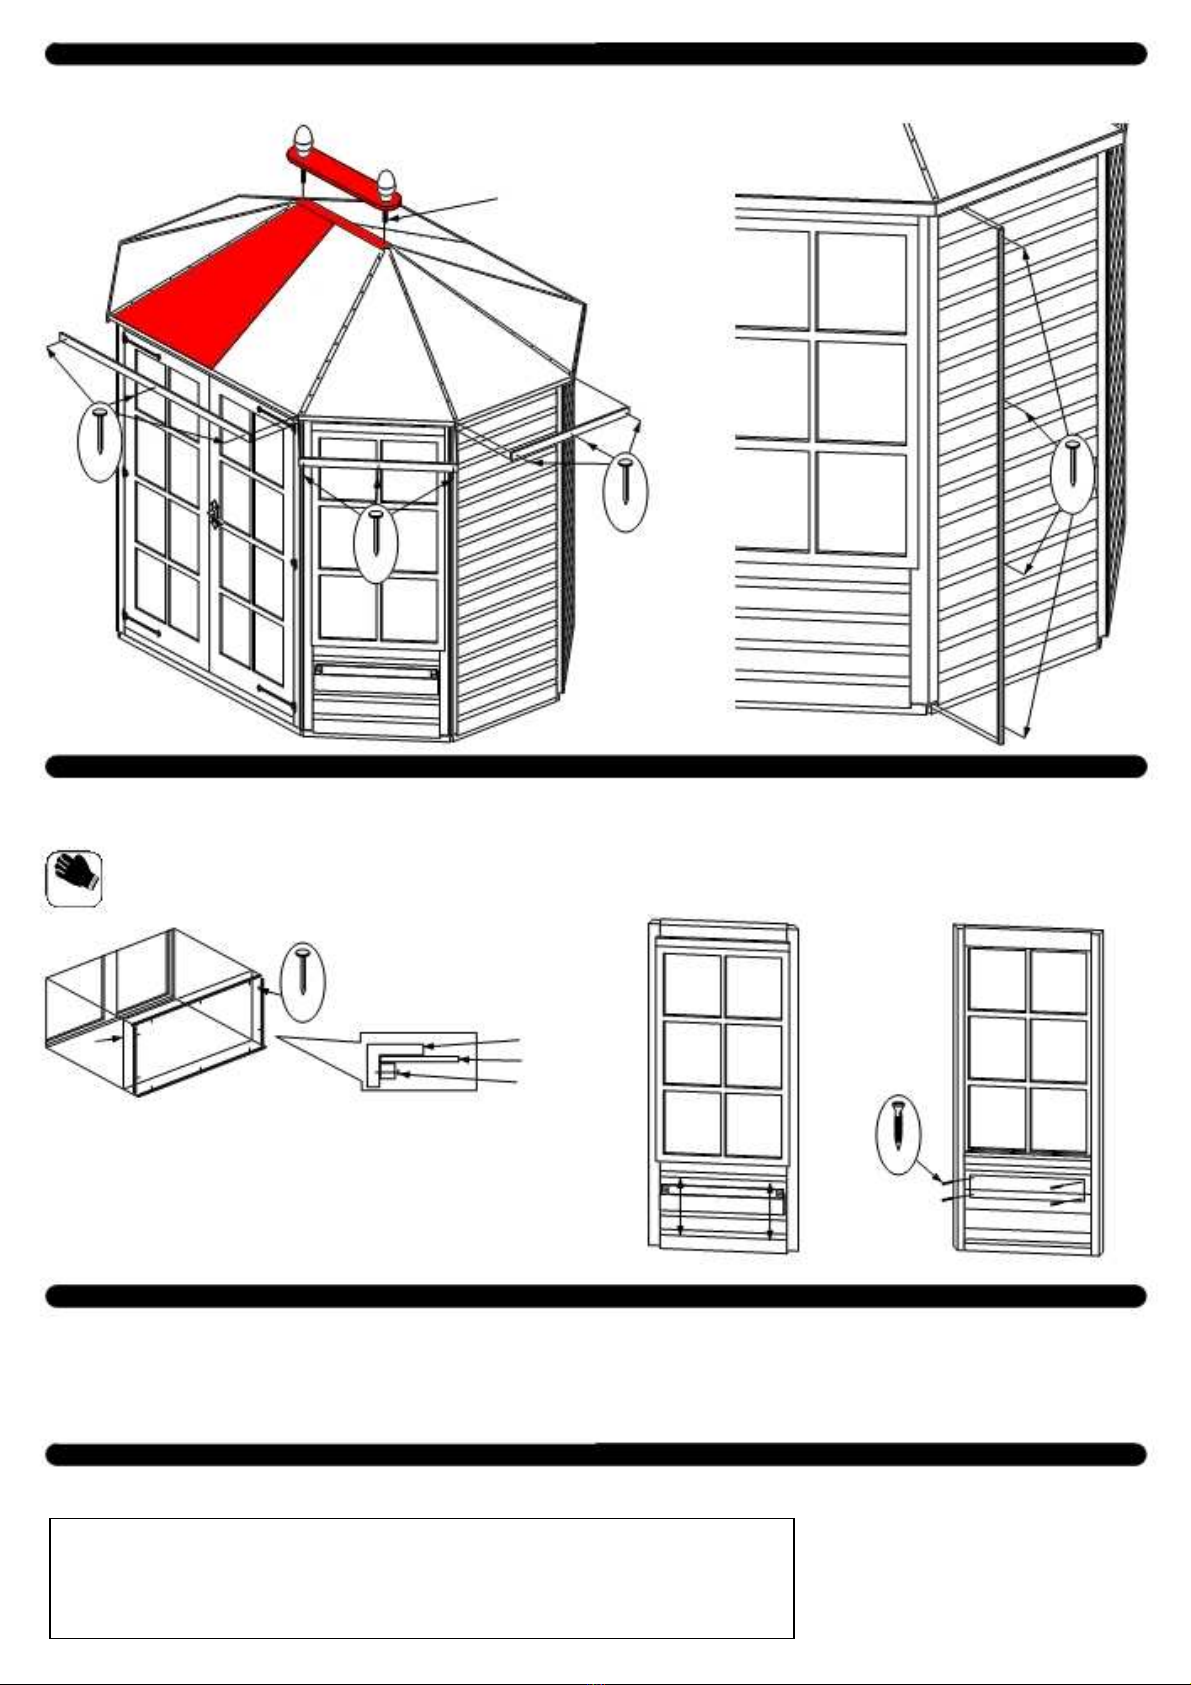
7. Cover strips, bargeboards and finial Summer Garden Buildings – Octagonal Summerhouse 272
Onto the centre of the roof position the roof top piece with finials, ensure the bolts go though the drilled holes in the roof support and secure the bolts inside the building with
the nuts and washers. Around the edge of the roof secure the bargeboards, ensure the top edge of the bargeboards are flush to the roof line and secure each board using 3
x38mm nails.Attachtoeachof the 8corners a cover stripusing 4x 25mm nails per strip.
Ensuretheboltsgothroughthe
drilled holes in the roof support
and secure on the inside of the
buildingwith nutand
awasher
oneachbolt.
38mm
25mm
38mm
38mm
8. Glazing and window boxes
It is recommended that a waterproof sealant is applied around the edge of the glazing before fitting. From the inside of the building fit the window panes into the window
frame, fix each window pane in place with 4 window beading strips secured in place using 3 x 20mm nails per beading strip. Locate a window box at the desired height under each
window.Fromtheinsideofthesummerhousescrewthroughtheshiplapcladdingintothecorner framingofthewindowboxusing4x32mmscrewsperbox.
wearprotectivegloves
whilehandlingglazing.
Gloves Outside windowpanel.
Insidewindowpanel.
20mm
Glazing Window frame
Windowpane
Woodenbeading
63mm
Important information - retain for future reference
Shiplap buildings come ready stained but this is only a preparatory treatment.To VALIDATE the guarantee, the building must be properly treated with a recognized
external wood preserver WITHIN 3 MONTHS of assembly and RE-TREATED ANNUALLY thereafter.
Timber Information.
As timber is a natural material, there are certain weather conditions that may affect the materials properties. In times of excessive dry spells the material may lose some of its
internal moisturecausing acertaindegreeofshrinkageona panelandinperiodsofexcessive rain therewill be acertainamountofswellingthroughoutthewooden
panels. This
process can not be avoided. If you have problems with certain boards shrinking in dry spells try to decrease the amount of direct sunlight on the building or the amount of air
passingoverthebuilding.Duringhotspells spraywaterdirectlyontothepanelswiththeaidof a gardenhose.
Ifindoubtofanyaspectregardingtheassembly,useorsafetyofyourbuildingpleasecontactourHelpLine
Weconstantlyimprove thequalityofourproducts,
occasionally the components may differ from the
components shown and are only correct at time of
printing. We reserve the right to change the
specification of our products without priornotice.
Summer Garden Buildings does not guarantee that this is the most recent version of these
instructions or that all data has been accurately reproduced. You are advised to refer to the
instructions supplied with the product before assembly. If for any reason the instructions are not
delivered with the product you are advised to obtain the most recent version before assembly. No
guarantee is given regarding the accuracy of these instructions and no liability will be accepted for
any errors o
r inaccuracies.
Other Summer Garden Buildings Garden House manuals
Popular Garden House manuals by other brands

Biohort
Biohort Europa Assembly manual

Palmako
Palmako FR44-4836 installation manual

Lemeks
Lemeks Palmako FR28-2929-10 Assembly, installation and maintenance manual

USP
USP DURAMAX 15.5 Ft x 8 Ft Apex Pro Assembly instructions

ABSCO SHEDS
ABSCO SHEDS 30152GK manual

Best Barns
Best Barns Arlington II Assembly Book