Summit CF11ES User manual

Page 16 SUMMIT APPLIANCE
WARRANTY
ONE YEAR LIMITED WARRANTY
Within the 48 contiguous United States, for one year from the date of purchase,
when this appliance is operated and maintained according to instructions attached
to or furnished with the product, warrantor will pay for factory specified parts and
repair labor to correct defects in materials or workmanship. Service must be pro-
vided by a designated service company. Outside the 48 states, all parts are war-
ranted for one year from manufacturing defects. Plastic parts, shelves and cabi-
nets are warranted to be manufactured to commercially acceptable standards, and
are not covered from damage during handling or breakage.
5 YEAR COMPRESSOR WARRANTY
1. The compressor is covered for 5 years.
2. Replacement does not include labor.
ITEMS WARRANTOR WILL NOT PAY FOR:
1. Service calls to correct the installation of your appliance, to instruct you how to
use your appliance, to replace or repair fuses or to correct wiring or plumbing.
2. Service calls to repair or replace appliance light bulbs or broken shelves. Con-
sumable parts (such as filters) are excluded from warranty coverage.
3. Damage resulting from accident, alteration, misuse, abuse, fire, flood, acts of
God, improper installation, installation not in accordance with electrical or
plumbing codes, or use of products not approved by warrantor.
4. Replacement parts or repair labor costs for units operated outside the United
States.
5. Repairs to parts or systems resulting from unauthorized modifications made to
the appliance.
6. Expenses for travel and transportation for product service in remote locations.
7. The removal and reinstallation of your appliance if it is installed in an inaccessi-
ble location or is not installed in accordance with published installation instruc-
tions. DISCLAIMER OF IMPLIED WARRANTIES;
LIMITATION OF REMEDIES
CUSTOMER'S SOLE AND EXCLUSIVE REMEDY UNDER THIS LIMITED WAR-
RANTY SHALL BE PRODUCT REPAIR AS PROVIDED HEREIN. IMPLIED WAR-
RANTIES, INCLUDING WARRANTIES OF MERCHANTABILITY OR FITNESS
FOR A PARTICULAR PURPOSE, ARE LIMITED TO ONE YEAR. WARRANTOR
SHALL NOT BE LIABLE FOR INCIDENTAL OR CONSEQUENTIAL DAMAGES.
SOME STATES DO NOT ALLOW THE EXCLUSION OR LIMITATION OF INCI-
DENTAL OR CONSEQUENTIAL DAMAGES, OR LIMITATIONS ON THE DURA-
TION OF IMPLIED WARRANTIES OF MERCHANTABILITY OR FITNESS, SO
THESE EXCLUSIONS OR LIMITATIONS MAY NOT APPLY TO YOU. THIS WAR-
RANTY GIVES YOU SPECIFIC LEGAL RIGHTS AND YOU MAY ALSO HAVE
OTHER RIGHTS, WHICH VARY FROM STATE TO STATE.
FELIX STORCH, INC.
770 Garrison Avenue
Bronx, NY 10474
Phone: (718) 893-3900
Fax: (718) 842-3093
www.summitappliance.com
For parts and accessory ordering,
troubleshooting and helpful hints, visit:
www.summitapplianceparts.com
SUMMIT APPLIANCE Page
Chest Freezer
Use and Care Guide
Models CF07ES and CF11ES
Write the serial number here:
Serial #_________________________
Felix Storch, Inc.
Summit Appliance Division
770 Garrison Avenue
Bronx, NY 10474

Page 2 SUMMIT APPLIANCE
Thank you for purchasing this SUMMIT®Chest Freezer. Like all
SUMMIT®products, this unit has been manufactured to the high
standards identified with the SUMMIT®name. We fully expect it to
bring you many years of excellent service.
Please read this manual before installing and using the unit, and
keep the manual in a handy spot for future reference.
Table of Contents
Appliance Safety ...................................................................2-3
Technical Information ...............................................................4
Location of Parts .....................................................................4
Before First Use .......................................................................5
Installation ................................................................................5
Operation of the Freezer........................................................6-9
Control Panel...................................................................6-7
The Freezer Compartment ................................................8
Defrosting the Freezer.....................................................8-9
Care and Maintenance ......................................................10-11
Troubleshooting .................................................................11-13
Warranty .................................................................................16
Appliance Safety
Your safety and the safety of others are very important to us. We
have provided several important safety messages in this manual.
Always read and obey all safety messages. Serious injury or
even death can be the result if you do not follow these instruc-
tions. All safety messages will tell you what the potential hazard
is, how to reduce the chance of injury, and what can happen if the
instructions are not followed.
WARNING! To reduce the risk of fire, electric shock or injury
when using your appliance, follow these basic precautions:
Use two or more people to move and install this appliance.
Plug into a grounded 3-prong outlet.
Do not remove ground prong, nor use a 3/2 adapter.
Do not use an extension cord.
SUMMIT APPLIANCE Page 15
Notes

Page 14 SUMMIT APPLIANCE
Notes
SUMMIT APPLIANCE Page 3
This freezer is designed for free-standing installation only. It
should not be recessed or built in.
Use care not to plug into outlets controlled by wall switches.
Disconnect power before servicing.
After service, replace all parts and panels before operating.
Do not store or use gasoline or other flammable items in the
area of this or any appliance, as the fumes can create a fire
hazard or explosion.
Use nonflammable cleaners.
When replacing a light bulb, unplug your freezer or turn off
power at the circuit breaker or fuse box in order to avoid touch-
ing a live wire. Turning the control to OFF turns off the com-
pressor, but does not disconnect power to other electrical com-
ponents.
Never unplug your freezer by pulling on the power cord. Al-
ways grip the plug firmly and pull straight out from the outlet.
Be careful not to roll over or damage the cord when moving the
freezer.
Do not pinch, knot or bend power cord in any manner.
Replace or repair any electric service cord that has become
damaged or frayed.
Unplug your freezer before making repairs or cleaning. We
recommend that servicing be done by a qualified technician.
If your electricity goes off, follow this procedure:
Call your power company to see how long the power will be
out.
If service is to be interrupted for less than 24 hours, keep
freezer closed. This will help food stay frozen.
If service is to be interrupted for more than 24 hours, remove
food and store in a frozen food locker or other freezer.
RISK OF CHILD ENTRAPMENT !
Old appliances can represent a suffocation hazard to children.
Remove door(s) from your old appliance.
Leave shelves or baskets in place.
If an old appliance contains refrigerants, it must be recy-
cled by a licensed service or disposal agency.

Page 4 SUMMIT APPLIANCE
Technical Information
Location of Parts
Model CF07ES CF11ES
Capacity 6.4 cu.ft. 10.6 cu.ft.
Elec. Input 115V AC / 60Hz 115V AC / 60Hz
Power Input 127W 150W
Refrigerant R134a, 3.0 oz. R134a, 4.2 oz.
Unit Weight 96.8 lbs. 114.4 lbs.
Unit Dims. 37.6”W x 24.0”D x 33.5”H 44.1”W x 28.4”D x 33.5”H
Installation Free-standing Free-standing
Control panel
Vents
Feet with rollers
Movable
basket
Light
(CF07ES
only)
Freezer
compart-
ment
Not shown:
divider rack,
ice scraper,
set of 2 keys
Handle
Lock
Door
Door gasket
(seal)
SUMMIT APPLIANCE Page 13
Vibrations
Check to be sure that the freezer is level.
Floor is uneven or weak. Freezer rocks on the
floor when it is moved slightly. Be sure floor
can adequately support freezer. Level the
freezer by putting wooden or metal shims
under part of the freezer,
The freezer is touching the wall. Re-level the
freezer and move it from the wall.
See Installation instructions.
Moisture forms on in-
side freezer walls.
Weather is hot and humid, which increases in-
ternal rate of frost build-up. This is normal.
Door is slightly open.
Door is kept open too long, or is opened too
frequently. Open the door less often.
The door is not sealed properly.
Moisture forms on out-
side of freezer.
Door is slightly open, causing cold air from in-
side the freezer to meet warm, moist air
from outside.
The door will not close
properly.
The freezer is not level.
The gasket is dirty.
The storage basket is out of position.
TROUBLESHOOTING GUIDE (cont’d)

Page 12 SUMMIT APPLIANCE
PROBLEM POSSIBLE CAUSE
Freezer does not
operate.
Not plugged in.
The circuit breaker was tripped or a fuse blown.
The freezer thermostat is set at OFF.
Compressor turns on
and off frequently.
Room temperature is hotter than normal.
A large amount of food has been added to the
freezer.
The door is opened too often.
The door is not closed completely.
The temperature control is not set correctly.
The door gasket does not seal properly.
The freezer does not have the correct
clearances.
The freezer has recently been disconnected for
a period of time. Four hours are required for
the freezer to cool down completely.
Temperature inside the
freezer is too warm.
Temperature control is set too warm. Turn the
control to a cooler setting and allow several
hours for the temperature to stabilize.
The door is kept open too long or is opened too
frequently. Warm air enters the freezer every
time the door is opened. Open the door less
often.
The door is not closed completely.
The door gasket does not seal properly.
A large amount of warm or hot food may have
been stored recently. Wait until the freezer
has had a chance to reach its selected tem-
perature.
The freezer has recently been disconnected for
a period of time. Four hours are required for
the freezer to cool down completely.
Temperature inside the
freezer is too cold.
Temperature control is set too cold. Turn the
control to a warmer setting and allow several
hours for the temperature to stabilize.
The Fast Freeze switch is turned on. This
causes continuous running of the compres-
sor and bypasses the temperature control.
Popping or cracking
sound when compres-
sor comes on
Metal parts undergo expansion and contraction,
as in hot water pipes. This is normal. Sound
will level off or disappear as freezer contin-
ues to run.
Bubbling or gurgling
sound, like water boil-
ing
Refrigerant (used to cool freezer) is circulating
throughout the system. This is normal.
TROUBLESHOOTING GUIDE
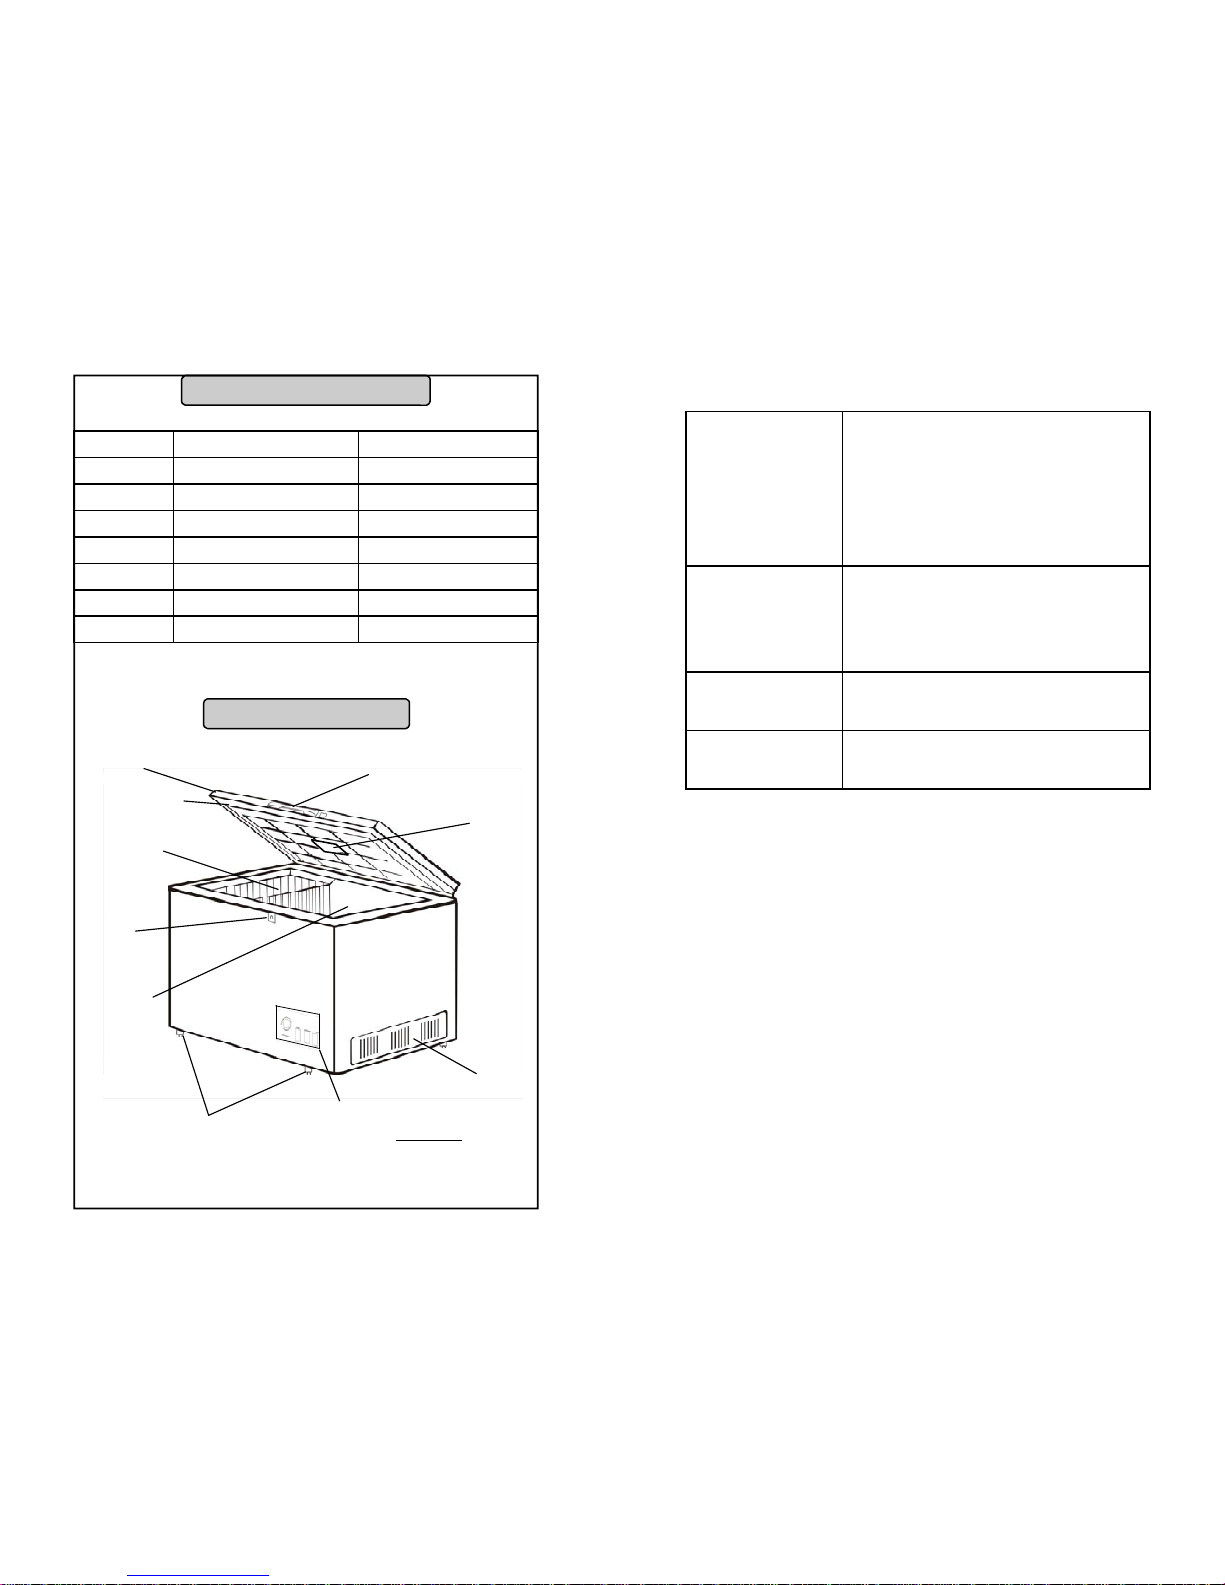
SUMMIT APPLIANCE Page 5
Before First Use
Remove the exterior and interior packing.
Check to be sure you have all of the following parts:
Storage basket
Divider rack
Set of 2 keys for door lock
Plastic ice scraper
Before connecting the freezer to the power source, let it stand
upright for approximately 2 hours. This will reduce the possi-
bility of a malfunction in the cooling system from handling dur-
ing transportation.
Clean the interior surface with lukewarm water using a soft
cloth.
Installation
This appliance is designed to be free-standing only, and should
not be recessed or built in.
1. Place your freezer on a floor that is strong enough to support
the freezer when it is fully loaded.
2. Leave 6 inches of space at the back and sides of the freezer,
which allows for the proper circulation of air.
3. Locate the freezer away from direct sunlight and sources of
heat (stove, heater, radiator, etc.). Direct sunlight may affect
the acrylic coating and heat sources may increase electrical
consumption. Extremely cold ambient temperatures may also
cause the freezer to perform improperly.
4. Avoid placing the freezer in moist areas.
5. Plug the freezer into an exclusive, properly installed grounded
wall outlet. Do not, under any circumstances, cut or remove
the third (ground) prong from the power cord. Any questions
concerning power and/or grounding should be directed toward
a certified electrician or an authorized service center.
6. After plugging the appliance into a wall outlet, allow the unit to
cool down for two to three hours before placing food in the
freezer compartment.

Page 6 SUMMIT APPLIANCE
Operation of the Freezer
Control Panel
Temperature Control (Thermostat)
Your freezer has one control for regulating the temperature. This
control, the thermostat, is located on the control panel in the lower
right-hand corner of the front of the unit.
1. When you first turn the unit on, switch on the Fast Freeze con-
trol and run the unit for at least 2 hours before putting frozen
foods inside. This will ensure the cabinet is thoroughly chilled
before food is put in.
2. Turn off the Fast Freeze switch.
3. The range of the thermostat is from position 1(the warmest) to
6(the coldest). Adjust this control to the setting that best suits
your needs. The setting of 4should be appropriate for home
and office freezer use.
4. To turn the freezer off, turn the thermostat to OFF.
NOTES
Turning the thermostat to the OFF position stops the cooling
cycle but does not shut off the power to the freezer.
POWER COMPRESSOR FAST FREEZE
CHEST FREEZER
6 5
4
3
2
1
OFF
O
I
SUMMIT APPLIANCE Page 11
Moving the Freezer
Remove all the food.
Securely tape down all loose items inside your freezer.
Remove the rollers to prevent damage.
Tape the door shut.
Be sure freezer stays in upright position during transportation.
Energy-Saving Tips
The freezer should be located in the coolest area of the room,
away from heat-producing appliances or heating ducts, and out
of direct sunlight.
Let hot foods cool to room temperature before placing in the
freezer. Overloading the freezer forces the compressor to run
longer. Foods that freeze too slowly may lose quality, or spoil.
Be sure to wrap foods properly, and wipe containers dry before
placing them in the freezer. This cuts down on frost build-up
inside the freezer.
The freezer storage bin should not be lined with aluminum foil,
wax paper or paper toweling. Liners interfere with cold air cir-
culation, making the freezer less efficient.
Organize and label food to reduce door openings and extended
searches. Remove as many items as needed at one time, and
close the door as soon as possible.
Troubleshooting
Before calling for assistance or service, please check this Trouble-
shooting section. It may save you the cost of a service call. If you
still need help, follow the instructions below.
If you don’t find the answer to your question in this manual, try our
website, www.summitappliance.com, under Service and Sup-
port, or contact our Customer Service department toll-free in the
U.S.A. at 1-800-287-8799, Monday through Friday, 9:00 a.m. –
5:00 p.m. (ET).
If you need replacement parts, we recommend that you only use
factory-specified parts. Factory-specified parts will fit right and
work right, because they are made with the same precision used to
build every new SUMMIT®appliance. Parts can be ordered on-
line at www.summitapplianceparts.com.

Page 10 SUMMIT APPLIANCE
Care and Maintenance
Cleaning Your Freezer
Upon installation of your new freezer, it is recommended that it
be cleaned thoroughly.
Turn the thermostat to OFF, unplug the freezer, remove the
food and storage basket.
Wash the inside with a warm damp cloth containing a water
and baking soda solution. The solution should be about 2 ta-
blespoons of baking soda to a quart of water.
Wash the storage basket with a mild detergent solution.
Be sure to keep the door gasket (seal) clean to keep the unit
running efficiently.
The outside of the freezer should be cleaned with mild deter-
gent and warm water.
Dry the interior and exterior with a soft cloth.
The condenser coils should be vacuumed when they are dusty
or dirty.
It is recommended that the unit be cleaned each time it is de-
frosted to help keep the unit odor-free and running efficiently.
Vacation Time
Remove all the food.
Unplug the freezer.
Clean the freezer.
Leave the door open slightly to avoid possible formation of con-
densation, mold or odors.
Use extreme caution in the case of children. The unit should
not be accessible to children’s play.
Short vacations: Leave the freezer operating during vacations
of less than three weeks.
Long vacations: If the appliance will not be used for several
months, remove all food and unplug the power cord. Clean
and dry the interior thoroughly. To prevent odor and mold
growth, leave the door open slightly, blocking it open if neces-
sary, or have the door removed.
SUMMIT APPLIANCE Page 7
If the unit is unplugged, loses power or is turned off, you must
wait 3 to 5 minutes before restarting the unit. If you attempt to
restart before this time delay, the freezer will not start.
Large amounts of food will lower the cooling efficiency of the
appliance.
If you choose to change the thermostat setting, adjust the ther-
mostat knob by one numerical increment at a time. Allow sev-
eral hours for the temperature to stabilize between adjust-
ments.
The Power Indicator
As soon as the freezer is plugged in, the Power Indicator glows
red. It will remain in this condition as long as the unit is receiving
electrical input. Even if the thermostat is in the OFF position, an
illuminated POWER indicator lets you know that electricity is still
being supplied to the freezer.
The Compressor Indicator
When this indicator is glowing green, you know the compressor is
activated. Expect the Compressor Indicator to be lit steadily when
the freezer is first turned on, since the compressor must run al-
most continuously to bring the unit down to the desired tempera-
ture. Once that temperature is achieved, the compressor cycles
off and on to maintain that temperature, and the Indicator will turn
off and on accordingly. The Compressor Indicator will also be lit
whenever the Fast Freeze switch is turned on.
The Fast Freeze Switch
The Fast Freeze switch glows yellow when the switch is in the
ON position.
The switch overrides the thermostat and will make the com-
pressor operate continuously, lowering the cabinet tempera-
ture still further than the thermostat setting.
This switch is used to freeze unfrozen food in appreciable
quantities.
When loading the freezer, freeze only three pounds of fresh
food per cubic foot of freezer space at one time.
Distribute packages to be frozen evenly throughout the
freezer.
It is not necessary to adjust the thermostat setting when using
the Fast Freeze switch.

Page 8 SUMMIT APPLIANCE
The Freezer Compartment
This compartment is designed for the long-term storage of fro-
zen food. Storage time is up to three (3) months.
The storage life of frozen foods varies and the recommended
storage time should not be exceeded. The instructions regard-
ing the care of frozen foods should be followed when defrosting
the freezer.
Pre-packed commercially frozen food should be stored in ac-
cordance with the frozen foods manufacturer’s instructions for
a three-star frozen food storage compartment or home freezer.
Place frozen food in the freezer as quickly as possible after
purchase. If there are instructions on the packet, carefully fol-
low these instructions regarding storage times.
The freezer door is susceptible to breaking due to excessive
ice build-up. Be sure to defrost when the ice reaches 1/4” in
thickness.
A storage basket is provided for the organization of odd-
shaped items. To reach other packages in the freezer, just
slide the basket to one side, or lift it out.
Defrosting the Freezer
For the most efficient operation and minimum energy consump-
tion,
defrost when the frost on the freezer walls is excessive, or
more than 1/4” thick.
Choose a time when the stock of frozen food is low.
Remove the frozen food from the freezer and place it in a
cooler to protect the food.
Turn the thermostat knob to OFF.
Unplug the freezer. The Power Supply light should be off
(green light out).
CAUTION
Do not use boiling water because it may damage
the plastic parts. In addition, never use a sharp or
metallic instrument to remove frost as it may dam-
age the cooling coils and will void the warranty. We
recommend using the plastic scraper provided
with your unit.
SUMMIT APPLIANCE Page 9
During defrosting, the ice melts into the cabinet.
Remove the drain plug on the inside floor of the freezer by
pulling straight out.
Place a shallow pan outside the drain outlet. The defrost water
will drain out.
Check the pan occasionally so the water does not overflow.
Clean the interior of the freezer.
Replace the plug on the inside floor.
Plug in the freezer and reset thermostat to the desired setting.
Allow the cabinet to cool for one hour.
Switch on the Fast Freeze for a minimum of 2 hours.
Return food to the freezer.
Useful Hints for Defrosting
Defrosting usually takes a few hours. Leaving the door open will
help speed the process. Also, pouring warm (not boiling) water
on the ice/frost will help speed melting. If you must use a scraper,
please use caution. It is very easy to damage the freezer com-
partment and void your warranty.
This manual suits for next models
1
Table of contents
Other Summit Freezer manuals

Summit
Summit SCFM62 User manual

Summit
Summit FS-56L User manual

Summit
Summit SCFM252W User manual

Summit
Summit FDRD152PL User manual

Summit
Summit accucold ACR45L User manual

Summit
Summit FSM50LES User manual

Summit
Summit SCFF1842KS User manual

Summit
Summit R221FFPL User manual

Summit
Summit FS21L User manual

Summit
Summit SCFM232 User manual

Summit
Summit FS20L7CSS User manual

Summit
Summit SCR314L User manual

Summit
Summit SCFF51OSWH User manual

Summit
Summit FS62 Series User manual

Summit
Summit CF04 User manual

Summit
Summit FS60MSSVHFROST User manual

Summit
Summit FS408BL User manual

Summit
Summit SCFF1842 User manual

Summit
Summit CP962 User manual

Summit
Summit SCFF55IM2DAL User manual