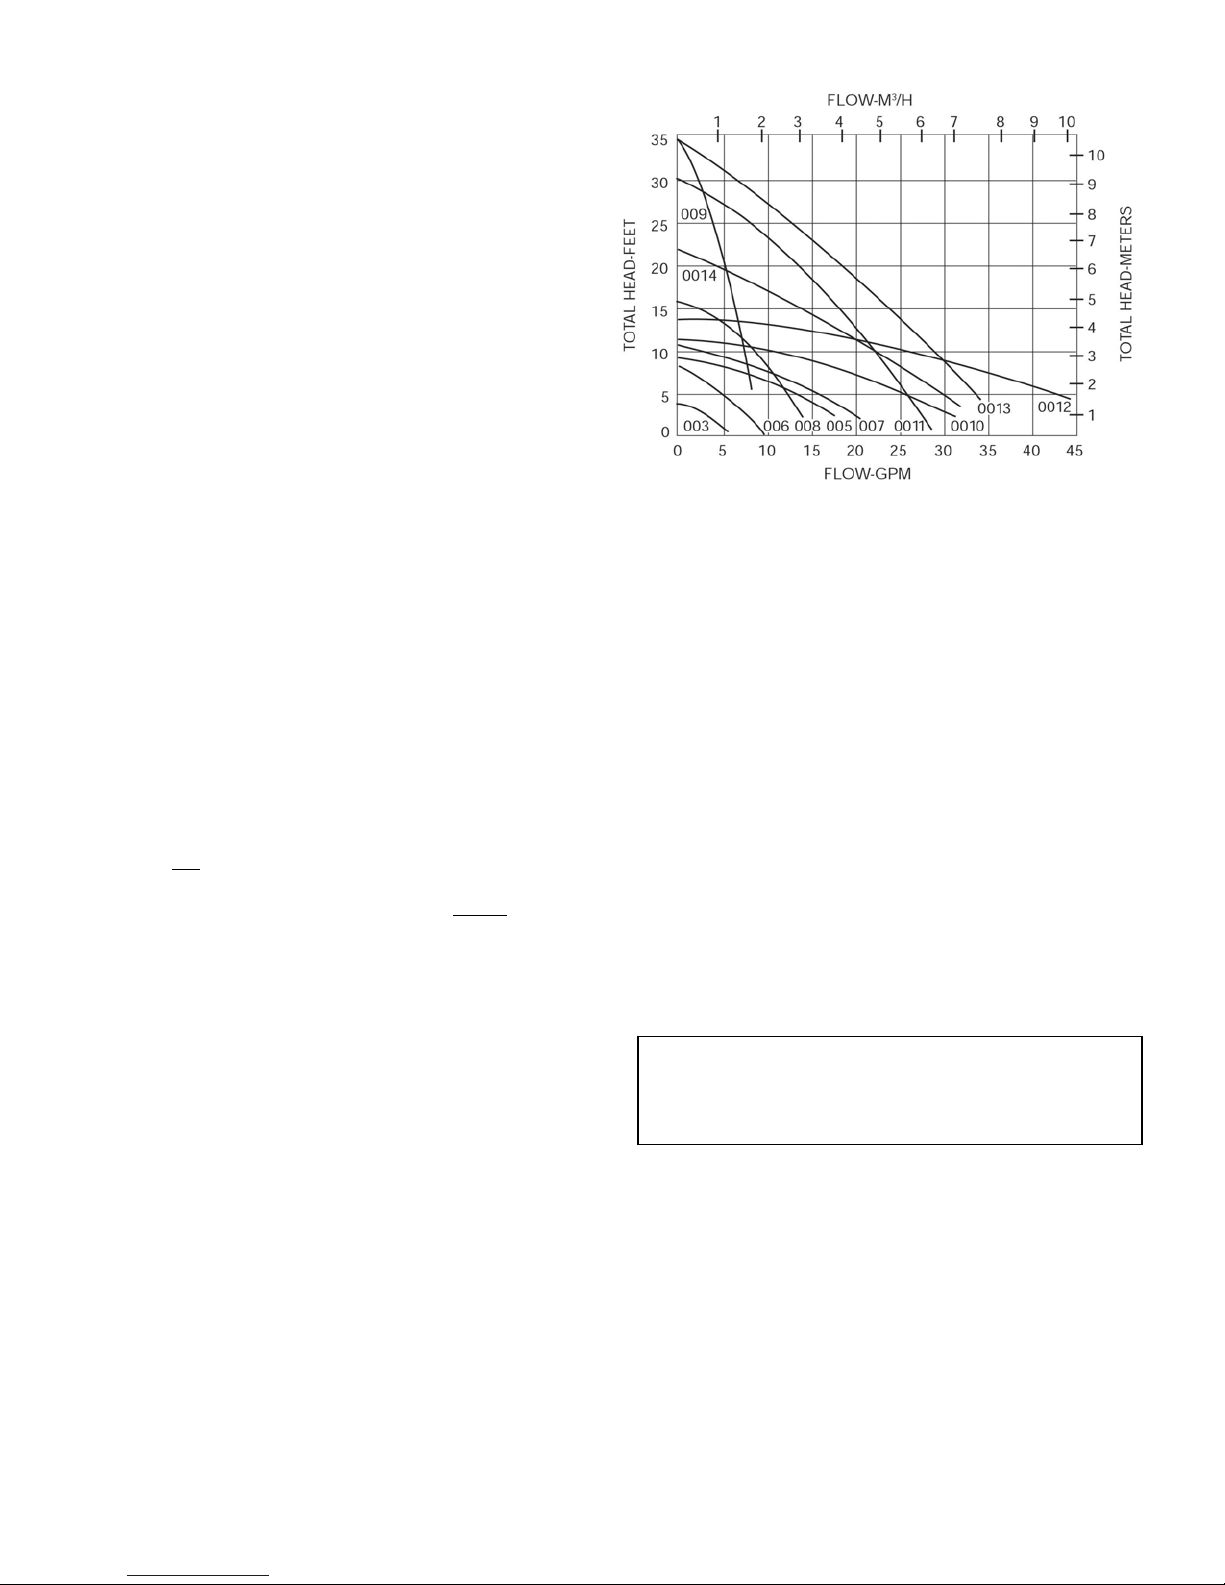
3
POTABLE WATER CONNECTIONS:
Be sure to make all potable water connections prior
to installation of the solar components. Follow the
steps below to insure proper sequence. With the
exception of the tank drain valve, all potable water
connections are located on the top of the water
heater. Locate and identify connections before
proceeding with the installation.
CAUTION: Hydrogen gas can be produced in a
water heater that has not been used for a long
period of time (generally two weeks or more).
HYDROGEN GAS IS EXTREMELY FLAMMABLE. To
dissipate such gas and to reduce the risk of injury,
it is recommended that the hot water faucet be
opened for several minutes at the kitchen sink
before using any electrical appliance connected to
the hot water system. If hydrogen is present, it
usually sounds like air escaping through the pipe
as the water begins to flow. Do not smoke or use
an open flame near the faucet at the time it is open.
1. “COLD” Connect the cold water supply to the
connection marked “COLD” on the top of the
water heater tank. Install a shut off valve in the
cold water line near the water heater. See
Figures 1 and 2.
2. “HOT” Connect the hot water line to he
connection marked “HOT” on top of the water
heater tank. See Figures 1 and 2.
If it is more convenient, the COLD connection on top
of the water heater can be used as the HOT water
outlet. If connections are used in reverse, remove
the dip tube and gasket from COLD outlet. Discard
the gasket. Install close a nipple in HOT connection
and insert the dip tube into the close nipple. HOT
connection can then be used as regular COLD
connection.
3. “Temperature and Pressure (T&P) Relief
Valve” Install the T&P Relief Valve in the marked
opening on top of water heater. See Figure 1. and 2.
The pressure rating of the relief valve must not
exceed the working pressure rating of the water
heater tank as marked on the tank’s rating plate
(150 psi for standard glass-lined tank). If other
components in the system have a lower working
pressure, the T&P relief valve should be selected
accordingly. The BTUH Rating of the relief valve
must not be less than the input rating of the water
heater (1 watt = 3.412 BTUH).
WARNING: DO NOT Connect potable water
lines to the To and From connections to the
solar collector. Serious injury and damage can
occur. DO NOT introduce heat transfer fluids to
potable water lines
Refer to Figures 1. & 2. for the following. Install the
T&P relief valve in the 3/4"NPT fitting provided and
marked for the purpose on the water heater. The
outlet of the relief valve should be directed to a
suitable open drain, so that the discharge water
cannot contact live electrical parts and to eliminate
potential water damage. The discharge line must be
no smaller than outlet of the relief valve. Material for
the discharge line shall be of the type used for hot
water distribution. The valve and the line must drain
fully by gravity. The end of the discharge line should
terminate within 6 inches of an open drain, should
not be concealed and should be protected from
freezing. No valve or restriction of any type shall be
installed between the relief valve and tank or in the
discharge line. Follow all local codes.
WARNING: The manufacturer’s warranty does
not cover any damage or defect caused by
installation, attachment or use of any type of
energy saving devices (other than those
authorized by the manufacturer) into or onto or
in conjunction with the water heater system.
The use of unauthorized energy saving devices
may shorten the life of the water heater and
may endanger life and property. The
manufacturer disclaims any responsibility for
such loss or injury resulting from the use of
such unauthorized devices.
CAUTION: For protection against excessive
pressure and temperature, install temperature-
and-pressure protective equipment required by
local codes, but not less than a combination
temperature-and-pressure relief valve certified as
meeting the requirements of ANSI Z21.22-1979,
by a nationally recognized testing laboratory.
4. FILL the TANK. Refer to Figures 1 & 2 for this
procedure. After making sure the Drain Valve is
closed, open the Shut Off Valve in the cold water
line. Open hot water faucet in the highest location in
the dwelling and keep it open until water flows from it
in a steady stream.
CAUTION: The water heater should not be
located in an area where leakage of the tank or
connections will result in damage to the area
adjacent to it or to lower floors of the structure.
When such areas cannot be avoided, it is
recommended that a suitable catch pan,
adequately drained, be installed under the
water heater. See Figure 1. and 2.
NOTE: Catch
an must conform to local codes
3


 Operation and maintenance instructions")