SunComm SC-6600 Service manual

SunComm
SC-6600
Wireless IP Phone
Administrator’s Guide

2
Contents
1. Introduction ...................................................................... 4
2. Getting Started................................................................. 5
2.1. Package Contents..................................................................... 5
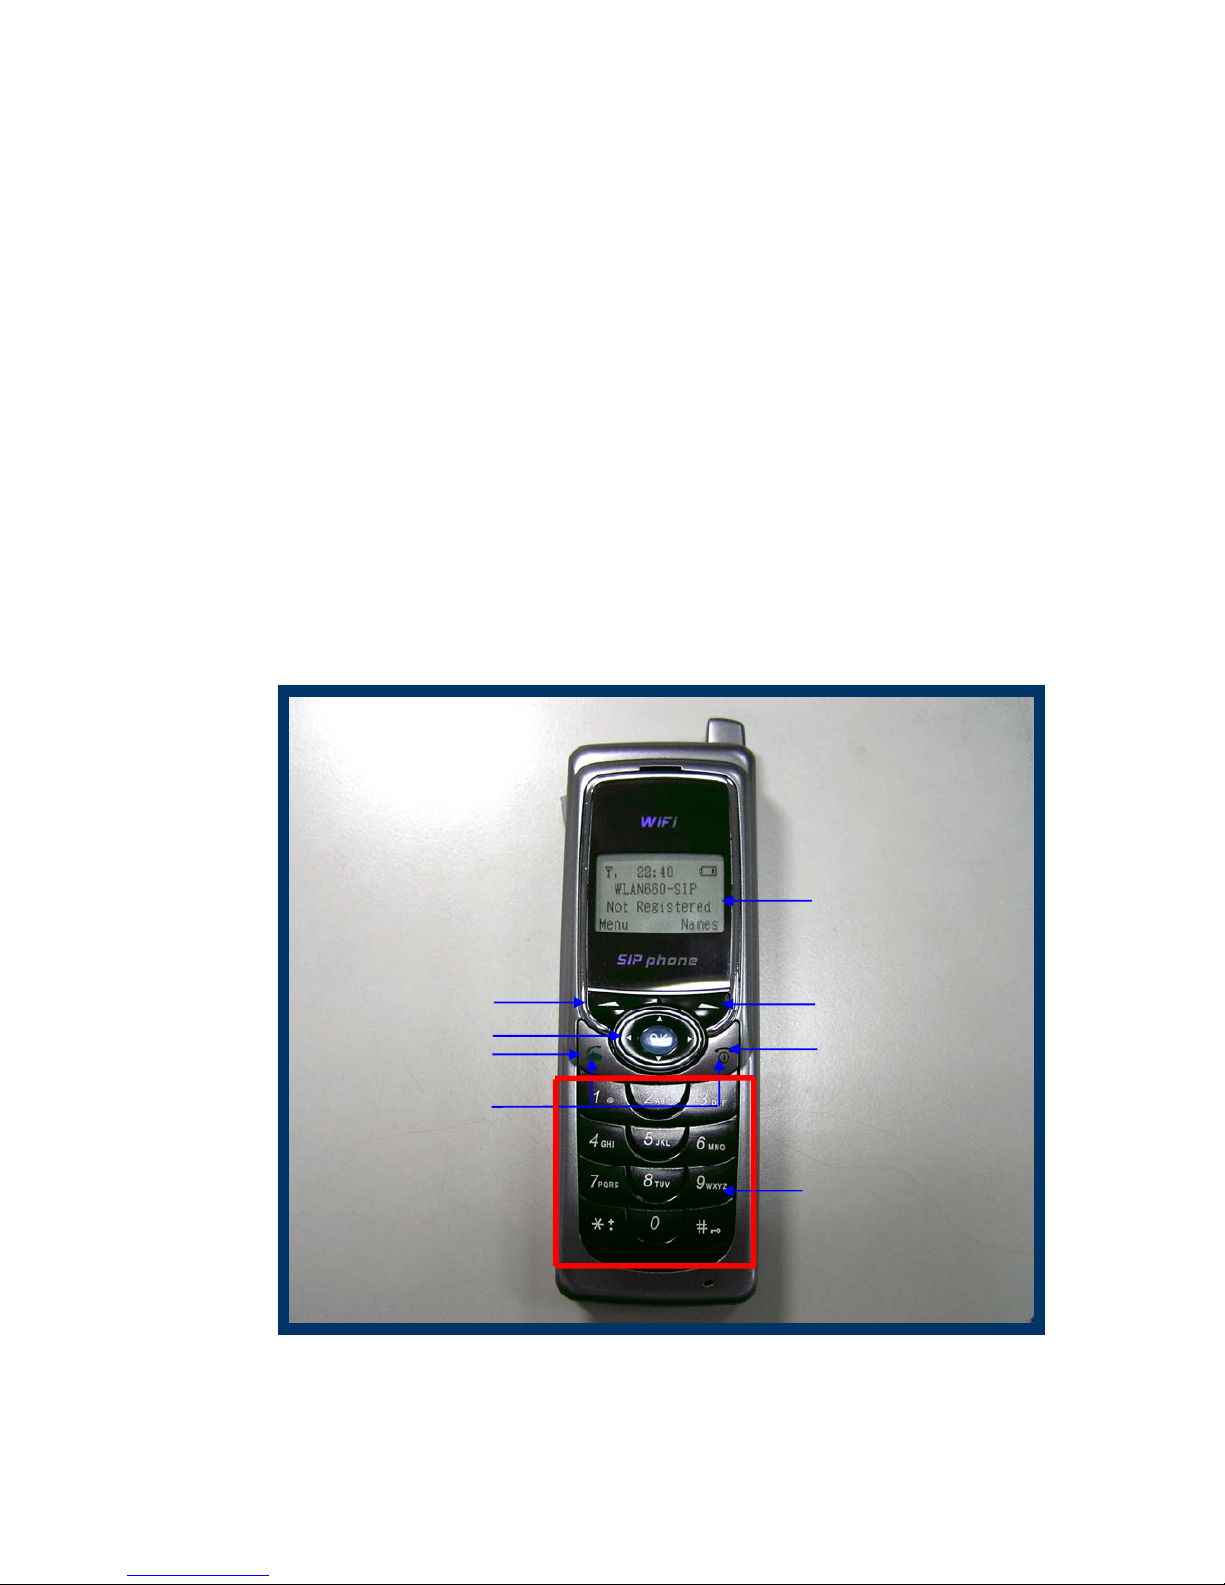
2.2. Keypad ...................................................................................... 5
2.3. Turn On/Off the Power .............................................................. 6
2.4. Load Default IP Address ........................................................... 6
2.5. Enter Administrative Mode ....................................................... 7
2.6. Locking & Unlocking the Keypad............................................. 7
2.7. Adjusting the Speaker Volume ................................................. 8
2.8. Selecting the Character Mode.................................................. 8
2.9. Erasing the Character Mode..................................................... 8
3. Configuring Network Environment................................... 9
3.1. Network Configuration ............................................................. 9
3.1.1. Fixed IP ......................................................................... 9
3.1.2. DHCP ........................................................................... 10
3.1.3. PPPoE.......................................................................... 11
3.2. Wireless Configuration ........................................................... 12
3.2.1. Wireless LAN Settings................................................ 12
3.2.1.1. Wireless LAN...................................................................................................................................12
3.3. SIP Configuration.................................................................... 15
3.3.1. Registrar IP Settings................................................... 15
3.3.2. Outbound Proxy Settings............................................ 16
3.3.3. SIP Proxy Server Settings........................................... 17
3.3.4. Setting up the User Account ...................................... 18
3.4. Using the Phonebook.............................................................. 19
3.4.1. Searching Phonebook Entries - Edit Entry ................. 19
3.4.2. Searching Phonebook Entries - Erase Entry .............. 20
3.4.3. Searching Phonebook Entries – Speed dial Entry...... 21
3.4.4. Adding a Phonebook Entry ......................................... 22
3.4.5. Erasing Phonebook Entries - One By One................... 23
3.4.6. Erasing Phonebook Entries - All ................................. 24
3.5. Call History ............................................................................. 25
3.5.1. Missed Call.................................................................. 25
3.5.2. Received Call .............................................................. 26

3
3.5.3. Dialed Call................................................................... 27
3.5.4. Erasing Call....................................................................... 28
3.6. Settings................................................................................... 29
3.6.1. Setting the Ring Melody.............................................. 29
3.6.2. Setting the Vibration Mode......................................... 30
3.6.3. Adjusting the Ring Volume ......................................... 30
3.6.4. Setting the Time ......................................................... 31
3.6.5. Setting the Date.......................................................... 31
3.6.6. Setting the Banner...................................................... 32
3.6.7. Setting the Key Lock .................................................. 32
3.6.8. Don’t Disturb ............................................................... 33
4. Web Configuration ...........................................................34
4.1. Login Password....................................................................... 34
5. Basic Phone Tasks ..........................................................35
5.1. Dialing a Phone Number ......................................................... 35
5.2. Redialing a Phone Number ..................................................... 35
5.3. Answering a Call..................................................................... 35
6. Display Messages............................................................36
6.1. Error Messages....................................................................... 36
6.2. Warning Messages.................................................................. 37

4
1.Introduction
This is an Administrator’s manual describing the wireless IP phone SC-6600 running in
Administrative mode. Before using SC-6600, some setup processes are required to make the
phone work properly. You should at least setup the IP address of SC-6600 and router when
DHCP is disabled. When DHCP server is available, you can skip the process of setting up
the SC-6600 IP address.
Figure 1.1 Network connections for SC-6600
Internet
Proxy ServerProxy Server
AP
ADSL Modem
AP
A
D
S
L M
ode
m
SC-6600 SC-6600

5
2. Getting Started
Please check the following before using the SC-6600:
Package contents
How to install and remove the battery
How to charge the battery
How to turn on/off the device
2.1. Package Contents
You should find the following contents in your SC-6600 package:
SC-6600 Wireless IP Phone x1
Standardbattery x1
SC-6600 Wireless IP Phone User’s Guide x1
Power Supply (AC adapter) x1
If any of these items are missing or damaged, please contact your distributor or sales
representative immediately.
2.2. Keypad
Figure 2.2-1 SC-6600 Wireless IP Phone
Mono Graphic LCD
Soft Key 2
●End key
●Power key
Soft Key 1
Load Default IP
(192.168.0.6)
Numerical keys &
special keys: @, *, #, etc.
Talk Key
Arrow Keys

6
KEY DESCRIPTION
Soft key 1
This key is used for making selections on the bottom left side of the
phone LCD, such as: Menu, Select, OK... Its current function is
indicated by the word appearing above the key.
Soft key 2
This key is used for making selections on the bottom right side of the
phone LCD, such as: Names, Back, Clear... Its current function is
indicated by the word appearing above the key.
Arrow keys
Use the arrow keys to navigate through your phone’s menus and
submenus, as well as your Phonebook. The up / down arrow keys are
also used for selecting the character mode: A, a, 1, @.
Talk Key Use this key to answer a call or make a call.
End Key / Power Key Use this key to end a call, reject a call or return to Standby mode. Press
and hold this key for two seconds to switch off / switch on the phone.
Numerical / special keys Use to enter numbers, characters or special characters.
2.3. Turn On/Off the Power
To turn on/off the power, press and hold the “ ”key for approximately
2 seconds.
The phone enters the “standby” mode; Main Screen is displayed as shown in Figure
2.3-1
Figure 2.3-1 Standby Mode
2.4. Load Default IP Address
1. Turn of the power.
2. Press and hold the “ ” + “ ” keys for about 2 seconds to load the
default IP address. SC-6600 will reset to the default IP address (192.168.0.6).
Figure 2.4-1 Load default IP
12:00
SC-6600-user
Not Registered
Menu Names
Initializing...
>>Please Wait!<<
Load Default IP
<<Release key!>>

7
2.5. Enter Administrative Mode
1. Turn of the power.
2. Press the “ ” + “ ” + ” ” keys and hold till the
<ENGINEER MENU> is shown on the LCD screen. Then release the keys.
3. In approximately 10 seconds, you will enter the main screen of the administrative
mode.
Figure 2.5-1 Administrative Mode
2.6. Locking & Unlocking the Keypad
Follow these steps to lock & unlock the keypad:
1. In idle state, hold the key over 2 seconds or wait over 1 minute.
The keypad will be locked, as shown in Figure 2.6-1.
Figure 2.6-1 Keypad Locked
2. To release, press and hold the key for approximately 2 seconds and
the message will appear prompting you to confirm, the procedure like Figure
2.6-2.
Figure 2.6-2 Keypad Unlocked
〈
ENGINEER MENU
〉
Enabled Engineer
Mode For MMI/WEB
10/20
12:00
X
12:00
SC-6600-user
Not Registered
Menu Names
10/20
12:00
X
10/20
12:00
X
10/20
12:00
X
10/20
12:00
X
10/20
SC-6600-user
Not Registered
Menu Names
10/20
12:00
X

8
3. When locking, press any key would show, Figure 2.6-3.
Figure 2.6-3 Keypad Locked
2.7. Adjusting the Speaker Volume
During conversation, press the ” “ key to increase the volume.
To decrease the volume, during conversation, press the ” “ key. See Figure 2.7-1.
Figure 2.7-1 Adjusting the Speaker Volume
2.8. Selecting the Character Mode
Use the up / down arrow keys (▲/▼)to select the character mode: capital or lowercase
characters, numbers or special characters (A, a, 1, @). See Figure 2.8-1.
Figure 2.8-1 Selecting the Character Mode
2.9. Erasing the Character
When editing , press “ “ key would erase character . See Figure 2.9-1.
Figure 2.9-1 Erasing the Character Mode
12:00
12 ) ) ) ) ) ) ) ) ) )
123456
Phone Number
100|
Ok Aa1@ Back
10/20
12:00
X
Phone Number
100|
Ok Aa1@ Back
Press power key erase character

9
3.Configuring Network Environment
This chapter explains how to modify the network environment.
3.1. Network Configuration
This section introduces modifications to the network information.
3.1.1. Fixed IP
This section introduces how to select Fixed IP.
12:00
SC-6600-user
Not Registered
Menu Names
Menu
Select Select
Back
IP Address
192.168.0.6|
Ok Aa1@ Back
Subnet Mask
255.255.0.0|
Ok Aa1@ Back
Select
Gateway
172.16.0.1|
Ok Aa1@ Back
Select
Back
Back
Back
S
T
4. Net Setting
5. SIP Setting
6. Settings
Select Back
Back
S
T
[1]FixedIP
[2]DHCP
[3]PPPoE
Select Back
S
T
2. IP Address
3. Subnet Mask
4. Gateway
Select Back
Select
S
T
3. Subnet Mask
4. Gateway
1. Network Mode
Select Back
S
T
4.Gateway
1. Network Mode
2. IP Address
Select Back
[1]Fixed IP
[2]DHCP
[3]PPPoE
Select Back
OK
Select
S
T
1. Network Mode
2. IP Address
3. Subnet Mask
Select Back
Back
Back
Back
Ok IP Address
192.168.0.6|
Ok Aa1@ Back
OK
Ok Subnet Mask
255.255.0.0|6|
Ok Aa1@ Back
OK
Ok
Gateway
172.16.0.1|
Ok Aa1@ Back
OK

10
3.1.2. DHCP
This section provides instructions for performing the DHCP settings.
The Dynamic Host Configuration Protocol (DHCP) client provides a
mechanism for allocating IP address dynamically so that addresses can be
reused when hosts no longer need them.
12:00
SC-6600-user
Not Registered
Menu Names
Menu
Select Select
Back
S
T
4. Net Setting
5. SIP Setting
6. Settings
Select Back
Back
S
T
[2]DHCP
[3]PPPoE
[1]Fixed IP
Select Back
[2]DHCP
[3]PPPoE
[1]Fixed IP
Select Back
OK
Select
S
T
1. Network Mode
2. IP Address
3. Subnet Mask
Select Back

11
3.1.3. PPPoE
The Point-to-Point Protocol over Ethernet (PPPoE) provides more than just IP
address assignment, which is the primary purpose of DHCP (assigning a unique
and available IP address based upon a unique network adapter address).
PPPoE also allows for the movement of TCP/IP traffic between two known
points. It requires a username and password to log on.
PPPoE Name
pppoe_username|
Ok Aa1@ Back
Select Ok
PPPoE Pwd
************|
Ok Aa1@ Back
Select Ok
Back
Back
12:00
SC-6600-user
Not Registered
Menu Names
Menu
Select Select Select
Back Back
S
T
4. Net Setting
5. SIP Setting
6. Settings
Select Back
S
T
1. Network Mode
2. IP Address
3. Subnet Mask
Select Back
S
T
[3]PPPoE
[1]Fixed IP
[2]DHCP
Select Back
S
T
3. PPPoE Pwd
1. Network Mode
2. PPPoE Name
Select Back
S
T
2. PPPoE Name
3. PPPoE Pwd
1. Network Mode
Select Back
Input the name
Input the password
Back
Back
[3]PPPoE
[1]Fix IP
[2]DHCP
Select Back
OK
PPPoE Name
pppoe_username
Ok Aa1@ Back
OK
PPPoE Pwd
************|
Ok Aa1@ Back
OK

12
3.2. Wireless Configuration
This section provides instructions for configuring the wireless, 802.11b,
configuration submenu.
3.2.1. Wireless LAN Settings
This section explains the following:
Scanning for the Wireless Service Set Identifier
Making wireless settings
Setting up WEP Keys (Wireless Equivalent Privacy Keys)
3.2.1.1. Wireless LAN
Ok
S
T
2. SSID
3. Network Mode
4. Channel
Select Back
Input the SSID
12:00
SC-6600-user
Not Registered
Menu Names
Menu
Select Select
Select
Back Back
S
T
7. Wireless
8. Restart
1. Information
Select Back
S
T
1. Site Survey
2. SSID
3. Network Mode
Select Back
S
T
AP1
AP2
AP3
Select Back
Back Select
Select
Select
Back
Select
Back
Back S
T
[1]Ad Hoc
[2]Infra.
Select Back
S
T
3. Network Mode
4. Channel
5. Rate
Select Back
S
T
4. Channel
5. Rate
6. WEP Select
Select Back
S
T
Channel 1
Channel 2
Channel 3
Select Back
Select
Select
Back
Back S
T
5. Rate
6. WEP Select
7. Profile
Select Back
S
T
[1]Auto
[2]1M
[3]2M
Select Back
Select
Back
S
T
SSID
bcm-test|
Ok Aa1@ Back
AP1
AP2
AP3
Select Back
OK
Back
SSID
bcm-test|
Ok Aa1@ Back
OK
[1]Ad Hoc
[2]Infra.
Select Back
OK
Channel 1
Channel 2
Channel 3
Select Back
OK
[1]Auto
[2]1M
[3]2M
Select Back
OK

13
Back
S
T
6. WEP Select
7. Profile
8. Auth Type
Select Back
12:00
SC-6600-user
Not Registered
Menu Names
Select
Menu
Select Ok
Select
Ok
Ok
Back
Back
S
T
7. Wep Key 1
8. Wep Key 2
9. Wep Key 3
Select Back
S
T
8. Wep Key 2
9. Wep Key 3
10. Wep Key 4
Select Back
S
T
9. Wep Key 3
10. Wep Key 4
11. Key Select
Select Back
Select
Ok
S
T
10. Wep Key 4
11. Key Select
12. Profile
Select Back
Input the wep key 1
Wep Key 1
*******
Ok Aa1@ Back
Select
Wep Key 2
*******
Ok Aa1@ Back
Wep Key 3
*******
Ok Aa1@ Back
Wep Key 4
*******
Ok Aa1@ Back
Input the wep key 3
Input the wep key 4
Select Select
Select
Back Back
S
T
[1]None
[2]64bit
[3]128bit
Select Back
Select Select
Select
Back
S
T
[2]64bit
[3]128bit
[1]None
Select Back
S
T
7. Wireless
8. Restart
1. Information
Select Back
Input the wep key 2
[1]None
[2]64bit
[3]128bit
Select Back
OK
[2]64bit
[3]128bit
[1]None
Select Back
OK
Back
Wep Key 1
*******
Ok Aa1@ Back
OK
Wep Key 3
*******
Ok Aa1@ Back
OK
Wep Key 3
*******
Ok Aa1@ Back
OK
Back
Back
Back
Wep Key 4
*******
Ok Aa1@ Back
OK
S
T
6. WEP Select
7. Profile
8. Auth Type
Select Back
Select
Back
S
T
11. Key Select
12. Profile
13. Auth type
Select Back
S
T
Key 1
Key2
Key 3
Select Back
Key 1
Key2
Key 3
Select Back
OK
Select
Back

14
Select Back
Select
[1]Open System
[2]Shared Key
Select Back
OK
S
T
7. Wireless
8. Restart
1. Information
Select Back
Select
12:00
SC-6600-user
Not Registered
Menu Names
Menu
1: (AP) Bcm
2:
3:
Select Back
Select
Back
S
T
1. Create
2. Activate
3. Remove
Select Back
S
T
12. Profile
13. Auth type
1. Site Survey
Select Back
Select
Back
1: (AP) Bcm
2:
3:
Select Back
OK
S
T
2. Activate
3. Remove
1. Create
Select Back
S
T
3. Remove
1. Create
2. Activate
Select Back
Select
Back
S
T
[1]Open System
[2]Shared Key
Select Back
S
T
13. Auth type
1.Site Survey
2.SSID
Select Back
Select
1: (AP) SunComm
2:
3:
Select Back
OK
1: (AP) Bcm
2:
3:
Select Back
Select
Back
1: (AP) Bcm
2:
3:
Select Back
Select
Back
Are you sure?
Ok Back
Ok
Select Back

15
3.3. SIP Configuration
This section provides information on the Session Initiation Protocol (SIP) settings.
Please note that you have to configure both, Registrar Server , SIP Proxy Server and
Outbound Proxy.
3.3.1. Registrar IP Settings
12:00
SC-6600-user
Not Registered
Menu Names
Menu
Select Back
Registrar IP
192.168.0.3|
Ok Aa1@ Back
Select Ok
Select
Back
Port
5060|
Ok Aa1@ Back
Select OkBack S
T
2.Port
3. Expiry Time
1. Registrar IP
Select Back
Input the Registrar IP
S
T
1. Registrar IP
2. Port
3. Expiry Time
Select Back
Input the Port
Expiry Time
3600|
Ok Aa1@ Back
Select OkBack S
T
3. Expiry Time
1. Registrar IP
2. Port
Select Back
Input the Expiry Time
S
T
5. SIP Setting
6. Settings
7. Wireless
Select Back
Registrar IP
192.168.0.3|
Ok Aa1@ Back
OK
Back
Back
Back
Port
5060|
Ok Aa1@ Back
OK
Expiry Time
3600|
Ok Aa1@ Back
OK
S
T
1. Registrar
2. Outbound Proxy
3. Proxy Server
Select Back

16
3.3.2. Outbound Proxy Settings
Back
Select
12:00
SC-6600-user
Not Registered
Menu Names
Menu
S
T
5. SIP Setting
6. Settings
7. Wireless
Select Back
Proxy IP
192.168.0.191|
Ok Aa1@ Back
Select
Ok
Select
Port
5060|
Ok Aa1@ Back
Select
Ok
Back
S
T
2. Outbound Proxy
3. Proxy Server
4. User Account
Select Back
S
T
1. Proxy IP
2. Port
Select Back
S
T
2. Port
1. Proxy IP
Select Back
Input the Proxy IP
Input the Port Port
5060|
Ok Aa1@ Back
OK
Proxy IP
192.168.0.191|
Ok Aa1@ Back
OK
Back
Back
Back

17
3.3.3. SIP Proxy Server Settings
Back
Select
12:00
SC-6600-user
Not Registered
Menu Names
Menu
S
T
5. SIP Setting
6. Settings
7. Wireless
Select Back
Proxy IP
192.168.0.3|
Ok Aa1@ Back
Select
Ok
Select
Port
5060|
Ok Aa1@ Back
Select
Ok
Back
S
T
3. Proxy Server
4. User Account
1. Registrar
Select Back
S
T
1. Proxy IP
2. Port
Select Back
S
T
2. Port
1. Proxy IP
Select Back
Input the Proxy IP
Input the Port Port
5060|
Ok Aa1@ Back
OK
Proxy IP
192.168.0.3|
Ok Aa1@ Back
OK
Back
Back
Back

18
3.3.4. Setting up the User Account
This section explains how to set up your phone number, username and
password you will be using to connect to the SIP server.
Select Back
12:00
SC-6600-user
Not Registered
Menu Names
Menu
S
T
5. SIP Setting
6. Settings
7. Wireless
Select Back
Input the number
Input the name
Input the password
Phone Number
100|
Ok Aa1@ Back
Select
Ok
Select
Back
Username
David|
Ok Aa1@ Back
Select
Ok
Back
Back
S
T
4. User Account
1. Registrar
2. Outbound Proxy
Select Back
S
T
1. Phone Number
2. Username
3. User Pwd
Select Back
S
T
2. Username
3. User Pwd
1. Phone Number
Select Back
User Pwd
******|
Ok Aa1@ Back
Select
Ok
S
T
3. User Pwd
1. Phone Number
2. Username
Select Back
Back
Phone Number
100|
Ok Aa1@ Back
OK
Username
David|
Ok Aa1@ Back
OK
Back
Back
User Pwd
******|
Ok Aa1@ Back
OK

19
3.4. Using the Phonebook
This section provides information about accessing the phonebook and using its
features.
3.4.1. Searching Phonebook Entries - Edit Entry
Back
Select
S
T
P2P
Proxy
Select Back
Port:
5060
Ok Aa1@ Back
User Info:
123456|
Ok Aa1@ Back
12:00
SC-6600-user
Not Registered
Menu Names
Menu
Select Back
Display Name:
David|
Ok Aa1@ Back
S
T
3. Phonebook
4. Net Setting
5. SIP Setting
Select Back
S
T
1. Search
2. Add Entry
3. Erase
Select Back
Select
Back
S
T
David
Mark
Ken
Select Back
S
T
1. Edit
2. Erase
3. Speed dial
Select Back
Host IP:
172.16.156.123|
Ok Aa1@ Back
Edit the number
Edit the IP
Select
P2P
Proxy
Select Back
OK
Selec Ok
Ok
Ok
Ok
Select Edit the name
1. Search
2. Add Entry
3. Erase
Select Back
Press key , go back menu
Back
Press key , go back menu
Back

20
3.4.2. Searching Phonebook Entries - Erase Entry
1. Search
2. Add Entry
3. Erase
Select Back
S
T
1. Search
2. Add Entry
3. Erase
Select Back
Back
12:00
SC-6600-user
Not Registered
Menu Names
Menu
Select
Back
Are you sure?
Ok Back
Select
S
T
3. Phone book
4. Net Setting
5. SIP Setting
Select Back
Select
S
T
David
Mark
Ken
Select Back
S
T
2. Erase
3. Speed dial
1. Edit
Select Back
Select
Ok
Select
Are you sure?
Ok Back
OK
Back
Press key , go back menu
Back
Table of contents