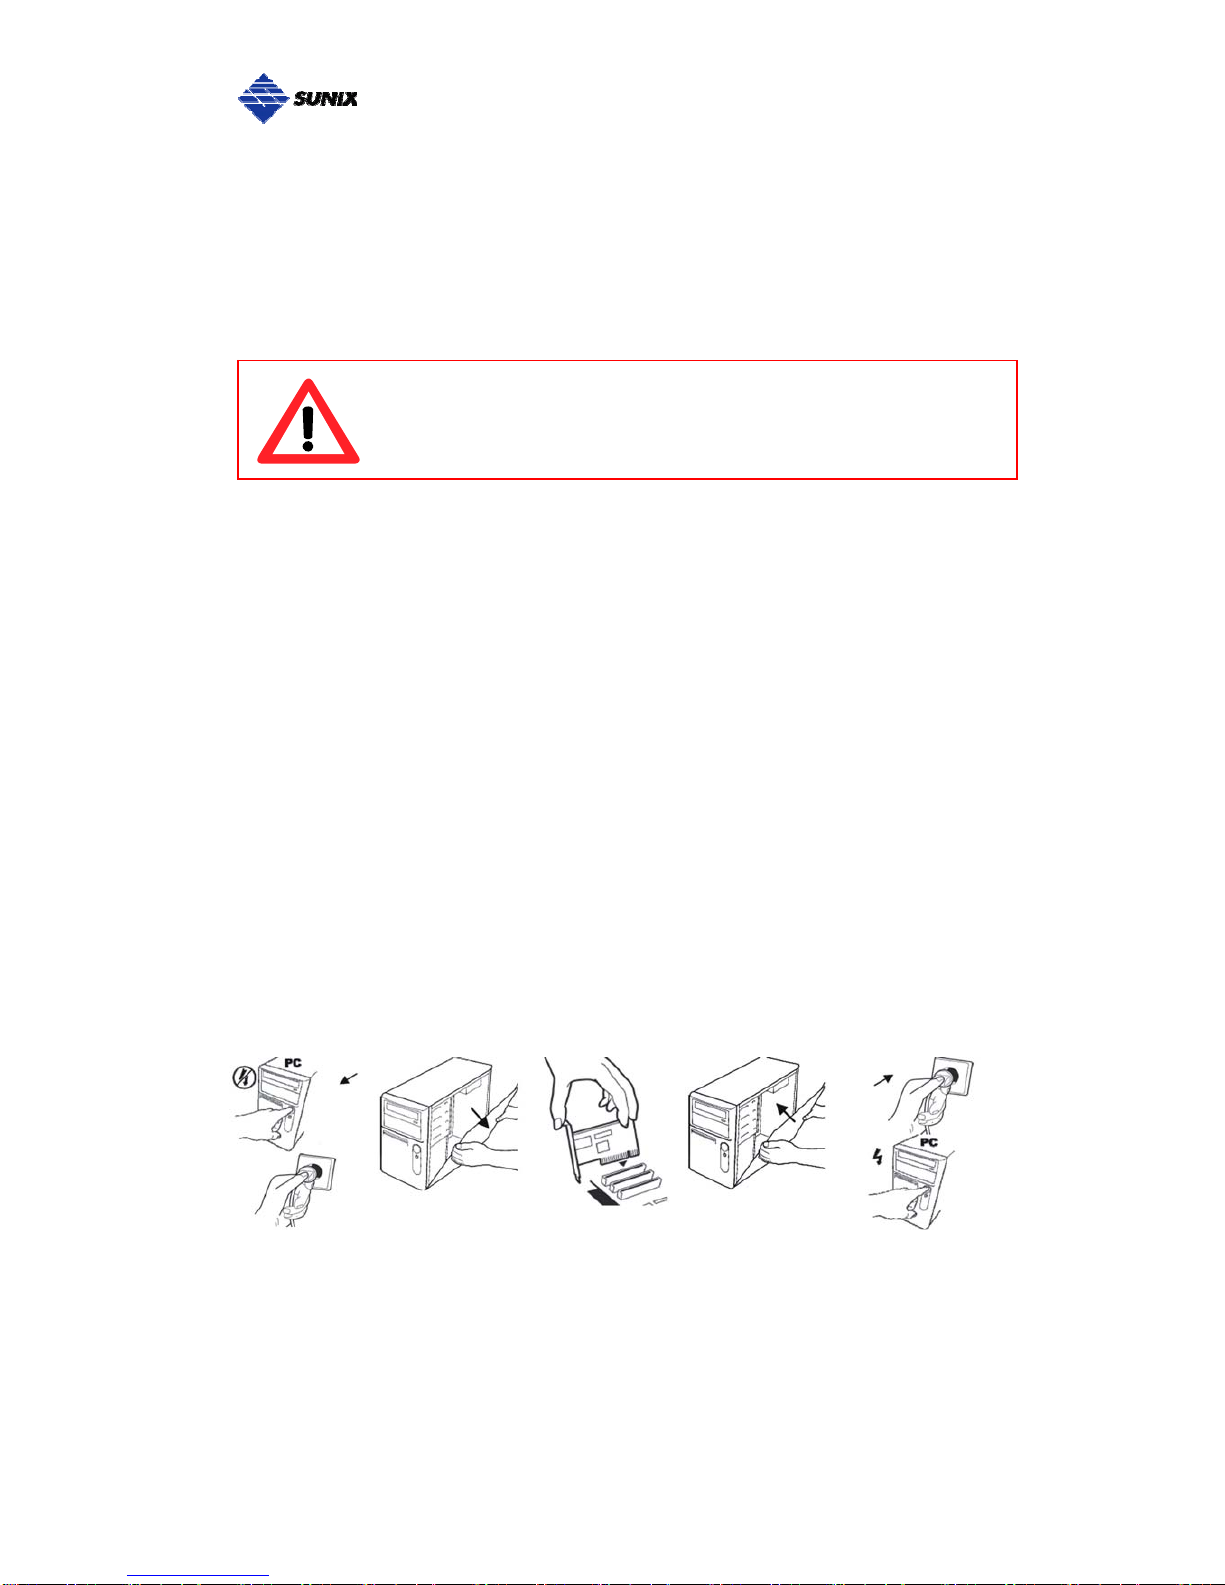
Sunix RS-422 User manual

Universal PCI
RS-422/485
Communication Board
USER’S MANUAL
SUNIX Co., Ltd.
Tel : +886-2-8913-1987
Fax: +886-2-8913-1986
Http://www.sunix.com.tw
English Version
Second Edition, December 2010

___________________________________________________________________________________
1
Universal PCI RS-422/485 Communication Board
User’s Manual
Copyright
Copyright© 2010 SUNIX Co., Ltd. All Rights Reserved.
No part of this publication may be reproduced, transcribed, stored in a retrieval system, translated into any language, or
transmitted in any from or by any means, photocopying, manual, or otherwise, without prior written permission from
SUNIX.
Disclaimer
SUNIX shall not be liable for any incidental or consequential damages resulting from the performance or use of this
equipment.
SUNIX makes no representations or warranties regarding the contents of this manual. Information in this manual has
been carefully checked for reliability; however, no guarantee is given as to the correctness of this content. In the interest
of continued product improvement, this company reserves the right to revise the manual or include change in the
specifications of the product described within it at any time without notice and without obligation to notify any person of
such revision or changes. The information contained in this manual is provided for general use by the customers.
Trademarks
SUNIX is a registered trademark of SUNIX Group.
All other trademarks or registered marks in this manual belong to their respective owners.
Safety Information
1. Keep this User’s Manual for future reference.
2. Always read the safety information carefully.
3. Keep this equipment away from direct sunlight, or in humid or damp places.
4. Do not place this equipment in an unstable position, or on vibrating surface before setting it up.
5. Do not use or place this equipment near magnetic fields, televisions, or radios to avoid electronic
interface that affects device performance.

___________________________________________________________________________________
2
Table of Contents
Chapter 1 Introduction...............................................................................................4
Overview ........................... ............................................................................ 5
Package Checklist ......................................................................................... 5
Product Features ........................................................................................... 6
Product Specifications ................................................................................... 7
Chapter 2 Hardware Installation................................................................................8
Hardware Installation......................................................................................9
Pin Assignment ............................................................................................10
Jumper Settings...........................................................................................15
Chapter 3 Driver Installation ...................................................................................17
Windows Driver Installation.......………………………....................................18
Windows Driver Uninstallation...................................................................... 23
Linux Driver Installation...…….......................................................................24
Verify Installation.......................................................................................... 26
Chapter 4 Port Configuration...................................................................................27
Configure Serial Port Settings……………………….......................................28
COM Port Number Settings.......................................................................... 29
COM I/O Resource.…..…..............................................................................29
FIFO Settings.…........................................................................................... 30
Advanced Settings for RS-422/485 Communication……………………….... 31
Chapter 5 Appendix .................................................................................................35
Troubleshooting.............................................................................................36
Product Family…..........................................................................................38
Contact Information.......................................................................................43

___________________________________________________________________________________
3
WHQL Certification Approval
The Designed for Microsoft Windows 32/64-bit operation system WHQL logo
identifies products that meet Microsoft’s quality standards, SUNIX I/O products
carry with this logo and listed on Windows Catalog. WHQL logo includes below
operation system version
Microsoft Windows Client: Windows 2000 / XP / Vista / 7 (X86/X64)
Microsoft Windows Server: Windows 2003 / 2008 (X86/X64)

___________________________________________________________________________________
4
1.
Introduction
______________________________________________
RS-422/485 Golden I/O series, a line of Universal PCI Multi-port Serial
Communication Board, is designed for both 3.3V / 5V and 32 / 64-bit PCI Bus
with Plug and Play feature. Its can be installed in virtually any available PC
system and compatible with all major operating systems. Users do not need to
manually set jumpers to configure I/O addresses and IRQ locations.
This board offers independent RS-422 and RS-485 ports for connecting kinds of
serial terminals on the PC based systems. This board is industrial stand which
offers a reliable and high performance solution for serial multi-port
communications.
The following topics covered in this chapter:
Overview
Package Checklist
Product Features
Product Specifications

___________________________________________________________________________________
5
Overview
Thanks for purchasing SUNIX Universal PCI Multi-Port Communication Board; it
is compatible with RS-422 and RS-485 standard serial interfaces. User can
expand Multi RS-422/485 ports on PC-based system by installing in PCI or
PCI-X slots. Each port has on-chip hardware and software flow control, a built-in
128-byte Tx/Rx FIFO, and WHQL certificated device drivers. This board is
designed with SUNIX 16C950 UART controller and as well built with many of
SUNIX advanced features and technologies, making it the best solution for
commercial and industrial automation applications.
Package Checklist
Please check if the following items are present and in good condition upon
opening your package. Contact your vendor if any item is damaged or missing.
1. Hardware:
Serial Communication Board:
Universal PCI RS-422/485 Multi-Port Communication Board ×1
Cable: (Depend on what product you bought)
* 4 ports PCI series: DB44M to 4 ports DB9/25 Male Cable ×1
* 8 ports PCI series: DB62M to 8 ports DB9/25 Male Cable ×1
* 16 ports PCI series: DB78M to 16 ports DB9/25 Male Cable ×1
2. CD Driver
3. User's Manual (This document)
4. Termination Resistor Jumper

___________________________________________________________________________________
6
Product Features
Expands Multi RS-422/485 serial ports on the system
High performance SUNIX 16C950 compatible UART controller on-board.
Ultra low power consumption design for Green Environment.
Compliance with PCI 33MHz Version 3.0/2.3/2.2./2.1 specification.
Supports both 64-bit PCI-X & 32-bit PCI bus slot.
Data transmission speeds up to 921.6Kbps.
On-chip hardware auto flow control to guarantee no data loss.
RS-422 and RS-485 auto detect and switching technology.
AHDC/CS™ technology for collision free communication.
Ultra low power consumption design for Green Environment.
Built-in ± 15KV ESD protection for all serial signals.
2.0 KV optical isolation protection for all signal and power. (SI Version Only)
500W peak surge protection for all signal lines. (SI Version Only)
Plug-n-Play, I/O address and IRQ assigned by BIOS.
Certified by CE, FCC, RoHS, and Microsoft WHQL approval.
Support Microsoft Windows, Linux, and DOS.
Note:
SUNIX RS-422/485 Card with Surge and Isolation (SI Version) is available with
certain models which include TVSS (Transient Voltage Surge Suppressor)
technology to help prevent damage due to lightning or high potential voltage.
Optical isolation (2000V) and embedded protection (max. ESD of 16 KV, max.
EFT of 2 KV). These features help provide protection in critical or harsh
factory-type environments.

___________________________________________________________________________________
7
Product Specifications
Serial Communication
Driver Support
Regulatory Approvals
Environment
Interface RS-422/485 Baud rate 50bps ~921.6Kpbs
Controller SUNIX SUN1999
(16C950 UART Compatible) Stop bit 1, 1.5, 2
BUS Universal PCI 64/32bit
PCI Spec.Ver3.0/2.3/2.2/2.1 Parity even, odd, none, mark, space
No. of Port 1/2/4/8/16-port Flow
Control None, Xon/Xoff, RTS/CTS
IRQ & IO Assigned by System FIFO 128byte Hardware
Signal RS-422: TxD+, TxD-, RxD+, RxD-, GND
4-wire RS-485: TxD+, TxD-, RxD+, RxD-, GND
2-wire RS-485: Data+, Data-, GND
ESD
Protection
±15KV ESD protection for each signal Human Body Model (HBM)
±15KV IEC1000-4-2 Air Gap Discharge
±8KV IEC1000-4-2 Contact Discharge
Surge
Protection 500W peak surge protection for all signal lines meet IEC 61000-4-5
(SI Version Only)
Isolation
Protection 2.5 KV Isolation Protection for all signal and power
(SI Version Only)
Connector DB9 / 25 Male
Microsoft Client XP / Vista / 7 (X86/X64)
Microsoft Server 2000 / 2003 / 2008 (X86/X64)
Microsoft Embedded XP Embedded / POS Ready 2009 / Embedded System 2009
Linux Linux 2.4.x / 2.6.x
DOS DOS
Hardware EN55022 Class B, EN55024, EN61000-3-2, EN61000-3-3,
FCC Part 15 Class B, RoHS
Software Microsoft WHQL Windows
Microsoft Client: XP / Vista / 7 (X86/X64)
Microsoft Server: 2000 / 2003 / 2008 (X86/X64)
Operation Temperature 0 to 60°C (32 to 140°F)
Operation Humidity 5 to 95% RH
Storage Temperature -20 to 85°C (-4 to 185°F)

___________________________________________________________________________________
8
2.
Hardware Installation
______________________________________________
This chapter includes information about hardware installation for Universal PCI
RS-422/485 Multi-Port Communication Board. The following topics are covered:
Hardware Installation
Pin Assignments
Jumper Settings

___________________________________________________________________________________
9
Hardware Installation
The hardware installation of PCI serial boards is easy to carry out. Before
inserting the card into the PCI bus, please follow the detailed steps given below
to install the PCI serial board in your computer.
Step 1: Turn your PC’s power off, and shut off the power to any peripheral.
Step 2: Remove the power plug from the plug socket.
Step 3: Remove the cover from the computer case.
Step 4: If fitted. Remove the metal cover plate on the rear of a free PCI slot.
Step 5: Insert Universal PCI Multi-Port Communication Board into the free PCI
slot and screw it firmly on the bracket side.
Step 6: Place the cover back onto the computer.
Step 7: Insert the plug into the plug socket.
Safety First
To avoid damaging your system and boards, make sure your
PC’s power is turned off before installing PCI card.

___________________________________________________________________________________
10
Pin Assignment
This chapter provides the pin assignments for SUNIX Universal PCI
RS-422/485 Multi-Port Communication Board, as well as the pin assignments for
the optional accessories.
RS-422 or 4-Wire RS-485
PIN DB9M DB25M Pin Header
Tx+ 2 3 3
Tx- 1 8 1
Rx+ 3 2 5
Rx- 4 20 7
GND 5 7 9
2-Wire RS-485
PIN DB9M DB25M Pin Header
Tx+ 2 3 3
Tx- 1 8 1
GND 5 7 9

___________________________________________________________________________________
11
SUNIX 4-port RS-422/485 Card builds DB44F connector on board.
SUNIX DB44 Female 4 ports Serial Communication Boards Pin Assignment
Port
Signal 1 2 3 4
Tx+ 32 36 40 44
Tx- 17 22 26 30
Rx+ 3 7 11 15
Rx- 1 5 9 13
RS-422
or
4-Wire
RS-485
GND GND GND GND GND
SUNIX DB44 Female 4 ports Serial Communication Boards Pin Assignment
Port
Signal 1 2 3 4
D+ 32 36 40 44
D- 17 22 26 30
2-Wire
RS-485
GND GND GND GND GND

___________________________________________________________________________________
12
SUNIX 8-port RS-422/485 Card builds DB62F connector on board.
SUNIX DB62 Female 8 ports Serial Communication Boards Pin Assignment
Port
Signal 1 2 3 4 5 6 7 8
Tx+ 44 47 49 52 54 57 60 62
Tx- 24 45 8 50 11 55 58 21
Rx+ 23 26 28 31 34 36 39 41
Rx- 2 5 7 10 13 15 18 20
RS-422
or
4-Wire
RS-485
GND GND GND GND GND GND GND GND GND
SUNIX DB62 Female 8 ports Serial Communication Boards Pin Assignment
Port
Signal 1 2 3 4 5 6 7 8
Tx+ 44 47 49 52 54 57 60 62
Tx- 24 45 8 50 11 55 58 21
2-Wire
RS-485
GND GND GND GND GND GND GND GND GND

___________________________________________________________________________________
13
SUNIX 16-port RS-422/485 Card builds DB78F connector on board.
SUNIX DB78 Female 16 ports Serial Communication Boards Pin Assignment
Port
Signal 1 2 3 4 5 6 7 8
Tx+ 60 21 43 4 65 26 48 9
Tx- 40 1 62 23 45 6 67 28
Rx+ 61 22 44 5 66 27 49 10
Rx- 41 2 63 24 46 7 68 29
GND GND GND GND GND GND GND GND GND
Port
Signal 9 10 11 12 13 14 15 16
Tx+ 70 31 53 14 75 36 58 19
Tx- 50 11 72 33 55 16 77 38
Rx+ 71 32 54 15 76 37 59 20
Rx- 51 12 73 34 56 17 78 39
RS-422
or
4-Wire
RS-485
GND GND GND GND GND GND GND GND GND

___________________________________________________________________________________
14
SUNIX DB78 Female 16 ports Serial Communication Boards Pin Assignment
Port
Signal 1 2 3 4 5 6 7 8
Tx+ 60 21 43 4 65 26 48 9
Tx- 40 1 62 23 45 6 67 28
GND GND GND GND GND GND GND GND GND
Port
Signal 9 10 11 12 13 14 15 16
Tx+ 70 31 53 14 75 36 58 19
Tx- 50 11 72 33 55 16 77 38
2-Wire
RS-485
GND GND GND GND GND GND GND GND GND

___________________________________________________________________________________
15
Jumper Settings
For RS-422/485 serial communications, when an electrical signal travels
through two different resistance junctions in a transmission line, the impedance
mismatch will sometimes cause signal reflection. Signal reflection causes signal
distortion, which in turn will contribute communication errors. The solution to this
problem is to establish the same impedance at the line ends as in the line itself
by terminating them with resistors.
Ideally, the two ends of the cable will have a termination resistor connected
across the two wires. Without termination resistors, reflections of fast driver
edges can cause multiple data edges that can cause data corruption.
Termination resistors also reduce electrical noise sensitivity due to the lower
impedance, and bias resistors (120 ohms for twisted pairs) are required. The
value of each termination resistor should be equal to the cable impedance.

___________________________________________________________________________________
16
RS-422 or 4-Wire RS-485 working model with termination resistor:
2-Wire RS-485 working model with termination resistor:
SUNIX RS-422/485 PCI Serial board equips independent TX and RX
termination resistors for each serial port. User can modify the jumper setting
(short the pins) to avoid impedance mismatched problem when operate under
Multi-drop transmission. Resistors should be added near the receiving side.
Note: Stands for termination resistor near the receiving side.
Manufactory default jumper setting is OPEN (disable 120 ohms termination
resistors across the two wires).
SUNIX Host Card Device
D + (Tx+)
D – (TX-) D +
D –
SUNIX Host Card Device
Tx +
Tx –
Rx +
Rx –
Rx +
Rx –
Tx +
Tx –

___________________________________________________________________________________
17
3.
Driver Installation
______________________________________________
After installing the Universal PCI RS-422/485 Multi-Port Communication Board
in your system successfully, please follow the step by step software installation
guide to confirm how to install appropriate driver and configure the serial port
settings.
The driver for PCI serial board supports Windows and Linux operating systems,
and you can select your requirement in the following chapter:
The following topics covered in this chapter:
Windows Driver Installation
Windows Driver Uninstallation
Linux Driver Installation
Verify Installation

___________________________________________________________________________________
18
Windows Driver Installation
Please refer to following instructions to install the driver for the first time under
Windows operation system. You will need to plug the board in an available PCI
or PCI-X slot first, before installing the driver.
(1) After the board is physically installed and the PC boots up, system will detect
the PCI Serial card and prompt for driver installation wizard, please choose
cancel.
(2) Put CD driver bound with product in your CD / DVD ROM drive.
Please select autorun.exe., then select “Driver Installation”.

___________________________________________________________________________________
19
(3) Please select the product interface you bought, such as PCI.
(4) Please select the O.S. version you are using, such as Windows Vista.
Then system will process the driver installation step automatically.
This manual suits for next models
1
Table of contents