Page 8 Page 9
Pflege und Wartung
Pumpe: Die Pumpe verliert an Leistung oder fördert kein Wasser.
Überprüfen Sie die Pumpe auf Ablagerungen oder Kalkrückstände im
Pumpenfiltergehäuse.
Lily behutsam aus dem Wasser nehmen und kopfüber auf eine weiche
Oberfläche legen. Die Stecker gut abtrocknen und trennen. Die
Pumpe vom Solarmodul abziehen und das Pumpenfiltergehäuse
öffnen. Die Flügelradabdeckung abnehmen und das Flügelrad
herausziehen, Schmutz oder Kalk entfernen. Das Flügelrad, die
Flügelradabdeckung und das Pumpenfiltergehäuse wiedereinsetzen.
Die Pumpe in den Brunnen einbauen und den Stecker der Pumpe mit
dem Solarmodul verbinden.
Bitte beachten Sie:
Die Unterwasserstecker müssen absolut trocken sein bevor Sie
verbunden werden. Um die Dichtheit zu garantieren muss die
Kabelverbindung zusammen gedreht und nicht gesteckt werden.
Stellen Sie sicher das der O-Ring nicht aus der Nut rutscht, da sonst
Wasser in den Stecker eindringt und dazu führt, das die Pumpe
unbrauchbar wird.
Solarmodul:
Das Solarmodul sollte nur mit einem weichen Tuch und
etwas Glasreiniger gereinigt werden. Regelmäßige Reinigung
verbessert die Leistung Ihres Solarmoduls.
Funktionsstörungen
Sollte Sie Probleme haben, dann wenden Sie sich bitte zuerst an
Sunny Pumps. Besuchen Sie unsere Internet Seite
www.sunny-pumps.com wo Sie sofort Antworten auf Ihre Fragen
finden sowie eine Service-email an uns absenden können. Sie erhalten
umgehend Unterstützung und können Ersatzteile anfordern.
Die Pumpe hört auf Wasser zu fördern, obwohl sich das
Solarmodul in voller Sonneneinstrahlung befindet:
Überprüfen, ob das Flügelrad blockiert ist. Das Pumpenfiltergehäuse
öffnen, die Flügelradabdeckung abnehmen und das Flügelrad
herausziehen. Ist es blockiert, dann reinigen, wie oben beschrieben.
Fals nicht, nehmen Sie Verbindung mit unserem Kundenservice auf
Die Pumpe funktioniert, aber fördert kein Wasser:
1) Nehmen Sie den Pumpendeckel ab und reingen Sie wie oben
beschrieben.
2) Überprüfen, ob das Pumpenfiltergehäuse und Flügelrad richtig
sitzt. Sollten diese nicht richtig sitzen, kann die Pumpe kein Wasser
fördern, da der Wasserdruck entweicht.
3)
Bei Betrieb mit D
üsenset
bitte das D
üsenset
auf Verschmutzung
überprüfen und gegebenfalls reinigen.
Stecker eindrehen
Modul auf weiche Oberfläche legen
Pumpe vorsichtig auf das Rohr
stecken
Sunny Lily
Anleitung
Sprinkler & Ankersack set
Pumpe vorsichtig auf
das Rohr stecken
Beschweren des Anckersacks
mit Steinen
DEUTSCH
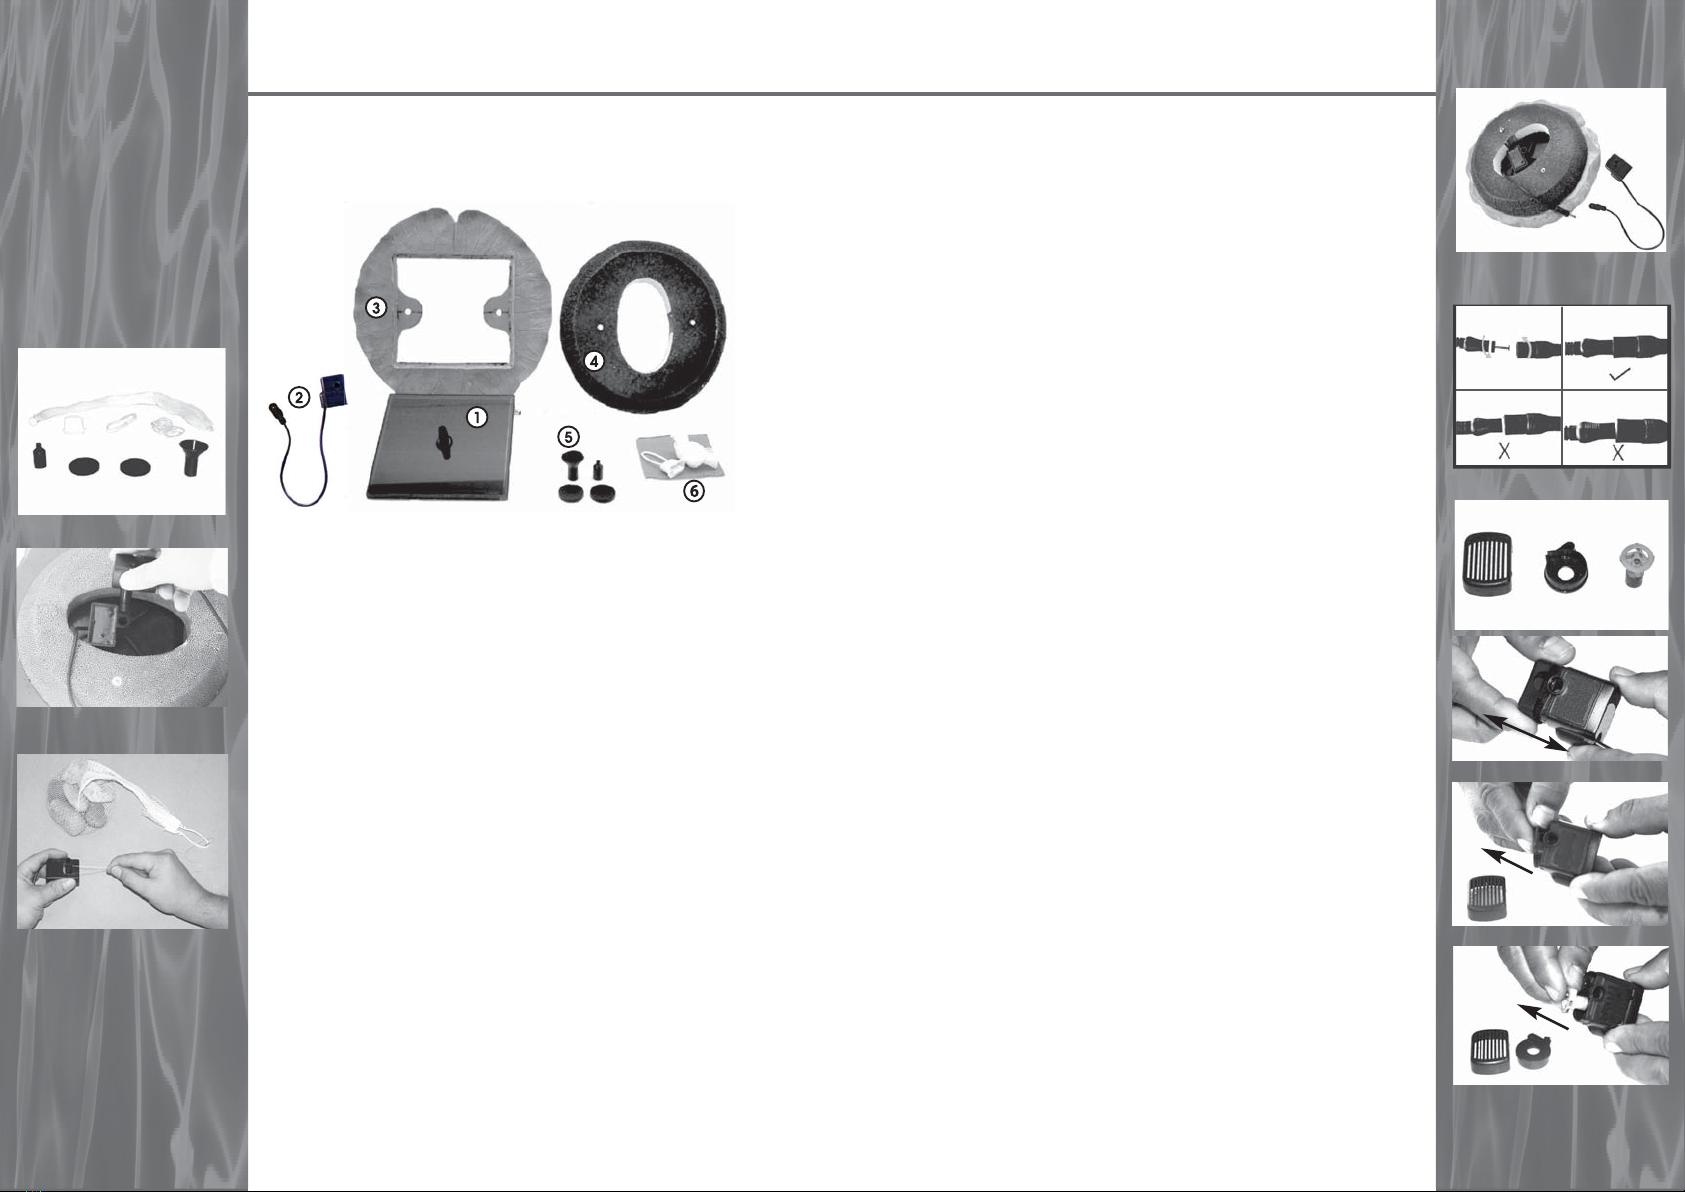
Bedienungselemente
1 Solarmodul mit Pumpe 2 Oberteil (Schale)
3 Rohr 4 Stand
5 Gewicht 6 D
ü
senset
Montage und Inbetriebnahme
Packen Sie alle Teile sorgfältig aus. Stellen Sie sicher, das nichts in
der Verpackung zurückbleibt.
Packen Sie alle Teile sorgfältig aus.
Stecken Sie die Pumpe vorsichtig auf das Rohr an der Unterseite.
Stecken Sie die von Ihnen gewünschte Sprinklerdüse auf.
Legen Sie die Sunny Lily in Ihren Teich.
Die Sunny lily ist nun betriebsbereit.
Bitte beachten Sie:
Bei der ersten Benutzung kann sich noch Luft in der
Pumpe befinden. Es kann bis zu 5 Minuten dauern, bis die Luft
komplett entweicht.
Tauchen Sie die Sunny Lily kurz
unter Wasser, damit die Luft aus der Pumpe entweichen kann.
Bei Bedarf kann der beiliegende Anckersack an der Pumpe
befestigt werden.
Flügelradabdeckung
Flügelradabdeckung abnehmen
Entfernen Sie den Pumpendeckel
Reinigen Sie die Pumpe (bitte
Flügelrad dazu herausnehmen)
Pumpendeckel
Flügelrad