SunSetter EASYSHADE User manual

EasyShade™ Vertical Roll up
Motorized Solar Shade Screen Kits
Tools Needed:
Electric Drill
1/8" Drill Bit
Pencil
Open End Wrench
Phillips Screwdriver
Tape Measure
Level
Parts Supplied:
Shade Assembly
Mounting Brackets - (2) for 4' to 9' Models, and
(3) for the 10' to 12' Models
#8 x 1- ½" Round-Head Screws – (4) for 4' to 9'
Models and (6) for 10' to 12' Models
1/8" Allen Wrench – for securing mounting
bracket set screws
Cable Guide (2)
Cable Guide Bracket (2)
Cable Guide Stops (2)
5/64" Allen Wrench – for securing cable guide
stop set screws
#8 x 1- ½" Flat-Head Screws (4)
Remote Transmitter with Wall Mounting Post(1)
WARNING: FAILURE TO FOLLOW THESE
INSTRUCTIONS CAN RESULT IN PERSONAL
INJURY! PLEASE READ THESE INSTRUCTIONS
IN ITS ENTIRETY BEFORE ATTEMPTING TO
COMPLETE THIS PROCEDURE.
NOTE: PRIOR TO INSTALLING YOUR EASYSHADE, PLEASE INSPECT
THE MOUNTING SURFACE TO ENSURE THAT THERE ARE NO
OBSTRUCTIONS ON YOUR WALL SURFACE, SUCH AS LIGHT FIXTURES,
DOOR HANDLES, ETC THAT WOULD INTERFERE WITH OR BLOCK THE
SHADE PANEL AS IT IS EXTENDED.
The SunSetter EasyShade can be installed with the mounting brackets on a wall (vertical surface)
see Figure 1a or on the underside of a structure (horizontal surface) see Figure 1b. For the 4' to 9'
models, each of the brackets should be installed so that it is no more than 10" from the end of the
shade assembly. For the 10' to 12' models, a mounting bracket should be installed at each end of
the shade assembly so that it is no more than 10" from the end of the shade assembly. The third
mounting bracket should be installed at the mid point between the two end brackets.

STEP 1. Determine the desired location for the mounting brackets, making sure that they are plumb
and level. Using a pencil, mark the 2 hole locations in the bracket. Using a 1/8” bit, drill holes
approximately 1-½” deep at both hole locations. Repeat for the mounting bracket on the other side,
and the center mounting location on 10’ to 12’ models.
STEP 2A. For mounting on a wall (vertical surface), secure each bracket with two #8 x 1-½"round-
head screws. Note the orientation of the bracket, the end with the set screw should be at the
bottom. See Figure 1a.
STEP 2B. For mounting on an underside structure (horizontal surface), secure each bracket with two
#8 x 1-½" round-head screws. Note the orientation of the bracket, the end with the set screw
should face toward you as you face your mounting location. See Figure 1b.
STEP 3. With your helper, lift the shade assembly up to the installed mounting brackets and insert
the Top groove of the shade assembly onto the protruding tab on the mounting brackets (See Figure
1a). While maintaining upward pressure to keep the top groove of the shade assembly on the tab of
the mounting brackets, press the shade assembly toward the mounting bracket and be sure that the
set screw is aligned in the recessed portion of the shade assembly. See Figure 2

STEP 4. Tighten the set screw in each mounting bracket until the shade assembly is secure. (See
Figure 2a)
STEP 5. Plug the motor power cord into your electrical outlet.
NOTE: THE OPEN AND CLOSE STOP LIMITS ON THE EASYSHADE MOTOR WERE SET AND
TESTED AT THE FACTORY PRIOR TO SHIPMENT. THE OPEN STOP LIMIT WAS SET AT 36
INCH EXTENSION, THIS WILL ALLOW FOR COMPLETION OF THE INSTALLATION PROCESS.
STEP 6. Open your EasyShade using the open button on your remote control. (See Figure 3) Once
you opened the EasyShade, unplug the power cord from the electrical outlet.
NOTE: IF THE EASYSHADE DOES NOT RESPOND WHEN YOU PRESS THE OPEN BUTTON ON
THE REMOTE CONTROL, CHECK TO SEE IF THE FIRST CHANNEL SELECTOR LIGHT ON THE
REMOTE BLINKS ON AND OFF WHEN YOU PRESS THE OPEN BUTTON. (See Figure 4). IF
ONE OF THE OTHER CHANNEL LIGHTS COMES ON, PRESS THE CHANNEL SELECTOR
BUTTON UNTIL YOU HAVE SWITCHED TO THE FIRST CHANNEL. (See Figure 5)

STEP 7. At each end of the EasyShade Housing Assembly you will find a Vinyl Coated Cable, you will
need to unroll this cable and allow it to hang flat against the mounting surface. (See Figure 6)
STEP 8. Insert the Vinyl Coated Cable located at each end of the Housing Assembly through the
guide holes at each end of the EasyShade drop down panel. (See Figure 7)
STEP 9. Determine how far down your EasyShade will be extended (this is limited to the length of
the Vinyl Coated Cable, but you may not exceed 84" from the bottom of the EasyShade housing).
Below each end of the EasyShade Housing Assembly, mark a horizontal line on the wall. (See Figure
8)
STEP 10. Using the Vinyl Coated Cable as a guide, ensure the cable is straight and plumb and mark
a vertical line where it crosses the horizontal lines
STEP 11. Locate the Cable Guide Brackets and Cable Guide stops in your hardware package.
STEP 12. Align the top of the Cable Guide Brackets below the horizontal line and centered on the
vertical lines as shown in Figure 10. Ensure the bracket is plumb and mark both screw hole
locations. Remove the bracket and pre-drill both screw hole locations with a 1/8" drill bit. Repeat for
the other side of the EasyShade.

STEP 13. Place the Cable Guide Bracket over the pre-drilled holes and secure in place with the #8 x
1-1/2 Flat Head screws.
STEP 14. Place the lower end of one of the Vinyl Coated cables through the hole in the Cable Guide
Bracket you just installed and from the bottom slide one of the Cable Guide Stops onto the vinyl
cable and secure in place with the supplied 5/64" Allen wrench. Repeat for the other side of the
EasyShade. (See Figure 11)
STEP 15. You should check to ensure that the Vinyl Coated Cables are tight, if they seem to be loose you can
adjust the tension using a 7/16" open end wrench as follows. On each of the Cable Guide Stops you will find
7/16" nut, by turning the nut Counter Clockwise you can tighten the cable. (See Figure 12) NOTE: DO NOT
OVER TIGHTEN THE CABLE.
STEP 16. If you have excess Vinyl Coated Cable extending from the bottom of the Cable Guide Stops, trim it
off using wire cutters. (See Figure 13)
STEP 17. Plug the power cord back into the electrical outlet.
NOTE: THE FOLLOWING PROCEDURE WILL ALLOW YOU TO SET THE OPEN LIMIT TO YOUR SPECIFIC
INSTALLATION POSITION.
STEP 18. Use the close button on your remote to Close the EasyShade. (See Figure 14)
STEP 19. Use the open button on your remote to Open the EasyShade to the current open limit position and let
it stop. (See Figure 15)
STEP 20. Press the Open and Close buttons simultaneously until the EasyShade jogs, then release. (A "jog" is a
small back and forth movement of the motor.) (See Figure 16)

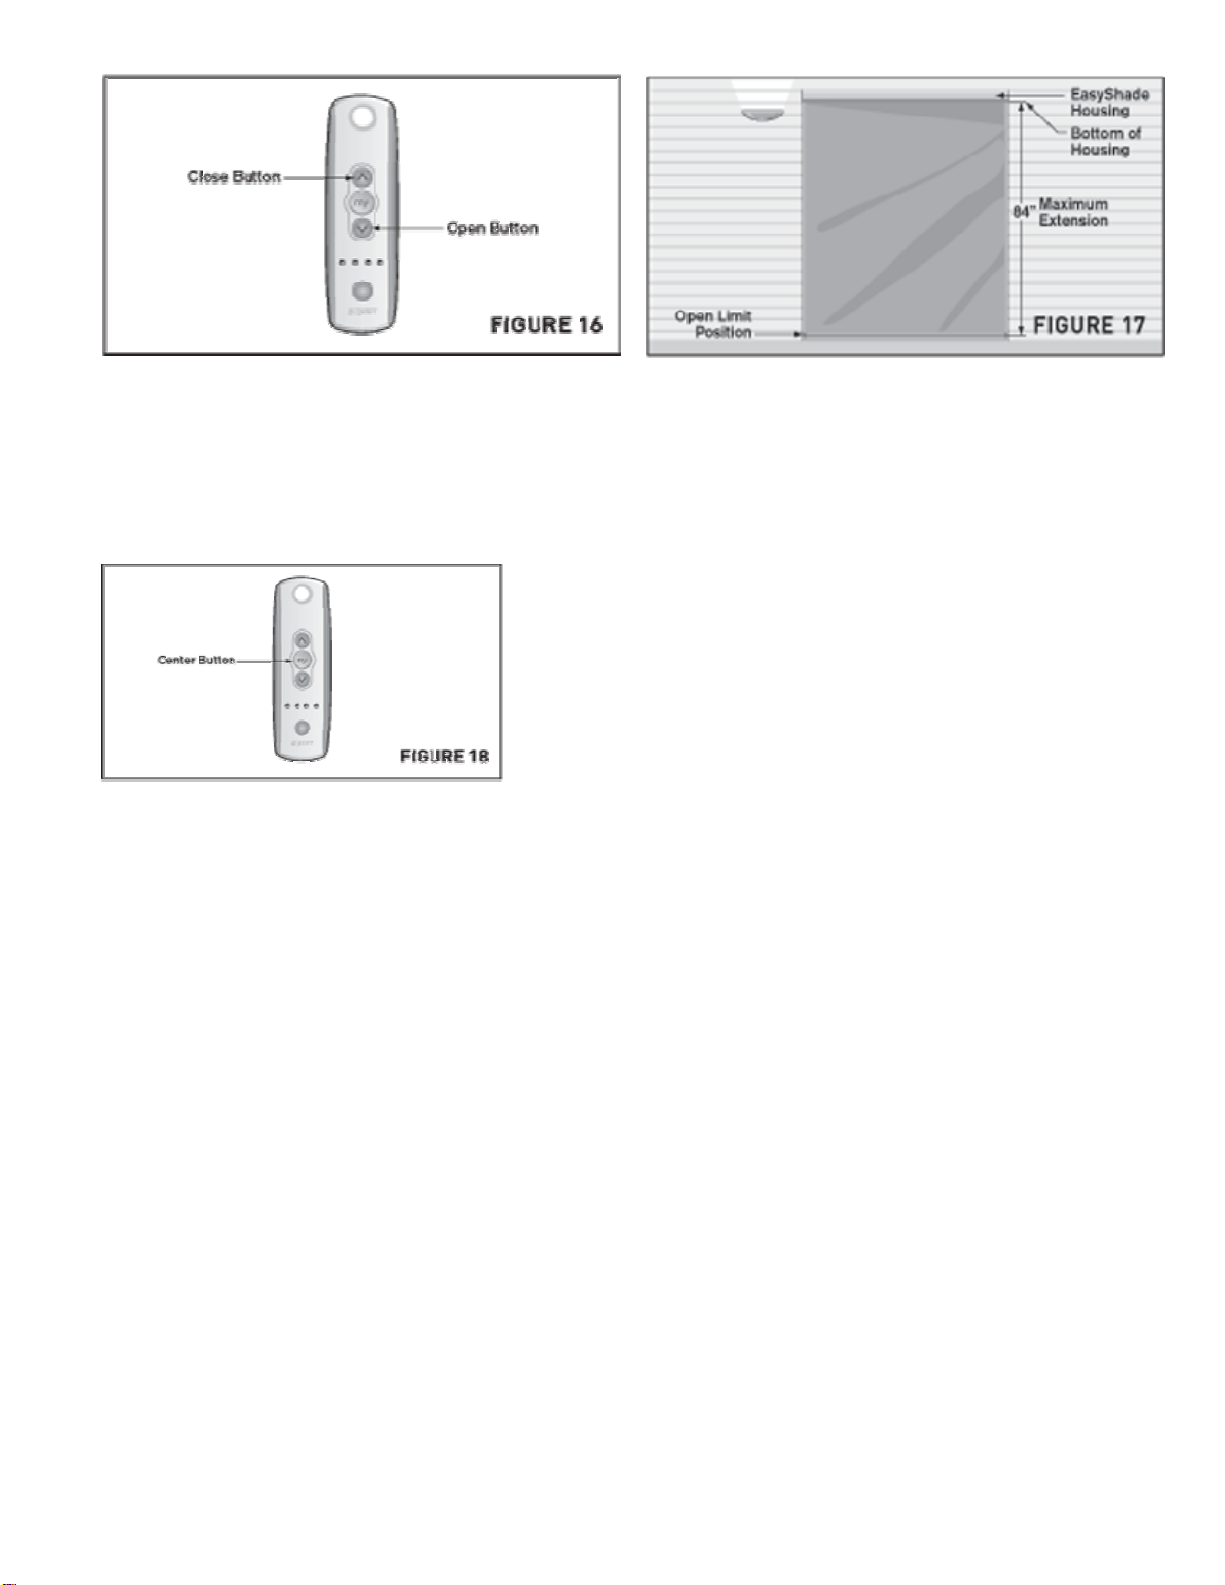
STEP 21. Use the Open button on the remote to adjust the EasyShade to your new Open limit
position that you marked in Step 9. (See Figure 17)
STEP 22. Press the center button on your remote until the EasyShade jogs, then release. (See
Figure 18) Your new open position is now set.
STEP 23. Test the operation of your EasyShade by using the open and close buttons on your remote
control.
STEP 24. We've supplied a wall holder for the remote transmitter, see figure 1 on page 1. Position
the wall post at the desired location and secure as needed.
CAUTION: DO NOT PERMIT THE HAND-HELD REMOTE TRANSMITTER TO GET WET AS THIS
CAN AFFECT IT’S PROPER OPERATION. IT IS RECOMMENDED TO KEEP THE REMOTE
TRANSMITTER INDOORS WHEN THE EASYSHADE IS NOT IN USE OR IF RAIN IS EXPECTED.
CAUTION: THE INSTALLATION PROCEDURE FOR THE MOTORIZED EASYSHADE INCLUDES
THE USE OF CABLE GUIDES TO STABILIZE THE EXTENDED SOLAR SCREEN DURING
NORMAL USE. IF YOUR APPLICATION DOES NOT PERMIT THE INSTALLATION OF THE
NECESSARY CABLE GUIDES OR YOU DO NOT PLAN TO INSTALL THEM, YOU MUST USE
ADDITIONAL CARE TO PREVENT DAMAGE TO YOUR PRODUCT. WHILE WE DO NOT
RECOMMEND INSTALLING THE MOTORIZED EASYSHADE WITHOUT THE SUPPLIED CABLE
GUIDES, SOME CUSTOMERS MAY DETERMINE THAT THEIR APPLICATION DOES NOT HAVE
A VERTICAL SURFACE TO INSTALL THE SUPPLIED CABLE GUIDES AS INSTRUCTED. UNDER
NO CIRCUMSTANCES SHOULD YOU ATTEMPT TO SET THE EXTENSION OF THE SOLAR
SCREEN GREATER THAN 84” FROM THE BOTTOM OF THE ALUMINUM HOUSING (SEE FIG
17), AS THIS WILL CAUSE THE SOLAR SCREEN TO BE PULLED OFF OF THE INTERNAL
ROLLER BAR. DO NOT LEAVE YOUR MOTORIZED EASYSHADE EXTENDED DURING WINDY
CONDITIONS OR LEAVE UNATTENDED, AS THE UNCONTROLLED MOVEMENT OF THE
EXTENDED SOLAR SCREEN COULD CAUSE DAMAGE TO THE PRODUCT AND SURROUNDING
ITEMS. SIMPLY CLOSE THE MOTORIZED EASYSHADE BY PRESSING THE UP BUTTON ON
THE REMOTE TRANSMITTER.
NOTE: During an electrical outage, you will not have the ability to open or close your EasyShade.

APPENDIX A
Adjusting the Open and Close Limits of the EasyShade Motor
APPENDIX B
Resetting the EasyShade Motor
This procedure describes the actions needed to reset the communication between the motor and the
remote transmitter that’s supplied with your motorized EasyShade. This procedure should only be
performed if the remote transmitter does not operate the motorized EasyShade. Please review the
steps below to familiarize yourself with the procedure before attempting to complete them.
To Reset the Motor:
You will need to disconnect power (120V AC) for 2 seconds, reconnect for 10 seconds, disconnect for
another 2 seconds and reconnect. The motor should start to move and then stop on its own (if this
does not happen, continue to perform the disconnects until it does). Once the motor stops moving
on its own, press and hold the Program button on the back of the remote and count to ten without
letting go. The EasyShade will jog twice a few seconds apart The motor has no w been reset.
Complete steps 1 thru 6 below to restore communication to the transmitter, verify the motor
rotation and to reset the Open and Close positions for the EasyShade.

Add/Delete a Control Device (Transmitter)
To ADD an additional Control Device (not the one that was supplied with the EasyShade).
•Press the programming button on the back of the transmitter that was supplied with the
EasyShade until the motor 'jogs'.
•On the additional Control Device, press the programming button until the motor 'jogs', then
release.
If you wish to DELETE a Control Device, simply repeat the two steps listed above.
Rev03/02/11
Other manuals for EASYSHADE
7
Table of contents
Other SunSetter Indoor Furnishing manuals
Popular Indoor Furnishing manuals by other brands

KidKraft
KidKraft 53260A Assembly instructions

Sunjoy
Sunjoy L-DN899SAL-A Assembly instructions

American Standard
American Standard Chandler w/Drainboard Double Bowl Sink... Specification sheet

Home Decorators Collection
Home Decorators Collection Accent 1200 Use and care guide

Dorel Home Products
Dorel Home Products 2008017 Assembly manual

GABBY
GABBY EVEREST SCH-170215 Assembly instruction