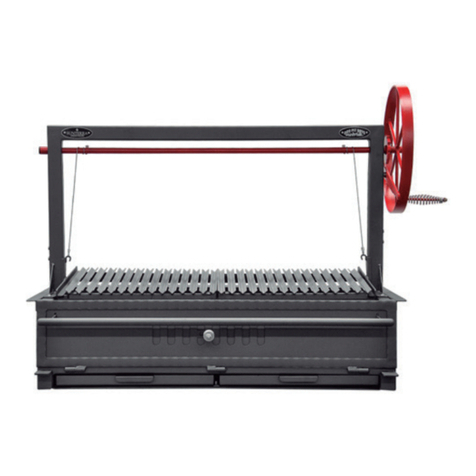
SUNTERRA ARGENTINE ARG Series User manual

ARGENTINE
STYLE
HAND CRAFTED
GRILLS
OWNERS MANUAL
Ju ne 11, 2019
C e rt i f ic at e #
C0430413-01

HAND CRAFTED GRILLS2
OWNERS MANUAL
3
4
Rotisserie
Safety
Care & Maintenance 15-16
SERIES
FEATURES
SPECIFICATIONS
ASSEMBLY
13
2
TABLE OF CONTENTS
14
ARGENTINE GRILLS
5-6-7-8-9
10-11-12

SERIES
ARGENTINE GRILLS 3
ARG-48DSIBR7030
ARG-60DSIBR7030
ARG-72DSIBR7030
ARG-96DSIBR7030
ARG-48DSIBR7030CRT
ARG-60DSIBR7030CRT
ARG-72DSIBR7030CRT
ARG-96DSIBR7030CRT
ARG-36DSI
ARG-48DSI
ARG-60DSI
ARG-36DSICRT
ARG-48DSICRT
ARG-60DSICRT
ARG-36DSIBRB
ARG-48DSIBRB
ARG-48DSPLBRB
ARG-60DSIBRB
ARG-60DSPLBRB
ARG-72DSPLBRB
ARG-36DSIBRBCRT
ARG-48DSIBRBCRT
ARG-48DSPLBRBCRT
ARG-60DSIBRBCRT
ARG-60DSPLBRBCRT
ARG-72DSPLBRBCRT

ARGENTINE GRILLS
4
FEATURES
Manufactured with Heavy Gauge Steel
•Includes firebrick on floor and walls
•70/30 split grate system for Argentine Brasero grills
•Thickness - Grill base floor and side walls; Heavy gauge
3/16“ steel
•Height Firebox: 12"
•Finish: Satin Black
•Fire bricks included for heat retention and distribution
•Single Grill Grate with side Brasero
•Single Door will swing down or without door
•Three Step metal and finish process with 1200 degree
Paint
•Heavy Duty flywheels w/cool to the touch handles
•1000 lbs. stainless steel aircraft cable. Raises & lowers V
channel grates
•V channel grates lower into the grill box approximately
3” above coals
•V channel grates are inverted and slopped to the front
of the grill to catch fats & juices to reduce flare-up
•Sliding Damper System w/cool to the touch handles.
•Wood and Lump Charcoal Fuel

SPECIFICATIONS
ARGENTINE GRILLS 5
OVERALL WIDTH
INCHES (MM)
OVERALL LENGTH
INCHES (MM)
OVERALL HEIGHT
INCHES (MM)
WEIGHT LBS
(KG)
36”
DSI
CRT
48”
DSI
CRT
60”
DSI
CRT
36”
DSI
48”
DSI
60”
DSI
45”
(1143)
29”
(736)
64”
(1625)
298
(135)
57”
(1448)
29”
(736)
64”
(1625)
435
(197)
69”
(1753)
35”
(889)
64”
(1625)
624
(283)
45”
(1143)
29”
(736)
40”
(1016)
237
(108)
57”
(1448)
29”
(736)
40”
(1016)
360
(163)
69”
(1753)
35”
(889)
40”
(1016)
529
(240)
SERIES ARG

ARGENTINE GRILLS
6
SPECIFICATIONS
48”
DSI
60”
DSI
72”
DSI
96”
DSI
57”
(1448)
29”
(736)
40”
(1016)
425
(193)
69”
(1753)
35”
(889)
40”
(1016)
625
(283)
81”
(2057)
35”
(889)
40”
(1016)
835
(379)
105”
(2667)
35”
(889)
40”
(1016)
1100
(499)
OVERALL WIDTH
INCHES (MM)
OVERALL LENGTH
INCHES (MM)
OVERALL HEIGHT
INCHES (MM)
WEIGHT LBS
(KG)
SERIES ARG7030BR

SPECIFICATIONS
ARGENTINE GRILLS 7
48”
DSI
CRT
60”
DSI
CRT
72”
DSI
CRT
96”
DSI
CRT
57”
(1448)
29”
(736)
64”
(1625)
510
(231)
69”
(1753)
35”
(889)
64”
(1625)
705
(320)
81”
(2057)
35”
(889)
64”
(1625)
835
(447)
105”
(2667)
35”
(889)
64”
(1625)
1175
(533)
OVERALL WIDTH
INCHES (MM)
OVERALL LENGTH
INCHES (MM)
OVERALL HEIGHT
INCHES (MM)
WEIGHT LBS
(KG)
SERIES ARG7030BR

SPECIFICATIONS
ARGENTINE GRILLS 8
36”
BRB
72”
BRB
45”
(1143)
42”
(1066)
42”
(1066)
604
(273)
66”
(1676)
42"
(1066)
42”
792
(359)
78"
(1981)
42”
(1066)
42"
(1066")
980
(444)
90”
(2286)
42”
(1066)
42”
(1066")
1250
(567)
OVERALL
DEPTH INCHES
(MM)
OVERALL HEIGHT
INCHES (MM)
WEIGHT LBS
(KG)
SERIES ARGBRB
NON-CART
(1066")
OVERALL LENGTH
INCHES (MM)
Deduct 9" for single grate design on 48" & 60"
48”
BRB
60”
BRB

SPECIFICATIONS
ARGENTINE GRILLS 9
36”
BRB
CRT CRT CRT
72”
BRB
CRT
45”
(1143)
42”
(1066)
66”
(1676)
704
(319)
66”
(1676)
42"
(1066)
66”
965
(437)
78"
(1981)
42”
(1066)
66"
(1676")
1120
(508)
90”
(2286)
42”
(1066)
66”
(1676")
1350
(612)
OVERALL DEPTH
INCHES (MM)
OVERALL HEIGHT
INCHES (MM)
WEIGHT LBS
(KG)
SERIES ARGBRB
CART
(1676")
OVERALL LENGTH
INCHES (MM)
Deduct 9" for single grate design on 48" & 60"
48”
BRB
60”
BRB

ASSEMBLY
To prevent cart movement, lock down
both locking casters.
Tools required
3/4” & 7/32”
ARGENTINE GRILLS
10
Tighten the wheels
Check over each step of the
assembly when performed
1
2
3
4
Tighten all bolts of top frame and
bottom shelf
Place the shelf into
the angle iron of the
legs. Thread caster
bolt through the hole
of shelf and tighten
with 3/4" wrench.
bolts and tighten with 7/32" allen wrench.
Place 4 legs into the top frame using 3/8"

ASSEMBLY
ARGENTINE GRILLS 11
Place the firebox into counter top or
onto assembled cart. (Heavy - lift
properly)
Insert flywheel(s) on spindle and hand
turn.
Lock flywheel on spindle with a cotter pin
and use pliers to bend.
Chech over each step of the
assembly when performed
Organize enough
helpers
1
2
3

ARGENTINE GRILLS
12
ASSEMBLY
Chech over each step of the
assembly when performed
To light the grill
Use only proper lighting methods.
Add charcoal/logs to firebox and
light.
Be sure to season the grill before
first time use. (See instructions in
the BBQ tips and techniques section
on website.
Most importantly, have fun, and use
safely when cooking your favorite meals!
4
5
Install brake handle into upright
in this sequence as pictured;
Position handle-washer- bolt
and tighten.

ASSEMBLY
ROTISSERIE INSTALLATION 13
Rotisserie equipment will be shipping independently of the grill. Upon receiving, please
use the following instructions noted in the manual for the rotisserie installation. DO NOT
FOLLOW INSTRUCTIONS THAT COME WITH THE ROTISSERIE.
Rotisserie bracket set
Motor bracket
Hardware for motor bracket
Step 1: Assemble both brackets
Step 2: Secure the Spit rod bracket
into the upright frame opposite the motor
Step 3: Secure the motor
bracket to the uprights.
Tools required
1/8” & 3/16”

HAND CRAFTED GRILLS
14
SAFETY
• Only use the outdoor cooking equipment on a hard, level, noncombustible, stable surface (concrete, ground,
etc.) capable of supporting the weight of the unit. DO NOT use on wooden or other surfaces that could burn.
• FOR OUTDOOR USE ONLY. DO NOT operate outdoor cooking equipment indoors or in an enclosed area. In
windy weather, place outdoor cooking equipment in an outdoor area that is protected from the wind.
• Proper clearance of 10’ feet between outdoor cooking equipment and combustible materials (bushes, trees,
wooden decks, fences, buildings, etc.) or construction should be maintained at all times when fire
pit/outdoor cooking equipment is in use. DO NOT place outdoor cooking equipment under a roof overhang or
other enclosed area.
• Place on a sandy surface or place a metal pan or pot under outdoor cooking equipment to catch any ashes or
embers that may escape from outdoor cooking equipment.
• DO NOT us gasoline, kerosene or alcohol for lighting wood. Use of any of these or similar products will
cause an explosion possibly leading to severe bodily injury.
• This is an attended product. DO NOT leave outdoor cooking equipment unattended while in use or while hot.
• Never move the outdoor cooking equipment when in use or when it contains hot coals or ashes.
• Keep outdoor cooking equipment in an area where children and pets cannot come into contact with unit.
• Close supervision is necessary when the outdoor cooking equipment is in use or hot after use.
• It is recommended to use mesh cover on fires at all times.
• Never add charcoal lighting fluid to hot or even warm coals as flashback or explosion may occur.
• DO NOT store or use outdoor cooking equipment near gasoline or other flammable liquids, gases or where
flammable vapors may be present.
• To avoid personal injury, DO NOT wear loose clothing or allow hair to hang freely while tending to outdoor
cooking equipment.
• DO NOT burn any material other than wood or charcoal in outdoor cooking equipment as fuel source.
• Always use oven mitts/gloves to protect your hands. Surfaces will be very HOT!
• Always hold crank handle when lifting or lowering cooking outdoor cooking equipment cover.
• Safety pins should be used at all times. Insert safety pins in nearest holes directly under cooking outdoor
cooking equipment.
• Never leave hot coals and ashes in outdoor cooking equipment unattended. Remaining coals and ashes
must be extinguished. Use caution to protect yourself and property. Carefully saturate coals completely with
water. Allow coals and water to remain in outdoor cooking equipment 24 hours prior to disposing.
• With garden hose, completely wet the surface beneath and around the outdoor cooking equipment to
extinguish any ashes, coals or embers which may have fallen during use or cleaning.
• Use caution when lifting or moving outdoor cooking equipment to prevent strains and back injuries. Moving
outdoor cooking equipment may require the help of an additional person.
• Please keep a fire extinguisher close by. You may need to contact your local authority to determine the
proper type of fire extinguisher needed.
• DO NOT use wood logs over 18 inches in length.
USE CAUTION AND COMMON SENSE WHEN OPERATING YOUR OUTDOOR OUTDOOR COOKING EQUIPMENT.
FAILURE TO ADHERE TO THE SAFETY WARNINGS AND GUIDELINES
COULD RESULT IN BODILY INJURY OR PROPERTY DAMAGE.
SAVE THIS MANUAL FOR FUTURE REFERENCE
WARNING
IMPORTANT SAFETY WARNINGS
READ ALL SAFETY WARNINGS AND INSTRUCTIONS CAREFULLY
BEFORE OPERATING YOUR FIRE PIT, GRILL OR OVEN

SAFETY
HAND CRAFTED GRILLS 15
IMPORTANT: To protect your outdoor cooking equipment from excessive
rust, the unit must be properly cured and covered at all times when not in
use.
Step 1 Lightly coat all interior surfaces of the grill body with vegetable oil
or vegetable oil spray.
Step 2 To build a fire, you may use charcoal and/or wood as fuel in the
Sunterra Casual Fire Pit & Grill.
WARNING: DO NOT use gasoline, kerosene, or alcohol for
lighting wood. Use of any of these or similar products will cause an
explosion possibly leading to sever bodily injury.
Step 3 With the coals burning strong, maintain a good fire for 1 hour then
allow unit to cool completely.
Note: It is important that the exterior of the grill is no scraped or rubbed
during the curing process.
WARNING: DO NOT use wood logs over 18” in length.
Stand back a safe distance and use fireplace tongs to lightly brush
aside ashes on hot coals. Use fireplace tongs to add charcoal and
/or wood to you outdoor cooking equipment, being careful not to
stir-Up ashes and sparks.
Keep hot coals and ashes away from the edges of the grill to
prevent the embers from falling out.
With garden, completely wet the surface beneath and around the
grill to extinguish any ashes, coals, or embers which may have
fallen during use or cleaning.
DO NOT use pretreated charcoal or Dura flame type logs.
PREPARATION FOR USE & LIGHTING INSTRUCTIONS
Place outdoor cooking equipment on a hard, level, noncombustible, stable surface (concrete, ground, etc.)
away from roof overhang or any material. Never use on wood surfaces that could burn.
Place outdoor cooking equipment away from open windows or doors to keep smoke from entering house.
operate fire pit/outdoor cooking equipment indoors or in an enclosed area. In windy weather, place outdoor
cooking equipment in an outdoor area that is protected from the wind.
READ ALL SAFETY WARNINGS AND INSTRUCTIONS CAREFULLY
BEFORE OPERATING YOUR FIRE PIT / GRILL
CURING YOUR GRILL
Adding Charcoal/
Wood During
Cooking
Prior to your first use of the Sunterra Outdoor Cooking Equipment, follow the
instructions below carefully to cure your grill. Curing your grill will minimize
damage to the exterior finish, as well as rid the grill of paint odor that can
impart unnatural flavors to the first meal prepared on your Sunterra Casual
Fire Pit & Grill.
When seasoning or cooking, keep the chamber door closed and only opened
minimally at all times and for refueling only. Reduce the amount of fuel used
to a moderate amount to maintain the coal bed. By design our grills and ovens
are created to cook on embers not flames as in a fireplace. Keeping the door
open for a long period while under intense flame may possibly damage the
exterior finish.

HAND CRAFTED GRILLS
CARE & MAINTENANCE
16
PROPER CARE & MAINTENANCE
If rust appears on the exterior surface of your outdoor cooking equipment, clean and buff the affected area with
steel wool or fine grit emery cloth. Touch-up with a good quality high temperature resistant paint.
Lifetime Limited Warranty
This warranty is not transferable.
EXCEPT AS ABOVE STATED, SUNTERRA OUTDOOR MAKES NO OTHER
EXPRESS WARRANTY.
© Sunterra International, LLC
21720 Hardy Oak Boulevard Ste. 102
San Antonio, TX 78258 U.S.A.
Sunterra Outdoor Products offers a limited lifetime warranty against the firebox burnout of any of their
smoker pit, pizza oven and grill products. This warranty does not apply if the smoker pit or fire box area has
not been used and properly maintained in accordance with the instructions supplied with the product, as well
as online, at the time of original purchase. Rust in firebox, wood grates, cooking grates, and lack of grill
maintenance are not covered by this limited warranty. As with most companies, the High Temp Paint is not
warranted. Warranty coverage does not extend to products shipped outside of the continental United States.
Sunterra Outdoor Products reserves the right to repair or replace, at the sole option of the manufacturer, any
Sunterra Outdoor Products presented to them which they deem to have been defective. Sunterra Outdoor
Products also reserves the sole right to distinguish between burnout, rust, misuse, or problems arising from
neglect of reasonable and necessary care and maintenance. Owners presenting claims will be required to
provide proof of purchase by way of the original purchase receipt and registration certificate.
This manual suits for next models
29
Table of contents
Other SUNTERRA Grill manuals
Popular Grill manuals by other brands

Bodum
Bodum FYRKAT 11421 Instructions for use

Safire
Safire Just GRILLiant Instruction booklet

Bakers & Chefs
Bakers & Chefs mev808alp Operator's manual

Barbecue King
Barbecue King CLASSIC 800 instructions

Weber
Weber Summit Series owner's guide

KBS Gastrotechnik
KBS Gastrotechnik NGW74ED Instructions for installation, operation and maintenance