Surgimedics SURGIFRESH TURBO User manual

OWNERS MANUAL
SMOKE EVACUATION SYSTEM
SAFETY PRECAUTIONS
This manual contains information that is important to your
safety and preventing damage to your smoke evacuator
CAREFULLY READ THIS INSTRUCTION MANUAL
BEFORE ATTEMPTING TO OPERATE THIS SMOKE EVACUATOR
Model #
Serial #
Purchase Date
SAFETY PRECAUTIONS
Notice: Federal (USA) law restricts this device to
sale by or on the order of a physician.
This Owner's Manual and the equipment discussed herein are to be used only by qualified and
properly trained medical personnel who are skilled in the particular technique and surgical pro-
cedure to be performed.
This symbol is intended to alert the user to the presence of uninsulated
“dangerous voltage” within the product’s enclosure that may be of suf-
ficient magnitude to constitute a risk of electric shock to persons.
This symbol is intended to alert the user to the presence of important
operating and maintenance instructions in the literature accompanying
the product.
Warning -- indicates that a condition may exist which could adversely affect the
operator or patient.
Caution -- indicates that a condition may exist which could damage the smoke
evacuation system.
WARNINGS.................................Page 2 CUSTOMER SERVICE............Page 9
INTRODUCTION.........................Page 3 TROUBLESHOOTING.............Page 10
OPERATING INSTRUCTIONS ...Page 4 SPECIFICATIONS...................Page 11
MAINTENANCE..........................Page 8 WARRANTY............................Page 12
CONTENTS
TURBO
http://www.surgimedics.com
301848 ART Rev 0
© Coastal Life Systems, Inc.
120V 60Hz
PN 906500
1

WARNING
CAUTION
Warning: To prevent electric shock
Do not connect a wet power cord to the wall receptacle.
Do not expose to moisture.
Do not use extension cords, adapter plugs, or a non approved hospital grade grounded
polarized receptacle. Be sure electrical plug blades are fully inserted in receptacle.
Do not remove covers from the unit. The unit is non serviceable except for component
replacement. Refer to qualified service personnel.
Unplug the unit from the wall receptacle before cleaning.
Unplug the unit from the wall receptacle if it is not to be used for several days or more.
To disconnect the power cord, pull it out by firmly grasping the plug, never pull the cord
itself.
Caution: Use the unit in a well-ventilated area.
Caution: Introduction of fluids into the filters could damage them and the smoke evacuation
system.
Caution: An occlusion of the smoke evacuation system can overheat the unit.
2
Warning: The smoke evacuator produces a strong vacuum. Properly adjust the suction control
and the position of the inlet end of the suction tubing or wand to prevent injury to the
patient or inadvertent damage to surgical materials prior to turning power on.
Warning: Laser and electrosurgical plume are potentially hazardous. Used filters, tubing, and
accessories should be handled according to your institution's procedures for
biohazardous materials.
Warning: To prevent a fire or explosion hazard, do not use the unit in the presence of flammable
or potentially flammable materials.
Warning: Some cannulas, valves, or other instruments combined with suction may cause rapid
reduction of the pneumoperitoneum in laparoscopic procedures.
WARNING

3
Not category AP (Anesthesia Proofed) equipment.
Danger, explosion risk if used in presence of flammable anesthetics
Medical Electrical Equipment Classified with respect to electrical shock, fire and
mechanical hazards only in accordance with UL 60601-1 and
CAN/CSA-22.2 No. 601.1 61CB
INTRODUCTION
Caution, consult accompanying documentation for warnings and precautions.
Consult instructions for use.
1.0 INTENDED USE
The SurgiFresh® Turbo Smoke Evacuation System is intended to be used to evacuate plume / smoke
created during electrosurgery, laser surgery, and laparoscopic or power tool surgical procedures.
Do not use the SurgiFresh® Turbo for applications other than its intended use.
Use only Surgimedics accessories with the SurgiFresh® Turbo. Using products and
accessories other than Surgimedics may void warranty.
Contact Surgimedics with questions concerning features, performance, and intended use of
this device, and to order Surgimedics accessories.
Distributed by: Surgimedics, a division of Coastal Life Systems, Inc.
7027 Fairgrounds Pkwy.
San Antonio, TX 78238 USA
800-645-7418
www.surgimedics.com
2.0 DESCRIPTION OF SYMBOLS
The following is a description of the symbols located on the SurgiFresh® Turbo.
Protective earth; protective ground.
To identify any terminal which is intended for connection to an external conductor
for protection against electric shock in case of a fault, or the terminal of a
protective earth (ground) electrode

Suction Control
Knob
Filter Test Switch
Indicator Lamp
Circuit Breaker
Circuit Breaker
IEC Connector
Power Cord
Folding
Handle
Footswitch Control
Cord Wrap
Power Switch
OPERATING INSTRUCTIONS
4
FIGURE 1
Footswitch Tubing port
A
B
Note: Shown with optional handle and wheel cart.
3.0 FEATURES AND CONTROLS
Figure 1 User controls
A) Power Switch, Suction Control Knob, Filter Test Switch, and Replace Filter Lamp.
B) Footswitch Tubing Port and Footswitch Control -- connection and control for remote footswitch.

OPERATING INSTRUCTIONS
5
4.0 SYSTEM SET-UP
4.1 Installation
The SurgiFresh® Turbo with manual will arrive in a single carton. Inspect the carton and the
product for any scratches, dents or damage which may have occurred during shipment. If any damage is noted,
follow the instructions per the Warranty section. Smoke evacuation disposables such as filters, tubing and
accessories may be shipped separately. The same shipping damage instructions apply to
these items.
After removal from the carton, the SurgiFresh® Turbo is set up as follows:
Note: Save carton and packing for future use.
1. Connect the footswitch tube to the side tubing port on the smoke evacuator. Place the footswitch control
in the footswitch mode. If the footswitch is not desired for use, override the footswitch by placing the
footswitch control in the normal mode.
2. Install an ULPA filter in the center core of the unit. Note the air flow direction arrow on the ULPA filter.
The arrow should be pointing downward. Be sure there are no obstructions and the filter
seats completely by pushing all the way down.
Note: Fill out the date sticker (included with filter) and apply it to the top of the unit. The normal replacement is
90 days from the date of installation. Early replacement is possible due to heavy usage as indicated by the ULPA
filter test or odor.
3. Connect the power cord to the unit and an appropriate electrical receptacle.
4. Perform the ULPA filter test per the procedure in Section 6.2.
Note: The ULPA filter test is performed with no pre-filter or tubing in place. After testing is satisfactorily
completed, turn the motor speed knob to approximately ¼ speed to ensure that the unit will not be
activated at high speed.
5. Install a pre-filter to the top of the ULPA filter.
Caution: Be sure that both the ULPA filter and the pre-filter are securely seated to ensure proper
suction flow.
6. Determine the type of procedure, select the appropriate tubing and accessories, and prepare the unit for
use as described in Section 4.2
Warning: Sterile tubing should be handled using your institution's sterile protocol.
4.2 Typical Setup Instructions
1. OPEN PROCEDURES -- EVACUATING DRY PLUME / SMOKE
a. Ensure an ULPA filter and applicable pre-filter are installed per section 4.1
b. Connect an adapter, if required, and/or tubing appropriate for the procedure to the pre-filter.

OPERATING INSTRUCTIONS
6
2. OPEN PROCEDURES -- EVACUATING SMOKE WITH INCIDENTAL FLUIDS
a. Ensure ULPA filter / pre-filter are installed and tested per section 4.1
b. Secure a disposable suction canister near the unit.
c. Attach a 1 1/3" diameter hose from the suction canister to the pre-filter.
Note: Hose attaches to the 'vacuum' port on a suction canister.
d. Connect the adapter and/or tubing appropriate for the procedure to the 'patient' port of the
suction canister.
Caution: If 3/8" tubing is used, avoid dislodging from the suction canister by using a sufficient
length for the procedure.
If desired, connect an optional suction wand to the tubing distal end (7/8" or 1 1/3" only). Remove
the plastic sponge guard, connect the wand, and replace the sponge guard on the wand.
3. CLOSED PROCEDURES
Note: Closed procedure set up for dry smoke or smoke with incidental fluid is the same as
the corresponding open procedure set-up.
Warning: Some cannulas, valves, or other instruments combined with suction may cause
rapid reduction of the pneumoperitoneum in laparoscopic procedures.

OPERATING INSTRUCTIONS
7
5.0 SYSTEM OPERATING INSTRUCTIONS
5.1 Pre-procedure preparation
1. Choose the appropriate set-up per Section 4.2 for the intended procedure.
2. Verify the power cord is plugged into the unit and an appropriate electrical receptacle.
3. Verify the footswitch cord is attached to the unit. Uncoil the footswitch cord and place the
footswitch near the operator's station.
4. Turn on the power switch. Note: On is the "I" position. Off is the "O" position.
5. Rotate motor speed control knob slightly to verify that the motor speed varies.
6. Press the footswitch to ensure that the unit starts and stops using the footswitch.
7. Turn off the power switch until the smoke evacuator is required.
5.2 Operative Use
Warning: The smoke evacuator produces a strong vacuum. Properly adjust the suction control
and the position of the inlet end of the suction tubing or wand to prevent injury to the
patient or inadvertent damage to surgical materials.
Warning: Some cannulas, valves, or other instruments combined with suction may cause rapid
reduction of the pneumoperitoneum in laparoscopic procedures.
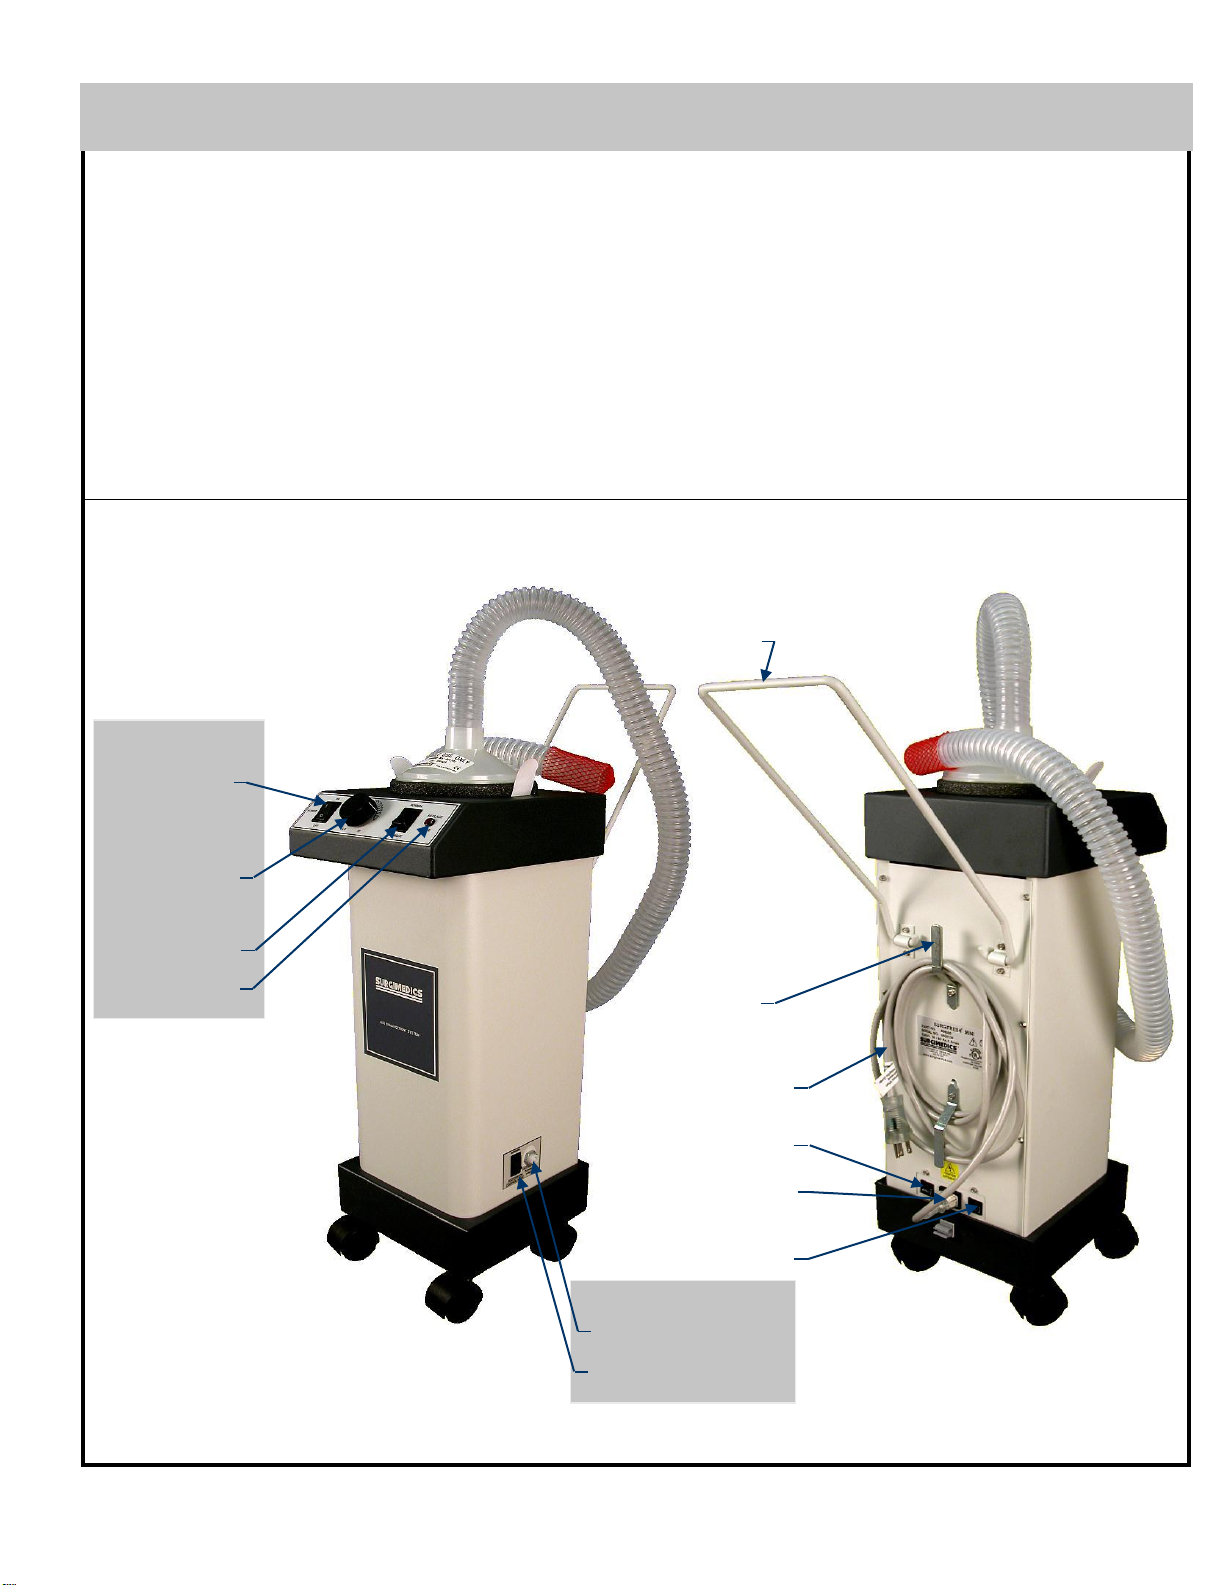
1. Move the SurgiFresh® Turbo into position near the procedure site.
2. Attach tubing per the instructions in Section 4.2.
3. Turn on the power switch.
4. The footswitch may be pressed by personnel in the operative area to start and stop the
suction as needed during the procedure. Place the footswitch in a convenient location.
5. Rotate the motor speed control knob clockwise to increase air flow (suction) and
counterclockwise to decrease air flow. Stop at desired setting.
6. Verify adequate air flow is set by inquiring with the surgeon. Adjust as necessary with the
motor speed control knob. Turning the control knob completely clockwise places the unit in
turbo mode.
7. When the procedure is finished, turn off the power switch.
8. Collect the footswitch and electrical cord.
9. Follow cleanup instructions per Section 5.4.
5.3 Maximizing Use Suggestions
1. Air flow
a. The distance of the tubing from the plume source affects capture and removal of the
plume. The tubing end should be within several inches of the procedure site.
b. Larger tubing will permit a higher volume of flow for better plume removal. Do not occlude
tubing.
2. Noise
a. Lower speed equals less noise.
b. Larger tubing equals less noise. Do not occlude tubing.
c. Use the footswitch to turn the suction on and off as it is needed during the procedure.
3. Incidental Fluids
a. Do not allow a suction canister to overfill.
b. Replace filters immediately if contaminated by fluids.
c. The SurgiFresh® Turbo should not be used as a primary fluid suction system.

4. Filters
a. Ensure filters are securely seated.
b. Perform the ULPA filter test (Section 6.2) prior to the start of each surgical procedure.
5. Tubing
a. Check throughout the surgical procedure to be sure the hose or tubing is not occluded.
Caution: Ensure sponge guard is attached to prevent surgical materials or tissue from
being aspirated / pulled into the tubing.
5.4 Clean-Up
After each surgical procedure, the SurgiFresh® Turbo smoke evacuation system should be
cleaned and prepared for future use.
1. Turn off the power switch and unplug the unit from the wall receptacle.
2. Remove the unit from the immediate procedure area.
3. Wipe the footswitch and footswitch cord with an appropriate hospital disinfectant. Coil the
footswitch cord around the cord wrap at the back of the unit.
4. Wipe the power cord with an appropriate hospital disinfectant. Coil the power cord around
the cord wrap.
5. Remove the tubing from the pre-filter or suction canister.
6. If a suction canister was used, securely close lids/caps and properly dispose canister.
7. Remove the pre-filter.
8. Dispose of all single-use waste materials according to your institution's procedures for
biohazardous materials.
9. Check the ULPA filter to be sure no fluids are on top of the filter. Replace filter if fluids are
present.
10. Install a new pre-filter.
11. Thoroughly wipe all external surfaces of the SurgiFresh® Turbo with an appropriate
hospital disinfectant. Follow the procedures approved by your institution.
Warning: Ensure the unit is completely dry before restoring power.
OPERATING INSTRUCTIONS
8
MAINTENANCE
6.0 MAINTENANCE
6.1 Power Cord
1. Prior to each use, check the power cord along its entire length and at both plugs to ensure
no damage has occurred.
2. Do not use a power cord with exposed wires, cracks, or frayed areas.
6.2 Filter Test
Note: Perform the ULPA filter test with no pre-filter or tubing in place.
1. Ensure an ULPA filter is in the unit and seated properly.
2. Plug the unit into an appropriate electrical receptacle.

MAINTENANCE
9
CUSTOMER SERVICE
3. Turn on the POWER switch. Place the filter TEST SWITCH in TEST MODE. (See Figure
1.) Operate the unit for ten to fifteen seconds to assure the motor speed is stabilized.
4. Should the red REPLACE FILTER indicator lamp light, replace the ULPA filter with a new
one. Note: An ULPA filter that tests OK but produces an abnormal odor or is over 90 days
old requires replacement because the carbon life has been exceeded. Note: The filters
design life is 12 hours of average smoke/plume removal.
5. Move the TEST SWITCH to the NORMAL mode after the test is completed.
6.3 Replacing the ULPA filter
1. Unplug the power cord from the electrical receptacle before replacing the ULPA filter.
2. Obtain a new ULPA filter. Remove its outer storage bag and dispose of the bag and
twist tie properly.
Note: Fill out date sticker and apply to the unit for future reference.
3. Open the biohazard bag provided with the new ULPA filter and prepare to dispose of the
old filter.
4. Grasp the used ULPA filter tabs. Carefully lift the used ULPA filter out of the unit, dispose
of the ULPA filter in the biohazard bag, and seal the bag.
Warning: Follow instructions and procedures for biohazardous materials
recommended by your institution.
5. Grasp the tabs of the new ULPA filter and insert it into the unit. Make sure the filter is
seated completely.
Install a new pre-filter on top of the ULPA filter. Make sure the prefilter is not placed over
an ULPA Filter pull tab. Follow instructions in Section 4.1 as appropriate.
7.0 CUSTOMER SERVICE
7.1 Parts and Accessories: Surgimedics
7027 Fairgrounds Pkwy.
San Antonio, TX 78238 USA
Phone: 800-645-7418
7.2 Customer Service Department:
1. If a problem is experienced, first review the troubleshooting section of this manual. For
troubleshooting support, please contact Surgimedics Customer Service (800) 645-7418.
2. In the event your unit needs service or repair, do not attempt to repair. Please contact
Surgimedics Service for assistance.

TROUBLESHOOTING
10
Condition Causes Correction
Smoke evacuator does not operate
when you turn on the power switch.
1. Disconnected or faulty power cord.
.
1. Check and correct power cord connections.
Check cord for damage and replace as needed.
2. No power from electrical
receptacle or wrong mains power.
2. Connect power cord to functional electrical
receptacle. Check voltage and frequency.
3. Footswitch control is in footswitch
mode, unit was turned off with
footswitch and no footswitch is
installed.
3. Turn footswitch control to normal position or
install footswitch and turn unit on.
.
4. Circuit breaker needs to be reset.
.
4. Press the circuit breaker switch on the rear
panel to reset the circuit breaker.
No suction when footswitch is
depressed in footswitch mode.
1. Improperly connected footswitch.
.
1. Check and correct footswitch cord
connection.
2. Damaged footswitch.
.
2. Check footswitch cord for damage and
replace as needed.
3. Kink in footswitch cord. 3. Straighten kinked section of cord
Smoke evacuator is operating but
there is inadequate or no vacuum.
1. Improperly installed filter.
.
1. Turn the smoke evacuator off (O). Ensure pre-
filter and ULPA filter are seated properly.
2. Clogged or kinked tubing. 2. Unclog or replace tubing.
3. Clogged pre-filter. 3. Replace pre-filter.
4. Clogged ULPA filter. 4. Replace ULPA filter.
5. Obstructed or malfunctioning
motor and/or blower.
5. Refer to your Bio-Engineering Dept. or
Surgimedics Service.
System does not remove odor.
1. The charcoal component of the
ULPA filter has expired.
1. Replace the ULPA filter.
.
Above Normal Noise/Whining.
.
.
.
1. Poorly seated filters.
.
.
.
1. Check bottom of ULPA filter for condition of
seal. Seat ULPA filter properly inside unit.
Check seal around top of ULPA filter. Seat pre-
filter securely into ULPA filter.
2. Variation in line voltage.
.
.
.
2. Position motor speed control knob slightly
lower than maximum to ensure controlled
constant speed even with slight line voltage
fluctuations.
3. Motor brushes worn. 3. Return to Surgimedics for service.
8.0 TROUBLESHOOTING
8.1 General
If the SurgiFresh® Turbo smoke evacuation system is not functioning properly,
review the items in this section for assistance.
1. Inspect the unit for visible signs of physical damage.
2. Verify all tubing and cords are connected properly.
3. Verify that the power cord has no exposed wires.
4. Ensure both filters are securely seated.
5. Check to see if the power cord is plugged into an appropriate electrical receptacle at the wall.
6. Check to see if the power switch is turned on.
7. Perform a filter test to verify the filter and motor are functioning.
8.2 Specific Conditions
If the solution is not readily apparent, these items may be of assistance:

9.0 TECHNICAL SPECIFICATIONS SURGIFRESH TURBO 120V
All specifications are nominal and subject to change without notice.
Filters
Pre-filter: Captures medium and large particles > 0.3 microns; single / daily use.
ULPA filter: 0.1 micron particulate size at 99.9995% efficiency; activated high grade carbon for gas and
odor adsorption; up to 8 hrs. use over 3 month maximum life.
Nominal Air Flow*
* Air flow is tested at 120VAC in a controlled environment using a digital anemometer.
Maximum Static Suction
92 inches H20 (172mm Hg) suction pressure motor fan rating (sealed)
Safety
Circuit breakers: 8 amps / ea
Power cord: 3 - prong hospital grade plug
Leakage Current: 300µA max.
Power
Input mains voltage (nominal): 120VAC
Mains frequency (nominal): 60 Hz
Mains current: 6.5 amps maximum during normal operation
Physical Characteristics
Height: 25 1/4 inches (64.1 cm)
Depth: 10.5 inches (26.6 cm)
Width: 9 1/8 inches (23.2 cm)
Weight: 26.25 pounds (11.90 kg) without filters, hoses or box
10.0 TRANSPORT AND STORAGE
Ambient temperature range –40°F to 158°F (-40°C to 70°C)
Relative Humidity: <75%, noncondensing
Use original packaging materials when shipping or transporting via carrier
SPECIFICATIONS
11
Motor Speed
Setting Tubing Accessory
1 1/3 in. X 6 ft. 7/8 in. X 6 ft. 3/8 in. X 6 ft.
0% 45 cfm 25 cfm 5 cfm
50% 50 cfm 30 cfm 6 cfm
100% 60 cfm 35 cfm 7 cfm

WARRANTY
12
Warranty Limitations
Surgimedics makes no express guarantees, warranties, or other representations as to its products, other
than those appearing in its written form in its own trade literature or written proposals. Surgimedics
expressly disclaims the implied warranties of merchantability, fitness for a particular purpose,
and noninfringement in relation to any of its products. In no event shall Surgimedics be liable to
the purchaser of any product for consequential, incidental, or special damages irrespective of
whether such damages are alleged to arise in tort, contract, law, equity, or by statute. The above
provisions relating to the exclusion of consequential, incidental, and special damages shall survive and
remain in force notwithstanding a finding by a court of competent jurisdiction that the exclusive remedy
provided below to a product purchaser has failed of its essential purpose.
For a period of one year, Surgimedics will repair or replace, at its option, any product, or part thereof,
that fails because of a material or manufacturing defect; provided that (1) the defect is not caused by the
purchaser or its customer, (2) the product was not custom manufactured to the specifications of the
purchaser, and (3) the product has not been damaged, altered, or defaced. This limited warranty shall be
the sole and exclusive remedy of the purchaser, irrespective of whether the claims of purchaser are
made in contract, tort, warranty, law, equity, or by statute. In the event that a court of competent
jurisdiction determines that the exclusive remedy set forth above has failed of its essential purpose, such
a failure shall entitle the purchaser to a return of the purchase price of the product involved.
Shipping Damage
Title and risk of loss will pass to purchaser upon delivery at the (Ex-Works) point. Delivery shall be (Ex-
Works San Antonio, Texas). Surgimedics will, as an accommodation to purchaser unless otherwise
directed in writing, ship product to purchaser at its address, freight prepaid and insured at purchasers
risk and expense. Purchaser should (1) inspect all packaging for external damage, (2) report the same to
the carrier, (3) obtain an inspection report from the carrier within 15 days, and (4) file a claim with the
carrier.
Returned Goods Policy
A request for return authorization must be submitted to Surgimedics Customer Service Department prior
to the return of any product. The request for return authorization must include the product catalog
number, product lot number, quantity, and specific reason for the return. No product may be returned
after 90 days from the original date of purchase, unless defective.
Where a return of any product is authorized, Surgimedics will provide a return authorization number and
a Certificate of Cleanliness to be completed by the customer. Each shipping container must be marked
with the return authorization number, as well as a completed Certificate of Cleanliness, or it will not be
accepted. All product must be returned freight prepaid except returns due to our shipping error, material
or manufacturing defects, or damage during shipment that renders the product unsalvageable upon
receipt. Unsalvageable product must be returned via the original carrier.
Credit may be issued to the original purchaser for authorized returns of salable, unused product in
unopened boxes in Surgimedics current catalog, subject to a 35% restocking fee. Surgimedics Quality
Assurance Department will inspect returned product to determine whether it is in salable condition. Credit,
including transportation costs, will be issued to the original purchaser for authorized returns within 90 days
for product discovered upon inspection to be unsalvageable or shipped in error. Except for defective
products, no credit will be issued for unauthorized returns, returns after 90 days from original date of
purchase, custom manufactured product, or unsalable product.

MANUAL DE USUARIO
SISTEMA DE EVACUACIÓN DE HUMO
PRECAUCIONES DE SEGURIDAD
Este manual contiene información importante para su
seguridad y para evitar daños al evacuador de humo.
LEA CON SUMA ATENCIÓN ESTE MANUAL DE INSTRUCCIONES
ANTES DE TRATAR DE UTILIZAR EL EVACUADOR DE HUMO
Modelo #
Serie #
Fecha de compra
PRECAUCIONES DE SEGURIDAD
Aviso: La ley federal de los EE. UU. permite la venta de este dispositivo
exclusivamente a médicos o bajo instrucciones de un médico.
Sólo personal médico calificado y debidamente entrenado en la técnica y procedimiento
quirúrgico a realizar deberá utilizar este manual del usuario y los equipos que se describen en él.
Este símbolo tiene por objeto advertir al usuario de la presencia de “voltaje
peligroso” no aislado en el gabinete del producto cuya magnitud puede ser
suficiente como para constituir un riesgo de descarga eléctrica para las personas.
Este símbolo tiene por objeto advertir al usuario de la presencia de
instrucciones importantes de uso y mantenimiento en la documentación que se
adjunta con el producto.
Advertencia-- Indica la presencia de una condición que podría afectar adversamente al
usuario o al paciente.
Precaución-- Indica la presencia de una condición que podría dañar el sistema de
evacuación de humo.
ÍNDICE
TURBO
http://www.surgimedics.com
301848 ART Rev 0
© Coastal Life Systems, Inc.
120V 60Hz
PN 906500
ADVERTENCIAS……………......Página 14
INTRODUCCIÓN…….……….....Página 15
INSTRUCCIONES DE USO…....Página 16
MANTENIMIENTO………………Página 20
ATENCIÓN AL CLIENTE…………...Página 21
SOLUCIÓN DE PROBLEMAS.........Página 22
ESPECIFICACIONES………….…....Página 23
GARANTÍA……………………………Página 24
13

Advertencia: Para evitar descargas eléctricas
•No enchufe el cable de alimentación si está mojado
•No lo exponga a humedad.
•No utilice extensiones, adaptadores ni tomacorriente polarizado a tierra de
grado hospitalario no aprobado. Compruebe que las clavijas del enchufe eléctrico se
introduzcan por completo en el tomacorriente.
•No quite las tapas de la unidad. La unidad no requiere servicio técnico salvo el
reemplazo de componentes. Consulte a personal calificado de servicio técnico.
•Desenchufe la unidad antes de proceder a su limpieza.
•Desenchufe la unidad si no la va a utilizar durante varios días o un período prolongado.
•Para desconectar el cable de alimentación, sujete firmemente el enchufe para retirarlo,
nunca tire del cable.
ADVERTENCIA
PRECAUCIÓN
14
ADVERTENCIA
Advertencia: El evacuador de humo genera alto vacío. Ajuste correctamente el control de succión y la
posición del extremo de entrada del tubo de succión o su boquilla, a fin de evitar lesionar al paciente o dañar
de manera involuntaria material quirúrgico antes de encender el sistema.
Advertencia: El láser y los penachos de humo electro-quirúrgicos pueden ser perjudiciales.
Los filtros, el tubo y los accesorios usados deberán manipularse según los procedimientos para la
eliminación de materiales biológicos peligrosos establecidos por su institución.
Advertencia : Para evitar el riesgo de incendio o explosión, no utilice la unidad ante la presencia de
materiales inflamables o potencialmente inflamables..
Advertencia : Algunas cánulas, válvulas u otros instrumentos combinados con la succión pueden reducir
con rapidez el neumoperitoneo en los procedimientos de laparoscopía
Precaución: Utilice la unidad en una zona con ventilación adecuada.
Precaución: Evite que ingrese liquido a los filtros, ya que puede generar daño
en estos así como en el sistema de evacuación de humo.
Precaución: Una obstrucción en el sistema de evacuación de humo puede
sobre calentar la unidad.

15
Equipo no es categoría AP (aprobado para anestesia).
Peligro, riesgo de explosión si equipo es usado en presencia de anestésicos inflamables.
Equipo Médico Eléctrico Clasificado con respecto a descarga eléctrica, fuero y
Riesgos mecánicos solo bajo las siguientes normas UL 60601-1 y CAN/CSA-
22.2 No. 601.1 61CB
INTRODUCCIÓN
Precaución, consulte documentos que acompañan al equipo para precaución y advertencias
Consulte las indicaciones de uso.
1.0 INDICACIONES
El sistema de evacuación de humo SurgiFresh® Turbo está indicado para evacuar penachos de humo
generados durante procedimientos de electrocirugía, cirugía láser, laparoscopía u otros procedimientos
quirúrgicos en los que se emplean herramientas eléctricas.
No utilice el sistema SurgiFresh® Turbo para otras aplicaciones no indicadas.
Use solamente productos y accesorios Surgimedics con el SurgiFresh Turbo. El uso de otros productos y
accesorios que no sean Surgimedics puede invalidar la garantía.
Póngase en contacto con Surgimedics si tiene dudas sobre desempeño, funcionamiento o uso indicado
de este equipo.
Distribuido por: Surgimedics, una division de Coastal Life Systems, Inc.
7027 Fairgrounds Pkwy.
San Antonio, TX 78238 USA
+1-800-645-7418
www.surgimedics.com
2.0 DESCRIPCIÓN DE SÍMBOLOS
A continuación se describen los símbolos del sistema SurgiFresh® Turbo.
Aislamiento a tierra física.
Identifique conexiones de toma corriente con conexión externa a tierra física,
para prevenir riesgo de descarga eléctrica en caso de falla, o que tengan
terminar de tierra aislada.

Perilla de control
De succión
Botón de prueba
De filtro
Luz indicadora
Interruptor
de corriente
Interruptor
de corriente
Conector IEC
Cable de
alimentación
Asa
plegable
Control de interruptor
de pedal
Sujetador
de cable
Botón de
encendido
INSTRUCCIONES DE USO
16
FIGURA 1
Puerto para interruptor
de pedal
A
B
Nota: Ilustración mostrada con accesorios adicionales:
asa plegable y base con ruedas.
3.0 FUNCIONES Y CONTROLES
Figura 1 Controles del usuario
A. Botón de encendido, perilla de control de succión, interruptor de prueba del filtro y lámpara
indicadora de reemplazo de filtro
B. Entrada del tubo del interruptor de pedal y control del interruptor de pedal. Conexión y control del
interruptor de pedal remoto.

INSTRUCCIONES DE USO
17
4.0 CONFIGURACIÓN DEL SISTEMA
4.1 Instalación
El sistema SurgiFresh® Turbo se envía con el manual en una sola caja. Inspeccione la caja y el producto para
determinar si presenta rayaduras, abolladuras o daños que podrían haberse producido durante el envío. Si
observa algún daño, siga las instrucciones que se ofrecen en la sección Garantía.
Es posible que se envíen por separado los filtros desechables de evacuación de humo, el tubo y los accesorios.
Las mismas instrucciones de inspección de daños aplican a estos componentes..
Una vez que se haya retirado el sistema SurgiFresh® Turbo de la caja, siga las siguientes instrucciones para
instalación y configuración del mismo.
Nota: Guarde la caja y el material de embalaje para su uso en el futuro
1. Conecte el tubo del interruptor de pedal a la entrada del tubo lateral del evacuador de humo. Coloque el
control de interruptor de pedal en el modo de interruptor de pedal. Si no desea utilizar el interruptor de
pedal, coloque el control de este interruptor en el modo normal para desactivarlo..
2. Instale un filtro ULPA en el núcleo central de la unidad. Observe la flecha de dirección del flujo de aire en
el filtro ULPA. La flecha deberá apuntar hacia abajo. Compruebe que no haya obstrucciones y que el filtro
quede bien asentado empujándolo al fondo hacia abajo
Nota: Complete la etiqueta con la fecha (que se incluye con el filtro) y colóquela en la parte superior de la
unidad. En general, el filtro se cambia 90 días después de la fecha de instalación. Es posible que deba
cambiarse el filtro antes de lo previsto cuando se utiliza con frecuencia y el olor o la prueba del filtro
ULPA indican la necesidad de hacer el cambio
3. Conecte el cable de alimentación a la unidad y enchúfela.
4. Realice la prueba del filtro ULPA siguiendo el procedimiento indicado en la sección 6.2
Nota: La prueba del filtro ULPA se realiza sin instalar el prefiltro ni el tubo. Una vez finalizada la prueba con
resultados satisfactorios, coloque la perilla de velocidad del motor alrededor de ¼ de velocidad para
garantizar que no se active la unidad a una alta velocidad.
5. Instale un prefiltro en la parte superior del filtro ULPA
Precaución: Compruebe que el filtro ULPA y el prefiltro estén bien asentados para garantizar un flujo de succión
correcto.
6. Determine el tipo de procedimiento, seleccione el tubo y accesorios adecuados y prepare la unidad para
su uso según se describe en la sección 4.2.
Advertencia: El tubo de succión esteril debe ser usado de acuerdo a los protocolos establecidos
por su institución en el manejo de componentes estériles.
4.2 Instrucciones de configuración típica
1. PROCEDIMIENTOS A CIELO ABIERTO –EVACUACIÓN DE HUMO O PENACHOS EN SECO
a.Compruebe que el filtro ULPA y el prefiltro correspondiente estén instalados según se describe en
la sección 4.1.
b. De ser necesario, coloque un adaptator o tubo apropiado al prefiltro, de acuerdo al procedimiento.

INSTRUCCIONES DE USO
18
2. PROCEDIMIENTOS A CIELO ABIERTO –EVACUACIÓN DE HUMO CON LÍQUIDOS
RESIDUALES
a. Compruebe que el filtro ULPA y el prefiltro se hayan instalado y probado según se describe
en la sección 4.1.
b. Coloque un recipiente de succión desechable cerca de la unidad
c. Conecte una manguera de 1 1/3” de diámetro desde el recipiente de succión hasta el prefiltro.
Nota: Conectar manguera entrada de “vacío” del recipiente de aspiración.
d. Conecte el adaptador o el tubo que corresponda al procedimiento a la entrada de “paciente”
del recipiente de succión.
Precaución: Si se utiliza un tubo de 3/8”, deberá tener la longitud necesaria para el
procedimiento, a fin de evitar que se separe del recipiente de succión.
Si lo desea, conecte un tubo de succión adicional a la punta distal (tubo 7/8 y 1 1/3). Retire la
malla protectora, conecte la varilla de succión y vuelva a poner la esponja protectora la punta de
el tubo de succión.
3. PROCEDIMIENTOS CERRADOS
Nota: La configuración del sistema para evacuación de humo en seco o de humo con
líquidos residuales en procedimientos cerrados es igual a la configuración para
procedimientos a cielo abierto..
Advertencia: Algunas cánulas, válvulas u otros instrumentos combinados con la succión
pueden reducir con rapidez el neumoperitoneo en procedimientos de
laparoscopía.

INSTRUCCIONES DE USO
19
5.0 INSTRUCCIONES DE USO DEL SISTEMA
5.1 Preparación antes del procedimiento
1. Seleccione el tipo de configuración que corresponde al procedimiento previsto según se explica en la
sección 4.2.
2. Compruebe que el cable de alimentación esté conectado a la unidad y que esté enchufado al
tomacorriente.
3. Compruebe que el tubo del interruptor de pedal esté conectado a la unidad. Desenrolle el tubo del
interruptor de pedal y coloque el interruptor cerca del lugar de uso.
4. Encienda la unidad. Nota: Para encender la unidad, el interruptor debe estar en la posición “I”. Para
apagar la unidad, el interruptor debe estar en la posición “O”..
5. Gire levemente la perilla de control de velocidad para comprobar que la velocidad del motor varía.
6. Presione el interruptor de pedal para asegurarse de que la unidad prende y apaga con este interruptor.
7. Apague la unidad hasta que necesite utilizar el sistema de evacuación de humo.
5.2 Uso durante el procedimiento
Advertencia: El evacuador de humo genera alto vacío. Ajuste correctamente el control de succión y la
posición del extremo de entrada del tubo de succión o su boquilla, a fin de evitar lesionar
al paciente o dañar de manera involuntaria materiales quirúrgicos..
Advertencia: Algunas cánulas, válvulas u otros instrumentos combinados con la succión pueden
reducir con rapidez el neumoperitoneo en los procedimientos de laparoscopía.
1. Coloque el sistema SurgiFresh® Turbo cerca del sitio del procedimiento.
2. Conecte el tubo siguiendo las instrucciones de la sección 4.2.
3. Encienda la unidad.
4. El personal que se encuentra en el sitio del procedimiento podrá presionar el interruptor de pedal para
iniciar y detener la succión según sea necesario durante el procedimiento. Coloque el interruptor de
pedal en un lugar accesible.
5. Gire la perilla de control de velocidad del motor en sentido horario para aumentar el caudal de aire
(succión) y en el sentido contrario para reducirlo. Detenga la perilla en la posición deseada.
6. Consulte al cirujano si el caudal de aire configurado es el adecuado. Ajústelo según sea necesario con
la perilla de control de velocidad. Para configurar la unidad en modo turbo, gire por completo la perilla en
sentido horario.
7. Una vez finalizado el procedimiento, apague la unidad.
8. Desenchufe la unidad y retire el interruptor de pedal y el cable de alimentación.
9. Siga las instrucciones de limpieza según sección 5.4.
5.3 Sugerencias de uso óptimo
1. Flujo de aire
a. La distancia del tubo desde la fuente que origina los penachos afecta su captura y eliminación. El
extremo del tubo debe estar situado dentro de una corta distancia del sitio del procedimiento..
b. Un tubo de mayor diámetro permitirá que circule un mayor flujo de aire y optimizará la eliminación
de penachos de humo. No obstruya el tubo.
2. Ruido
a. A velocidades bajas el ruido disminuye.
b. Un tubo de mayor diámetro disminuirá el nivel de ruido. No obstruya el tubo.
c. Utilice el interruptor de pedal para activar o desactivar la aspiración según sea necesario durante el
procedimiento.
3. Líquidos residuales.
a. Evite que se llene en exceso el recipiente de succión
b. Cambie los filtros de inmediato si estos son contaminados con fluidos.
c. El sistema SurgiFresh® Turbo no deberá usarse como sistema principal para succión de líquidos.

4. Filtros
a. Compruebe que los filtros estén bien asentados.
b. Realice la prueba del filtro ULPA (Sección 6.2) antes de comenzar cada procedimiento
quirúrgico.
5. Tubo
a. Durante todo el procedimiento quirúrgico asegúrese de que no se obstruya el tubo.
Precaución: Compruebe que la guarda de esponja esté colocada para evitar que material
quirúrgico o tejidos ingresen en el tubo por aspiración o succión.
|5.4 Limpieza
Después cada procedimiento quirúrgico, el sistema de evacuación de humo SurgiFresh® Turbo
debe limpiarse y prepararse para próximos usos.
1. Apague la unidad y desenchúfela..
2. Retire la unidad de la zona inmediata del procedimiento.
3. Limpie el interruptor de pedal y su tubo con desinfectante de uso hospitalario. Enrolle el
tubo del interruptor de pedal en el sujetador que se encuentra en la parte posterior de la
unidad.
4. Limpie el cable de alimentación con un desinfectante de uso hospitalario. Enrolle el cable
de alimentación en el sujetador de cable.
5. Retire el tubo del prefiltro o del recipiente de succión.
6. Si utilizó un recipiente de succión, cierre bien las tapas y deseche el recipiente en
condiciones seguras.
7. Retire el prefiltro.
8. Deseche todo el material quirúrgico de un solo uso siguiendo los procedimientos para la
eliminación de materiales biológicos peligrosos establecidos por su institución.
9. Revise el filtro ULPA y asegúrese que no haya líquido en la parte superior.
10. Instale un nuevo prefiltro..
11. Limpie minuciosamente todas las superficies externas del sistema SurgiFresh® con un
desinfectante de uso hospitalario. Siga los procedimientos aprobados por su institución.
Advertencia: Compruebe que la unidad esté totalmente seca antes de volver
a enchufarla.
INSTRUCCIONES DE USO
20
MANTENIMIENTO
6.0 MANTENIMIENTO
6.1 Cable de alimentación eléctrica
1. Antes de cada uso, revise el cable de alimentación de punta a punta y los dos enchufes y
asegúrese de que no existan daños.
2. Absténgase de usar el cable de alimentación si presenta zonas peladas, fisuradas o
deshilachadas..
6.2 Prueba de Filtro
Nota: Realice la prueba del filtro ULPA sin tubo y prefiltro instalados.
1. Compruebe que el filtro ULPA se haya instalado correctamente en la unidad.
2. Conecte la unidad en un toma corriente adecuado.
Table of contents
Languages:
Other Surgimedics Medical Equipment manuals