manuals.online logo
Brands
  1. Home
  2. •
  3. Brands
  4. •
  5. SurgiTel
  6. •
  7. Telescope
  8. •
  9. SurgiTel ErgoVision User manual

SurgiTel ErgoVision User manual

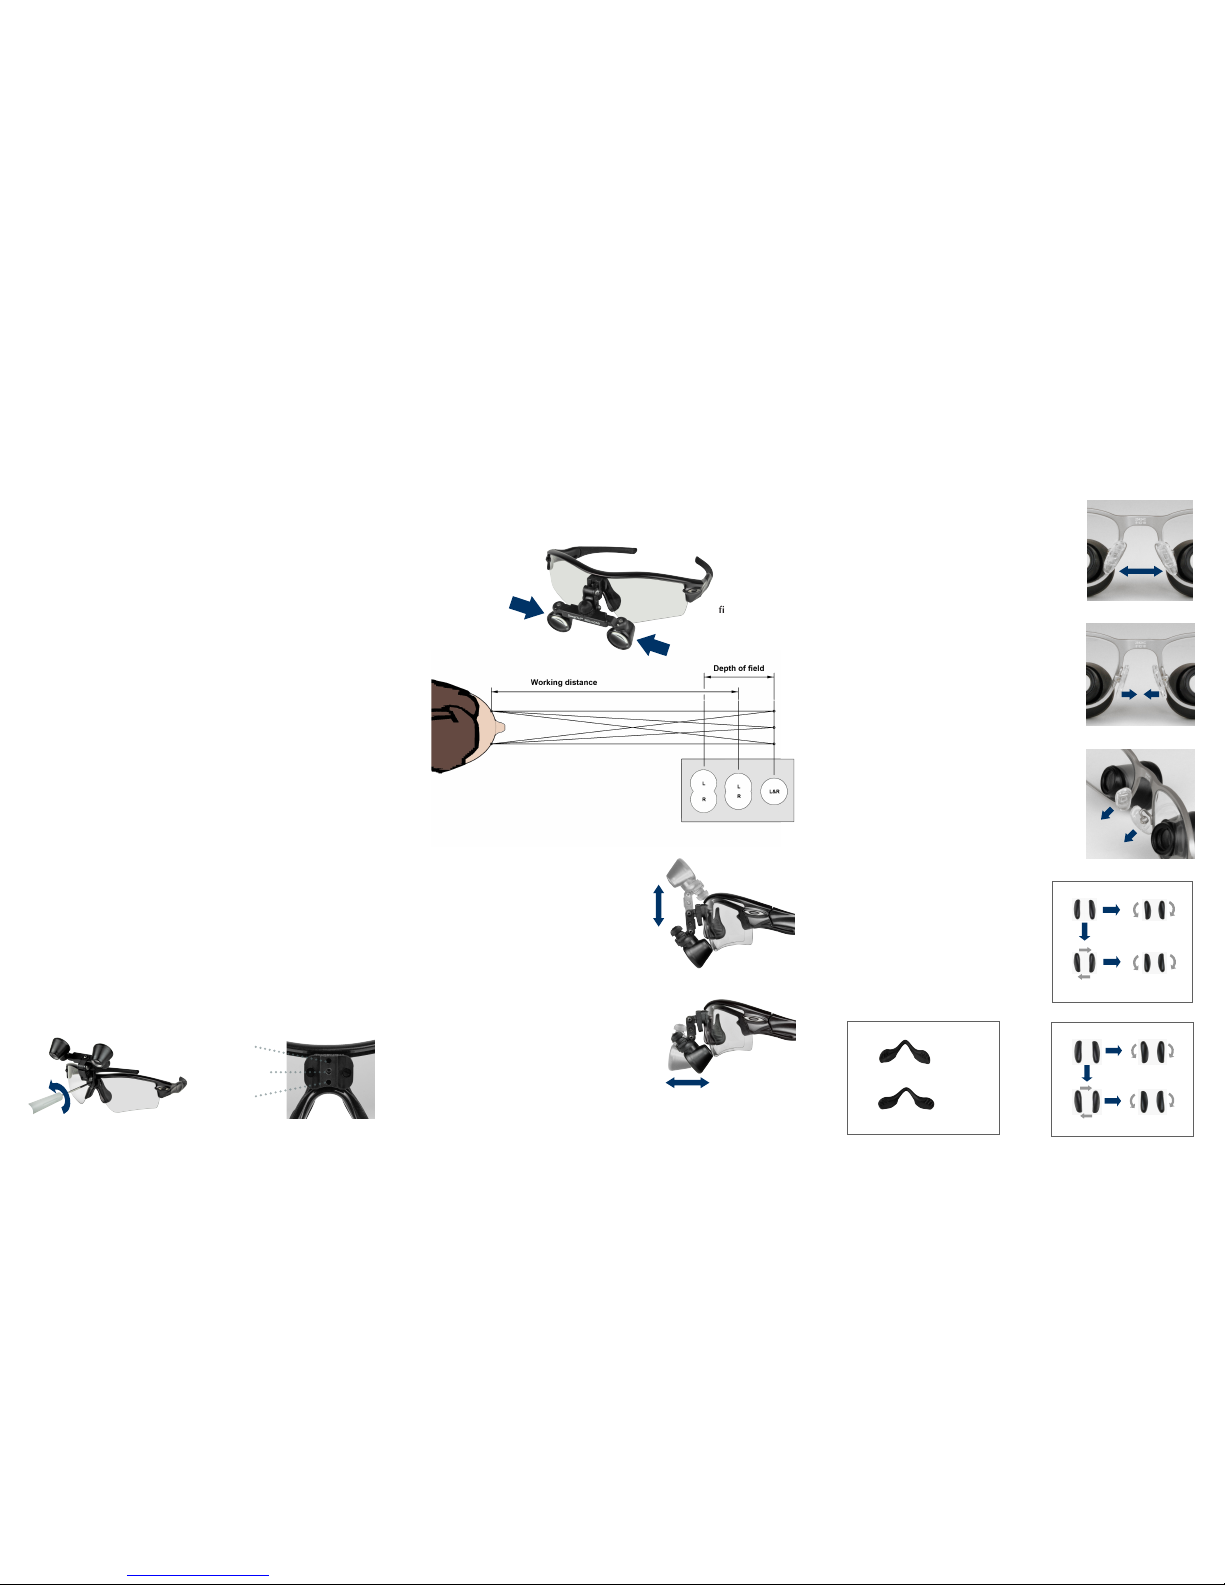
Remember that the hinge
tension is adjustable by
adjusting the center tension
screw on the hinge.
 To achieve the optimum
resolution and field size,
make sure that the telescope
oculars are touching the
frame's lens.
Doc No. 23822L
SurgiTel
ErgoVision®
Front-Lens-Mounted (FLM) Telescopes
USER INSTRUCTIONS
►Thank you for choosing SurgiTel®!
Your SurgiTel®telescopes have been designed to meet the demanding needs
of today’s clinical professionals. Please keep in mind that you will have
a hand-eye coordinaon adjustment period of about two weeks. Begin
slowly with simple movements, working your way up to more complicated
procedures. In the end, SurgiTel®telescopes will allow you to see, work, and
feel your best.
►GETTING STARTED
1
2
3
4
Remove protection caps.
Adjust nose pads.
Adjust your pupillary distance knob
to a comfortable setting where the
two images converge together. (see
Adjusting P.D. (Pupillary distance)
section)
Move your frame slightly away
from face/eyes to minimize fogging.
5
6Adjust the tension in the hinge to a
comfortable setting. (see Adjusting
Flip-up Tension section) Make sure
to add slightly more tension when
using a clip-on light.
Position your oculars against the
frame lens to maximize field size.
Starting Magnification Tips
 A new or upgraded user to magnicaon will experience a normal
“adjustment” period.
 This is normal as you are adjusng to using your new loupes on two levels:
 Hand/Eye Coordinaon – geng used to working with a magnied eld.
 Improved Posture – geng used to sing more upright.
 For the 1 Week: Begin by working for 1-2 hours in the morning on simple
procedures.
 For the 2 Week: Gradually work your way to more complex procedures,
both in the morning and aernoon.
 Also, do not walk around with your telescopes on. Be sure to take them o
when walking around.
®
SurgiTel’s mission is to provide the best products for your Vision & Ergonomics
at Work. To support this commitment SurgiTel®warranties all of its products.
SurgiTel®strives to make the best loupes and light systems available. Please
inspect and try on product immediately upon receipt. If you notice any issues,
contact our customer service department at 800-959-0153.
For both warranty and out-of-warranty issues, contact SurgiTel®Customer Service
regarding repairs.
Warranties vary by product. Check www.surgitel.com/warranty for more details.
Check www.surgitel.com/help for up to date care information/instructions.
Please keep up to date on care information/instructions, as warranties can be
affected if product is misused.
SurgiTel®
a division of General Scientific Corporation
77 Enterprise Drive • Ann Arbor, MI 48103-9503
E-mail info@surgitel.com • www.surgitel.com
►WARRANTY
►SETTINGS/ADJUSTMENT
All SurgiTel®telescopes are factory set to the users specicaons. If minor
adjustments are necessary for change in preference(s) follow the steps below.
1. Loosen the slide retainer screw that allows you to adjust the V.P. (vercal
posion). (g 1)
2. Place the loupes at the lowest posion on the frame, then slowly raise
upward unl you achieve a comfortable ocular height. To hold V.P., make
sure the slide retainer screw is ghtened. (g 1)
3. Adjust the declinaon angle by moving the ocular rack unl your preferred
head lt is achieved. Then adjust the ocular rack to aain your line of
sight. (g 6)
4. Tighten all hinge screws with hex key (add slight tension) once you have
found your comfortable declinaon angle and alignment.
5. Posion yourself into your working posion and adjust the P.D. (pupillary
distance) knob (g 3) unl you have one image in an oblong/oval shape.
(g 4)
►ADJUSTING V.P. (VERTICAL POSITION)
1. Loosen the slide retainer screw that allows the slide retainer to move up/
down. (g 1)
2. Posion the loupes on your face/nose.
3. Adjust the oculars unl oculars are aligned to the eyes.
4. If oculars are not moved enough to align, remove loupes from your face to
adjust. Remove slide retainer screw and change placement. For screw
placement guidance refer to g 2.
Low nose
Medium nose
High nose
fig 1 fig 2
►ADJUSTING FLIP-UP TENSION
• Top Locking Screw
The whole loupe system can be ipped up to
open up your line of sight by simply rotang
link-hinge upwards (g 5). If you ip-up your
loupes frequently, leave this screw a lile
loose.
• Boom Locking Screw
Allows adjustment and locking of declinaon
angle (g 6). Maintains angle while ipped-
up or ipped-down. If you use your loupes at
dierent working postures, you should leave
this screw loose and allow the middle tension
screw to hold it in place.
• Middle Tension Screw
The level of ipping tension can be adjusted by
ghtening the middle screw. Tighten or loosen
the center screw so that the ip-up tension is
acceptable.
*Note: This hinge system is designed to work with the middle tension screw. The
top and boom screws are used for locking purposes.
fig 6
fig 5
►ADJUSTING P.D. (PUPILLARY DISTANCE)
1. Posion the loupes on your face and nose.
2. Using the P.D. knob (g 3), spread the oculars apart to the widest distance.
3. When looking through the oculars, focus on an object in front of you (such as
your thumb). If it is not in focus, move your thumb/object towards or away
from you unl you see it clearly.
4. With the other hand slowly adjust the P.D. knob unl you have one image in
an oblong/oval shape. (g 4)
Adjust pupillary (P.D. Knob) to a comfortable
setting where two images converge together.
(
fig 3,4)
fig 4
fig 3
Optimal/Preferred
Pupillary Adjustment
►CLEANING & DISINFECTION
• Do not use Lysol®or any disinfectants containing glutaraldehydes, iodophors,
ammonia, alcohol, or ethanol
• Do not autoclave
• Do not submerge in water or any liquid; wipe down with damp cloth. Do not
use HOT or COLD water; using “room-temperature” water is acceptable
Cleaning: Apply mild soap and water with a so cloth unl parcles are loosened.
Rinsing is ok with “room-temperature” water to remove gross debris. Wipe or
air-dry.
Use an opcal cleaning cloth that is formulated for use with coated lens surfaces.
These cleaning cloths can be purchased from SurgiTel (provided with loupe pur-
chase)or any retail chain that provides opcal merchandise.
Disinfecon: Use SciCan® “OPTIM 1” wipes/soluon only.
FACTORY REFURBISHMENT CLEANING: is available if you come across a dicult
cleaning situaon. Call customer support for details: 800-959-0153
►ADJUSTING NOSE PAD(S)
When the nose pads are properly adjusted to your face, they will provide excel-
lent comfort and balance. If the nose pads do not make even contact with your
nose comfortably, please follow the direcons described below.
SurgiTel frames
• Adjusng Nose Pads for Too High Oculars
Adjust the width of the nose pads by bending the
nose pad wire mounts outwards (g 7). By doing
so, this will reduce the height of the frame and
lower the ocular posion.
• Adjusng Nose Pads for Too Low Oculars
Adjust the width of the nose pads by bending the
nose pad wire mounts inwards (g 8). By doing so,
this will increase the height of the frame and raise
the ocular posion.
• Adjusng Nose Pads for Low Nose
If the nose pads are not evenly placed on the bridge
of the nose, bend the wire mounts down and away
from the frame (g 9) and readjust the width of the
nose pads if necessary. Note that the wire mount
lt angle depends on the bridge of the nose. The
less nose bridge you have, the larger the lt be-
comes to t your nose.
• Nose Pad Covers
By aaching nose pad covers (not shown), this will
help increase the height of the frame and raise the
ocular posion up to 2 mm (0.079 inches). Also
these nose pads will improve comfort when worn.
Oakley frames
Single Nose Pads
Change orientaon and/or nose pad size
unl you nd your desired t. (g 10)
Single String Nose Pad
Alter ocular height by changing nose pad
size. Only thin and thick nose pad opons
are available. (g 11)
g 7
g 8
g 9
Thin
Thick
g 11
(Standard)
(Rotated)
(Rotated)
(Switched sides)
Large (4 conguraons) g 10
(Standard)
(Rotated)
(Switched sides)
(Rotated)
Small (4 conguraons) g 10
nd
st

Other SurgiTel Telescope manuals

SurgiTel Odyssey LED User manual

SurgiTel

SurgiTel Odyssey LED User manual

SurgiTel Odyssey Wireless LED User manual

SurgiTel

SurgiTel Odyssey Wireless LED User manual

SurgiTel ErgoVision FLM User manual

SurgiTel

SurgiTel ErgoVision FLM User manual

SurgiTel SurgiCam HD User manual

SurgiTel

SurgiTel SurgiCam HD User manual

SurgiTel ST250 User manual

SurgiTel

SurgiTel ST250 User manual

SurgiTel ErgoVision User manual

SurgiTel

SurgiTel ErgoVision User manual

SurgiTel ErgoVision TTL User manual

SurgiTel

SurgiTel ErgoVision TTL User manual

Popular Telescope manuals by other brands

Celestron PowerSeeker 70AZ Quick setup guide

Celestron

Celestron PowerSeeker 70AZ Quick setup guide

EASTCOLIGHT 375 Power 50mm Wide Angle Sport user manual

EASTCOLIGHT

EASTCOLIGHT 375 Power 50mm Wide Angle Sport user manual

Motorola PMLN4605A quick start guide

Motorola

Motorola PMLN4605A quick start guide

Meade ETX Astro Telescope/ETX Spotting Scope instruction manual

Meade

Meade ETX Astro Telescope/ETX Spotting Scope instruction manual

Orion 180mm Maksutov-Cassegrain instruction manual

Orion

Orion 180mm Maksutov-Cassegrain instruction manual

Orion EON 10287 instruction manual

Orion

Orion EON 10287 instruction manual

SKY-WATCHER 1309EQ2 instruction manual

SKY-WATCHER

SKY-WATCHER 1309EQ2 instruction manual

Coronado CORONADO SolarMax II series manual 

Coronado

Coronado CORONADO SolarMax II series manual 

Orion SHORTTUBE 80-A instruction manual

Orion

Orion SHORTTUBE 80-A instruction manual

Meade 2120 instruction manual

Meade

Meade 2120 instruction manual

Stellarvue SV80ED-1 manual

Stellarvue

Stellarvue SV80ED-1 manual

Explore One CF400SP instruction manual

Explore One

Explore One CF400SP instruction manual

ORION TELESCOPES & BINOCULARS StarBlast 10283 instruction manual

ORION TELESCOPES & BINOCULARS

ORION TELESCOPES & BINOCULARS StarBlast 10283 instruction manual

Celestron ASTROMASTER 21061-CT-DS Quick setup guide

Celestron

Celestron ASTROMASTER 21061-CT-DS Quick setup guide

Orion STARBLAST 6 9964 instruction manual

Orion

Orion STARBLAST 6 9964 instruction manual

ENGAGE SENDX2680A owner's manual

ENGAGE

ENGAGE SENDX2680A owner's manual

TAS Red Dot BKRD42 instruction manual

TAS

TAS Red Dot BKRD42 instruction manual

TAS 56TN owner's manual

TAS

TAS 56TN owner's manual

manuals.online logo
manuals.online logoBrands
  • About & Mission
  • Contact us
  • Privacy Policy
  • Terms and Conditions

Copyright 2025 Manuals.Online. All Rights Reserved.