Swann SDW7040 User manual


Compartment A:Compartment A:
With each wash cycle.
Compartment B:B:
For programmes with pre-wash only.
(Follow the user instructions!)
Mechanical indicator C.Mechanical indicator C.
Electric indicator on control panel (if provided).
Check the rinse aid level
(On models with water softener system only.)
Electric indicator on control panel (if provided).
If there is no salt warning light in the control panel
(for some models), you can estimate when to fill the salt into
the softener by the number of cycles the dishwasher has run.
Check the regeneration
salt level
Load the baskets
Select a programme
Close the door, turn on the water tap. The machine will start working after about 10 seconds.
Running the dishwasher
Switch off the appliance
Turn off the water tap,
unload the baskets
Fill the detergent dispenser
Warning: wait a few minutes (about 15 minutes) before unloading the dishwasher to avoid handling
the dishes and utensils while they are still hot and more susceptible to break.
They will also dry better.Unload the appliance, starting from the lower basket.
Changing the programme
Add forgotten dishes in the
dishwasher.
Scrape off any large amount of leftover food. Soften remnants of burnt food in pans,
then load the baskets. Refer to the dishwasher loading instructions.
Open the door and press the power button, then press program button to select your desired program.
( See the section entitled Operationg instruction )
When the working cycle has finished, the buzzer of the
dishwasher will sound 8 times, then stop.
Turn off the appliance by pressing the Power button.
If the appliance is switched
off during a wash cycle.
Open the doorcarefully.
Hot steam mayescape
when the dooris opened!
WARNING!
If the appliance is switched off during a wash cycle, when switched
on again, please re-select the washing cycle and operate the dishwasher
according to the original Power-on state ).
Switch on the appliance
Press the Power switch button to switch on the appliance, Open the door.
1.Open the door to stop the machine.
2.Add the forgotten dishes, when the sprayers stop running completely.
3.Close the door, and the dishwasher will start running again after 10
seconds.
Quick operation guideQuick operation guide
For detailed operating method read the corresponding content on the instruction manual.
1. A running cycle can only be modified if it has been running for a short time. If the detergent has
already been released and the water has already been drained out, the detergent dispenser must
be refilled.
2. Open the door carefully. When sprayers stop running, pless press the program button more than
3 seconds to cancel the running programme.
3. Select a new programme.
4. Close the door to restart the dishwasher.
CC
AA
BB

To review the section on troubleshooting Tips
will help youto solve somecommon problems
by yourself .
NOTE:
Dear Customer,
Please carefully read this manualbefore using the
dishwasher, itwill help youto use and maintain the
dishwasher properly.
Pass it on to any subsequent owner of the appliance.
This manual containssections on safetyInstructions,
Operating Instructions, Installation Instructions and
Troubleshooting Tips, etc.
The manufacturer,following a policyof constant
development and updatingof the product,may
make modifications withoutgiving prior notice.
Read this Manual
Before Calling for Service
Keep it asa refer inthe later days.
If you can not solve the problems by yourself ,
please ask forthe help of
professional technicians.
This appliance isintended to beused in household
and similar applicationssuch as:
-staff kitchen areas in shops,offices and other
working environments;
-farm houses;
-by clients inhotels, motels andother residential
type environments;
-bed and breakfasttype environments.
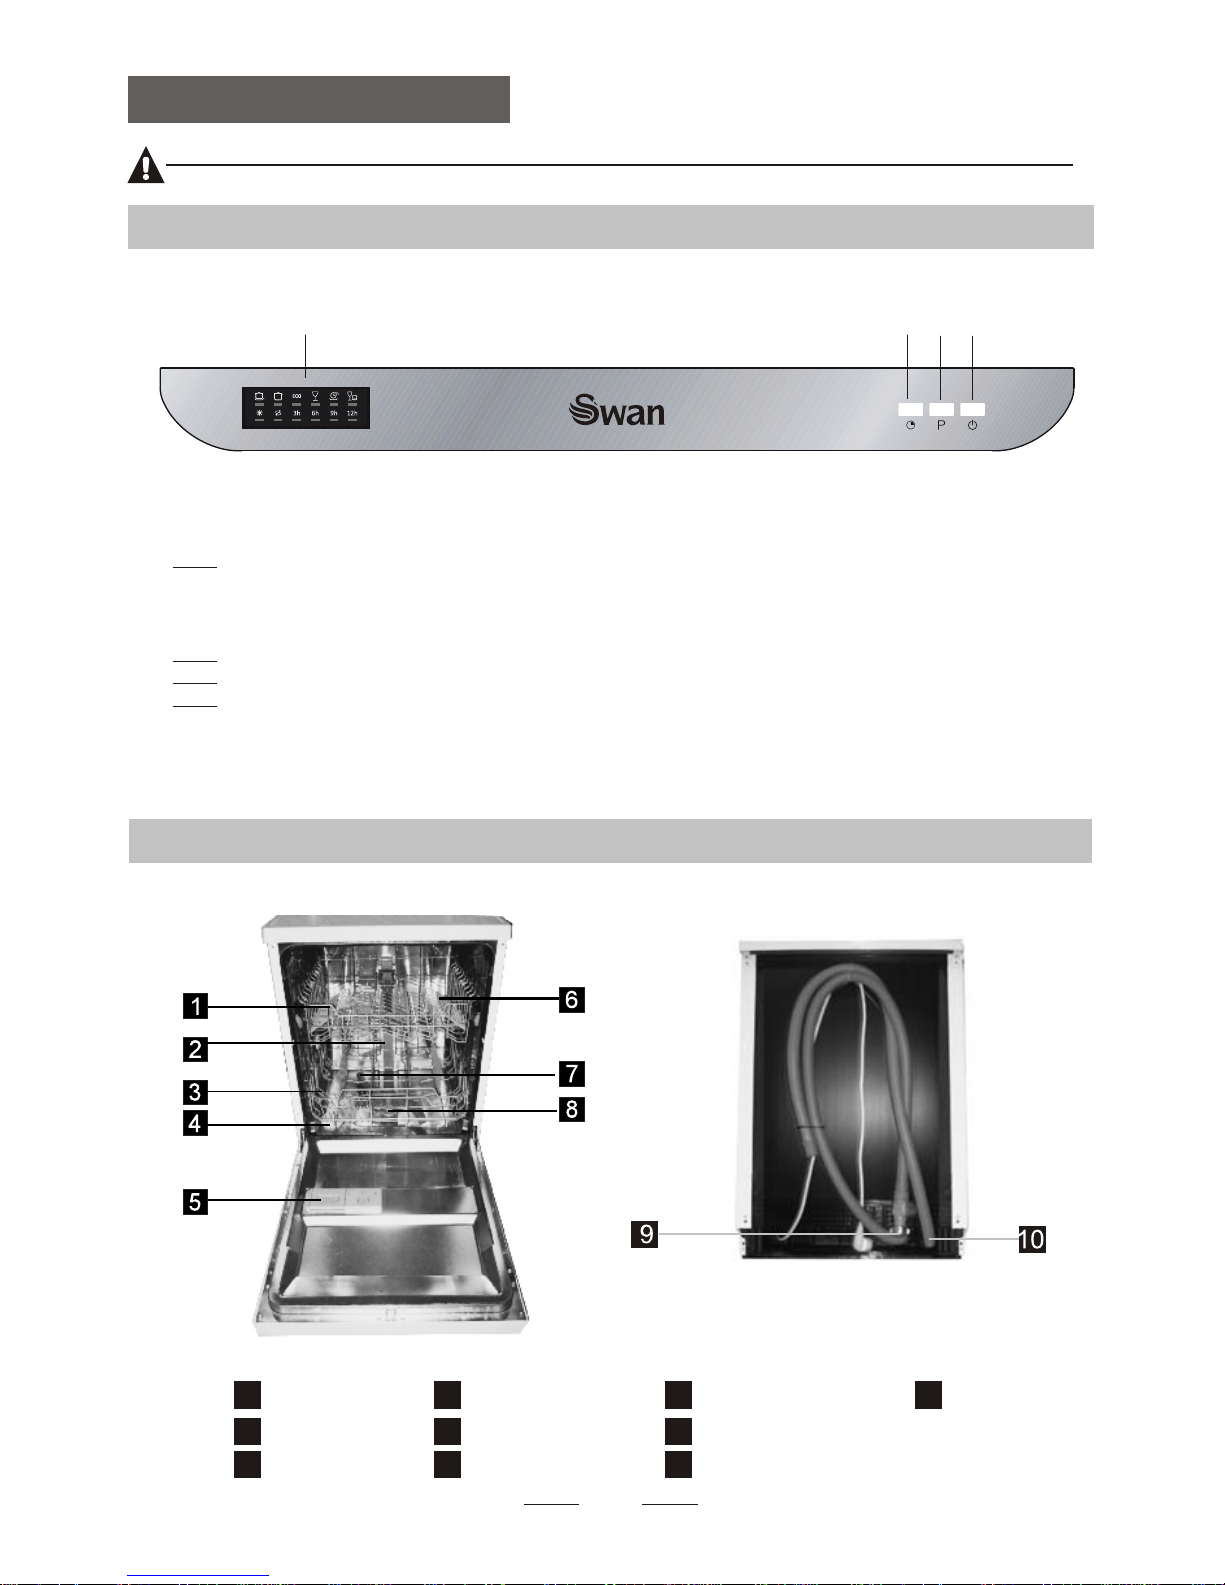
Dishwasher Features.................................... ...3
4) Prior usingfor the firsttime...............................44) Prior usingfor the firsttime...............................4
A Water Softener...........................................4
5) Loading theDishwasher Basket........................95) Loading theDishwasher Basket........................9
Attention before orafter loading theDishwasher
Baskets..........................................................9
7) Maintenance andcleaning..............................137) Maintenance andcleaning..............................13
Filtering System.............................................13
Caring for the Dishwasher...............................14
B Loading the Salt into the Softener.................5
C Fill the RinseAid Dispenser.........................5
D Function of Detergent .................................6
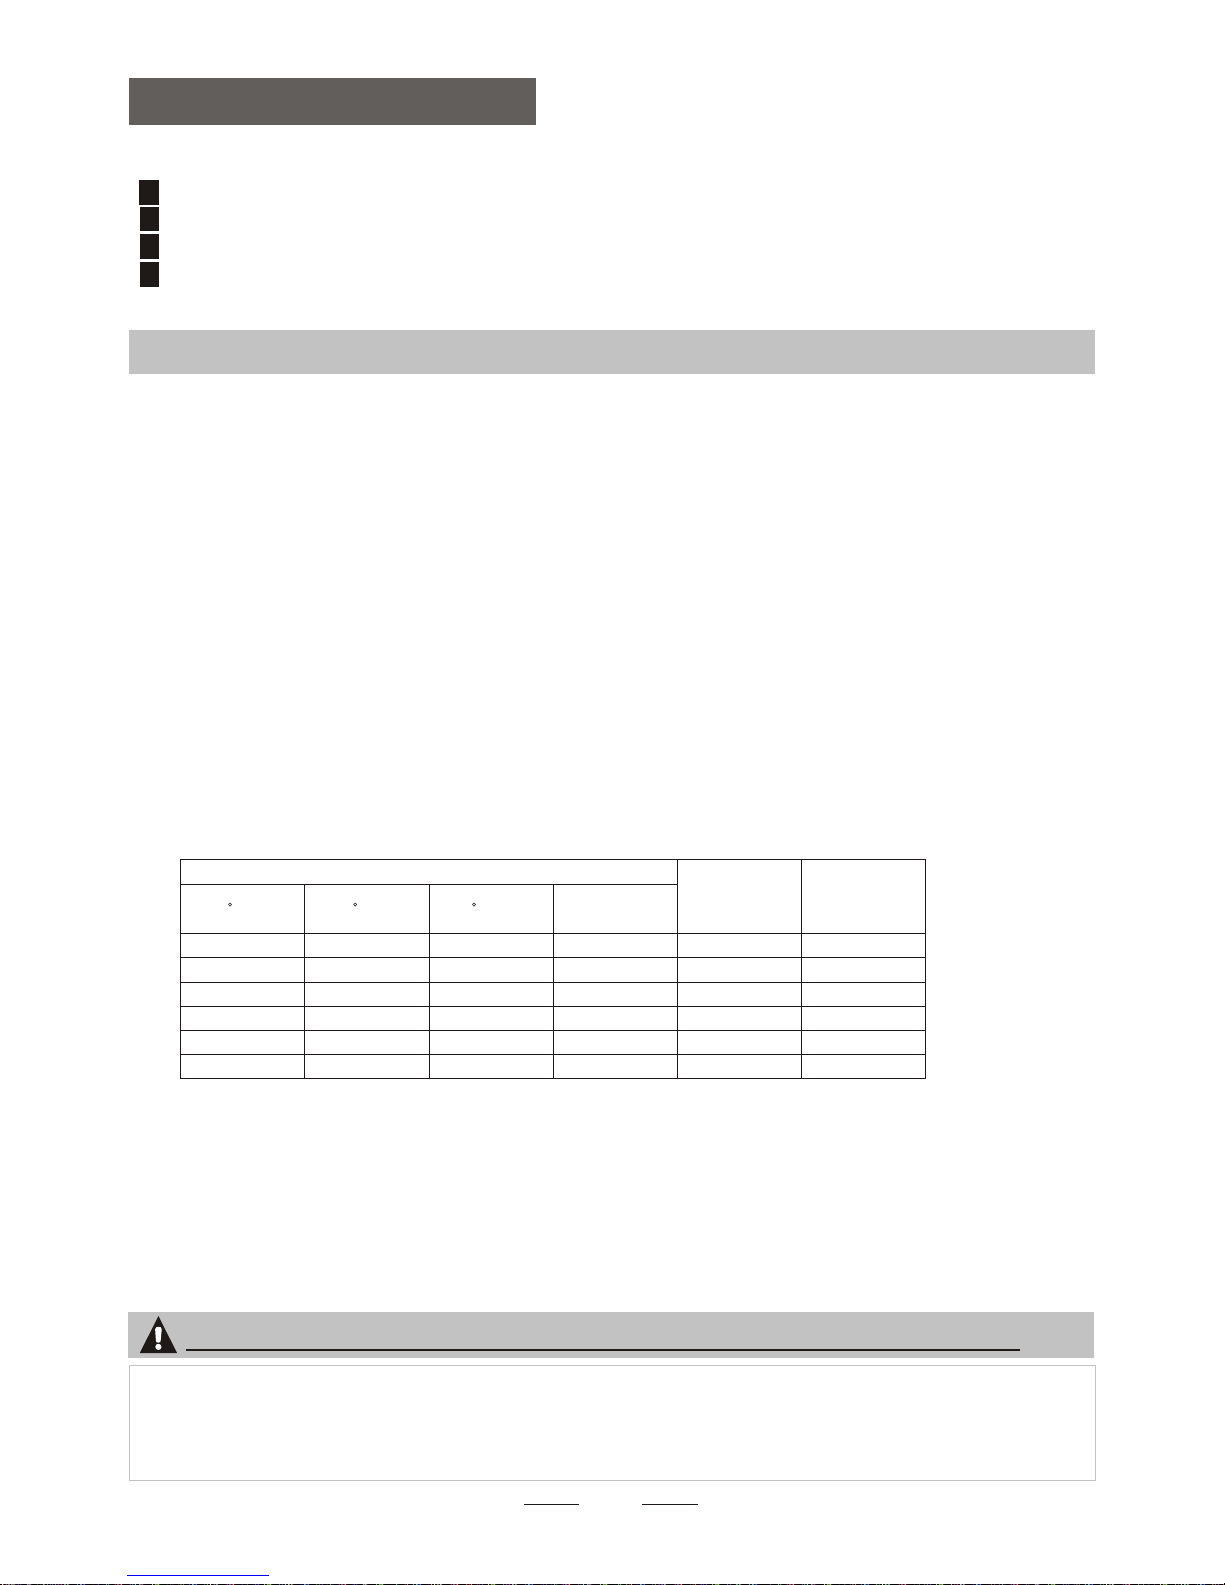
6) Starting awashing programme........................116) Starting awashing programme........................11
Wash Cycle Table...........................................11
Turning on the Appliance................................12
Change the Programme..................................12
At the End of the Wash Cycle...........................12
8) Installation instruction....................................158) Installation instruction...................... ............15..
Positioning theAppliance...............................15
Water Connection..........................................16
About Power Connection................................15
Start of dishwasher........................................17
9) TroubleshootingTips......................................189) TroubleshootingTips................................ ....18..
Before calling for service.................................18
Error codes...................................................19
Technicalinformation.....................................20
1) Safety Information..........................................11) Safety Information..........................................1
2) Disposal.........................................................22) Disposal.........................................................2
3) Operating Instructions.....................................33) Operating Instructions.....................................3
Control Panel...................................................3
The Method LoadingNormal Dishware.............10
Loading the baskets according to En50242Loading the baskets according to En50242
This product is guaranteed for one year from the date of original
purchase. If any defect arises due to faulty materials of
workmanship the faulty product will be repaired, refunded
or replaced at our discretion.
The following conditions apply:
The product must have been purchased from new. Proof of
purchase will be required
The product must be installed and used in accordance with the
instructions contained in this instruction guide. It must be used
only for household and similar purposes such as:
· staff kitchen areas in shops, offices and other working
environments;
· farm houses and by clients in hotels, motels and other
residential type environments;
· bed and breakfast type environments;
· catering and similar non-retail applications.
The appliance has not been altered, serviced, dismantled or
otherwise interfered with by any person not authorised by
Swan.
Any repair work must be undertaken by us or our appointed
agent.
Any parts removed during repair work or any appliance that
is replaced becomes our property. It does not cover wear
and tear, damage, misuse or consumable parts. Swan
Products Ltd has no liability for incidental or consequential
loss or damage. Food value is NOT covered by the warranty.
This guarantee is valid in the UK and Eire Only.

KEEP THESE INSTRUCTIONS
READ AND FOLLOW THIS SAFETY INFORMATION CAREFULLY
1.IMPORTANT SAFETY INFORMATION
READ ALL OF THE INSTRUCTIONS BEFORE USING
1.IMPORTANT SAFETY INFORMATION
READ ALL OF THE INSTRUCTIONS BEFORE USING
11
GROUNDING INSTRUCTIONS
WARNING! PROPER USE
Keep children away from detergent and rinse aid, keep
children away from the open door of the dishwasher,
there could still be some detergent left inside.
Do not abuse, sit on, or stand on the door or dish
rack of the dishwasher.
Do not touch the heating element during or
immediately after use.
(This instruction is only applicable to machines
with a visual heating element.)
Do not wash plastic items unless they are marked
dishwasher safe or the equivalent. For plastic items
not s
o m
arked, c
heck th
e m
anufacturer's
recommendations.
Use only detergent and rinse additives
designed for an automatic dishwasher.
Never use soap, laundry detergent, or hand
washing detergent in your dishwasher. Keep
these products out of the reach of children.
During installation, the power supply must not
be excessively or dangerously bent or flattened.
Do not tamper with controls.
Do not place any heavy objects on or stand on the
door when it is open. The appliance could tip
forward.
When loading items to be washed:
1) Locate sharp items so that they are not likely
to damage the door seal;
2) Warning: Knives and other utensils with
sharp points must be loaded in the basket
with their points down or placed in a
horizontal position.
When using yourdishwasher, youshould
prevent plastic itemsfrom coming intocontact
with the heating element.(This instruction is only
applicable to machineswith a visualheating
element.)
If the supply cord is damaged, it must be replaced
by the manufacturer or its service agent or a
similarly qualified person in order to avoid a
hazard.
Please dispose of packing materials properly.
Use the dishwasher only for its intended function.
Remove the door to the washing compartment when
removing an old dishwasher from service or discarding it.
Dishwasher detergents are strongly alkaline, they
can be extremely dangerous if swallowed. Avoid
contact with skin and eyes and keep children away
from the dishwasher when the door is open.
Check that thedetergent comparment isempty
after completion of the wash cycle.
The appliance is to be connected to the water
mains using newhose sets andthat old hose-sets
should not be reused.
The maximum number of place settings to be
washed is 12.
The maximum permissible inlet water pressure is
1MPa.
The minimum permissible inlet water pressure is
0.04MPa.
Children should be supervised to ensure that they do
not play with the appliance.
This appliance is not intended for use by persons
(including children )with reduced physical, sensory or
mental capabilities, or lack of experience and
knowledge ,unless they have been given supervision
or instruction concerning use of the appliance by a
person responsible for their safety.
When using your dishwasher, follow the precautions listed below:
WARNING!WARNING!
The door should not be left open,
since this could increase the risk of tripping.
Do not operate your dishwasher unless all
enclosure panels are properly in place. Open
the door very carefully if the dishwasher is
operating, there is a risk of water squirting out.
BS Plug Wiring
The wires in the mains lead are coloured in accordance with the following code:
BLUE NEUTRAL BROWN LIVE GREEN/YELLOW EARTH
As the colours of the wire in the mains lead of this appliance may not correspond with the colour markings
identifying the terminals on your plug, proceed as follows:
The wire which is coloured BLUE must be connected to the terminal which is marked with the letter N or
coloured black. The wire which is coloured BROWN must be connected to the terminal which is marked
with the letter L or coloured red. The wire which is coloured GREEN/YELLOW must be connected to the
terminal which is marked with the letter E or (earth symbol) and is coloured GREEN or GREEN/YELLOW.
WARNING: THIS APPLIANCE MUST BE EARTHED

22
Packaging material could be dangerous for children!
For disposing of package and the appliance please go to a recycling centre. Therefore cut
off the power supply cable and make the door closing device unusable.
Cardboard packaging is manufactured from recycled paper and should be disposed in the
waste paper collection for recycling.
By ensuring thisproduct is disposedof correctly, you will help preventpotential negative
consequences for the environment and human health, which could otherwise be caused
by inappropriate wastehandling of thisproduct.
For more detailedinformation about recyclingof this product, please contact your local
city office and your household waste disposal service.
2.Disposal2.Disposal
DISPOSAL: Do not dispose this product as unsorted municipal waste. Collection of such
waste separately forspecial treatment isnecessary.
WARNING!WARNING!
Disposal of Unit
Disposal instructions for Swan items in accordance with the WEEE
directive. Appliances bearing the symbol shown here may not be
disposed of in domestic rubbish. You are required to dispose of old
electrical and electronic appliances like this separately. Please visit
www. recyclemore.co.uk, or www.recyclenow.co.uk for access to
information about the recycling of electrical items. The WEEE directive,
introduced in August 2006, states that all electrical items must be recycled,
rather than taken to landfill. Please arrange to take this appliance to your
local Civic Amenity site for recycling, once it has reached the end of its life.

Back View
Front view
3.Operation Instruction3.Operation Instruction
Dispenser
Cup Shelf
Spray arms
Filter assembly
Inlet pipe connector
Drain pipe
Lower Basket
Inner pipe
Upper Basket
1Salt Container
33
Dishwasher FeaturesDishwasher Features
Control PanelControl Panel
before using it for the first time.
To get the best performance from your dishwasher, read all operating instructions
IMPORTANTIMPORTANT
5
6
7
8
9
10
3
2
4
3
13
1
11223344
1 Display Window
a) Labels in the first row ordinally mean intensive, normal, eco, glass, 1 hour and rapid;
b) Labels in the second row ordinally mean rinse-aid, salt,3 hours delay,6 hours delay,
9 hours delay and 12 hours delay.
2 Delay Start Button
3 Program Select Button
4 Power Button

The water softener must be set manually, using the water hardness dial.
The water softener is designedto remove mineralsand salts fromthe water, which would have
a detrimental or adverse effect on the operation of the appliance.
The higher thecontent of these minerals and salts, the harder your water is.
The softener shouldbe adjusted accordingto the hardnessof the waterin your area.Your local Water Authority
can advise you on the hardness of the water in your area.
Adjusting Salt Consumption
The dishwasher is designed to allow for adjustment in the amount of salt consumed based on the hardness of
the water used.This is intended to optimiseand customise the level o f salt consumption.
1. Switch on the appliance;
2. Press theProgram button formore than 5seconds to startthe water
softener set model within 60seconds after the appliance was
switched on;
3. Press theprogram button toselect the properset according to
your local environment, the sets will change in the following
sequence: H1->H2->H3->H4->H5->H6;
4. Press the power button more than 5 seconds to end the set up model.
WATER SOFTENER
The hardness of the water varies from place to place. If hard water is used in the dishwasher, deposits will
form on the dishes and utensils.
The appliance is equipped with a special softener that uses a salt container specifically designed to eliminate
lime and minerals from the water.
4.Prior using for the first time4.Prior using for the first time
Contact your local water board for information on the hardness of your water supply.
Please follow the steps below for adjustment in salt consumption.
44
A. Water SoftenerA. Water Softener
NOTE:NOTE:
If your model does not have any water softener, you may skip this section.
¡ã
Clark: British degree
¡ã
fH: French degree
¡ã
DH: German degree
Note:1Note:1 dH=1.25 Clarke=1.78 fH=0.178mmol/l
¡ã ¡ã
¡ã
1
Note:2Note:2
The manufactory setting: H4 (EN 50242)
Before using your dishwasher for the first time:
A. Set the water softener
B. Add 1.5Kgdishwasher salt andthen full fillthe salt containerwith water
C. Fill the rinse aid dispenser
D. Fill in detergent
dH
mmol/l
0~90~5 0~0.94 H1 0
10-20
6-11
1.0-2.0 H2 9
21-30
12-17 2.1-3.0
H3
12
H4 20
fH
0~6
7-14
15-21
Clarke
WATER HARDNESS
Selector Position Salt consumption
(gram/cycle)
18-22 31-40 22-28 3.1-4.0
41-60
23-34 4.1-6.0 H5 30
H6 60
29-42
35-55 61-98 43-69 6.1-9.8

1. The salt container mustonly be refilledwhen the saltwarning light inthe control panelcomes on.
Depending on howwell the saltdissolves, the saltwarning light maystill be oneven though the
salt container isfilled.
If there isno salt warninglight in thecontrol panel (forsome Models),you canestimate when to fill
the salt intothe softener bythe cycles thatthe dishwasher hasrun.
2. If thereare spills ofthe salt, asoak or arapid program shouldbe run toremove the excessivesalt.
Always use the salt intended for use with dishwasher.
The salt container is located beneath the lower basket and should be filled as explained
in the following:
Attention!
Only use salt specifically designed for the use in dishwashers! Every other type of
salt not specifically designed for the use in a dishwasher, especially table salt, will
damage the water softener. In case of damages caused by the use of unsuitable
salt the manufacturer does not give any warranty nor is liable for any damages caused.
Only fill with salt just before starting one of the complete washing programs.
This will prevent any grains of salt or salty water, which may have been spilled,
remaining on the bottom of the machine for any period of time, which may cause
corrosion.
55
B. Loading the Salt Into the SoftenerB. Loading the Salt Into the Softener
C. Fill the Rinse Aid DispenserC. Fill the Rinse Aid Dispenser
The rinse aid is released during the final rinse to prevent water from forming droplets on your dishes, which can
leave spots and streaks. It also improves drying by allowing water to roll off the dishes. Your dishwasher is
designed to use liquid rinse aids. The rinse aid dispenser is located inside the door next to the detergent dispenser.
To fill the dispenser, open the cap and pour the rinse aid into the dispenser until the level indicator turns completely
black. The volume of the rinse aid container is about 110ml.
Rinse AidDispenser
Function of Rinse Aid
Rinse aid is automatically added during the last rinse, ensuring thorough rinsing, and spot and streak free drying.
Attention!
Only use branded rinse aid for dishwasher. Never fill the rinse aid dispenser with any other substances
(e.g. Dishwasher cleaning agent, liquid detergent). This would damage the appliance.
NOTE:NOTE:
OpenOpen
1122
.
Full fill the salt container with water,It is normal for a small amount of water to come out of the
salt container
11
22
A After the lower basket has been removed, unscrew and remove the cap from the salt container.
BPlace the end of the funnel (supplied) into the hole and introduce about 1.5kg of dishwasher salt.
C
D After filling the container , screw the cap tightly back clockwise.
E The salt warning light will stop being after the salt container has been filled with salt.
FImmediately after filling the salt into the salt container, a washing program should be started (We suggest to use a short
program). Otherwise the filter system, pump or other important parts of the machine may be damaged
by salty water. This is out of warranty.

66
To open the dispenser, turn the cap to the "open" (left) arrow and lift it out.
Pour the rinse aid into the dispenser, being careful not to overfill.
Replace the cap by inserting it aligned with "open" arrow and turning it to the closed (right) arrow.
Adjusting Rinse Aid Dispenser
The rinse aid dispenser has six or four settings. Always start with the dispenser
set on "4". If spots and poor drying are a problem, increase the amount of rinse
aid dispensed by removing the dispenser lid and rotating the dial to "5". If the
dishes still are not drying properly or are show spots, adjust the dial to the next
higher lever until your dishes are spot-free. The recommended setting is "4".
(Factory value is "4".)
Increase the dose if there are drops of water or lime spots on the dishes after washing.
Reduce it if there are sticky whitish stains on your dishes or a bluish film on glassware or
knife blades.
1
2
3
As the rinse aid diminishes, the size of the black dot
on the rinse aid level indicator changes, as illustrated below.
Full
3 / 4 ful l
1 / 2 ful l
1 / 4 full - Should refill to eliminate spotting
Empty
Adjust lever
(Rinse)
Adjust lever
(Rinse)
When to Refill the Rinse Aid Dispenser
If there isno rinse-aid warninglight in thecontrol panel, youcan estimate theamount from thecolour
of the opticallevel indicator C located next tothe cap. When the rinse-aid container is full, the whole
indicator will bedark .As the rinse-aid diminishes, the size of the dark dot decreases. You should never let
the rinse aidlevel fall 1/ 4 full.
during the next wash. Don't forget to replace the cap before you close dishwasher door.
Clean up any rinse aid spilled while during filling with an absorbent cloth to avoid excessive foaming
NOTE:NOTE:
NOTE:NOTE:
Detergents with its chemical ingredients are necessary to remove dirt, crush dirt and transport it out of the dishwasher.
Most of the commercial quality detergents are suitable for this purpose.
D. Function of DetergentD. Function of Detergent
MAXMAX
Proper Use of Detergent
Use only detergentspecifically made forthe use indishwashers. Keep your detergent fresh and dry.
Don't put powdereddetergent into thedispenser until you'reready to wash dishes.
Attention!
C (Rinse-Aid indicator)C

77
Amount of Detergent to Use
Dishwasher detergent is corrosive! Take care to keep it out of reach of children.
WARNING!WARNING!
Based on theirchemical composition, detergentscan be splitin two basictypes:
The use of normal washing programs incombination with concentrateddetergents
reduces pollution and is good for your dishes; these wash programs are specifically matched
to the dirt-dissolving properties of the enzymes of the concentrated detergent. For this reason
normal wash programs in which concentrated detergents are used can achieve the same
results that can otherwise only be achieved using intensive programs.
Detergent tablets ofdifferent brands dissolve at different speeds. For this reasonsome
detergent tablets cannotdissolve and developtheir full cleaningpower during short
programs. Therefore please use longprograms when usingdetergent tablets, to
ensure the completeremoval of detergentresiduals.
The dispenser mustbe refilled beforethe start ofeach wash cyclefollowing the instructions
provided in the wash cycle table . Your dishwasher uses less detergent and rinse aid than
Conventional dishwasher. Generally, only one tablespoon of detergent is needed for
a normal wash load. More heavily soiled items need more detergent. Always add the
detergent just before starting the dishwasher, otherwise it could get damp and will not
dissolve properly.
Concentrated Detergent
Detergent Tablets
Detergent Dispenser
conventional, alkaline detergents with caustic components
low alkaline concentrated detergents with natural enzymes
Normally new pulveriseddetergent is without phosphate. Thus the water softener function of
phosphate is notgiven. In this case we recommend to fill salt in the salt container even when
the hardness ofwater is only6 dH. If detergents without phosphate are used in the case of hard water
often white spotsappear on dishes and glasses. In this case please add more detergent to reach
better results. Detergentswithout chlorine do only bleach a little. Strong and coloured spots will not
be removed completely. In this case pleasechoose a program with a higher temperature.
Detergents
There are 3sorts of detergents
1.With phosphate and with chlorine
2.With phosphate andwithout chlorine
3.Without phosphate and without chlorine
Always add the detergent just before starting each wash cycle.
Only use branded detergent aid for dishwasher.
If the lid is closed: press release button. The lid will spring open.
NOTE:NOTE:
Push latch to openPush latch to open
1122
Detergent tablet
Detergent powder

Fill the detergentdispenser with detergent.
The marking indicates the dosing levels , as
illustrated on theright:
The place of main wash cycle detergent placed.
The place of pre-wash cycle detergent placed.
Please observe the manufacturers dosing and storage
Recommendations as stated on the detergent packaging.
Close the lid and press until it locks in place.
If the dishes are heavily soiled, place an additional
detergent dose inthe pre-wash detergent chamber. This detergent will take effect during the pre-wash phase.
A
B
Fill in Detergent
You find information about the amount of detergent for the single programme on the last page.
Please aware, thataccording to thelevel soiling andthe specific hardnessof water differences are possible.
Please observe themanufacturer's recommendations onthe detergent packaging.
NOTE:NOTE:
88
AABB

5.Loading the Dishwasher Baskets5.Loading the Dishwasher Baskets
For washing in the dishwasher the following cutlery/dishesFor washing in the dishwasher the following cutlery/dishes
Cutlery with wooden, horn china or
mother-of-pearl handles
Plastic items that are not heat resistant
Older cutlery with glued parts that are not
temperature resistant
Bonded cutlery items or dishes
Pewter or cooperitems
Crystal glass
Steel items subject to rusting
Wooden platters
Items made from synthetic fibres
Some types ofglasses can become
dull after a large number of washes
Silver and aluminumparts have a
tendency to discolour during washing
Glazed patterns may fade if machine
washed frequently
Are not suitable Are of limited suitability
Dishes and items of cutlery must not lie inside one another, or cover each other.
To avoid damage to glasses, they must not touch.
Load large itemswhich are mostdifficult to clean into thelower basket.
The upper basket is designed to hold more delicate and lighter dishware such as glasses, coffee
and tea cups
Long bladed knives stored in an upright position are a potential hazard!
Long and/or sharp items of cutlery such as carving knives must be positioned
horizontally in theupper basket.
Please do not overload your dishwasher. This is important for good results and for
reasonable consumption of energy.
Load hollow itemssuch as cups,glasses, pans etc.With the opening facing downwards so that
water cannot collect in the container or a deep base.
RecommendationRecommendation
Consider buying utensilswhich are identified as dishwasher-proof.
Use a mild detergent that is described as 'kind to dishes'. If necessary, seek further
information from thedetergent manufacturers.
For particular items, select a program with as low a temperature as possible.
To prevent damage, do not take glass and cutlery out of the dishwasher immediately
after the programme has ended.
(For best performance of the dishwasher, follow these loading guidelines.
Features and appearanceof baskets and cutlery baskets may vary from your model.)
Scrape off any large amountsof leftover food. Soften remnants of burntfood in pans.
It is not necessary to rinse the dishes under running water.
Place objects inthe dishwasher in following way:
1.Items such as cups, glasses, pots/pans, etc. are faced downwards.
2.Curved items,or ones withrecesses, should be loaded aslant so that water can run off.
3.All utensils are stacked securely and can not tip over.
4.All utensilsare placed inthe way that the spray arms can rotate freely during washing.
NOTE:NOTE:
Very smallitems should notbe washed in the dishwasher as they could easily fall out of the basket.
Attention before or after loading the Dishwasher BasketsAttention before or after loading the Dishwasher Baskets
Toprevent water drippingfrom the upper basket into the lower basket, we recommend that you
empty the lowerbasket first andthen the upperbasket.
Removing the DishesRemoving the Dishes
99

1010
The upper basketis designed tohold more delicate
and lighter dishware such as glasses, coffee and
tea cups and saucers, as well as plates, small bowls
and shallow pans(as long asthey are nottoo dirty).
Position the dishes and cookware so that they will
not get moved by the spray of water.
Loading the Upper BasketLoading the Upper Basket
We suggest that you place large items and the most
difficult to clean items are to be placed into the lower
basket: such as pots, pans, lids, serving dishes and
bowls, as shownin the figurebelow. Itis preferable to
place serving dishesand lids onthe side of the racks
in order to avoid blocking the rotation of the top spray
arm.
Loading the Lower BasketLoading the Lower Basket
Pots, serving bowls, etc, must always be placed top down.
Deep pots should be slanted to allow water to flow out.
Please be remindedthat:
The Bottom Basket features folding spikes so that larger or more pots and pans can be loaded.
The Method Loading Normal DishwareThe Method Loading Normal Dishware
IN
IN
Folding Spikes of Lower Basket
For better stacking of pots and pans,
the spikes can be folded down as
show in thepicture right.
Adjusting the Upper Basket
The height ofthe upper basketcan be adjusted in order to
create more space for large utensils both for the upper
/lower basket. The height of the upper basket can be
adjusted by placing the wheels on different height of the
rails. Long items, serving cutlery, salad servers and knives
should be placedon the shelf so that they do not obstruct
the rotation ofthe spray arms..
Lower positionLower position Upper positionUpper position
WheelsWheels
Folding back the cup shelives
For better stacking of pots and pans,
the spikes can be folded down as
show in thepicture right.
Cutlery should beplaced in thecutlery basket withthe handles atthe bottom. Ifthe rack hasside baskets, the
spoons should beloaded separately intothe appropriate slots,especially long utensilsshould be placed in the
horizontal position atthe front ofthe upper basketas shown inthe picture.
Cutlery BasketCutlery Basket
Do not letany item extendthrough the bottom.
Always load sharputensils with thesharp point down!
WARNING!
For personal safetyand a topquality cleaning, placethe silverware inthe basket
making sure that:
For personal safetyand a topquality cleaning, placethe silverware inthe basket
making sure that:
They do not nest together.They do not nest together.
Silverware is placed with the handles-down.Silverware is placed with the handles-down.
But place knives and other potentially dangerous utensils are placed handles-up.But place knives and other potentially dangerous utensils are placed handles-up.

Detergent
pre/main
Detergent
pre/main
Cycle Selection
Information
Cycle Selection
Information
ProgramProgram
Intensive
Normal
(*EN 5 0242)
Running
time(min)
Running
time(min) Water
(L)
Water
(L)
Energy
(Kwh)
Energy
(Kwh)
Rinse
Aid
Rinse
Aid
(or3in1)
5/25g
(or3in1)
5/25g
(Or3in1)
5/25g
Prewash 50
Wash 65
Rinse
Rinse
Rinse 55
Drying
Prewash(45 )
Wash (55 )
Rinse
Rinse (65 )
Drying
Prewash
Wash (50 )
Rinse
Rinse(60 )
Drying
160
170
140
1.35
1.02
1.45
19
15
12
Description
of Cycle
Description
of Cycle
1 hour
Prewash 50
Wash(60 )
Rinse (55 )
Drying
60 10
1
NOTE:NOTE:
*EN 50242 : This programme is the test cycle. The information forcomparability test
in accordance withEN 50242, asfollows:
Capacity: 12 setting
Position Upper basket: upper wheels on rails
Rinse aid setting: 6
Pl:0.49w; Po:0.45w.
Turning On the ApplianceTurning On the Appliance
Starting a cyclewash
Draw out thelower and upperbasket, load thedishes and pushthem back.
It is commendedto load thelower basket first,then the upperone (see the section entitled
Loading the Dishwasher ).
Pour in thedetergent (see thesection entitled Salt, Detergent and Rinse Aid ).
Insert the pluginto the socket.The power supply is 220-240VAC /50 HZ, thespecification
of the socketis 10A 250VAC. Make sure thatthe water supplyis turned onto full pressure.
Open the door, press the Power button, to switch on the machine.
Press the program button , the wash program will be changed as follows direction:
Intensive->Normal->Eco->Glass->1Hour->Rapid;
If a programis selected, theresponse light will light. Close the door and thedishwasher begins to start.
1
2
3
4
5
5/25g
6.Starting a washing program6.Starting a washing program
Wash Cycle TableWash Cycle Table
NOTE:NOTE:
Means: need to fill rinse into the Rinse-Aid Dispenser.
( )
1111
For normally soiled loads,
such as pots, plates,glasses
and lightly soiled pans.
This is standard programme, it is suitable
to clean normally soiled tableware and
it is the most efficient programme in
teams of its combined energy and water
consumption for that type of tableware.
For heaviest soiled crockery,
and normally soiled pots
pans dishes etc with dried
on soiling.
For lightly soiled loads that
do not need excellent drying
efficiency.
Rapid
Wash (40 )
Rinse
Rinse (45 )
40 0.6
11.5
20g
A shorter wash for lightly
soiled loads that do not
need drying.
For lightly soiledloads,
such as glasses,
crystal and fine china.
5/25g
Pre-wash
wash(40 )
Rinse
Rinse(60 )
Drying
120
0.85 15
Glass

When the workingcycle has finished,the buzzer ofthe dishwasher willsound for 8seconds, then stop.Turn off
the appliance usingthe Power switchbutton, shut off the water supply and open the door of the dishwasher.
Wait for a few minutes before unloading the dishwasher to avoid handling the dishes and utensils while they
are still hot and more susceptible to breakage. They will also dry better.
Switch Off the Dishwasher
The program light is on but is not blinking, only in this case the programme has ended.
1.Switch off the dishwasher by pressing the Power button.
2.Turn off the water tap!
Open the door carefully.
Hot dishes aresensitive to knocks. The dishes should therefore be allowed to cool down around 15 minutes
before removing from the appliance.
Open the dishwasher'sdoor, leave it ajar and wait a few minutes before removing the dishes. In this way they
will be cooler and the drying will be improved.
Unloading the dishwasher
It is normal that the dishwasher is wet inside.
Empty the lowerbasket first andthen the upperone. This will avoid waterdripping from the upper Basket onto
the dishes in the lower one.
Change the Program...Change the Program...
Forgot to Add a Dish?Forgot to Add a Dish?
If you open the door during a wash cycle , the machine will pause. The program light will
stop blinking and the buzzer will mooing every minute unless you close the door . After
you close the door ,the machine will keep on working after 10 seconds.
NOTE:NOTE:
At the End of the Wash CycleAt the End of the Wash Cycle
A forgotten dish can be added any time before the detergent cup opens.
Add forgotten dishes.
After the spray arms stop working,you can open the door
completely.
2
3
Open the door a little to stop the washing.
1
4Close the door, the dishwasher will run
after 10 seconds.
When you open the door of dishwasher during washing, the running indicator will
stop blinking and the dishwasher will mooing every minute unless you close the
door to restart.
NOTE:NOTE:
Wash the arms in soapy and warm water and use a soft brush to
clean the jets. Replace them after rinsing them thoroughly.
NOTE:NOTE:
When following this procedure from step1 to step 3, the filter system will be removed;
when following it from Step 3 to Step 1, the filter system will be installed.
WARNING!WARNING! It is dangerous to open the door when washing, because the hot water may scald you.
1212
If your model has broken remember function, the machine will go on to finish the selected
program after the power cut.
1. A running cycle can only be modified if it has been running for a short time. If the detergent has
already been released and the water has already been drained out, the detergent dispenser must
be refilled.
2. Open the door carefully. When sprayers stop running, pless press the program button more than
3 seconds to cancel the running programme.
3. Select a new programme, then close the door to restart the dishwasher.

The filter preventslarger remnants offood or otherobjects from gettinginside the pum.
The residues may block the filter, in this case they must be removed.
The filter system consists ofa coarse filter,a flat (Main filter)
And amicrofilter(Fine filter).
Food and soil particles trapped in this filter are pulverized by a
special jet on the lower spray arm and washed down to drain.
Larger items, suchas pieces ofbones or glass,that could block
the drain aretrapped in thecoarse filter.To remove theitems
caught by thefilter, gentlysqueeze the tapon the topof this
filter and liftout.
This filter holds soil and food residues in the sump area and
prevents it from being redeposit on the dishes during wash cycle.
Main filter 1
Coarse filter2
Fine filter 3
2
3
1
Filter assembly
The filter efficiently removes food particles from the wash water, allowing it to be recycled during the cycle.
For best performanceand results, thefilter must becleaned regularly. For thisreason, it is a good idea to
remove the largerfood particles trappedin the filterafter each washcycle by rinsingthe semicircular filterand
cup under runningwater. Toremove the filterdevice, pull thecup handle inthe upward direction.
WARNING!WARNING!
The dishwasher must never be used without the filters.
Improper replacement of the filter may reduce the performance level of the appliance
and damage dishes and utensils.
nn
nn
1
2
Step 1 Turn the filter in anti-clockwisedirection,
Step 2 lift the filterassy up
OpenOpen
7.Maintenance and Cleaning7.Maintenance and Cleaning
Filtering SystemFiltering System
NOTE:NOTE:
When following this procedure from step1 to step 2, the filter system will be removed;
when following it from Step 2 to Step 1, the filter system will be installed.
1313

The control panel can be cleaned by using a lightly dampened cloth.
After cleaning, make sure to dry it thoroughly.
For the exterior, use a good appliance polish wax.
Never use sharp objects, scouring pads or harsh cleaners on any part of the dishwasher.
Protect AgainstFreezing
1.Cut off the electrical power to the dishwasher.
2.Turn off the water supply and disconnect the water inlet pipe from the water valve.
3.Drain thewater from the inlet pipe and water valve. (Use a pan to gather the water)
4.Reconnect the water inlet pipe to the water valve.
5.Remove thefilter at the bottom of the tub and usea sponge tosoak up waterin the sump.
please take frostprotection measures onthe dishwasher inwinter. Everytime after washing cycles,
please operate as follows
Caring for the DishwasherCaring for the Dishwasher
Cleaning the Filter
Cleaning The Door
Toclean the coarsefilter and thefine filter,use a cleaningbrush. Reassemble thefilter parts as shown in the figures
on the lastpage and reinsertthe entire assemblyin the dishwasher, positioning itin its seatand pressing downwards.
When cleaning the filters, don't knock on them. Otherwise, the filters could be
contorted and the performance of the dishwasher could be decreased.
WARNING!WARNING!
To clean the edge around the door, you should use only a soft warm, damp cloth.
To avoid penetration of water into the door lock and electrical components, do not
use a spray cleaner of any kind.
WARNING!WARNING!
Never use a spray cleaner to clean the door panel as it may damage the door lock
and electrical components.
Abrasive agents or some paper towels should not be used because of the risk of
scratching or leaving spots on the stainless steel surface.
nn
nn
Cleaning the Spray Arms
NOTE:NOTE:
If your dishwasher cannot work because of the ice,
please contact professional service persons.
It is necessaryto clean thespray arms regularlyfor hard
water chemicals willclog the sprayarm jets andbearings.
- Inspect the filters for blocking after every time the dishwasher has beenused.
- By unscrewing the coarse filter, you can remove the filter system. Remove any food remnantsand
clean the filters under running water.
Remarks:
The entire filter assembly should be cleaned once a week.
NOTE:NOTE:
To remove the lower spray arm, pull out the spray arm upward.
Toremove the upperspray arm, hold the nut, rotate the arm
clockwise to removeit.
Wash the arms in soapy and warm water and use a soft brush to
clean the jets. Replace them after rinsing them thoroughly.
1414
OpenOpen

It is recommend that you run a wash cycle with the
dishwasher empty andthen remove the plug fromthe
socket, turn off the water supply and leave the doorof
the appliance slightlyopen. This will help thedoor
seals to last longer and prevent odours from forming
within the appliance.
If the appliance must be moved, try to keep it in the
vertical position. If absolutely necessary, it can be
positioned on its back.
One of thefactors that causeodours to formin the
dishwasher is foodthat remains trappedin the seals.
Periodic cleaning witha damp spongewill prevent this
from occurring.
Electrical Requirements
Ensure the voltage and frequency of the power being corresponds to
those on the rating plate. Only insert the plug into an electrical socket which is earthed
properly. If the electrical socket to which the appliance must be connected is not
appropriate for the plug , replace the socket, rather than using a adaptors or the like as
they could cause overheating and burns.
Electrical Connection
Insure proper ground
exists before use
GROUNDING INSTRUCTIONS
8.Installation instruction8.Installation instruction
Please look at the rating label to know the rating voltage and connect the dishwasher to the appropriate power supply.
Use the required fuse 10 amp, time delay fuse or circuit breaker recommended and provide separate circuit serving
only this appliance.
Position the appliancein the desiredlocation. The back should restagainst the wall behind it, and the sides,
along the adjacentcabinets or walls. The dishwasher is equipped with water supply and drain hoses that can
be positioned eitherto the right or the left sides to facilitate proper installation.
Levelling the Appliance
Once the appliance is positioned for levelling, the height of the dishwasher
may be altered via adjustment of the screwing level of the feet. In any case,
the appliance should not be inclined more than 2 .
Positioning the AppliancePositioning the Appliance
About Power ConnectionAbout Power Connection
WARNING!WARNING!
For personal safety:
DO NOT USE AN EXTENSION CORD OR AN ADAPTER PLUG WITH THIS APPLIANCE.
DO NOT, UNDER ANY CIRCUMSTANCES, CUT OR REMOVE THE EARTHING
CONNECTION FROM THE POWER CORD.
nn
nn
Before cleaning orperforming maintenance, always
remove the plugfrom the socket.
To clean the exterior and rubber parts of the dishwasher,
do not use solvents or abrasive cleaning products.
Only use a cloth with warm soapy water.
Toremove spots orstains from thesurface of the
interior, use a cloth dampened with water an a little
vinegar, or a cleaning product made specifically for
dishwashers.
Remove the Plug
No Solvents or Abrasive Cleaning
Moving the Appliance
Seals
How to Keep Your Dishwasher in Shape
After every wash,turn off the water supplyto the
appliance and leave the door slightly open so that
moisture and odours are not trapped inside.
After Every Wash When not in Use for a LongTime
This appliance must be earthed. In the event of a malfunction or breakdown, earthing will reduce the risk of
electric shock by providing a path of least resistance for the electric current. This appliance is equipped with a
cord having an equipment-earthing conductor and an earthing plug. The plug must be plugged into an
appropriate outlet that is installed and earthed in accordance with all local standards and requirements.
nn
1515

1616
Cold Water Connection
Connect the coldwater supply hoseto a threaded3/4(inch) connector andmake sure
that it isfastened tightly inplace.
If the waterpipes are newor have notbeen used foran extended periodof time, letthe
water run tomake sure thatthe water isclear. This precaution isneeded to avoidthe
risk of thewater inlet tobe blocked anddamage the appliance.
Please close the hydrant after using.
WARNING!WARNING!
Water ConnectionWater Connection
Drain hose Connection
for personal safety:
DO NOT USE AN EXTENSION CORD OR AN ADAPTER PLUG WITH THIS APPLIANCE.
DO NOT, UNDER ANY CIRCUMSTANCES, CUT OR REMOVE THE
FROM THE POWER CORD.
EARTHING
CONNECTION
nn
nn
WARNING!WARNING!
Improper connection of the equipment earthing conductor can result in the risk of an
electric shock.
Check with a qualified electrician or service representative if you are in doubt whether the
appliance is properly earthed.
Do not modify the plug provided with the appliance. If the plug does not fit properly to the
outlet, please have a qualified electrician to install a proper outlet.
nn
nn
nn
Insert the drainhose into adrain pipe with a minimum diameter of 40mm, or let it run into the sink, making sure to
avoid bending orcrimping it. The top ofthe hose must be less than 1000mm.
MAX 1000mm
A
Counter
Front
Drain pipe
NOTE
The top of the hose
must be less than
1000mm.
40mm
B
PLEASE HANG UP THE DRAIN HOSE EITHER WAYOF A, BPLEASE HANG UP THE DRAIN HOSE EITHER WAYOF A, B

The following things should be checked before starting the dishwasher.
Start of DishwasherStart of Dishwasher
The content of this manual is very helpful to the users.
After installation, please make sure to keep this manual.
Attention:Attention:
1The dishwasher is level and fixed properly
2The inlet valve is open
3There is a leakage at the connections of the conducts
4The wires are tightly connected
5The power is switched on
6The inlet and drain hoses are knotted
7All packing materials and printings should be taken out from the dishwasher
Extension Hose
If you need a drain hose extension, make sure to use a similar drain hose.
It must be no longer than 4 metres; otherwise the cleaning effect of the dishwasher couldbe reduced.
Water Outlet
Connect the waterdrain hose. The drain hosemust be correctly fitted to avoid water leaks.
Ensure that the water drain hose is not kinked or squashed.
If the sinkis 1000 higherfrom the floor, the excesswater in hosescannot be draineddirectly
into the sink. It will be necessary to drain excess water from hoses into a bowl or suitable
container that isheld outside andlower than thesink.
How to Drain Excess Water From Hoses
1717
Syphon Connection
The waste connectionmust be ata height lessthan 1000 mm(maximum) from the bottom ofthe dish.
The water drain hose should be fixed .
Table of contents
Other Swann Dishwasher manuals