manuals.online logo
Brands
  1. Home
  2. •
  3. Brands
  4. •
  5. SwissPhone
  6. •
  7. Receiver
  8. •
  9. SwissPhone HURRICANE DUO User manual

SwissPhone HURRICANE DUO User manual

11. Settings
These settings allow personalising your HURRICANE DUO
as follows:
• Message font Select between standard font
(three lines) and small font (up to
five lines).
• Melodies Select the address (RIC) for
which you would like to change
the melody by pressing SEL
repeatedly. On confirming with
OK, the current melody will be
played (once).
Use SEL to change the melody.
• Alarm Clock After activating the alarm clock,
the desired alarm time can be
set.
• Call Reminder Select the desired reminder type:
flashing, beeping, both, or none.
• Date/Time Use SEL to jump into desired field
and press OK to change values.
To apply your changes press
SEL until the confirmation dialog
appears. Now select Save and
press OK.
• Contrast Change display contrast from
1 (light) to 8 (dark).
• Button Click Enable or disable button clicks as
desired.
• Button Vibration On rolling over menu ends, a
short vibration occurs, depen-
ding on this setting.
• Confirmation Tones Toggle confirmation tones on
applying changes.
• Status Shows battery levels, firmware
version, serial number, and start-
up-text (or picture).
• Backlight Turn automatic backlight on/ off.
• Out of Range If active, the acoustic out of
range alert may be switched on/
off here.
12. PIN Lock
Terminals with active PIN lock will ask for the Unlock-PIN
on power up. Use SEL to change the first digit, press OK
as soon as the correct number is shown. Repeat for the
remaining three digits. In case the PIN is entered wrong
10 times, you will need the programming software to
unlock your terminal. If the pager configuration is protec-
ted by a programming password this has to be entered. In
case you need to re-set the programming password, all
user data will be lost!
13. Charging/Programming
Your HURRICANE DUO can be charged using either LGRA
Expert or LG Standard. Car chargers (ALG Stand-ard/
ALGRA Expert) are available as well. During charging the
LED on the charger glows orange. When charging is finis-
hed, the LED will change to green. On the terminal display
charging state and name of charging profile are shown.
HURRICANE DUO offers different alerting profiles depen-
ding on it being charged in a gang charger or single unit
charger. To change the configuration on your HURRICANE
DUO please only use current PG-SET Expert. Older pro-
gramming adapters may not support the baud rate used
by HURRICANE DUO.
14. Miscellaneous
Further information is available on the
Swissphone-Website http://www.swissphone.com.
Important Advice
• Do not recharge dry batteries to reduce the risk of fire
or explosion.
• Use only genuine Swissphone chargers for safety
reasons.
• Do not throw batteries into a fire to prevent an
explosion.
• Keep out of reach of children.
Disclaimer
The information in this document is provided “as is”
without express or implied warranty. All contents in this
HURRICANE DUO-Manual subject to change.
Manufacturer
Swissphone Wireless AG
Fälmisstrasse 21
CH-8833 Samstagern
User Manual
HURRICANE DUO
1. Introduction
We would like to congra-
tulate you on your new
receiver. In purchasing
the new Swissphone
HURRICANE DUO you
have decided on a device
of the highest quality.
The Swissphone HURRI-
CANE DUO is a convin-
cing product thanks to
the most effective com-
bination of an attrac-
tive design, simplest of
operation and highest of
quality. Your new recei-
ver features both a gra-
phical display and text
to speech technology. Messages are being displayed as
well as read to you.
These operating instructions provide you with informa-
tion on how to get the most from your device. Always
keep them readily at hand. Each Swissphone terminal
can be configured for the particular application. For this
reason, it is possible that functions described in these
operating instructions may not be available on your
device. We hope you will enjoy reading through these
operating instructions and using your Swissphone HUR-
RICANE DUO.
2. First Steps
Switching on
Press and hold any corner button until either start text
or start-up image are displayed. Now your terminal is in
stand-by mode.
Switching off
Press SEL (upper left hand corner) multiple times until
you reach the “Switch off” menu. Press OK (upper right
hand corner) to confirm the menu selection. A dialog
“Switch off: No/Yes” is now displayed. Please use the
SEL button to select “Yes” and confirm with OK.
3. Buttons/Menu Navigation
HURRICANE DUO is
operated with two but-
tons: The SEL-Button in
the upper left hand cor-
ner and the OK-Button
in the upper right hand
corner.
Using SEL you navi-
gate through menus and
make selections. OK,
is used to enter (sub)
menus and apply chan-
ges.
The device meets the provisions of the European directive RED
2014/53/EU («Radio Equipment Directive»).
You can request a copy of the declaration of conformity from info@
swissphone.com.
This device complies with Part 15 of the FCC Rules. Ope-
ration is subject to the condition that this device does not
cause harmful interference.
08/2017 0343001 v3
After-sales Service
Swissphone Wireless AG
Fälmisstrasse 21
CH-8833 Samstagern
Switzerland
6. Main Menu
At the first press off SEL
stand-by mode is left and the
main menu shown. Pressing
SEL again will advance the
active menu by one. To enter
a sub menu simply press OK.
Currently active menu items
are shown inverted on the screen and the menu item
name is shown.
Main Menu:
• Messages Manage and read message that have been
read before.
• Profile Select any of the pre-programmed profiles
• Alert Select between “Speak”, “Loud”,
“Discrete”, “Silent” (Device is completely
silent, Vibrator may be active) and “Off”
• Volume Speech output volume
• Settings Depending on configuration this menu
includes the following sub menus: Melo-
dies, Alert Reminder, Out of Range Alert,
Date/Time, Status, Backlight,
Key Clicks
• Switch off Turn of reciever completely
Menu items are freely programmable with the pro-
gramming software. Please refer to documentation for
PSWplus programming software regarding configuration
of the various sub menus.
7. Messages Menu
Change to Messages by selecting menu item “Messages”
with SEL now press OK, to open the menu.
Up to four different message folders may be present in
“Messages”:
• Read Messages
• Saved Messages
• Folder A
• Folder B
All messages that have been read previously are auto-
matically moved to the “Read” folder. Inside “Read”
please use SEL to browse through read messages. To lis-
ten to a message, delete or protect it, select the desired
message and press OK. A dialog will appear containing
the selections: “Speak”, “Delete”, “Save”. Please choose
your desired action and press OK. Saved messages are
moved to the “Saved Messages” folder immediately. If an
address is assigned to one of the message folders A or
B, messages will be saved directly to the correct folder.
New (unread) messages in folder A or B will
not be indicated with the envelope icon in
the status line!
• Delete all After a confirmation step, all messages
(including saved messages) will be deleted.
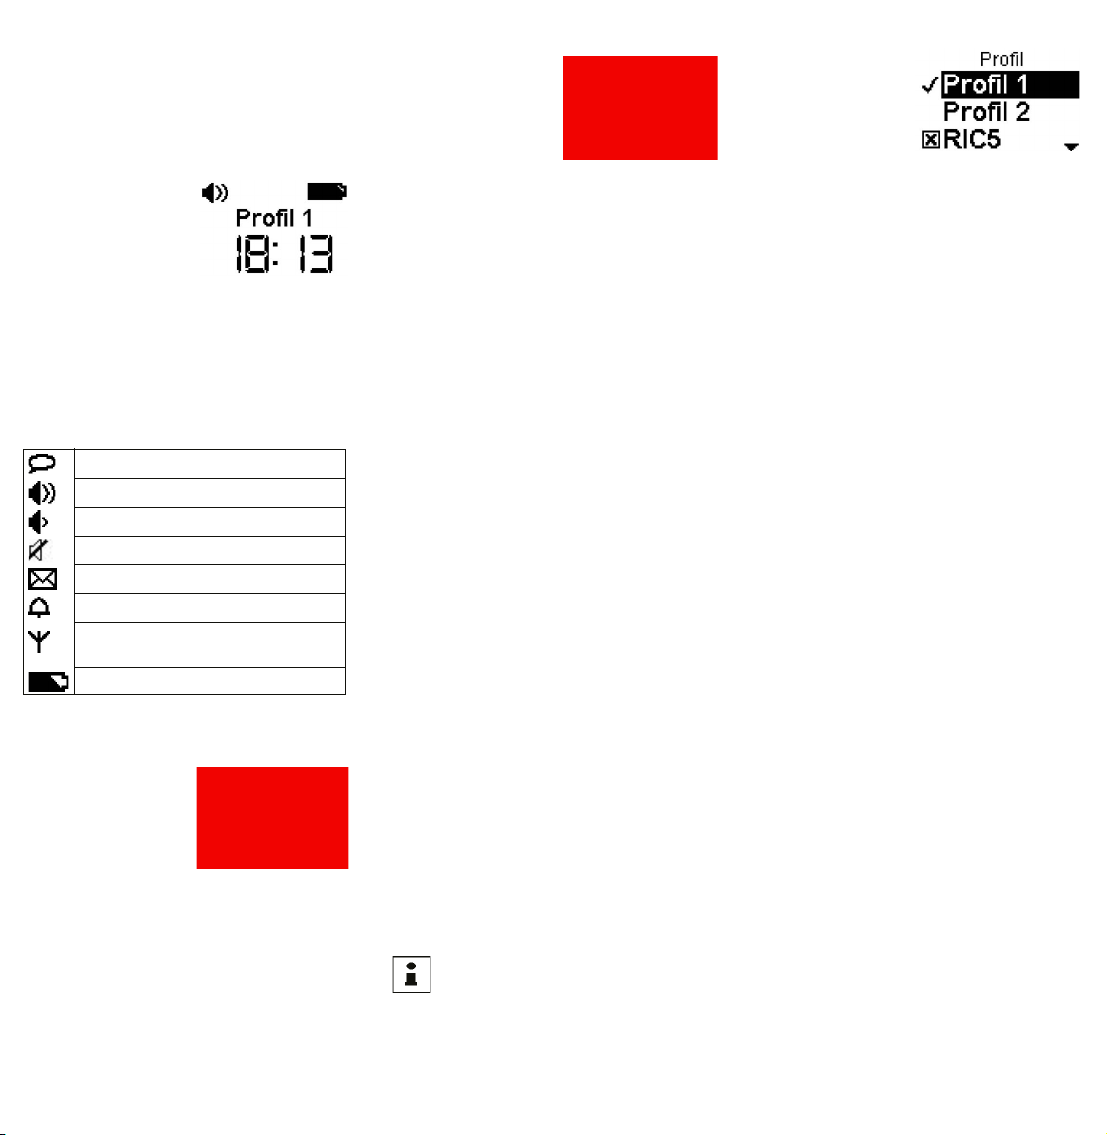
8. Prole
Select “Profile” with SEL
and confirm with OK. Now
you may navigate all avai-
lable profiles. A down-
ward pointing arrow indi-
cates further profiles are
available but can not be
shown on the current screen.
HURRICANE DUO offers two sorts of profiles:
Select-Profiles and Toggle-Profile. At any time only one
Select Profile can be active. On the other hand multiple
Toggle-Profiles can be activated together. The picture to
the right shows Select-Profiles “Profil 1” and “Profil 2”
are available, currently active is “Profile 1”.
Toggle-Profiles may be (de)activated independent of any
other profile. You can recognize Toggle-Profiles by their
“check-box” before the profile name. If only one address
is configured in a Toggle-Profile (in this case RIC5), the
address can be turned on or off on the terminal.
9. Alert
Inside the “Alert” menu you can choose between the fol-
lowing alert modes with SEL:
• Speak On reception of a message, the selected alert
pattern (melody) is played. Following this, the
message is read out loud. In case the melody
is set to endless, the message will only be
read out once the alerting has been interrup-
ted with OK.
• Loud The melody for the address is played. To lis-
ten to the message, please push OK after the
melody.
• Discreet A message is first indicated with by vibration,
followed by a short beep.
• Silent Incoming messages can be advertised by
vibration only. Messages can not be played
back by pressing OK. There is no sound
from the device at all, even button clicks are
muted. Vibration may be enabled/disabled in
a separate menu-entry.
• Off Messages are received but no indication hap-
pens (apart from showing the envelope icon).
Messages may not be played back with OK.
10. Speech Volume
Set your preferred volume for the speech output. There
are eight volume levels available ranging from 1 (low) to 8
(loud). This setting does not affect the volume of the alert
tones. To change alert tones, please select a different
melody (refer to chapter 11). Melodies may be composed
with the programming software (please refer to the docu-
mentation for PSWplus). Melodies can be composed from
up to eight different tones with two volume levels.
In case a setting has been changed unintentionally, sim-
ply wait a moment until the device returns to stand by
mode. Any changes that have not explicitly been saved
(with OK) will be restored to the previous value. On each
button press the backlight will turn on.
4. Display
The stand-by display is divi-
ded into three areas: The
top line, called status line,
shows icons indicating cur-
rent alerting mode (“Loud”
in this picture) as well as
battery status. Additionally
the status line signals unread messages and possible out
of range conditions. The middle area shows the currently
active profile name, or the charger profile name if the ter-
minal is inside a charger.
At the bottom the time of the day is shown. In case the
alerting mode is set to “off” the watch will be hidden by
the information “Alerting off!”.The following icons can
appear in the status line:
5. Reading Messages
In alerting mode “Speak”,
incoming messages will be
read out loud following the
alert beep and marked as
“read”. If it is undesirable to
have the message read out,
press OK and scroll through
the message with SEL. Are
either “Loud” or “Discreet” alerting modes active the
message will be read out only after pressing OK. The
current alert can always be replayed (and displayed) by
pushing OK.
In alerting mode “Silent”, the message will never be read
out loud. You will have to switch to an alerting mode such
as “Loud”, “Speak” or “Discreet“ if you want to hear the
message.
When a message is displayed the header line will show
alert time as well as the name of the address or the
RIC-Index (in this case 1A). A downward pointing arrow
indicates that there is more text that can not be shown on
the current screen.The end of messages is indicated with
a horizontal bar below the message.
Alerting mode Speak active
Alerting mode Loud active
Alerting mode Discreet (Mini-Beep)
Silent Alert active
Unread Message(s)
Alarm clock active
Out of range
(no POCSAG-Signal detected)
Battery status

Other SwissPhone Receiver manuals

SwissPhone s.QUAD Voice User manual

SwissPhone

SwissPhone s.QUAD Voice User manual

SwissPhone DiCal-ToM User manual

SwissPhone

SwissPhone DiCal-ToM User manual

Popular Receiver manuals by other brands

Xantech Dinky Link DL95 installation instructions

Xantech

Xantech Dinky Link DL95 installation instructions

iGage iG9 user manual

iGage

iGage iG9 user manual

PPA F32 PLUS Quick user guide

PPA

PPA F32 PLUS Quick user guide

Pioneer VSX-824-K quick start guide

Pioneer

Pioneer VSX-824-K quick start guide

Samsung CL-29Z43MQ Service manual

Samsung

Samsung CL-29Z43MQ Service manual

DMR 200 user guide

DMR

DMR 200 user guide

Sony STR DA2400ES - 7.1 Channel Home Theater AV... Service manual

Sony

Sony STR DA2400ES - 7.1 Channel Home Theater AV... Service manual

Schartec ST201013 quick start guide

Schartec

Schartec ST201013 quick start guide

JTS UF-10R/12 instruction manual

JTS

JTS UF-10R/12 instruction manual

Marmitek GIGAVIEW 545 user manual

Marmitek

Marmitek GIGAVIEW 545 user manual

TechniSat DiGYBOXX HD CX manual

TechniSat

TechniSat DiGYBOXX HD CX manual

Hanwell IM6001 user manual

Hanwell

Hanwell IM6001 user manual

Extron electronics FOX3 SR 301 Setup guide

Extron electronics

Extron electronics FOX3 SR 301 Setup guide

TERSUS Oscar user manual

TERSUS

TERSUS Oscar user manual

mcmurdo NAV-7 User & installation manual

mcmurdo

mcmurdo NAV-7 User & installation manual

Life FAST manual

Life

Life FAST manual

Harman AMX IRIS instruction manual

Harman

Harman AMX IRIS instruction manual

Onkyo TX-NR808(B) Service manual

Onkyo

Onkyo TX-NR808(B) Service manual

manuals.online logo
manuals.online logoBrands
  • About & Mission
  • Contact us
  • Privacy Policy
  • Terms and Conditions

Copyright 2025 Manuals.Online. All Rights Reserved.