Sygic Drive 10s User manual

User guide
© 2014 Sygic, a.s. All rights reserved.
DRIVE 10s

ii User Guide
......................................................................................................... 1
I. Getting Started.......................................................................1
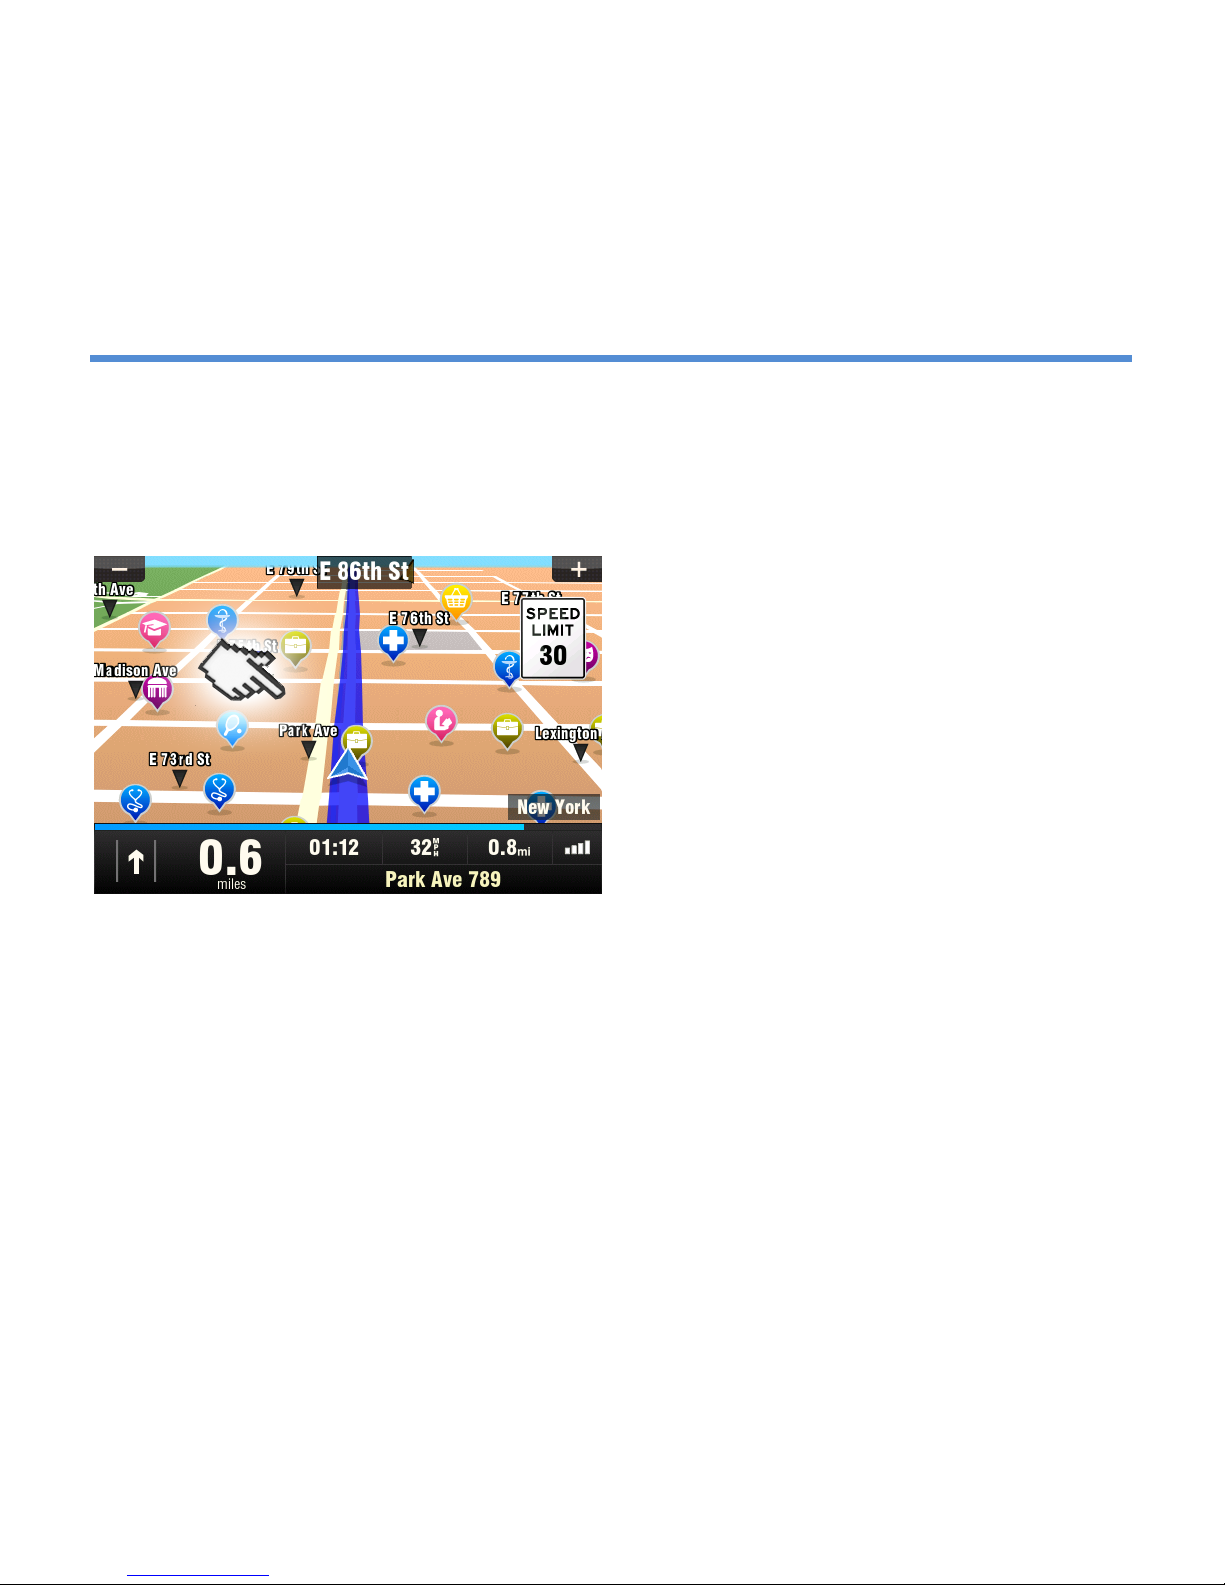
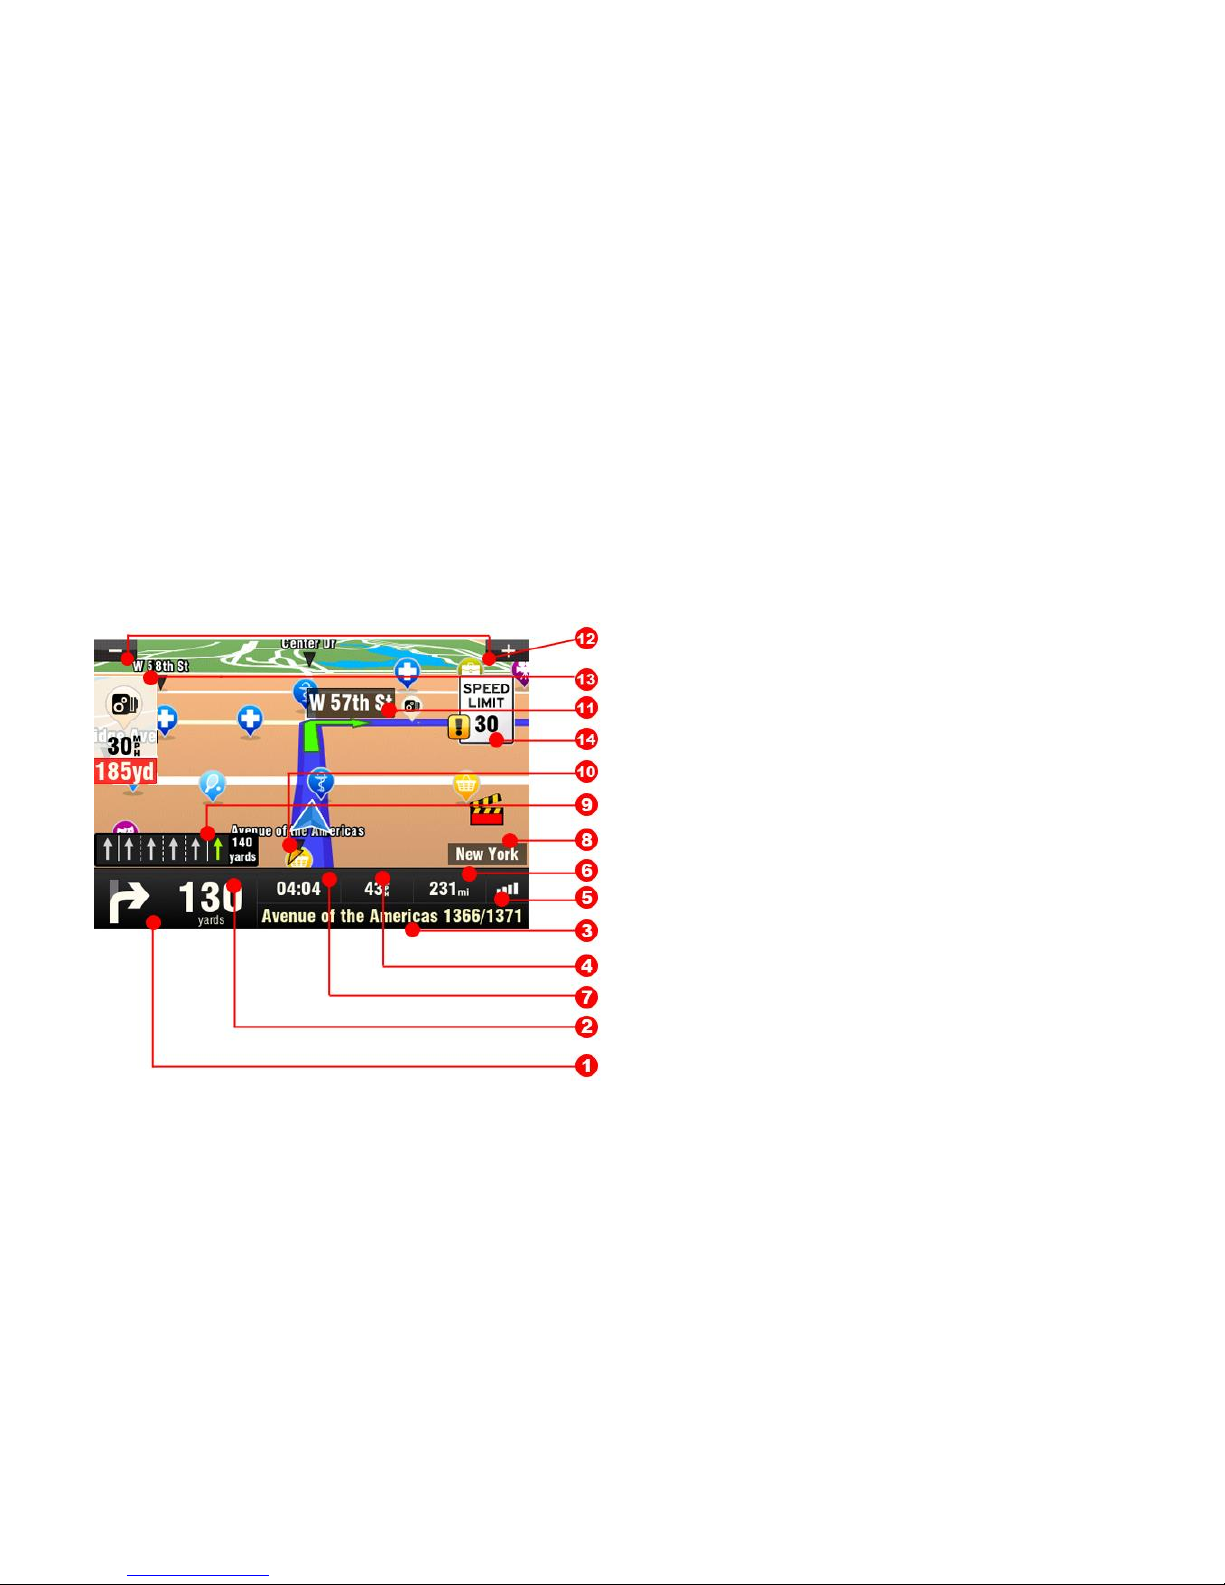
The Navigation Screen ................................................................. 1
Entering an Address ..................................................................... 2
Turn by Turn Navigation .............................................................. 6
Acquiring GPS Position................................................................. 7
II. Planning the Route ...............................................................9
Navigating to a Point of Interest ................................................. 9
Navigating Home ........................................................................12
Navigating to Recent Destinations ...........................................13
Navigating to Favorite Destinations .........................................14
III. Altering the Route .............................................................16
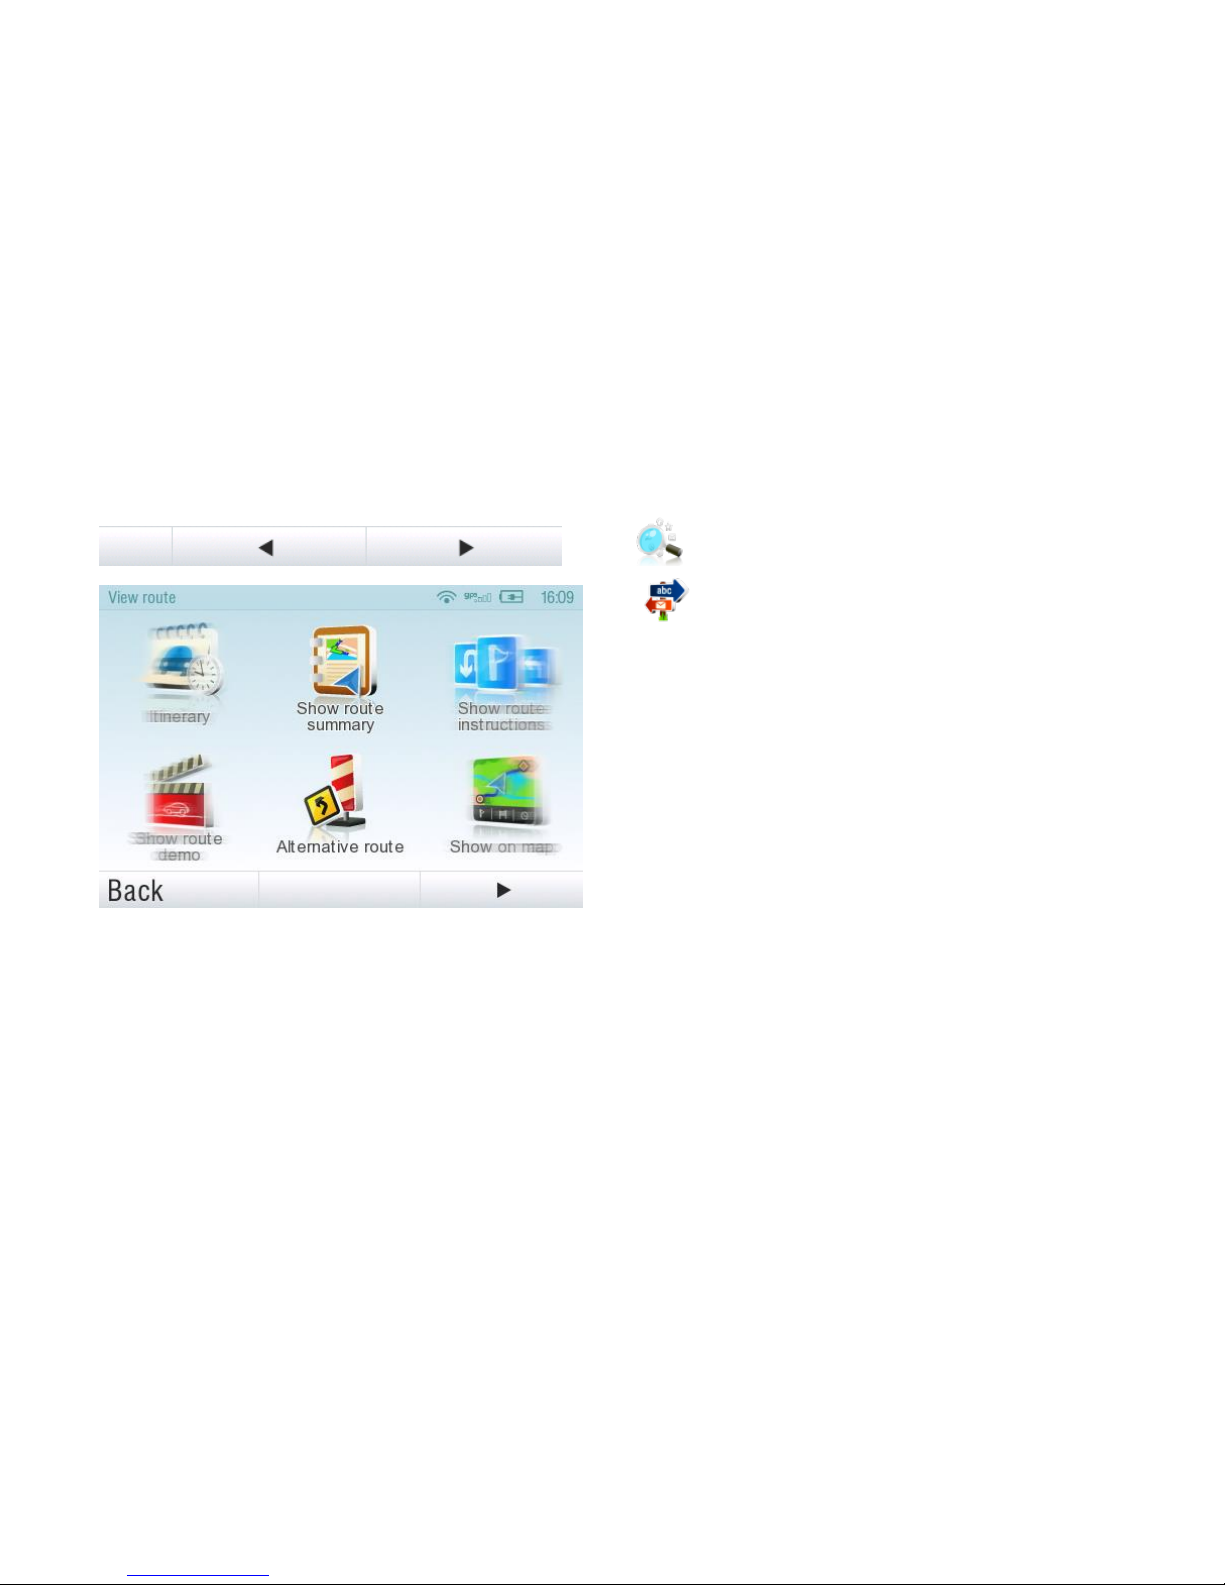
Route Menu ................................................................................. 16
Modifying the Route ...................................................................18
Map Browsing Mode ..................................................................19
Multi-stop route planning.......................................................... 22
IV. Settings ...............................................................................26
Advanced settings .............................................................29

Sygic DRIVE 10s 1
I. Getting Started
The Navigation
Screen
On startup, the application
opens with the Navigation
Screen, showing your position
as a blue arrow. You can zoom
in and out of the map by
tapping the + and –buttons in
the top corners of the screen.
For further functions, enter the
Main menu by tapping the map
area on the Navigation Screen.

2 User Guide
You can scroll between the
menu pages by tapping the
arrow buttons at the bottom of
the screen or by sliding a finger
across the screen.
Entering an Address
To set your destination by
entering its address select
Main menu >
Navigate to… >
Address or Zip code.
Next, you will be asked to select
a Country a City, Street and
House number or Street
crossing. Enter the required
names and numbers.
Alternatively, just enter the first
few letters of the city/street
name to see a list of similar
names.

Sygic DRIVE 10s 3
The list also features
explanatory icons left to the
city/street name:
City
Capital city
City center
Street
Street crossing
Select the desired city/street
from the list.
When finished, a Confirmation
Screen pops up showing the
address entered.
Tap “On Map”to see the exact
location of the address, or tap
“Add to favorites”to store it
among your frequently used
destinations (see

4 User Guide
Navigating to Favorite
Destinations”on page 13).
To set the address shown as
your destination, tap the “Route
Me!”button at the bottom of
the screen.
If you would rather be directed
to a parking lot nearby, tap
“Parking” and select from the
list shown.
To select a different address
altogether, tap the “Back”
button.
If your device can determine your
current position, your route will
be calculated immediately from
that positon. If your current
position cannot be determined,
you will be offered the following
options:
Wait for valid signal
(Recommended)
Your route will be
calculated from your
current position as soon as
a valid GPS signal is
available (see “Acquiring
GPS PositionAcquiring GPS
Position”on page 6).
Last valid position
Your route will be
calculated from your last
known position (i.e. where
you were just before the
device lost GPS signal).
Select from map
Allows you to select any
starting point for the route
calculation.

Sygic DRIVE 10s 5
When route calculation is
complete, the entire route is
displayed on the map (in blue)
with total distance, estimated
time of arrival (ETA), time left to
destination and route
calculation method (Fastest,
Economic, Shortest,
Pedestrian, Bicycle) shown
below the map.
To accept the route and start
turn by turn navigation, tap
“Done”.
For further information on the
route, tap “Details”.
NOTE: By default, the method of route
calculation is set to “Fastest”.

6 User Guide
Turn by Turn
Navigation
The Navigation Screen will show
the map of your surrounding
area with the calculated route
highlighted in blue.
As you approach a junction,
further directions are displayed
to indicate which road to take.
In addition to turn by turn
directions, the Navigation
Screen also provides a range of
further useful information:
1
Next maneuver
2
Distance to next change of
direction
3
Current road/street
4
Distance to destination
5
GPS signal strength
6
Current speed
7
Estimated time of arrival at
destination
8
Current city
9
Lane Assistant
10
Heading to destination
11
Next road/street to take
12
Map zoom in/out
13
Speed camera warning
14
Current speed limit

Sygic DRIVE 10s 7
Acquiring GPS
Position
If there is no GPS signal, the
screen becomes grey. This can
happen under any of the
following conditions:
■
The device is in a tunnel or
at a location where signals
from the GPS satellites are
obstructed by buildings,
trees, electric cables or
other objects.
■
Device system settings or
Product Settings are set
incorrectly.
The information below is not
available on iPhone, Android
and Maemo devices.
The signal strength bars at the
bottom of the screen provide
additional information:
If the colour of the bars or the
GPS port name/number turns
red, re-check the GPS settings.
If the bars are grey, move the
device to an outdoor location
with good visibility of the sky
until the signal is regained and

8 User Guide
the bars become green. Tap the
signal bars or select
Main menu >
GPS
to see more detailed GPS
information.
Once GPS signal is regained turn
by turn navigation resumes
automatically.

Sygic DRIVE 10s 9
II. Planning the Route
Navigating to a Point
of Interest
In addition to the road network,
the map also stores the details
of thousands of Points of
Interest (POIs) such as gas
stations, restaurants, hotels,
tourist attractions and other
facilities.
To set a POI as your
destination, first select
Main menu >
Navigate to… >
Point of Interest
Next, define the area where
you want to search for a POI.
Select
Near my position
to search POIs around
your current position;
Near address…
to search POIs near a
particular address (to be
entered in the next step);
Near destination
to search POIs near the
current destination (if
set);
In City…
to search POIs in a

10 User Guide
particular city (to be
entered in the next step);

Sygic DRIVE 10s 11
Searching POIs
POIs are arranged in groups
(such as Food, Hotel or Motel
etc.) to help find a facility even
when you do not know its
name or address.
Once the search area is
selected, a list of the POI
groups is displayed.
Tap on the POI group and you
will see the list of all POIs that
are nearby.
NOTE: The distances shown in the list
are relative to the search location.
Scroll down the list and select
your POI by tapping its name.
To refine your search results,
tap the keyboard icon at the
bottom of the screen and type
the name of the POI you are
looking for. You can also enter
partial names.
When finished, a Confirmation
Screen pops up showing the
POI selected.

12 User Guide
To set the selected POI as your
destination, tap the “Route
Me!”button.
Navigating Home
To start using this feature, you
need to set your home location
first. Select
Main menu >
Settings >
Set home location
and enter your home address.
Once your home address is
stored, you can navigate home
by simply selecting
Main menu >
Navigate to… >
Home

Sygic DRIVE 10s 13
Navigating to Recent
Destinations
Sygic Mobile Maps keeps track
of your recent destinations,
making it easy to return to a
previously set location.
When entering an address
through
Main menu >
Navigate to… >
Address or Zip code
the list of previously selected
Countries/Cities/Streets
appears, as you go through the
address details.
They are marked with icon.
You can directly go to a list of
recent destination by selecting
Main menu>
Navigate to… >
History
and start navigation by
selecting a previous destination
from the list shown.

14 User Guide
Navigating to
Favorite
Destinations
To view a list of your Favorite
destinations, select
Main menu >
Navigate to… >
Favorite
and start navigation by
selecting a Favorite destination
from the list shown.
Select the desired Favorite
destination by tapping it and
then select your next option
from the Confirmation Screen.
Defining a new
Favorite destination
To add a new address to your
Favorites tap "Add to
favorites" in the Confirmation
Screen
or select

Sygic DRIVE 10s 15
Main menu >
Map >
Select point on map > >
Add as POI > Favorites
or select
Main menu >
Manage POI > Add POI

16 User Guide
III. Altering the Route
Route Menu
You can access detailed
information about the
calculated route from the Route
menu. Select
Main menu >
Route
To get a schematic overview of
the route, select
Show route summary >
Details
The icons highlighted in blue
indicate specific types of roads
included in the route.
To avoid a specific road type
(e.g. Highways), tap the blue
highlighted button.

Sygic DRIVE 10s 17
To get a detailed list of
junctions and directions along
the route, select
Show route instructions
To see the same junctions as a
series of images, select
Show route as images
To see the entire route on the
map, select
Show on map
To see the calculated route as if
you were driving along (fly over
mode) select
Show route demo

18 User Guide
Modifying the Route
To modify an existing route,
first open the Alternative route
menu:
Main menu >
Route >
Alternative route
If you do not like the calculated
route and wish to calculate an
alternative option, select
Compute alternative
To calculate a detour (e.g.
because the road ahead is
closed), select
Avoid next...
If you wish to travel through a
certain place on your trip, select
Travel via...
and add a waypoint of a place
you want to go through on the
road.
If you want to cancel your
modifications to the route,
select Reset to original.
If you wish to cancel the
calculated route entirely, and
use the navigation system only
as an indicator of your current
position, select
Main menu >
Route >
Cancel route
Table of contents