Sylvania SYNET61601X User manual

10” Ultra Light Magni Plus
MODEL NUMBER: SYNET61601X
Windows® 7 Starter Edition
Mobile Internet Device
QUICK START GUIDE
NETBOOK

MODEL NUMBER: SYNET61601X
SYNET61601X
1
1
2
3
4
5
6
7
8
9
No.
1.
2.
3.
4.
5.
6.
7.
8.
9.
Item
Camera
Color LCD Display
Off/ On Button
Keyboard
Touchpad
Right Touchpad Button
Left Touchpad Button
Computer Status Light
Microphone
Description
Records video or takes photos
Screen
Button for turning the computer’s power on and off
Input device used for typing and controlling the
Netbook’s various functions.
Works the same way as a mouse and is used for
controlling the cursor
Works the same way as the right mouse button
Works the same way as the left mouse button
From top to bottom:
Power Icon
Hard Disk Activity
Wireless WI-FI On/Off
Caps Lock/Number Lock
Built-inmicrophone
TOP VIEW

SYNET61601X
2
REAR VIEW
FRONT VIEW
Bottom VIEW
No.
1.
Item
Battery
Description
Replaceable battery serves as mobile power supply.
No.
1.
2.
3.
Item
SD Card Slots
Headphone Jack
Microphone Jack
Description
Use the SD Card Slot for cards containing applications, or for data storage.
Connect Headphone.
Connect Microphone.
No.
1.
2.
3.
4.
Item
Battery Lock
Battery
Battery Latch
Hard Disk Cover
Description
Slide inward to lock the battery in place, slide outward
to unlock battery
Replaceable battery serves as mobile power supply
Push outward to release battery for removal
Allows access to the hard drive disk,
Opening the Hard Disk Cover will void your warranty
1
12
3
1
2
4
3
SD

Setting Up Your Computer
SIDE VIEW
No.
1.
2.
Item
Power Button
Vent
Description
Turn On
Cooling Vent (Do not cover)
12
No.
1.
2.
3.
4.
5.
Item
USB Port
USB Port
Network Port
External VGA Display Port
Description
Connects to USB device
Standard port for Ethernet cable
Connects to externaldisplay
Power Port Connects to external power supply
1. INSTALLING/REMOVING THE BATTERY
Please install the battery before using your Netbook and connect the external
power supply. It is recommended using the external power supplyas a main
power source asmuch as possible. If you are away from the office and no
power supply is available, use the battery instead.
SYNET61601X
3
12345
USB 2.0 USB 2.0
VGA

SYNET61601X
4
Installing the Battery
Step 1: Turn the Netbook andbattery so they are bothupside down like the
illustration below. Now push the end of the battery with the metal
contacts into the Netbook’s battery slot evenly and slowly along the
battery rails.
Step 2: Push the end of the Netbook battery withthe metal contacts completely
into the battery slot. When there is a “click”, this means the battery latch
has engagedand the battery is now secured into the Netbook.
Step 3: Push the Battery Lock inward to lock the battery in place.
Removing the Battery
Step 1: Shut down the Netbook. Disconnect allcables and devices.
Step 2: Turn the Netbook over and unlock the battery by pushing the Battery
Lockoutwards.
Step 3: Push the Battery Lock outwards and hold itinplace. Remove battery.
CAUTION!
Do not remove
the battery
while the netbook
is still running.
This may damage
data on the
hard disk.
3
1
2
2
3
1
2
3
3

SYNET61601X
5
2. CONNECTING THE POWER SUPPLY
4. EMERGENCY SHUTDOWN
If the Netbook cannot shut down through normal means, press and hold
the Power Button until the Netbook powers o.
3. STARTUP
Step 1: Insert the round end of the power supply into the charging port on the
side of the Netbook.
Step 2: Insert the other end of the power supply into the power socket.
Step 3: Charge your Notebook for at least 6 hours before using.
Step 2: Turn the Netbook on.
Step 1: Open the Netbook.
power button

SYNET61601X
6
Activation Instruction
Activation Key
This Microsoft Windows 7 Starter Edition Operating System was specially
developed and installed specically for this netbook. Please do not install
any other operating system other than the one that came with this Netbook.
The Microsoft license of Windows 7 Starter must be activated for its installation
by entering a product key during installation when prompted. The operating
system product key is located on the bottom of your netbook.
Activate using the Internet
When you begin the activation process, Windows tries to detect an
Internet connection. If one is found, you can activate online. If you
use a modem to connect to the Internet but aren't currently online,
you'll have the option to activate using a modem.
Starter Edition

SYNET61601X
7
Special Function Keys
Function Keys
Fn + F1
Fn + F3
Fn + F4
Fn + F5
Fn + F6
Fn + F7
Fn + F8
Fn + F9
Fn+ F10
Fn + Page Up
Fn+ Page down
Fn + Ins
Fn + Esc
Description
Activates/deactivates the WIFI function
System Mute
Toggle touchpadon and off
Toggle screen function between external display
Reduces LCD backlight brightness
Increase LCD backlight brightness
Decrease system volume
Increase system volume
Toggle LCD backlight on and off
Pages up
Pages down
Number lock on or off
Put system into sleep mode
To activate by using a direct connection
1. Open Windows Activation by clicking the Start button ,
right-clicking Computer, clicking Properties, and then clicking
Activate Windows now.
2. If Windows detects an Internet connection, click Activate Windows
online now. If you're prompted for an administrator password or
conrmation, type the password or provide conrmation.
3. Type your Windows 7 product key when prompted,
click Next, and then follow the instructions.
Activation can also be done by phone.

Connecting to the Internet
8
1. Wired Network Connection
Step 1: Plug Ethernet cable into the side of your Netbook.
Step 2: Contact your Internet Service Provier to obtain your settings.
When connecting to the Internet, please make sure it is a network you can trust
such as your own home network, that of a friend or a public Wi-Fi hotspot such
as library, restaurant, hotel or school campus. It is unsafe to connect to Internet
or Wi-Fi sources that you do not own or cannot be trusted. If you do not have an
Internet connection in your home you may have to contact your local ISP to
purchase service.
Step1: Press Fn + F1 on
the wireless wi-.
Step 2: To view and connect to
wireless networks in
Windows 7 (Starter).
Click the wireless network
icon in the notication
area of your taskbar.
Step 3: In the list of wireless networks,
choose and click the network
you want to connect to, and
then click Connect.
Step 4: If you’re connecting to a
secure (encrypted) network,
Windows 7 will prompt you to
enter a key. Type the security
key, and then click OK.
2. Wireless Network Connection
SYNET61601X
3

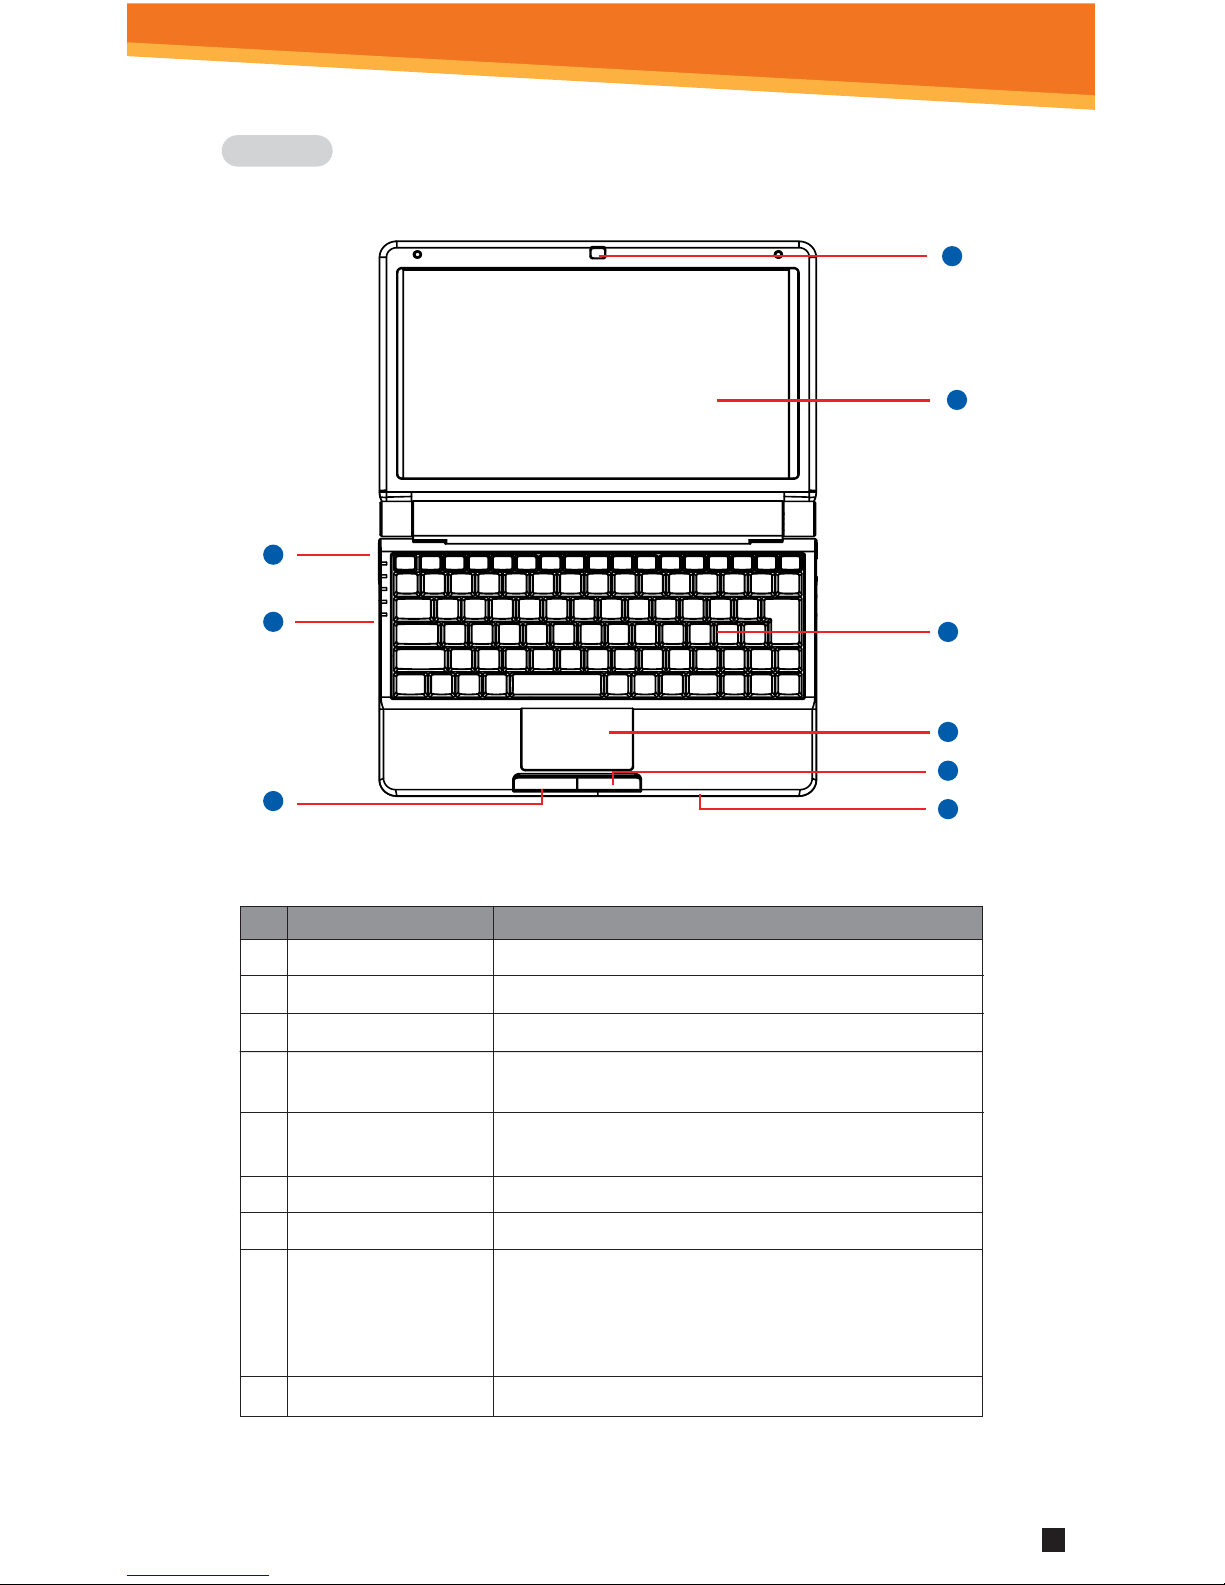
Windows 7 Starter Edition Desktop Overview
9
Useful information and reminders
This notication area alerts you to
reminders and system activities such
as internet connection and speaker
volume.. Click the arrow to see other
hidden items.
Tips
Customize your Start menu and taskbar
Right-click the Start button and choose
Properties.
Add the Quick Launch bar to the taskbar
to access frequently used programs with one
click. Right-click a recenlty used program on
the Start menu, then click Pin to start menu.
It’s easy to “pin” a program to the permanent
area of the Start menu. Right-click recently used
programs on the Start menu, and then click Pin
to Start menu.
Recover your deleted les by opening the
Recycle Bin on the desktop. Find the deleted
le, click it, and then click Restore item.
Locate your files quickly
All yourfiles are just one
click away! Here you can
save documents, pictures,
and music files in their
own folders for easy
access. Relevant tasks
appearin each window
you open to help
streamline your work.
Where can I get help?
Get help when you needit
in the improved Help and
Support Center. Here you’ll
find answers to your
questions, new search
options, ways to get help
from a friend or support
professional, and a tour to
help you get acquainted
with Windows 7 starter
Edition.
Find deleted files
The Recycle Bin
holds files that you
delete from your
computer until
you’re ready to
empty it.
The experience starts here
Click the Start button to open your Start menu
and view everything that Microsoft® Windows®
7 Starter Edition offers. If you upgraded from a
previous version of Windows, you’ll see your
familiarsettings.
SYNET61601X

SYNET61601X
10
Your Start menuReturn to frequently used programs
This area lists all the programs you’ve frequently
used. The listchanges as you use the computer.
Where are my other
programs?
Click here to see all
programs installed
on your computer
Log off Windows
Click Log Off to
complete your
Windows session
and return to the
Welcome screen.
When you’re finished
Click here to turn off, restart, or put
your computer instand-by mode
to save power. Orclick Switch User
to let someone else use the
computer – you don’t have to close
yourprograms to switch users.
Switch between windows
The taskbarstays tidy as you work –
each program automaticallygroups
open windows if several windows
accumulate on the taskbar. Just click
a button to quickly switch between
files within a program.
Access the internet and other programs from task bar
Programs like a calculator can be permanently
“pinned” to the task bar, along side your Web
browser.

McAfee
Microsoft Oce Instructions
The McAfee anti-virus trial program is included and is highly suggested to
be purchased and installed on your computer. Click on the McAfee desktop
icon and follow instructions.
Trial Version Software Available.
SYNET61601X
11
Trial Version

SYNET61601X
12

SYNET61601X
13

Most issues can be resolved by visiting our web site at: www. digitalgadgets.com.
Locate your product and check out the instructional videos, FAQ, and download
section, for the new updates.
If you are experiencing problems with this product,
please contact customer service before
contacting your retailer.
www.digitalgadgets.com | 888–571–0866
Digital Gadgets, 21 Englehard Drive, Monroe, NJ 08831
Call 888–571–0866
or email:
dgsupport@digitalgadgets.com
SYNET61601X
14
Digital Gadgets warrants this product against defects in workmanship and materials for a
period of 12 months from the original date of purchase. If the product fails during normal and
proper use within the warranty period, Digital Gadgets will, at its option, repair or replace any
products or parts determined to be defective in workmanship or material. All components
repaired or replaced by Digital Gadgets’ service site will be under warranty for the remaining
period of the warranty.
This Limited Warranty covers only products manufactured by Digital Gadgets.This Limited
Warranty does not include failure caused by improper installation, operation, cleaning or
maintenance, accident, damage caused by extreme temperature, humidity or extreme electrical
stress, misuse, abuse, unauthorized modifications to the product, software faults, normal wear
and tear or any other event, act, default, or omission outside of Digital Gadgets’ control or if the
serial number has been defaced, altered or removed and the casing has been opened.
To obtain warranty service, please contact Digital Gadgets for specific instructions at the
telephone number below. Dated, documented proof of the original purchase is required.
Digital Gadgets Customer Service Representatives are available by calling 888–571–0866 or
Digital Gadgets Limited Warranty Statement

SYNET61601X
15
FCC Notices:
The FCC requires that you will be advised of certain requirements involving the use of this equipment.
This device complies with Part 15 of the FCC Rules. Operation is subject to the following two conditions:
(1) This device may not cause harmful interference, and (2) this device must accept any interference received,
including interference that may cause undesired operation. Privacy of communications may not be ensured
when using this device. Changes or modications not expressly approved in writing by the responsible party
may void the user’s authority to operate this equipment.
Note: This equipment has been tested and found to comply with the limits for Class B digital devise, pursuant
to Part 15 of the FCC Rules. These limits are designed to provide reasonable protection against harmful
interference in a residential installation. This equipment generates, uses, and can radiate radio frequency
energy and, if not installed and used in accordance with the instructions, may cause harmful interference
to radio communications. However, there is no guarantee that interference will not occur in a particular
installation. If this equipment does cause harmful interference to radio or television reception, which can
be determined by turning the equipment o and on, the user is encouraged to try to correct the interference
by one or more of the following measures: (1) Reorient or relocate the receiving antenna. (2) Increase the
separation between the equipment and receiver. (3) Connect the equipment into an outlet on a circuit
dierent from that to which the receiver is connected. (4) Consult the dealer or an experienced radio TV
technician for help.
SYLVANIA is a registered trademark of OSRAM SYLVANIA INC., used under license.
Microsoft® and Windows® is a trademark of Microsoft Corporation and is used under license.
All other trademarks are those of their respective owners.
PRINTED IN CHINA 2011 Digital Gadgets LLC
Table of contents
Other Sylvania Laptop manuals