Syrp Genie II Linear User manual

Setup Guide
II linear

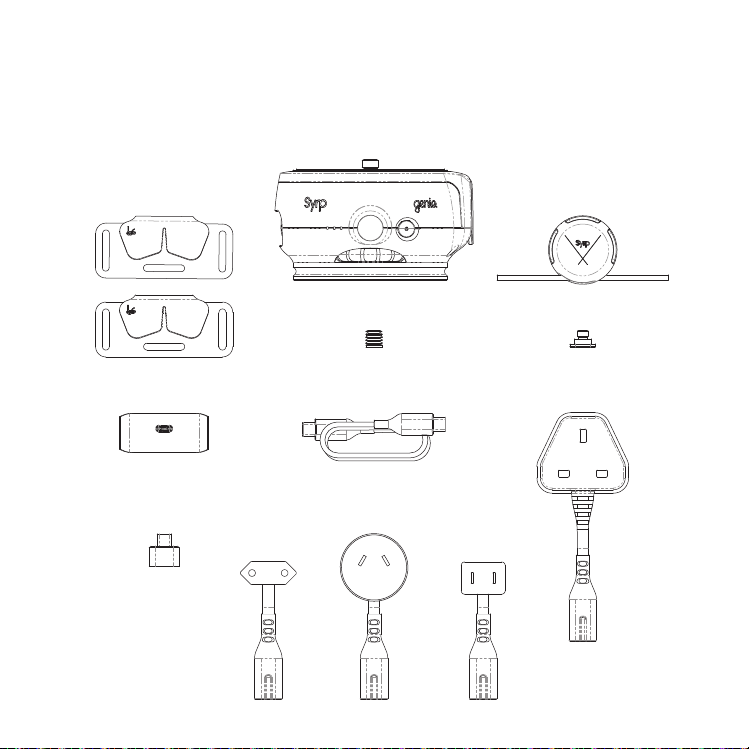
Welcome to the Syrp family
Before you start filming, there are a few simple steps
to follow to ensure your Genie II is assembled
correctly and you’re sliding smoothly.
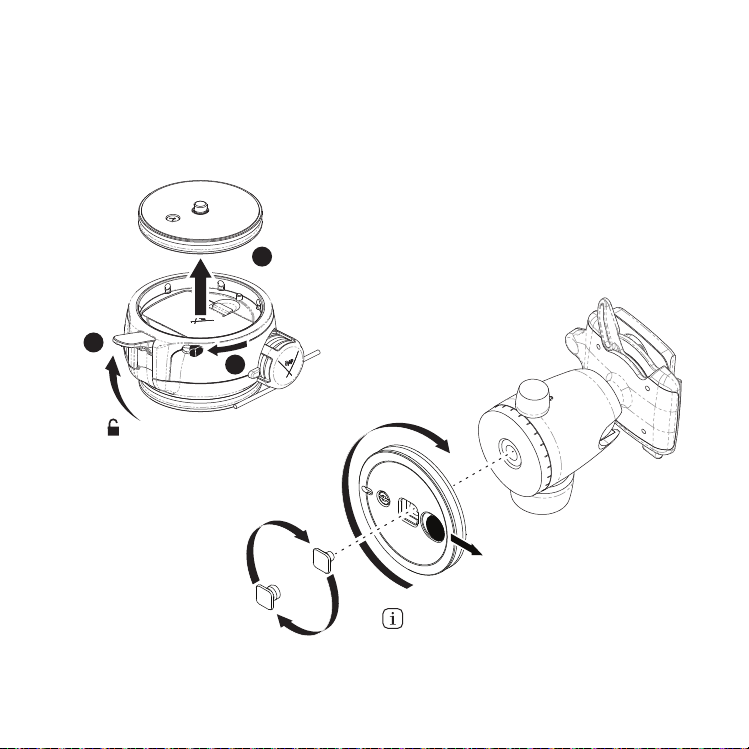
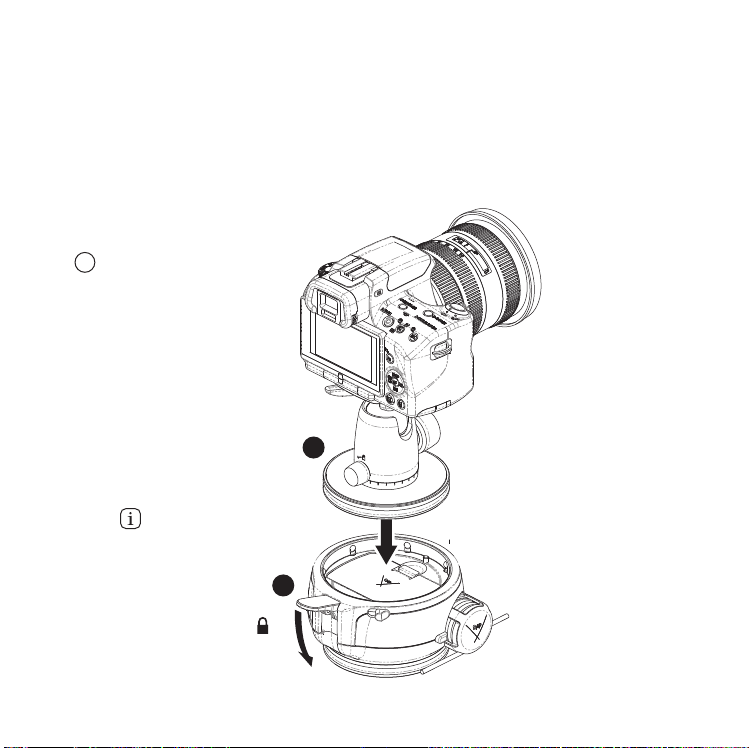
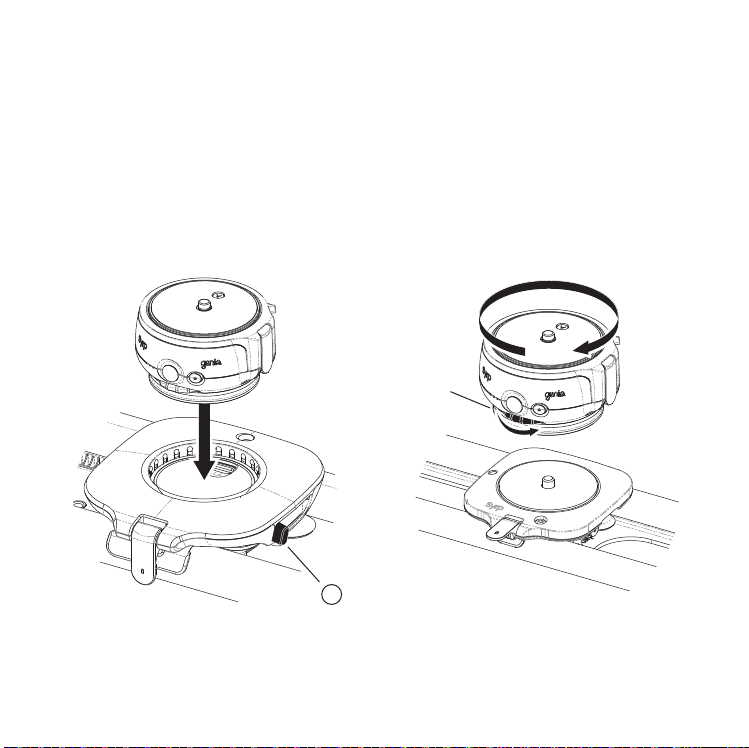
This guide will walk you through the correct Genie II
set up, as well as some helpful tips.
Additional resources can be found at
support.syrp.co.nz

AU/NZ Plug
Rope Hooks
Euro Plug
USB Adapter
1/4" - 3/8" Adapter 1/4" Camera Screw
UK Plug
Genie II Linear (Battery + QR Plate Incl.)
Capstan
USA Plug
Charger
What’s in the Box
USB-C Charge Cable

Genie II Linear
USB-C Port
Joystick Capstan release button
Capstan Drive Gear
Power Button
Quick Release Lock
Quick Release Button
Tightening Wheel
Camera recording light
Charging light
Wireless connection light
Linear Base 90mm
Camera Port

Install the Capstan
Align the markings and insert
the Capstan.
1
Turn the capstan counter
clockwise until you hear a
CLICK!
2
Correct Rope Direction Incorrect Rope Direction
The rope shouldn’t exit
the channels and cross
back over itself.

Quick Release Plate
Pull out the 90mm Quick Release Plate and screw
to the base of your ballhead or video head.
PULL
TO RELEASE
SWAP
1
2
Pull the Thread Release
to swap between 3/8” &
1/4” Camera Screws.
3
Push Quick Release
button across and pull
the plate up to remove
Open the Quick
Release Lock
UNLOCK

Mount Camera
7
Push the 90mm Quick Release Plate down into the Genie II
Linear. You will hear a click when it’s flush and engaged.
Close the Quick Release Lock.
IMPORTANT
Do not lift the Genie and or
attached equipment by the
camera. Always detach first
and transport separately.
!
1
2
Always lock the Quick
Release once the plate
is installed.
LOCK

Mount the Genie
Screw the Genie II Linear
clockwise onto a 3/8 thread
and fully tighten.
Standard Slider
Push the Genie II Linear
directly down into the Quick
Release Base and lock it.
Magic Carpet PRO
Always lock the Quick
Release once the plate
is installed.
!
Tightening Wheel
can also be used
to screw to base

Mounting Warning
IMPORTANT
Ensure the Quick Release
Plate and the Linear Base is
fully inserted. They should
be flush.
!WARNING
Always ensure the Quick
Release Plate & Genie are
not partially inserted
!
7
You must ensure the Quick Releases are installed correctly.
Incorrect installation could result in your equipment
detaching and cause harm to your equipment or others.

Tie off the Genie Rope
Correct Rope Direction Incorrect Rope Direction
Rope should not
pass through on
the inside of the
Genie II Linear.
7
Tie off the Genie rope to both ends of your track using the
supplied rope hooks. Make note of the correct direction of
the rope as illustrated.

Remove / Install Battery
2
Push the Quick
Release button
and lift the lock.
UNLOCK
Before you use the Genie
for the first time you must
remove the battery tape
1
3

Camera Control
If you have a USB shutter
cable for your camera you
can use the supplied USB
adaptor to connect it to the
Genie
2
1
Plug the 2.5mm jack end of your
Syrp Link Cable into the Camera
Port.
Connect the opposite end of your
Syrp Link Cable into the remote port
of your camera.
The shutter cable
is not required for
video recording

Connect to Genie
Turn on the Genie, press the on
button once.
1
Turn Bluetooth on in your mobile
device settings.
2
Download the Syrp Genie App
3
Open the Syrp Genie App.
4
Continued overleaf.

App Connect
Select your Genie or multiple
Genies to link to more than
one Genie.
2
CONNECTION
GENIE II
Linear
Tick confirms Connection.
3
CONNECTION
GENIE II
Linear
Press “OK”.
4
OK
Tap the CONNECT icon.
1

Joystick Drive
7
The Genie Linear can be driven manually left and right and
into position with Joystick.

Orange light indicates
charging, green is
charged
IMPORTANT
Use only Syrp
supplied chargers
and cables
!
Charging
7
Select your country’s plug and connect to the Charger.
Connect the USB-C charging cable to the charger and to
one of the Genie’s USB ports.
AU/NZ USA EURO UK
3hrs
Charger

Remove the Capstan
Push in the Capstan Release
Button and hold in.
1
Turn the capstan clockwise
and pull it out to remove.
2
UNLOCK

Thread the Capstan
Thread the rope around
the Capstan until you
can count 4 rope winds
through the capstan
window.
2
4x
3x
2x
1x
Holding the Capstan
with the bayonet end
down, thread the rope in
through the bottom
channel from the right to
the left.
1
Pull the rope up out
through the top channel.
3
Wind 4x around
The Capstan is pre-wound,
avoid removing unless
absolutely necessary

Genie Quick Tips
When recording photographs always set your camera and
lens to manual focus (MF), if set to Auto Focus (AF) the
camera can misfire leading to missed frames.
Turn image review OFF on your camera. On some cameras
image review can cause missed frames in your time-lapse.

Firmware Tips
If you’re having difficulty updating the Firmware try
theses tips.
• Try to update on a different device, if it works you can go
back to using your original device.
• Do not connect to other Bluetooth devices while updating,
it's best to turn off other nearby Bluetooth devices
completely, or the update may fail.
• Try the update from a different location, in some situations
unknown interference can cause a failed update.
For more information visit support.syrp.co.nz
Table of contents