Originalgebrauchsanweisung
Die Benutzer sollten sicherstellen, dass die Wartungsarbeiten von qualifizierten Personen ausgeführt werden,
und dass diese Personen die Anweisungen für Installierung und Wartung in erster Linie sorgfältig gelesen haben.
Wird das Gerät längere Zeit nicht benutzt, sollte das Gerät entleert werden. Bei Frost kann verbliebenes Wasser
durch Einfrieren erhebliche Schäden verursachen. Lagern Sie das Gerät an einem trockenen, frostsicheren Ort.
Wenn Sie das Gerät erneut in Betrieb nehmen, stellen Sie sicher, dass alle Dichtungen und O-Ringe in gutem
Zustand sind. Ersetzen sie beschädigte oder verschlissene Dichtungen.
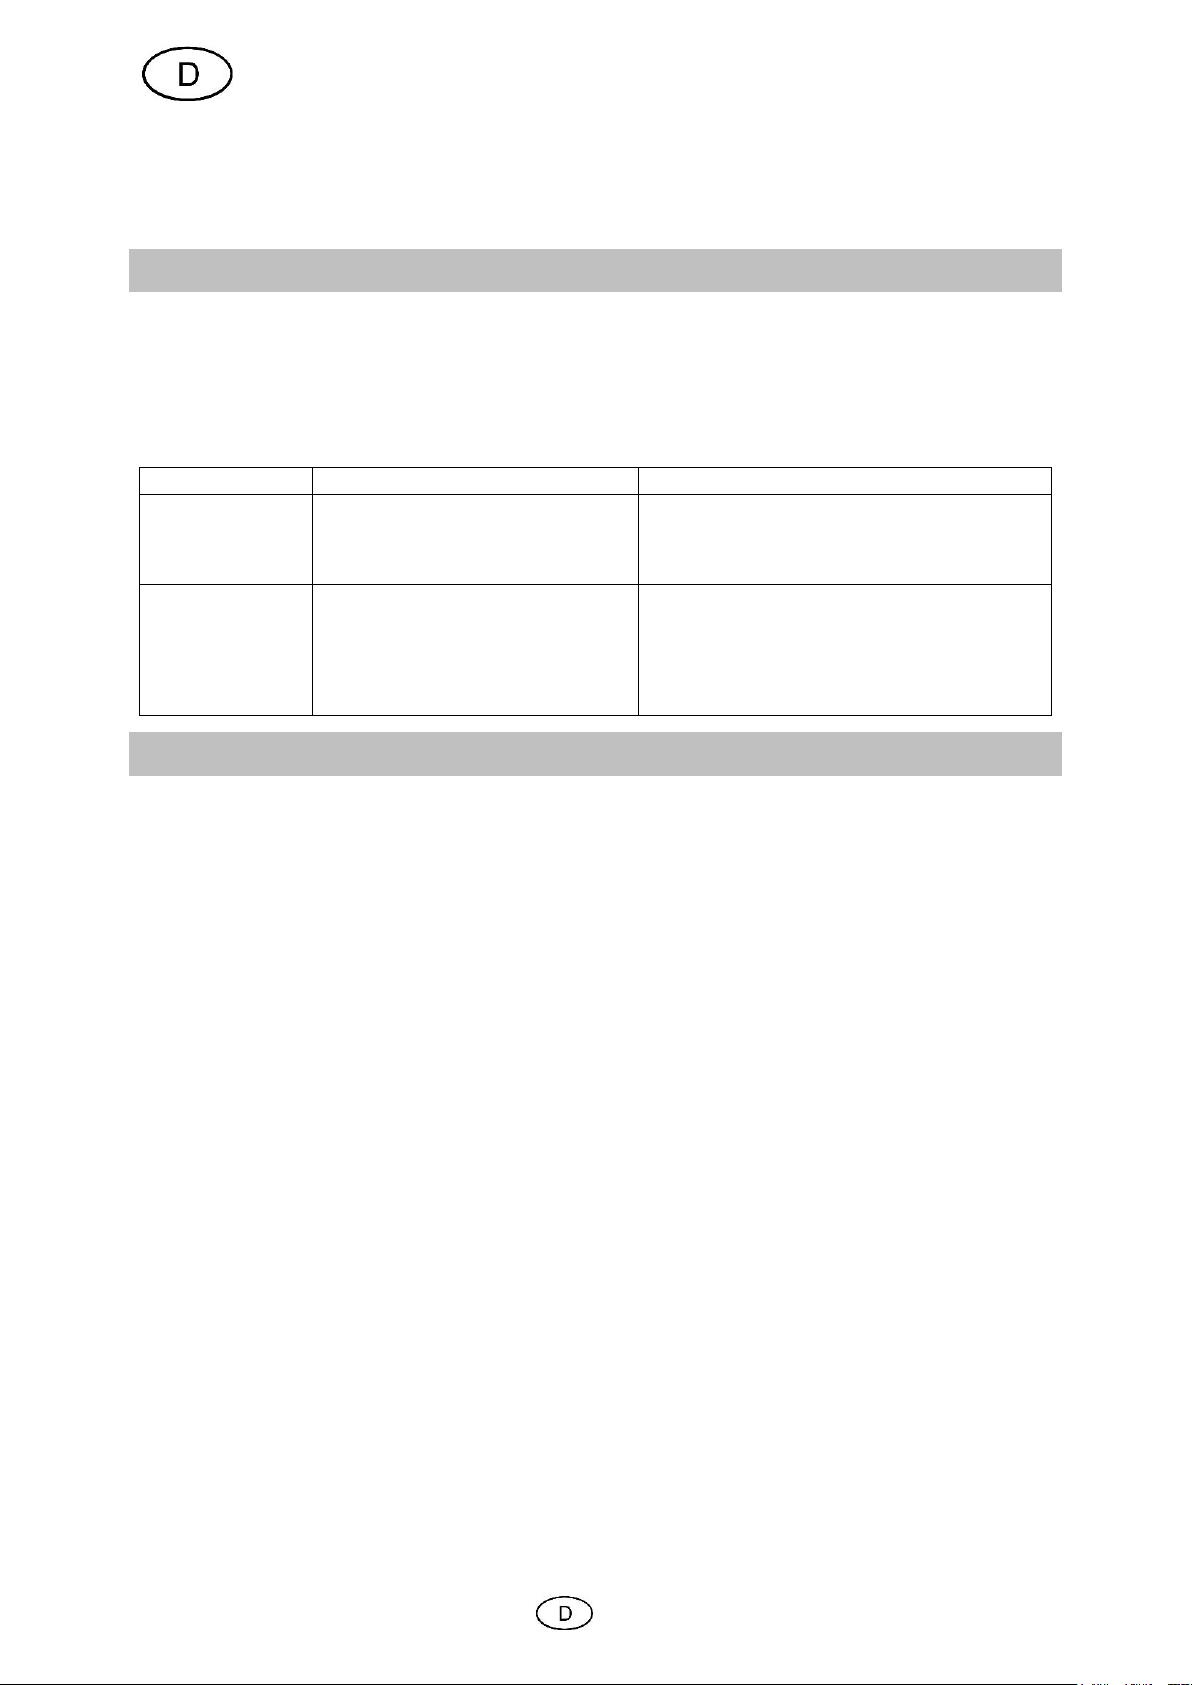
8. Fehlersuche / Ratschläge
Überprüfen Sie bei Betriebsstörungen zunächst, ob ein Bedienungsfehler oder eine andere Ursache vorliegt, die
nicht auf einen Defekt des Gerätes zurückzuführen ist.
In der folgenden Liste sind einige eventuelle Störungen des Gerätes, mögliche Ursachen und Tipps zu deren Be-
hebung genannt. Falls Sie eine Störung nicht selbst beheben können, wenden Sie sich bitte an den Kundendienst
bzw. an Ihre Verkaufsstelle. Weitergehende Reparaturen dürfen nur von Fachpersonal durchgeführt werden. Be-
achten Sie bitte unbedingt, dass bei Schäden in Folge unsachgemäßer Reparaturversuche alle Garantieansprü-
che erlöschen und wir für daraus resultierende Schäden nicht haften.
Geringe Durch-
flussmenge.
Schmutziger Filter.
Blockade in der Leitung.
Blockade im Gerät
Rückspülen oder Reinigen des Filters.
Kontrollieren Sie die Leitungen, Vermeiden Sie
Biegungen, ggf. kräftig durchspülen.
Gerät kräftig durchspülen.
Kein Sonnenschein vorhanden.
Gerät steht im Schatten.
Es fließt kein Wasser durch das Ge-
rät.
Wassermenge im Pool zu groß.
Sorry, muss du warten bis wieder da ist.
Gerät so positionieren, dass es in der Sonne
steht.
Kontrollieren, ob Pumpe arbeitet und der Heiz-
kreislauf (Bypass) offen ist
Weitere Geräte in Reihe installieren.
9. Garantie
T.I.P. garantiert dem privaten Endkunden (im Folgenden „Kunde“), nicht hingegen dem gewerblichen Nutzer,
nach Maßgabe der nachfolgenden Bestimmungen, dass das vom Kunden innerhalb der Bundesrepublik Deutsch-
land gekaufte Gerät innerhalb eines Zeitraums von 2 Jahren frei von Material- oder Verarbeitungsfehlern sein
wird. Die vertraglichen oder gesetzlichen Rechte des Kunden gegenüber dem jeweiligen Verkäufer werden durch
diese Garantie nicht berührt. Insbesondere werden die gesetzlichen Mängelrechte durch die Garantie nicht ein-
geschränkt.
Die Garantiezeit beginnt mit dem Tag des Kaufs des Gerätes durch den Kunden, zu nachfolgenden Bedingungen:
I. Innerhalb der Garantiezeit werden alle Mängel, die auf Material- oder Verarbeitungsfehler zurückzuführen sind,
kostenlos beseitigt. Reklamationen sind unmittelbar nach Feststellung schriftlich zu melden.
II. Ansprüche aus dieser Garantie bestehen nur, wenn das Produkt keine Schäden oder Verschleißerscheinungen
aufweist, die durch eine von der normalen Bestimmung oder Vorgaben der Gebrauchsanweisung von T.I.P. ab-
weichende Benutzung verursacht worden sind.
Keine Garantie besteht insbesondere:
- Bei unsachgemäßer Behandlung und bei eigenen Veränderungen am Gerät
- Bei mechanischer Beschädigung des Gerätes von außen und Transportschäden
- Bei üblicher Abnutzung von Verschleißteilen wie z.B. Dichtung, Schlauchanschlüsse
- Bei Schäden, die auf höhere Gewalt, Wasser, Blitzschlag, Überspannung zurückzuführen sind
- Bei Missachtung der Gebrauchsanweisung und Bedienungsfehlern
- Wenn das Gerät keinen technischen Defekt aufweist
III. Die vom Kunden geltend gemachten Fehler wird T.I.P. nach eigenem Ermessen auf seine Kosten durch Repa-
ratur oder Lieferung neuer oder generalüberholter Teile beheben bzw. das Gerät austauschen. Ausgetauschte
Teile gehen in das Eigentum von T.I.P. über. Nach Ablauf der Garantie anfallende Reparaturen sind kostenpflich-
tig.
IV. Weitergehende Ansprüche oder eine weitergehende Haftung bestehen auf Grund der Garantie nicht, es sei
denn zwingende gesetzliche Haftungsvorschriften kommen zur Anwendung, wie zum Beispiel das Produkthaf-
tungsgesetz, in Fällen des Vorsatzes und der groben Fahrlässigkeit sowie wegen Verletzung des Lebens, des
Körpers oder der Gesundheit durch T.I.P..
Von T.I.P. erbrachte Garantieleistungen verlängern die Garantiefrist nicht, auch hinsichtlich eventuell ausge-
tauschter Komponenten. Die Garantieverpflichtung erlischt im Falle des Weiterverkaufs durch den Kunden.
V. Der Garantieanspruch ist vom Kunden durch Vorlage der Kaufquittung nachzuweisen, welche dem Gerät bei
Rücksendung beizulegen ist. Ohne gültige Kaufquittung ist eine kostenfreie Reklamationsbearbeitung im Zuge
dieser Herstellergarantie nicht möglich.