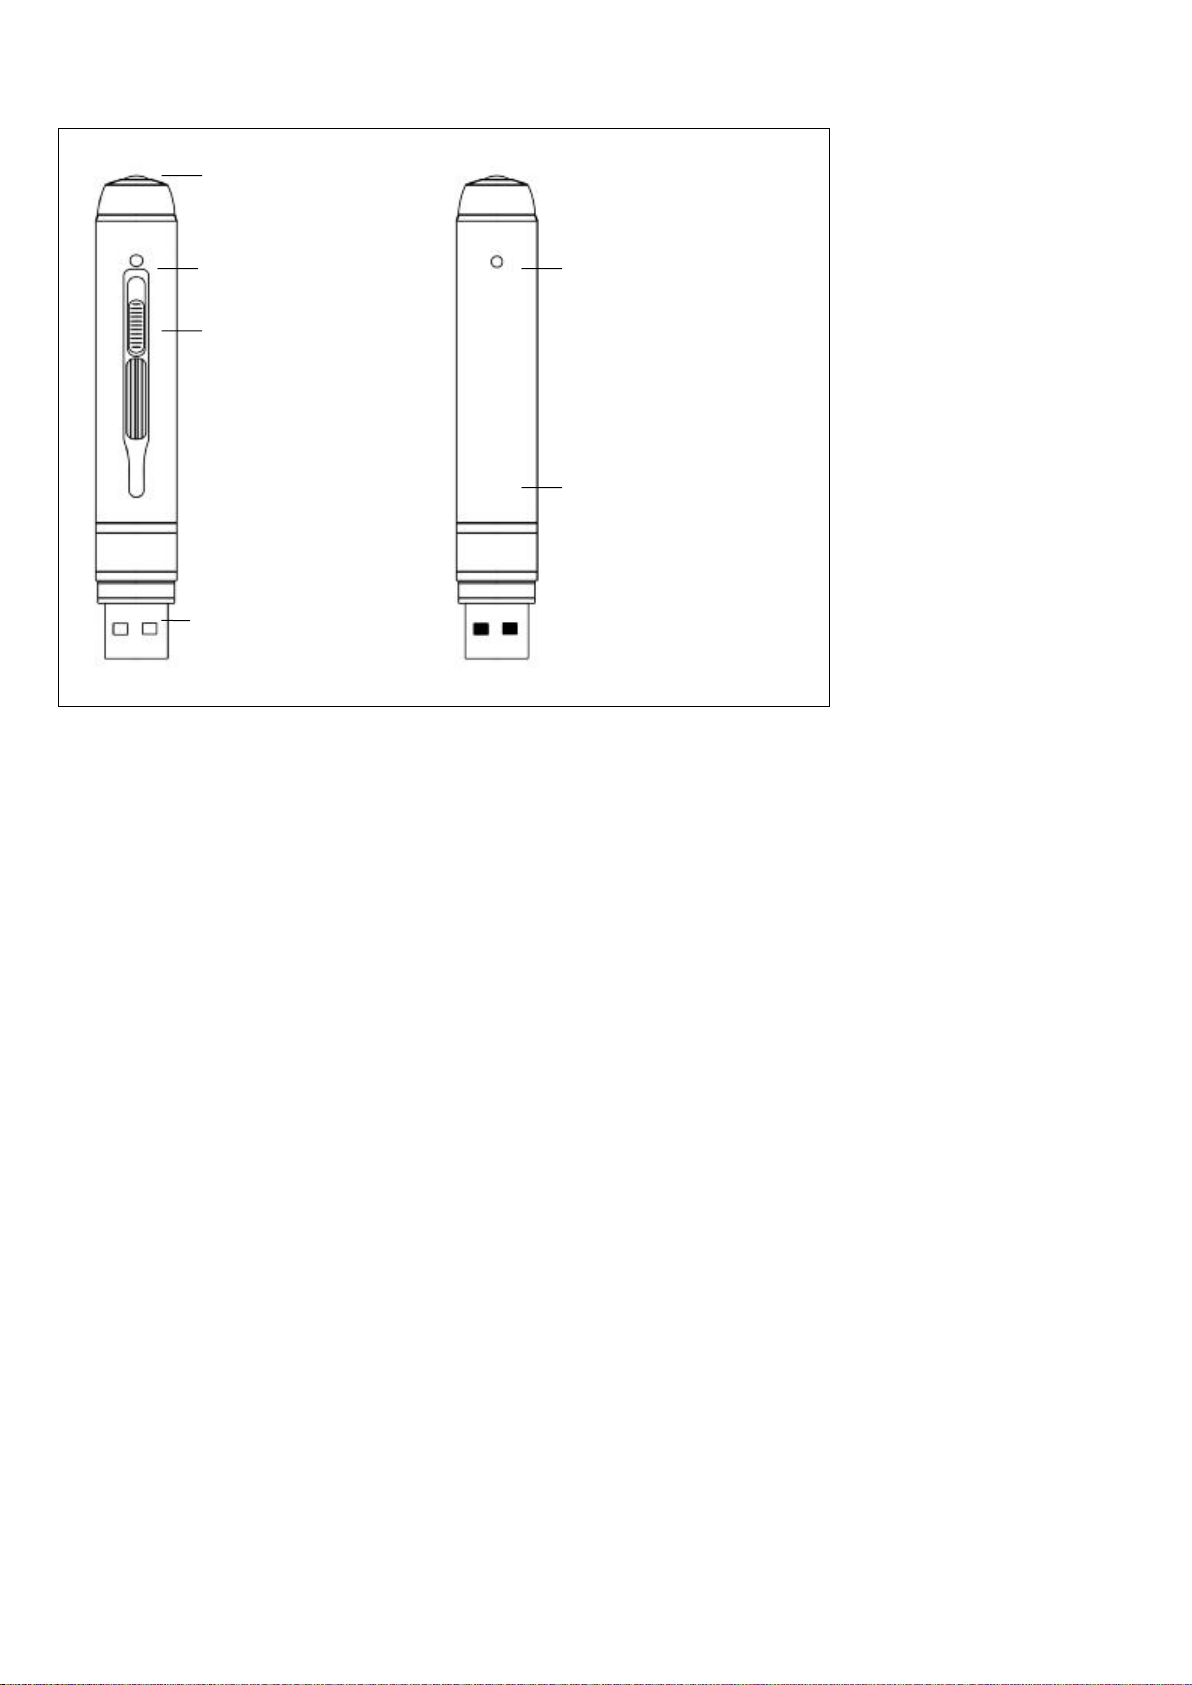
TAIWAN-SPY GL-E42 User manual

1
GL-E42 User Manual
Be fore ope ra tin g the unit, ple a s e re a d this ma nua l ca re fully a nd unde rs ta nd th oroughly. R e ta in it for future u s e
Pro du c t Fe atu re s
S u pe r im a ge s e n s o r fo r low illu mina tion vide o re co rdin g. Auto fo cu s , q u ick ligh t re s p on s e
Full HD 1080P up to 30 fps , 720P up to 60fp s
H.26 4 co m p re s s ion
Built-in micro S D ca rd , s up port up to 32 G B
Only one button , e a s y ope ra tion
ultra -in te g ra te d pe n type de s ign, suita b le fo r m e e ting re cording , e vide n ce re co rding, a nd outdoo r s po rts s ce ne s , e tc.
Ea s y downloa d to P C /MAC with US B plug

2
Pro du c t Overview
Ba s ic Op e ratio n s
1. Tu rn ing Th e Un it On / Vid eo Re co rd ing
P re s s a nd hold the Fun ction bu tton till the blu e indica tor tu rns o n, re le a s e the button, the gre e n indica tor will blink a nd
th e n turn off, the unit s ta rts vide o re cording.
Click the F unction button a ga in, will s top re c o rding , the blue indica to r turns on a nd the unit is on s ta ndb y mode .
Whe n the vide o clip le n gth is o ve r 10 min ute s , the unit will s a ve the cu rre nt clip file , a nd the n re s ta rt vide o re cording
a utoma tica lly.
No te: Be s ure to ope n the le n s co ve r be fo re re cording.
2. P h o to S h ootin g
En ter Ph oto Mo d e: Whe n the unit is on s ta ndb y m ode (the blu e indica to r ke e ps on), double click the Fun ction button , the
blue a nd gre e n indica to rs will blink a lte rna te ly, the unit e nte re d P hoto Mode .
Click the Function button on ce to ta ke a ph oto , the blue indica to r blinks ra pidly.
Qu it th e Photo mod e: Double clic k the Fun ction bu tto n, th e u nit will ba ck to S ta ndb y Mode , the blue indica tor ke e ps on .
3. Tu rn ing Th e Un it Off
Wh e n th e u nit is o n , p re s s a n d ho ld th e Fu n ction b utto n fo r a b o ut 3 s e co nd s , the u nit will s h ut do wn .
Au to p o wer o ff fun ctio n:
The unit will s hu t down a u toma tica lly in followin g cond itions:
(1 ). The ba tte ry powe r is low. The blu e indica tor will blink for s e cond s , a nd the n the unit will shu t down.
(2 ). The me m o ry is full. The blue a nd g re e n indica to rs will blink for s e conds , a nd the n the unit will s hut down.
Len s
Microphone
Lens Cover
Slid er
Re s et Ho le
LED Ind icator
USB Plug
Fu nction
Button

3
(3 ). If no ope ra tion fo r one minute in S ta ndb y Mode , the un it will s hut down to s a ve powe r.
4. Ch a rg in g Th e B att ery
The unit ha s a n inte rna l, re cha rge a ble ba tte ry. The ba tte ry ca n be cha rge d b y following wa ys :
1 ). P lu g the u nit into you r co mpute r US B port.
2). Plug the u nit to DC5V ba tte ry cha rge r.
Du ring cha rging, the blue ind ica to r will blin k, whe n the ba tte ry powe r is full, the b lue indica tor ke e p s on.
5. Re s e t Fu n c tio n
Whe n the unit wo rks a bno rma l fo r ille ga l o pe ra tion or othe r unknown re a s on s , it ne e ds to be re s e t.
Us e a thin s tick (e .g. tooth pick) to pre s s th e R e s e t button in s ide the R e s e t hole . R e s ta rt the unit, it will wo rk norma lly a ga in .
6. S etting Th e Un it
P lug the un it in to the co m pute r US B port, a ne w re mo va ble dis k will a ppe a r on the co mpu te r s cre e n. O p e n the re mova ble
dis k, you will find the file E42s etu p .e xe und e r the root dire ctory, double -click the file to run it, following window will a ppe a r:
You ca n s e t da te /time , fra me s ize , ima ge q ua lity, a ud io vo lu m e , e tc. Whe n the s e tting is com ple te d, click th e button
on the lowe r le ft to s a ve the s e ttings .
To m a ke the s e ttin gs ta ke e ffe ct, dis conne c t the unit with co mpu te r, a nd tu rn the unit on .


5
GL-E42 鋼筆型針孔蒐證 DVR 使用說明書
使用時請詳細閱讀本說明書,以免因不熟悉或不對操作,導致未達成使用目的。妥善保存本說明書
以備不時查閱。
産品特點:
采用高清晰低照度攝像模組,明暗環境自動適應,使昏暗環境下的錄影效果達至最佳。
全高清 1080P 錄影,最高幀速可達 30FPS;可設置 720P 高速動態錄影,最高幀速可達 60FPS。
H.264 視頻壓縮格式,節省存儲空間。
內置 Micro SD 卡,最大可支援 32GB。
單鍵操作,簡單快捷。
筆式設計,方便在會議記錄、採訪取證、戶外活動等場合使用。
USB 2.0 即插即用,方便與 PC/MAC 連接。

6
産品各部件名稱:
操作說明:
1.開機與錄影
長按功能按鈕約 3 秒, 直到藍燈亮起後松開, 完成開機。接著綠燈閃爍數次後熄滅,自動開始錄影。
短按一下功能按鈕,即可停止錄影,綠燈快閃後轉爲藍燈長亮,進入待機狀態。如需繼續錄影,請再次
短按功能按鈕。
當錄制時間超過 10 分鍾時,機器將自動保存視頻,並在存盤完成後繼續錄影。
注意:錄影時請把滑動鏡頭蓋打開,露出鏡頭。
2.照相
進入照相模式:在待機狀態(藍燈長亮)下,連續短按功能按鈕 2 次,指示燈由藍燈長亮轉爲藍燈和綠燈
交替閃爍,即已進入照相模式。
拍照:短按一下功能按鈕,藍燈快閃數次,完成一次拍照。
退出照相模式:再次連續短按功能按鈕 2 次,返回待機狀態(藍燈長亮)。
3.關機
當主機處于工作狀態時,長按功能按鈕約 3 秒,松開按鈕,待指示燈熄滅即已關機。
自動關機功能:在下列情況下,錄影筆將自動關機:
(1)當內置鋰電電量不足時,藍燈將連續閃爍數秒後,將保存視頻,並自動關機;
(2)當存儲空間滿時,藍燈和綠燈同時閃爍數秒後,將保存視頻,並自動關機;
功能按鈕
鏡頭
滑動鏡頭蓋
嘜頭
復歸孔
指示燈
US B 插口

7
(3)當主機處于待機狀態,1 分鍾內沒有任何操作,將自動關機,以節省電力。
4.充電
本機內置可充電鋰電池,可以通過以下方式充電:
(1) 連接電腦充電。把錄影筆插入電腦 USB 口即可充電;
(2) 用充電器充電。把錄影筆連接到充電器,再把充電器插入市電插座即可。
充電時,藍燈閃爍,當內置鋰電充滿電時,藍燈長亮。
注意:當電池量不足時,藍色指示燈會連續閃爍數秒,然後自動關機。此時請對本機進行充電。
5.故障重置
當本機因爲不當操作或其他原因,工作不正常時,需要對産品進行複位重置。
具體實現方法是:用細杆從複位孔插入,按一下內置的複位按鈕,即可實現一次重置操作。
6.設置
把錄影筆插入電腦 USB 口,數秒後電腦屏幕上將會彈出新增的可移動磁盤標識。在其根目錄下,有一
個設置文件,名爲 E42Setup.exe,雙擊運行該文件,電腦屏幕上會出現如下設置界面:
可以在上面設置日期時間、視頻畫面尺寸、畫質、音量等各項參數,勾選完成後,點擊左下角
按鈕保存設置。
把錄影筆與電腦斷開,重新開機,新的日期時間等參數即可生效。

Table of contents