Targa LT 4010 User manual


LT 4010 Content
i
Content
Unpacking and Setup ............................................................................ 1
Scope of Supply . . . . . . . . . . . . . . . . . . . . . . . . . . . . . . . . . . . . . . . . . . . . . . . . . . . . . . . . 1
Safety . . . . . . . . . . . . . . . . . . . . . . . . . . . . . . . . . . . . . . . . . . . . . . . . . . . . . . . . . . . . . . . . . 2
General . . . . . . . . . . . . . . . . . . . . . . . . . . . . . . . . . . . . . . . . . . . . . . . . . . . . . . . . . . . . . 2
Location . . . . . . . . . . . . . . . . . . . . . . . . . . . . . . . . . . . . . . . . . . . . . . . . . . . . . . . . . . . . . 3
Children . . . . . . . . . . . . . . . . . . . . . . . . . . . . . . . . . . . . . . . . . . . . . . . . . . . . . . . . . . . . . 3
Loudspeaker/headphone . . . . . . . . . . . . . . . . . . . . . . . . . . . . . . . . . . . . . . . . . . . . . . . . 3
Batteries . . . . . . . . . . . . . . . . . . . . . . . . . . . . . . . . . . . . . . . . . . . . . . . . . . . . . . . . . . . . . 3
The Best Distance . . . . . . . . . . . . . . . . . . . . . . . . . . . . . . . . . . . . . . . . . . . . . . . . . . . . . 4
Background Light/Reflections . . . . . . . . . . . . . . . . . . . . . . . . . . . . . . . . . . . . . . . . . . . . 4
The Best Alignment . . . . . . . . . . . . . . . . . . . . . . . . . . . . . . . . . . . . . . . . . . . . . . . . . . . . 5
Intended purpose . . . . . . . . . . . . . . . . . . . . . . . . . . . . . . . . . . . . . . . . . . . . . . . . . . . . . . . 5
Connections and Start of Operation .................................................... 7
Overview Controls . . . . . . . . . . . . . . . . . . . . . . . . . . . . . . . . . . . . . . . . . . . . . . . . . . . . . . 7
Front . . . . . . . . . . . . . . . . . . . . . . . . . . . . . . . . . . . . . . . . . . . . . . . . . . . . . . . . . . . . . . . . 7
Rear . . . . . . . . . . . . . . . . . . . . . . . . . . . . . . . . . . . . . . . . . . . . . . . . . . . . . . . . . . . . . . . . 8
Access to the Connections . . . . . . . . . . . . . . . . . . . . . . . . . . . . . . . . . . . . . . . . . . . . . . . 9
Connecting to AV . . . . . . . . . . . . . . . . . . . . . . . . . . . . . . . . . . . . . . . . . . . . . . . . . . . . . . . 9
Composite Video or S-Video . . . . . . . . . . . . . . . . . . . . . . . . . . . . . . . . . . . . . . . . . . . . . 9
Connecting to SCART . . . . . . . . . . . . . . . . . . . . . . . . . . . . . . . . . . . . . . . . . . . . . . . . . . 10
Connecting to Component Video . . . . . . . . . . . . . . . . . . . . . . . . . . . . . . . . . . . . . . . . . 11
Connecting to HDMI . . . . . . . . . . . . . . . . . . . . . . . . . . . . . . . . . . . . . . . . . . . . . . . . . . . . 12
Connecting to Audio Output . . . . . . . . . . . . . . . . . . . . . . . . . . . . . . . . . . . . . . . . . . . . . 13
Notes on Handling Headphones . . . . . . . . . . . . . . . . . . . . . . . . . . . . . . . . . . . . . . . . . 13
Connecting to the Optical/Coaxial Digital Output . . . . . . . . . . . . . . . . . . . . . . . . . . . . 14
Use of a Headphone with Cable . . . . . . . . . . . . . . . . . . . . . . . . . . . . . . . . . . . . . . . . . . 15
Notes on Handling Headphones . . . . . . . . . . . . . . . . . . . . . . . . . . . . . . . . . . . . . . . . . 15
Connection to Roof Aerial . . . . . . . . . . . . . . . . . . . . . . . . . . . . . . . . . . . . . . . . . . . . . . . 16
Connecting to a Computer . . . . . . . . . . . . . . . . . . . . . . . . . . . . . . . . . . . . . . . . . . . . . . 16
Connecting several Devices . . . . . . . . . . . . . . . . . . . . . . . . . . . . . . . . . . . . . . . . . . . . . 17
Connecting Mains Cable . . . . . . . . . . . . . . . . . . . . . . . . . . . . . . . . . . . . . . . . . . . . . . . . 17
Inserting the Batteries . . . . . . . . . . . . . . . . . . . . . . . . . . . . . . . . . . . . . . . . . . . . . . . . . . 18
Notes on Handling Batteries . . . . . . . . . . . . . . . . . . . . . . . . . . . . . . . . . . . . . . . . . . . . 18
Settings ................................................................................................ 21
Switching On . . . . . . . . . . . . . . . . . . . . . . . . . . . . . . . . . . . . . . . . . . . . . . . . . . . . . . . . . .21

Content LT 4010
ii
Switching Off . . . . . . . . . . . . . . . . . . . . . . . . . . . . . . . . . . . . . . . . . . . . . . . . . . . . . . . . .21
Stand-by . . . . . . . . . . . . . . . . . . . . . . . . . . . . . . . . . . . . . . . . . . . . . . . . . . . . . . . . . . .21
Switch Stand by Off . . . . . . . . . . . . . . . . . . . . . . . . . . . . . . . . . . . . . . . . . . . . . . . . . . . 21
Setting up for Operation . . . . . . . . . . . . . . . . . . . . . . . . . . . . . . . . . . . . . . . . . . . . . . . . 22
Open, Select and Close Menus . . . . . . . . . . . . . . . . . . . . . . . . . . . . . . . . . . . . . . . . . . . 22
Tuning . . . . . . . . . . . . . . . . . . . . . . . . . . . . . . . . . . . . . . . . . . . . . . . . . . . . . . . . . . . . . . . 22
Starting Automatic Tuning TV Stations . . . . . . . . . . . . . . . . . . . . . . . . . . . . . . . . . . . . 22
Change channel . . . . . . . . . . . . . . . . . . . . . . . . . . . . . . . . . . . . . . . . . . . . . . . . . . . . . . . 24
Set Colour System . . . . . . . . . . . . . . . . . . . . . . . . . . . . . . . . . . . . . . . . . . . . . . . . . . . . . 24
Set System . . . . . . . . . . . . . . . . . . . . . . . . . . . . . . . . . . . . . . . . . . . . . . . . . . . . . . . . . . .25
Manual Tuning . . . . . . . . . . . . . . . . . . . . . . . . . . . . . . . . . . . . . . . . . . . . . . . . . . . . . . . . 26
Fine Tuning . . . . . . . . . . . . . . . . . . . . . . . . . . . . . . . . . . . . . . . . . . . . . . . . . . . . . . . . . . .26
Change Channel Name . . . . . . . . . . . . . . . . . . . . . . . . . . . . . . . . . . . . . . . . . . . . . . . . . 27
Sound Settings . . . . . . . . . . . . . . . . . . . . . . . . . . . . . . . . . . . . . . . . . . . . . . . . . . . . . . . . 27
Improve Signal Quality . . . . . . . . . . . . . . . . . . . . . . . . . . . . . . . . . . . . . . . . . . . . . . . . . . 28
Set Channel . . . . . . . . . . . . . . . . . . . . . . . . . . . . . . . . . . . . . . . . . . . . . . . . . . . . . . . . . . .29
Reduce Noise . . . . . . . . . . . . . . . . . . . . . . . . . . . . . . . . . . . . . . . . . . . . . . . . . . . . . . . . . 29
Channel Groups . . . . . . . . . . . . . . . . . . . . . . . . . . . . . . . . . . . . . . . . . . . . . . . . . . . . . . . 30
Watch Favourite Channel . . . . . . . . . . . . . . . . . . . . . . . . . . . . . . . . . . . . . . . . . . . . . . 30
Set Screen Language . . . . . . . . . . . . . . . . . . . . . . . . . . . . . . . . . . . . . . . . . . . . . . . . . . . 31
Set Aspect Ratio . . . . . . . . . . . . . . . . . . . . . . . . . . . . . . . . . . . . . . . . . . . . . . . . . . . . . . . 31
Set Wide Screen Format . . . . . . . . . . . . . . . . . . . . . . . . . . . . . . . . . . . . . . . . . . . . . . . 31
Display if no Wide Screen Signal is Received . . . . . . . . . . . . . . . . . . . . . . . . . . . . . . . 32
Set Picture Mode . . . . . . . . . . . . . . . . . . . . . . . . . . . . . . . . . . . . . . . . . . . . . . . . . . . . . . 33
Additional Picture Settings . . . . . . . . . . . . . . . . . . . . . . . . . . . . . . . . . . . . . . . . . . . . . . 34
Set Individual Colour Channels . . . . . . . . . . . . . . . . . . . . . . . . . . . . . . . . . . . . . . . . . . 34
Sound Settings . . . . . . . . . . . . . . . . . . . . . . . . . . . . . . . . . . . . . . . . . . . . . . . . . . . . . . . . 35
Set Balance . . . . . . . . . . . . . . . . . . . . . . . . . . . . . . . . . . . . . . . . . . . . . . . . . . . . . . . . . 35
Set volume . . . . . . . . . . . . . . . . . . . . . . . . . . . . . . . . . . . . . . . . . . . . . . . . . . . . . . . . . . 35
Adjust Individual Audio Frequencies . . . . . . . . . . . . . . . . . . . . . . . . . . . . . . . . . . . . . . 35
Surround Sound by SRS WOW . . . . . . . . . . . . . . . . . . . . . . . . . . . . . . . . . . . . . . . . . . . 36
Set Sound Source . . . . . . . . . . . . . . . . . . . . . . . . . . . . . . . . . . . . . . . . . . . . . . . . . . . . . . 37
Set Sound Source when using an Adapter Cable . . . . . . . . . . . . . . . . . . . . . . . . . . . . 37
Set Time . . . . . . . . . . . . . . . . . . . . . . . . . . . . . . . . . . . . . . . . . . . . . . . . . . . . . . . . . . . . . . 38
Set Time by Station . . . . . . . . . . . . . . . . . . . . . . . . . . . . . . . . . . . . . . . . . . . . . . . . . . . 38
Set Switch on Time . . . . . . . . . . . . . . . . . . . . . . . . . . . . . . . . . . . . . . . . . . . . . . . . . . . . . 39
Set Switch off Time . . . . . . . . . . . . . . . . . . . . . . . . . . . . . . . . . . . . . . . . . . . . . . . . . . . . 39
Automatic Switch off . . . . . . . . . . . . . . . . . . . . . . . . . . . . . . . . . . . . . . . . . . . . . . . . . . . 40
Automatic Switch off if no Signal is Received . . . . . . . . . . . . . . . . . . . . . . . . . . . . . . . 40
Switch Off if no Key is Pressed . . . . . . . . . . . . . . . . . . . . . . . . . . . . . . . . . . . . . . . . . . 40

LT 4010 Content
iii
Set On-Screen Display . . . . . . . . . . . . . . . . . . . . . . . . . . . . . . . . . . . . . . . . . . . . . . . . . . 40
Set Duration . . . . . . . . . . . . . . . . . . . . . . . . . . . . . . . . . . . . . . . . . . . . . . . . . . . . . . . . . 40
Set Transparency . . . . . . . . . . . . . . . . . . . . . . . . . . . . . . . . . . . . . . . . . . . . . . . . . . . . . 41
Child Lock . . . . . . . . . . . . . . . . . . . . . . . . . . . . . . . . . . . . . . . . . . . . . . . . . . . . . . . . . . . . 42
Activate Child Lock . . . . . . . . . . . . . . . . . . . . . . . . . . . . . . . . . . . . . . . . . . . . . . . . . . . 42
Deactivate Child Lock . . . . . . . . . . . . . . . . . . . . . . . . . . . . . . . . . . . . . . . . . . . . . . . . . 42
Set Characters for Teletext . . . . . . . . . . . . . . . . . . . . . . . . . . . . . . . . . . . . . . . . . . . . . . 43
Restore Default . . . . . . . . . . . . . . . . . . . . . . . . . . . . . . . . . . . . . . . . . . . . . . . . . . . . . . . . 43
Settings for the Computer . . . . . . . . . . . . . . . . . . . . . . . . . . . . . . . . . . . . . . . . . . . . . . . 44
Watching .............................................................................................. 45
Watch Television Program . . . . . . . . . . . . . . . . . . . . . . . . . . . . . . . . . . . . . . . . . . . . . . 45
Set volume . . . . . . . . . . . . . . . . . . . . . . . . . . . . . . . . . . . . . . . . . . . . . . . . . . . . . . . . . . .45
Mute . . . . . . . . . . . . . . . . . . . . . . . . . . . . . . . . . . . . . . . . . . . . . . . . . . . . . . . . . . . . . . . 45
Change Channel . . . . . . . . . . . . . . . . . . . . . . . . . . . . . . . . . . . . . . . . . . . . . . . . . . . . . . . 45
Switch to Last Channel . . . . . . . . . . . . . . . . . . . . . . . . . . . . . . . . . . . . . . . . . . . . . . . . 45
Watch Favourite Channel . . . . . . . . . . . . . . . . . . . . . . . . . . . . . . . . . . . . . . . . . . . . . . 45
Show Channel Information . . . . . . . . . . . . . . . . . . . . . . . . . . . . . . . . . . . . . . . . . . . . . . 46
Recall a Favourite Channel . . . . . . . . . . . . . . . . . . . . . . . . . . . . . . . . . . . . . . . . . . . . . . 46
Select source . . . . . . . . . . . . . . . . . . . . . . . . . . . . . . . . . . . . . . . . . . . . . . . . . . . . . . . . .46
Select Input . . . . . . . . . . . . . . . . . . . . . . . . . . . . . . . . . . . . . . . . . . . . . . . . . . . . . . . . . 46
Watch Two Programs at the Same Time (PIP ) . . . . . . . . . . . . . . . . . . . . . . . . . . . . . . 47
Display Second Picture . . . . . . . . . . . . . . . . . . . . . . . . . . . . . . . . . . . . . . . . . . . . . . . . 47
Select Signal Source for PIP . . . . . . . . . . . . . . . . . . . . . . . . . . . . . . . . . . . . . . . . . . . . 47
Toggle between Two Pictures . . . . . . . . . . . . . . . . . . . . . . . . . . . . . . . . . . . . . . . . . . . 47
Switch Second Picture Off . . . . . . . . . . . . . . . . . . . . . . . . . . . . . . . . . . . . . . . . . . . . . . 47
Toggle Sound between Main Screen and Sub Screen . . . . . . . . . . . . . . . . . . . . . . . . 47
Display Two Pictures at the same Time . . . . . . . . . . . . . . . . . . . . . . . . . . . . . . . . . . . . 47
Set Picture-in-Picture Size . . . . . . . . . . . . . . . . . . . . . . . . . . . . . . . . . . . . . . . . . . . . . . . 48
Set Picture-in-Picture Position . . . . . . . . . . . . . . . . . . . . . . . . . . . . . . . . . . . . . . . . . . . 48
Video Text . . . . . . . . . . . . . . . . . . . . . . . . . . . . . . . . . . . . . . . . . . . . . . . . . . . . . . . . . . . . 48
Still Picture . . . . . . . . . . . . . . . . . . . . . . . . . . . . . . . . . . . . . . . . . . . . . . . . . . . . . . . . . . . 49
Show Time . . . . . . . . . . . . . . . . . . . . . . . . . . . . . . . . . . . . . . . . . . . . . . . . . . . . . . . . . . . .49
Set Sleep Time . . . . . . . . . . . . . . . . . . . . . . . . . . . . . . . . . . . . . . . . . . . . . . . . . . . . . . . . 49
Set Picture Mode while Watching . . . . . . . . . . . . . . . . . . . . . . . . . . . . . . . . . . . . . . . . . 49
Adjust Picture Size while Watching . . . . . . . . . . . . . . . . . . . . . . . . . . . . . . . . . . . . . . . 49
Set Surround Sound while Watching . . . . . . . . . . . . . . . . . . . . . . . . . . . . . . . . . . . . . . 50
Set Sound while Watching . . . . . . . . . . . . . . . . . . . . . . . . . . . . . . . . . . . . . . . . . . . . . . . 50
Set Stereo/Mono while Watching . . . . . . . . . . . . . . . . . . . . . . . . . . . . . . . . . . . . . . . . . 50
Select a Different Audio Language while Watching . . . . . . . . . . . . . . . . . . . . . . . . . . 50

Content LT 4010
iv
Cleaning and Troubleshooting .......................................................... 51
Cleaning . . . . . . . . . . . . . . . . . . . . . . . . . . . . . . . . . . . . . . . . . . . . . . . . . . . . . . . . . . . . . 51
Troubleshooting . . . . . . . . . . . . . . . . . . . . . . . . . . . . . . . . . . . . . . . . . . . . . . . . . . . . . . . 51
No Picture or Sound . . . . . . . . . . . . . . . . . . . . . . . . . . . . . . . . . . . . . . . . . . . . . . . . . . . . 51
Black Screen . . . . . . . . . . . . . . . . . . . . . . . . . . . . . . . . . . . . . . . . . . . . . . . . . . . . . . . . . .51
Picture OK but no Sound . . . . . . . . . . . . . . . . . . . . . . . . . . . . . . . . . . . . . . . . . . . . . . . . 52
Poor Sound . . . . . . . . . . . . . . . . . . . . . . . . . . . . . . . . . . . . . . . . . . . . . . . . . . . . . . . . . . .52
No Picture on Some Channels . . . . . . . . . . . . . . . . . . . . . . . . . . . . . . . . . . . . . . . . . . . 52
Unstable, Poor Picture . . . . . . . . . . . . . . . . . . . . . . . . . . . . . . . . . . . . . . . . . . . . . . . . . . 52
Some Channels Display Black and White . . . . . . . . . . . . . . . . . . . . . . . . . . . . . . . . . . 52
Snow on one or Several Channels . . . . . . . . . . . . . . . . . . . . . . . . . . . . . . . . . . . . . . . . 52
Remote Control Does Not Work . . . . . . . . . . . . . . . . . . . . . . . . . . . . . . . . . . . . . . . . . . 53
Message "No Signal" . . . . . . . . . . . . . . . . . . . . . . . . . . . . . . . . . . . . . . . . . . . . . . . . . . . 53
Message "Video not Supported" . . . . . . . . . . . . . . . . . . . . . . . . . . . . . . . . . . . . . . . . . . 53
Picture Scrolls Vertically . . . . . . . . . . . . . . . . . . . . . . . . . . . . . . . . . . . . . . . . . . . . . . . . 53
Parts of the Picture are not Displayed . . . . . . . . . . . . . . . . . . . . . . . . . . . . . . . . . . . . . 53
Picture Too Small or Too Large . . . . . . . . . . . . . . . . . . . . . . . . . . . . . . . . . . . . . . . . . . 53
Horizontal or Vertical Bars . . . . . . . . . . . . . . . . . . . . . . . . . . . . . . . . . . . . . . . . . . . . . . 54
Other Errors . . . . . . . . . . . . . . . . . . . . . . . . . . . . . . . . . . . . . . . . . . . . . . . . . . . . . . . . . .54
Technical specifications ..................................................................... 55
General . . . . . . . . . . . . . . . . . . . . . . . . . . . . . . . . . . . . . . . . . . . . . . . . . . . . . . . . . . . . . . 55
LCD . . . . . . . . . . . . . . . . . . . . . . . . . . . . . . . . . . . . . . . . . . . . . . . . . . . . . . . . . . . . . . . . . 55
Tuner . . . . . . . . . . . . . . . . . . . . . . . . . . . . . . . . . . . . . . . . . . . . . . . . . . . . . . . . . . . . . . . . 55
Audio . . . . . . . . . . . . . . . . . . . . . . . . . . . . . . . . . . . . . . . . . . . . . . . . . . . . . . . . . . . . . . . . 55
Component . . . . . . . . . . . . . . . . . . . . . . . . . . . . . . . . . . . . . . . . . . . . . . . . . . . . . . . . . . .56
SCART . . . . . . . . . . . . . . . . . . . . . . . . . . . . . . . . . . . . . . . . . . . . . . . . . . . . . . . . . . . . . . . 56
PC . . . . . . . . . . . . . . . . . . . . . . . . . . . . . . . . . . . . . . . . . . . . . . . . . . . . . . . . . . . . . . . . . . . 56
HDMI . . . . . . . . . . . . . . . . . . . . . . . . . . . . . . . . . . . . . . . . . . . . . . . . . . . . . . . . . . . . . . . . 56
Glossary ............................................................................................... 57
Conformity ........................................................................................... 61
Disposal . . . . . . . . . . . . . . . . . . . . . . . . . . . . . . . . . . . . . . . . . . . . . . . . . . . . . . . . . . . . . . 61
Index ..................................................................................................... 63
Warranty Card ........................................................................Rear cover

LT 4010 Unpacking and Setup
1
Unpacking and Setup
Scope of Supply
Please check, that the delivery is complete.
1Unit
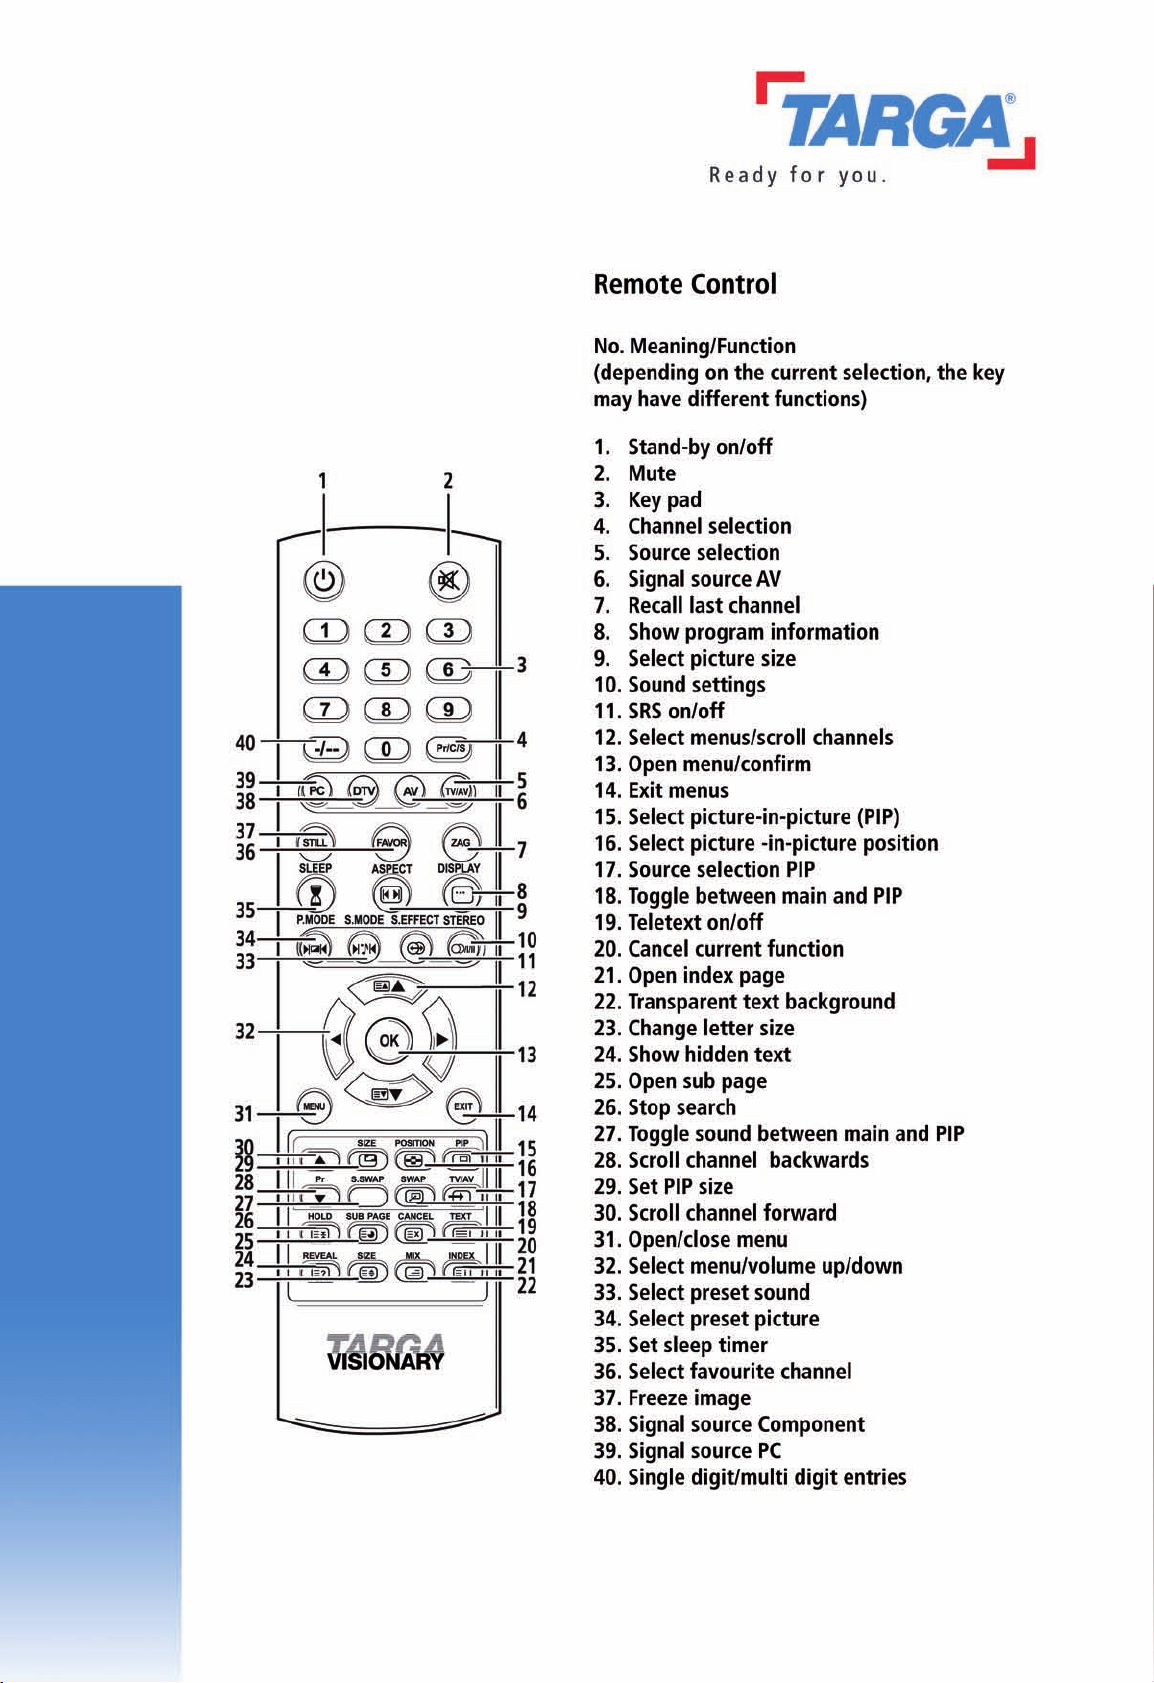
2 Remote control
3 Batteries
4 Mains cable
5 AV cable (red, white, yellow)
6 Component cable (green, blue , red)
7 SCART cable
8 HDMI cable
9 Stereo audio Adapter cable (red, white)
10 Antenna cable
11 Owner's Manual with service information
12 Wall mount
Battery
Battery
1
2
3
4
5
6
7
8
9
1
1
1
0
1
2

Unpacking and Setup LT 4010
2
Safety
General
•Read the following instructions carefully.
•Keep the manual with the instructions carefully and pass it on, if you sell the unit
or give it away otherwise.
•Observe all warnings exactly and proceed exactly as described in the
instructions.
•Clean the unit with a dry cloth only.
•Ensure that the ventilation openings are not covered.
•Only connect the unit as described in the instructions.
•Use the accessories specified by the manufacturer only.
•To completely disconnect the unit from the electric power, unplug the power
cable.
•Refer all servicing to qualified service personnel only. Servicing is required if the
unit has been damaged, e.g. if the mains adapter or power plug are damaged, if
liquid or objects entered the unit, if it was subject to rain or any other kind of
humidity, if it has been dropped or if it does not operate properly.
•Make sure the used mains outlet is easily accessible. Lay the power cable in a
manner that does not obstruct anyone.
•Do not use any extension cables.
•Disconnect the unit from the mains supply during thunderstorms by removing the
plug from the wall outlet. Do this also, if you will not use the unit for a longer period
of time.
•Do not use the unit near water.
•To prevent electric shock or fire make sure the unit is not subject to rain or
humidity.
•Do not expose the unit to dripping or splashing water. Do not place any heavy
objects or container with liquids (beverages, vases etc.) on the unit. Avoid
extreme changes of temperature to prevent humidity condensing in the unit.
•Do not place any open fire (candles etc.) on the unit.
•If you use an outdoor antenna, make sure to ground the antenna to provide
protection against voltage surges and build up of static charges.
•If you do not operate the unit in the Federal Republic of Germany, make sure to
observe the local laws and regulations applicable in your country.

LT 4010 Unpacking and Setup
3
Location
•Avoid humid and/or dusty environments.
•Place the unit on level, non-vibrating surfaces.
•Do not place the unit close to the outlets of air conditioners or heaters.
•Make sure the unit is easily accessible from all sides.
•Only use suitable stands, supports, carts or tables that ensure the unit does not
tip over. If you place the unit on a cart, move it with caution to prevent injuries or
damage resulting from tip-over.
•Do not install the unit close to heat sources such as radiators, stoves or other
devices (including amplifiers) radiating heat. Avoid exposure to direct sunlight.
•Do not operate the unit close to magnetic fields (e.g. loudspeakers).
•Make sure to provide sufficient ventilation. (Do not place the unit in racks, on thick
carpets, on a bed or any other place where the ventilation openings could be
covered and leave a space of at least 10 cm to all sides of the unit.)
Children
•Children: electric devices are not for children. Never leave children to play with
electric devices without supervision. Children are not always able to judge
possible dangers correctly. Keep the packaging material away from children,
there is a danger of suffocation.
•Small parts can be perilous if swallowed. Keep small parts away from children. If
a small part was swallowed, immediately contact a doctor.
Loudspeaker/headphone
•Never operate the loudspeakers or your headphone at high volume over long
periods of time. Otherwise you imperil your hearing and disturb your environment.
•Never operate the loudspeakers or the headphone in hazardous situations, e.g.
in traffic or when working with machines. Any distraction by noise reduces your
attention and may lead to accidents.
•Even if your headphone is designed to allow hearing of environmental noise,
never turn the volume so high that you cannot hear what happens around you.
•If you want to use a headphone on the line out connector, use a headphone with
an impedance of 30 - 50 Ohm.
Batteries
•Mind the polarity of the batteries (+/-) when inserting. Use only similar batteries
(manufacturer, carbon, alkaline, old, new) together.

Unpacking and Setup LT 4010
4
•Remove the batteries, if you will not use the unit for a longer period.
The Best Distance
Background Light/Reflections
When watching television at night, the television should not be the only source of
light in the room. The big difference of brightness between the screen and the
background causes continuous dark-light adaptation of the eyes. This leads to
strain of the eyes and may cause headaches.
It is better, if a dim, indirect light lights-up the environment of the television.
For the same reasons, make sure that no reflections on the screen impair the
picture.
This symbol indicates additional safety instructions in the text.
This symbol indicates instructions to facilitate the operation.
The distance when watching programs on a television of this size
should be approximately 2.2 to 2.7 metres. If the distance is too large
or too small, this may lead to strain of your eyes. This may impair your
health.
!
!

LT 4010 Unpacking and Setup
5
The Best Alignment
Intended purpose
This LCD television set is a unit for consumer electronics. It may only be used for
private, not industrial or other commercial purposes. Only use connecting cables
and external devices, that correspond to the present unit with respect to
electromagnetic compatibility and shielding. This unit fulfils all relevant rules and
standards with respect to the EEC conformity. Any change of the unit not
authorized by the manufacturer may violate these rules or standards. Use the
accessories specified by the manufacturer only.
Choose a location that allows you to sit in a relaxed position. Otherwise,
tension and further impairments to your health may be the
consequence.
!

Unpacking and Setup LT 4010
6
LT 4010 Connections and Start of Operation
7
Connections and Start of Operation
Overview Controls
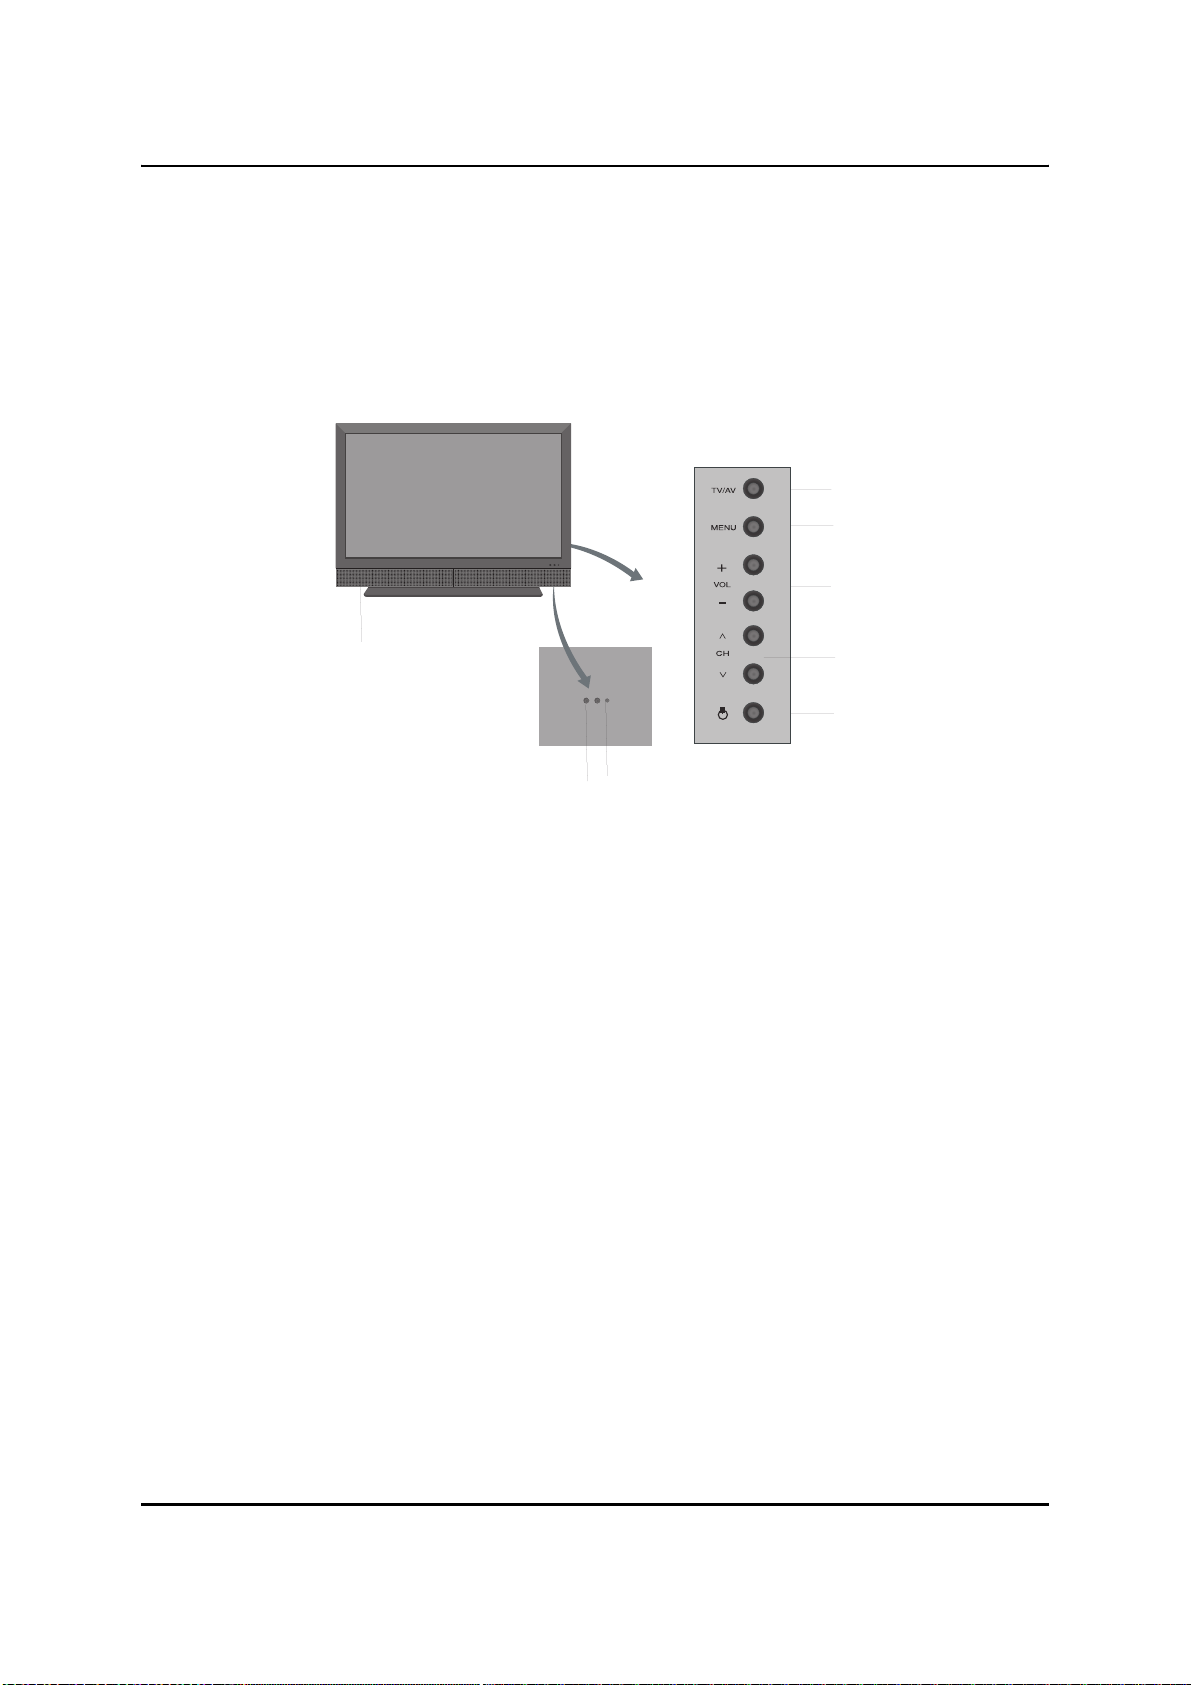
Front
1 Loudspeaker
2 Sensor for remote control
3 On/Off indicator
4 Select source
5 Select menu
6 Volume
7 Select channel
8 Stand-by switch ON/OFF
1
23
4
5
6
7
8
Connections and Start of Operation LT 4010
8
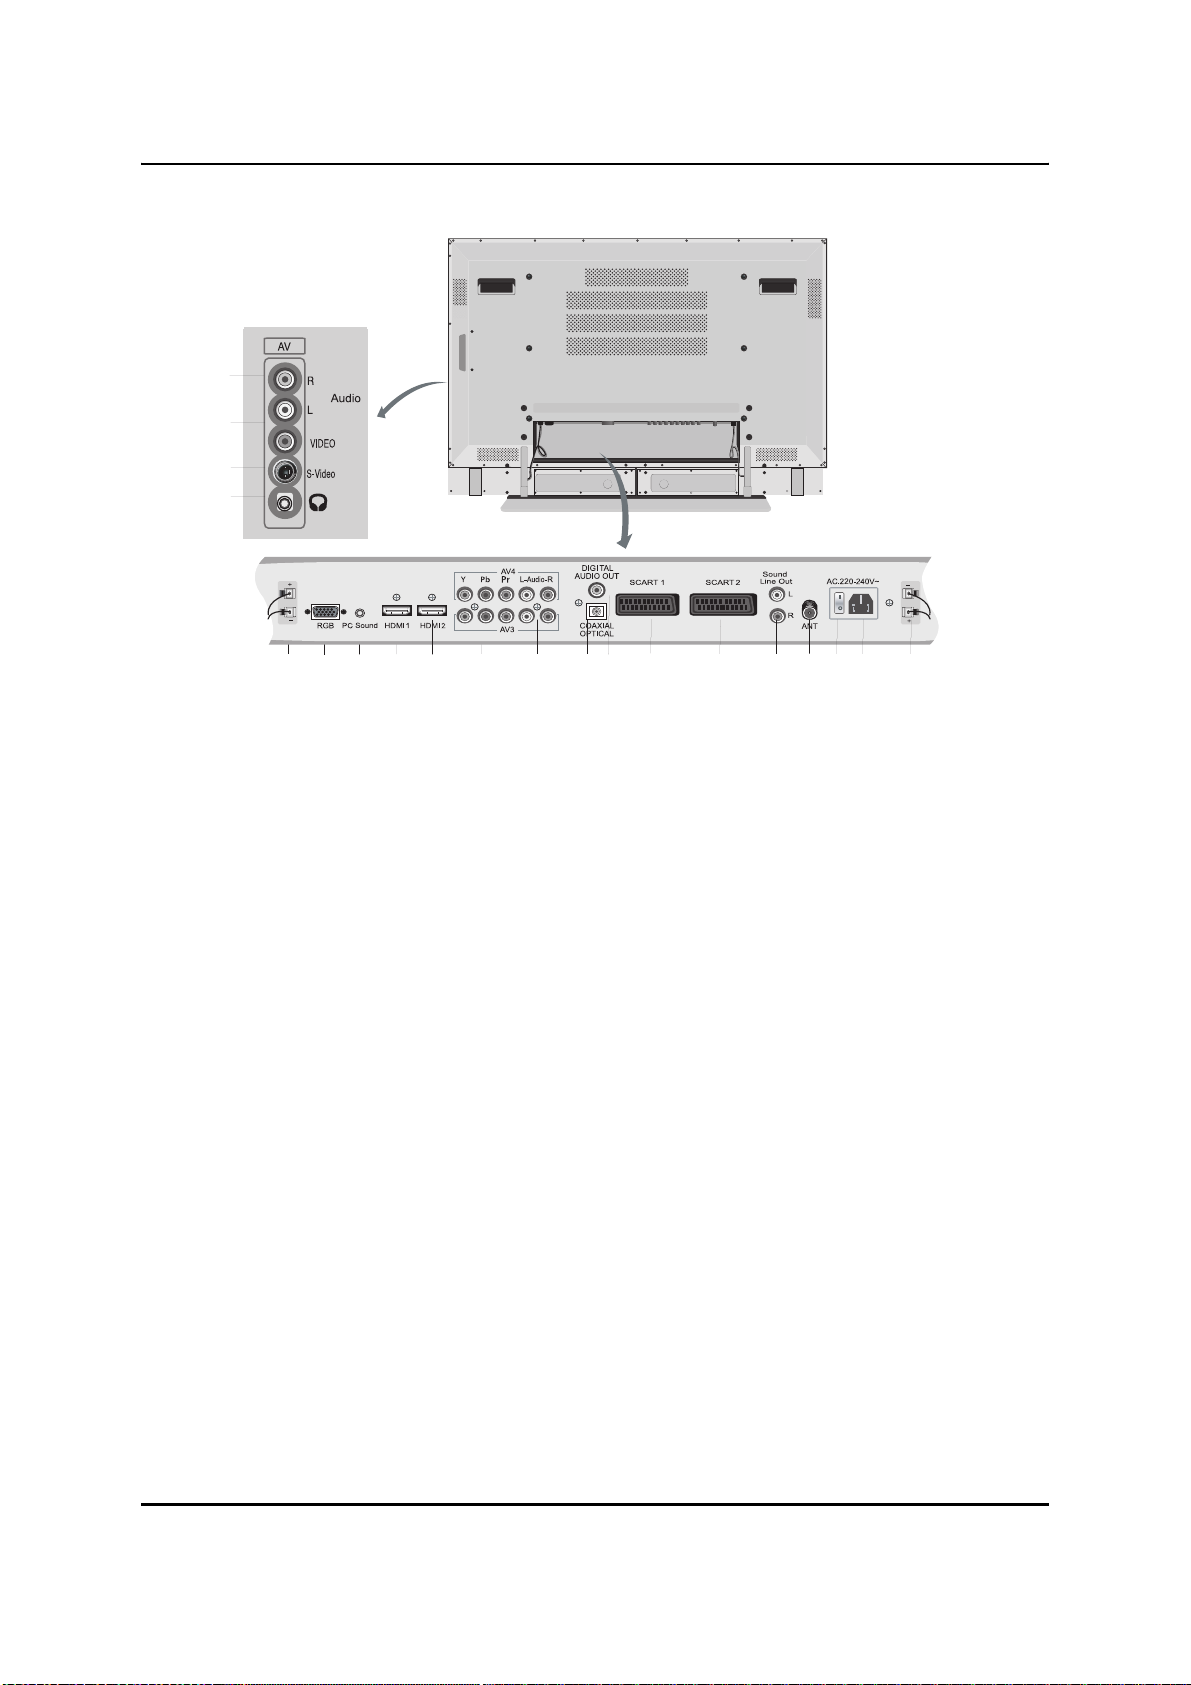
Rear
1 Input audio (left/right)
2 VIDEO input
3S-VIDEOinput
4 Headphone output
5 Loudspeaker right (4 Ohm/10 Watt)
6 Analogue RGB input (PC)
7 Audio input (PC)
8 HDMI 1 (DVI) input
9 HDMI 2 input
10 Video input (Y, Pb, Pr / Component 1/2)
11 Audio input (Component 1/2)
12 Digital audio output (optical)
13 Digital audio output (coaxial optical)
14 SCART 1 input
15 SCART 2 input
16 Audio output (analogue)
17 Antenna input
18 Power switch
19 Mains inlet
20 Loudspeaker left (4 Ohm/10 Watt)
567810 12 13 14 16 17 18 19 20
915
11
1
2
3
4
LT 4010 Connections and Start of Operation
9
Access to the Connections
The connectors are on the rear of the unit.
The unit is equipped with different inputs to allow the best possible signal
transmission from the respective source. If your signal source (e.g. DVD-unit,
satellite receiver etc.) is equipped with a digital output, you should uses this output
so that no information is lost during transfer.
You can use several input connectors at the same time. For information on how
to select a device for display, refer to chapter: “Select source” on page 46.
Connecting to AV
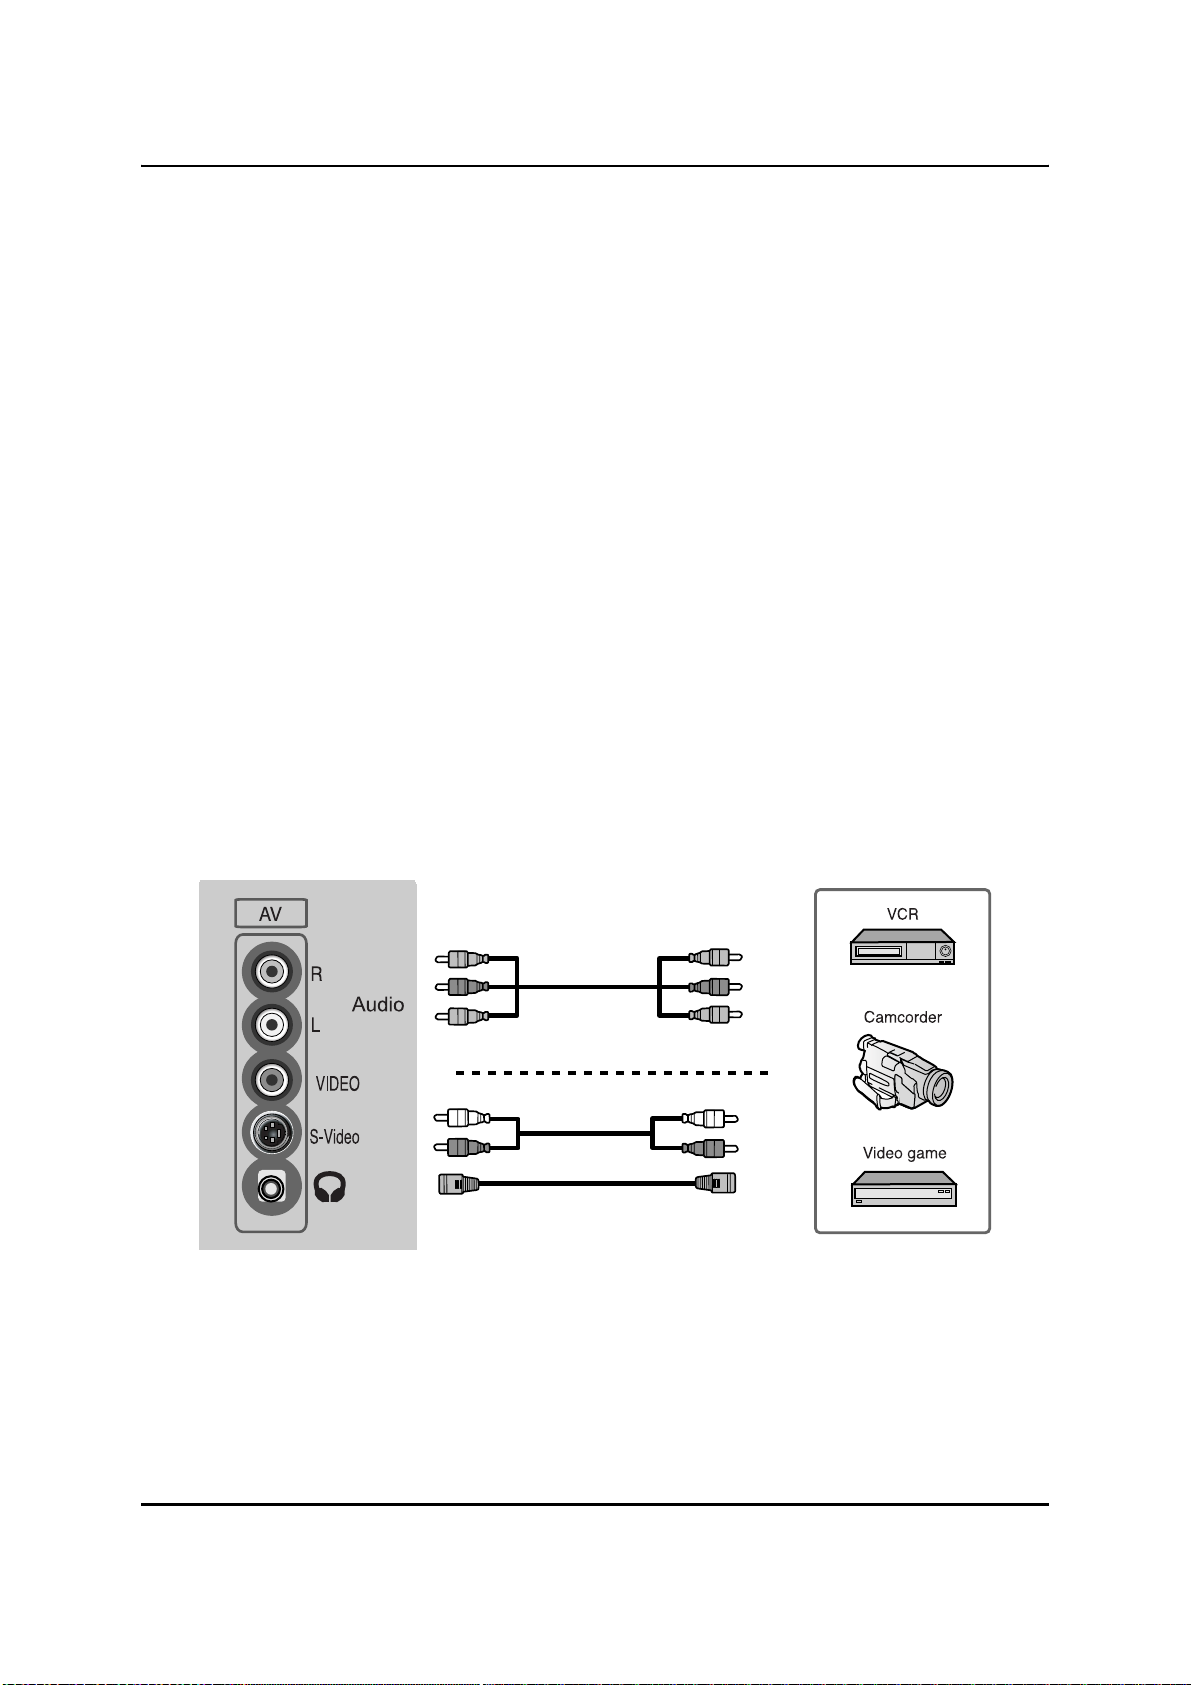
Composite Video or S-Video
Use this input to transfer images of external devices such as cameras, video
games or video recorders analogue to the TV set. S-Video is also an analogue
format transmitting brightness and colour information separately. For this a cable
with Hosiden plugs is used.
1. Plug the AV-cable according to the colours (red/white/yellow) into the socket
[VIDEO/AUDIO] and into the output sockets of the external device.
Or

Connections and Start of Operation LT 4010
10
1. Plug the S-Video cable into the socket [S-VIDEO] and the output socket of the
external device.
2. Plug the audio cable into the socket [AUDIO R/L] and connect them with the
output sockets of the external device.
If your external device only provides a Mono-output, use the left channel [MONO]
for the audio input.
Connecting to SCART
SCART is a standard for plugs to transmit analogue signals (RGB, S-Video,
Video). Depending on the external device you can use a SCART cable with 2
SCART plugs or with 1 SCART plug and chinch plugs (Audio R/L, Video) (not
included in the delivery).
1. Plug the SCART cable into the socket [SCART 1] on the TV set.
2. Plug the other end of the SCART cable into the output socket on the external
device.
SCART1 SCART2
Satellite Receiver
Camcorder
Video game
LT 4010 Connections and Start of Operation
11
If your external device provides RGB, S-Video and Video (CVBS), use the
SCART 1 socket. If your external device provides only S-Video and Video
(CVBS), use the SCART 2 socket. You can use both sockets parallel.
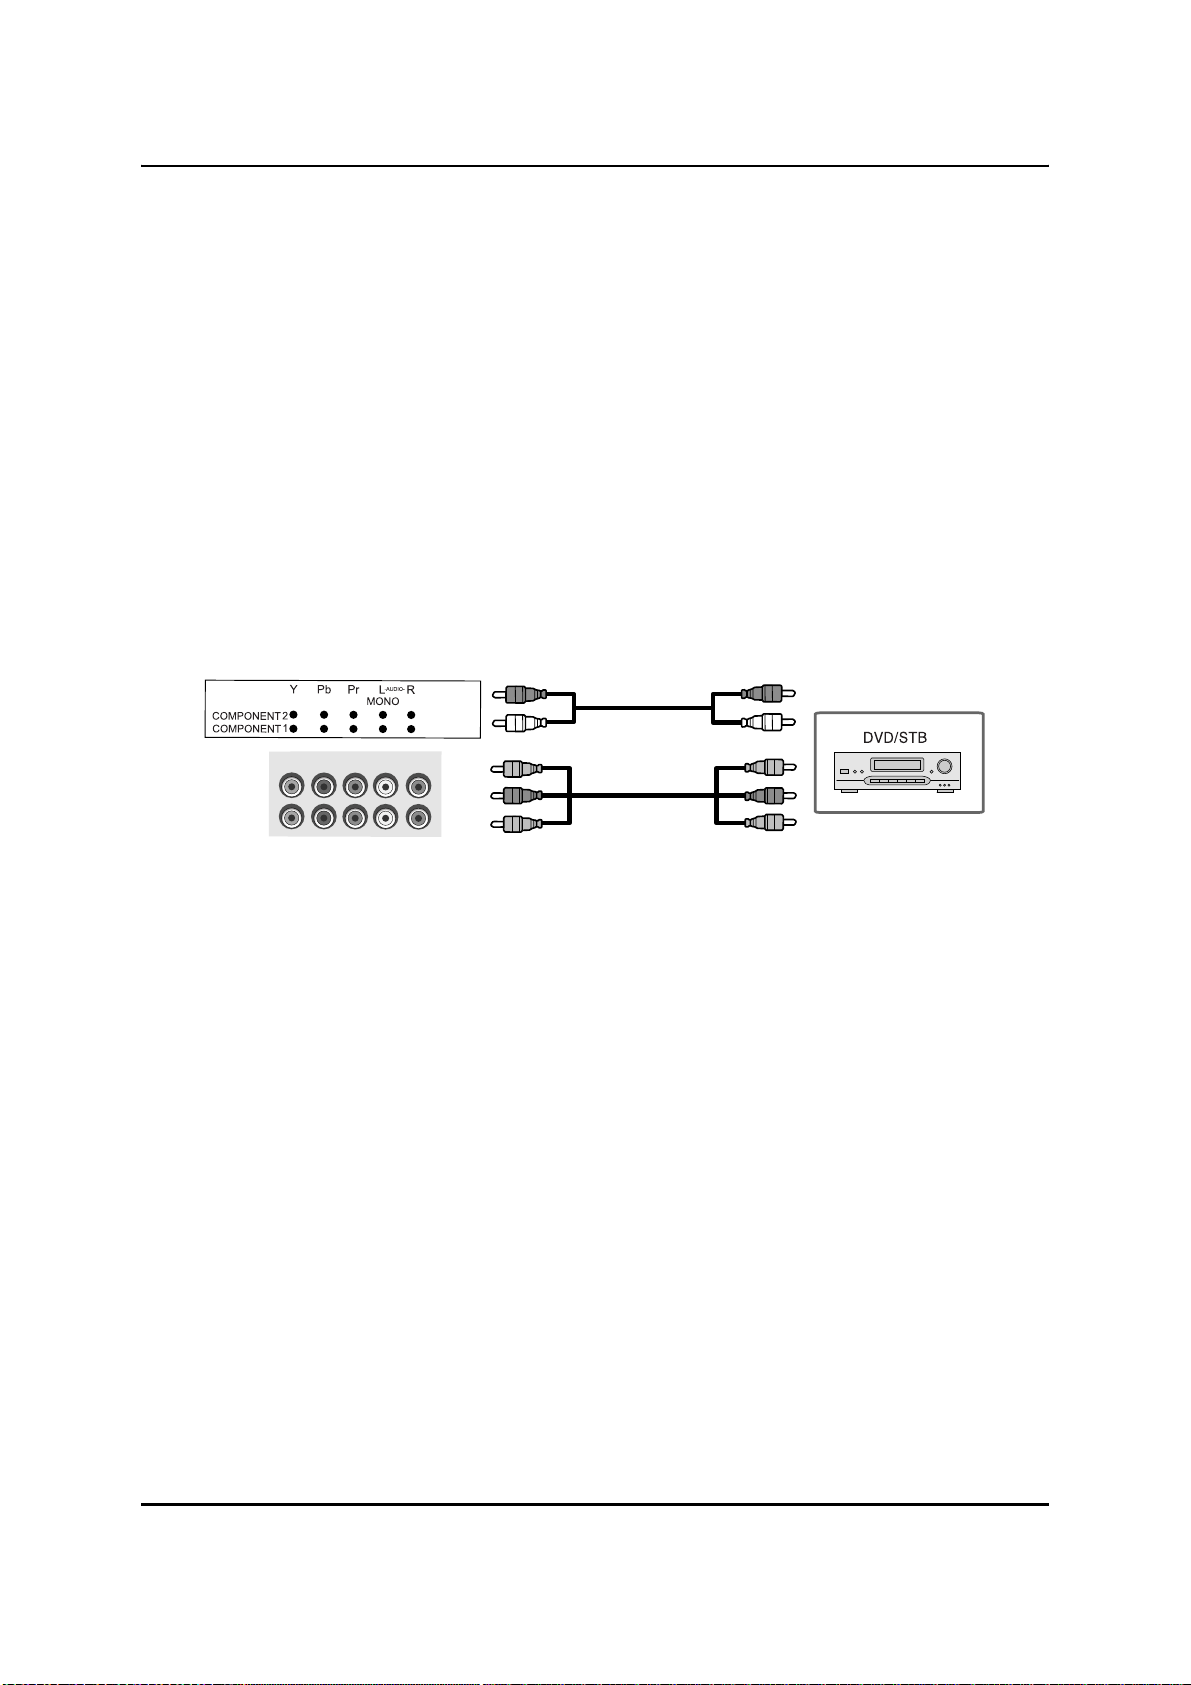
Connecting to Component Video
Component video or Y, Pb, Pr is an analogue connection that transmits images
of signal sources such as DVD-devices in a very good quality. For this the
brightness information is transmitted on one line and the colour information on the
other two. If you use this connection, you must transmit the sound separately. For
this, use the audio sockets on the respective component input.
Y, Pb, PR are also suitable to transmit progressive scan or HDTV signals to the
TV set.
1. Plug the component cable according to the colours (green, red, blue) into the
sockets [Y], [Pb] and [Pr] of the input COMPONENT 1 or COMPONENT 2 and the
output sockets of the external device.
2. Plug the audio cable into the socket [AUDIO R/L] of the Component input used
and connect them with the output sockets of the external device.
If your external device only provides a Mono-output, use the left channel [MONO]
for the audio input.
For information on the supported signals refer to chapter “Technical
specifications” on page 55.
Connections and Start of Operation LT 4010
12
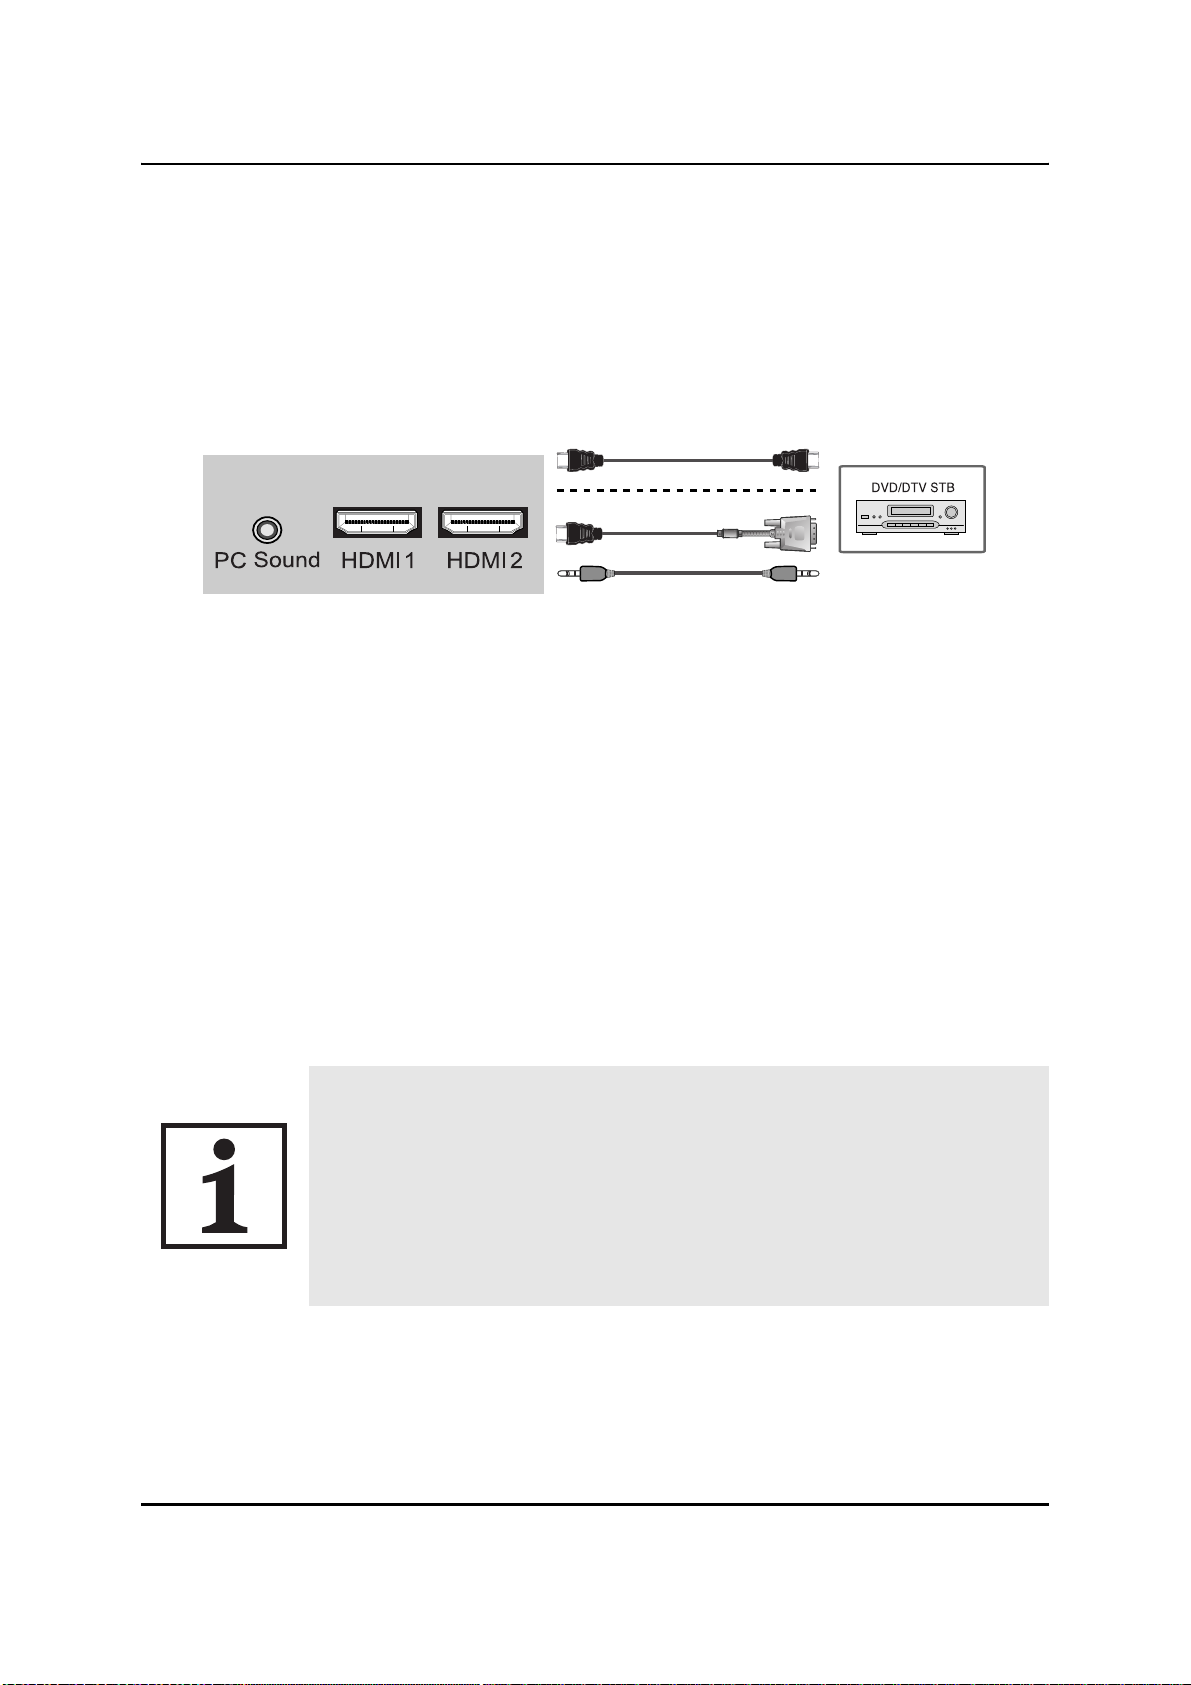
Connecting to HDMI
HDMI (High Definition Multimedia Interface) is an input for digital image and
sound signals. This input also transmits the multi-channel sound for 5.1 audio
systems to the digital audio output.
You can either use a HDMI cable or a DVI-HDMI adapter cable together with an
audio cable. The adapter cable is not included in the delivery.
1. Plug the HDMI cable into the socket [HDMI 1] or [HDMI 2] and the output socket
of the external device.
Or
1. Plug the HDMI/DVI cable into the socket [HDMI 1] and the output socket of the
external device.
2. Plug the audio cable into the socket [PC SOUND] and connect it with the output
sockets of the external device. The audio cable is not included in the delivery.
3. Set the sound source to PC. See chapter “Sound Settings” on page 27.
You can use both [HDMI] connections parallel.
To transmit the multi-channel information 5.1 to the digital audio
output, your external device must provide the function "Bitstream" or
"RAW". In this case the sound is not played by the loudspeakers of
the television set.
If your external device does not provide this function, use the setting
"PCM" or "Auto" to provide a stereo signal to the digital output and
activate the sound of the loudspeakers on the television set.

LT 4010 Connections and Start of Operation
13
Connecting to Audio Output
Use this output to transmit analogue sound signals. Use this output to connect a
home theatre system, wireless headphones or a suitable AV receiver/Stereo
amplifier.
1. Plug the audio cable into the socket [SOUND LINE OUT L/R] and the input socket
of the external device.
If you are using this output, turn the volume of the loudspeaker on the TV set
down and adjust the volume using the external device.
Notes on Handling Headphones
Never operate the loudspeakers or your headphone at high volume over long
periods of time. Otherwise you imperil your hearing and disturb your environment.
Never operate the loudspeakers or the headphone in hazardous situations, e.g.
in traffic or when working with machines. Any distraction by noise reduces your
attention and may lead to accidents.
Even if your headphone is designed to allow hearing of environmental noise,
never turn the volume so high that you cannot hear what happens around you.
Only use headphones with an impedance of 30 - 50 ohm. The use of headphones
with other impedances may permit hazardous sound level pressure.
L

Connections and Start of Operation LT 4010
14
Connecting to the Optical/Coaxial Digital Output
Use these outputs to transmit digital sound signals. Use these outputs to connect
a suitable home theatre system or a suitable AV receiver/Stereo amplifier.
1. Plug the optical cable (not included in the delivery) into the socket [OPTICAL] and
into the input socket of the external device.
1. Plug the coaxial cable (not included in the delivery) into the socket [COAXIAL] and
into the input socket of the external device.
You may also use only one of the outputs.
If you are using this output, turn the volume of the loudspeaker on the TV set
down and adjust the volume using the external device.
Table of contents
Other Targa LCD TV manuals


