Targa LT 2210 Instruction sheet

LT 2210
LCD-TV
Ready for you:
www.targa-online.com
User manual and
service information
GB
IE
22
TARGA GmbH
Lange Wende 41
D-59494 Soest
www.targa-online.com
Control panel
15 On/Standby Switch
16 Programme down
17 Programme up
18 Show/hide TV menu
19 Lower volume
20 Raise volume
21 Select source
Front panel
22 Power indicator
Connection panel
1 Power switch
2 Power cable receptacle
3 HDMI input
4 VGA input
5 Audio input for VGA connection
6 Component input (YPbPr)
7 Audio input for component connection
8 S-Video input
9 Video input
10 Audio input for S-Video or Video connection
11 Scart 1
12 Scart 2
13 RF IN for TV
14 Headphones jack
hb-cover_lt2210_uk_0807.qxd:Layout 1 14.08.2008 11:23 Uhr Seite 1

Remote control
1 On/Off button (Standby)
2 Numeric keypad 0…9
3 Shift button for one/two-digit input
4 Select audio channel
5 Increase/decrease audio volume
6 Four-way control
7 Show/hide TV menu
8 Picture preset selection
9 Display programme information
10 Pause button (Teletext)
11 Teletext on/off
12 Zoom in Teletext
13 Display Index page (Teletext)
14 Green function button
15 Red function button
16 Mute
17 Recall last tuned programme (TV mode)
18 Select picture format
19 Programme up/down
20 Confirms your entry
21 Select source
22 Audio preset selection
23 Sleep timer programming
24 Display selected page number only (Teletext)
25 Selection of Favourite bar (Teletext)
26 Display hidden information (Teletext)
27 Display subpage (Teletext)
28 Yellow function button
29 Blue function button
Important warranty
information
Dear Customer,
Thank you for purchasing a Targa product.
Please carefully read through the enclosed documentation or online help before putting your
TARGA product into service. If you have a problem, which can’t be solved in this way,
please contact our hotline.
If the problem cannot be solved over the phone, our hotline will arrange a "pickup and return
service" under the warranty cover. After receiving the unit, we will correct any manufacturing
and/or material defects and return the unit to you free of charge.
Up-to-date information and answers to the most frequently asked questions are available on
the internet from:
www.targa-online.com
This guarantee is valid in the UK.
All Targa LCD and TFT displays conform to the ISO standard 13406-2, Class II.
Your statutory guarantees from the seller are in addition to this warranty and are not limited
by it.
Hotline number:
0207-3650744
(Please have your
serial number to hand!)
36 month warranty from
date of purchase
Manufacturer: TARGA GmbH, Postfach 2244,
D-59482 Soest
www.targa-online.com
Important warranty
information
Dear Customer,
Thank you for purchasing a Targa product.
Please carefully read through the enclosed documentation or online help before putting your
TARGA product into service. If you have a problem, which can’t be solved in this way,
please contact our hotline.
If the problem cannot be solved over the phone, our hotline will arrange a "pickup and return
service" under the warranty cover. After receiving the unit, we will correct any manufacturing
and/or material defects and return the unit to you free of charge.
Up-to-date information and answers to the most frequently asked questions are available on
the internet from:
www.targa-online.com
This guarantee is valid in Ireland.
All Targa LCD and TFT displays conform to the ISO standard 13406-2, Class II.
Your statutory guarantees from the seller are in addition to this warranty and are not limited
by it.
Hotline number:
01-2421583
(Please have your
serial number to hand!)
36 month warranty from
date of purchase
www.targa-online.com
Manufacturer: TARGA GmbH, Postfach 2244,
D-59482 Soest
hb-cover_lt2210_uk_0807.qxd:Layout 1 14.08.2008 11:23 Uhr Seite 2

Targa Visionary LT 2210 Table of Contents
English - 1
Table of Contents
Introduction 3
Safety Instructions .................................................................................................3
Positioning .............................................................................................................5
Intended Use .........................................................................................................6
Package Contents .................................................................................................6
Getting Started 7
The Connection Panel ...........................................................................................7
Connecting the Devices.........................................................................................8
HDMI....................................................................................................................8
VGA .....................................................................................................................8
S-Video ................................................................................................................9
Component connector .........................................................................................9
Scart (Euro AV)..................................................................................................10
RF (Antenna connector).....................................................................................10
Inserting the Batteries..........................................................................................11
Switching the Device On and Off.........................................................................11
Powering On ......................................................................................................11
Powering Off ......................................................................................................11
Selecting the Input Source...................................................................................12
Via the Remote Control .....................................................................................12
Via the Control Panel.........................................................................................12
Adjusting the Volume...........................................................................................13
Switching Preset Programmes ............................................................................13

Table of Contents Targa Visionary LT 2210
2 - English
Receiving TV Programmes 14
Automatic Channel Search ..................................................................................14
TV Menu ..............................................................................................................15
Navigating the TV Menu.....................................................................................15
Picture ................................................................................................................16
Sound.................................................................................................................17
Source................................................................................................................18
System ...............................................................................................................19
TV-Channel ........................................................................................................20
Channel List .......................................................................................................21
Deleting a Channel...........................................................................................21
Renaming a Channel .......................................................................................22
Resorting Channels..........................................................................................22
Advanced Functions 23
Teletext ................................................................................................................23
Remote Control Function Buttons........................................................................23
Picture and Audio Settings.................................................................................23
Selecting Audio Tacks........................................................................................23
Sleep timer .........................................................................................................24
witch to Last Active Channel ..............................................................................24
Changing the Picture Format .............................................................................24
Appendix 25
Pixel Error Classes ..............................................................................................25
Technical Specifications ......................................................................................26

Targa Visionary LT 2210 Introduction
English - 3
Introduction
Safety Instructions
Please read the following instructions carefully.
Please keep this User's Guide for later use.
If you sell the device or pass it on, it is essential you hand over this manual
also.
Follow all warnings.
Proceed exactly as described in the instructions.
Never use the device near water.
Only use a dry and soft cloth for cleaning.
Never block the ventilation holes.
Do not place the device near heat sources such as radiators, ovens or other
appliances emitting heat (including amplifiers).
Only connect the device to a power outlet with a grounding pin. If the
provided plug does not fit into your outlet, consult an electrician for
replacement of the obsolete outlet.
Install the power cord in such a way that nobody can trip over it. Take special
care that the cable does not become pinched, particularly at the plug and
ports.
The power switch of this device does not fully disconnect the device from the
mains. Furthermore, the device consumes electricity in the Standby mode. In
order to completely disconnect the device from the mains, the power plug
must be pulled out from the wall outlet. For this reason, the device should be
positioned in a way that assures unobstructed access to the power outlet so
that the power plug can be immediately pulled out in an emergency situation.
To avoid the danger of fire if the device is not going to be used for a long
while (e.g. during holidays), it should always be disconnected from the power
socket.
Do not use any extension cords.
Only use the accessories recommended by the manufacturer.
Use only suitable carts, stands, brackets or tables for the device, that make it
impossible for it to fall or tip over. When a cart is used, operate carefully to
prevent the device from tipping over.

Introduction Targa Visionary LT 2210
4 - English
Separate the device from the mains during storms or when not using it for a
long period of time, and also pull out the antenna plug.
Always hold cables by the plug and never pull on the cable itself. Never hold
the power cord with wet hands as this may cause a short circuit or electric
shock.
Please contact qualified personnel when servicing is needed. Servicing is
required when this device has been damaged in any way, for example, when
the power cord or plug is damaged, when liquid has been spilled on the
product, when objects have fallen into the product, when the product has
been exposed to rain or moisture, when the product does not work normally
or if the product has been dropped.
Battery Safety Instructions
To prevent battery leakage which may result in bodily injury or property
damage:
- Install all batteries correctly, with + and - signs matching the marks
indicated. Do not mix batteries (old and new or carbon and alkaline,
etc.).
- Remove batteries when the device is not to be used for a long time.
- Respect the environment. Old batteries do not belong in with the
domestic waste. They must be handed in to a collection point for old
batteries.
To avoid electric shock or fire, prevent this product from being exposed to
any rain, dripping or splashing.
Do not place it under dripping or flowing liquids. Do not place any
receptacles containing liquids (beverages, vases, etc.) on the device.
Do not place any fire sources (such as candles) onto the device.
Outdoor Antenna Grounding
If an outside antenna is connected to the product, be sure that the antenna
system is grounded so as to provide sufficient protection against voltage
surges and built-up static charges.
If you are not using the device within the Republic of Germany, you must
observe the regulations and laws in the country of use.

Targa Visionary LT 2210 Introduction
English - 5
Positioning
Do not place the device in direct sunlight.
Avoid damp or dusty places.
Place the device only on flat, vibration-free surfaces.
Avoid positioning it in the vicinity of air-conditioning and heating units.
Always make sure there is sufficient ventilation. The ventilation slots on the
lid of the device should never be covered (e.g. by laying a cloth on the
device).
Never place the device in the immediate vicinity of magnetic fields (e.g.
loudspeakers).
The device should be easy to access from all sides.
Make sure that no liquid gets into the device.
Avoid severe temperature changes as this may cause moisture in the device
through condensation.

Introduction Targa Visionary LT 2210
6 - English
Intended Use
This device is a consumer electronics device. It may only be used for private use,
not industrial or commercial. Furthermore, the device may not be used outdoors
or in tropical climates. Only connection cables and external devices may be used
that comply with safety standards and the electromagnetic compatibility and
shielding quality of the LT 2210.
If the product is labelled with a struck-out waste bin, it is subject to the
European Guideline 2002/96/EC. All electric and electronic devices
must be disposed of separately from household waste at established
bodies. With the proper disposal of old devices you avoid damage to
the environment and your personal health.
This device has been tested and approved for compliance with the
basic and other relevant requirements of the EMC Directive
2004/108/EC, as well as the Low-voltage Directive 2006/95/EEC. Any
modifications to the equipment other than recommended changes by
the manufacturer may lead to the result that these directives are not
met any more. Only use the accessories recommended by the
manufacturer.
Package Contents
First check that the package contents are complete.
1. Targa Visionary LT 2210
2. Power cord
3. Remote control
4. 2 Batteries type AAA
5. User manual with service information
Targa Visionary LT 2210 Getting Started
English - 7
Getting Started
The LT 2210 offers multiple connection possibilities. These allow you to include
the device more easily into any existing installation.
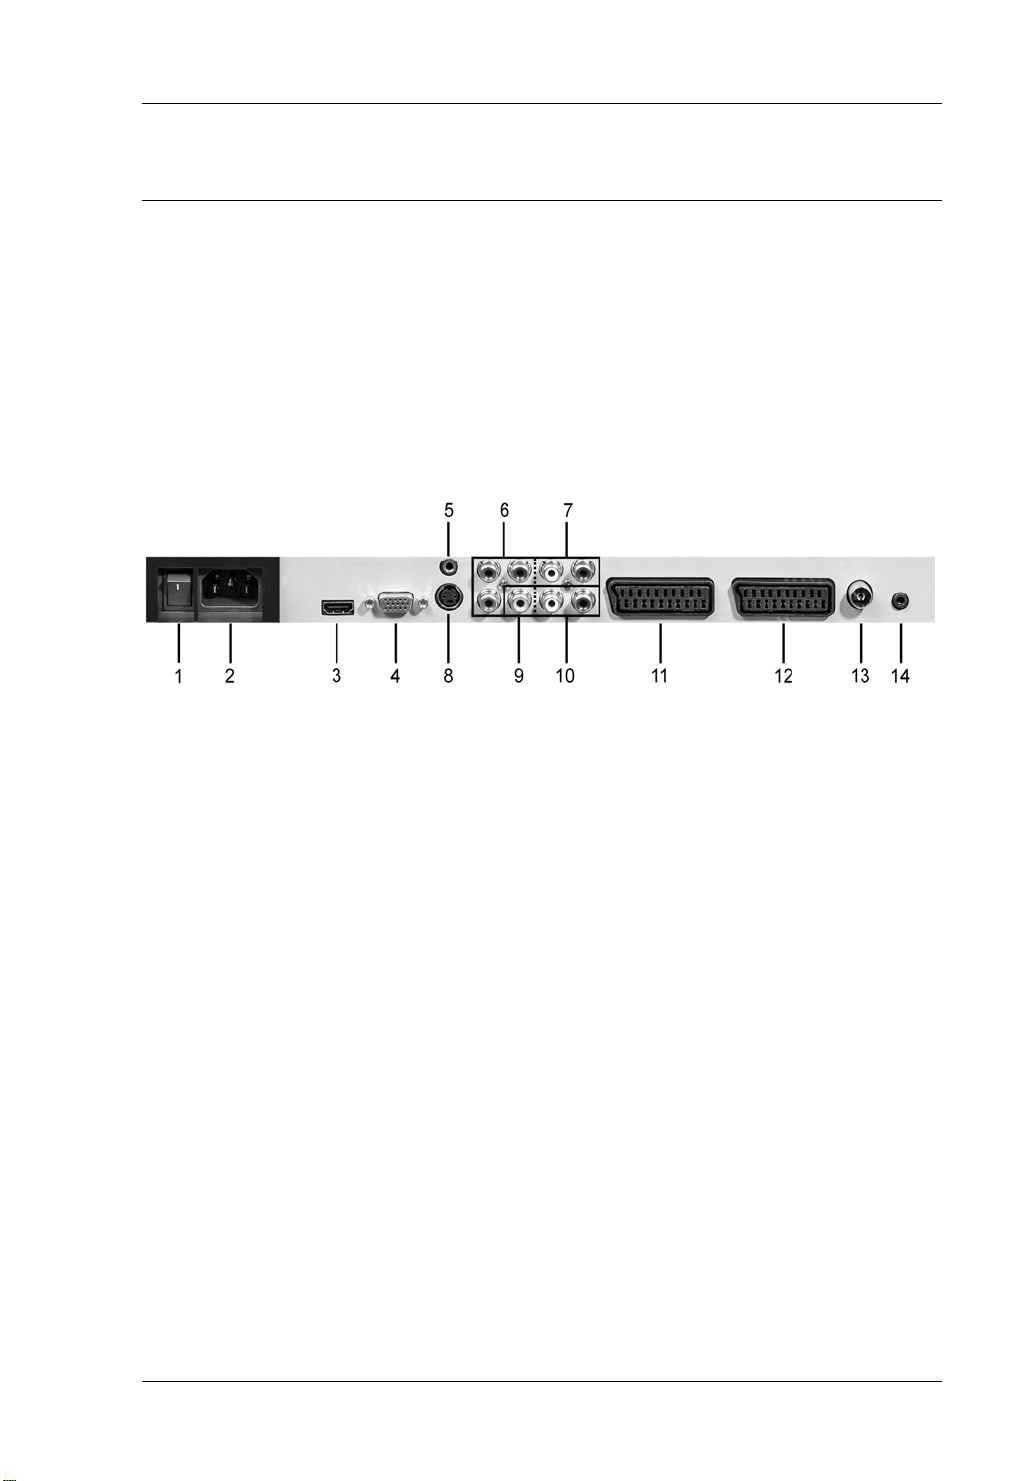
The Connection Panel
On the device’s back panel you’ll find the input connector panel. Depending on
the capabilities of the device to be connected you can choose a specific
connection type. Of course you may connect multiple playback devices and
enable them via the Source selector.
1 Power switch
2 Power cable receptacle
3 HDMI input
4 VGA input
5 Audio input for VGA connection
6 Component input (YPbPr)
7 Audio input for component connection
8 S-Video input
9 Video input
10 Audio input for S-Video or Video connection
11 Scart 1
12 Scart 2
13 RF IN for TV
14 Headphones jack
Getting Started Targa Visionary LT 2210
8 - English
Connecting the Devices
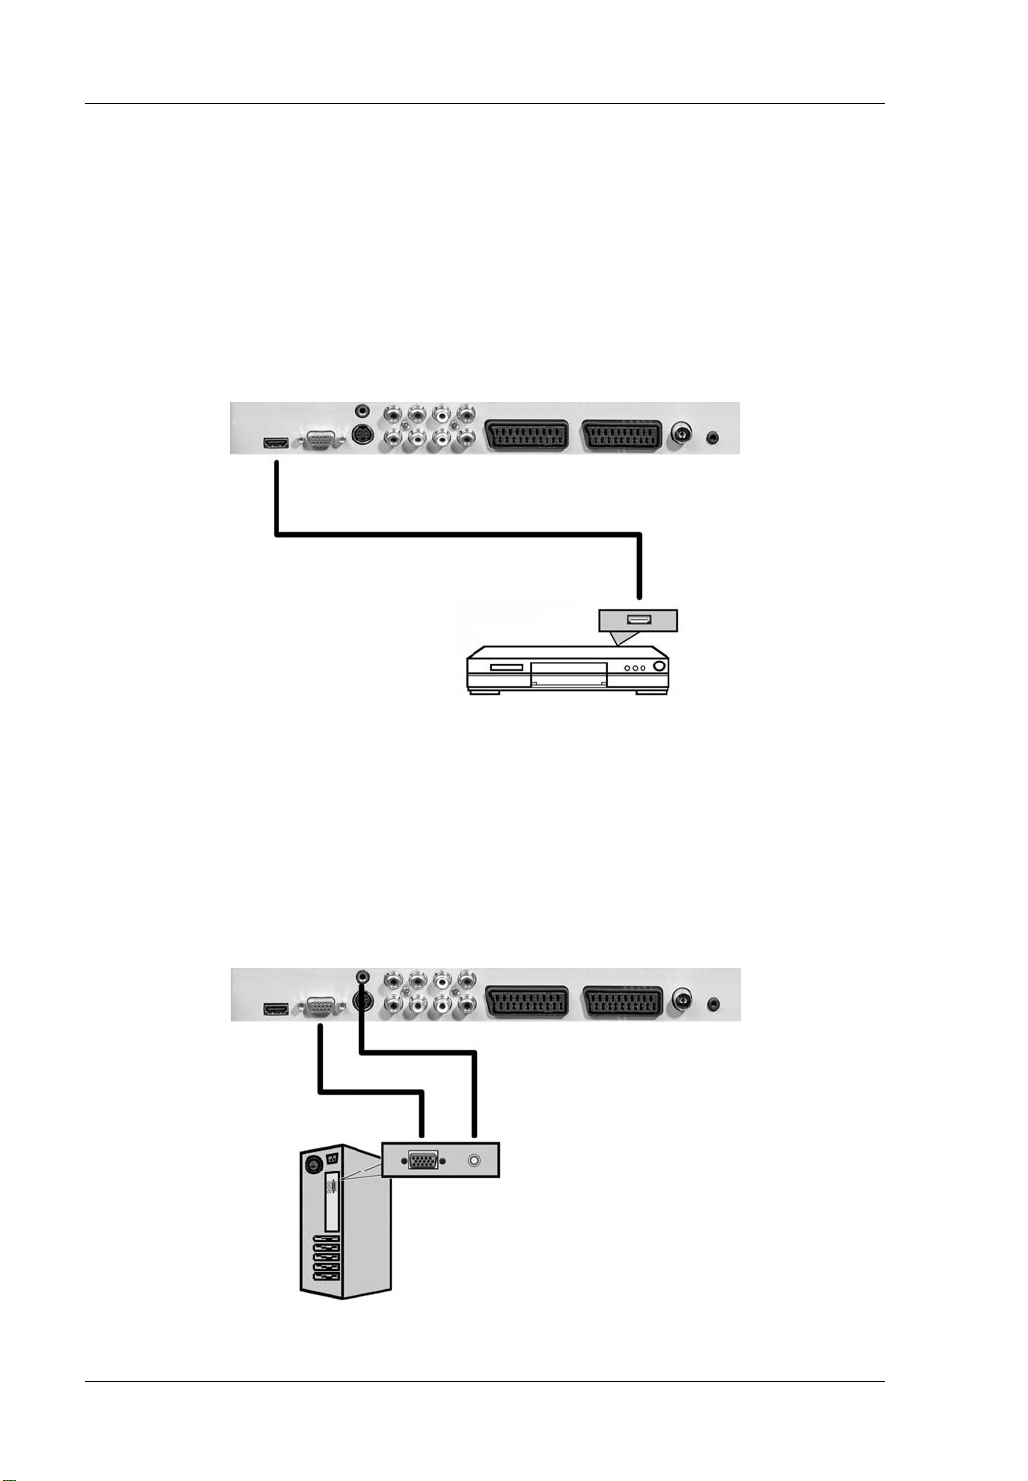
HDMI
Selected source: HDMI
HDMI is the abbreviation for “High Definition Multimedia Interface” and allows the
digital transmission of both the audio and video signals. Use an HDMI cable (not
included) to connect the output of a playback device (e.g. a digital satellite
receiver or DVD player) to the input of your LT 2210.
HDMI cable
VGA
Selected source: VGA
Use a VGA cable (not included in the package) to connect the graphics adapter
output of a PC or notebook with the VGA input of your LT 2210. Please note that
only the picture signal will be transferred via this connector. In order to be able to
listen to the sound transmitted by the computer, use a 3.5 mm jack-type audio
cable (not included) to connect the audio output (Line Out) of your computer to
the Audio In connector (5) of your LT 2210.
VGA cable (picture)
Audio cable (sound)

Targa Visionary LT 2210 Getting Started
English - 9
S-Video
Selected source: SVIDEO
To transmit video signals to other devices. Please note that the audio signal must
be transmitted to the separate Audio connector (10).
Audio cable
S-Video cable
Component connector
Selected source: YPBPR
Use a triple-Cinch cable (not included) to connect this input to a high-end video
source. Connect the green, blue and red cables to the corresponding receptacles
of your playback device and the LT 2210. Please note that the audio signal must
be transmitted to the separate Audio connector (7).
Audio cable
Triple-Cinch cable
(green, blue, red)
Getting Started Targa Visionary LT 2210
10 - English
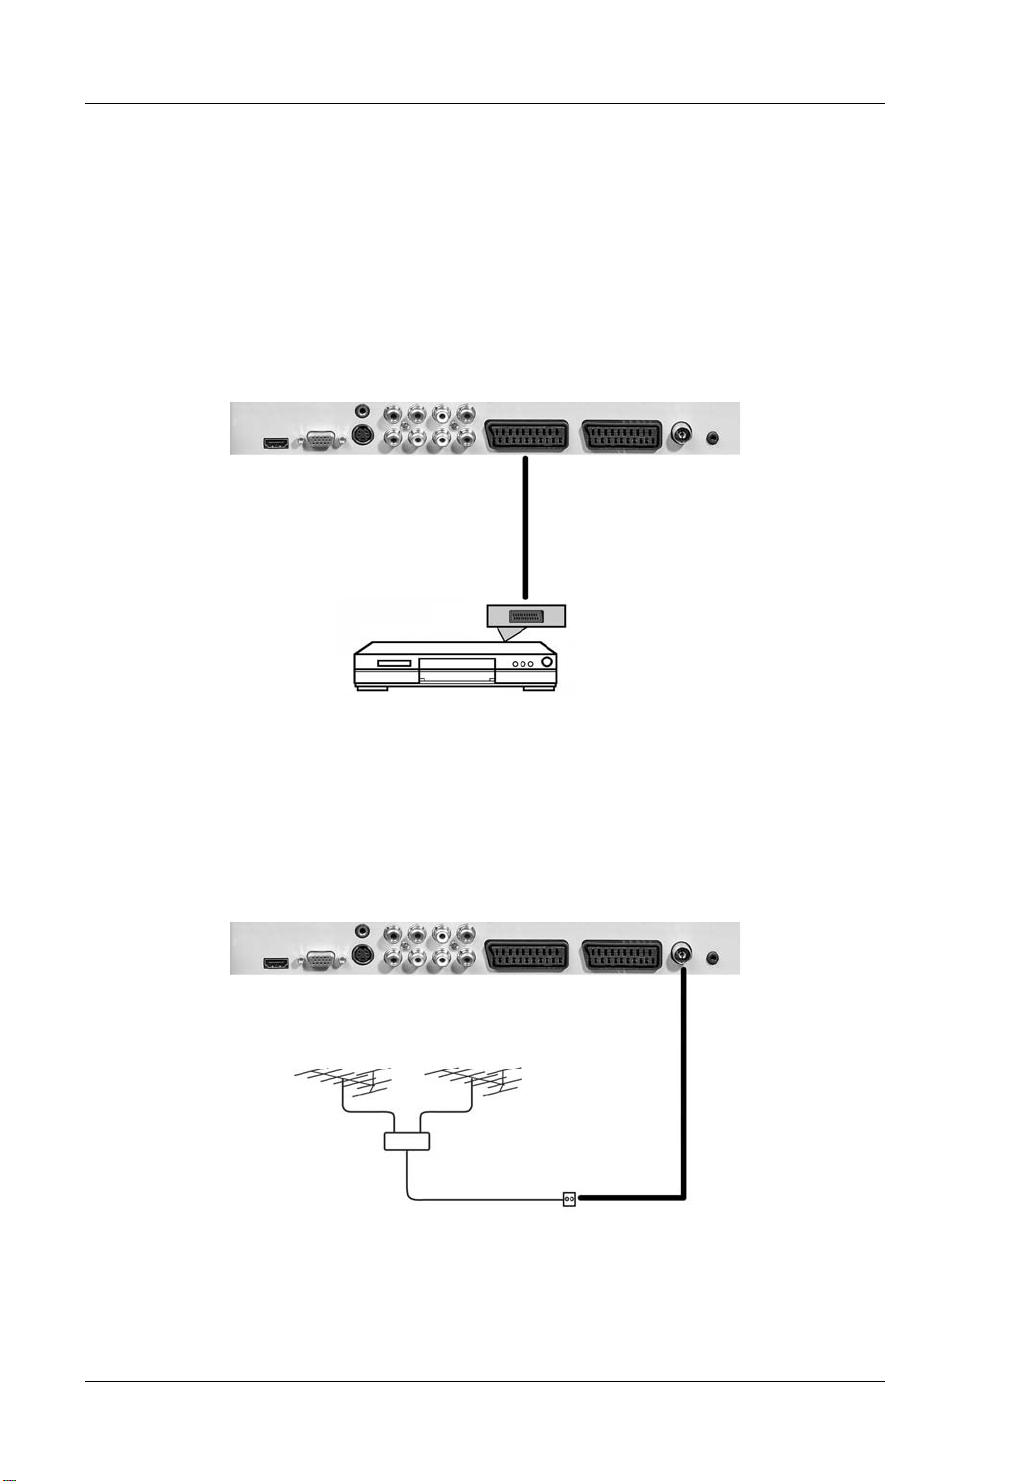
Scart (Euro AV)
Selected source: SCART
You can use a Scart cable (not included) to connect other devices (e.g. a VCR or
a DVD player) to the LT 2210. The device offers the two connectors Scart1
(source: SCART1) and Scart2 (source: SCART2 VIDEO). If your A/V source
device also offers an S-Video signal via its Scart output, you can use the
SCART2 input of your LT 2210 to transfer this S-Videosignal. To do so, select the
source SCART2 SVIDEO.
Euro AV cable (Scart)
RF (Antenna connector)
Selected source: TV
Here you can connect the antenna cable of an outdoor or indoor antenna or the
cable TV wire.
Antenna cable

Targa Visionary LT 2210 Getting Started
English - 11
Inserting the Batteries
Insert the supplied batteries (size AAA) into the remote control. Be sure to
respect the polarity. The polarity is indicated with the symbols + and – on the
batteries and in the battery compartment on the remote control.
Remove the batteries from the remote control when you are not
going to use the device for a long period of time. Otherwise the
remote control may become damaged by leaking batteries.
Switching the Device On and Off
Powering On
Check that the LT 2210 is in Standby mode. The power indicator (22) on the front
panel should light orange. If this is not the case, first power the device on by
toggling the main power switch (1) on the back panel.
To power the LT 2210 on either press the On/Off button (15) on the device’s
control panel or press the Power button (1) on the remote control. When the
device is powered on, the front panel power indicator (22) will light green.
Powering Off
To power the LT 2210 off either press the On/Off button (15) on the device’s
control panel or press the Power button (1) on the remote control. This will turn

Getting Started Targa Visionary LT 2210
12 - English
the LT 2210 to Standby mode and the power indicator (22) on the front panel will
light orange.
In order to also turn off the Standby mode press the Power button (1) on the back
panel of the device. The power indicator will stop lighting.
Selecting the Input Source
Press the Input button (21) on the remote control or the Source button (21) on the
control panel to select the input source.
The input source selection works also when a menu is displayed. The TV menu
will hide automatically, if open.
Via the Remote Control
Press the Input button (21) on the remote control. The following menu will
appear:
Press Sor T(6) on the remote control to select
the desired input source. The selection is
highlighted in yellow. Press the OK button (20)
on the remote control to confirm the desired
option. The LT 2210 immediately toggles to the
corresponding input source.
Via the Control Panel
Press Source (21) to display the input source selection. Press or CH+ (17) and
CH- (16) on the control panel to select the desired input source. As soon as the
menu disappears, the selected input source should be visible.

Targa Visionary LT 2210 Getting Started
English - 13
Adjusting the Volume
You can adjust the volume of your LT 2210 either via the remote control or via
the control panel.
Press the VOL+ button (5) on the remote control or the VOL+ (20) button on the
control panel of the LT 2210 to increase the volume.
Press the VOL- button (5) on the remote control or the VOL- (19) button on the
control panel of the LT 2210 to decrease the volume.
You can also mute the sound completely by pressing the MUTE button (16) on
the remote control. While the mute function is enabled, the message “MUTE” will
be displayed. Press the button again or press or the button V+ (5) to resume the
sound output.
Switching Preset Programmes
You can switch the preset programmes of your LT 2210 either via the remote
control or via the control panel.
Press the CH+ button (19) on the remote control or the CH+ (17) button on the
control panel of the LT 2210 to switch the programmes upwards.
Press the CH- button (19) on the remote control or the CH- (16) button on the
control panel of the LT 2210 to switch the programmes downwards.
You can also enter the number of the programme directly with the remote control.
For multi-digit numbers, press the number buttons in sequence.

Receiving TV Programmes Targa Visionary LT 2210
14 - English
Receiving TV Programmes
The built-in receiver allows you to watch terrestrial TV shows via an outdoors or
indoors antenna as well as TV shows from the cable TV network. To do so,
connect the corresponding antenna cable to the RF input (see page 7, item 13)
on the back panel of your LT 2210. After connecting any antenna for the first time
you must program the channels or perform an automatic channel search.
Automatic Channel Search
With automatic channel search, your LT 2210 will store all available channels. In
order for the automatic channel search to work properly, the TV mode must be
enabled (see page 12 - Selecting the Input Source). Proceed as follows:
Press the LCD MENU button (7) on the remote control. The TV menu will
appear.
Press the Xbutton (6) on the remote control 4 times to display the TV-
Channel menu.
Press the Tbutton [6] on the remote control 4 times to select the Autosave
item.
Press the Xbutton (6) on the remote control to launch the automatic channel
search.
A windows in the upper-left corner of the screen will show the life picture for the
current frequency. A progress bar will inform you of the status of the automatic
channel search. All found stations will be automatically stored in a sequential list
of channel presets.
After the search of the entire frequency band is completed you’re done. Then the
first found channel will be tuned-in. To cancel the process at any time, press LCD
MENU (7) on the remote control.
If you had already performed an automatic channel search in the
past, all existing preset channels will be replaced by the new ones
found.

Targa Visionary LT 2210 Receiving TV Programmes
English - 15
TV Menu
The TV menu lets you perform specific settings to customise the LT 2210
according to technical and personal requirements. The menu is divided into five
items allowing you to adjust or change picture, sound, source, system
preferences and station settings.
The TV-Channel menu for setting the TV stations is only available
while in TV mode.
Navigating the TV Menu
To open or exit the TV menu, press the LCD MENU button (7) on the remote
control. Press Wor X(6) on the remote control to select a function, then press T
or S(6) on the remote control to select an option. Press X(6) on the remote
control to confirm the selected option and then press Wor X(6) on the remote
control to set the desired value.
You can also perform menu settings via the keypad located on the upper panel of
your LT 2210. To open or exit the menu press the MENU button (18) on the
keypad and press the buttons VOL+ (29)(right), VOL- (19)(left), CH+ (17)(up) or
CH-(16)(down) to navigate the menu. Press VOL+ (20) on the remote control to
confirm the selection and then press VOL- (19) or VOL+ (20) to set the desired
value.
When you exit the TV menu, all settings will be saved automatically.

Receiving TV Programmes Targa Visionary LT 2210
16 - English
Picture
Picture Mode Select one of the picture settings Standard, Dynamic
or Soft. Select “Personal” to customize your settings.
Contrast * To adjust the contrast.
Brightness * To adjust the brightness.
Hue * To adjust the colour hue/tint (available only for the
SECAM TV system).
Saturation * To adjust the saturation.
Sharpness * To adjust the picture sharpness.
NR (Noise Reduction) Select a noise reduction level between Weak, Middle
or Strong, or select Off to disable the Noise Reduction
feature.
Color Temperature Choose either Warm (more red), Cold (more blue) or
Normal (balanced colours) according to your
preferences.
Scale Select an aspect ratio from Zoom1, Zoom2, Subtitle,
Full and Normal. Or select “Auto” to have the device
adjust the aspect ratio automatically depending on the
received programme.
* This options are only available after choosing the “Personal” picture mode.
Targa Visionary LT 2210 Receiving TV Programmes
English - 17
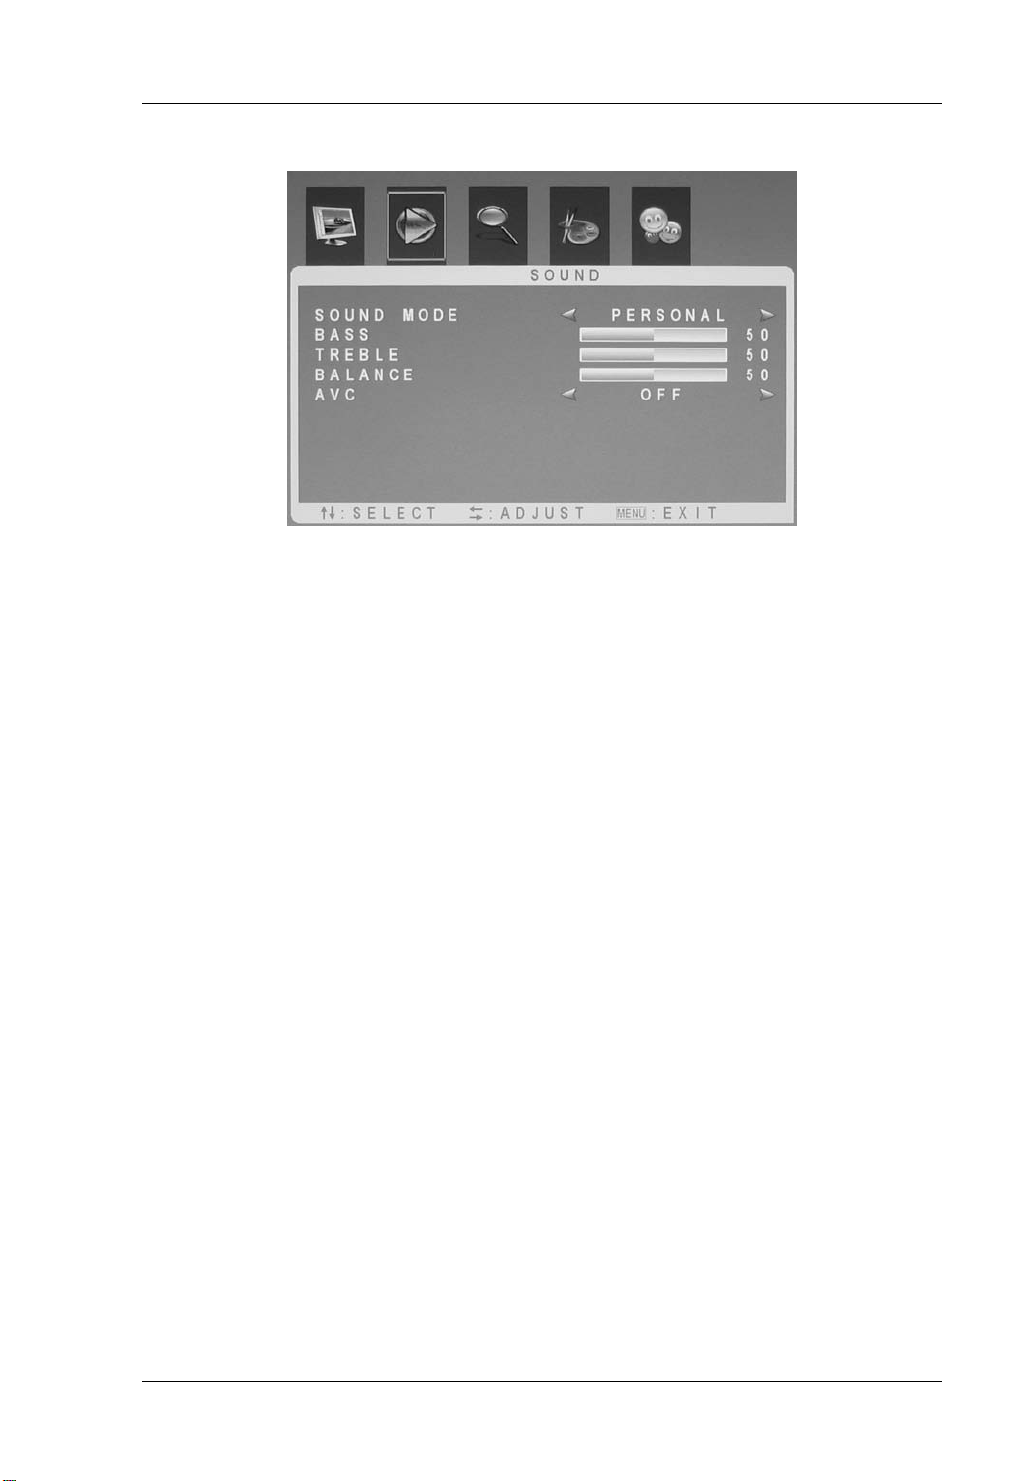
Sound
Sound Mode Select between the default settings for Standard,
News, Music and Theatre. Select “Personal” to
customize your settings.
Bass * Increases or decreases the volume of the lower
frequencies.
Treble * Increases or decreases the volume of the higher
frequencies.
Balance To adjust the volume balance between the left and
right speaker.
AVC The AVC (Automatic Volume Control) adjusts the
volume automatically (e.g. when commercials are
being broadcast).
* This options are only available after choosing the “Personal” sound mode.
Table of contents
Other Targa LCD TV manuals


