Tasty Trotter KYQ-BFT402 User manual

1
ASSEMBLY INSTRUCTIONS HOODED GAS GRILL
Model:KYQ-BFT402
FOR OUTDOOR USE ONLY
PLEASE READ INSTRUCTIONS CAREFULLY BEFORE ASSEMBLY
RETAIN THIS MANUAL FOR FUTURE REFERENCE

2
WARNING
Hazardous fire or explosion may result if instructions are ignored
It is the consumer’s responsibility to see that the barbecue is properly assembled, installed, and taken care of. Failure to
follow instructions in this manual could result in bodily injury and/or property damage.
1. Read the instructions before using the appliance.
2. Retain this manual for future reference.
3. Use outdoors only.
4. Warning accessible parts may be very hot. Keep young children away.
5. Do not move the appliance during use.
6. Turn off the gas supply at the gas cylinder after use.
7. Do not modify the appliance.
8. This appliance must be kept away from flammable materials during use.
9. The regulator and hose must be connected correctly to the appliance. A spanner must be used to tighten the nut
onto the connection thread.
10. In addition gas cylinder must be kept well away from naked flames and heat sources.
FOR YOUR SAFETY IF YOU SMELL GAS:
1. Turn off gas supply at bottle.
2. Extinguish all naked flames; do not operate any electrical appliances.
3. Ventilate the area.
4. Check for leaks as detailed in this manual.
5. If odour persists, contact your dealer or gas supplier immediately.
PRECAUTIONS:
1. Leak test all connections after each tank refill.
2. Never check for leaks with a match or open flame.
3. Do not store of use gasoline or other flammable vapours and liquids in the vicinity of this or any other appliance.
4. Any gas cylinder not connected for use shall not be stored in the vicinity of this or any other appliance.
ASSEMBLY
WARNING: Whilst every effort has made in manufacture of your barbecue to remove any sharp edge, you should
handle all components with care to avoid accidental injury.
Tools required: Either a Philips crosshead or flat-bladed screwdriver and either a spanner (we have supplied a
multifunction spanner) or a pair of pliers.
Please read all instructions thoroughly before proceeding. Find a large, clean area in which to assemble your
trolley barbecue. Please refer to the parts list and assembly diagram as necessary. Assembly of the barbecue
involves many large components; it is advisable to have two people assemble the unit.
NOTICE: Make sure all the plastic protection is removed before assembling!
3
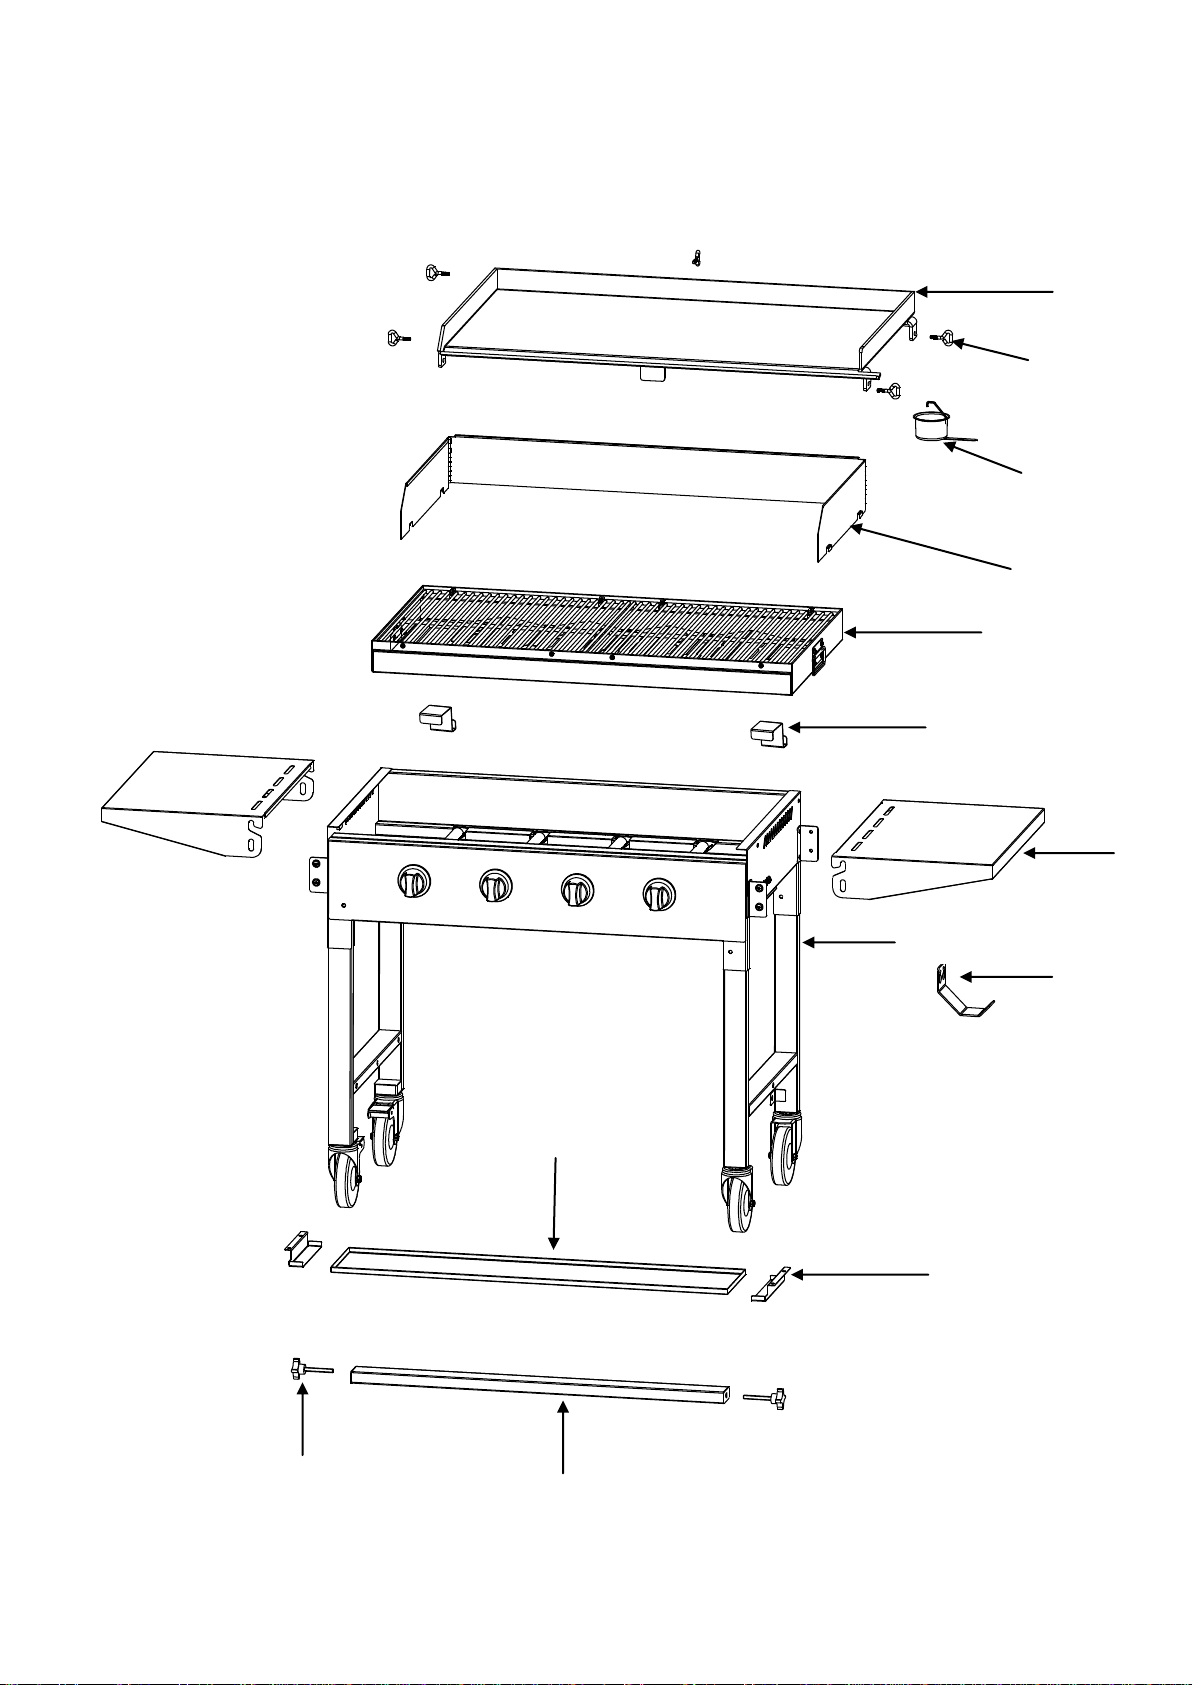
Expanded view
1
2
3
4
5
8
6
11
12
10
7
9
13

4
NO. DESCRIPTION QTY
NO.
DESCRIPTION QTY
13
1
10
1
12
2
6
2
7
2
1
8
1
9
1
1
1
2
5
3
PARTS LIST
1
4
11
1
5
1
OPTIONAL
OPTIONAL
OPTIONAL
OPTIONAL

5
APPLIANCE MANUFACTURED
BY:
TASTY TROTTER
APPLIANCE CODE:
KYQ-BFT402
TOTAL HEAT INPUT:
(ALL GAS CATEGORIES)
16kW(1142g/h) The grill burners are rated at 4kW per burner
GAS CATEGORY:
I3+(28-30/37)
I3B/P(30)
TYPES OF GAS:
Butane
Propane
LPG GAS MIXTURES
GAS PRESSURE:
28-30
mbar
37 mbar
30 mbar
INJECTOR SIZE:
Grill: 0.95mm 0359/12
IDENTIFICATION CODE:
359CL1155
COUNTRIES OF DESTINATION
I3+(28-30/37) BE, CH, CY, CZ, ES, FR, GB, GR, IE, IT, LT, LU, LV, PT, SK,
and SI.
I3B/P(30) BE, CY, DK, EE, FI, FR, HU, IT, LT, NL, NO, SE, SI, SK, RO, HR,
TR, BG, IS, LU and MT.
SERIAL NUMBER
DATE CODE
FOR USE OUTDOORS AND IN WELL VENTILATED AREAS
ACCESSIBLE PARTS MAY BE VERY HOT. KEEP YOUNG CHILDREN AWAY.
DO NOT MOVE THE APPLIANCE DURING USE.
TURN OFF THE GAS SUPPLY AT THE GAS CYLINDER AFTER USE.
DO NOT MODIFY THE APPLIANCE.
THIS APPLIANCE MUST BE KEPT AWAY FROM FLAMMABLE MATERIALS DURING USE.
READ THE INSTRUCTION LITERATURE BEFORE USING THE APPLIANCE.
IN ADDITION A LOGO OR A WARNING SHALL BE USED TO FORBID GAS CYLINDERS IN PLACES OF
THE APPLIANCE NOT INTENDED TO RECEIVE GAS CYLINDERS IF ANY.
6
ASSEMBLE COOKING PLATE
Step 3. Turn back the right way, and install the Ref# 7 and the Ref# 3. The Ref# 7
should be installed such that the bottom screw in each bracket will go through the
hole in the Ref# 7. The top remains free, so the Ref# 7 can be folded.
Step 1. Place the BBQ upside down,
and release legs by undoing the Ref# 12
Step 2. Pull both wheels frames to a
vertical position, place the Ref# 13 in
betweetn the horizontal members, and
tighten with the Ref# 12
Ref# 3
Ref# 7
Ref# 7
Ref# 7
Ref# 12
Ref# 13
Ref# 12
Ref# 12

7
Step 4.
ASSEMBLE COOKING GRILLS
Step 1. Please pay attention to the direction of the Ref# 10
Ref# 9
Ref#10
Ref# 10
M6x12x 4 PCS
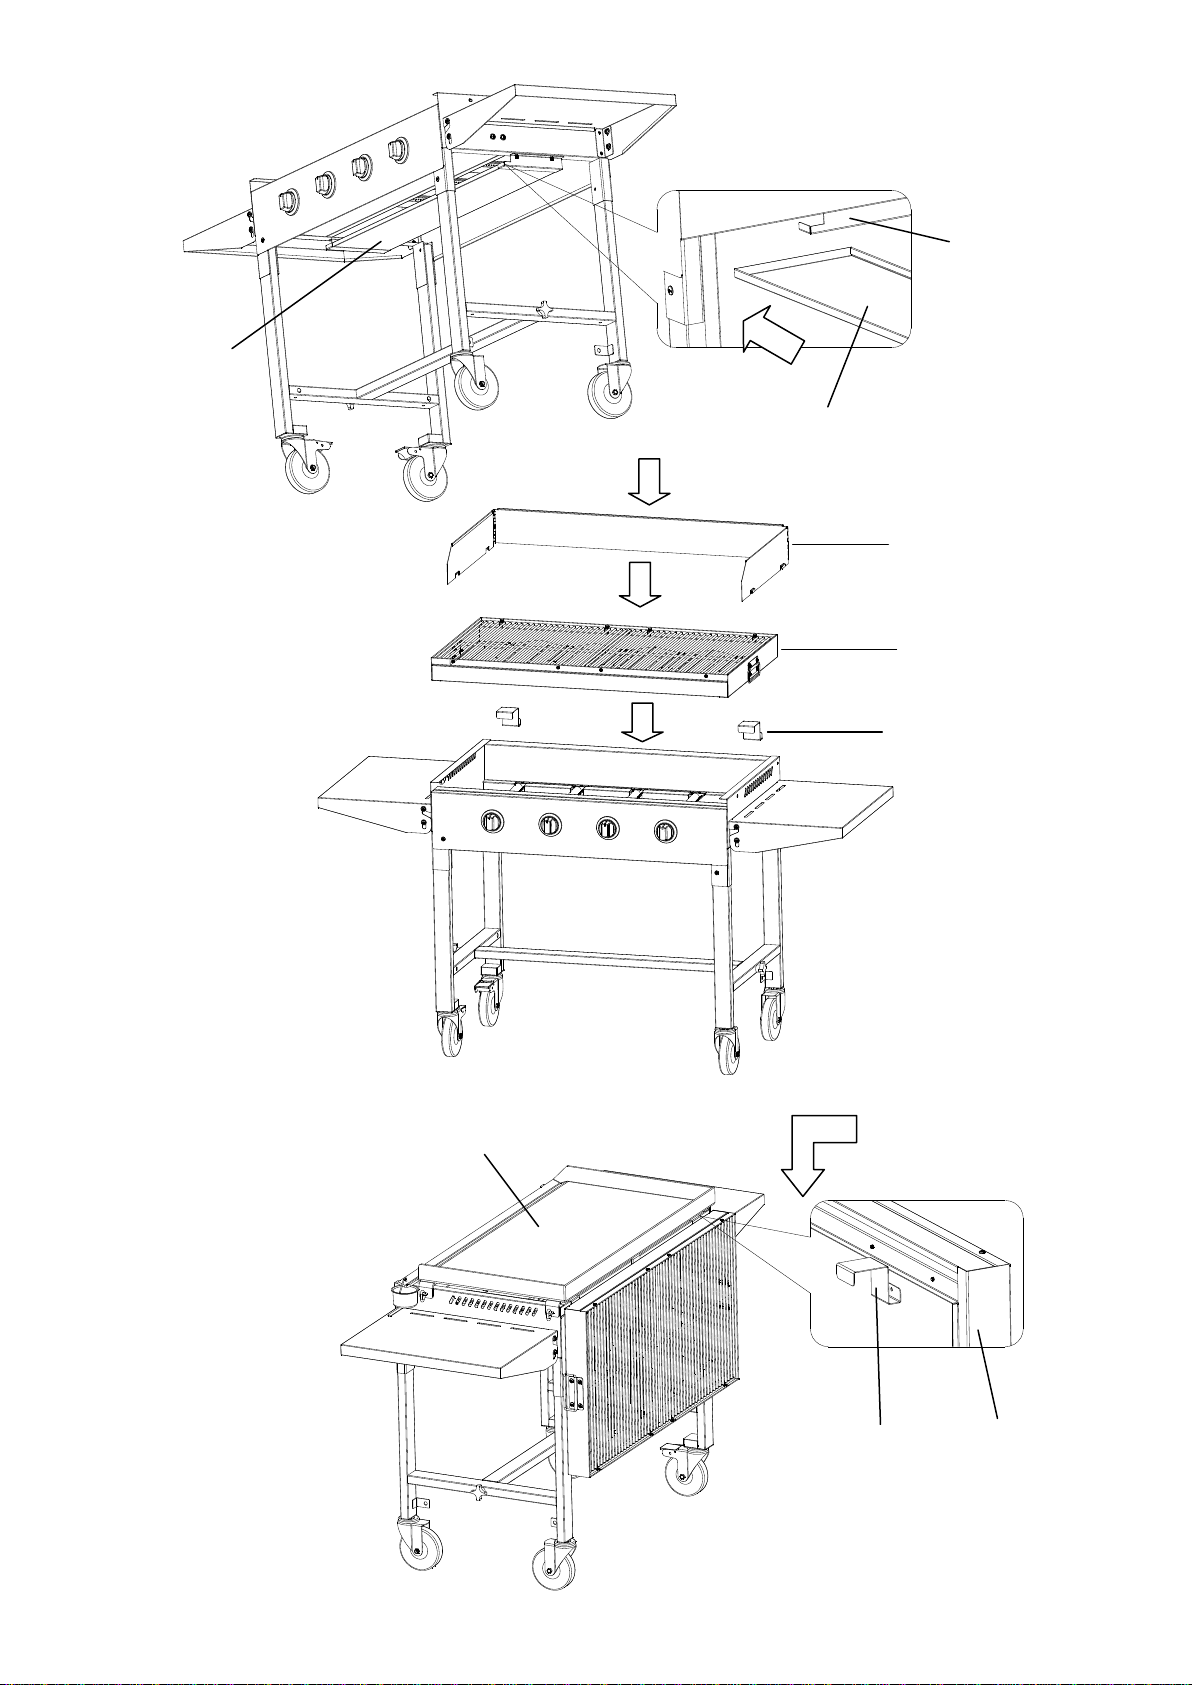
8
Step 2.
Step 3.
Step 4.
Ref# 6
Ref# 5
Ref#1
Ref# 13
Ref# 10
Ref# 13
Ref# 4
Ref# 5
Ref# 6

9
IMPORTANT INFORMATION
Please read these instructions carefully before assembly and use.
Retain these instructions for future reference.
For outdoors use only-do not use indoors.
Do not use within 1 metre of any flammable structure of surface.
LPG and other gas cylinders must not be stored or used in the horizontal position. A leak would be very serious
and liquid could enter the gas line.
Do not move the barbecue while alight.
This barbecue must not be left unattended when lit.
Parts of this barbecue can be very hot, care must be taken when children, elderly people, and animals are present.
Always turn off the gas bottle when the barbecue is not in use.
Never cover a barbecue until it has completely cooled.
Leak test annually, and whenever the gas bottle is removed or replaced.
Ensure the appropriate annual tests are carried out on the barbeque to meet the national standards for country of
use (i.e. GAS SAFE certification in the UK)
Do not store flammable materials near this barbecue.
Do not use aerosols near this barbecue.
Failure to follow the manual’s instructions could result in serious injury or damage.
If you have any queries regarding these instructions, contact your local dealer.
GAS AND REGULATOR
This barbecue can use either propane or butane LPG bottle gas.
You must have the proper regulator and bottle in order for the barbecue to operate safely and efficiently. Use of an
incorrect or faulty regulator is dangerous and will invalidate any warranty.
Please consult your local gas dealer for the most suitable gas bottles and regulators.
INSTALLATION
Selecting a location
This barbecue is for outdoor use only and should be placed in a well-ventilated area. Take care to ensure that it is not
placed under any combustible surface. The sides of the barbecue should NEVER be closer than 1 metre from any
combustible surface. Keep this barbecue away from any flammable materials!
PRECAUTIONS
Do not obstruct any ventilation openings in the barbecue body.
Position the gas supply bottle on level ground next to the barbecue and safely away from any source of heat. Should
you need to change the gas bottle, confirm that the barbecue is switched off, and that there are no sources of ignition
(cigarettes, open flame, sparks, etc.) near before proceeding. Inspect the gas hose to ensure it is free of any twisting or
tension. The hose should hang freely with no bends, folds, or kinks that could obstruct free flow of gas. Apart from the
connection point, no part of the hose should touch any hot barbecue parts.Always inspect the hose before use.
The length of the hose shall not exceed 1.5m.
FIXING THE REGULATOR TO THE GAS BOTTLE
Confirm all barbecue control knobs are in the off position. Connect the regulator to the gas bottle according to your
regulator and bottle dealer’s instructions.

10
Leak testing (to be performed in a well-ventilated area).
Confirm all barbecue control knobs are in the off position.
Open the gas control valve on the bottle or regulator.
Check for leaks by brushing a solution of 1/2 water and 1/2 soap over all gas system joints. Including all valve
connections, hose connections and regulator connections.
NEVER USEAN OPEN FLAME to test for leaks at any time.
If bubbles form over any of the joints, there is a leak. Turn off the gas supply and retighten all joints.
Repeat test. If bubbles form again, do not use the barbecue. Please contact your local dealer for assistance. Leak test
annually, and whenever the gas bottle is removed or replaced.
OPERATION
Warnings
Before proceeding, make certain that you understand the IMPORTANT INFORMATION section of this manual.
Preparation before cooking
To prevent foods from sticking to the cooking grill, please use a long handled brush to apply a light coat of cooking or
vegetable oil before each barbecuing session. (note: when cooking for first time, paint colours may change slightly as a
result. This is normal and should be expected.)
Lighting the barbecue
1. Ensure all knobs are in the “OFF” position. Open the gas control valve on the gas bottle or regulator.
2. Open the gas control valve at the cylinder.
3. From “OFF” position, push down the front left control knob and keep pressing whilst turning anti-clockwise to the
“HIGH” position (a clicking sound is heard), this will light the left hand burner.
4. If burner fails to light, turn to “OFF” position and wait five minutes. Then begin again step 3.
If the burner still fails to light after several attempts, try the manual ignition procedure below.
5. When the left hand burner is lit any of the remaining burners can be lit by repeating operation 3 and 4.
6. After use, turn all control knobs to the “OFF” position and turn off the gas control valve at the cylinder.
7. After ignition, the burner should be burned at the “HIGH” position for 3-5 minutes in order to preheat the barbecue.
This process should be done before every cooking session.
MAUNAL IGNITION:
1. Open the gas control valve at the cylinder.
2. Insert lit match through the match lighting hole on the left side of the barbecue body and place near the left burner.
3. Push and turn left most control knob anti-clockwise to the “HIGH” position.
4. If the burner fails to light after 5 seconds, turn to “OFF” position and wait five minutes. Then begin again from step
2. If the burner still fails to light after several attempts, call your local dealer for service.
5. After successfully lighting the first burner, turn next control knob to the “HIGH” position. The gas will ignite from
the lit burner on the left. Follow the same procedure for each successive burner. Ensure burner is lit before opening
control valve on next burner. Light the remaining burners from left to right.
6. After use, turn all control knobs to the “OFF” position and turn off the gas control valve at the cylinder.
NOTE: if the flame of the burner is yellow coloured, adjust the aeration screw located on the neck of the burner.
The burner flame should be blue: blue coloured flames are confirmation that the burner is burning properly.
Turning the screw anti-clockwise will increase the amount of blue, and clockwise the amount of yellow.

11
DO NOTALLOW YOUR BARBECUE TO OVERHEAT.
End of cooking session
After each cooking session, turn the barbecue burners to the “HIGH” position and burn for 5 minutes. This procedure
will burn off cooking residue, thus making cleaning easier.
Turning off you barbecue
When you have finished using your barbecue, turn all the control valves fully clockwise to the “OFF” position, and
then switch off the gas at the bottle. Wait until the barbecue is sufficiently cool before attempting to move.
CAREAND MAINTENANCE
Regularly clean your barbecue between uses and especially after extended periods of storage. Ensure the
barbecue and its components are sufficiently cool before cleaning.
Never douse the barbecue with water when its surfaces are hot.
Never handle hot parts with unprotected hands.
In order to extend the life and maintain the condition of your barbecue, we strongly recommend that the unit be
covered when left outside for any length of time, especially during the winter months.
Cooking grill
Clean with hot soapy water. To remove any food residue, use a mild cream cleaner on a non-abrasive pad. Rinse well
and dry thoroughly.
Burner maintenance
In normal usage, burning off the residue after cooking will keep the burner clean.
The burner should be removed and cleaned annually, or whenever heavy build-up is found, to ensure that there are no
signs of blockage (debris, insects) in either the burner portholes or the venture tubes.
Use a pipe cleaner to clear obstructions.A wire brush can be used to remove corrosion from the burner surfaces.
When refitting the burner, be careful to check that venture tubes of the burner fit over the valve outlets.
Barbecue body
Regularly remove excess grease of fat from the barbecue body with a soft plastic or wooden scraper.
It is not necessary to remove all the grease from the body.
If you need to clean fully, use hot soapy water and a cloth, or nylon-bristled brush only.
Remove cooking surfaces and burners before full cleaning.
Do not immerse the gas controls or manifold in water. Check burner operation after carefully refitting into body.
Fixings
Annual checking and tightening of metal fixing is recommended.
Storage
Store your barbecue in a cool dry place. Cover the burners with aluminium foil in order to prevent insects or other
debris from collecting in burner holes. If the barbecue is to be stored indoors, the gas bottle must be disconnected and
left outside. The gas bottle should always be stored outside, in a dry, well-ventilated area, away from any sources of
heat or ignition. Do not let children tamper with the bottle.

12
TROUBLE SHOOTING
PROBLEM
POSSIBLE CAUSE
SOLUTION
Burners will not light using the
ignition system
1. Gas cylinder is empty
2. Faulty regulator
3. Obstructions in burner
4. Obstructions in gas jets or gas hose
5. Electrode wire loose or disconnected on
electrode or ignition unit
6. Electrode or wire is damaged or faulty
1. Replace with full cylinder
2. Have regulator checked or replace
3. Clean burner
4. Clean jets and gas hose
5. Reconnect wire
6. Change electrode and wire
Burner will not light with a
match
1. Gas cylinder is empty
2. Faulty regulator
3. Obstructions in burner
4. Obstructions in gas jets or gas hose
1. Replace with full cylinder
2. Have regulator checked or replace
3. Clean burner
4. Clean jets and gas hose
Low flame or flashback (fire in
burner tube-a hissing or roaring
noise may be heard)
1. Gas cylinder too small
2. Obstructions in burner
3. Obstructions in gas jets or gas hose
4. Windy conditions
1. Use larger cylinder
2. Clean burner
3. Clean jets and gas hose
4.Use BBQ in a more sheltered position
Tasty Trotter, Bridge Street, Clay Cross, Derbyshire S45 9NU, UK
Tel: +44(0)1246 866800
Email: info@tastytrotter.com
Website: www.tastytrotter.com
Table of contents
Other Tasty Trotter Grill manuals


Popular Grill manuals by other brands


Expo Börse
Expo Börse 613-401326 instruction manual

Kenmore
Kenmore 146.1615311 Use and care guide

ProFire
ProFire Phoenix owner's manual

George Foreman
George Foreman COMPACT 2 18840 Instructions and recipes

Bull
Bull Bison Premium 88787 Assembly & operating instructions

Magma
Magma Delmar DM10-016NG owner's manual


