Tasty Trotter KYQ-GFT402G Parts list manual

ASSEMBLY AND OPERATION INSTRUCTIONS
Model: KYQ-GFT402G
0359-19
FOR OUTDOOR USE ONLY
PLEASE READ INSTRUCTIONS CAREFULLY BEFORE ASSEMBLY
RETAIN THIS MANUAL FOR FUTURE REFERENCE
USE ONLY THE HOSE AND HOSE CONNECTOR PROVIDED!
If a replacement is necessary, please contact either our Customer Service
Department or your local dealer.
The use of unauthorised parts can create unsafe conditions and environment.


Hazardous fire or explosion may result if instructions are ignored
It is the consumer’s responsibility to see that the oven is properly assembled, installed, and taken
care of. Failure to follow instructions in this manual could result in bodily injury and/or property
damage.
1. Read the instructions before using the appliance.
2. Retain this manual for future reference.
3. Use outdoors only.
4. Warning accessible parts may be very hot. Keep young children away.
5. Do not move the appliance during use.
6. Turn off the gas supply at the gas cylinder after use.
7. Do not modify the appliance.
8. This appliance must be kept away from flammable materials during use.
9. A minimum clearance from the sides and back of the unit to a combustible construction is 3m
10.The regulator and hose must be connected correctly to the appliance. A spanner must be
used to tighten the nut onto the connection thread.
11.In addition, a logo or a warning shall be used to forbid gas cylinders in places of the appliance
not intended to receive gas cylinders if any.
FOR YOUR SAFETY IF YOU SMELL GAS:
1. Turn off gas supply at bottle.
2. Extinguish all naked flames; do not operate any electrical appliances.
3. Ventilate the area.
4. Check for leaks as detailed in this manual.
5. If odour persists, contact your dealer or gas supplier immediately.
PRECAUTIONS:
1. Leak test all connections after each tank refill.
2. Never check for leaks with a match or open flame.
3. Do not store of use gasoline or other flammable vapours and liquids in the vicinity of this or
any other appliance.
4. Any gas cylinder not connected for use shall not be stored in the vicinity of this or any other
appliance.
WARNING: Whilst every effort has made in manufacture of your oven to remove any sharp edge,
you should handle all components with care to avoid accidental injury.
Tools required: Either a philips crosshead or flat-bladed screwdriver and either a spanner (we
have supplied a multifunction spanner) or a pair pliers.
ASSEMBLY:
Please read all instructions thoroughly before proceeding. Find a large, clean area in
which to assemble your Tasty Trotter oven. Please refer to the parts list and assembly
diagram as necessary. Assembly of this oven involves many large components; it is
advisable to have two people to assemble the unit.
NOTICE: Make sure all the plastic protection (usually a blue film) is removed before
assembling!
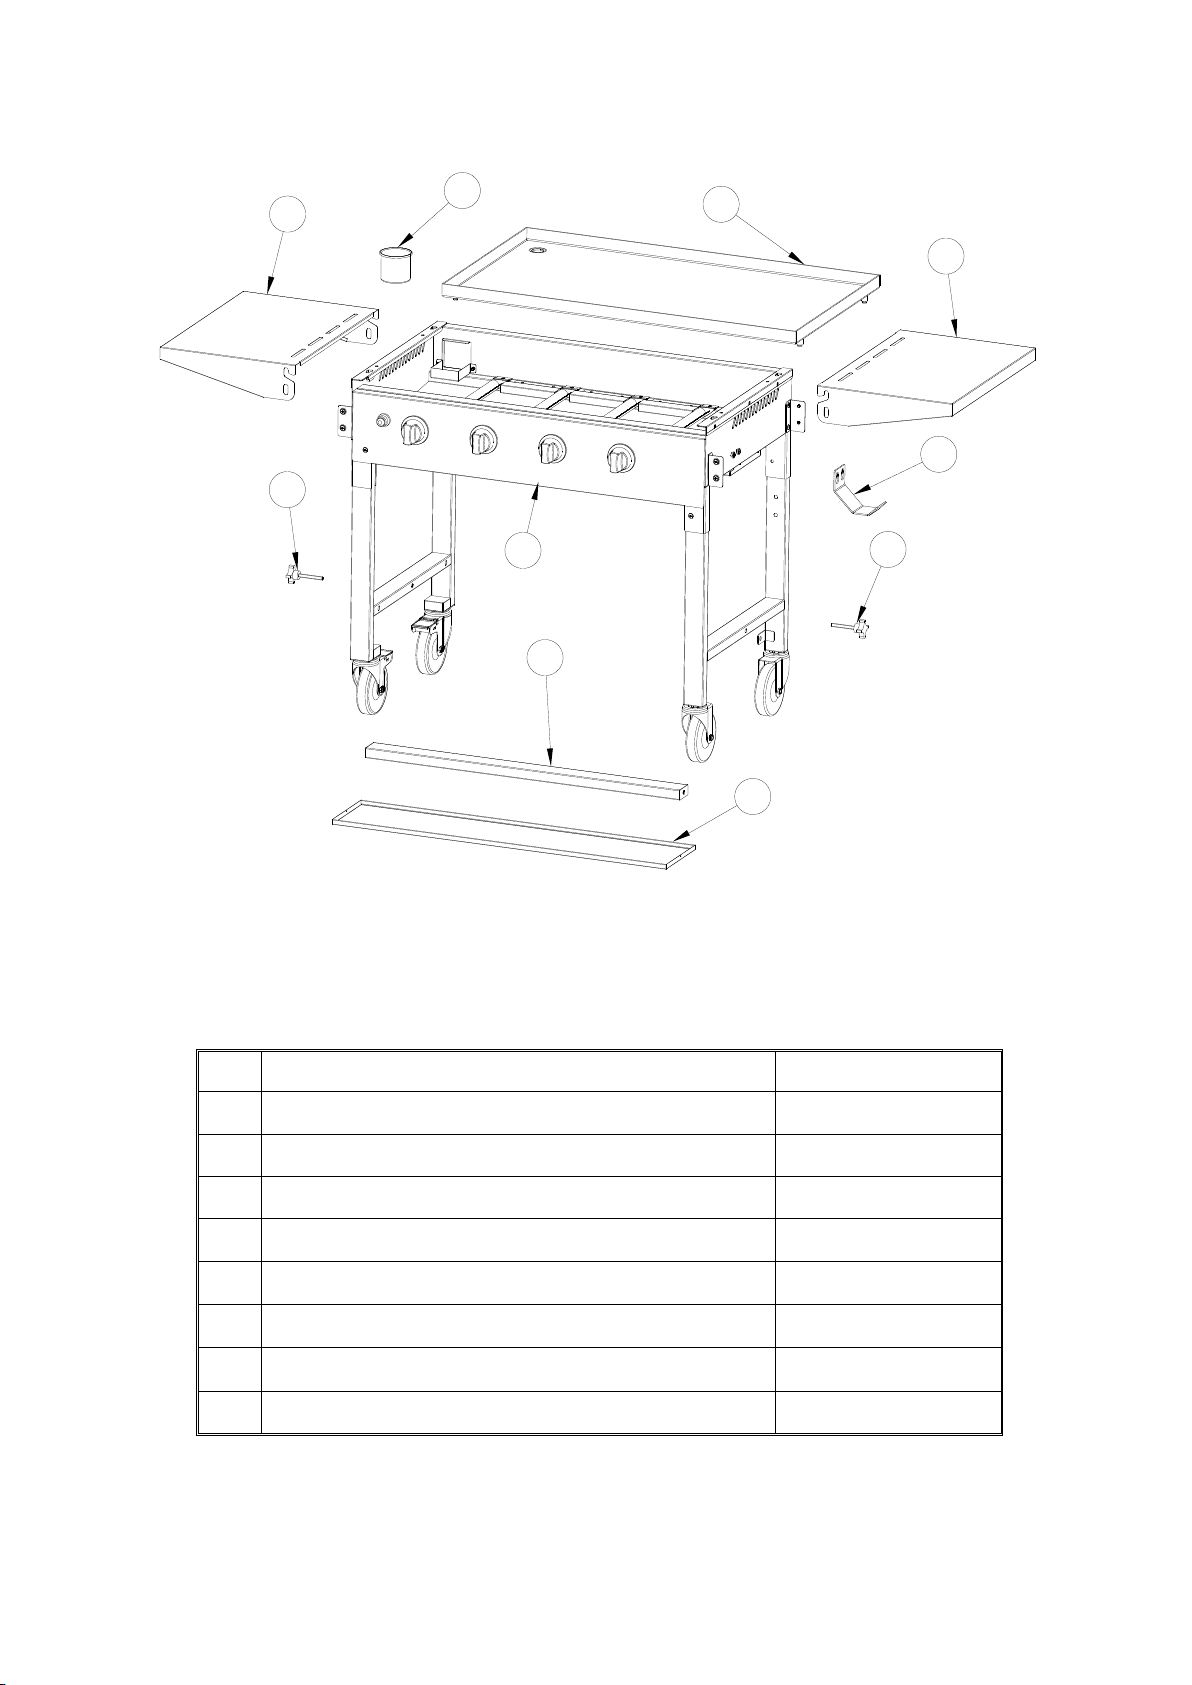
Exploded view: KYQ-GFT402G
Hard Wares List: KYQ-GFT402G
Ref
Description
GFT402G
1
Cooking plate assembly
1
2
Grease cup
1
3
Grill body assembly
1
4
Side table shell
2
5
Cylinder hook
1
6
Handle screw
2
7
Trolley cross brace assembly
1
8
Drip tray
1
1
2
4
4
5
6
6
7
8
3

ASSEMBLY: KYQ-GFT402G
1
2
Remove the cooking
plate assembly
Ref # 1
Ref # 3
Turn the grill upside
down, and remove
two handle screws
from the leg frames
Ref # 3
Ref # 6
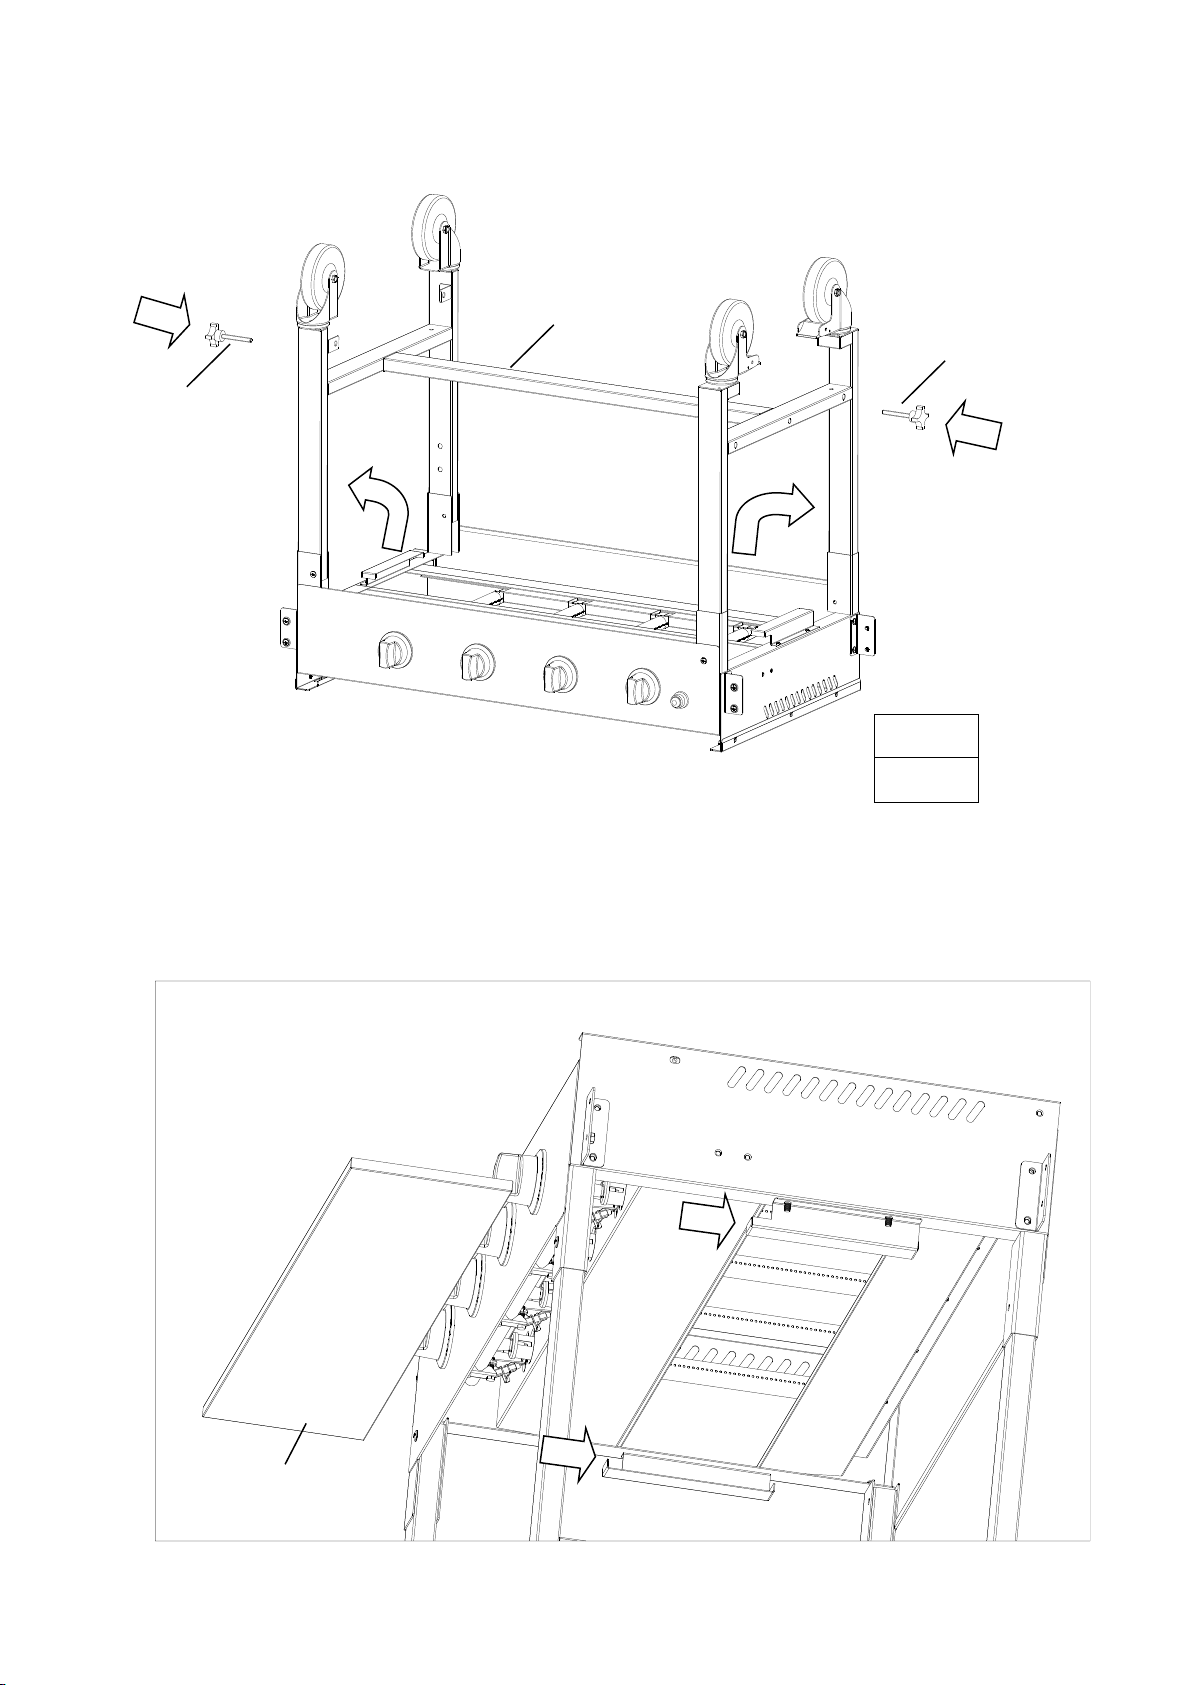
3
4
Ref # 8
Ref # 7
Ref # 6
Ref # 6

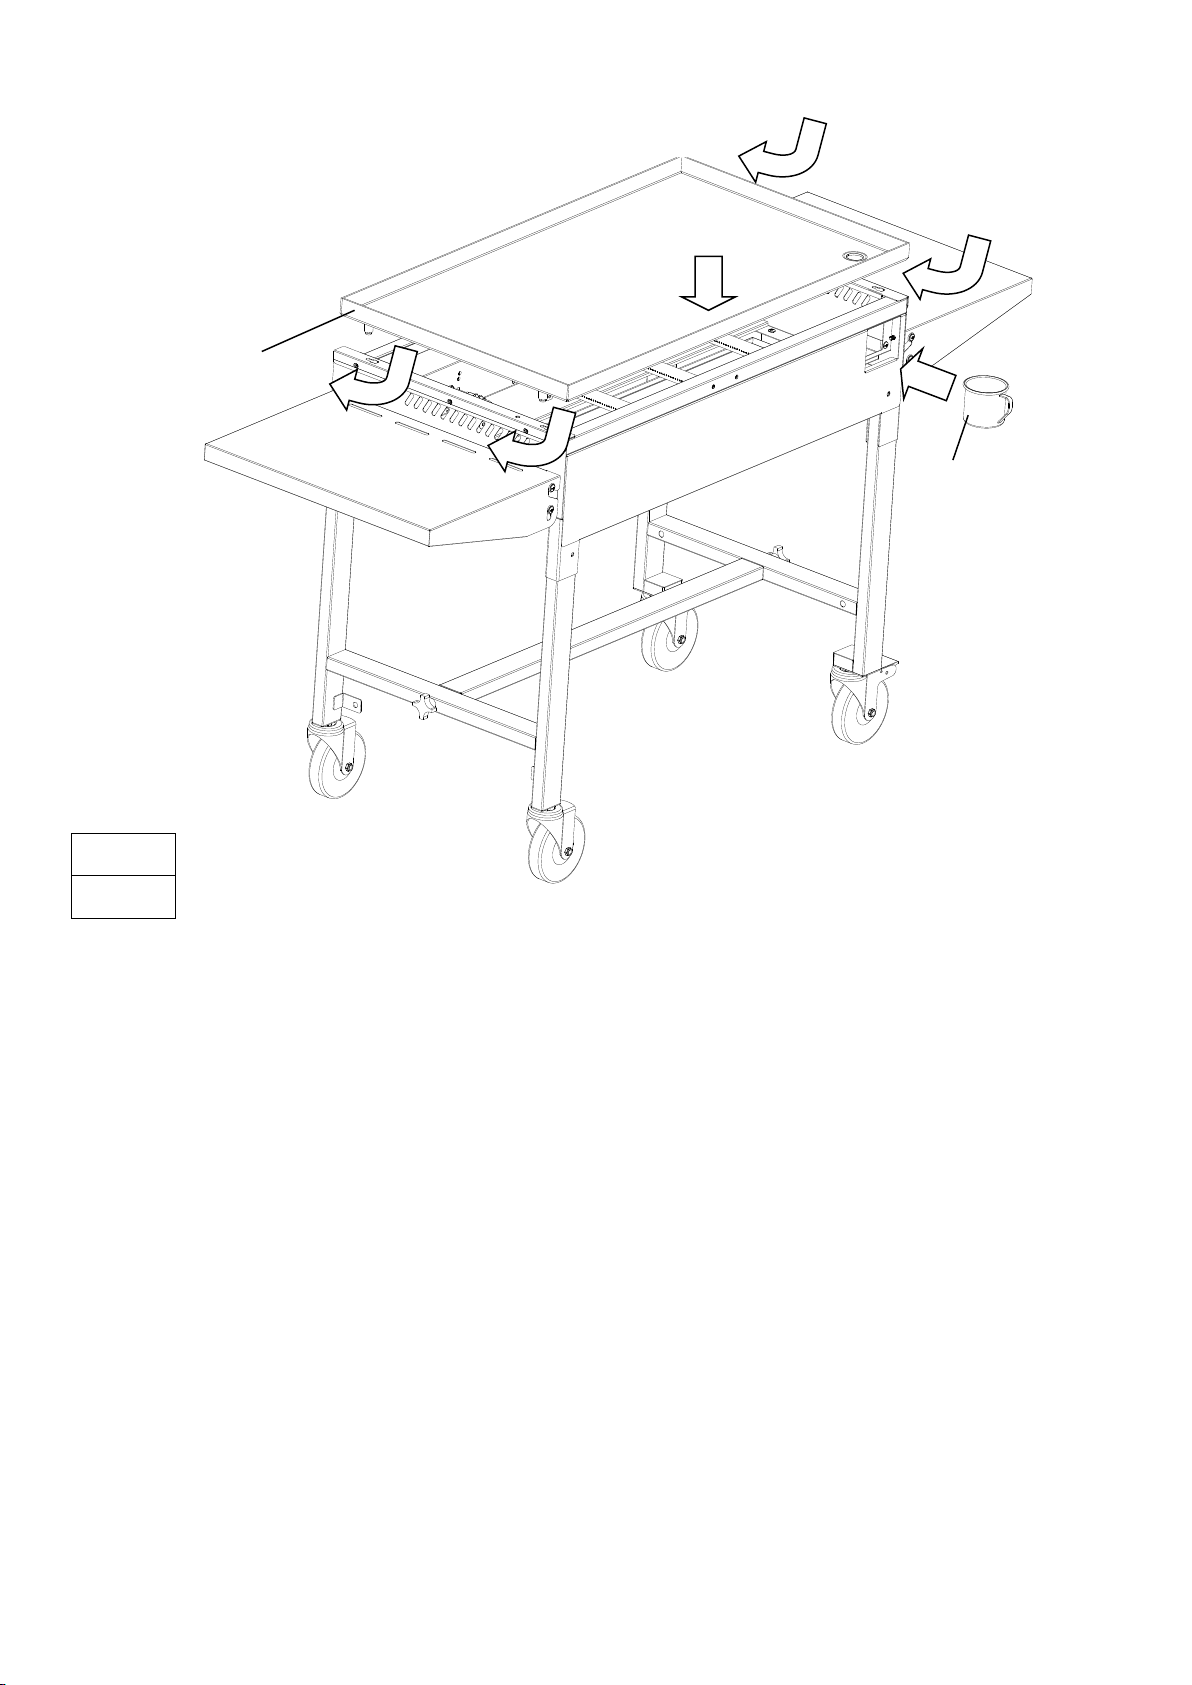
5
6
Ref # 5
M6×15×4 PCS
(All part remove from
the bracket)
Axis pad×4 PCS
M6 Nut×4 PCS
Ref # 4
Ref # 4
Finally, unscrew the igniter cap and insert a AA battery with the “ + “ end upwards
IMPORTANT: THERMOCOUPLE INFORMATION
The thermocouple can move during the first cooking process, if it moves too far out of the flame it
will assume the burner has gone out and shut down the gas valve –This is the most common
reason for a burner to go out. Simple repositioning of the probe by altering its position on the
brass thread so it is nearer the flame will quickly cure this problem. Don’t get the thermocouple
mixed up with the spark igniter which has a white stem. The probe and igniter can be found
under the protective cover at the control panel end, in the oven.
7
8
Ref # 2
Ref # 1
Technical Information:
IMPORTANT:
Read the following instructions carefully and be sure your barbecue is properly installed,
assembled and cared for. Failure to follow these instructions may result in serious bodily injury
and/or property damage.
If you have any questions concerning assembly or operation, consult your dealer or LPG Gas
Company.
When used on the ground always place the appliance and cylinder on flat level ground.
Never light the GRILL OR REAR BURNERS with the HOOD in the closed position.
Never light the SIDE BURNER with the lid in the closed position.
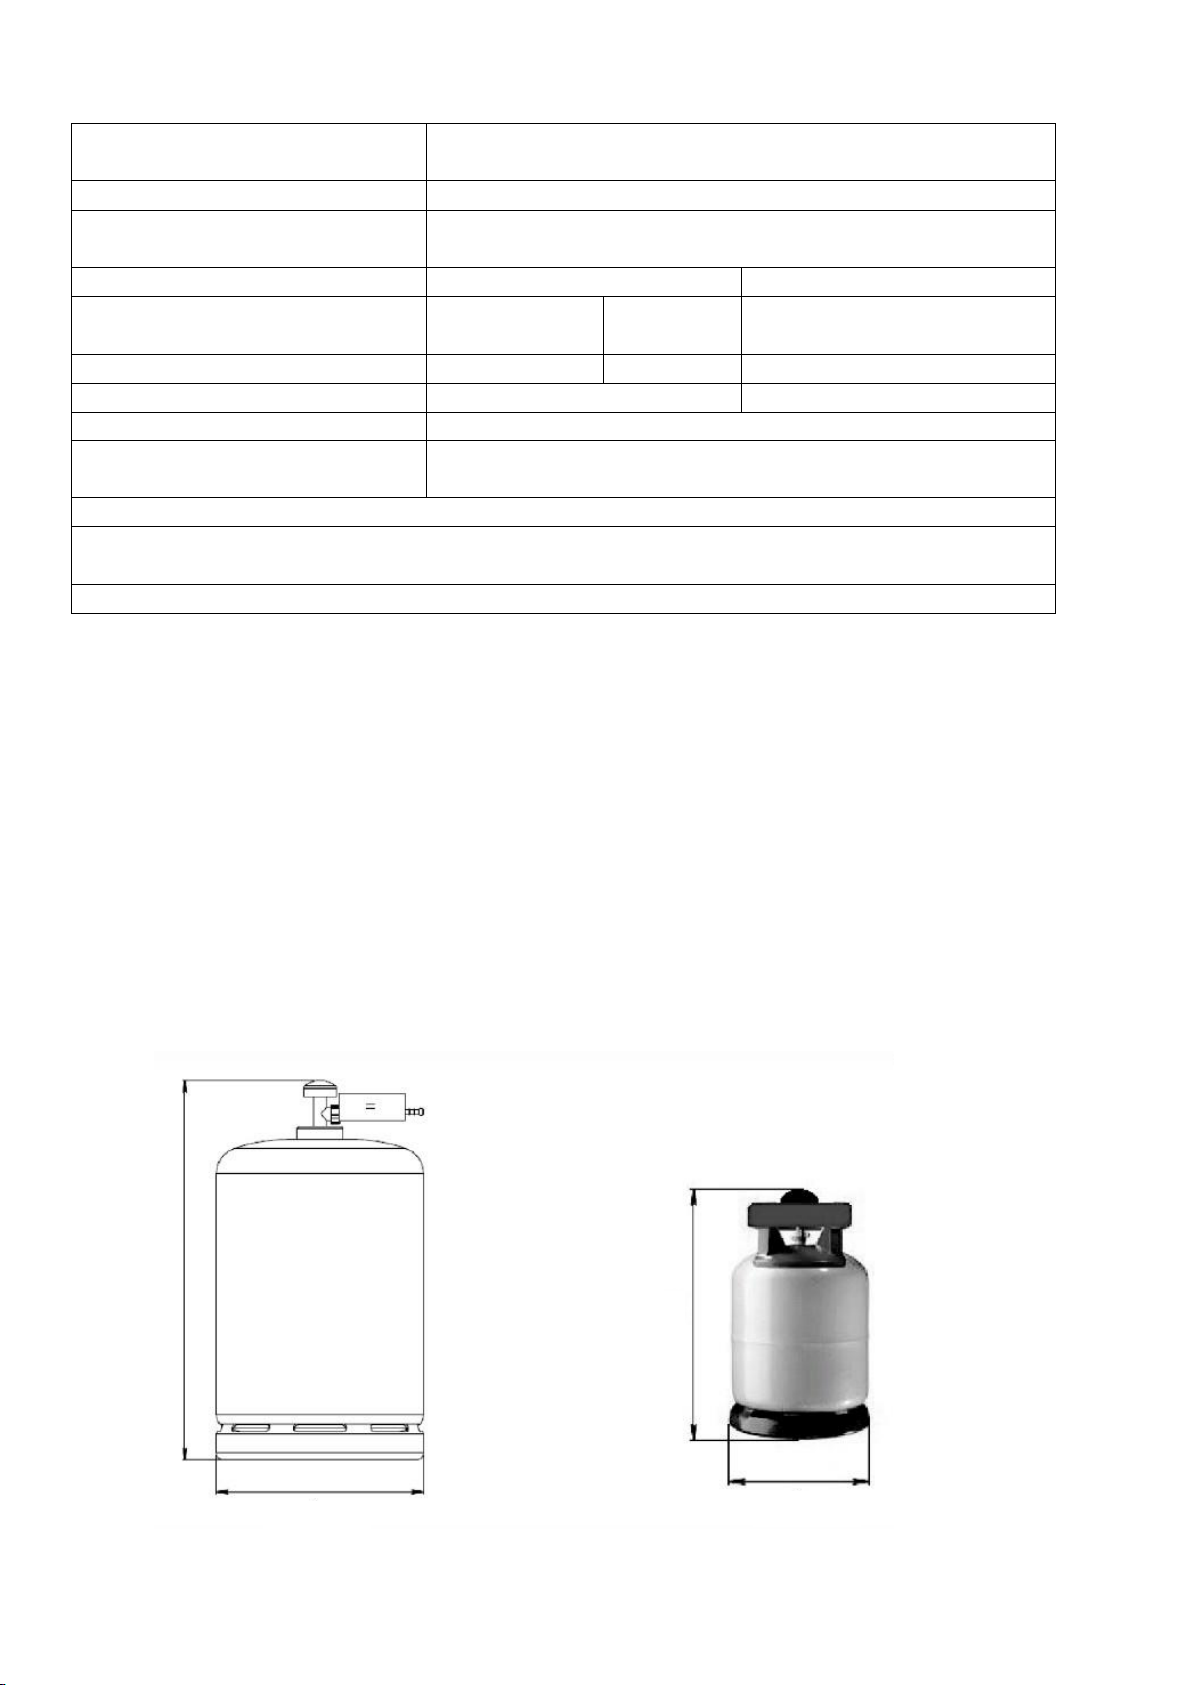
Your barbecue can be used on gas cylinders between 9 kg and 15 kg, and diameter maximum
23.5 cm; height (regulator included)maximum 48 cm. Your barbecue will perform better if
propane or LPG mixtures are used. Butane can be used but because of the rate of the appliance
the cylinder will tend to freeze and supply gas at reduced pressures affecting the performance of
your barbecue.
APPLIANCE
MANUFACTURED BY:
TASTY TROTTER / GUANGDONG KANGYE
ELECTRIC APPLIANCE CO., LTD.
APPLIANCE CODE:
KYQ-GFT402G
TOTAL HEAT INPUT:
(ALL CATEGORIES)
16.0 kW (1164 g/h) The grill burner is rated at 4.0 kW
APPLIANCE CATEGORY:
I3+(28-30/37) □
I3B/P(30)□
TYPES OF GAS:
Butane
Propane
Butane, Propane or their
mixture
GAS PRESSURE:
28-30 mbar
37 mbar
30 mbar
INJECTOR SIZE:
Grill: 0.95 mm
Grill: 0.95 mm
IDENTIFICATION CODE:
0359CL1155
SERIAL NUMBER
DATE CODE
Appliance code-12-0000000
FOR USE OUTDOORS AND IN WELL VENTILATED AREAS
WARNING: ACCESSIBLE PARTS MAY BE VERY HOT. KEEP YOUNG CHILDREN
AWAY
READ THE INSTRUCTION LITERATURE BEFORE USING THE APPLIANCE.
48 CM
48 CM
23.5 CM
23.5 CM

NOTE FOR CONSUMER: Retain for future Reference
SERVICING: Your gas barbecue should be serviced annually by a competent registered person.
CONNECTING THE GAS CYLINDER TO THE APPLIANCE
This appliance is only suitable for use with low-pressure butane or propane gas or LPG mixtures,
fitted with the appropriate low-pressure regulator via a flexible hose. The hose should be
secured to the regulator and the appliance with hose clips. For barbecue which set to I3B/P(30),
I3+(28-30/37) should use a regulator which operates butane gas at 30 mbar and propane gas at
37 mbar. For I3B/P(50), a regulator operates the butane, propane gas mixture at 50mbar. Ensure
the regulator was certified by standard EN16129
Please consult your LPG dealer for information regarding a suitable regulator for the gas cylinder.
Regulator and Hose
Use only regulators and hose approved for LP Gas at the above pressures. The life expectancy
of the regulator is estimated as 2 years.
The use of the wrong regulator or hose is unsafe; always check that you have the correct items
before operating the barbecue.
The hose used must conform to the relevant standard for the country of use. The
length of the hose must be 1.5 metres (maximum). Worn or damaged hose must be
replaced. Ensure that the hose is not obstructed, kinked, or in contact with any part
of the barbecue other than at its connection.
Storage of Appliance
Storage of an appliance indoors is only permissible if the cylinder is disconnected and removed
from the appliance. When the appliance is not to be used for a period of time it should be stored
in its original packaging and stored in a dry dust free environment.
Gas Cylinder
The gas cylinder should not be dropped or handled roughly! Always keep the cylinder in upright
position. during operation. Make sure the cylinder is from any source of flame before you change
the cylinder. If the appliance is not in use, the cylinder must be disconnected. Replace the
protective cap on the cylinder after disconnecting the cylinder from the appliance. The gas
cylinder must be sited outside the body of the appliance.
Cylinders must be stored outdoors in an upright position and out of the reach of children. The
cylinder must never be stored where temperatures can reach over 50C. Do not store the
cylinder near flames, pilot lights or other sources of ignition. DO NOT SMOKE.
This barbecue is designed for use outdoors, away from any flammable materials. It is important
that there are no overhead obstructions and that there is a minimum distance of 1 m from the
side or rear of the appliance. It is important that the ventilation openings of the appliance are not
obstructed. The barbecue must be used on a level, stable surface. The appliance should be
protected from direct draughts and shall be positioned or protected against direct penetration by
any trickling water (e.g. rain).
Parts sealed by the manufacturer or his agent must not be altered by the user. No
modifications should be made to any part of this barbecue and repairs and maintenance
should only be carried out by a GAS SAFE registered service engineer.
Since this barbecue has no restriction in the emission of unburned gas, this barbecue must be
installed and/or used outdoors or in an amply ventilated area. Were this BBQ in an amply
ventilated area, the area must have at least 25% of the surface(sum of the wall surface) area
open.

Connection to Appliance
Before connection, ensure that there is no debris caught in the head of the gas cylinder,
regulator, burner and burner ports. Spiders and insects can nest within and clog the
burner/venturi tube at the orifice. A clogged burner can lead to a fire beneath the appliance.
Clean burner holes with a heavy-duty pipe cleaner.
Fit the hose to the appliance using a spanner to tighten it onto the connection thread. If the hose
is replaced it must be secured to the appliance and regulator connections with hose clips.
Disconnect the regulator from the cylinder (according to the directions supplied with the
regulator) when the barbecue is not in use.
The Barbecue must be used in a well-ventilated area. Do not obstruct the flow of combustion air
to the burner when the barbecue is in use. ONLY USE THIS BARBECUE OUTDOORS.
BEFORE USE CHECK FOR LEAKS
Never check for leaks with a naked flame, always use a soapy water solution
TO CHECK FOR LEAKS
Make 2-3 fluid ounces of leak detecting solution by mixing one part washing up liquid with 3 parts
water.
Ensure the control valve is “OFF”.
Connect the regulator to the cylinder and ON/OFF valve to the burner, ensure the connections
are secure then turn ON the gas.
Brush the soapy solution onto the hose and all joints. If bubbles appear you have a leak, which
must be rectified before use.
Retest after fixing the fault
Turn OFF the gas at the cylinder after testing.
If leakage is detected and cannot be rectified. Do not attempt to cure leakage but consult your
gas dealer.
Lighting Instructions for barbecue
1.Turn all the control knobs clockwise to “OFF” position.
2.Connect the regulator to the gas bottle. Turn the gas supply “ON” at the regulator. Check with
the use of soapy water for any gas leakage between the bottle and the regulator.
3.Push down the front left control knob and keep pressing whilst turning anti-clockwise to the
“HIGH” position (a clicking sound is heard), this will light the left hand burner. Observe if the
burner has lit. If not repeat this process.
4.If the burner has not lit after retrying wait 5 minutes and repeat step 4.
5.Adjust the heat by turning the knob to the High/Low position.
6.If the burner does not light. Light the appliance with a match using the lighting hole in the side of
the appliance. Consult your gas dealer to rectify the ignition.
7.To light the remaining burners in sequence from left to right, and repeat 4 above. The
crosslighting channel between the burners will light the burner adjacent to it. Never attempt to
light other burners except left hand burner first.
8. To turn the barbecue ‘OFF’ turn the cylinder valve or regulator switch to the ‘OFF’ position and
then turn the control knob on the appliance clockwise to the ‘OFF’ position.
Warning: If the burner fails to ignite, turn the control knob off (clockwise) and also turn the
cylinder valve off. Wait five minutes before attempting to relight with ignition sequence.
Before cooking for the first time, operate the barbecue for about 15 minutes with the lid closed
and the gas turned on LOW. This will “heat clean” the internal parts and dissipate odour from the
painted finish.
Clean your barbecue after each USE. DO NOT use abrasive or flammable cleaners, as it will
damage the parts of the product and may start a fire. Clean in warm soapy water.
WARNING: Accessible parts may be very hot. Keep young children away from the hot
appliance at all times (even while cooling down!). It is recommended that protective gloves (eg
oven gloves) be used when handling particularly hot components.
CLEANING AND CARE
CAUTION: All cleaning and maintenance should be carried out when the barbecue is cool and
with the fuel supply turned OFF at the gas cylinder.
CLEANING
“Burning off” the barbecue after every use (for approx 15 minutes) will keep excessive food
residue to a minimum.
OUTSIDE SURFACE
Use mild detergent or baking soda and hot water solution. Non-abrasive scouring powder can be
used on stubborn stains, then rinse with water.
If the inside surface of the barbecue lid has the appearance of pealing paint, baked on grease
build-up has turned to carbon and is flaking off. Clean thoroughly with strong hot soapy water
solution. Rinse with water and allow to completely dry. NEVER USE OVEN CLEANER.
INTERIOR OF BARBECUE BOTTOM
Remove residue using brush, scraper and/or cleaning pad then wash with a soapy water
solution. Rinse with water and allow to dry.
CLEANING THE BURNER ASSEMBLY
Turn the gas OFF at the control knob
and disconnect the cylinder.
Remove cooling grate.
Clean the burner with a soft brush or
blow clean with compressed air and
wipe with a cloth.
Clean any clogged ports with a pipe
cleaner or stiff wire (such as an
opened paper clip).
Inspect burner for any damage (cracks or holes). If damage is found, replace with a new burner.
Reinstall the burner, check to ensure that the Gas valve orifices are correctly positioned and
secured inside the burner inlet (venturi).
THIS SIDE UP
PLEASE NOTE THE BURNER DIRECTION
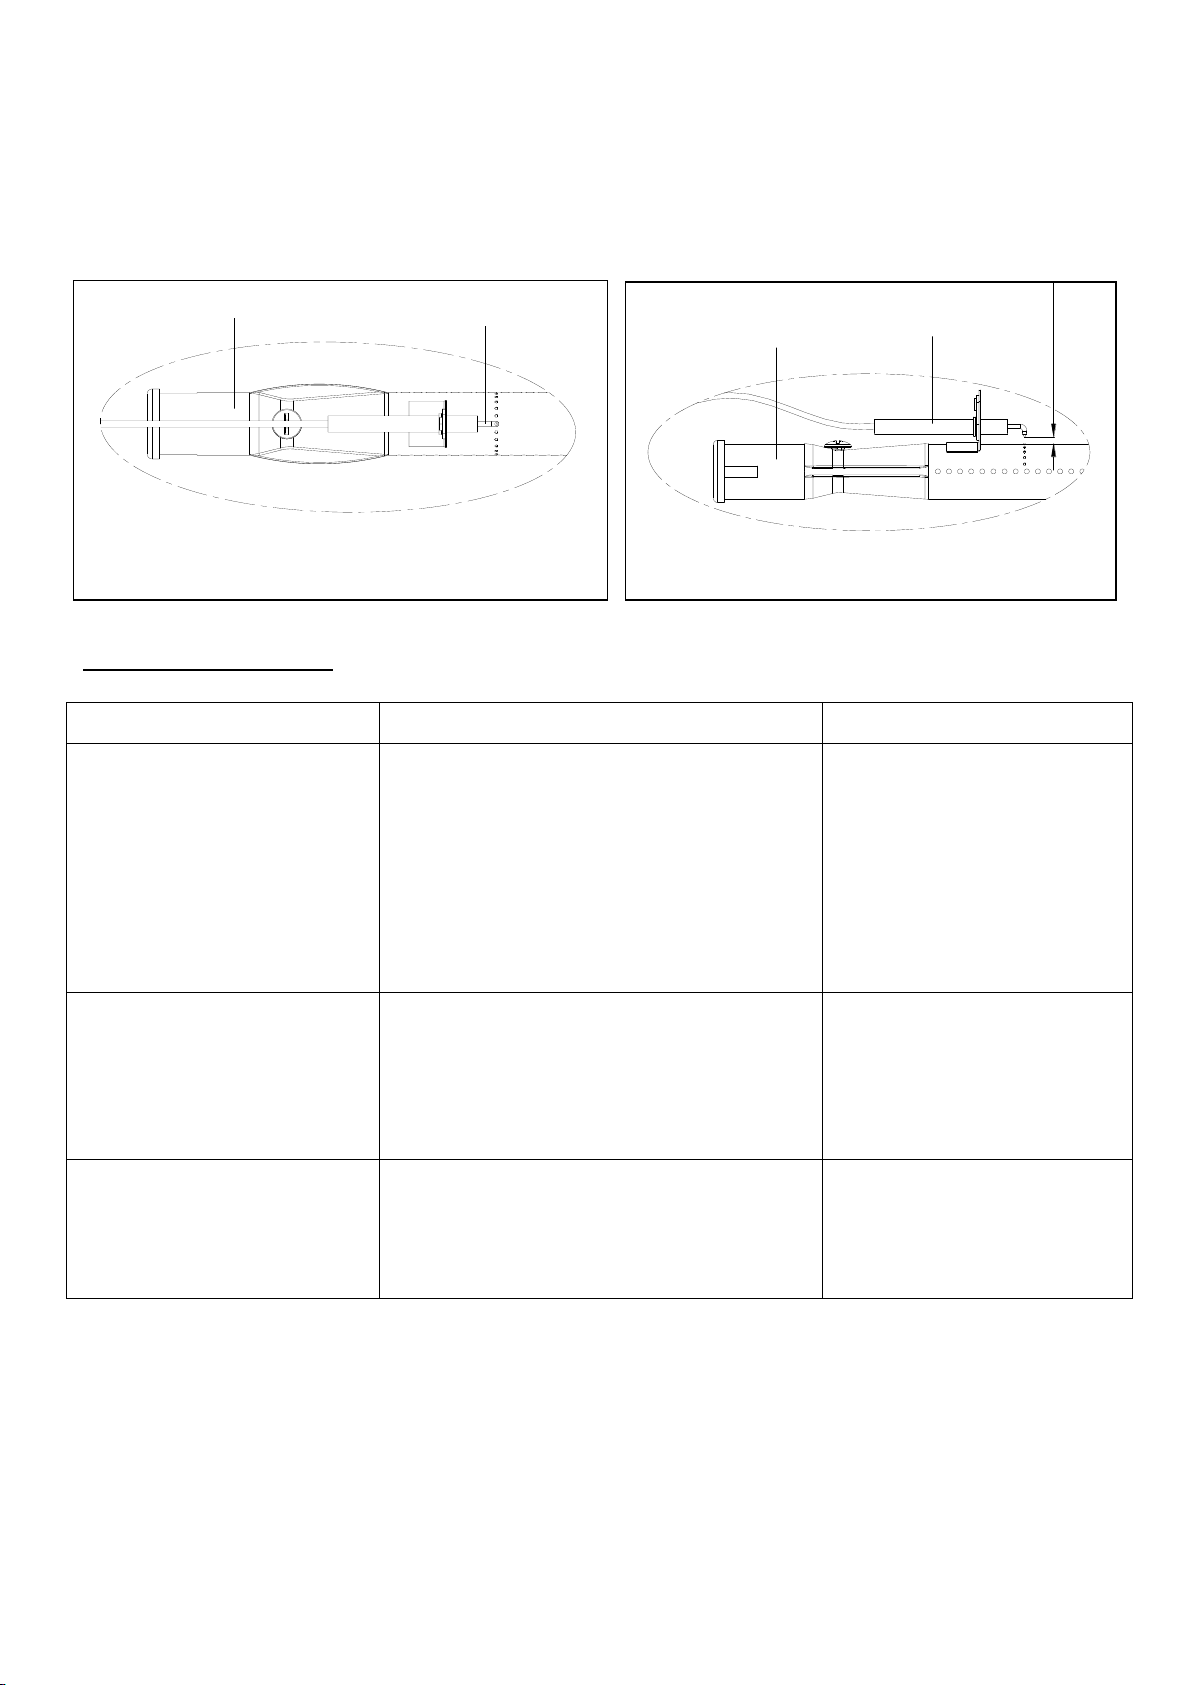
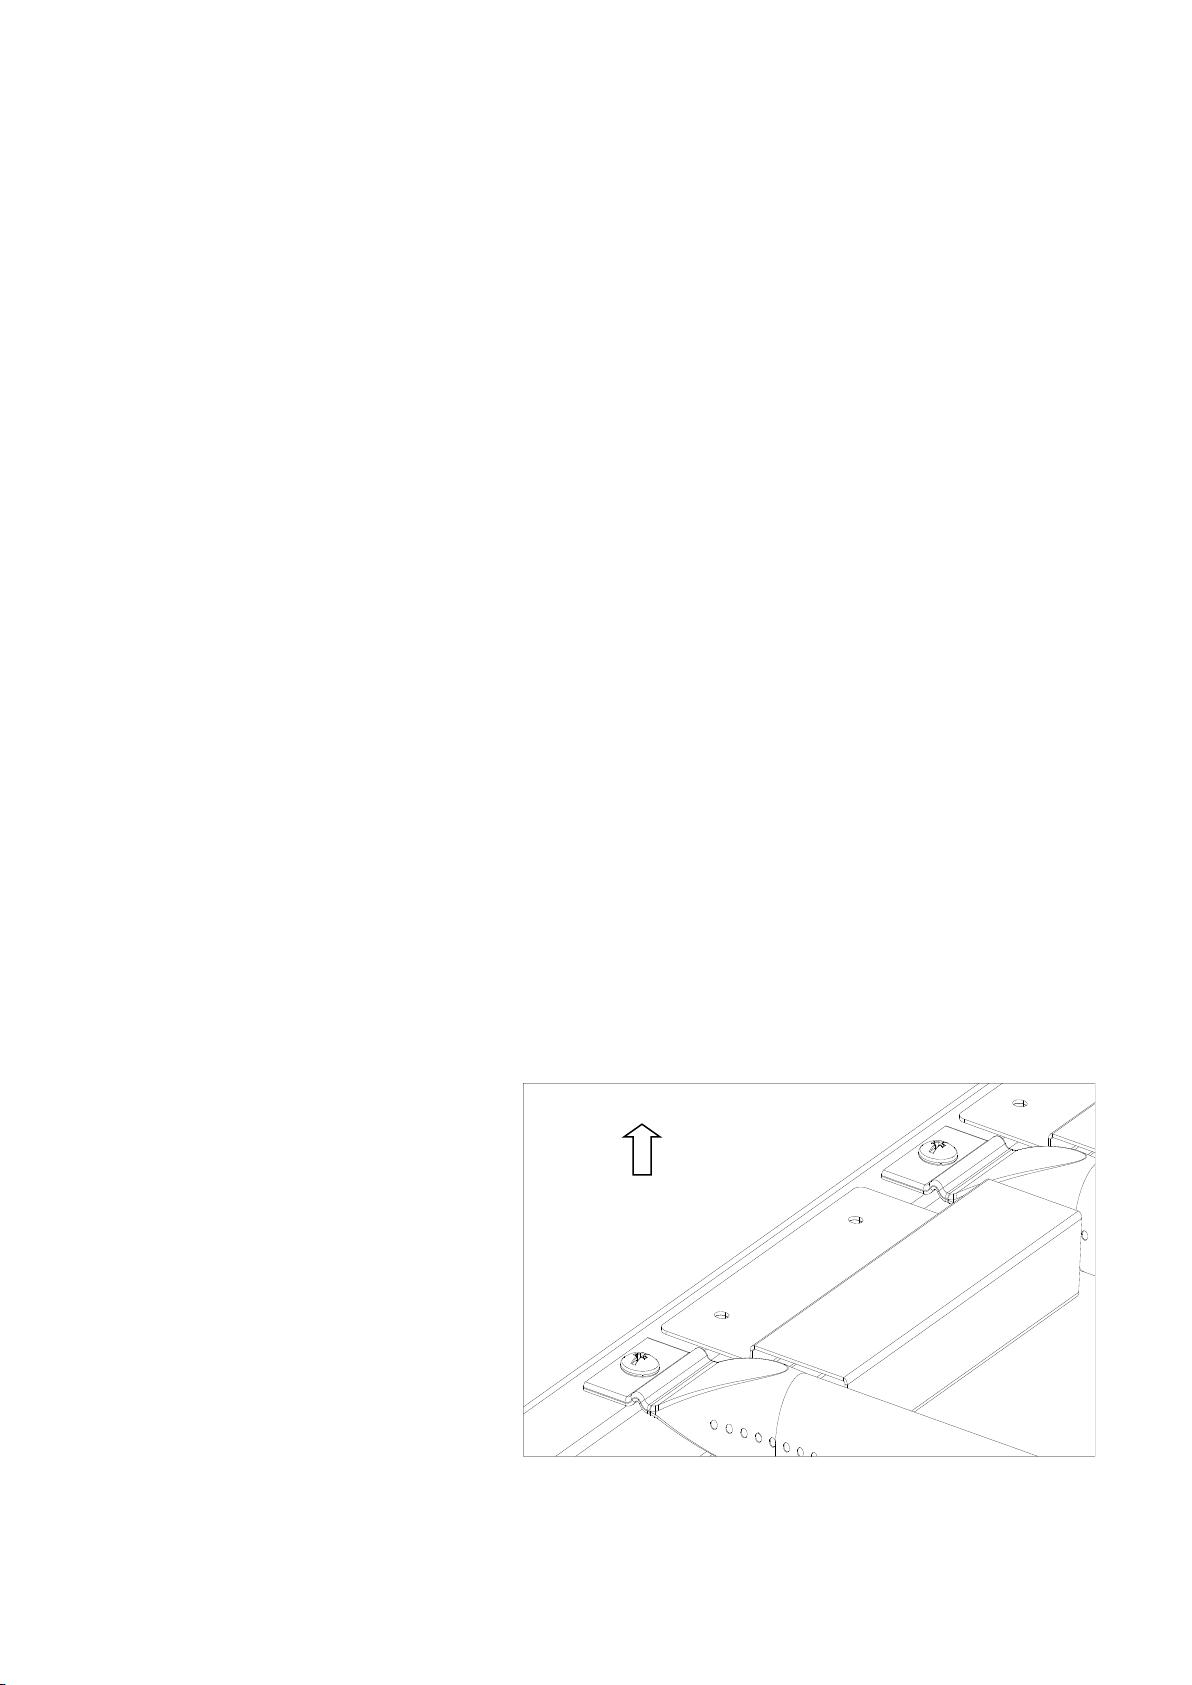
IGNITER TIP CLEANING:
If lighting the burners is difficult you may need to clean and adjust the igniter tip located near the
burner orifice. (FIG. 1). To ensure that the igniter lights properly, clean off any cooking residue
from igniter tip and burner. Use a very fine grit sand paper to clean igniter tip an edge of burner.
Igniter tip should be 4–6 mm away from burner edge. (FIG. 2) This is the ideal distance for most
effective ignition.
TROUBLE SHOOTING
PROBLEM
POSSIBLE CAUSE
SOLUTION
Burners will not light using
the ignition system
1. LP gas cylinder is empty
2. Faulty regulator
3. Obstructions in burner
4. Obstructions in gas jets or gas hose
5. Electrode wire loose or disconnected
on electrode or ignition unit
6. Electrode or wire is damaged faulty
pushbutton igniter
1. Replace with full
cylinder
2. Have regulator checked
or replace
3. Clean burner
4. Clean jets and gas hose
5. Reconnect wire
6. Change electrode and
wire change igniter
Burner will not light with a
match
1. LG gas cylinder is empty
2. Faulty regulator
3. Obstructions in burner
4. Obstructions in gas jets or gas hose
1. Replace with full
cylinder
2. Have regulator checked
or replace
3. Clean burner
4. Clean jets and gas hose
Low flame or flashback
(fire in burner tube-a
hissing or roaring noise
may be heard)
1. LP gas cylinder too small
2. Obstructions in burner
3. Obstructions in gas jets or gas hose
4. Windy conditions
1. Use larger cylinder
2. Clean burner
3. Clean jets and gas hose
4. Use BBQ in a more
sheltered position
Burner Igniter tip
FIG. 1
5¡À1mm
Burner Igniter tip
FIG. 2

CARE AND PROTECTION OF STAINLESS STEEL SURFACES
Your BBQ features Stainless Steel components, using moderate grade Stainless Steels. All
Stainless Steel grades require a level of care and protection to retain their appearance.
Stainless Steels are not immune to corrosion and neither are they maintenance-free,
contrary to popular public perception. Even the highest marine grades of Stainless Steel
require frequent cleaning with fresh water to avoid oxidation and other corrosive issues.
Modern tastes dictate that your BBQ features Stainless Steel with a brushed finish. This brushed
finish is attained by running Stainless Steel sheets through an abrasive process that removes the
mirror finish and leaves the brushed finish. Brushed-finish Stainless Steel requires frequent
cleaning and care, to maintain its quality of appearance. Without adequate care it is realistic to
expect that it will show signs of corrosion in time.
After assembly, we recommend that owners apply a thin layer of Olive Oil with a clean rag,
to all exposed Stainless Steel areas. This should then be polished in and buffed off with
another clean rag to a non-oily finish. This process will aid protection against dirt and other
corrosive contaminants, by providing a temporary food-safe shield. The Olive Oil layer also
makes later polishing and removal of fingerprints easier. This process should be repeated
frequently when cleaning your grill.
You may have bought a protective cover for your BBQ. It is recommended that a BBQ cover
should be used at all times when the BBQ is not in use to protect your investment. However it is
vital to understand that unless the BBQ is cool, clean and dry when the cover is fitted, use
of a cover can in fact be detrimental. A cover placed on a warm, wet or unclean BBQ (or any
mix of these factors) can in fact be a very effective corrosion breeder!
For this reason, the BBQ should always be cool, cleaned of any surface contaminants or
dirt and be thoroughly dry before a protective cover is fitted. This is especially important
before a BBQ is stored for any length of time i.e. if the BBQ doesn’t get frequent use, or when the
BBQ is stored away over winter months.
In order to maintain the quality of the finish of your Stainless Steel BBQ, the owner must be
vigilant with care and maintenance according to this advice.
Look after your investment carefully and it will serve you well for many years to come.


Table of contents
Other Tasty Trotter Grill manuals


Popular Grill manuals by other brands

Brinkmann
Brinkmann ProSeries 2700 owner's manual

Everdure
Everdure DAINTREE ESEE Assembly, operation & maintenance instructions

George Foreman
George Foreman GBZ120V 127V owner's manual

Blaze
Blaze BLZ-2PRO Use & care manual

Masterbuilt
Masterbuilt 20072912 Assembly, care & use manual warning & safety information

Nexgrill
Nexgrill 820-0062H owner's manual


 Installation Instructions and Use & Care Guide")


