Tasty Trotter KYQ-BFT300 User manual

1
ASSEMBLY INSTRUCTIONS PLANCHA GAS GRILL
Model: KYQ-BFT300
0359/15
Thank you for buying a TASTY TROTTER Plancha, we trust it will give you
many years of service and many successful catering events
FOR OUTDOOR USE ONLY
PLEASE READ INSTRUCTIONS CAREFULLY BEFORE ASSEMBLY
RETAIN THIS MANUAL FOR FUTURE REFERENCE

2

3
WARNING
Hazardous fire or explosion may result if instructions are ignored
It is the consumer’s responsibility to see that the barbecue is properly assembled, installed, and
taken care of. Failure to follow instructions in this manual could result in bodily injury and/or
property damage.
1. Read the instructions before using the appliance.
2. Retain this manual for future reference.
3. Use outdoors only.
4. Warning; accessible parts may be very hot. Keep young children away.
5. Do not move the appliance during use.
6. Turn off the gas supply at the gas cylinder after use.
7. Do not modify the appliance.
8. This appliance must be kept away from flammable materials during use.
9. The regulator and hose must be connected correctly to the appliance. A spanner must be
used to tighten the nut onto the connection thread.
10.In addition a logo or a warning shall be used to forbid gas cylinders in places of the
appliance not intended to receive gas cylinders if any.
11.Ensure the drip tray is emptied on a regular basis and never overflows.
12.A heat resistant (such as aluminium) table is a recommended surface for the Plancha Gas
Grill to be used upon. Do not use on any soft, unstable or flammable surfaces.
FOR YOUR SAFETY IF YOU SMELL GAS:
1. Turn off gas supply at bottle.
2. Extinguish all naked flames; do not operate any electrical appliances.
3. Ventilate the area.
4. Check for leaks as detailed in this manual.
5. If odour persists, contact your dealer or gas supplier immediately.
6. PRECAUTIONS:
7. Leak test all connections after each tank refill.
8. Never check for leaks with a match or open flame.
9. Do not store of use gasoline or other flammable vapours and liquids in the vicinity of this or
any other appliance.
10.Any gas cylinder not connected for use shall not be stored in the vicinity of this or any other
appliance.
WARNING: Whilst every effort has made in manufacture of your barbecue to remove any sharp
edge, you should handle all components with care to avoid accidental injury.
Tools required: a spanner.
ASSEMBLY:
Please read all instructions thoroughly before proceeding. Find a large, clean area in which
to assemble your Plancha barbecue. Please refer to the parts list and assembly diagram as
necessary. Assembly of the barbecue involves many large components; it is advisable to
have two people assemble the unit.
NOTICE: Make sure all the plastic protection is removed before assembling!

4
1
4
2
3
3
3
3
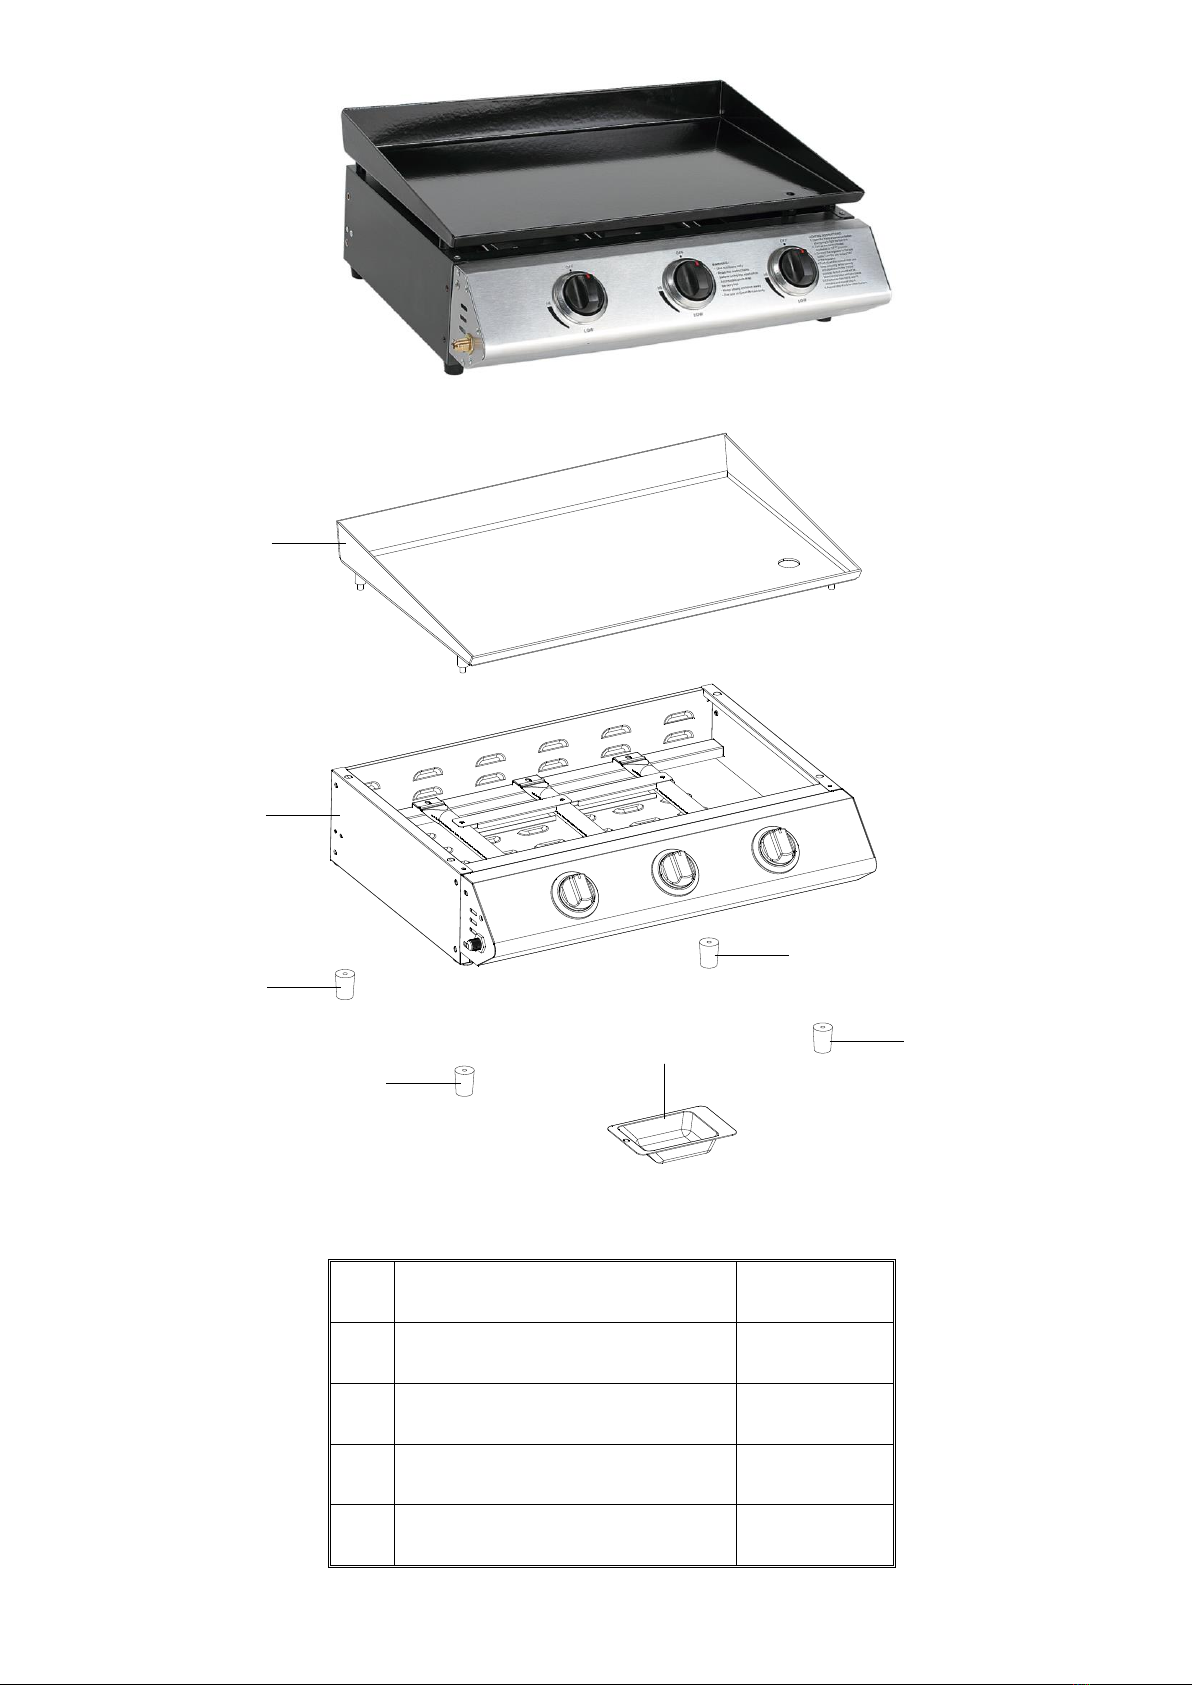
Part List: KYQ-BFT300
Ref
Description
BFT300
1
Grill p Plate
1
2
Grill body assembly
1
3
Feet
4
4
Drip tray
1
Expanded view

5
ASSEMBLY:
1
Ref # 2
Ref # 3
M5x25x 4 PCS
2
Ref # 4
Ref # 1

6
Technical Information:
Rating label 29mbar
APPLIANCE
MANUFACTURED BY:
TASTY TROTTER
APPLIANCE CODE:
KYQ-BFT300
TOTAL HEAT INPUT:
(ALL GAS CATEGORIES)
9.45 kW (687 g/h) The grill burners are rated at 3.15 kW
GAS CATEGORY:
I3+(28-30/37)
I3B/P(30)
TYPES OF GAS:
Butane
Propane
LPG GAS MIXTURES
GAS PRESSURE:
28-30
mbar
37 mbar
30 mbar
INJECTOR SIZE:
Grill: 0.85mm 0359/15
IDENTIFICATION CODE:
COUNTRIES OF
DESTINATION
I3+(28-30/37) BE, CH, CY, CZ, ES, FR, GB, GR, IE, IT, LT, LU, LV, PT,
SK, and SI.
I3B/P(30) BE, CY, DK, EE, FI, FR, HU, IT, LT, NL, NO, SE, SI, SK,
RO, HR, TR, BG, IS, LU and MT.
SERIAL NUMBER DATE
CODE
FOR USE OUTDOORS AND IN WELL VENTILATED AREAS
ACCESSIBLE PARTS MAY BE VERY HOT. KEEP YOUNG CHILDREN AWAY.
DO NOT MOVE THE APPLIANCE DURING USE.
TURN OFF THE GAS SUPPLY AT THE GAS CYLINDER AFTER USE.
DO NOT MODIFY THE APPLIANCE.
THIS APPLIANCE MUST BE KEPT AWAY FROM FLAMMABLE MATERIALS DURING USE.
READ THE INSTRUCTION LITERATURE BEFORE USING THE APPLIANCE.
IN ADDITION A LOGO OR A WARNING SHALL BE USED TO FORBID GAS CYLINDERS IN
PLACES OF THE APPLIANCE NOT INTENDED TO RECEIVE GAS CYLINDERS IF ANY.
IMPORTANT:
Read the following instructions carefully and be sure your barbecue is properly installed,
assembled and cared for. Failure to follow these instructions may result in serious bodily injury
and/or property damage. If you have any questions concerning assembly or operation, consult
your dealer or LPG Gas Company. When used on the ground always place the appliance and
cylinder on flat level ground. Your barbecue will perform better if propane or LPG mixtures are
used. Butane can be used but because of the rate of the appliance the cylinder will tend to freeze
and supply gas at reduced pressures affecting the performance of your barbecue.
NOTE FOR CONSUMER: Retain for future Reference
CONNECTING THE GAS CYLINDER TO THE APPLIANCE
This appliance is only suitable for use with low-pressure butane or propane gas or LPG mixtures,
fitted with the appropriate low-pressure regulator via a flexible hose. The hose should be secured
to the regulator and the appliance with hose clips. For barbecue which are set to I3B/P(30),
I3+(28-30/37) should use a regulator which operates butane gas at 30 mbar and propane gas at
37 mbar. For I3B/P(50), a regulator operates the butane, propane gas mixture at 50mbar. Ensure
the regulator was certified by standard EN16129
Please consult your LPG dealer for information regarding a suitable regulator for the gas cylinder.

7
Regulator and Hose
This item comes complete with a hose but requires a regulator. Regulators are available from your
equipment retailer or an authorised LPG gas stockist. Use only regulators and hose approved for
LP Gas at the above pressures. The life expectancy of a regulator is an estimated 2 years. It is
recommended that the regulator is changed within 2 years of the date of manufacture. The type of
regulator needs to match the connector on your butane or propane gas bottle.
The use of the wrong regulator or hose is unsafe; always check that you have the correct items
before operating the barbecue.
The hose used must conform to the relevant standard for the country of use. The length of the
hose must be 1.5 metres (maximum). Worn or damaged hose must be replaced. Ensure that the
hose is not obstructed, kinked, or in contact with any part of the barbecue other than at its
connection.
Storage of Appliance
Storage of an appliance indoors is only permissible if the cylinder is disconnected and removed
from the appliance. When the appliance is not to be used for a period of time it should be stored
in its original packaging and stored in a dry dust free environment.
Gas Cylinder
The gas cylinder should not be dropped or handled roughly! If the appliance is not in use, the
cylinder must be disconnected. Replace the protective cap on the cylinder after disconnecting the
cylinder from the appliance. The gas cylinder must be sited outside the body of the appliance.
Cylinders must be stored outdoors in an upright position and out of the reach of children. The
cylinder must never be stored where temperatures can reach over 50C. Do not store the cylinder
near flames, pilot lights or other sources of ignition. DO NOT SMOKE near cylinders.
This Plancha barbecue is designed for use outdoors, in a well-ventilated area, away from any
flammable materials. It is important that there are no overhead obstructions and that there is a
minimum distance of 1m from the side or rear of the appliance. It is important that the ventilation
openings of the appliance are not obstructed. The Plancha barbecue must be used on a level,
stable surface. The appliance should be protected from direct draughts and should be positioned
or protected against direct penetration by any trickling water (e.g. rain).
Parts sealed by the manufacturer or his agent must not be altered by the user. No
modifications should be made to any part of this barbecue and repairs and maintenance
should only be carried out by a GAS SAFE registered service engineer.
Connection to Appliance
Before connection, ensure that there is no debris caught in the head of the gas cylinder, regulator,
burner and burner ports. Spiders and insects can nest within and clog the burner/venturi tube at
the orifice. A clogged burner can lead to a fire beneath the appliance.
Clean burner holes with a heavy-duty pipe cleaner/wire brush.
Fit the hose to the appliance using a spanner to tighten it onto the connection thread. If the hose
is replaced it must be secured to the appliance and regulator connections with hose clips.
Disconnect the regulator from the cylinder (according to the directions supplied with the regulator)
when the barbecue is not in use.
The Plancha Barbecue must be used in a well ventilated area. Do not obstruct the flow of
combustion air to the burner when the barbecue is in use. ONLY USE THIS BARBECUE
OUTDOORS.

8
BEFORE USE CHECK FOR LEAKS
Never check for leaks with a naked flame, always use a soapy water solution
TO CHECK FOR LEAKS
Make 2-3 fluid ounces of leak detecting solution by mixing one part washing up liquid with 3 parts
water.
Ensure the control valve is “OFF”.
Connect the regulator to the cylinder and ON/OFF valve to the burner, ensure the connections are
secure then turn ON the gas.
Brush the soapy solution onto the hose and all joints. If bubbles appear you have a leak, which
must be rectified before use.
Retest after fixing the fault
Turn OFF the gas at the cylinder after testing.
If leakage is detected and cannot be rectified, do not attempt to cure leakage but consult your gas
dealer.
Lighting Instructions for barbecue
1. Turn all the control knobs clockwise to “OFF” position.
2. Connect the regulator to the gas bottle. Turn the gas supply “ON” at the regulator. Check
with the use of soapy water for any gas leakage between the bottle and the regulator.
3. Push down the front left control knob and keep pressing whilst turning anti-clockwise to the
“HIGH” position (a clicking sound is heard), this will light the left hand burner. Observe if the
burner has lit. If not repeat this process.
4. If the burner has not lit after retrying wait 5 minutes and repeat step 3.
5. Adjust the heat by turning the knob to the High/Low position.
6. If the burner does not light. Light the appliance with a match using the lighting hole in the
side of the appliance. Consult your gas dealer to rectify the ignition.
7. To light the remaining burners in sequence from left to right, repeat 3 above. The cross
lighting channel between the burners will light the burner adjacent to it. Never attempt to
light other burners except left hand burner first.
8. To turn the barbecue ‘OFF’ turn the cylinder valve or regulator switch to the ‘OFF’ position
and then turn the control knob on the appliance clockwise to the ‘OFF’ position.
Warning: If the burner fails to ignite, turn the control knob off (clockwise) and also turn the
cylinder valve off. Wait five minutes before attempting to relight with ignition sequence.
Before cooking for the first time, operate the barbecue for about 15 minutes and the gas turned on
LOW. This will “heat clean” the internal parts and dissipate odour from the painted finish.
Clean your Plancha barbecue after each USE. DO NOT use abrasive or flammable cleaners, as it
will damage the parts of the product and may start a fire. Clean in warm soapy water.

9
WARNING: Accessible parts may be very hot. Keep young children away from the hot appliance
at all times (even while cooling down!). It is recommended that protective gloves (e.g. oven
gloves) be used when handling particularly hot components.
CLEANING AND CARE
CAUTION: All cleaning and maintenance should be carried out when the barbecue is cool and
with the fuel supply turned OFF at the gas cylinder.
CLEANING
“Burning off” the barbecue after every use (for approx. 15 minutes) will keep excessive food
residue to a minimum.
OUTSIDE SURFACE
Use mild detergent or baking soda and hot water solution. Non-abrasive scouring powder can be
used on stubborn stains, then rinse with water.
If the inside surface of the barbecue lid has the appearance of peeling paint, baked on grease
build-up has turned to carbon and is flaking off. Clean thoroughly with strong hot soapy water
solution. Rinse with water and allow to completely dry. NEVER USE OVEN CLEANER.
INTERIOR OF BARBECUE BOTTOM
Remove residue using brush, scraper and/or cleaning pad then wash with a soapy water solution.
Rinse with water and allow to dry.
CLEANING THE BURNER ASSEMBLY
Turn the gas OFF at the control knob and disconnect the cylinder.
Remove cooling grate.
Clean the burner with a soft brush or blow clean with compressed air and wipe with a cloth.
Clean any clogged ports with a pipe cleaner or stiff wire (such as an opened paper clip).
Inspect burner for any damage (cracks or holes). If damage is found, replace with a new burner.
Reinstall the burner, check to ensure that the Gas valve orifices are correctly positioned and
secured inside the burner inlet (venturi).
SERVICING
Your gas barbecue should be serviced annually by a competent registered person and an annual
gas safety certificate should be issued starting one year from date of purchase.

10
CARE AND PROTECTION OF STAINLESS STEEL SURFACES
Your BBQ features Stainless Steel components, using moderate grade Stainless Steels. All
Stainless Steel grades require a level of care and protection to retain their appearance. Stainless
Steels are not immune to corrosion and neither are they maintenance-free, contrary to
popular public perception. Even the highest marine grades of Stainless Steel require frequent
cleaning with fresh water to avoid oxidation and other corrosive issues.
Modern tastes dictate that your BBQ features Stainless Steel with a brushed finish. This brushed
finish is attained by running Stainless Steel sheets through an abrasive process that removes the
mirror finish and leaves the brushed finish. Brushed-finish Stainless Steel requires frequent
cleaning and care, to maintain its quality of appearance. Without adequate care it is realistic to
expect that it will show signs of corrosion in time.
Stainless Steel is definitely not a maintenance-free material. Cleanliness and Stainless
Steel are closely related.
After assembly, we recommend that owners apply a thin layer of Olive Oil with a clean rag,
to all exposed Stainless Steel areas. This should then be polished in and buffed off with another
clean rag to a non-oily finish. This process will aid protection against dirt and other corrosive
contaminants, by providing a temporary food-safe shield. The Olive Oil layer also makes later
polishing and removal of fingerprints easier. This process should be repeated frequently when
cleaning your grill.
You may wish to buy a protective cover for your BBQ. It is recommended that a BBQ cover
should be used at all times when the BBQ is not in use to protect your investment. However it is
vital to understand that unless the BBQ is cool, clean and dry when the cover is fitted, use
of a cover can in fact be detrimental. A cover placed on a warm, wet or unclean BBQ (or any
mix of these factors) can in fact be a very effective corrosion breeder!
For this reason, the BBQ should always be cool, cleaned of any surface contaminants or dirt
and be thoroughly dry before a protective cover is fitted. This is especially important before a
BBQ is stored for any length of time i.e. if the BBQ doesn’t get frequent use, or when the BBQ is
stored away over winter months.
In order to maintain the quality of the finish of your Stainless Steel BBQ, the owner must be
vigilant with care and maintenance according to this advice.
Look after your investment carefully and it will serve you well for many years to come.

11
TROUBLE SHOOTING
PROBLEM
POSSIBLE CAUSE
SOLUTION
Burners will not light using
the ignition system
1. LP gas cylinder is empty
2. Faulty regulator
3. Obstructions in burner
4. Obstructions in gas jets or gas hose
5. Electrode wire loose or disconnected
on electrode or ignition unit
6. Electrode or wire is damaged faulty
pushbutton igniter
1. Replace with full cylinder
2. Have regulator checked
or replace
3. Clean burner
4. Clean jets and gas hose
5. Reconnect wire
6. Change electrode and
wire change igniter
Burner will not light with a
match
1. LG gas cylinder is empty
2. Faulty regulator
3. Obstructions in burner
4. Obstructions in gas jets or gas hose
1. Replace with full cylinder
2. Have regulator checked
or replace
3. Clean burner
4. Clean jets and gas hose
Low flame or flashback (fire
in burner tube-a hissing or
roaring noise may be heard)
1. LP gas cylinder too small
2. Obstructions in burner
3. Obstructions in gas jets or gas hose
4. Windy conditions
1. Use larger cylinder
2. Clean burner
3. Clean jets and gas hose
4. Use BBQ in a more
sheltered position
Table of contents
Other Tasty Trotter Grill manuals