Taylor Swoden 300105QUK User manual

MODEL PLEASE READ THIS MANUAL CAREFULLY BEFORE OPERATING
THE PRODUCT AND RETAIN IT FOR FUTURE REFERENCE
300105QUK
COFFEE MAKER
INSTRUCTION MANUAL


CONTENTS
01-08
GB
09-16
ES
17-24
PL
25-32
IT
33-40
DE
41-48
NL
49-56
FR
57-64
PT

1.Read all instructions before operating or using
the appliance.
2.Do not touch hot surfaces.
3.To protect against electric shock, do not the
place cord, plug or appliance in water or any
other liquid.
4.Close supervision is necessary whenever the
appliance is used near children.
5.Unplug the appliance from the electrical socket
when it is not in use and before cleaning. Allow it
to cool before putting on or removing parts and
before cleaning.
6.Do not operate the appliance if the cord or plug
is damaged or after the appliance malfunctions
or has been damaged in any way. Return the
appliance to our authorised service facility for
examination, repair or adjustment.
7.The use of an accessory not intended for use
with this appliance may cause injury.
8.Do not use the appliance outdoors.
9.Do not allow the cord to hang over the edge of
GB
IMPORTANT SAFETY INSTRUCTIONS
When using electrical appliances, basic safety
precautions should always be followed, including:
GB-01

GB
a table or counter or come into contact with a
hot surface.
10.Do not place the appliance on or near a hot
gas or electric burner or oven.
11.Do not move the unit when the appliance is
on or when there is hot liquid in the thermal
carafe.
12.Ensure the appliance is off before connecting
or disconnecting the plug from the electrical
socket.
13.Only use the appliance for its intended
purpose.
14.WARNING: To reduce the risk of fire and electric
shock, do not remove the bottom cover of the
appliance. There are no user-serviceable parts
inside. Repairs should be done by authorised
professionals only.
15.Use cold filtered or bottled water for the best
results. Warm water or other liquids may
damage the appliance.
16.Scalding may occur if the water reservoir cover
is lifted or removed during the brewing cycle.
17.If the supply cord is damaged, it must be replaced
by the manufacturer or a similarly qualified person
to prevent risk to person and property.
GB-02

GB
GB-03
Short Cord Instructions
This appliance has a three-prong plug. To reduce the risk of electric shock, the
18.The glass carafe is designed for use with this
appliance only. It must never be used in any
other drip-type coffee maker, on a range
top or in a microwave.
19.Never clean the inside of the carafe with a
hard implement, scouring pad or abrasive
cleaning products. Scratches on the glass
can eventually cause the glass to break.
20.Never stir the liquid inside the carafe with a
spoon or other utensil.
21.Do not use a cracked glass carafe or a carafe
with a loose or weakened handle.
22.Never use ice cubes in the carafe or place
the carafe in the refrigerator.
23.Never drink directly from the carafe. Always check
beverages for broken glass before drinking.
24.This product is not intended for use by children.
25.Do not tilt or overturn the carafe as this may
cause spillage.
26.Always carry the carafe by the handle.
27.Never leave an empty carafe on the warming
plate as this may cause it to crack.

GB
GB-04
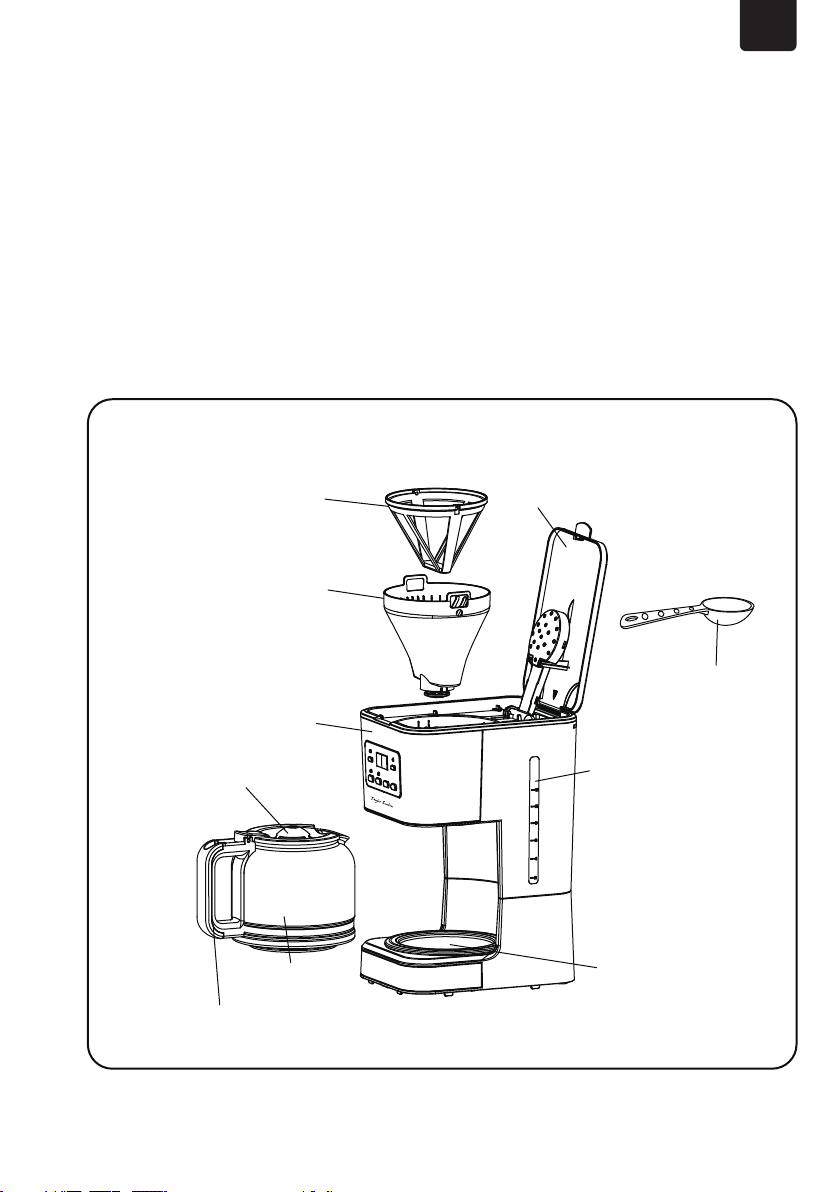
PRODUCT OVERVIEW
1. Top cover
2. Filter basket
3. Funnel
4. Control panel
5. Carafe cover
6. Carafe
7. Carafe handle
8. Warming plate
9. Water gauge
10.Spoon
plug is intended to fit into an electric socket in one way only. If the plug does not
fit fully into the socket, reverse it. If it still does not fit, contact a qualified
electrician. Do not attempt to modify the plug in any way.
A short power cord is provided to reduce the tripping and entanglement risks
posed by a longer cord. Extension cords are available and may be used with the
appropriate care. If an extension cord is used, the marked electrical rating of the
extension cord should be at least as great as the electrical rating of the appliance.
The appliance is grounded and the extension cord should provide a grounded
type 3 wire cord. Arrange the cord so that it does not hang over a countertop or
tabletop where it can be pulled on by children or tripped over.

GBGB
Model No. 300105QUK
Power Supply 220-240V ~ 50-60Hz
Power Consumption 950W
Dimensions L230*W168*H325mm
Capacity 1.5L
TECHNICAL SPECIFICATIONS
Specifications and design are subject to change without notice.
1. ON/OFF button: Press to turn the appliance on and off.
2. PROG button: Press to pre-set the auto-brew time.
3. HOUR button: Press to set the clock and pre-set time (00-23 in one hour
increments).
4. MIN button: Press to set the clock and pre-set time (00-59 in one minute
increments).
5. STRONG button: Press to lengthen the brewing time and thus alter the
strength of the coffee. You can start the STRONG function during the brewing
process or start the appliance using the STRONG button.
6. CLEAN button: Press to decalcify your appliance.
BEFORE FIRST USE
1.Before using the appliance for the first time, remove the carafe and filter basket
and wash them in warm, soapy water and then rinse and dry thoroughly.
2.Wipe the main body of the appliance with a soft, damp cloth and allow it to dry
thoroughly. Do not immerse the main body in water or any other liquid.Never
use harsh or abrasive cleaning detergents or scourers to clean the appliance as
this could cause damage.
3.Clean your appliance before using it by running two brewing cycles (as
CONTROL PANEL ILLUSTRATION
GB-05
HOUR MIN
ON/OFFPROGSTRONGCLEAN

GB
GB-06
described below) without coffee or a coffee filter.
OPERATING INSTRUCTIONS
1. Place the appliance on a hard, flat surface and connect it to the electricity
supply.
2. Open the top cover and pour cold water (preferably bottled or filtered water)
into the water chamber. The water level indicator shows the number of cups of
coffee. Do not exceed the maximum fill level (12 cups). We do not recommend
making fewer than four cups of coffee.
3. Place the carafe with the lid closed in the coffee maker, making sure it is fully in
place to activate the PAUSE & SERVE function.
CAUTION: If the carafe is not positioned properly on the warming plate, hot
water or hot coffee could spill over.
4. With the top cover fully open, insert the filter basket (or coffee filtering paper)
into the funnel.
5. Add coffee using the measuring scoop provided. Use the same coffee: water
ratio you use when you prepare ground coffee.
6. Clo se the top cover and ensure it is closed securely.
7. Then:
Make coffee immediately
• Press the ON/OFF button to immediately begin brewing coffee. The red LED
light will flash to indicate the brewing cycle is taking place. The LCD display will
read“ON”in the top right-hand corner alongside the coffee cup icon.
• If you want to stop the appliance during the brewing cycle, press the ON/OFF
button again.
Pre-set the auto-brew time
• You can pre-set the auto-brew time using the PROG function. First, set the
current time. When plugged in, the coffee maker will show“00:00”by default.
Use the HOUR and MIN buttons to set the current time.
• Set the desired auto-brew time. Press the PRO button once. The display will
show“PROGRAM”. Set the desired start time using the HOUR and MIN
buttons.
• The appliance will now be in auto-brew mode. A green light will come on and
the display will show“AUTO”, the current time. Your coffee maker will
automatically begin brewing at the pre-set time. When the brew cycle begins,
the red light will flash to indicate the coffee maker is in operation and the
green light will turn off.
• Press the PRO button for about three seconds to cancel the auto-brew setting.
CAUTION: Never open the top cover during the brewing cycle even if no water
is draining from the funnel. Extremely hot water/coffee can spill out from the
filter basket and cause injury. If water/coffee is not draining from the filter
basket, IMMEDIATELY unplug the appliance and wait 10 minutes before
opening the top cover and checking the filter.
NOTE: This appliance has a PAUSE & SERVE function that allows you to pour a
cup of coffee at any time before the brewing cycle is complete. If activated, the
appliance will stop dripping automatically but for no longer than 30 seconds.

GB
GB-07
While the PAUSE & SERVE function is a convenient way to pour a cup of coffee
mid-cycle, we recommend you wait until the completion of the brewing cycle
as the strength of the coffee poured mid-cycle may vary from the finished
brew and will affect the coffee’s flavour.
8. When the brewing cycle ends and the water level indicates that the water
chamber is empty, there will still be hot liquid in the filter basket. Wait a few
minutes for the remaining liquid to drip through into the carafe. The coffee
maker will then enter warming mode and the red indicator light will remain on
for 40 minutes. Always switch the appliance off when the carafe is empty or
you no longer want to keep coffee hot.
9. Once the warming time is finished and the coffee grounds have cooled, open
the top cover and carefully remove the filter by grasping the handle and lifting
it straight up from the funnel compartment. Discard the used coffee grounds.
Note: If two or more pots of coffee are needed, it is recommended that the
appliance be allowed to cool for 10 minutes between each pot. The filter
should be rinsed after each brewing cycle.
COFFEE-MAKING HINTS AND TIPS
1. Always use fresh, cold water to fill the water chamber.
2. The quantity of ground coffee used can be adapted to taste. Use more or less
coffee for a stronger or weaker flavour.
3. If using regular ground coffee, more grounds are needed per cup to achieve
the same strength of flavour as finer ground coffee.
4. After using packaged ground coffee, tightly reseal and store it in a cool, dry
place.
5. To achieve the best-tasting coffee, use whole coffee beans and finely grind
them in a coffee grinder.
6. Do not reuse ground beans as this will greatly reduce the flavour of the coffee.
7. Reheating the resulting coffee is not recommended as this interferes with the
taste.
CLEANING AND MAINTENANCE
1. Always unplug the appliance and allow it to cool before cleaning.
2. Wash the carafe, carafe lid and removable filter basket holder in hot, soapy
water or the dishwasher (in the top rack). DO NOT place any other parts of the
appliance in the dishwasher.
3. Never use harsh or abrasive cleaning products on any part of the appliance. To
clean, simply wipe with a soft, damp cloth. The warming plate may be wiped
with a clean, damp cloth when necessary. For hard to remove stains, use a
plastic mesh pad or cloth dipped in vinegar.
IMPORTANT: Never immerse the warming plate or main body of the appliance
in water or any other liquid. Do not try to clean the inside of the water
chamber with a cloth as this will leave lint residue that may clog the appliance.
Simply rinse with cold water periodically.
4. DECALCIFYING YOUR COFFEE MAKER (CLEAN function)
Calcium build-up frequently occurs in drip coffee makers. This build-up is

GB
GB-08
DISPOSAL
WARRANTY: 2 YEARS
As a responsible retailer, we care about the environment.
As such, we urge you to follow the correct disposal procedures for
the appliance and its packaging materials. This will help conserve
natural resources and ensure that these items are recycled in a
manner that protects health and the environment.
You must dispose of the appliance and its packaging according to
local laws and regulations.
As this appliance contains electronic components, it and its
accessories must be disposed of separately from household waste
when the appliance reaches the end of its life.
Contact your local authority to learn about your disposal and
recycling options.
The appliance should be taken to your local recycling centre. Some
collection points accept appliances free of charge.
normal and caused by
minerals commonly found in drinking water. The appliance needs to be
cleaned periodically to remove any calcium or mineral deposits. You will know
when your unit needs decalcifying when you notice an obvious slowing of the
brewing cycle.
We recommend decalcifying your unit with a solution of white vinegar and
cold water. A solution of two tablespoons of white vinegar to one carafe of
cold water works best. Pour this solution into the water chamber and follow
normal operating instructions without a filter in the filter holder. Press the
CLEAN button. When the brewing cycle is finished, empty the carafe and rinse
with water. Refill the water chamber with cold water and repeat the brewing
cycle twice more with water only. This will remove any remaining vinegar
solution. We recommend you do this four times annually.
Note: After the appliance is used 60 times, the CLEAN light (green) will flash to
remind users to clean the unit. Press the CLEAN button to clean the appliance
(in standby mode) or the green light will keep flashing.

1.Lea todas las instrucciones antes de comenzar
a utilizar la cafetera.
2.No toque las superficies calientes.
3.No sumerja el enchufe ni el cable eléctrico en
agua u otros líquidos para evitar riesgos de
incendios, descargas eléctricas o cortocircuitos.
4.Extreme la precaución cuando utilice el aparato
en presencia de niños.
5.Retire el enchufe de la toma de corriente antes
de limpiar la cafetera o cuando no esté en uso.
Deje que se enfríe completamente antes de
almacenarla, instalar componentes o lavarla.
6.Si el cable o el enchufe están dañados, o el aparato
no funciona correctamente o se ha caído o dañado
de algún modo, lleve el aparato a un centro
autorizado para que lo examinen y reparen.
7.No use accesorios no recomendados por el
fabricante ya que podrían producirse incendios,
descargas eléctricas o lesiones personales.
8.No utilice el aparato al aire libre.
9.No deje que el cable eléctrico cuelgue del
ES
INSTRUCCIONES DE SEGURIDAD
Cuando use aparatos eléctricos, deberá tener
en cuenta las siguientes instrucciones de seguridad
básicas:
ES-09

ES
borde de la mesa ni toque superficies calientes.
10.No utilice ni coloque ninguna de las partes de
este aparato cerca de cocinas de gas, placas
eléctricas y hornos calientes.
11.No mueva la unidad mientras esté encendida o
cuando contenga café caliente en el recipiente.
12.Asegúrese de que el aparato esté apagado
antes de enchufarlo o desenchufarlo de la
toma de corriente.
13.Use el aparato exclusivamente para el fin con
el que fue diseñado.
14.ATENCIÓN: Para reducir el riesgo de incendio y de
choque eléctrico, no retire la cubierta inferior del
aparato. No hay ninguna parte del aparato que
pueda reparar usted mismo. Las reparaciones debe
llevarlas a cabo un profesional autorizado.
15.Utilice agua fría filtrada o de botella para obtener
mejores resultados. La cafetera podría dañarse si
echa agua caliente u otros líquidos.
16.Al levantar la cubierta del depósito de agua
durante el proceso, podría quemarse.
17.Si el cable o el enchufe están dañados, o el aparato
no funciona correctamente o se ha caído o dañado
de algún modo, lleve el aparato a un centro
autorizado para que lo examinen y reparen.
ES-10

ES
ES-11
Instrucciones del cable corto
Este aparato tiene un cable de conexión a tierra de tres alambres. Para reducir el
riesgo de descargas eléctricas, el enchufe sólo se puede introducir en la toma de
18.La jarra está diseñada para ser utilizada con la
cafetera únicamente. Nunca debe utilizarse
con otros fines.
19.Nunca lave el interior de la jarra con productos
de limpieza abrasivos ni estropajos duros. Los
arañazos en el vidrio podrían provocar que se
rompa.
20.Nunca remueva el líquido de la jarra con una
cuchara ni con cualquier otro utensilio.
21.No utilice una jarra con el vidrio quebrado ni
una jarra con la agarradera floja o rota.
22.Nunca introduzca cubitos de hielo en la jarra
ni coloque la jarra en el frigorífico.
23.No beba el café directamente de la jarra.
Verifique siempre que no haya trocitos de
vidrio antes de beber el café.
24.Los niños no deben utilizar este aparato.
25.No vuelque ni de la vuelta a la jarra ya que
podría derramar el contenido.
26.Utilice las agarraderas de la jarra.
27.Nunca deje la jarra vacía sobre la placa calefactora
ya que podría romperse.
ES
ES-12
IDENTIFICACIÓN DE LAS PARTES
1. Cubierta superior
2. Filtro
3. Embudo
4. Panel de control
5. Cubierta de la jarra
6. Jarra
7. Agarradera de la jarra
8. Placa calefactora
9. Escala de medición
de agua
10. Cuchara
corriente de una sola manera. Si no puede introducir completamente el enchufe en
la toma de corriente, dele la vuelta al enchufe. Si aún no puede introducir el enchufe,
póngase en contacto con un electricista. Nunca intente modificar el enchufe.
Se proporciona un cable de alimentación corto para reducir los riesgos de enredarse
o tropezarse con un cable más largo. Existen cables alargadores que pueden
utilizarse extremando la precaución. Si utiliza un cable alargador, los valores
eléctricos nominales marcados deben ser al menos tan grandes como los valores
eléctricos nominales del aparato. El aparato es de conexión a tierra y el cable
alargador debe ser un cable de conexión a tierra de 3 alambres. El cable más largo
debe colocarse de modo que no quede colgado sobre la superficie de trabajo o
mesa para que los niños no puedan tirar de él ni ocasione tropiezos.

GBES
Modelo Nº 300105QUK
Alimentación 220-240V ~ 50-60Hz
Consumo 950W
Dimensiones Largo230*Ancho168*Alto325
Capacidad 1.5L
ESPECIFICACIONES TÉCNICAS
Las especificaciones y las medidas podrían variar del artículo real
1. Botón ON/OFF: Pulse este botón para encender o apagar la cafetera.
2. Botón PROG: Pulse este botón para seleccionar el tiempo de preparado de café
automático.
3. Botón HOUR: Pulse este botón para programar el tiempo de preparado (00-23
en incrementos de una hora).
4. Botón MIN: Pulse este botón para programar los minutos en el tiempo de
programado (00-59 en incrementos de un minuto).
5. Botón STRONG: Pulse este botón para prolongar el tiempo de preparado del
café para que este sea más fuerte. Puede pulsar el botón STRONG cuando el
café esté hirviendo o comenzar el proceso pulsando directamente el botón
STRONG.
6. Botón CLEAN: Pulse este botón para descalcificar el aparato.
ANTES DEL PRIMER USO
1.Antes de utilizar la cafetera por primera vez, retire la jarra y la estructura del
filtro y lávelos en agua caliente con jabón. Después, enjuáguelos y séquelos.
2.Limpie el exterior de la cafetera con un trapo suave y húmedo y espere hasta que
se seque completamente. Nunca sumerja la cafetera en agua u otros líquidos. No
utilice productos de limpieza abrasivos para evitar dañar la superficie.
FUNCIONAMIENTO DEL PANEL DE CONTROL
ES-13
HOUR MIN
ON/OFFPROGSTRONGCLEAN

ES
ES-14
3.Limpie el interior de la cafetera antes de utilizarla dejándola funcionar 2 ciclos
(como se describe a continuación) sin café ni filtro de café.
INSTRUCCIONES DE FUNCIONAMIENTO
1. Coloque la cafetera sobre una superficie plana y estable y enchúfela a una
toma de corriente.
2. Abra la cubierta superior y vierta agua fría (preferiblemente agua mineral o
filtrada) en el depósito de agua. El medidor de nivel de agua le indicará el
número de tazas de café que puede obtener con el agua. No sobrepase la
marca de llenado máximo (12 tazas). Se recomienda hacer un mínimo de
cuatro tazas de café.
3. Coloque la jarra con la tapa cerrada en la cafetera y asegúrese de que está bien
colocada en su sitio antes de activar la función de PAUSAR & SERVIR.
ATENCIÓN: Si la jarra no está bien colocada sobre la placa calefactora, el agua
o el café caliente podrían derramarse.
4. Introduzca la estructura del filtro (o el papel de filtro) en el embudo.
5. Añada el café molido con la cuchara medidora incluida. Utilice la misma
proporción de café y agua que cuando prepare un café soluble.
6. Cierre la cubierta superior y asegúrese de que está bien cerrada.
7. Seguidamente:
Preparar café al instante
• Pulse el botón ON/OFF para que la cafetera comience a preparar el café. El LED
rojo parpadeará para indicar que el café se está preparando. En la esquina
superior derecha de la pantalla aparecerá“ON”y un icono de una taza de café.
• Si desea parar el proceso, pulse el botón ON/OFF de nuevo.
Programar la hora de preparación del café
• Puede programar la cafetera para que prepare el café a la hora que seleccione
utilizando la función PROG. En primer lugar, introduzca la hora actual. Al
enchufar la cafetera, aparecerá por defecto“00:00”. Con los botones HOUR y
MIN, introduzca la hora actual.
• Seleccione la hora a la que quiere programar la preparación del café. Para ello,
pulse el botón PROG una vez. En la pantalla aparecerá“PROGRAM”. Seleccione la hora a
la que quiere que comience a preparar el café con los botones de HOUR y MIN.
• La cafetera estará ahora en modo preparado automático. El indicador luminoso
verde se encenderá y en la pantalla aparecerá“AUTO”y la hora actual. La
cafetera comenzará automáticamente a preparar el café a la hora predefinida.
Cuando comience el ciclo de preparado de café, el indicador rojo comenzará a
parpadear para indicar que la cafetera está en funcionamiento y se apagará el
indicador verde.
• Mantenga pulsado el botón PROG durante tres segundos para cancelar el
ajuste de preparado de café automático.
ATENCIÓN: Nunca abra la cubierta superior durante el ciclo de preparación de
café, aunque no vea que las gotas de café caen por el embudo. El café o el
agua extremadamente caliente podría salir del filtro y provocar quemaduras. Si
durante la preparación del café, observa que no caen gotas de café del filtro,
desenchufe INMEDIATAMENTE la cafetera y espere 10 minutos antes de abrir la
tapa superior y verificar el estado del filtro.

ES
ES-15
NOTA: Este aparato tiene la función PAUSAR & SERVIR, que permite servirse
una taza de café en cualquier momento antes de que el ciclo de preparado de
café haya terminado. Si esta función está activada, la cafetera dejará de gotear
automáticamente durante 30 segundos como máximo. La función PAUSAR &
SERVIR le permite servirse cómodamente una taza de café sin tener que
esperar a que finalice el proceso. Sin embargo, se recomienda esperar hasta el
final del ciclo ya que la intensidad del café a mitad del ciclo puede variar de la
intensidad al final del ciclo y afectar el sabor del café.
8. Cuando termina el ciclo y observe en la escala de medición de agua que no
hay agua en el depósito, podría quedar agua caliente en el filtro. Espere unos
minutos hasta que se filtre el líquido en la jarra. La cafetera entrará en modo
mantener el calor y el indicador rojo permanecerá encendido durante 40
minutos. Apague siempre la cafetera cuando la jarra esté vacía o cuando no
desee mantener el café caliente.
9. Cuando se acabe el tiempo de mantener el calor y el café molido se haya
enfriado, abra la tapa superior y retire el filtro agarrándolo por el mango y
retirándolo en posición vertical del embudo. Tire el café molido que quede en
la cafetera.
Nota: Si necesita preparar más de una tanda de café, se recomienda dejar que
la cafetera se enfríe durante 10 minutos entre cada tanda. Enjuague el filtro
tras cada tanda.
CONSEJOS DE PREPARACIÓN DE CAFÉ
1. Utilice siempre agua fría para llenar el depósito de agua.
2. Puede adaptar la cantidad de café molido a su gusto. Use más café molido
para obtener un café más intenso y menos café molido para un sabor más
suave.
3. Si utiliza café molido normal, necesitará más cantidad por cada taza para
conseguir la misma intensidad de sabor que con café molido fino.
4. Cuando haya abierto el paquete de café molido, vuelva a cerrarlo bien y
consérvelo en un lugar fresco y seco.
5. Para un sabor óptimo, compre el café en granos y muélalos bien justo antes de
añadirlos a la cafetera.
6. No reutilice el café molido ya que esto reduce el sabor del café.
7. No se recomienda recalentar el café ya que éste tiene un mejor sabor
inmediatamente después de su elaboración.
LIMPIEZA Y MANTENIMIENTO
1. Desenchufe la cafetera y deje que se enfríe antes de lavarla.
2. Lave la jarra, la tapa de la jarra y el soporte extraíble del filtro con agua tibia
con jabón o en la fila superior del lavavajillas. NO lave ninguna otra pieza en el
lavavajillas.
3. No utilice productos de limpieza abrasivos para limpiar las partes de la
cafetera. Para lavarlas, utilice un trapo suave y húmedo. La placa calefactora se
puede limpiar con un trapo húmedo cuando sea necesario. Para retirar
manchas difíciles, utilice un estropajo de plástico o un trapo con vinagre.
IMPORTANTE: Nunca sumerja la placa calefactora ni el cuerpo principal del
ES
ES-16
ELIMINACIÓN DEL PRODUCTO
Garantía: 2 años cuyo origen de defecto sea un defecto de fabricación.
Como vendedores responsables, nos preocupamos por el
medioambiente.
Le instamos a seguir los procedimientos de un reciclaje correcto del
aparato y su embalaje. Al asegurarse de depositar el aparato en un
lugar autorizado, estará contribuyendo a proteger el medio
ambiente y la salud humana de posibles daños que podrían
ocasionarse en el caso contrario.
Recicle este aparato y su embalaje según las normas y reglas de su
localidad.
Debido a los componentes electrónicos de este producto, no debe
desecharse junto con los residuos domésticos no clasificados al
final de su vida útil.
Para más información sobre el tratamiento y reciclaje de este
producto, contacte con el punto limpio de su localidad.
Lleve este aparato a un punto de recogida especial para el reciclaje
de equipos electrónicos.
aparato en agua u otros líquidos.No intente limpiar el interior del depósito de
agua con un trapo, ya que este dejará restos de tejido que podrían atascar la
cafetera. Para limpiarlo, simplemente aclárelo con agua fresca frecuentemente.
4. CÓMO DESCALCIFICAR LA CAFETERA (Función CLEAN)
El proceso de descalcificación limpia los depósitos de cal que se forman en las
partes metálicas de la cafetera. Para que su cafetera funcione de manera
eficiente, es necesario limpiar y quitar periódicamente los depósitos de cal.
Cuando el ciclo de preparado de café sea más lento de lo normal, descalcifique
la unidad.
Se recomienda descalcificar la unidad con una mezcla de vinagre blanco y
agua caliente. La mejor mezcla es 2 cucharadas de vinagre blanco para una
jarra de agua fría. Vierta la mezcla en el depósito de agua y pulse el botón
CLEAN para que la cafetera empiece a funcionar. No coloque ningún filtro.
Cuando termine el ciclo, vacíe la jarra y aclárela con agua. Repita el proceso
dos veces más utilizando únicamente agua en el depósito de agua, para
eliminar los restos de vinagre de la cafetera. Se recomienda repetir este
proceso 4 veces al año aproximadamente.
Nota:Tras 60 usos, el indicador verde CLEAN parpadeará para recordarle que
debe lavar la unidad. Pulse el botón CLEAN para limpiar la cafetera (en modo
reposo) o el indicador luminoso verde seguirá parpadeando.

1.Przeczytaj wszystkie instrukcje przed rozpoczęciem
korzystania z urządzenia.
2.Nie dotykaj rozgrzanych powierzchni.
3.Aby zabezpieczyć się przed porażeniem prądem,
nie należy dopuszczać do kontaktu przewodu,
wtyczki lub urządzenia z wodą lub innymi płynami.
4.Konieczny jest ścisły nadzór za każdym razem,
gdy urządzenie jest używane w pobliżu dzieci.
5.Odłącz urządzenie od gniazdka elektrycznego,
gdy nie jest ono używane i przed czyszczeniem.
Pozwól urządzeniu ostygnąć przed założeniem
lub zdjęciem jego części oraz przed czyszczeniem.
6.Nie należy obsługiwać urządzenia, jeśli przewód
lub wtyczka są uszkodzone lub gdy urządzenie
działa nieprawidłowo lub gdy zostało w jakikolwiek
sposób uszkodzone. Zwróć urządzenie do naszego
autoryzowanego serwisu w celu sprawdzenia,
naprawy lub regulacji.
7.Korzystanie z akcesoriów nieprzeznaczonych do użytku
z tym urządzeniem może spowodować obrażenia.
8.Nie używaj urządzenia na zewnątrz.
9.Nie pozwól, aby przewód zwisał nad krawędzią
PL
WAŻNE INSTRUKCJE DOTYCZĄCE
BEZPIECZEŃSTWA
Podczas korzystania z urządzeń elektrycznych
należy zawsze przestrzegać podstawowych
zasad bezpieczeństwa, w tym:
PL-17
Table of contents
Languages:
Other Taylor Swoden Coffee Maker manuals


