Taylor Swoden 8433325504823 User manual


32-40
41-49
50-57
58-65

IMP
O
RT
A
NT
SA
FE
G
U
A
RD
S
When usin
g
electrical a
pp
liance. Basic safet
y
p
recautions shoul
d
alwa
y
s
b
efollowe
d
includin
g
the followin
g
:
1. Rea
d
all instructions.
2. Make sure that
y
ou
r
outlet volta
g
e corres
p
onds to the volta
g
e
stated on the ratin
g
label of the coffee make
r
.
3. To
p
rotect a
g
ainst fire, electric shock and in
j
ur
y
to
p
ersons do
not immerse cord,
p
lu
g
,o
r
a
pp
liance in wate
r
o
r
othe
r
li
q
uid.
4. Close su
p
ervision is necessar
y
when an
y
a
pp
liance is used
by
o
r
nea
r
children.
5. Un
p
lu
g
from outlet when not in use and
b
efore cleanin
g
.
Allow to coolin
g
b
efore
p
uttin
g
on o
r
takin
g
off
p
arts, and
b
efore
cleanin
g
the a
pp
liance.
6. Do not o
p
erate an
y
a
pp
liance with a dama
g
ed cor
d
o
r
p
lu
g
o
r
afte
r
the a
pp
liance malfunctions, o
r
has
b
een dama
g
ed in an
y
manner. Return a
pp
liance to an authorized service facilit
y
fo
r
examination, re
p
ai
r
o
r
ad
j
ustment.
7. The use of accessor
y
not recommende
d
by
the a
pp
liance
manufacture
r
ma
y
result in fire, electric shock o
r
in
j
ur
y
to
p
ersons.
8. Do not use outdoors.
9. Do not let cor
d
han
g
ove
r
ed
g
eoftableo
r
counter, o
r
touch
hot surface.
10. Do not
p
lace on o
r
nea
r
a hot
g
as o
r
electric
b
urner, o
r
in a
heate
d
oven.
11. Do not use a
pp
liance fo
r
othe
r
than intended use.
12. The containe
r
is desi
g
ne
d
fo
r
use with this a
pp
liance. It mus
t
neve
r
b
eusedonaran
g
eto
p
.
13. Do not clean containe
r
with cleansers, steel wool
p
ads, o
r
othe
r
abrasive material.
14. To disconnect, turn off switch, remove
p
lu
g
from wall outlet.
Alwa
y
s hold the
p
lu
g
. But neve
r
p
ull the cord.
15. Scaldin
g
ma
y
occu
r
if the cove
r
is removed durin
g
the
b
rewin
g
c
y
cles. Be careful not to
g
et
b
urned
by
the steam.
16. Some
p
arts of a
pp
liance are hot when o
p
erated, so do not
1

touch with hand. Use handles o
r
knobs onl
y
.
17. Neve
r
leave the em
p
t
y
carafe on the kee
p
in
g
warm
p
late
otherwise the carafe is liable to crack.
18. Neve
r
use the a
pp
liance if the carafe shows an
y
si
g
ns of
cracks o
r
carafe havin
g
a loose o
r
weakene
d
handle. Onl
y
use the
carafe with this a
pp
liance.
Use carefull
y
as the carafe is ver
y
fra
g
ile.
19. This a
pp
liance is not intended fo
r
used
by
p
ersons
(
includin
g
children
)
with reduced
p
h
y
sical, sensor
y
o
r
mental ca
p
abilities,
o
r
lac
k
of ex
p
erience and knowled
g
e, unless the
y
have
b
een
g
iven su
p
ervision o
r
instruction concernin
g
use of the a
pp
liances
by
a
p
erson res
p
onsible fo
r
thei
r
safet
y
. Children shoul
d
b
e
su
p
ervised to ensure that the
y
do not
p
la
y
with the a
pp
liance.
20. Do not set a hot containe
r
on a hot o
r
cold surface.
21. WARNING:TO REDUCE THE RISK OF FIRE O
R
ELECTRIC SHOCK.DO NOT REMOVE COVER.NO USE
R
SERVICEABLE PARTS INSIDE.REPAIR SHOULD BE DONE
BY AUTHORIZED SERVICE PERSONNE
L
ONLY.DO NOT
IMMERSE IN ANY LIQUID .
22. This a
pp
liance is intende
d
to
b
e used in househol
d
and
simila
r
a
pp
lications such as:
– Staff kitchen areas in sho
p
s, offices and othe
r
workin
g
environments;
– Farm houses;
–B
y
clients in hotels, motels and othe
r
residential t
yp
e
environments;
–Be
d
and
b
reakfas
t
t
yp
e environments.
SAVE THESE INSTRUCTIONS.
HOUSEHOLD USE ONLY
2
Notes on the cord plug
This appliance has a polarized plug, To reduce the risk of electric shock, this plug is intended
to fit into a polarized outlet only one way, If the plug does not fit fully into the outlet, reverse
the plug, If it still does not fit, contact a qualified electrician, Do not attempt to modify the
plug in any way.
Notes on the cord
a) A short power-supply cord (or detached power-supply cord) is to be provided to reduce
risks resulting from becoming entangled in or tripping over a long cord.
b) Longer detachable power-supply cords or extension cords are available and may be used if
care is exercised in their use.
c) If a long detachable power-supply cords or extension cord is used,
1) The marked electrical rating of the detachable power-supply cord or extension cord should
be at least as great as the electrical rating of the appliance.
2) The longer cord should be arranged so that it will not drape over the counter top or table
top where it can be pulled on by children or tripped over.
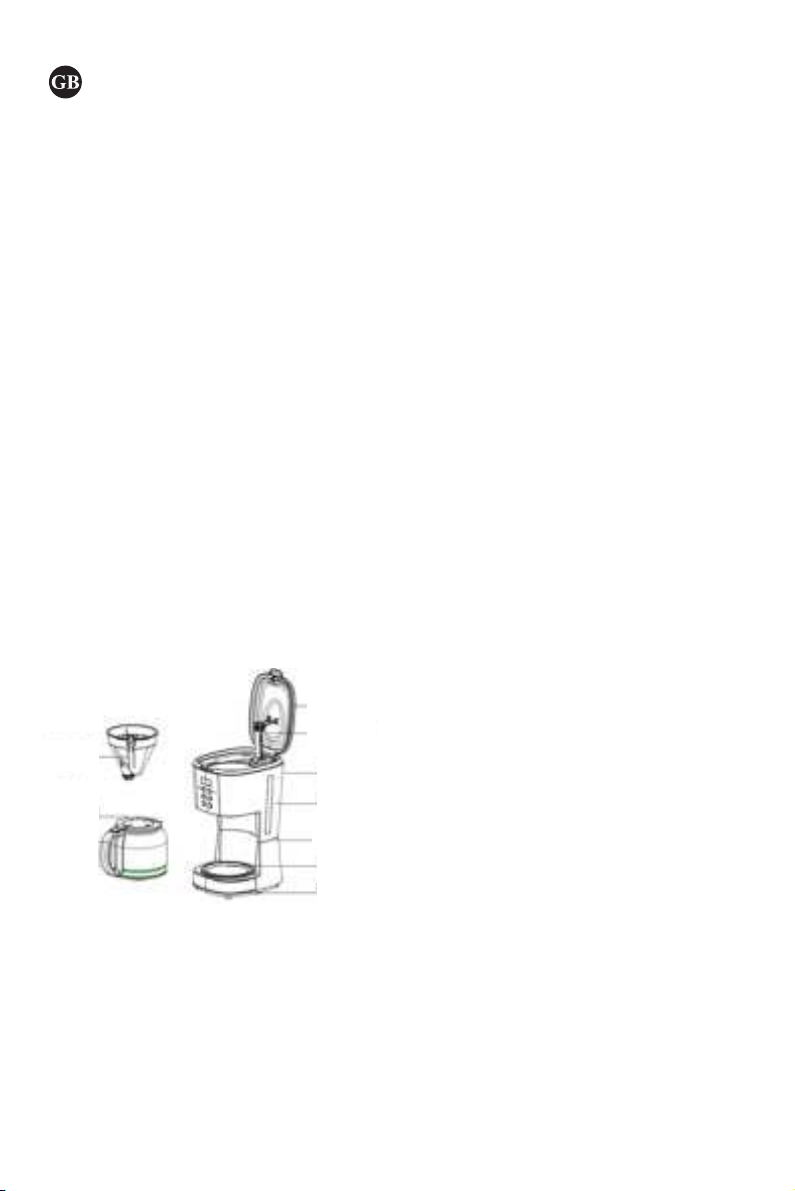
KNOW YOUR COFFEE MAKER
1. Funnel
2. Carafe lid
3. Carafe handle
4. Carafe
5. Top lid
1
2
3
5
6
4
7
8
9
10
11
3

6. Sprayer
7. Water tank
8. Water gauge
9. Main housing
10. Warming plate
11. Bottom cover
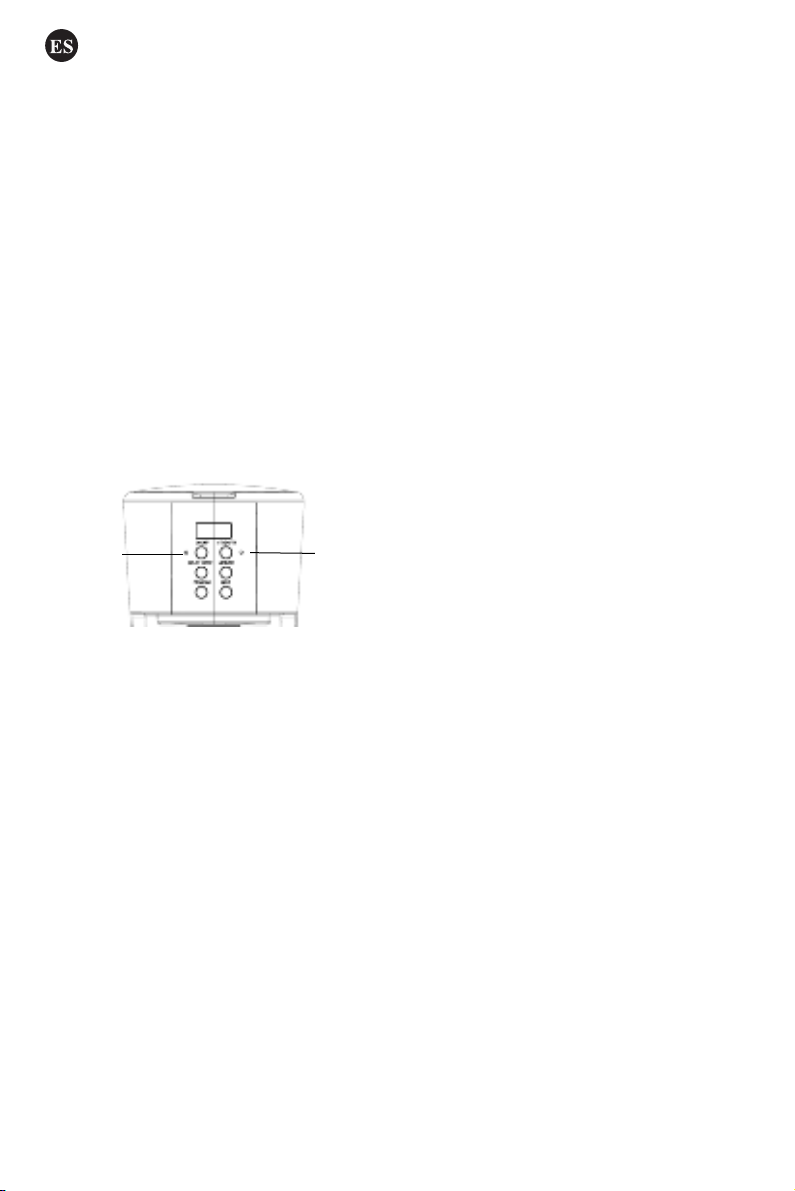
CONTROL PANEL
BEFORE THE FIRST USE
Check that all accessories are complete and the unit is not damaged. Fill water into water
tank to the MAX level and brew water for several times without coffee powder, then discard
the water. Clean and dry all detachable parts thoroughly according to the section “CLEANING
AND MAINTENANCE”
USING YOUR COFFEE MAKER
1. Open the top cover and fill the water tank with drinking water. The water level should not
exceed MAX level as indicated on the water gauge.
2. Place the funnel into the funnel support, make sure it is assembled correctly, otherwise the
top cover cannot be closed. Place permanent filter in the funnel.
3. Add coffee powder into permanent filter. Usually a cup of coffee needs a level spoon of
coffee powder, but you may adjust according to personal taste. Close the top cover
completely.
4. Insert the carafe with handle closed onto keeping warm plate horizontally.
5. Plug the power cord into the outlet. If you want to adjust the coffee strength, you can press
“ Strength” button once, and then the “Strength” indicator will illuminate in orange and the
Strength
in
d
i
ca
t
or
ON/OFF
indicato
r
4

appliance will brew thick coffee. If you do not want to adjust the coffee strength, just follow
the following operation to brew normal coffee.
6. Press ON/OFF button, the indicator will be illuminated red. The appliance will begin
working.
7. The brewing process can be interrupted by pressing the ON/OFF button at any time, the
indicator of ON/OFF button will be extinguished. The appliance will continue brewing once
ON/OFF button is pressed again.
Note: You can take out carafe, pour and serve at any time. The appliance will stop dripping
automatically. But the time cannot exceed 30 seconds.
8. Remove out carafe to serve when finish brewing (about one minute later after the coffee
stops dripping out.)
Note: the coffee you get will less than the water you have added, as some water is absorbed
by coffee ground and adhere to the plastic.
9. When the process is finished, if you do not want to serve immediately, keep the coffee
maker is energized, the coffee can be kept warm in the keeping warm plate, The appliance
will be cut off power automatically after 40 minutes if it has not been manually disconnected
at the completion of brewing. For an optimum coffee taste, serve it just after brewing.
10. Always turn the coffee maker off and disconnect the power supply when not use.
Note: pay attention to pour the coffee out, otherwise you may be hurt as the temperature of
coffee just finished is high.
DELAY FUNCTION
If you do not want the coffee maker to start operation immediately, for example now it is AM
8:10, you hope that the coffee maker will automatically start working at PM 1:00, first
follow steps 1 to 5 of above section, and then you can set the automatic start function as
follows:
1) Press PROGRAM button one time, that is AM 8:10.
Note: The time cycle is 12 hours.
2) Press PROGRAM button one time, the LED will illuminates in green and flash.(means the
coffee make enter the presetting time state.)
3) Set the delayed starting time by pressing HR and MIN button repetitively, that is PM
01:00.
4) Press the DELAY BREW button, the LED is illuminated in green. After a while, the
LCD will display the current clock. You may see the automatic start time by pressing
5

DELAY BREW.
Note: You may cancel the automatic start function by pressing ON/OFF. If you want to
change the automatic start time, only following the above 2-4 steps again.
5) When the time is due, the LED will illuminate in red and the appliance starts brewing.
When the process is finished, if you do not want to serve immediately, keep the coffee maker
is energized, the coffee can be kept warm in the keep warm plate and the appliance will be
cut off automatically after keeping warm for 30 minutes. For an optimum coffee taste, serve
it just after brewing.
Note: During brewing process, the buttons of “PROGRAM”, “DELAY BREW” ,“HR” and
“MIN” are invalid.
CLEANING AND MAINTENANCE
CAUTION: Be sure to unplug this appliance before cleaning. To protect against electrical
shock, do not immerse cord, plug or unit in water or liquid. After each use, always make sure
plug is first removed from wall outlet.
1. Clean all detachable parts after each use in hot sudsy water.
2. Wipe the exterior surface of unit with a soft, damp cloth to remove stains.
3. Water droplets may buildup in the above area of the funnel
and drip onto the product
base during brewing. To control the dripping, wipe off the area with a clean, dry cloth after
each use.
3. Use a damp cloth to gently wipe the keeping warm plate. never use abrasive cleaner to
clean it.
5. Replace all parts and keep for next use.
REMOVING MINERAL DEPOSITS
To keep your coffee maker operating efficiently, periodically you should clean away the
mineral deposits left by the water according to the water quality in your area and the use
frequency, we recommend removing mineral deposits as follows:
1. Fill the tank with water and descaler to the max level as
indicated on water gauge (the scale of water and descaler is 4:1, the detail refers to the
instruction of descaler. Please use “household descaler”, you may also use the citric acid
instead of the descaler (the one hundred parts of water and three parts of citric acid).
2. place the serving cup under the brew basket.
3. Make ensure funnel are assembled in place.
6
4. Switch on the appliance and allow it to “brew” de-scaling solution.
5. After “brew” one-cup solution, switch off the appliance.
6. Leave the solution stay for 15 minutes and repeat step 3-5.
7. Switch on the appliance and run off the solution until the water tank is completely empty.
8. Rinse by operating the appliance with water at least 3 times.
HINTS FOR GREAT-TASTING COFFEE
1. A clean coffee maker is essential for making great-tasting
coffee. Regularly clean the coffee maker as specified in the “CLEANING AND
MAINTENANCE” section. Always use fresh, cold water in the coffee maker.
2. Store unused coffee powder in a cool, dry place. After
opening a package of coffee powder, reseal it tightly and store it in a refrigerator to maintain
its freshness.
3. For an optimum coffee taste, buy whole coffee beans and
finely grind them just before brewing.
4. Do not reuse coffee powder since this will greatly reduce
the coffee’ flavor. Reheating coffee is not recommended as coffee is at its peak flavor
immediately after brewing.
5. Clean the coffee maker when over-extraction causes
oiliness. Small oil droplets on the surface of brewed, black coffee are due to the extraction of
oil from the coffee powder.
6. Oiliness may occur more frequently if heavily roasted coffees are used.
WARRANTY: 2 YEARS
7

INSTRUCCIONES DE SEGURIDAD
Las si
g
uientes instrucciones de se
g
uridad
b
ásicas deben se
g
uirse
cuando se usan a
p
aratos eléctricos:
1. Le
a
todas las instrucciones.
2. Verifi
q
ue
q
ue el volta
j
eindicadoenela
p
arato coincida con el
volta
j
e
local.
3. No sumer
j
aela
p
arato, ni el cable eléctrico en a
g
ua u otros
líquidos
para evita
r
descargas eléctricas u otros daños.
4. Cuando use el aparato cerca de niños, extreme la precaución.
5. Desenchufe la cafetera de la corriente eléctrica cuando no va
y
a
a
usarla, antes de monta
r
o desmonta
r
los accesorios
y
antes de
lavarla.
6. No use el a
p
arato si el cable léctrico está dañado o si el a
p
arato
no
Funciona correctamente. Llévelo a un centro autorizado
p
ar
a
q
ue
lo examinen
y
re
p
aren.
7. El uso de accesorios no Recomendados
p
o
r
el fabricante
p
od
r
ía
causa
r
un incendio, descar
g
a eléctrica o lesiones al usuario.
8. No use el a
p
arato al aire libre.
9. No de
j
e
q
ue el cable eléctrico cuel
g
ue del
b
orde de la mesa ni
to
q
ue su
p
erficies calientes.
10. No colo
q
ue el a
p
arato sobre o cerca de su
p
erficies calientes
(
cocinas de
g
as,
p
lacas eléctricas
y
hornos
)
.
11. No use el a
p
arato con fines
p
ara los
q
ue no fue diseñado.
12. La
j
arra está diseñada
p
ara su uso con este a
p
arato. Nunca la
utilice sobre otra
p
laca eléctrica.
13. No lave la
j
arra con deter
g
entes, estro
p
a
j
os de metal u otros
materiales abrasivos.
14. Para desconecta
r
la cafetera,
p
on
g
aelinterru
p
to
r
en OFF
y
desenchúfela de la corriente eléctrica. Su
j
ete siem
p
re el enchufe,
8

sin tira
r
del cable.
15. Levanta
r
la ta
p
a durante el Proceso
p
od
r
ía
p
rovoca
r
q
uemaduras.
Extreme la
p
recaución
p
ara evita
r
q
uemaduras
p
roducidas
p
o
r
el
va
p
or.
16. Al
g
unas
p
artes del a
p
arato están mu
y
calientes durante su
funcionamiento, no las to
q
ue con las manos. Sírvase únicamente
de las
asas.
17. Nunca de
j
ela
j
arr
a
vacía en la
p
laca calefactora o
p
od
r
ía
rom
p
erse.
18. No use el a
p
arato si la
j
arr
a
Presenta al
g
ún Si
g
no de rotura, o
si el
man
g
o está suelto. Use la
j
arra exclusivamente en el a
p
arato.
Extreme
la
p
recaución
y
a
q
ue la
j
arr
a
es mu
y
f
r
á
g
il.
19. Este
p
roducto no debe se
r
utilizado
p
o
r
p
ersonas con
ca
p
acidades físicas, sensoriales o mentales reducidas, o
q
ue
carezcan de ex
p
erienci
a
o conocimiento sobre el mane
j
odeestos
dis
p
ositivos, a menos
q
ue estén
b
a
j
osu
p
ervisión de una
p
ersona
res
p
onsable
y
sean conscientes de los
p
osibles ries
g
os. No de
j
e
q
ue los niños utilicen estos a
p
aratos sin su
p
ervisión.
20. No colo
q
ue la
j
arr
a
caliente sobre una su
p
erficie caliente o
mu
y
f
r
ía.
21. ATENCI
Ó
N: PAR
A
REDUCIR EL RIESGO DE
INCENDIOS O DESCARGAS EL
É
CTRICAS, NO RETIRE LA
TAPA. LAS REPARACIONES NO DEBE HACERLAS USTED
MISMO, LLEVE EL APARATO
A
UN CENTRO
AUTORIZADO. NO SUMERJ
A
LA CAFETERA EN AGUA U
OTROS L
Í
QUIDOS.
22. Este a
p
arato está diseñado
p
ara uso doméstico o a
p
licaciones
como:
-
Á
reas de cocina en tiendas, oficinas
y
otros entornos de traba
j
o
-Casas rurales
9

-Po
r
clientes de hoteles, moteles
y
otros ti
p
os de residencia
-Establecimientos
q
ue ofrecen cama
y
desa
y
uno
CONSERVE ESTAS INSTRUCCIONES.
S
Ó
LO PAR
A
USO DOM
É
STICO
Información sobre el enchufe
Este aparato contiene un enchufe polarizado. Para evitar riesgos de descargas eléctricas, el
enchufe se encaja en una toma de corriente polarizada, en una sola posición. Si el enchufe no
se ajusta completamente en la toma de corriente, de la vuelta al enchufe. Si sigue sin ajustar,
contacte con un electricista. No intente hacer ningún tipo de modificación en el enchufe.
Información sobre el cable eléctrico
a) Se incluye un cable eléctrico corto para
reducir los riesgos que resultan de enredarse o tropezarse con un cable largo.
b) El uso de cables eléctricos largos o alargadores está permitido, pero deben usarse con
cuidado.
c) Si usa un cable eléctrico largo o un alargador,
1) Asegúrese de que el voltaje eléctrico deberá ser igual al del aparato.
2) Recoja el cable de tal manera que no cuelgue del borde de la mesa donde lo puedan coger
los niños, o pueda causar tropiezos.
KNOW YOUR COFFEE MAKER
ES
1
2
3
4
5
6
7
8
9
10
11
10
1. Embudo
2. Tapa de la jarra
3. Asadelajarra
4. Jarra
5. Tapa superior
6. Pulverizador
7. Depósito de agua
8. Medidor de agua
9. Cuerpo principal
10.Placa calefactora
11.Cubierta inferior
PANEL DE CONTROL
ANTES DE COMENZAR A USAR
Compruebe que el aparato contiene todos los accesorios y que la unidad no esté dañada.
Llene el tanque con agua hasta la marca de MAX y hágala hervir unas cuantas veces sin
añadir el café, después vacíe el depósito de agua. Lave y seque todas las partes desmontables,
como se indica en la sección “LIMPIEZA Y MANTENIMIENTO”
FUNCIONAMIENTO DE LA CAFETERA
1. Levante la tapa y llene el tanque con agua potable. No sobrepase la marca de MAX
indicada en el medidor de agua.
2. Coloque el embudo en su soporte y asegúrese de haberlo instalado correctamente; de lo
contrario, no podrá cerrar la tapa. Coloque el filtro permanente en el embudo.
Strength
indicator
Indicador
de
intensidad
11

3. Agregue el café molido en el filtro. Normalmente, para una taza de café, se necesita una
cuchara de café molido, pero puede ajustarlo a su gusto. Cierre completamente la tapa.
4. Coloque la jarra de manera horizontal sobre la placa calefactora.
5. Echufe el aparato a la corriente eléctrica. Si desea ajustar la intensidad del café, presione
el botón de intensidad “Strength” una vez, se encenderá el indicador naranja y el aparato
comenzará a preparar un café fuerte.Si no desea ajustar la intensidad del café, siga estos
pasos para obtener un café normal.
6. Presione el interruptor ON/OFF, se encenderá el indicador rojo, y la cafetera
comenzará a funcionar.
7. Podrá interrumpir el proceso de preparación del café presionando el interruptor ON/OFF
en cualquier momento, el indicador ON/OFF se apagará. El aparato continuará el proceso si
vuelve a presionar el interruptor ON/OFF.
Nota: Puede retirar la jarra para servir el café cuando lo desee. La cafetera dejará de gotear
automáticamente durante 30 segundos.
8. Retire la jarra para servir cuando haya terminado el proceso (un minuto después
aproximadamente, la cafetera dejará de gotear).
Nota: Obtendrá menor cantidad de café en comparación al agua que añadió, debido a que
parte del agua es absorbida en el proceso.
9.Cuando el proceso haya terminado, si no desea servir el café inmediatamente, no
desconecte la cafetera pues el café puede mantenerse caliente gracias a la placa calefactora
que mantiene la temperatura. El aparato se desconectará automáticamente tras 40 minutos si
no lo ha desconectado tras el fin del proceso. Para un sabor óptimo, sirva en cuanto haya
concluido la elaboración.
10. Desenchufe la cafetera cuando no vaya a usarla.
Nota: Tenga cuidado al verter el café ya que la temperatura del café recién hecho es muy alta,
y podría causarle quemaduras.
FUNCIONAMIENTO DE LA CAFETERA
1. Enchufe el cable a la corriente eléctrica. La pantalla LCD indicará “AM 12:00”.
2. Pulse el interruptor ON/OFF, el indicador rojo se encenderá y la cafetera comenzará a
funcionar.
Nota: Podrá interrumpir el proceso de preparación del café presionando el interruptor
ON/OFF en cualquier momento, el indicador ON/OFF se apagará indicando que la cafetera
está apagada.
12

Nota: Durante el proceso, los botones de “PROGRAM”,“DELAY BREW” ,“HR” y “MIN”
no serán válidos.
3. Cuando el proceso haya terminado, si no desea servir el café inmediatamente, no
desconecte la cafetera pues el café puede mantenerse caliente gracias a la placa calefactora
que mantiene la temperatura. El aparato se desconectará automáticamente tras 40 minutos si
no lo ha desconectado tras el fin del proceso. Para resultados óptimos, sirva en cuanto haya
concluido la elaboración.
4. Apague y desenchufe la cafetera cuando no vaya a usarla.
FUNCIÓN DE INICIO AUTOMÁTICO
Si no desea que la cafetera comience el proceso inmediatamente, sí por ejemplo son las 8:10
AM, y quiere que la cafetera comience a preparar el café a la 1:00 PM, siga los pasos del 1 al
5 de la sección anterior y luego configure la función de inicio automático:
1) Pulse una vez el botón de PROGRAM, son las 8:10 AM.
Note: El ciclo horario es de 12 horas.
2) Pulse una vez el botón de PROGRAM, se encenderá el indicador verde y parpadeará.
(Esto indica que la cafetera entra en modo de inicio automático).
3) Seleccione la hora de inicio automático pulsando los botones de HR y MIN
repetidamente, hasta seleccionar 01:00 PM.
4) Pulse el botón DELAY BREW, el indicador verde se encenderá. Al cabo de unos
segundos, aparecerá un reloj en la pantalla. Podrá ver la hora de inicio automático si pulsa
DELAY BREW.
Nota: Puede cancelar la función de inicio automático pulsando ON/OFF. Si desea cambiar la
hora de inicio automático, siga los pasos 2-4 de nuevo.
5) Cuando sea la hora seleccionada, el indicador rojo se encenderá y la cafetera comenzará
el proceso. Cuando termine el proceso, si no desea retirar el café, mantenga la cafetera
enchufada y el café se mantendrá caliente en la placa calefactora, y se apagará
automáticamente tras 30 minutos. Para un sabor óptimo, sirva en cuanto haya concluido la
elaboración.
Nota: Durante el proceso, los botones de “PROGRAM”,“DELAY BREW” ,“HR” y “MIN”
no serán válidos.
LIMPIEZA Y MANTENIMIENTO
13

ATENCIÓN: Asegúrese de que el aparato está desenchufado antes de limpiarlo. Para evitar
descargas eléctricas, no sumerja el cable, el enchufe, ni el aparato en agua u otros líquidos.
Tras cada uso, asegúrese de desenchufar el aparato de la toma de corriente.
1. Lave todas las piezas desmontables después del uso con agua caliente y jabón.
2. Pase un trapo húmedo y suave por las superficies exteriores para limpiar las manchas.
3. Podrían formarse gotas de agua en la rte que cubre el embudo, y gotear durante el proceso.
Para evitar que esto suceda, e la zona con un trapo seco y limpio después de cada uso.
4. Pase un trapo húmedo por la placa calefactora. No use
materiales abrasivos para limpiarla.
5. Vuelva a colocar todas las piezas y deje el aparato preparado para el siguiente uso
DESCALCIFICACIÓN
Para que su cafetera funcione de manera eficiente, es necesario limpiar y quitar
periódicamente los depósitos de cal que el agua deja de acuerdo a la calidad del agua en su
zona y la frecuencia de uso del aparato. Hágalo de la siguiente manera:
1. Llene el depósito con agua y scalcificador, hasta la marca
de max indicada en el medidor (La proporción de agua y descalcificador es de 4:1, siga las
instrucciones del descalcificador en caso de duda. Use un descalcificador doméstico; puede
sustituir el descalcificador por ácido cítrico (cien partes de agua por 3 partes de ácido
cítrico).
2. Coloque la jarra sobre la placa calefactora.
3. Asegúrese de que el embudo está bien colocado.
4. Encienda el aparato y deje que la solución descalcificadora comience a hervir.
5. Tras preparar la solución descalcificadora, apague el aparato.
6. Deje que la solución actúe durante 15 minutos y repita los pasos 3-5.
7. Encienda el aparato y deje a correr la solución hasta que el
depósito esté completamente vacío.
8. Aclare el aparato haciéndolo funcionar con agua al menos 3 veces.
CONSEJOS PARA UN CAFÉ DELICIOSO
1. Una cafetera limpia es fundamental para
poder elaborar un café delicioso. Limpie la cafetera con regularidad como se indica en la
sección de “LIMPIEZA Y MANTENIMIENTO”. Use siempre agua fresca para llenar el
depósito de agua.
2. Conserve el café molido sin abrir en un lugar fresco y seco. Cuando haya abierto el
14

paquete de café molido, vuelva a cerrarlo bien y consérvelo en el frigorífico para mantenerlo
fresco.
3. Para un gusto óptimo, compre el café en granos y
tritúrelos bien justo antes de añadirlos a la cafetera.
4. No reutilice el café molido ya que esto reduce el sabor del
café. No se recomienda recalentar el café ya que éste tiene un mejor sabor inmediatamente
después de su elaboración.
ES
5. Limpie la cafetera cuando se encuentre aceitosa. Las
pequeñas gotas de aceite en la superficie del café se deben a la extracción de aceite del café
molido.
6. La oleosidad ocurre con más frecuencia cuanto más tostados sean los granos de café.
GARANTÍA: 2 AÑOS
15

W
A
Ż
NE W
S
K
A
Z
Ó
WKI
Podczas korz
y
stani
a
zurządzenńelektr
y
czn
y
ch te
g
ot
yp
unależ
y
zawsze
p
rzestrze
g
ać
p
odstawow
y
ch zasad
b
ez
p
ieczeństwa, w
t
y
m:
1. Przecz
y
ta
j
wsz
y
stkie instrukc
j
e.
2. U
p
ewni
j
si
ę
,żena
p
i
ę
cie w
yj
ściowe od
p
owiada na
p
i
ę
ciu
p
odanemu na tabliczce znamionowe
j
eks
p
resu do kaw
y
.
3. Ab
y
uniknąć
p
ożaru,
p
orażenia
pr
ądem cz
y
w
y
rządzenia
sz
k
ód na zdrowiu, nie należ
y
zanurz
a
ćkabla, wt
y
czki ani
urządzenia w wodzie lub inne
j
ciecz
y
.
4. Konieczne
j
est dokładne nadzorowanie urządzenia
p
odczas
uż
y
wania ich
p
rzez dzieci.
5. W
yj
mi
j
wt
y
czk
ę
z
g
niazdka,
g
d
y
nie
j
est uż
y
wan
y
i
p
rze
d
cz
y
szczeniem. Przed
p
rz
y
stą
p
ieniem do za
k
ładania lub
zde
j
mowania części oraz
p
rze
d
cz
y
szczeniem należ
y
p
ozostawić
j
edoochłodzenia.
6. Nie uż
y
wa
j
urządzenia z uszkodzon
y
m
p
rzewodem lub
wt
y
czkąani
p
o awarii cz
y
uszkodzeniu w
j
akikolwie
k
s
p
osó
b
.
Zw
r
óćurządzenie do autor
y
zowane
g
o
p
unktu Serwisowe
g
ow
celu s
p
rawdzenia, na
p
raw
y
lub re
g
ulac
j
i.
7. Stosowanie akcesoriów niezalecan
y
ch
p
rzez
p
roducenta
urządzenia możes
p
owodować
p
ożar,
p
orażenie
pr
ądem lub
w
y
rządzenie szkod
y
na zdrowiu inn
y
ch osó
b
.
8. Nie należ
y
uż
y
waćurządzenia na zewnątrz na woln
y
m
p
owietrzu.
9. Nie
p
ozwól, ab
y
p
rzewód wisiałnad kraw
ę
dziąstołulub
b
latu
ani żeb
y
dot
y
kał
g
o
r
ące
j
p
owierzchni.
10. Nie należ
y
umieszczaćurządzenia na
g
o
r
ąc
y
m
g
azie ani w
p
obliżu
p
alnika elektr
y
czne
g
o, ani teżw
p
iekarniku.
11. Nie uż
y
wa
j
urządzenia do celu inne
g
oniżzamierzone.
12. Po
j
emnik od eks
p
resu do kaw
y
j
est
p
rzeznaczon
y
do uż
y
cia
t
y
lko z t
y
murządzeniem. Nie wolno
g
ouż
y
waćz cza
j
nikiem do
kaw
y
.
13. Nie należ
y
cz
y
ścić
p
o
j
emnika za
p
omocąśrodków
16

cz
y
szcząc
y
ch, w
k
łade
k
zwełn
y
stalowe
j
ani inn
y
ch materiałów
ście
r
a
j
ąc
y
ch.
14. Ab
y
odłącz
y
ćurządzenie, należ
y
w
y
łącz
y
ć
p
rzełącznik, a
nast
ę
p
nie w
yj
ąć wt
y
czk
ę
z
g
niazda. Zawsze trz
y
ma
j
urządzenie
za wt
y
czk
ę
,ni
g
d
y
nie cią
g
ni
j
za
p
rzewód.
15. Możesz si
ę
o
p
arz
y
ć,
j
eśli usuwasz
p
okr
y
w
ę
p
odczas c
y
kli
za
p
arzania. Uważa
j
,ab
y
nie s
p
arz
y
ćsi
ę
teżw
y
dob
y
wa
j
ącąsi
ę
p
a
r
ą.
16. Niektóre części urządzenia sąroz
g
rzane
p
odczas
p
rac
y
,wi
ę
c
nie należ
y
dot
y
kaćich
r
ę
koma. Uż
y
wa
j
do te
g
ot
y
lko uchw
y
tów
lub
p
ok
r
ę
teł.
17. Ni
g
d
y
nie zostawia
j
p
uste
j
karafki na cie
p
łe
j
p
ł
y
cie,
p
onieważmoże ona
p
ę
knąć.
18. Ni
g
d
y
nie uż
y
wa
j
urządzenia,
j
eśli na karafce sąoznaki
p
ę
knięć lub ma luźn
y
albo osłabion
y
uchw
y
t. Uż
y
wa
j
t
y
lko te
j
or
yg
inalne
j
karafki z urządzeniem. Uż
y
wa
j
j
e
j
ostrożnie,
p
onieważkarafka
j
est
b
ardzo delikatna.
19. To urządzenie nie
j
est
p
rzeznaczone do uż
y
tku
p
rzez osob
y
(
wt
y
m dzieci
)
oo
g
raniczon
y
ch zdolnościach fiz
y
czn
y
ch,
p
s
y
chiczn
y
ch lub um
y
słow
y
ch albo z
b
rakiem doświadczenia i
wiedz
y
,ch
y
ba żesąnadzorowane
p
rzez osob
y
od
p
owiedzialne
za ich
b
ez
p
ieczeństwo. Dzieci
p
owinn
y
by
ć
p
ilnowane,ab
y
za
p
ewnienić,żenie
b
awiąsi
ę
urządzeniem.
20. Nie ustawia
j
na
g
o
r
ąc
y
m
p
o
j
emniku lub na
g
o
r
ące
j
lub
zimne
j
p
owierzchni.
21.OSTRZE
Ż
ENIE:
Ż
EBY UNIKNĄ
Ć
RYZYKA PO
Ż
ARU
LUB PORA
Ż
ENI
A
P
R
ĄDEM NIE ZDEJMUJ POKRYWKI.
NIE WYMIENIAJ SAM CZĘ
Ś
CI. NAPRAWA POWINN
A
BY
Ć
WYKONYWANA JEDYNIE PRZEZ AUTORYZOWANY
SERWIS LUB OSOBY UPOWA
Ż
NIONE. NIE ZANURZAJ
URZĄDZENI
A
W
Ż
ADNYM PŁYNIE.
22. Urządzenie
p
rzeznaczone
j
est do uż
y
tku domowe
g
oido
zastosowania w
p
odobn
y
ch mie
j
scach, takich
j
ak:
-
p
omieszczenia kuchenne w skle
p
ach,
b
iurach i inn
y
ch
środowiskach
p
raccownicz
y
ch;
-
g
os
p
odarstwach domow
y
ch;
17
Table of contents
Languages:
Other Taylor Swoden Coffee Maker manuals

Popular Coffee Maker manuals by other brands

TREVIDEA
TREVIDEA G3 Ferrari BONJOUR user manual

cecotec
cecotec Power Matic-ccino 8000 Touch instruction manual

Orbegozo
Orbegozo EX 5000 instruction manual

AMANTI
AMANTI Technologica instruction manual

Necta
Necta Koro Espresso Installation, use and maintenance manual

Clatronic
Clatronic KA 3382 instruction manual


