manuals.online logo
Brands
  1. Home
  2. •
  3. Brands
  4. •
  5. Taylor
  6. •
  7. Guitar
  8. •
  9. Taylor 12-Fret Manual

Taylor 12-Fret Manual

Changing Steel Strings the (new, improved) Taylor Way
by Anthony Adams / photos by Rita Funk-Hoffman
In the Summer 2004 issue, we showed the Taylor-recommended
way to change strings on our Nylon Series guitars. This time, we
tackle the same process on the more common steel-string guitar,
both because we’ve received requests for this vital information, and
because our thinking on the subject has changed a bit since we did
our first major piece about strings in the Spring 1995 issue.
Indeed, there are as many variations on the process of changing
steel strings as there are players, and not all methods are equally
effective. Some interfere with tuning (too many wraps) and others
make strings susceptible to breakage (too few wraps). Developed
over decades of experience, the current Taylor Guitars method has
proven to provide outstanding results for all steel-string guitars.
1. Position yourself comfortably to change strings. A workbench is
ideal, but good results can be obtained by sitting on a sofa and rest-
ing the neck of the guitar on the sofa arm. Loosen the bass strings
— 6th (Low E), 5th (A), and 4th (D) — by turning the tuners
clockwise with your left hand while holding tension on the string
with your right hand. Loosen the treble strings — 3rd (G), 2nd (B),
and 1st (High E) — by turning the tuners in a counter-clockwise
direction.
2. When all the strings are loosened, use wire cutters to remove the
bridge pins. Using the saddle as a cantilever, exert gentle pressure
to pull out the bridge pins. Now, gently lift out the old strings from
the bridge and discard them. With the old strings literally out of the
way, you have a great opportunity to clean your fretboard. Cover the
guitar’s soundhole with a towel and clean the fretboard with .0000
gauge steel wool. You can rub pretty hard without damaging the
fretboard, but be careful not to let it touch the body!
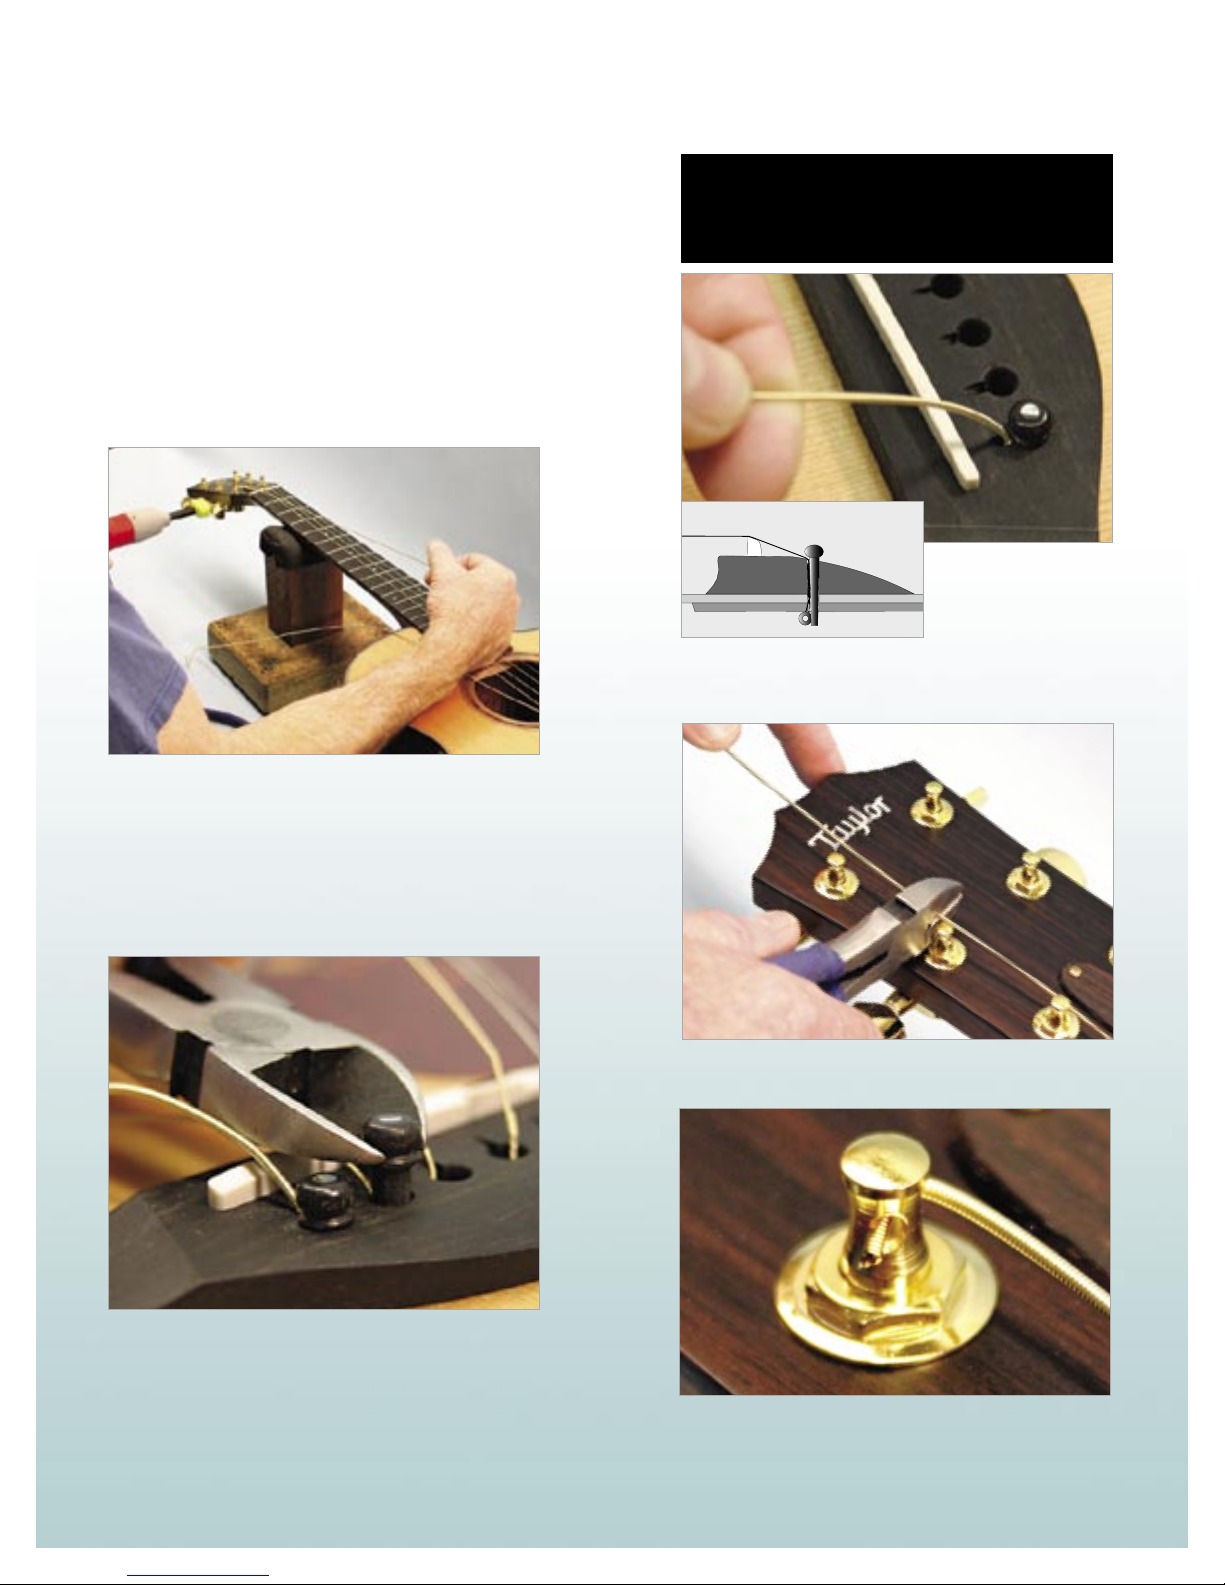
3. Once your fretboard is
clean it’s time to re-string.
Begin by inserting the ball
end of the 6th string, fol-
lowed by the bridge pin.
Push the bridge pin down and pull up on the ball end until it catches.
Pull gently on the string to verify that it’s “locked” in place.
4. Stretch the 6th string over the peghead. Using wire cutters, trim
the string at the 5th string post.
5. Turn the 6th string tuner so the hole in the tuner is at a 45-degree
angle, then insert the 6th string and turn the tuner in a counter-
clockwise direction to tighten the string. The string end should
protrude approximately 1/8th of an inch from the tuner hole.
6. Tune the string to pitch. Two-to-three wraps is perfect for the
bass strings. More is not better. Repeat the procedure to install the
5th string. As with the other bass strings, you will stretch the string
the equivalent of one tuner’s length past the post into which it’s
inserted.
7. For the 4th string, you simply measure one tuner’s length of slack
before snipping the string and tightening.
8. Trim the treble string ends 1-1/2 tuner’s lengths past the post
into which it’s inserted. For the 3rd string, as well as for the other
treble strings, the hole in the tuner should be at a 45-degree angle, as
shown. Tighten the treble strings in a clockwise direction.
9. The treble strings (G, B, and High E) require approximately six
wraps.
10. Keep the bottom-most wraps of the treble strings below the
edge of the tuner holes to avoid creating a kink, which could break
the string.
11. Gently stretch each string several times until the string stays in
pitch. Tune your guitar and you’re ready to play!
Taylor Guitars’ Tim Luranc, enjoying his newly-strung guitar.
The stringing process is the same
for 12-string guitars, except that you
should trim the bass strings the equiv-
alent of two tuners’ lengths past the
post into which it’s inserted and three
tuner lengths for the trebles. Is it worth
the trouble? You bet it is. Double your
pleasure — double your fun!
1. Taylor 30th Anniversary guitars feature a vintage slot-head
design, similar to that on a nylon-string guitar. When re-stringing,
trim the bass strings two tuners’ lengths past the post for trebles and
three tuners’ lengths for the trebles.
2. Position the tuner hole as shown and insert the string.
3. Here’s the big difference: one wrap goes on the inside, the rest of
the wraps go on the outside of the string end, toward the tuners.
4. A well-strung slot-head guitar.
Slot-Head
12-String

This manual suits for next models

109

Other Taylor Guitar manuals

Taylor DDSM Instruction Manual

Taylor

Taylor DDSM Instruction Manual

Taylor JMSM Instruction Manual

Taylor

Taylor JMSM Instruction Manual

Taylor Serj Tankian T5 Manual

Taylor

Taylor Serj Tankian T5 Manual

Taylor Nylon Series NS24CE Manual

Taylor

Taylor Nylon Series NS24CE Manual

Taylor JMSM Instruction Manual

Taylor

Taylor JMSM Instruction Manual

Taylor Serj Tankian T5 Manual

Taylor

Taylor Serj Tankian T5 Manual

Taylor Serj Tankian T5 Manual

Taylor

Taylor Serj Tankian T5 Manual

Taylor Baritone 6-String User manual

Taylor

Taylor Baritone 6-String User manual

Taylor 916CE Instruction Manual

Taylor

Taylor 916CE Instruction Manual

Popular Guitar manuals by other brands

Casio PG-380 Player's manual

Casio

Casio PG-380 Player's manual

Behringer Ultrabass Instruction book

Behringer

Behringer Ultrabass Instruction book

Yamaha CPX700 owner's manual

Yamaha

Yamaha CPX700 owner's manual

Fender STEVIE RAY VAUGHAN STRATOCASTER parts list

Fender

Fender STEVIE RAY VAUGHAN STRATOCASTER parts list

Yamaha FX-310 Service manual

Yamaha

Yamaha FX-310 Service manual

Yamaha FX370C owner's manual

Yamaha

Yamaha FX370C owner's manual

Fender American Standard Telecaster supplementary guide

Fender

Fender American Standard Telecaster supplementary guide

Daisy Rock Debutante Star Short Scale Brochure & specs

Daisy Rock

Daisy Rock Debutante Star Short Scale Brochure & specs

ION DISCOVER GUITAR USB quick start guide

ION

ION DISCOVER GUITAR USB quick start guide

Fretlight Traveler Ultra-Light Guitar user guide

Fretlight

Fretlight Traveler Ultra-Light Guitar user guide

Yamaha Monaural 2 Way owner's manual

Yamaha

Yamaha Monaural 2 Way owner's manual

ION iAEG04c Quick start owner's manual

ION

ION iAEG04c Quick start owner's manual

Spector Professional Series Legend 5 Classic user guide

Spector

Spector Professional Series Legend 5 Classic user guide

Cort JADE6 TWB instruction manual

Cort

Cort JADE6 TWB instruction manual

Guild Starfire VI Wiring diagram

Guild

Guild Starfire VI Wiring diagram

Fender HELLECASTERS JERRY DONAHUE STRATOCASTER manual

Fender

Fender HELLECASTERS JERRY DONAHUE STRATOCASTER manual

Fender Deluxe Active Jazz Bass V Diagram

Fender

Fender Deluxe Active Jazz Bass V Diagram

Yamaha A1M user guide

Yamaha

Yamaha A1M user guide

manuals.online logo
manuals.online logoBrands
  • About & Mission
  • Contact us
  • Privacy Policy
  • Terms and Conditions

Copyright 2025 Manuals.Online. All Rights Reserved.