manuals.online logo
Brands
  1. Home
  2. •
  3. Brands
  4. •
  5. Taylor
  6. •
  7. Guitar
  8. •
  9. Taylor JMSM Instruction Manual

Taylor JMSM Instruction Manual

Other manuals for JMSM

1

This manual suits for next models

11

Other Taylor Guitar manuals

Taylor Nylon Series NS24CE Manual

Taylor

Taylor Nylon Series NS24CE Manual

Taylor Serj Tankian T5 Manual

Taylor

Taylor Serj Tankian T5 Manual

Taylor Baritone 6-String User manual

Taylor

Taylor Baritone 6-String User manual

Taylor 12-Fret Manual

Taylor

Taylor 12-Fret Manual

Taylor DDSM Instruction Manual

Taylor

Taylor DDSM Instruction Manual

Taylor Serj Tankian T5 Manual

Taylor

Taylor Serj Tankian T5 Manual

Taylor 916CE Instruction Manual

Taylor

Taylor 916CE Instruction Manual

Taylor Serj Tankian T5 Manual

Taylor

Taylor Serj Tankian T5 Manual

Taylor JMSM Instruction Manual

Taylor

Taylor JMSM Instruction Manual

Popular Guitar manuals by other brands

Moog Guitar Service manual

Moog

Moog Guitar Service manual

Hohner Essential Series Essential Folk brochure

Hohner

Hohner Essential Series Essential Folk brochure

Squier Affinity Jazz Bass V Specifications

Squier

Squier Affinity Jazz Bass V Specifications

Fender 72 Telecaster Specifications

Fender

Fender 72 Telecaster Specifications

Gibson Firebird X owner's manual

Gibson

Gibson Firebird X owner's manual

CARVIN P-SERIES manual

CARVIN

CARVIN P-SERIES manual

Fender HEARTFIELD - FOR GUITARS AND BASSES manual

Fender

Fender HEARTFIELD - FOR GUITARS AND BASSES manual

Fender CY specification

Fender

Fender CY specification

Zon Mosaic BB5 Specifications

Zon

Zon Mosaic BB5 Specifications

Warwick RockBass Streamer LX Specifications

Warwick

Warwick RockBass Streamer LX Specifications

Fender Deluxe Active parts list

Fender

Fender Deluxe Active parts list

Peavey Spectrum Bass owner's manual

Peavey

Peavey Spectrum Bass owner's manual

Peavey Nitro I operating guide

Peavey

Peavey Nitro I operating guide

Peavey Acoustic Guitar Series operating guide

Peavey

Peavey Acoustic Guitar Series operating guide

Fender Ritchie Blackmore Stratocaster user guide

Fender

Fender Ritchie Blackmore Stratocaster user guide

Steinberger ZT3 TransTrem Specifications

Steinberger

Steinberger ZT3 TransTrem Specifications

Yamaha Electric Acoustic Guitar owner's manual

Yamaha

Yamaha Electric Acoustic Guitar owner's manual

Lightwave Atlantis user manual

Lightwave

Lightwave Atlantis user manual

manuals.online logo
manuals.online logoBrands
  • About & Mission
  • Contact us
  • Privacy Policy
  • Terms and Conditions

Copyright 2025 Manuals.Online. All Rights Reserved.

TAYLOR GUITARS TECH SHEET/PAGE 1 O f 2
Symptoms of a Wet Guitar
Extended exposure to high humidity can lead to guitar damage. Here’s what to look for and how to prevent it.
While much of our energy is
devoted to preventing guitars
from drying out, it also is pos-
sible for guitars to become too wet. Usually,a
guitar becomes over-humidified when it has
been exposed to the elements for a period of
several weeks in an area where the humidity
is very high (80 to 90 percent), or for several
months where the humidity is medium-high
(60 to 70 percent). In some cases, guitar
bodies are over-humidified by well-mean-
ing owners who, in an effort to prevent their
guitars from drying, have gotten carried
away with soundhole humidifiers.
While high humidity usually will not crack
the wood the way low humidity can, the
adverse effects can be just as damaging and
sometimes can be more costly to repair. The
wood in a guitar can swell tremendously,
causing glue joints to fail, finish to lift,
and neck angles to go bad. Distortions
in the wood can remain even after other
damage has been repaired, leaving the gui-
tar cosmetically disfigured. Read the Tech
Sheet,“Symptoms of a Dry Guitar,”to gain an
understanding of our wood-drying process,
the climate control of our factory, and how
relative humidity affects wood.
We do not expect guitar owners to become
meteorologists, or to walk on eggshells
concerning the safety of their guitars. But by
becoming familiar both with the principles
of humidity and with how a normal guitar
looks and feels,an owner can prevent almost
all damage to a guitar. Basic precautions
include: keeping the guitar in its case
when not in use; keeping it out of direct
sunlight and extremes in heat, cold, and
high or low humidity; and regularly
checking for any significant changes.
Examine these photographs of an ex-
tremely “wet” guitar that came to us from a
dealer in Asia. During a very wet and rainy
season, this guitar remained on the store
wall, where it absorbed moisture from the
air. When the dealer returned it to us for
repair, it weighed in at 2,431 grams. After
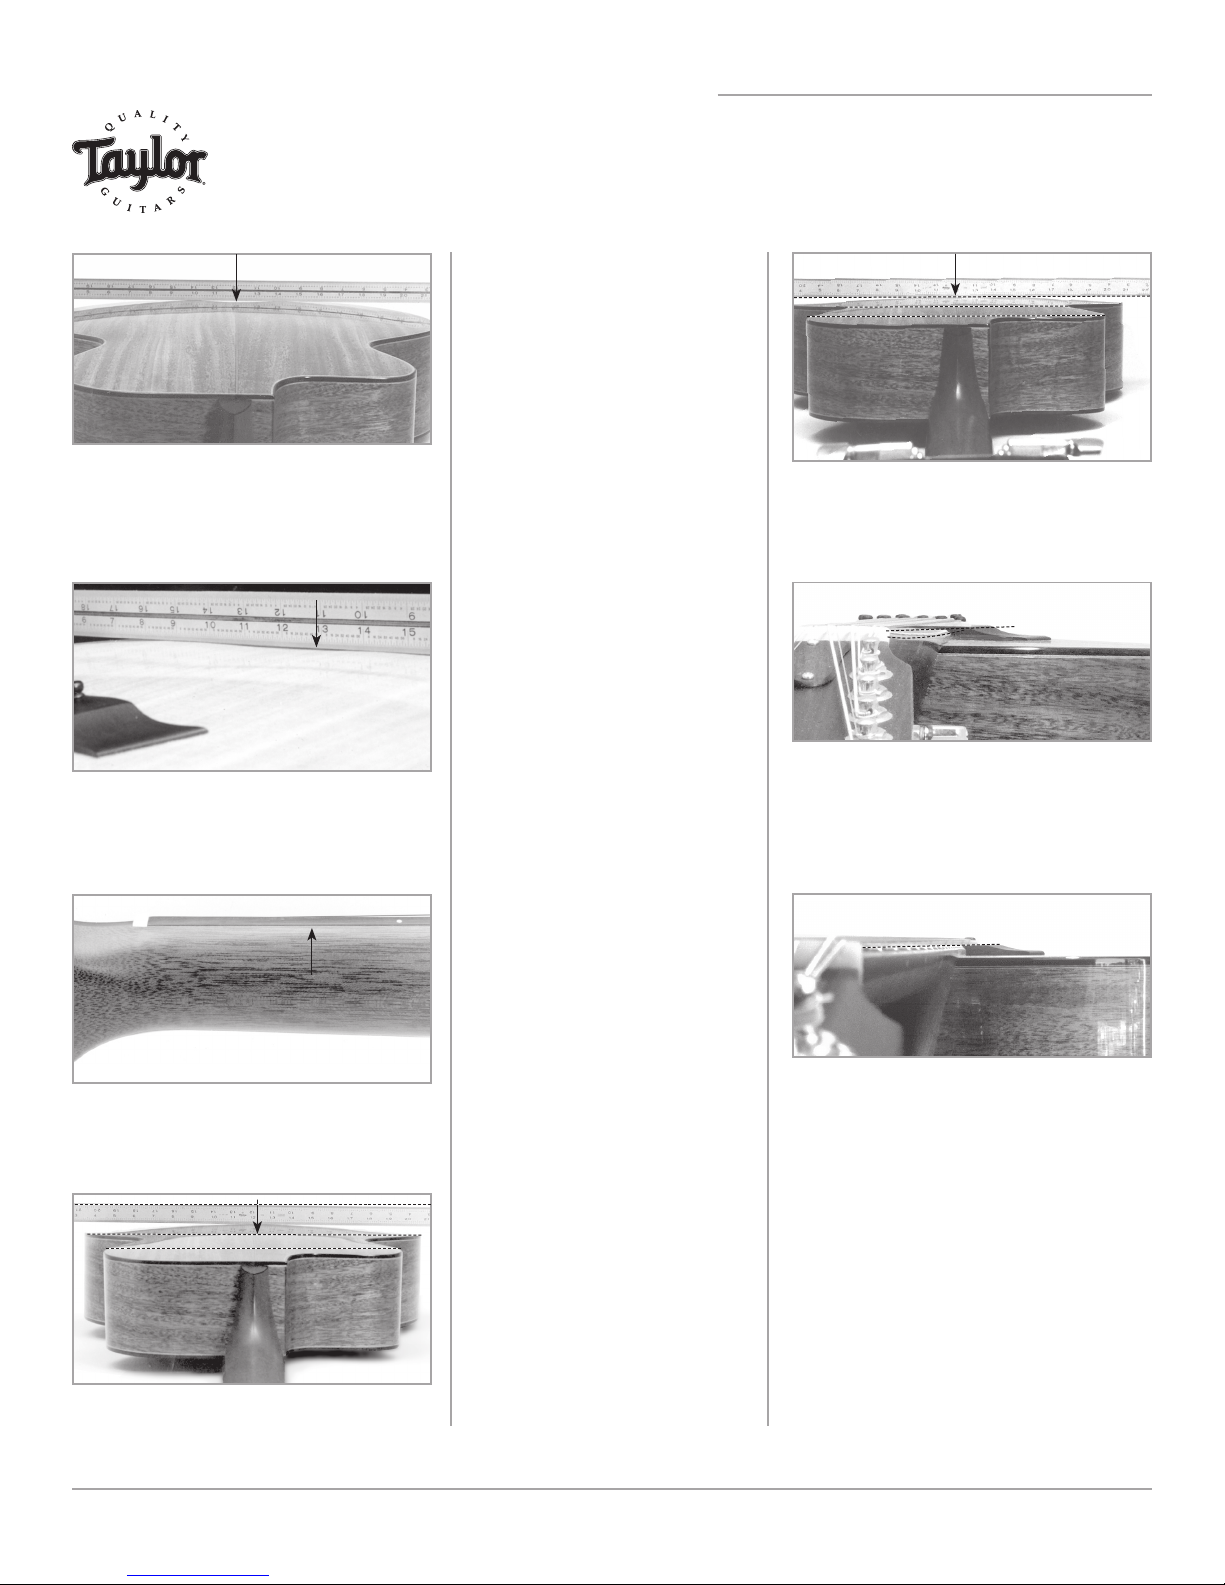
Photo 1. An extremely swollen guitar back. Notice the
dip in the center, where the back is glued to the tailblock.
It cannot rise at this section, so a ripple, or low spot, is cre-
ated.
Photo 2. An extremely swollen guitar top, with a dip similar
to that shown in Photo 1. In this case, the dip occurs where
the top is glued to the tailblock.
Photo 6. The neck angle when wet. The top is so swollen
that the bridge has risen above the fingerboard (see broken
lines). If you were to “sight” down the neck, you'd find that
it points “low” on the bridge. It would be a mistake to reset
the neck while the body is this wet.
Photo 3. Here, the fingerboard is swollen enough to grow
wider than the neck, leaving a “step” where the fretboard
meets the neck.
Copyright 2010 Taylor Guitars.All Rights Reserved.-
Photo 5. The back after the guitar has been dried. Notice
that the swelling on the back is less pronounced. This guitar
lost 38 grams of weight in the drying process, which trans-
lates into 1-1/3 ounces of water!
Photo 7. Here, the neck angle is correctly set. Notice that if
you sight down the neck to the top of the bridge, the top of
the frets and the bridge are on the same plane.
Photo 4. A back with an exaggerated radius due to excess
moisture.
drying it and then letting it normalize naturally to the 47
percent relative humidity in our factory (which restored
the guitar to its original moisture content), the guitar
weighed 2,383 grams. This was a loss of 48 grams of
water, or 1.34 ounces — enough to saturate four large,
highly absorbent paper towels!
1980 Gillespie Wa y • el Cajon, Ca 92020-1096 • 800-943-6782
Copyright 2010 Taylor Guitars.All Rights Reserved.
SYMPTOMS Of A WET GUITAR TAYLOR GUITARS TECH SHEET/PAGE 2 O f 2
Photo 8. The top of the frets are on the same plane as the top of the bridge. This is the correct adjustment for the neck.
Symptoms to look for:
1. High action. Strings that are unusually high off the fretboard,
making it difficult to play.
3. Unusually swollen top. See Photo 2.
4. Unusual warp on the top, back or both at the end-block. See Photos 1 and 2.
5. Improper neck angle. Sighting the neck to the bridge, the frets will appear
to hit below the bridge. See Photo 6.
NOTE: All guitars will have a certain amount of “pull” behind the bridge.
This alone is not an indication of a wet guitar. Look for a combination of
these symptoms to determine if the guitar is getting too humid.
In wet areas, prevention is best:
1. Periodically remove the guitar and blow-dry the interior of the case with a
hair dryer for 10-15 minutes.
2. Use a small de-humidifier in the room where you store your guitar. It’s also
wise to monitor the humidity levels with a digital hygrometer. Radio Shack
offers these.
3. Place several silica gel packs in the guitar case and change them every few
months.
4. Consider using the Planet Waves Humidipak® (available through TaylorWare).
Featuring two-way humidity control technology, the breathable membrane
packets will automatically maintain a relative humidity level of 48 percent by
absorbing excess moisture in humid environments.
A note on Taylor laminate guitars:
The Taylor 100 Series, 200 Series, Baby Taylor and Big Baby models feature a laminate back and sides with an arched back. The arch is by design and allows us to
add strength to the guitar body without bracing the back. Don’t be alarmed by the sight of the back arch on these models.