tbs electronics e-xpert lite User manual

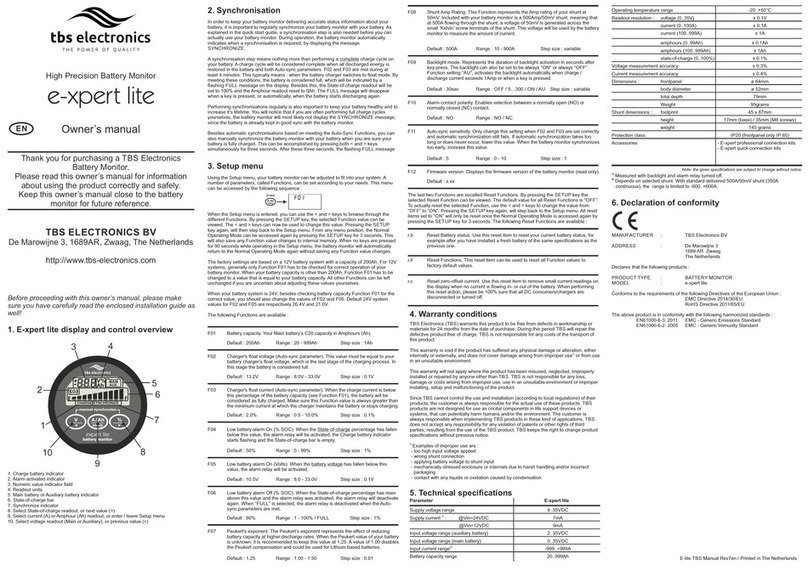
1. E-xpert lite display and control overview
1. Charge battery indicator
2. Alarm activated indicator
3. Numeric value indicator field
4. Readout units
5. Main battery or Auxiliary battery indicator
6. State-of-charge bar
7. Synchronize indicator
8. Select State-of-charge readout, or next value (>)
9. Select current (A) or Amphour (Ah) readout, or enter / leave Setup menu
10. Select voltage readout (Main or Auxiliary), or previous value (<)
2. Synchronisation
In order to keep your battery monitor delivering accurate status information about your
battery, it is important to regularly synchronize your battery monitor with your battery. As
explained in the quick start guide, a synchronisation step is also needed before you can
actually use your battery monitor. During operation, the battery monitor automatically
indicates when a synchronisation is required, by displaying the message SYNCHRONIZE.
A synchronisation step means nothing more than performing a complete charge cycle on
your battery. A charge cycle will be considered complete when all discharged energy is
restored in the battery and both Auto-sync parameters F02 and F03 are met during at
least 4 minutes. This typically means : when the battery charger switches to float mode. By
meeting these conditions, the battery is considered full, which will be indicated by a
flashing FULL message on the display. Besides this, the State-of-charge readout will be
set to 100% and the Amphour readout reset to 0Ah. The FULL message will disappear
when a key is pressed, or automatically, when the battery starts discharging again.
Performing synchronisations regularly is also important to keep your battery healthy and to
increase it’s lifetime. You will notice that if you are often performing full charge cycles
yourselves, the battery monitor will most likely not display the SYNCHRONIZE message,
since the battery is already kept in good sync with the battery monitor.
Besides automatic synchronisations based on meeting the Auto-Sync Functions, you can
also manually synchronize the battery monitor with your battery when you are sure your
battery is fully charged. This can be accomplished by pressing both < and > keys
simultaneously for three seconds. After these three seconds, the flashing FULL message
appears on the the display just like when it is automatically synchronized.
Before proceeding with this owner’s manual, please make
sure you have carefully read the enclosed installation guide as
well!
3. Setup menu
Using the Setup menu, your battery monitor can be adjusted to fit into your system. A
number of parameters, called Functions, can be set according to your needs. This menu
can be accessed by the following sequence :
When the Setup menu is entered, you can use the < and > keys to browse through the
different Functions. By pressing the SETUP key, the selected Function value can be
viewed. The < and > keys can now be used to change this value. Pressing the SETUP key
again, will then step back to the Setup menu. From any menu position, the Normal
Operating Mode can be accessed again by pressing the SETUP key for 3 seconds. This
will also save any Function value changes to internal memory. When no keys are pressed
for 90 seconds while operating in the Setup menu, the battery monitor will automatically
return to the Normal Operating Mode again without saving any Function value changes.
The factory settings are based on a 12V battery system with a capacity of 200Ah. For 12V
systems, generally only Function F01 has to be checked for correct operation of your
battery monitor. When your battery capacity is other than 200Ah, Function F01 has to be
changed to a value that is equal to your battery capacity. All other Functions can be left
unchanged if you are uncertain about adjusting these values yourselves.
When your battery system is 24V, besides checking battery capacity Function F01 for the
correct value, you should also change the values of F02 and F05. Default 24V system
values for F02 and F05 are respectively 26.4V and 21.0V.
The following Functions are available :
F02 Charger's float voltage ( . This value must be equal to your
battery charger’s float voltage. which is the last stage of the charging process. In
this stage the battery is considered full.
Auto-sync parameter)
Default : 13.2V Range : 8.0V - 33.0V Step size : 0.1V
F03 Charger's float current (Auto-sync parameter). When the charge current is below
this percentage of the battery capacity (see Function F01), the battery will be
considered as fully charged. Make sure this Function value is always greater than
the minimum current at which the charger maintains the battery or stops charging.
Default : 2.0% Range : 0.5 - 10.0% Step size : 0.1%
F04 Low battery alarm On (% SOC). When the State-of-charge percentage has fallen
below this value, the alarm relay will be activated, the Charge battery indicator
starts flashing and the State-of-charge bar is empty.
Default : 50% Range : 0 - 99% Step size : 1%
F05 Low battery alarm On (Volts). When the battery voltage has fallen below this
value, the alarm relay will be activated.
Default : 10.5V Range : 8.0 - 33.0V Step size : 0.1V
F06 Low battery alarm Off (% SOC). When the State-of-charge percentage has risen
above this value and the alarm relay was activated, the alarm relay will deactivate
again. When “FULL” is selected, the alarm relay is deactivated when the Auto-
sync parameters are met.
Default : 80% Range : 1 - 100% / FULL Step size : 1%
F01 Battery capacity. Your Main battery’s capacity in Amphours (Ah).
Default : 200Ah Range : 20 - 999Ah Step size : 1Ah
F07 Peukert's exponent. The Peukert’s exponent represents the effect of reducing
battery capacity at higher discharge rates. When the Peukert value of your battery
is unknown, it is recommended to keep this value at 1.25. A value of 1.00 disables
the Peukert compensation and could be used for Lithium based batteries.
Default : 1.25 Range : 1.00 - 1.50 Step size : 0.01
F08 Shunt Amp Rating. This Function represents the Amp rating of your shunt at
50mV. Included with your battery monitor is a 500Amp/50mV shunt, meaning that
at 500A flowing through the shunt, a voltage of 50mV is generated across the
small ‘Kelvin’ screw terminals of the shunt. This voltage will be used by the battery
monitor to measure the amount of current.
Default : 500A Range : 10 - 900A Step size : variable
F09 Backlight mode. Represents the duration of backlight activation in seconds after
key-press. The backlight can also be set to be always “ON” or always “OFF”.
Function setting “AU”, activates the backlight automatically when charge /
discharge current exceeds 1Amp or when a key is pressed.
Default : 30sec Range : OFF / 5…300 / ON / AU Step size : variable
F10 Alarm contact polarity. Enables selection between a normally open (NO) or
normally closed (NC) contact.
Default : NO Range : NO / NC
F11 Auto-sync sensitivity. Only change this setting when F02 and F03 are set correctly
and automatic synchronization still . If automatic takes too
long or does , lower this value. When the battery monitor synchronizes
too early, increase this value.
fails synchronization
never occur
Default : 5 Range : 0 - 10
F12 Firmware version. Displays the firmware version of the battery monitor (read only).
Default : x.xx
r.b Reset Battery status. Use this reset item to reset your current battery status, for
example after you have installed a fresh battery of the same specifications as the
previous one.
r.F Reset Functions. This reset item can be used to reset all Function values to
factory default values.
The last two Functions are socalled Reset Functions. By pressing the SETUP key the
selected Reset Function can be viewed. The default value for all Reset Functions is “OFF”.
To actually reset the selected Function, use the < and > keys to change the value from
“OFF” to “ON”. Pressing the SETUP key again, will step back to the Setup menu. All reset
items set to “ON” will only be reset once the Normal Operating Mode is accessed again by
pressing the SETUP key for 3 seconds. The following Reset Functions are available :
TBS Electronics (TBS) warrants this product to be free from defects in workmanship or
materials for 24 months from the date of purchase. During this period TBS will repair the
defective product free of charge. TBS is not responsible for any costs of the transport of
this product.
This warranty is void if the product has suffered any physical damage or alteration, either
1)
internally or externally, and does not cover damage arising from improper use or from use
in an unsuitable environment.
This warranty will not apply where the product has been misused, neglected, improperly
installed or repaired by anyone other than TBS. TBS is not responsible for any loss,
damage or costs arising from improper use, use in an unsuitable environment or improper
installing, setup and malfunctioning of the product.
Since TBS cannot control the use and installation (according to local regulations) of their
products, the customer is always responsible for the actual use of these products. TBS
products are not designed for use as cricital components in life support devices or
systems, that can potentially harm humans and/or the environment. The customer is
always responsible when implementing TBS products in these kind of applications. TBS
does not accept any responsibility for any violation of patents or other rights of third
parties, resulting from the use of the TBS product. TBS keeps the right to change product
specifications without previous notice.
1) Examples of improper use are :
- too high input voltage applied
- wrong shunt connection
- applying battery voltage to shunt input
- mechanically stressed enclosure or internals due to harsh handling and/or incorrect
packaging
- contact with any liquids or oxidation caused by condensation
4. Warranty conditions
6. Declaration of conformity
MANUFACTURER : TBS Electronics BV
ADDRESS : De Marowijne 3
1689 AR Zwaag
The Netherlands
Declares that the following products :
PRODUCT TYPE : BATTERY MONITOR
MODEL : e-xpert lite
Conforms to the requirements of the following Directives of the European Union :
EMC Directive 2004/108/EC
RoHS Directive 2002/95/EC
The above product is in conformity with the following harmonized standards :
EN61000-6-3: 2001 EMC - Generic Emissions Standard
EN61000-6-2: 2005 EMC - Generic Immunity Standard
5. Technical specifications
Parameter E-xpert lite
Supply voltage range
1)
Supply current : @Vin=24VDC
Input voltage range (auxiliary battery)
Input voltage range (main battery)
2)
Input current range
Battery capacity range
Operating temperature range
Readout resolution : voltage (0..35V)
current (0..100A)
current (100..999A)
amphours (0..99Ah)
amphours (100..999Ah)
@Vin=12VDC
9..35VDC
7mA
9mA
2..35VDC
0..35VDC
-999..+999A
20..999Ah
-20..+50°C
± 0.1V
± 0.1A
± 1A
± 0.1Ah
± 1Ah
1) Measured with backlight and alarm relay turned off.
2) Depends on selected shunt. With standard delivered 500A/50mV shunt (350A
continuous), the range is limited to -600..+600A.
Note: the given specifications are subject to change without notice.
- E-xpert professional connection kits
- E-xpert quick connection kits
Accessories
weight
Protection class
145 grams
IP20 (frontpanel only IP 65)
height 17mm (base) / 35mm (M8 screws)
Weight
Shunt dimensions : footprint
95grams
45 x 87mm
total depth 79mm
Dimensions : frontpanel
body diameter
ø 64mm
ø 52mm
Current measurement accuracy ± 0.4%
state-of-charge (0..100%)
Voltage measurement accuracy
± 0.1%
± 0.3%
[3 sec]
E-lite TBS Manual Rev5en / Printed in The Netherlands
High Precision Battery Monitor
e-xpert lite
Owner’s manual
Thank you for purchasing a TBS Electronics
Battery Monitor.
Please read this owner’s manual for information
about using the product correctly and safely.
Keep this owner’s manual close to the battery
monitor for future reference.
TBS ELECTRONICS BV
De Marowijne 3, 1689AR, Zwaag, The Netherlands
http://www.tbs-electronics.com
EN
2
34
5
6
7
8
1
9
10
Step size : 1
r.c Reset zero-offset current. Use this reset item to remove small current readings on
the display when no current is flowing in- or out of the battery. When performing
this reset action, please be 100% sure that all DC consumers/chargers are
disconnected or turned off.

1. E-xpert lite display en bedieningsoverzicht
1. Batterij laden indicator
2. Alarm geaktiveerd indicator
3. Indicatieveld voor numerieke waarden
4. Uitlees eenheden
5. “Main” batterij of “Auxiliary” batterij indicator
6. Laadtoestand (State-of-charge) indicator
7. Synchronisatie indicator
8. Selecteer Laadtoestand uitlezing, of volgende waarde (>)
9. Selecteer stroom (A) of Ampere-uren (Ah) uitlezing, of activeer / verlaat Setup menu
10. Selecteer voltage (V) uitlezing (Main of Auxiliary), of vorige waarde (>)
Voordat u deze gebruiksaanwijzing verder leest, is het
belangrijk dat u tevens de installatie voorschriften heeft
doorgenomen!
2. Synchronisatie
Om uw batterij monitor een accurate batterij (akku) status te laten tonen, is het belangrijk
om regelmatig de batterij monitor te synchroniseren met uw batterij. Zoals reeds uitgelegd
in de beknopte handleiding, is een synchronisatie stap ook noodzakelijk voordat u de
batterij monitor doelmatig kunt gebruiken. Tijdens het gebruik van de batterij monitor, geeft
deze automatisch aan wanneer een synchronisatie noodzakelijk is door de melding
“SYNCHRONIZE” op het display te tonen.
Een synchronisatie stap betekent niets meer dan het uitvoeren van een komplete laad-
cyclus op uw batterij. Een laadcyclus wordt als kompleet beschouwd, wanneer alle
ontladen energie weer teruggeladen is en aan beide “Auto-sync parameters” F02 en F03
zijn voldaan gedurende minimaal 4 minuten. In het algemeen is dit wanneer de batterij
lader overgaat op de onderhouds- (float) laadfase. Door aan deze condities te voldoen,
wordt de batterij als “vol” beschouwd en zal het display knipperend het “FULL” bericht
tonen. Hiernaast worden tevens de laadtoestand uitlezing op 100% en de Ampere-uren
uitlezing op 0Ah gezet. Het “FULL” bericht verdwijnt automatisch wanneer een toets wordt
ingedrukt of als de batterij weer ontladen wordt.
Het periodiek uitvoeren van synchronisaties is ook belangrijk voor de levensduur van uw
batterij. U zult merken dat wanneer u zelf regelmatig volledige laadcycli uitvoert op uw
batterij, de batterij monitor vrijwel nooit het “SYNCHRONIZE” bericht zal tonen omdat de
batterij reeds goed synchroon loopt met uw batterij monitor.
Naast automatische synchronisaties gebaseerd op het voldoen aan de Auto-Sync
Functies, kunt u de batterij monitor ook manueel synchroniseren als u zeker weet dat uw
batterij reeds volledig opgeladen is. Dit kan worden bereikt door de < en > toetsen
tegelijkertijd voor drie seconden in te drukken. Na deze drie sekonden zal een knipperend
“FULL” bericht op het display verschijnen, net als bij een automatische synchronisatie.
3. Setup menu
In het Setup menu, kan de batterij monitor perfect worden afgestemt op uw batterij
systeem. Een aantal parameters, Functies genaamd, kunnen naar eigen inzicht worden
ingesteld. Dit menu kan bereikt worden via de volgende toets combinatie :
Wanneer het Setup menu bereikt is, kunt u de < en > toetsen gebruiken om door de
diverse Functies te bladeren. Door op de SETUP toets te drukken, kan de waarde van de
op dat moment geselecteerde Functie bekeken worden. De < en > toetsen kunnen nu
gebruikt worden om deze waarde te wijzigen. Door opnieuw op de SETUP toets te
drukken kan worden teruggestapt naar het Functie setup menu. Vanuit elke menu positie
kan worden teruggestapt naar de normale mode door de SETUP toets voor 3 seconden in
te drukken. Hierbij zullen tevens alle gewijzigde Functie waardes opgeslagen worden in
het geheugen. Wanneer in het Setup menu voor 90 seconden geen toetsen worden
ingedrukt, zal de batterij monitor automatisch terugstappen naar de normale mode zonder
de gewijzigde Functie waardes op te slaan.
De fabrieksinstellingen zijn gebaseerd op een 12V batterij systeem met een capaciteit van
200Ah. Voor 12V systemen zal in het algemeen alleen Functie F01 gecontroleerd moeten
worden voor een correcte werking van de batterij monitor. Wanneer uw batterij capaciteit
anders is dan 200Ah, zal de waarde van Functie F01 gewijzigd moeten worden in een
waarde die hiermee overeenkomt. Alle overige Functies kunnen eventueel ongewijzigd
blijven.
Wanneer u een 24V batterij systeem heeft, moeten naast het controleren van Batterij
capaciteits Functie F01, tevens de waarden van Functies F02 en F05 gewijzigd worden.
Standaard 24V systeem waardes voor F02 en F05 zijn respectievelijk 26.4V en 21.0V.
De volgende Functies zijn beschikbaar :
[3 sec]
F02 Lader ‘float’ spanning (Auto-sync parameter). Deze waarde moet gelijk zijn aan de
‘float’- of onderhoudsladingsspanning van uw batterij lader, welke de laatste fase
inhoudt van het laadproces. In deze fase wordt de batterij als vol beschouwd.
Standaard : 13.2V Bereik : 8.0V - 33.0V Stapgrootte : 0.1V
F03 Lader ‘float’ stroom (Auto-sync parameter). Wanneer de laadstroom onder dit
percentage van de batterij capaciteit (zie Functie F01) komt, zal de batterij als
volledig opgeladen worden beschouwd. Deze waarde moet altijd hoger zijn dan
de minimale stroom waarbij de lader de batterij onderhoudt of stopt met laden.
Standaard : 2.0% Bereik : 0.5 - 10.0% Stapgrootte : 0.1%
F04 Low battery alarm Aan (% SOC). Wanneer het laadstatus percentage onder deze
waarde komt, zal het alarm relais geaktiveerd worden, de “Charge” indicator gaan
knipperen en de Laadtoestand indicator geheel leeg zijn.
Standaard : 50% Bereik : 0 - 99% Stapgrootte : 1%
F05 Low battery alarm Aan (Volts). Wanneer de batterij spanning onder deze waarde
komt, zal het alarm relais geaktiveerd worden.
Standaard : 10.5V Bereik : 8.0 - 33.0V Stapgrootte : 0.1V
F06 Low battery alarm Uit (% SOC). Wanneer het laadstatus percentage boven deze
waarde komt en het alarm relais stond geaktiveerd, zal deze weer gedeaktiveerd
worden. Wanneer de waarde “FULL” wordt geselecteerd, zal het alarm relais pas
gedeaktiveerd worden wanneer aan de Auto-sync parameters is voldaan.
Standaard : 80% Bereik : 1 - 100% / FULL Stapgrootte : 1%
F01 Batterij capaciteit. De capaciteit van uw Main batterij in Ampere-uren (Ah).
Standaard : 200Ah Bereik : 20 - 999Ah Stapgrootte : 1Ah
F07 Peukert's exponent. De Peukert’s exponent representeert het effect van
reducerende batterij capaciteit bij grotere ontladingsstromen. Wanneer de Peukert
waarde van uw batterij onbekend is, wordt aanbevolen deze op “1.25” te laten
staan. Een waarde van “1.00” blokkeert de Peukert compensatie en kan ook
worden gebruikt voor op Lithium gebaseerde batterijen.
F08 Shunt Ampere rating. Deze Functie representeert de Ampere rating van de shunt
bij 50mV. Bij uw batterij monitor is een zg. 500Amp/50mV shunt bijgesloten. Deze
shunt genereert een spanning van 50mV over de kleine schroefaansluitingen,
wanneer er een stroom van 500A doorheen vloeit. Deze spanning wordt door de
batterij monitor gebruikt om de hoeveelheid stroom te meten van- en naar de
batterij.
Standaard : 500A Bereik : 10 - 900A Stapgrootte : variabel
F09 Backlight modus. Deze Functie representeert de tijdsduur van de LCD backlight
aktivering in seconden, nadat een toets is ingedrukt. De backlight kan op altijd aan
(“ON”) of altijd uit (“OFF”) ingesteld worden. Functie instelling “AU” aktiveert de
backlight automatisch wanneer de laad/ontlaad stroom de 1A overschrijdt of
wanneer een toets wordt ingedrukt.
Standaard : 30sec Bereik : OFF / 5…300 / ON / AU Stapgrootte : variabel
F10 Alarm kontakt polariteit. Hiermee kan een selectie worden gemaakt tussen een
normaal geopend (”NO”) of een normaal gesloten (”NC”) kontakt.
Standaard : NO Bereik : NO / NC
F11 Auto-sync gevoeligheid. Wijzig deze Functie alleen wanneer F02 en F03 reeds
korrekt zijn en automatische synchronisatie toch niet lukt. Als automatische
synchronisatie te lang duurt of helemaal niet optreedt, moet deze waarde verlaagd
worden. Wanneer de batterij monitor te vroeg synchroniseert, moet deze waarde
verhoogd worden.
Standaard : 5 Bereik : 0 - 10
F12 Firmware versie. Toont de firmware (software) versie van de batterij monitor.
Standaard : x.xx
r.b Reset Batterij status. Gebruik dit reset item om de huidige batterij status te
resetten, bijvoorbeeld wanneer u uw oude batterij heeft vervangen voor een
identiek nieuw exemplaar.
r.F Reset Functies. Gebruik dit reset item om alle Functie waardes te resetten naar
de fabriekswaardes.
De laatste twee Functies zijn zogenaamde Reset Functies. Door op de SETUP toets te
drukken, kan de op dat moment geselecteerde Reset Functie bekeken worden. De
standaard waarde voor alle Reset Functies is “OFF”. Om de geselecteerde Functie
uiteindelijk te resetten, kunt u middels de < en > toetsen de waarde veranderen van “OFF”
naar “ON”. Door nogmaals op de SETUP toets te drukken wordt teruggestapt naar het
Setup menu. Alle items welke op “ON” gezet zijn worden pas gereset wanneer de normale
modus is bereikt door de SETUP toets voor 3 seconden ingedrukt te houden. De volgende
Reset Functies zijn beschikbaar :
Standaard : 1.25 Bereik : 1.00 - 1.50 Stapgrootte : 0.01
4. Garantie condities
TBS Electronics (TBS) garandeert dit produkt vrij van defecten veroorzaakt in de
assemblage of door de gebruikte materialen, tot 24 maanden na de aankoopdatum.
Gedurende deze periode neemt TBS de kosten van eventuele reparatie voor haar
rekening. TBS is niet verantwoordelijk voor de transportkosten van dit produkt.
Deze garantie vervalt wanneer dit produkt fysiek beschadigd is, zowel extern als intern en
1)
dekt geen kosten veroorzaakt door onjuist gebruik of gebruik in een ongeschikte
omgeving.
Deze garantie is niet geldig wanneer dit produkt is misbruikt, verwaarloosd, onjuist
geinstalleerd of gerepareerd door iemand anders dan door TBS is aangewezen. TBS is
niet verantwoordelijk voor enig verlies, schade of kosten voortvloeiende uit onjuist gebruik,
installatie, gebruikersinstellingen en storing van dit produkt.
Omdat TBS geen controle kan uitvoeren op het gebruik en de installatie (volgens lokaal
geldende voorschriften) van dit produkt, is de eindgebruiker ten alle tijden aansprakelijk
voor het gebruik hiervan. Dit TBS produkt is niet geschikt voor toepassing als kritische
component in (medische-) apparatuur of systemen die een potentieel gevaar kunnen
vormen voor mens, natuur en milieu. De eindgebruiker is ten alle tijden verantwoordelijk
voor de toepassing van dit produkt in deze applicaties. TBS accepteert geen
verantwoordelijkheid voor mogelijke inbreuk op patenten of andere rechten van derden,
verbonden aan het gebruik van dit produkt. TBS behoudt het recht om produkt
specificaties te wijzigen zonder voorafgaande aankondiging.
1) Enkele voorbeelden van onjuist gebruik zijn :
- het aanbieden van een te hoge ingangsspanning
- verkeerde aansluiting van de shunt
- het aanbieden van de accu spanning op de shunt ingang
- mechanisch te zwaar belaste behuizing en/of interne onderdelen, vanwege misbruik of
incorrecte verpakking
- contact met vloeistoffen of oxidatie door condensatie
5. Technische specificaties
Parameter E-xpert lite
Voedingsspanningsbereik
1)
Voedingsstroom : @Vin=24VDC
Ingangsspanningsbereik (”Auxiliary” batterij)
Ingangsspanningsbereik (”Main” batterij)
2)
Ingangsstroom bereik
Batterij capaciteit bereik
Werkingstemperatuur bereik
Uitlezingsresolutie : spanning (0..35V)
stroom (0..100A)
stroom (100..999A)
Amp-uren (0..99Ah)
Amp-uren (100..999Ah)
laadstatus (0..100%)
@Vin=12VDC
Nauwkeurigheid spanningsmeting
Nauwkeurigheid stroommeting
Afmetingen : frontpaneel
behuizingsdiameter
totale diepte
gewicht
Shunt afmetingen : breedte x lengte
hoogte
gewicht
Beschermingsklasse
Accessoires - E-xpert professionele connection kits
- E-xpert quick connection kits
N.B.: Bovenstaande gegevens kunnen zonder aankondiging van de fabrikant wijzigen.
9..35VDC
7mA
9mA
2..35VDC
0..35VDC
-999..+999A
20..999Ah
-20..+50°C
± 0.1V
± 0.1A
± 1A
± 0.1Ah
± 1Ah
± 0.1%
± 0.3%
± 0.4%
ø 64mm
ø 52mm
79mm
95gram
45 x 87mm
17mm (basis) / 35mm (M8 schroef)
145 gram
IP20 (frontpaneel IP 65)
1) Gemeten met uitgeschakelde backlight en alarm relais.
2) Afhankelijk van geselecteerde shunt. Met standaard meegeleverde 500A/50mV shunt
(350A continu), is de range gelimiteerd tot -600..+600A.
6. Conformiteitsverklaring
FABRIKANT : TBS Electronics BV
ADRES : De Marowijne 3
1689 AR Zwaag
The Netherlands
Verklaart dat het volgende product :
PRODUKT TYPE : BATTERIJ MONITOR
MODEL : e-xpert lite
conform de eisen is van de volgende richtlijnen van de Europese Unie :
EMC Directive 2004/108/EC
RoHS Directive 2002/95/EC
Het bovenstaande produkt is conform de volgende geharmoniseerde normen :
EN61000-6-3: 2001 EMC - Generic Emissions Standard
EN61000-6-2: 2005 EMC - Generic Immunity Standard
E-lite TBS Manual Rev5en / Printed in The Netherlands
High Precision Battery Monitor
e-xpert lite
Gebruiksaanwijzing
Wij danken u voor de aankoop van deze TBS
Electronics Batterij Monitor. Leest u alstublieft deze
gebruiksaanwijzing zorgvuldig door voor een correcte
en veilige werking van dit produkt. Om de gebruiksaan-
wijzing snel te kunnen raadplegen, is het raadzaam
deze in de buurt van de batterij monitor te houden.
TBS ELECTRONICS BV
De Marowijne 3, 1689AR, Zwaag, The Netherlands
http://www.tbs-electronics.com
NL
2
34
5
6
7
8
1
9
10
Stapgrootte : 1
r.c Reset nul-offset stroom. Gebruik dit reset item om kleine stroom uitlezingen op nul
te zetten wanneer er geen stroom in- of uit de accu vloeit. Het is zeer belangrijk
dat alle op de accu aangesloten verbruikers en laders zijn ontkoppeld of
uitgeschakeld wanneer deze reset actie wordt uitgevoerd.
Table of contents
Languages:
Other tbs electronics Monitor manuals
