TC Works SPARKLE User manual

99
CD BURNING IN SPARK LEPLUS /
ENGLISH
USER MANUAL
LE
LE

© BY TC WORKS SOFT & HARDWARE GMBH 1998 - 2002. ALL PRODUCT AND COMPANY NAMES ARE TRADEMARKS OF THEIR RESPECTIVE OWNERS.
ALL SPECIFICATIONS SUBJECT TO CHANGE WITHOUT NOTICE.ALL RIGHTS RESERVED.
0_EN_audio_neu 20.06.2002 13:59 Uhr Seite 2

3
TABLE OF CONTENTS
TABLE OF CONTENTS
INTRODUCTION-WELCOME
GETTING STARTED
SYSTEM REQUIREMENTS . . . . . . . . . . . . . . . . . . . . . . . . . . . . . . . 8
INSTALLATION . . . . . . . . . . . . . . . . . . . . . . . . . . . . . . . . . . . . . . 8
OPEN ARCHITECTURE:VST, ASIO . . . . . . . . . . . . . . . . . . . . . . . 10
THE USER INTERFACE CONCEPT . . . . . . . . . . . . . . . . . . . . . . . . 10
BROWSER VIEW
TRANSPORT WINDOW . . . . . . . . . . . . . . . . . . . . . . . . . . . . . . . 11
INPUT/OUTPUT SETTINGS . . . . . . . . . . . . . . . . . . . . . . . . . . . . . . . . . . . . . . . 11
TRANSPORT CONTROLS . . . . . . . . . . . . . . . . . . . . . . . . . . . . . . . . . . . . . . . . 13
RECORDING DIALOG . . . . . . . . . . . . . . . . . . . . . . . . . . . . . . . . . . . . . . . . . . 14
THE BROWSER VIEW . . . . . . . . . . . . . . . . . . . . . . . . . . . . . . . . 16
ACTIVE PART OF THE WINDOW . . . . . . . . . . . . . . . . . . . . . . . . . . . . . . . . . . . 18
FILE VIEW . . . . . . . . . . . . . . . . . . . . . . . . . . . . . . . . . . . . . . . . . . . . . . . . . 18
FILE FORMATS . . . . . . . . . . . . . . . . . . . . . . . . . . . . . . . . . . . . . . . . . . . . . . . 21
QUICKTIME IMPORT/EXPORT . . . . . . . . . . . . . . . . . . . . . . . . . . . . . . . . . . . . . 22
WAVE EDITOR . . . . . . . . . . . . . . . . . . . . . . . . . . . . . . . . . . . . 23
OVERVIEW . . . . . . . . . . . . . . . . . . . . . . . . . . . . . . . . . . . . . . . . . . . . . . . . . . 23
CURSORS . . . . . . . . . . . . . . . . . . . . . . . . . . . . . . . . . . . . . . . . . . . . . . . . . . 23
HOW TO MAKE A SELECTION . . . . . . . . . . . . . . . . . . . . . . . . . . . . . . . . . . . . . 24
Chapter 1
Chapter 2
English
0_EN_audio_neu 20.06.2002 14:49 Uhr Seite 3

4TABLE OF CONTENTS
ZOOMING . . . . . . . . . . . . . . . . . . . . . . . . . . . . . . . . . . . . . . . . . . . . . . . . . . 25
INFO LINE . . . . . . . . . . . . . . . . . . . . . . . . . . . . . . . . . . . . . . . . . . . . . . . . . 26
UNDO/REDO . . . . . . . . . . . . . . . . . . . . . . . . . . . . . . . . . . . . . . . . . . . . . . . . 26
EDIT FUNCTIONS . . . . . . . . . . . . . . . . . . . . . . . . . . . . . . . . . . . . . . . . . . . . . 27
PROCESS . . . . . . . . . . . . . . . . . . . . . . . . . . . . . . . . . . . . . . . . . . . . . . . . . . 28
FADE OPTIONS . . . . . . . . . . . . . . . . . . . . . . . . . . . . . . . . . . . . . . . . . . . . . . 28
SAMPLE RAT E CONVERSION . . . . . . . . . . . . . . . . . . . . . . . . . . . . . . . . . . . . . 30
PLAY LIST . . . . . . . . . . . . . . . . . . . . . . . . . . . . . . . . . . . . . . . 33
CD-BURNING . . . . . . . . . . . . . . . . . . . . . . . . . . . . . . . . . . . . . . . . . . . . . . . 40
MASTER VIEW
MASTER FADER . . . . . . . . . . . . . . . . . . . . . . . . . . . . . . . . . . . . . . . . . . . . . . 44
LEVEL METERS . . . . . . . . . . . . . . . . . . . . . . . . . . . . . . . . . . . . . . . . . . . . . . 44
DRY . . . . . . . . . . . . . . . . . . . . . . . . . . . . . . . . . . . . . . . . . . . . . . . . . . . . . . 45
CREATE FILE . . . . . . . . . . . . . . . . . . . . . . . . . . . . . . . . . . . . . . . . . . . . . . . . 45
FX SLOTS . . . . . . . . . . . . . . . . . . . . . . . . . . . . . . . . . . . . . . . 46
REALTIME EFFECTS . . . . . . . . . . . . . . . . . . . . . . . . . . . . . . . . . . . . . . . . . . . 46
WHICH PLUG-IN FORMATS CAN BE USED? . . . . . . . . . . . . . . . . . . . . . . . . . . . 47
NAVIGAT ION . . . . . . . . . . . . . . . . . . . . . . . . . . . . . . . . . . . . . . . . . . . . . . . 47
MOVING PLUG-INS . . . . . . . . . . . . . . . . . . . . . . . . . . . . . . . . . . . . . . . . . . . 47
HOW TO COPY PLUG-INS . . . . . . . . . . . . . . . . . . . . . . . . . . . . . . . . . . . . . . 48
REMOVING EFFECTS . . . . . . . . . . . . . . . . . . . . . . . . . . . . . . . . . . . . . . . . . . . 48
LEVEL INDICATION FOR EACH PLUG-IN. . . . . . . . . . . . . . . . . . . . . . . . . . . . . 48
CONTEXT SESITIVE MENU . . . . . . . . . . . . . . . . . . . . . . . . . . . . . . . . . . . . . . 49
SYSTEM PERFORMANCE:THE SYSTEM INFO SCREEN . . . . . . . . . . . . . . . . . . . . . 50
PLUG-INEDIT VIEW . . . . . . . . . . . . . . . . . . . . . . . . . . . . . . . . . . . . . . . . . . 50
TABLE OF CONTENTS
Chapter 3
0_EN_audio_neu 20.06.2002 14:49 Uhr Seite 4

5
TABLE OF CONTENTS
PLUG-IN
ONE BAND EQ . . . . . . . . . . . . . . . . . . . . . . . . . . . . . . . . . . . . 53
DELAYIT. . . . . . . . . . . . . . . . . . . . . . . . . . . . . . . . . . . . . . . . 53
MAXIT. . . . . . . . . . . . . . . . . . . . . . . . . . . . . . . . . . . . . . . . . . 54
MISCELLANEOUS
PREFERENCES . . . . . . . . . . . . . . . . . . . . . . . . . . . . . . . . . . . . . 55
SPARKLE FILE TYPES . . . . . . . . . . . . . . . . . . . . . . . . . . . . . . . 60
HARDWARE SUPPORT . . . . . . . . . . . . . . . . . . . . . . . . . . . . . . . . 61
LOOPING . . . . . . . . . . . . . . . . . . . . . . . . . . . . . . . . . . . . . . . . 61
SAVE / SAVE AS / EXPORT OPTIONS . . . . . . . . . . . . . . . . . . . . . 62
Chapter 4
English
Chapter 5
0_EN_audio_neu 20.06.2002 14:49 Uhr Seite 5

6TABLE OF CONTENTS
0_EN_audio_neu 20.06.2002 13:59 Uhr Seite 6

Welcome to SPARK LE –TCWORKS’ entry-level application for digital audio editing
SPARK LE’s new design concept,high-end processing tools,and“one window approach” turn for-
merly complex edits into a creative experience.Now you can do things you thought weren’t pos-
sible,at a speed you didn’t dare dream of!
If you’d like even more features and power,check out SPARK LE’s big brother SPARK XL.As a
registered user of SPARK LE,you are entitled to a special upgrade offer.Contact your local
TC Electronic distributor for details.
CONTACT DETAILS
may contact theTC Electronic distributor in your area, or write to:
TC ELECTRONICA/S
Customer Support
Sindalsvej 34
Risskov DK-8240
Denmark
USA:
TC Electronic,Inc.
742-A Hampshire Rd.
WestlakeVillage,CA 91361
www.tcelectronic.com
e-mail:support@tcelectronic.com
TC Support Interactive
TheTC Support Interactive website is designed as an online support and information center.At the
site you can find answers to specific questions regardingTC software.All known issues are stored
in a database searchable by product,category,keywords,or phrases.Under the section "My Stuff"
you can login to check the status of your questions,download materials such as product manuals,
software updates and new presets.This site has been specifically designed to meet the needs of our
users.
We constantly update the database and you will find the site to be a huge resource of information.
Browse through Q&A’s and discover new aspects of yourTC product.If you can’t find an answer
online, you have the option of submitting a question to our technical support staff who will then
reply to you by e-mail.TheTC SupportTeam is on constant alert to help you in any way they can.
www.tcsupport.tc
© BYTCWORKS SOFT & HARDWARE GMBH /TC ELECTRONIC,AS 1998 - 2003.ALL PRODUCT AND COMPANY NAMES ARE
TRADEMARKS OFTHEIR RESPECTIVE OWNERS.NATIVE BUNDLE IS ATRADEMARK OFTCWORKS,GmbH,VST ISATRADEMARK
OF STEINBERGA.G.,AUDIO UNITS ISATRADEMARK OFAPPLE COMPUTER.ALL SPECIFICATIONS SUBJECTTO CHANGE
WITHOUT NOTICE.ALL RIGHTS RESERVED.
TCWORKS IS ATC GROUP COMPANY.
7
INTRO-WELCOME
INTRODUCTION-WELCOME
Welcome
1_Installer_EN_neu 23.12.2003 15:20 Uhr Seite 7

SYSTEM REQUIREMENTS
• Power Macintosh with G3 processor or higher
• MacOS X (10.1 or higher)
• 128 MB
•ASIO compatible sound card for optimal audio capabilities recommended
(ASIO 2.0 or CoreAudio supported)
• CD Recorder and RoxioToast,Jam orApple iTunes software for CD recording
INSTALLATION
Run the SPARK LE installer and follow the instructions on screen:
1First,you’ll see thisWelcome Screen.Please click on“Continue”.
2On the Second screen,you’ll find the license agreement.Before proceeding further,make
sure you read,understand and agree to the terms.Then click“Accept”.
8GETTING STARTED
1
GETTING STARTED
1_Installer_EN_neu 23.12.2003 14:38 Uhr Seite 8

3This screen presents you with the ReadMe file – read it, save it if you like, then click
on “Continue”.
4Now you’re ready for the actual installation. Select “Easy Install” and pick a location for
SPARK LE by clicking on the location pop-up dialog at the bottom of the screen. If you
don’t set anything, SPARK LE will be installed to the root directory of your internal
hard disk into a folder also named “SPARK LE”.
5Now the installation is performed, and you’ll be presented with the final dialog, saying
that installation was successful. Click on “Quit” and you’re done!
6Now you’re ready to start using SPARK LE! The Folder on your hard disk should contain
the items you see pictured here:
Don’t forget to send in your registration card, or to register online!
9
GETTING STARTED
1
1_Installer_EN_neu 20.06.2002 13:59 Uhr Seite 9

10 GETTING STARTED
OPEN ARCHITECTURE:VST, ASIO
SPARK LE supports VST Plug-Ins and the Steinberg ASIO interfaces for maximum
compatibility.
Most current digital audio cards are supplied with ASIO drivers and all the big names in
Plug-Ins make VST Plug-Ins! Both these formats are quickly becoming standards on the
Macintosh, and are already supported by the likes of Emagic, Opcode, Cakewalk – and of
course Steinberg – on the host application side and by Sonorus, KORG, RME, MOTU,
Lexicon and many others on the card side.
THE USER INTERFACE CONCEPT
SPARK LE integrates the whole editing, processing and mastering process into only two
windows:The Browser View and the Master View.
In the Browser View, you’ll find the project file database, the audio editor and the Play
List – all at one glance and with a fully customizable view.Your window setting is saved
with the Project file.
The Master View includes all the realtime processing and mixing – with the unique
FXmachine that enables you to route up to 4 Plug-Ins into the signal path, the high-resolu-
tion master faders and export features to apply the processing to your files permanently.
Thanks to this unique approach, you won’t be surfing the menus desperately looking for
key-features.They are all right where you need them!
1
1_Installer_EN_neu 20.06.2002 13:59 Uhr Seite 10

11
BROWSER VIEW
2
This chapter describes the Browser View and the Transport Window.
Before we go into the Browser View details, let’s have a look at the Transport Window:
TRANSPORT WINDOW
The Transport Window provides all the transport controls you need to navigate through
your audio file or Play List, as well as some basic audio output information.
INPUT/OUTPUT SETTINGS
On the left of the Transport Window, you will find your current output setting and the
currently active I/O sampling rate. If SPARK LE’s real-time resampling algorithm is active, this
will also be indicated here.
BROWSER VIEW
File View Play List
Wave Editor
I/O settings Transport Controls
2_BrowserView_neu 20.06.2002 13:58 Uhr Seite 11

12 BROWSER VIEW
2HARDWARE SAMPLING RATE – Indicates the sample rate settings of your audio
– hardware.
RESAMPLING INDICATOR –Lit if waveform’s sampling rate and actual output
sampling rate are different, so SPARK LE’s software
resampling algorithm is active.
SELECTED OUTPUT –Allows you to change the set of output channels used, if
multiple are available.
SETUP DIALOG –Click on the “Setup” button to change your audio
device settings. If the audio device doesn’t offer a setup
page, this button will be disabled. For details on how to
setup your audio device, refer to the documentation of
your audio card.
Selected Output
Resampling Indicator
Hardware Sample Rate
Setup Dialog
2_BrowserView_neu 20.06.2002 13:58 Uhr Seite 12

TRANSPORT CONTROLS
SCRUBBING VIA KEYBOARD COMMANDS
It is possible to use the scrub function via keyboard shortcuts. Enter this mode by pressing
PAUSE in the transport bar (or pressing the <ENTER> key on the numerical keypad).
Now, the scrubbing speed can be set by pressing the <CURSOR LEFT / RIGHT> keys.
This will change the speed in 5% steps. For fine trimming the speed, press
<SHIFT + CURSOR LEFT / RIGHT>.This allows to change the speed in 1% steps.
<OPTION + CURSOR LEFT / RIGHT> will change the scrubbing direction, but keep the
scrubbing speed.
To stop the scrubbing immediately, press the <SPACE BAR>.To leave the <PAUSE> mode,
press the <ENTER> key again.
13
BROWSER VIEW
2
Left Selection/Region position
(In Time)
Cursor Position/
Current Time
Right Selection/Region position
(Out Time)
Active File
Scroll Bar
Transport Controls (from left to right)
Cycle – Switches automatic repetition of the current selection on/off.
Alternatively, press </>.
Stop – One click stops Playback. Pressing Play afterwards will play from
the current cursor position. Double click moves the cursor back
to the start of the Region/File.
Play – Starts Playback. Pressing the <SPACE BAR> toggles between Stop
and Play.
Pause – Stops Playback, but Playback will continue from current position.
To enter the Pause mode from the keyboard, press <ENTER>.
Record – Opens the Recording Dialog. Check the I/O settings in your
SPARKle Preferences, if the Recording Dialog doesn’t open - the
selected I/O device might not offer a recording possibility.
Key command for recording is <*>.
Fast Rewind/Fast Forward – Jump to previous/next marker. In Play List mode
this is used for track up/down navigation
(<COMMAND + CURSOR UP/DOWN>)
2_BrowserView_neu 20.06.2002 13:58 Uhr Seite 13
14 BROWSER VIEW
2
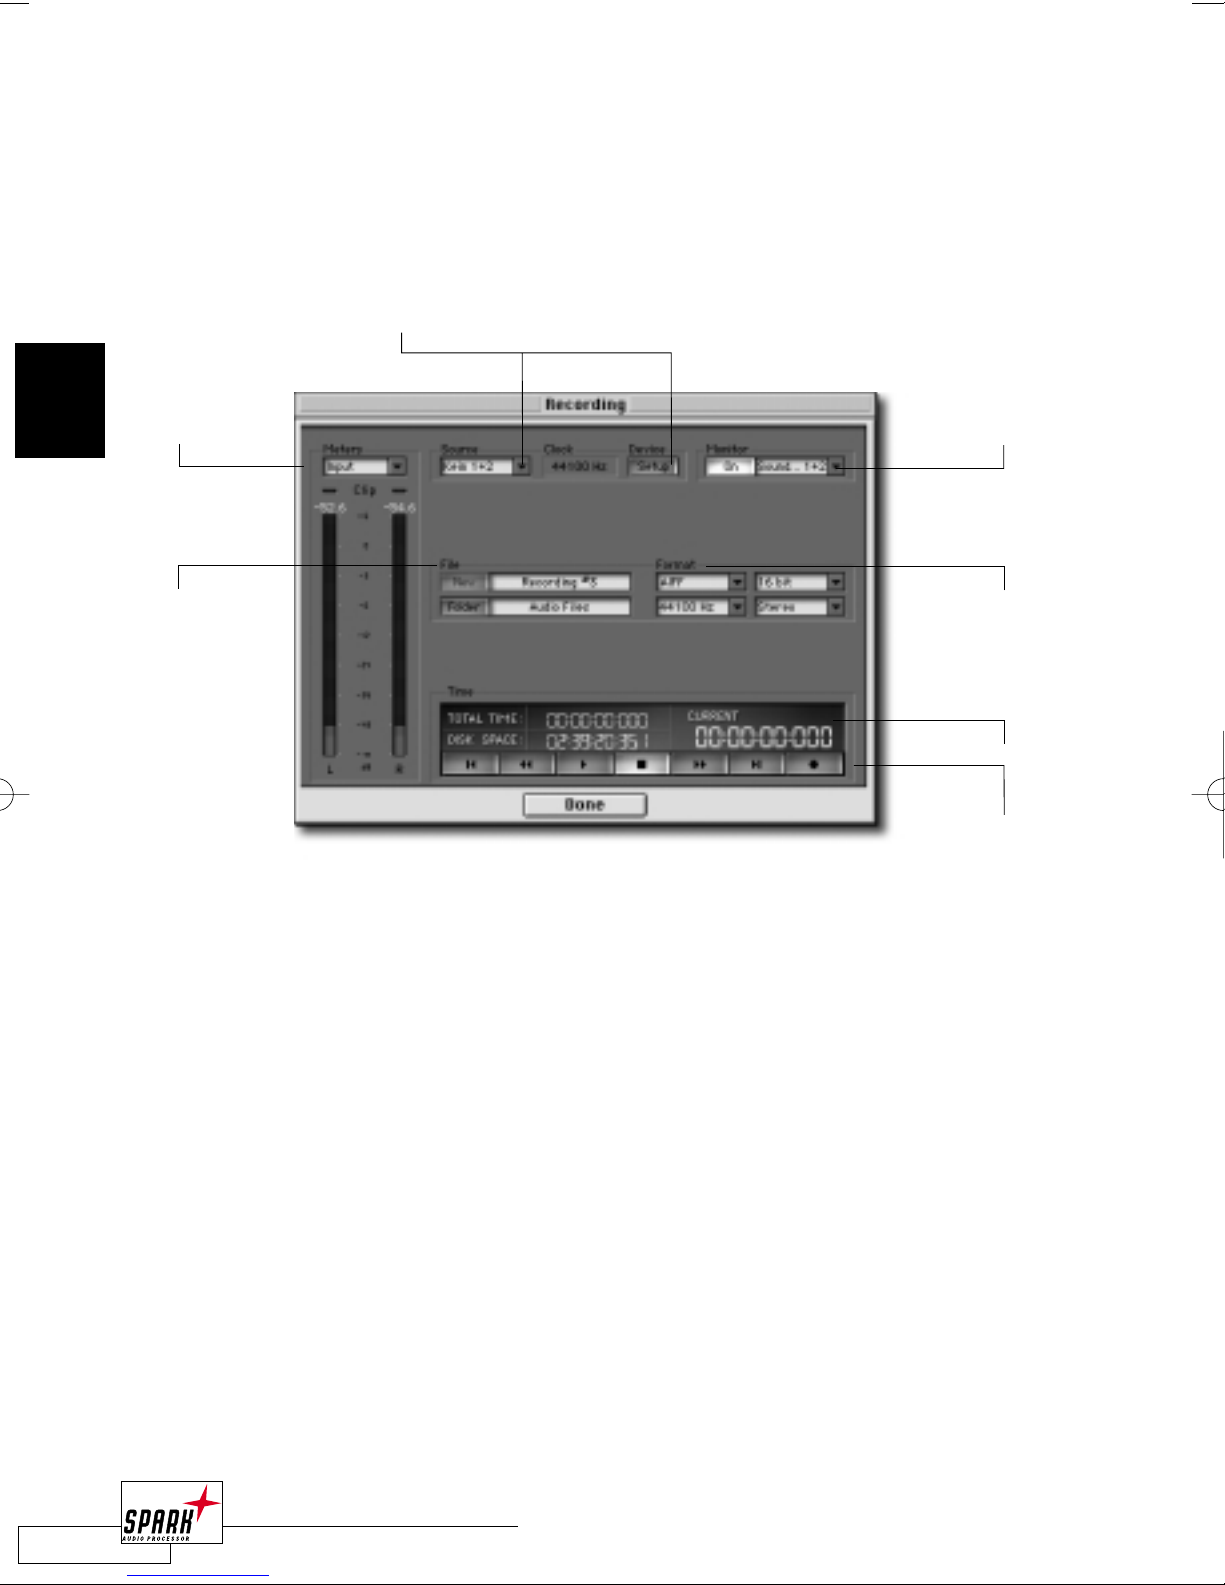
RECORDING DIALOG
SPARK LE offers flexible recording facilities.The recording dialog allows you to keep adding
takes into the same file and to set your audio Inputs/Outputs right there.
Click on the “Record” button in the Transport Window and the Recording Dialog will open:
NOTE:The Recording dialog will not open if the selected audio device can not accept audio inputs.
For example,“SoundManager” does not feature recording capabilities. Instead, select the “ASIO
SoundManager” or your optional audio card’s driver in the “I/O” page of the Preferences dialog.
METERS
The Recording Meters enable you to display the signal level input.When you click on the
Meters or the Clip Indication, the system displays a pop-up menu with peak-hold options.
SOURCE
You can select your recording input device in the Source section.The Clock indicates the
input sampling rate. Click the “Setup” button to display options for your audio device.This
settings dialog (“I/O; Setup Audio Device”) can also be accessed from the preferences dialog
and the transport bar.
MONITOR
The Monitor enables you to preview the audio before actually recording it.Turn the Monitor
on and select the desired audio source in the “Source” pop-up. By pressing <M> on the keyboard,
you can switch monitoring on or off.
FILE
Here you set the file properties such as your recording’s filename and destination. Click
“New” to create a new file.A default name with an incrementing number will automatically
be assigned to the file if you don’t type anything.
Meters
File
Monitor
File Format
Time Display
Transport
Controls
Source
2_BrowserView_neu 20.06.2002 13:58 Uhr Seite 14

15
BROWSER VIEW
2
FILE FORMAT: AIFF, SD2 AND WAV
Select the File Format you prefer. In addition to the File type, you can adjust the Sampling
frequency, bit depth, and mono/stereo settings.There is no “quality difference” between the
different available file formats.The most common on the Mac is “AIFF”.
If you select a sampling rate that is different from the sampling rate of your audio device, the
resampling function will be activated.
For high quality recordings it is not recommended to resample on the fly. Perform the
resampling off-line after recording instead.
NOTE: Explanations of the different file formats can be found on page 26 in this manual.
TIME DISPLAY
The Time Display supplies you with three different time read outs:
Total Time – Indicates the total length of your recording
Disk Space – Indicates the available disk space for recording in minutes. If you change the
file settings, the available disk space will be recalculated according to the file
attributes (recording with higher bit depths and sample rates require more
room on your hard disk).
Current – This displays the current time position in your recording.This is helpful,
when you play back an already recorded file for verification purposes.
TRANSPORT CONTROLS
The Transport Controls enable you to move around in a recorded audio file, for example, to
rehearse a part of your recording, or to replace it with a new recording.
Click the “Record” button or press <*> to start recording at the current position.To stop
recording, click “Stop” or press <*>.
After you have finished your recordings, select “Done”.
2_BrowserView_neu 20.06.2002 13:58 Uhr Seite 15

16 BROWSER VIEW
2
THE BROWSER VIEW
The Browser View is one of the many innovations in SPARK LE’s user interface concept. For
the first time, the File database, Play List and Wave Editor are all integrated into one window.
The Browser View features dynamic movable borders to adjust the section’s sizes to your
needs – and an unparalleled level of transparency!
movable borders
▲
▲
File View
Time ruler
Info Line
2_BrowserView_neu 20.06.2002 13:58 Uhr Seite 16

17
BROWSER VIEW
2
The BrowserView consists of three parts: The File View with all your audio files
and Regions used in your Project, the Play List where you arrange the Regions and define
Crossfades, and the Wave Editor to edit your audio and create Regions.
movable borders
▲
▲
▲
▲
Wave Editor
Playlist
Zoom Tools
2_BrowserView_neu 20.06.2002 13:58 Uhr Seite 17

18 BROWSER VIEW
2
ACTIVE PART OF THE WINDOW
The selected part of the BrowserView is marked by a colored frame – that way you will
always know whether you have focussed the FileView, the Play List or the Wave Editor.
To change between these three parts, simply click on the desired part, or press < TAB > /
<SHIFT + TAB> to change your focus.
The keyboard commands are always assigned to the active part of the window!
Note:There are some options in the Preferences (Edit; Preferences; Editor) on how this colored frame
should be indicated.Try the different options to find the one you prefer most.
FILE VIEW
The File View represents your virtual file database and includes references to the audio files
used in your project.You can build your own hierarchical order by creating virtual folders for
a better overview.
Of course, SPARK LE also supports drag & drop to and from the desktop, making it really
easy to load files or export regions into files.When you need to cut one long track into
many separate ones, this feature will save you hours!You can even import complete folders
with audio files just by dragging and dropping them to the File View!
Please note that the file tree that you build in your FileView does not represent the actual
location or order of your files on your hard disks – audio viewed in the same folder could be
on totally different hard disks. So you can easily build different views of your files without
actually having to move them around.
New files will always be opened into the currently selected folder. Files can not be moved
from one folder to another.Also, it is not possible to rename audio files within SPARK LE.
colored frame
2_BrowserView_neu 20.06.2002 13:58 Uhr Seite 18

Add Folder – This will create a new virtual folder.
Add File – Click this button to add audio files to the File View.
Add/Copy Region – By clicking on this button, you will create a Region based on the
current selection in your audio file.Alternatively press <COMMAND + R>.
Save File/Region as – This allows you to copy the selected file or export a selected region a
discrete file on your hard disk. Dragging the file/region to the desktop
will create a discrete file of the same file type as the original file.
Trash – To Trash a File View entry, select this entry and click on the File View’s
trash bin or press <BACKSPACE>.The file on your hard disk is not
affected by this action, only the reference in the FileView is removed.
However, if you have applied any kind of processing to this file, you will
be asked if you want to save the changes to the file before it is deleted
from the File View.
Info – This will open an info screen for the selected entry. In this info screen
you can, for example, change the region or folder name, or lock the
region start point and length. <COMMAND + I>
Use the cursor keys to navigate inside the File View. <CURSOR UP/DOWN> will select
the previous/next File View entry, <CURSOR LEFT/RIGHT> will open/close a folder.When
you select a File/Region in the FileView, the waveform will be displayed in the Wave Editor
immediately.
19
BROWSER VIEW
2
Folder
File
Region
Add Folder
Add/Copy Region
Save File/Region as
Trash
Info
Add File
2_BrowserView_neu 20.06.2002 13:58 Uhr Seite 19

FOLDERS
Folders will help you to structure your audio material in the File View.At least one
folder must exist in the FileView. Change the folder name by double-clicking on the folder
name or pressing <COMMAND + I>; this will bring up a dialog where you can enter a new
name.
FILES
If you click on the “Add File” button a file open dialog will pop-up.The selected
audio files will be opened into the File View. If you are working with split stereo files
(named *.L and *.R), SPARK LE will automatically open them as a stereo file, even if you
select just one of the files! To prevent SPARK LE from doing this, keep the <SHIFT> key
pressed while loading the file.
Note: To select multiple files in the “Add File” dialog hold the “shift” key while selecting the files.To
select all files press <COMMAND + A>.
REGIONS
A Region marks a section of your audio file.The borders
(marked with a small “S” and “E”) define the start and end points for playback.
You can have as many regions referencing the same file as you like. Regions do not affect
your audio file. By creating, editing or deleting them, the audio file on your hard disk is not
touched or changed!
As Regions belong to certain audio files, they will always appear as sub-entries of the related
audio file.
• DEFINING A REGION
There are two ways to define a Region:
· Make a selection in a waveform, click on the File View’s “Add Region” – a new Region
appears in the FileView!
· Make a selection in a waveform and press <COMMAND + R> on your keyboard – a new
Region appears in the FileView!
20 BROWSER VIEW
2
2_BrowserView_neu 20.06.2002 13:58 Uhr Seite 20
This manual suits for next models
1
Table of contents


