TDS Metrocom ACTIONTEC Product information sheet

helpful resources, features and utilities:
http://www.tdsmetro.net
TDS Metrocom Internet Services Homepage
http://www.tdsmetro.com
TDS Metrocom Homepage
http://www.tdsmetro.net/faq
TDS Metrocom Frequently Asked Questions
http://speedtest.tdsmetro.net/speedtest
TDS Metrocom DSL Speed Test
http://www.tdsmetro.net/spyware
TDS Metrocom Spyware Information
http://www.tdsmetro.net/virus
TDS Metrocom Virus Information
R0007-0405

1
CONTENTS
ACTIONTEC DSL GATEWAY SETUP INSTRUCTIONS:
DSL Kit Contents 2
DSL Filter Installation 4
Actiontec DSL Gateway Installation 6
CONFIGURING YOUR COMPUTER
Windows XP 8
Window 98, Me, NT & 2000 10
Mac OS X 11
Mac OS 8/9 12
CONFIGURING YOUR COMPUTER FOR STATIC IP*
Configuring Your Gateway for Static IP 13
Windows XP 15
Window 98, Me, NT & 2000 17
Mac OS X 19
Mac OS 8/9 20
CONFIGURING YOUR COMPUTER FOR E-MAIL
Configuring Your E-mail 21
Configuring Outlook Express 5.0/6.0 22
Accessing Your WebMail 23
TROUBLESHOOTING: 24
SYSTEM REQUIREMENTS: 27
SUPPORT SERVICES: 28
*Complete only if you purchased a Static IP package.

2
DSL KIT CONTENTS
1. Actiontec DSL Gateway
2. Power cord
3. Ethernet (yellow) cable

3
DSL KIT CONTENTS
6. Splitter
4. DSL (gray) cable
5. DSL filters
1. 1 Actiontec DSL Gateway
2. 1 Power cord (Color:Black)
3. 1 Ethernet cable (Color:Yellow)
4. 1 DSL cable (Color:Gray)
5. 4 DSL filters (Color:White)
6. 1 Splitter (Color:White)
If you did not receive these items,
please call TDS Metrocom Repair
at 1.877.METROCOM (877.638.7626).
Verify your computer meets the system
requirements listed on page 27 of this
User Guide.
your DSL kit should include:
4
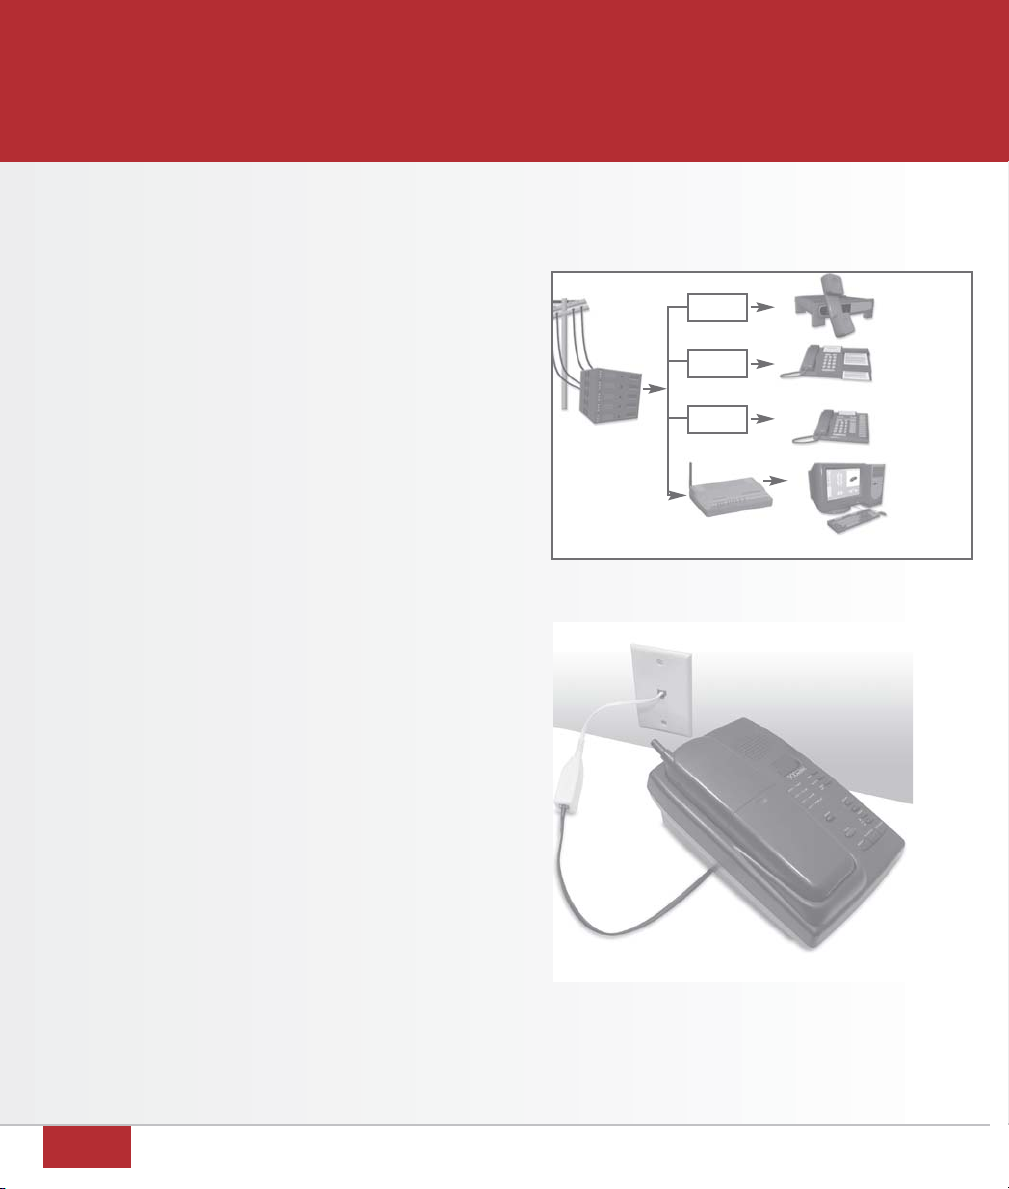
DSL FILTER INSTALLATION
TDS Metrocom provides DSL filters to ensure
that your DSL service does not interfere with
your telephone service. All analog telephony
devices* should be connected to your phone
jacks through a provided DSL filter (figure 7).
Unused phone jacks do not require a DSL filter.
Note: If you need additional filters or you
have a wall-mounted telephone, please call
TDS Metrocom Repair at 1.877.METROCOM.
1. Connect a DSL filter to your phone jack.
(figure 8)
2. Connect the analog device to the DSL filter.
Note: Phone cords that are 10 feet or less
are recommended. Using longer phone
cords between the phone jack and the
Actiontec DSL Gateway may cause slower
speeds or an interruption in service.
*Analog telephony devices include telephones,
answering machines, fax machines, dial-up modems,
some satellite dish receivers, security systems, and
many other devices.
figure 8
please note:
IMPORTANT: Do not install a DSL filter between
the Actiontec DSL Gateway and the phone jack. TDS
network
interface
answering
machine
fax machine
telephone
computer
DSL modem
FILTER
FILTER
FILTER
figure 7
5
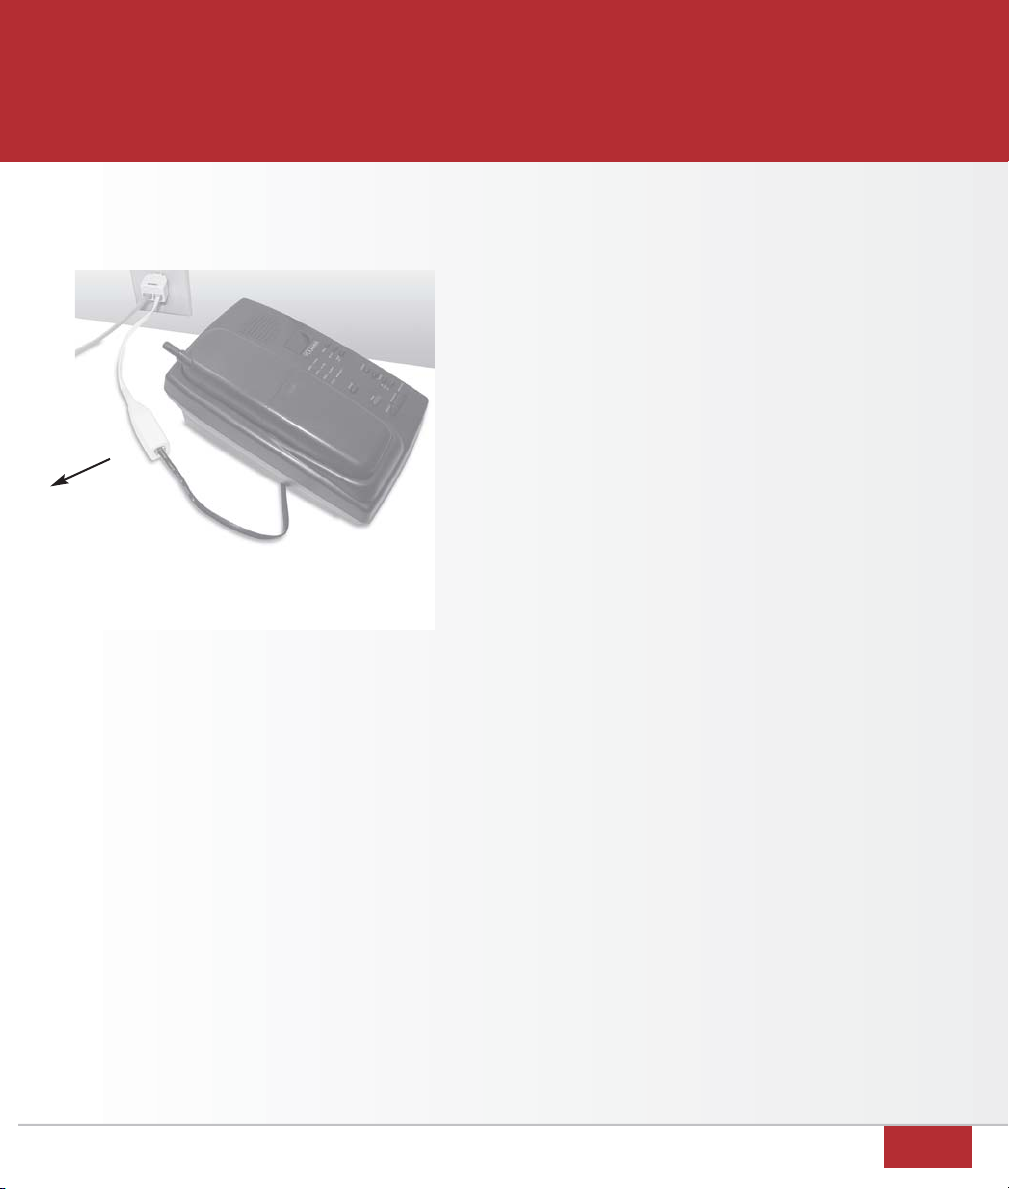
DSL FILTER INSTALLATION
If you want to have a phone (or other analog
telephony device) and the Actiontec DSL
Gateway connected to the same phone jack,
you will need to use the provided splitter.
1. Connect the splitter to your phone jack.
(figure 9)
2. Connect a DSL filter to one side of
the splitter.
3. Connect your phone (or other analog
telephony device) to the DSL filter.
4. Connect the DSL (gray) cable to the
remaining side of the splitter.
5. Connect the remaining end of the DSL
(gray) cable to the Phone port on the
back of the Actiontec DSL Gateway.
Note: If your DSL light is not solid green
after 5 minutes, the splitter may be
defective. Remove it and verify the
DSL light is solid green.
figure 9
to the
Actiontec DSL
Gateway

6
ACTIONTEC DSL GATEWAY INSTALLATION
The Actiontec DSL Gateway needs proper
ventilation to function. Place your Actiontec DSL
Gateway in an adequately ventilated area and
away from heat sources.
Steps for wiring a single computer:
1. Plug the end of the power cord into the power
port on the back of the Actiontec DSL Gateway.
(figure 10)
2. Plug the other end of the power cord into
a power outlet. (A power strip with surge
protection is recommended.)
3. Turn the power switch on.
4. Plug one end of the Ethernet (yellow) cable into
the Ethernet Network Interface Card (NIC) in
your computer. (figure 11)
Note: Your computer may look
slightly different.
5. Plug the remaining end of the Ethernet cable
into one of the yellow Ethernet ports on the
back of the Actiontec DSL Gateway. (figure 12)
6. Connect one end of the DSL (gray) cable
to the phone port on the back of the Actiontec
DSL Gateway. (figure 13 next page)
7. Connect the remaining end of the DSL (gray)
cable into your phone jack.
(figure 14 next page)
figure 10
figure 11
figure 12

7
ACTIONTEC DSL GATEWAY INSTALLATION
figure 14
figure 13
Wiring for use with up to four computers
(Optional–not supported by TDS Internet
Services Technical Support):
1. Verify each computer meets the system
requirements listed on page 27 of this
User Guide.
2. Purchase an Ethernet cable for each PC.
3. Plug one end of the Ethernet cable into the
Ethernet Network Interface Card (NIC).
4. Plug the remaining end of the Ethernet cable
into one of the yellow Ethernet ports on the
back of the Actiontec DSL Gateway.
5. Repeat these steps for any additional PCs.
Note: Each additional computer must also be
configured. See chapter entitled “Configuring
Your Computer”.
If you have:
Windows XP page 8.
Windows 98, Me, NT or 2000 page 10.
Mac OS X page 11.
Mac OS 8/9 page 12.

8
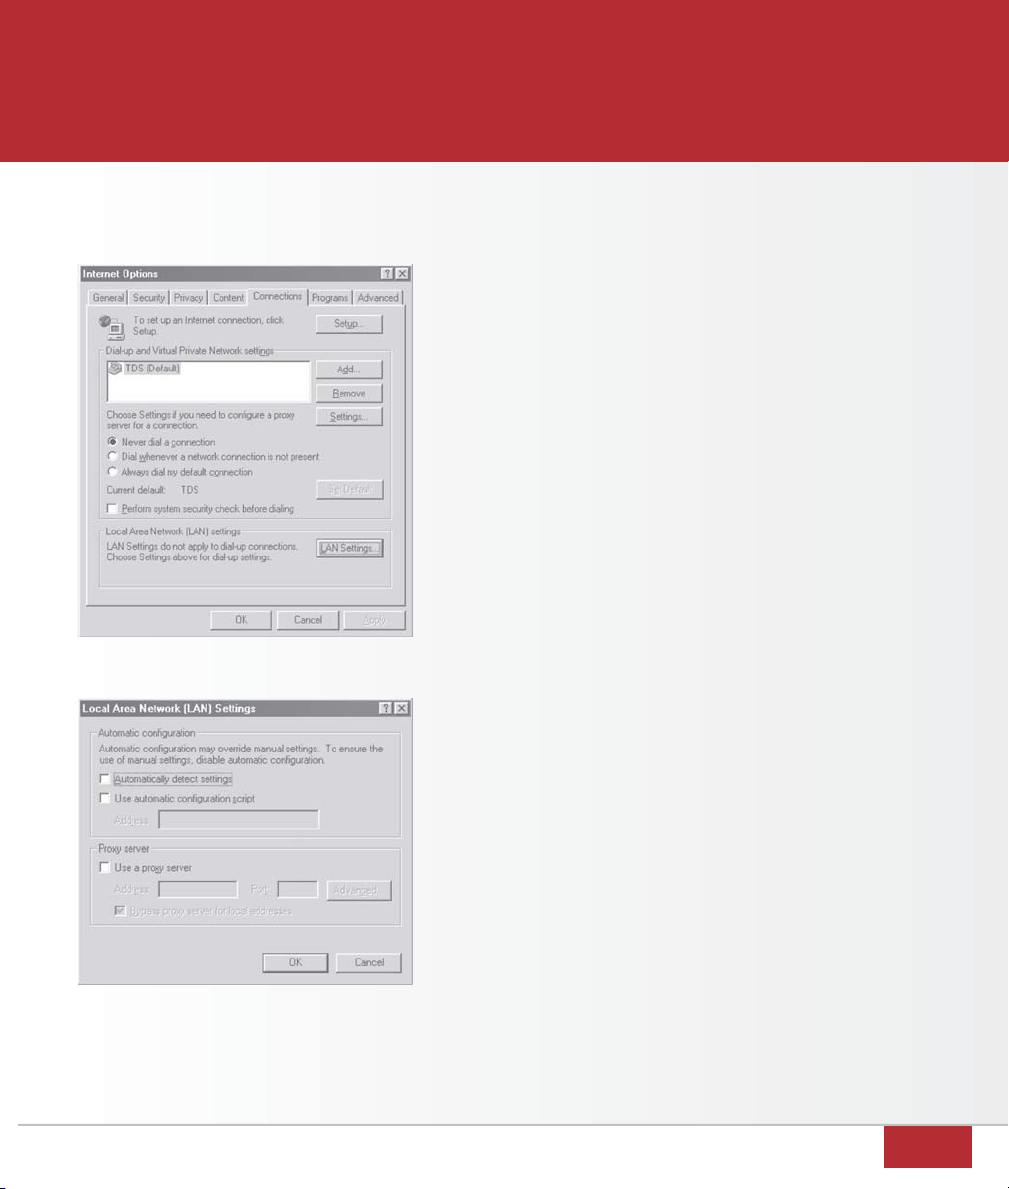
CONFIGURING YOUR COMPUTER FOR WINDOWS XP
1. Select
Start
then
Control Panel.
(figure 15)
2. Click
Network and Internet Connections
.
(figure 16)
Note: If you do not see
Network & Internet
Connections
, skip to the next step.
3. Click
Internet Options
. (figure 17)
figure 15
figure 16
figure 17
9
CONFIGURING YOUR COMPUTER FOR WINDOWS XP
4. Select the
Connections
tab. (figure 18)
5. Select
Never dial a connection
.
Note: If the
Never dial a connection
option is disabled (grayed out), skip to
the next step.
6. Click
LAN Settings
.
7. Verify all boxes are
unchecked
and
click
OK
. (figure 19)
8. Click
OK
. (figure 18)
Note: If you purchased a Static IP package,
proceed to page13 and complete the Static
IP setup for Windows XP. If you did not pur-
chase a Static IP package
you may proceed to page 21.
figure 18
figure 19

10
CONFIGURING YOUR COMPUTER FOR WINDOWS 98, ME, NT & 2000
1. Select
Start
, then
Settings,
then
Control
Panel
. (figure 20)
2. Double-click
Internet Options
. (figure 21)
3. Select the
Connections
tab. (figure 22)
4. Select
Never dial a connection
.
Note: If the
Never dial a connection
option
is disabled (grayed out), skip to the
next step.
5. Click
LAN Settings
.
6. Verify all checkboxes are
unchecked
and
click
OK
. (figure 23)
7. Click
OK
. (figure 22)
Note: If you purchased a Static IP package,
proceed to page13 and complete the Static IP
setup for Windows 98, Me, NT & 2000.
If you did not purchase a Static IP package
you may proceed to page 21.
figure 20
figure 21
figure 22
figure 23

11
CONFIGURING YOUR COMPUTER FOR MAC OS X
Note: If you purchased a Static IP package, do
not complete the instructions on this page.
Proceed to page 13.
1. Select
Apple
. (figure 24)
2. Select
System Preferences
.
3. Click
Network
. (figure 25)
4. Select the
TCP/IP
tab. (figure 26)
5. Select
Built-in Ethernet
from the
Show
box.
6. Select
Using DHCP
from the
Configure
box.
7. Click
Apply Now
.
8. Close the Network window.
Proceed to page 21.
figure 24
figure 25
figure 26

12
CONFIGURING YOUR COMPUTER FOR MAC OS 8/9
Note: If you purchased a Static IP package,
do not complete the instructions on this page.
Proceed to page13.
1. Select
Apple
. (figure 27)
2. Select
Control Panels
.
3. Select
TCP/IP
.
4. Select
Ethernet
from the
Connect via
box.
(figure 28)
5. Select
Using DHCP Server
from the
Configure
box.
6. Close the TCP/IP window.
Note: If asked to save the current
configuration, click
Save
.
Proceed to page 21.
figure 27
figure 28
13
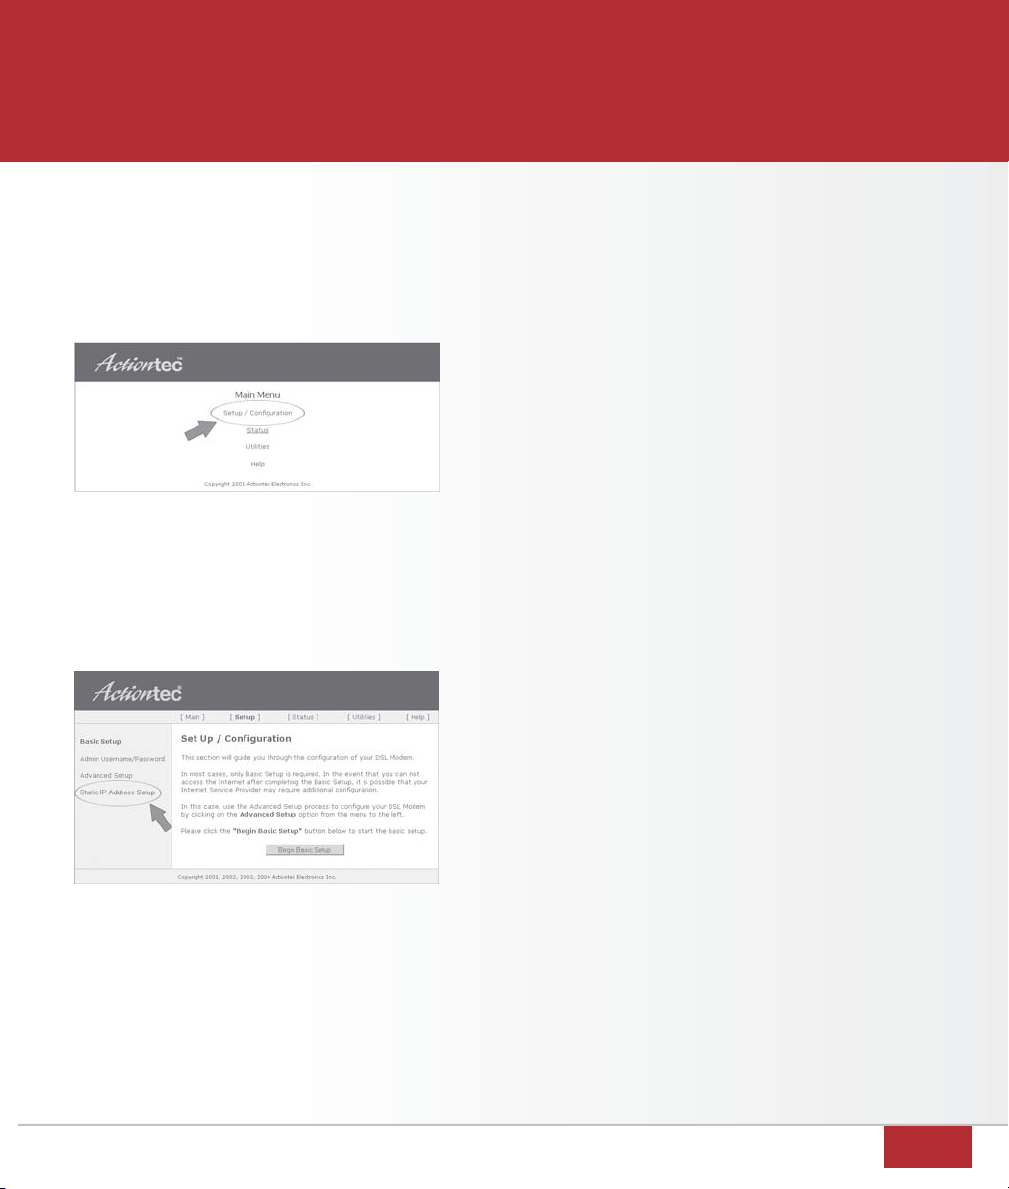
configuring your Gateway for Static IP
Note: If you did not purchase a Static IP
package, please proceed to page 21.
You will need your Customer Information
Sheet with your
IP & DNS Server
addresses
before beginning. If you do not know this
information, please call 1.877.METROCOM.
1. Open your browser
(example: Internet Explorer).
2. Type
http://192.168.0.1
in the address
or location text box and press
Enter
to
access the Actiontec DSL Gateway’s con-
figuration screen.
3. Click
Setup/Configuration
. (figure 29)
4. Click
Static IP Address Setup
.
(figure 30)
5. For
#1-IP Address
, enter the value labeled
A. WAN Gateway
on your Customer
Information Sheet. (figure 31 next page)
figure 30
CONFIGURING YOUR GATEWAY FOR STATIC IP
figure 29
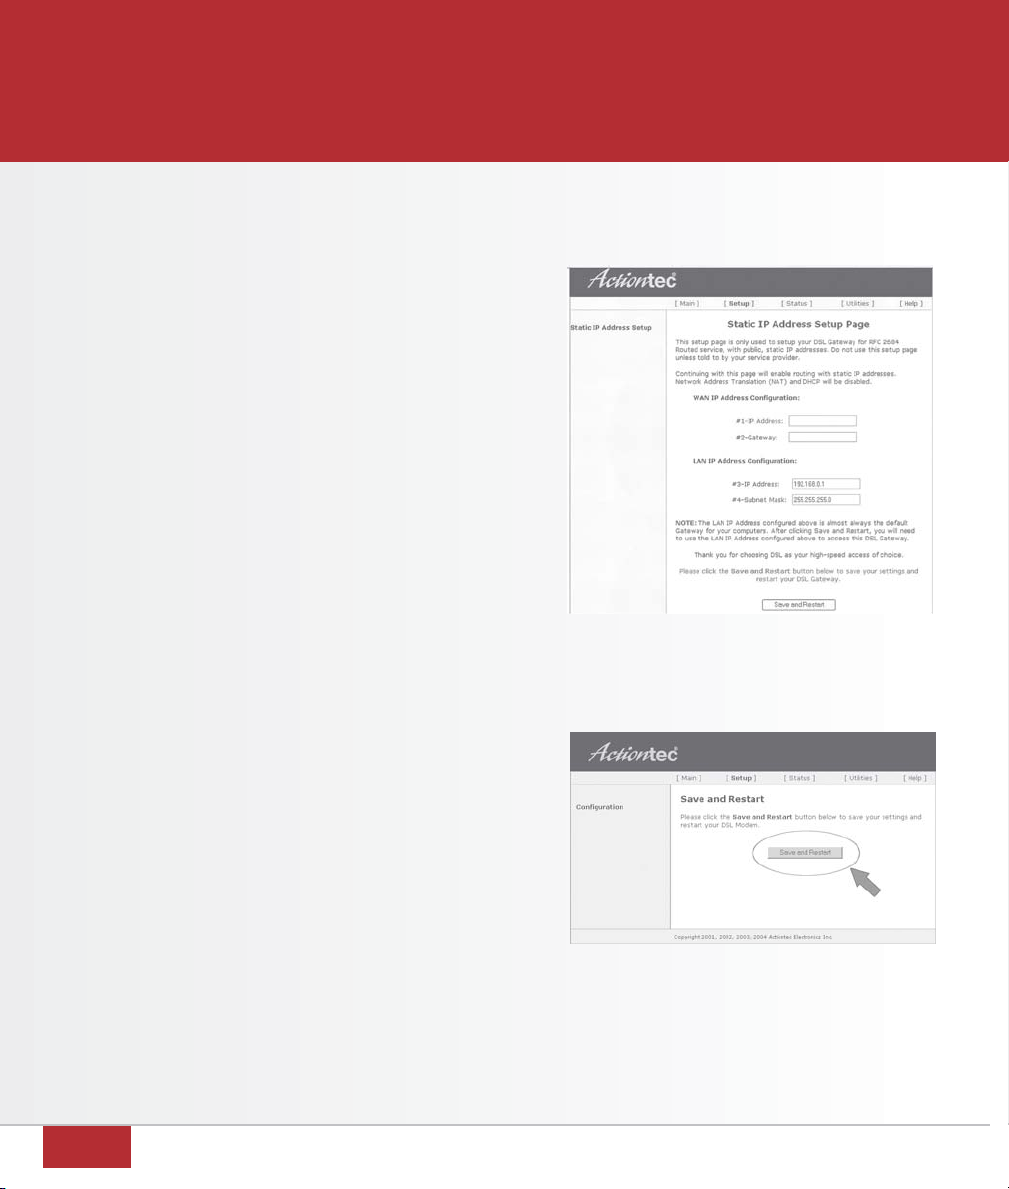
14
6. For
#2-Gateway
, enter the value labeled
B. WAN IP Address
on your Customer
Information Sheet. (figure 31)
7. For
#3-IP Address
, enter the value labeled
D. LAN Gateway
on your Customer
Information Sheet. (figure 31)
8. For
#4-Subnet Mask
, enter the value
labeled
F. LAN Subnet Mask
on your
Customer Information Sheet. (figure 31)
Note: Values entered may differ.
9. Click
Save and Restart
.
10. Click
Save and Restart
on the next screen.
(figure 32)
If you have:
Windows XP page 15.
Windows 98, Me, NT or 2000 page 17.
Mac OS X page 19.
Mac OS 8/9 page 20.
figure 31
figure 32
CONFIGURING YOUR GATEWAY FOR STATIC IP

configuring a Static IP
Note: Complete the instructions on this page
only if you have purchased a Static IP
package.
1. Select
Start
, then
Control Panel
.
2. Click
Network and Internet Connections
.
Note: If you do not see
Network &
Internet Connections
, skip to the next
step.
3. Click
Network Connections
.
4. Right-click
Local Area Connection
.
5. Click
Properties
.
6. Select
Internet Protocol (TCP/IP)
to
highlight it, then click
Properties
.
(figure 33)
7. Click
Use the Following IP Address
&
Use
the following DNS server addresses.
(figure 34)
8. For
IP address
, enter the value labeled
A. WAN Gateway
on your Customer
Information Sheet.
(figure 35 next page)
figure 33
15
CONFIGURING A STATIC IP FOR WINDOWS XP
figure 34

figure 35
10. For
Subnet mask
, enter the value labeled
F. LAN Subnet Mask
on your Customer
Information Sheet. (figure 35)
11. For
Default Gateway,
enter the value
labeled
D. LAN Gateway
on your
Customer Information Sheet.
(figure 35)
12. For
Preferred DNS server
, enter the value
labeled
Primary DNS
on your Customer
Information Sheet. (figure 35)
13. For
Alternate DNS server
, enter the value
labeled
Secondary DNS
on your
Customer Information Sheet.
(figure 35)
Note: Values entered may differ.
.
14. Click
OK
.
15. Click
Close
on the
Local Area Connection
Properties
screen.
16. Close all windows and open your
browser (example: Internet Explorer).
Your homepage appears and you should
be able to browse.
Proceed to page 21.
16
CONFIGURING A STATIC IP FOR WINDOWS XP
17
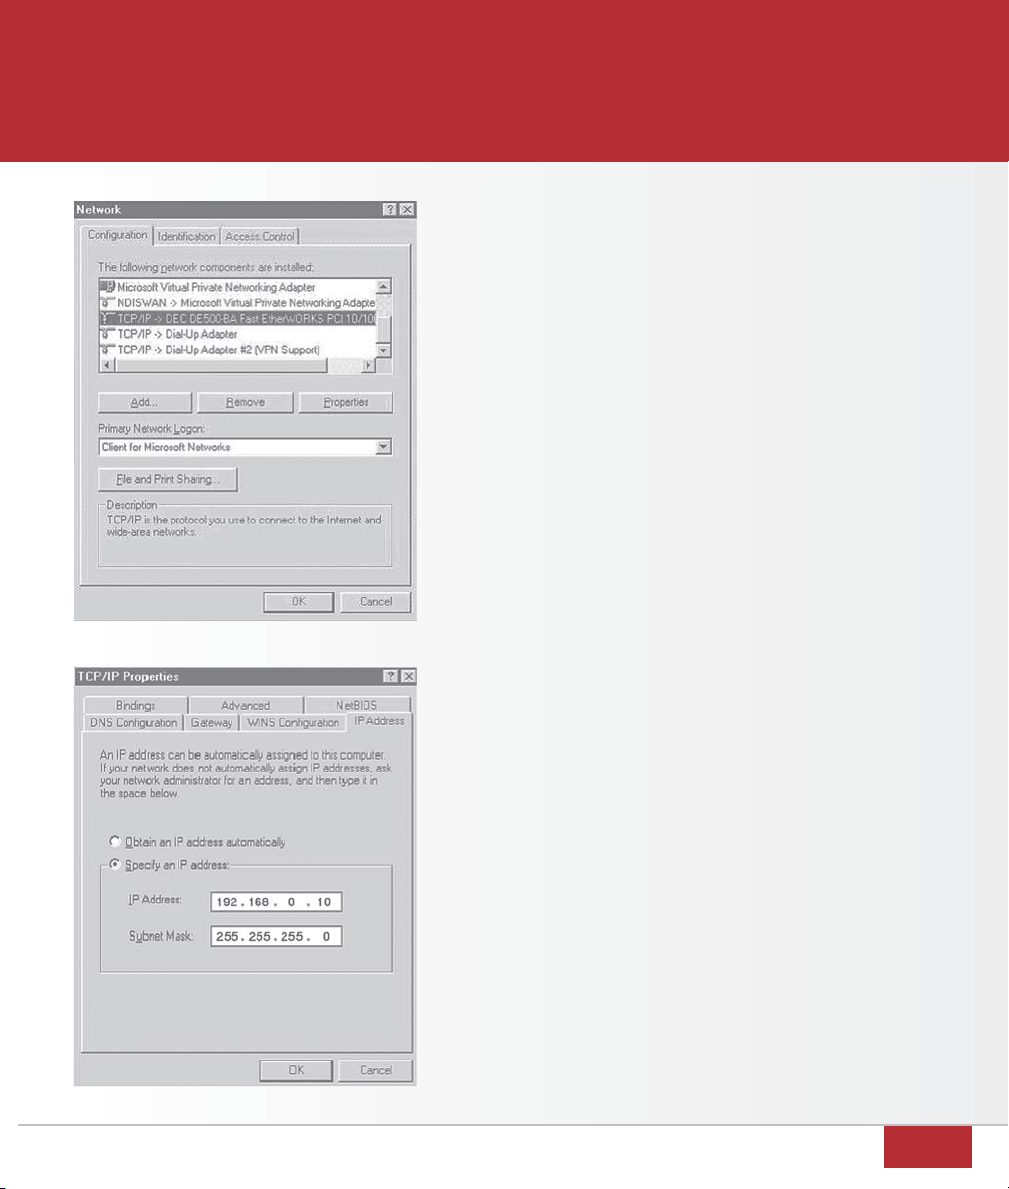
configuring a Static IP
Note: Complete the instructions on this page
only if you have purchased a Static IP package.
1. Click
Start
,
Settings
, then
Control Panel.
2. Double-click
Network
.
3. Select
TCP/IP
-> (your network card) to
highlight it then click
Properties
.
(figure 36)
4. Select
Specify an IP address
.
(figure 37)
5. For
IP Address
, enter the value labeled
A. WAN Gateway
on your Customer
Information Sheet. (figure 37)
6. For
Subnet Mask
, enter the value labeled
F. LAN Subnet Mask
on your Customer
Information Sheet. (figure 37)
7. Select the
Gateway
tab.
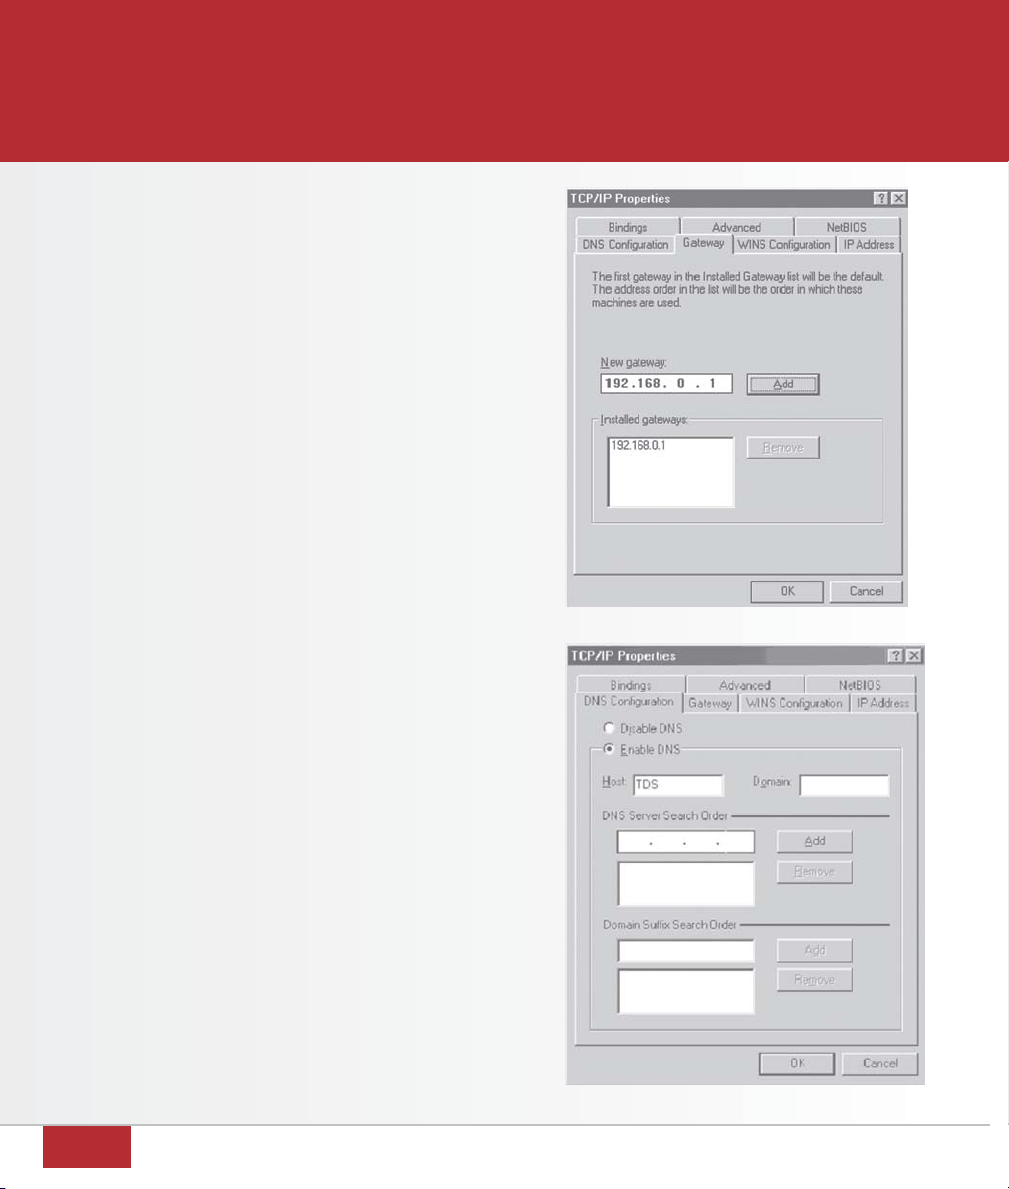
8. For
New gateway
, enter the value labeled
D. LAN Gateway
on your Customer
Information Sheet then click
Add
. The
address you entered will appear in
Installed gateways
. (figure 38 next page)
Note: Values entered may differ.
figure 36
figure 37
CONFIGURING A STATIC IP FOR 98, ME, NT & 2000
18
9. Select the
DNS Configuration
tab.
(figure 39)
10. Select
Enable DNS
.
11. For
Host
, enter
TDS
.
12. For
DNS Server Search Order
, enter the
value labeled
Primary DNS
on your
Customer Information Sheet then
click
Add
.
13. Repeat Step 12 entering the value
labeled
Secondary DNS
on your
Customer Information Sheet.
Note: Values entered may differ.
14. Click
OK
. Click
OK
on the
Network
screen.
15. Insert your Windows CD if prompted.
When Windows is finished updating, it
will prompt you to restart your computer.
Select
Yes
to restart the computer now.
16. After rebooting, open your browser
(example: Internet Explorer).
Your homepage appears and you should
be able to browse.
Proceed to page 21.
figure 38
figure 39
CONFIGURING A STATIC IP FOR WINDOWS 98, ME & NT

19
CONFIGURING A STATIC IP FOR MAC OS X
1. Select
Apple
, then
System Preferences
(figure 40), then
Network
(figure 41).
2. Select the
TCP/IP
tab.
3. Select
Built-in Ethernet
from the
Show
box.
4. Select
Manually
from the
Configure
box.
(figure 42)
5. For
IP address
, enter the value labeled
E. LAN
IP Address
on your Customer Information Sheet.
(If you have more than one value labeled
E. LAN IP Address
, you may use any one of
them.) (figure 42)
6. For
Subnet Mask
, enter the value labeled
F. LAN Subnet Mask
on your Customer
Information Sheet. (figure 42)
7. For
Router
, enter the value labeled
D. LAN
Gateway Address
on your Customer
Information Sheet. (figure 42)
8. For
DNS Servers
enter the values labeled
Primary DNS
and
Secondary DNS
on your
Customer Information Sheet (press return
between values to put them on two lines
as shown). (figure 42)
Note: Values entered may differ.
9. Click
Apply Now
.
10. Close the Network window.
11. Open your browser (example: Internet Explorer).
Your homepage appears and you should be
able to browse. Proceed to page 21.
figure 42
figure 40 figure 41
configuring a Static IP
Note: Complete the instructions on the
page only if you have purchased a
Static IP package.
Other manuals for ACTIONTEC
1
Table of contents
Popular Gateway manuals by other brands

Amaranten
Amaranten F1800 Series Installation and setup guide

Crestron
Crestron AM-100 AirMedia Quick start guides

Casa Systems
Casa Systems NetComm CloudMesh NL19MESH troubleshooting guide

IBM
IBM Proventia MX3006 Getting started

Fiberme
Fiberme FAG410X Configuring and Installing

Psion Teklogix
Psion Teklogix 9160 G2 user manual


