Teac Tascam Series User manual

INSTRUCTION
MANUAL
TEAC
Tascam
Series
MODEL
15
AUDIO
MIXER

CONTENTS
1,
INTRODUCTION
TO
THE-MODEL
15
.....
1
2,
IMPEDANCE
MATCHING
—OR,
WHAT
PLUGS
INTO
WHAT
........
2
Mathematical
Formulas
. .
QuickTest
for
Safe
Loads
without
using
Test
Gear.
4
3.
THE
MODEL
16
FROM
MIC
IN
TO
LINE
OUTS
3.1
INPUT
MODULE
Mic
In
XLR’
Connectors
Mic:
ATT
‘Switch
Line
In
Jacks
Input
Select
Switch
SIGUE
Ss
ascites
Overload
L.E.D.
Accessory
Send/Receive
Jacks
Equalization
Controls
7
Aux
1
and
Aux
2
Pre-/Post-Fader
Function
..
.
Input
Fader
2...
,.
Direct
Out
Jack
SOLO
ta
toss
eis
NYNDOGMOGDGAAR
AA
MURS,
Fos.
SEM
Case
ween
Te
3.2
BUSS
MASTER
MODULE
Buss
tn
Jacks
.........
Buss
Fri;
cag
oie
st
ss.
2
Accessory
Send/Receive
Jacks
ee
Buss
Master
Fader
.
Tape
as
source
Buss
as
source
......
Monitor
Pan
Aux
3
and
Aux
4.
Echo
Receive
Section
COMDDMOMO
3.3
AUX
A
MASTER
MODULE
(CUE}
Aux
A
Mix
Control
..
2.0...
Aux
3
and
Aux
4
Push
Switchs
.
Echo
RCV
Rotary
Control
Master
Aux
A
Master
Fader
Aux
A
Module
Back
Panel
Aux
3
output
jacks
Aux
A
output
jacks
.
ae
Line
out
1~
4
(buss
master
outputs)
.
Sieh
fey'e
AO!
3.4
AUX
B
MASTER
MODULE
(ECHO)
Aux
B
Mix
Control
.....
Aux
3
and
Aux
4
Push
Switch
Aux
B
Master
Fader
Aux
B
Module
Back
Panel
Aux
4
output
jacks
Aux
B
output
jacks
. .
al
eaeteae
Line
out
§
~
8
{buss
master
outputs)
Bh
eS
11
Loading
Advice
....
3.5
CONTROL
ROOM
MONITOR
MODULE
Monitor
A
Output
Jacks
22...
JT
CR
MON,
Land
R
Output
Jacks
21
Push
Switches:
80.
ese
eevee
ti
Control
Room
Master
......-...-..0-
il
Solo:
Masteh
cos
Aadis
Beek
cw
Fisk
pshes
pai
Solo
L.ED.
ett
Auxiliary
Line
tn
Jacks
11
3.6
STUDIO
MONITOR
MODULE
Studio
Studio
MON
L-R
Outputs
Monitor
B
L-R
Outputs
3.7
TALKBACK
MODULE
Oscillator
Frequency
Select
Switch
Oscillator
Function
Select
Switch
Talkback
Microphone
..........
Studio
Aux
A
Slate
:
Headphone
Select
Switch
vod
3.8
POWER
SUPPLY
UNIT
Meter
Bridge
Connector
......
ib
ated
esavol
4.
STANDARD
PATCHES
.........
hobtidicine
.12
Recommended
8
Track
Setup
............
18
16
Track
Remix
Patch
with
an
Unorthodox
Stereo
Echo
........-
14
Recommended
16
Track
Setup
............
15
5.
LEVEL
SETTING
AND
OPERATION
CHECK
Line
in
—»
Access
send
........
wean
VE
Line
in
—>
Direct
out
of...
.
0...
cee
7
Line
in
—>
Line
out/Aux
out
...........
7
Check
and
adjustment
of
the
input
module
QverlQa
LED
0
2
055
(oa)
he
ba
arate
ated
we
18
Aux
1
—»
Aux
Asend
..........
1.19
Aux
2
—>
Aux
B
send
Line
in.
—>
Line
—>
Aux
3
—>
Aux
A
send
. .
20
Aux
3
—+AuxBsend
.............
24
Line
in
—+
Line
out
—>
Aux
4
—+
Aux
B
send,
21
Aux
4
->
Aux A
send
Line
out
—>
Mon
A
left/right
Solo
circuit
Control
room
monitor
circuit
Studio
monitor
circuit
. ‘
Echo
RCV
circuit
......-.....
Meter
calibration
and
LED
circuit
Test
tone
oscillator
Talkback
circuit
......
Tape
in
circuit
...
Mic
input
(Model
301
Input
Module)
Phantom
power
supply
.............+4-

6.
EXPLODED
VIEWS
AND
PARTS
LIST
Model
15
Main
Frame
Model
301.
Input
Module
F
Model
302
Buss
Master
Module
Model
3034
Aux A
Module
Model
303B
Aux
B
Module
Model
304
Talkback
Module
Model
305A
Control
Room
Monitor
Module
.
Model
350B
Studio
Monitor
Module
Model
306
Power
Supply
Module
Model
307
Filler
Module
Tei
cae
Boats
Model
PS-15
Power
Supply
Unit
..........
7,
PC
CARDS
AND
PARTS
LIST
Input
Amplifier
PCB
Buss
Master
Amplifier
PCB
Aux
A
Amplifier
PCB
Aux
B
Amplifier
PCB
Talkback
Amplifier
PCB
Controt
Room
Monitor
Amplifier
PCB
.
2...
.
81
Studio
Monitor
Amptifier
PCB
He
satin
Bea
BT:
Power
supply
PCB.
.....
La
leah
genta
ieee
91
Mother
board:
PCB?
.ssasasries
cet
eed
das
95
8.
ELECTRONICS
SCHEMATICS
Block
diagram
........
Boe
aed
tad
hee
97
Modet
301
Input
Module
.....
Lashegarea
OS
Model
302
Buss
Master
Module
.
.
Se
4
OD.
Model
302A
Aux
A
Module
Model
303B
Aux
B
Module
Mode!
304
Talkback
Module
.
Model
305A
Control
Roam
Monitor
Module...
103
Model
305B
Studio
Monitor
Module
Model
306
Power
Supply
Module
Meter
bridge
..........
aerate
eves
Model
PS-15
Power
Supply
Unit
.....
9,
SPECIFICATIONS
109

1.
INTRODUCTION
TO
THE
MODEL
15
The
Madel
15
is
an
audio
mixing
console
designed
to
satisfy
the
requirements
of
modern
multichannel
re-
cording.
Many
of
the
auxiliary
mixing
systems
needed
are
built
in
and
canbe
re-routed
to
do
more
than
one
job.
Fast,
convenient
and
complete
operation
with
8
track
or
16
track
recorders
can
usually
be
accomplished
without
ré-patching.
However,
the
process
of
multi-
channel
recording
is
constantly
changing,
growing
more
complex
as
an
art
with
each
advance
in
technology.
Your
signal
processing
needs
may
require
a
unique
arrange-
ment
of
subsystems.
No
console
has
ever
been
built
so
large
and
complete
in
its
routing
that
it
could
solve
every
imaginable
problem
with
one
button.
Someone
will
al-
ways
be
able
to
come
up
with
that
unusual
situation
re-
quiring
“just
one
more
mix".
In
order
to
cope
with
these
unpredictable
requirements,
patch
points
are
provided
throughout
all
signal
pathways
on
the
M-15.
As
our
mixing
console
becomes
more
flexible,
the
amount
of
time
needed
to
understand
the
available
func-
tion
increases
as
well.
The
main
signal
path
from
mic
in
to
line
out
is
still
fairly
straight
forward.
The
require-
ments
have
not
changed
much
since
the
days
of
“mono”
but
the
routing
for
echo
sends,
multiple
source
cue
feeds,
and
stereo
monitoring
can
be
hard
to
visualize.
The
be-
ginner
often
overlooks
the
significance
of
connections
that
would
be
immediately
obvious
to
the
experienced
recording
engineer.
If
you
expect
to
find
that
“extra
mix”
quickly,
you
must
be
prepared
to
study
the
layout
of
the
M-15
thoroughly.
In
most
instances
the
physical
arrangement
of
the
controls
on
the
top
pane!
has
very
little
to
do
with
the
sequence
of
electronic
parts
inside,
The
actual
wiring
order
is
the
information
you
need
to
understand
to
use
the
M-15
successfully.
As
an
example,
if
the
controls
on
an
input
module
actually
followed
the
order
in
which
they
are
wired,
the
module
top
panel
would
look
like
this.
We'll
put
the
jacks
on
the
top,
as
well
as
the
switches
and
faders.
While
this
arrangement
of
controls
might
help
the
beginner
to
understand
the
flow
of
signal
in
the
module,
it
would
be
very
inconvenient
to
operate.
Still,
the
wiring
sequence
must
be
understood
before
the
more
complex
functions
of
the
M-15
can
be
used
successfully,
so
along
with
the
documentation
you
will
need
for
service
{sche-
matic
diagrams,
mother
board
layouts
and
mechanical
disassembly
information)
we
include
a
simplified
electri-
cal
sequence
chart
called
a
BLOCK
DIAGRAN.
This
drawing
shows
all
the
controls,
switches,
amplifying
stages
and
connectors
in
their
proper
order.
Learning
to
read
it
will
provide
the
answers
to
any
questions
about
what
comes
where
on
the
inside.
Even
though
the
block
diagram
can
indicate
what
is
available
in
the
way
of
ex-
tra
circuit
flexibility,
it
can’t
explain
why
2
connection
or
switch
has
been
included,
or
suggest
a
standard
layout.
In
the
following
sections
of
this
manual
we
will
do
our
best
to
describe
the
individual
functions
and
controls
of
the
M-15
and
how
they
can
be
arranged
in
more
than
one
sequence,
but
your
mixing
needs
may
be
best
served
by
an
arrangement
of
inputs
and
sub-system
connections
you
work
out
for
yourself.
Good
luck
with
your
sound.
‘EDs
2fB«
>>
<0:
fy
ea

2.
IMPEDANCE
MATCHING
—
OR;
WHAT
PLUGS
INTO
WHAT
All
electronic
parts
including
cabies
and
non
powered
devices
(mics,
passive
mixers
and
such)
have
impedance,
measurable
in
ohms
{symbol
$2
or
Z).
Impedance
is
the
total
opposition
a
part
presents
to
the
flow
of
signal,
and
it's
important
to
understand
some
things
about
this
value
when
you
are.making
connections
in
your
mixing
system.
The
outputs
of
circuits
have
an
impedance
rating
and
so
do
inputs.
What’s
good
?
What
values
are
best?
It
depends
on
the
direction
of
signal
flow,
and
in
theory,
it
looks
like
this:
plug
into
OUTPUTS
OUTPUTS
It
is
generally
said
that
the
output
impedance
(Z)
should
be
as
low
as
possible.
100
ohms,
10
ohms,
the
lower,
the
better
in
theory.
A
circuit
with
a
low
output
impedance
will
offer
a
low
resistance
to
the
passage
of
signal,
and
thus
will
be
able
to
supply
many
multipte
connections
without
a
loss
in
performance
or
a
voltage
drop
in
any
part
of
the
total
signal
pathway.
Low
impedance
values
can
be
achieved
economically
by
using
transistors
and
integrated
circuits
but
other
considera-
tions
are
still
a
problem
in
practice.
1,
The
practical
power
supply
is
not
infinitely
large.
At
some
point
even
if
the
circuit
is
capable
of
supplying
more
energy,
you
will
run
out
of
“juice”.
2.
Long
before
this
happens,
you
may
burn
out
other
parts
of
the
circuit.
The
output
impedance
may
be
close
to
the
theoretically
ideal
“O
ohms”
but
many
parts
in
the
practical
circuit
are
not.
Passing
energy
through
a
resistance
generates
heat,
and
too
much
current
will
literally
burn
parts
right
off
the
circuit
card
if
steps
are
not
taken
to
prevent
catastrophic
failure.
3.
Even
if
the
circuit
does
not
destroy
itself,
too
high
a
demand
may
seriously
affect
the
quatity
of
the
audio.
Distortion
will
rise,
frequency
response
will
suffer,
and
you
will
get
poor
results,
++
INPUTS
INPUTS
Inputs
should
have
very
high
impedance
numbers,
as
high
as
possible,
100,000
ohms,
1
million
ohms,
more,
if
it
can
be
arranged.
A
high
resistance
to
the
flow
of
signal
at
first
sounds
bad,
but
you
are
not
going
to
build
the
gear.
if
the
designer
telis
you
his
input
will
work
proper+
ly
and
has
no
need
for
a
large
amount
of
signal,
you
can
assume
that
he
means
what
he
says.
For
you,
a
high
input
impedance
is
an
unalloyed
virtue.
It
means
that
the
circuit
will
do
its
job
with
a
minimum
of
electrical
energy
as
a
beginning.
The
most
“economical”
electronic
devices
in
use
today
have
input
impedances
of
many
millions
of
ohms,
Test
gear.
For
example,
voltmeters
of
good
quality
must
not
draw
signal
away
from what
they
are
measuring
or
they
will
disturb
the
proper
operation
of
the
circuit.
A
design
engineer
needs
to
see
what
is
going
on
in
his
design
without
destroying
it,
so
he
must
have
an
“efficient”
device
to’
measure
with.
The
classic
measurement
for
Output
impedance
is
to
load
a
circuit
until
the
voltage
drops
6
dB
(to
half
the
original
power)
and
note
what
the
load
value
is.
In
theory,
you
now
have
a
load
impedance
that
is
the
same
as
the
output
impedance,
If
you
reduce
the
load
gradually,
the
dB
reading
will
return
slowly.
to
its
original
value.
How
much
drop
is
acceptable?
What
load
will
be
left
when
an
acceptable
drop
is
read
on
the
meter?
When
the
load
value
is
approximately
seven
times
the
output
impedance,
the
needle
is
still
a
little
more
than
1dB
lower
than
the
origina!
reading.
Most
technicians
says.”
1
dB,
not
bad,
that’s
accept-
able.”
We
at
TEAC
must
say
we
do
not
agree.
We
think
that
a
seven
to
one
ratio
of
input
(7)
to
output
(1)
is
not
a
high
enough
ratio
and
here’s
why.
1.
The
measurement
is
usually
made
at
a
midrange
fre-
quency
and
does
not
show
true
loss
at
the
frequency
extremes,
What
about
drop
at
20
Hz?
2.-All
outputs
are
not
measured
at
the
same
time.
Most
people
don't
have
twenty
meters,
we
do.
Remember,
everybody
plays
together
when
you
record
and
the
circuit
demands
in
practice
are
simultaneous,
All
draw
power
at
the
same
time.

Because
of
the
widely
misunderstood
rule
of
thumb,.
the
seven
to
one
ratio,
we
will
give
you
the
values
for
outputs
in
a
complete
form.
Even
though
the
true
output
impedance
is:
Line
Out/Aux
Out
100
ohms
CR
Mon
Out
100
ohms
a
Studio
Mon
Out 100
ohms
Aux
A
and
Aux
B
Out
100
ohms
Mon
A
and
Mon
B
Out
100
ohms
'
Aux.
3
and
Aux
4
Out
400
ohms
Tape
Foldback
Equal
to
tape
recorder
output
im-
pedance
connected
to
TAPE
IN.
Direct
Out 100
ohms
Access
Send
100
ohms
Talkback
Out
Less
than
1
ohms
Headphone
Out
Less
than
1
ohrns
For
the
practical
reasons
explained
previously,
we
feel
that
7
:1
ratio
is
not
sufficient.
To
use
this
rule
of
thumb,
you
must
use
this
higher
value.
We'll
call
this
value
the
“output
load
impedance.”
Line
Out/Aux
Out
1.4k
ohms
CR
Mon
Out
1.4k
ohms
Studio
Mon
Out
1.4k
ohms
Aux
A
and
Aux
B
Out
1.4k
ohms
Mon
A
and
Mon
B
Out
1.4k
ohms
Aux
3
and
Aux
4
Out
1.4k
ohms
Tape
Foldback
Equal
to
tape
recorder
output
im-
pedance
connected
to
TAPE
IN.
Direct
Out
1.4k
ohms
Access
Send
1.4k
ohms
This
is
a
number
that
will
give
good
results
with
the
7:1
method.
To
go
one
step
further,
here
are
the
actual
minimum
ohmic
values
we
feel
are
wise.
Connect
no
total
input
impedance
load
higher
than:
Line
Out/Aux
Out
10k
ohms
CR
Mon
Out
10k
ohms
Studio
Mon
Out
10k
ohms
Aux
A
and
Aux
B
Out
10k
ohms
Mon
A
and
Mon
B
Out
10k
ohms
Aux
3
and
Aux
4
Out
10k
ohms
Tape
Foldback
Equat
to
tape
recorder
output
im-
pedance
connected
to
TAPE
IN.
Direct
Out 10k
ohms.
Access
Send
10k
ohms
Input
impedance
is
more
straight
forward
and
re-
quires
only
one
number.
Load
is
load,
and
here
are
the
values
for
the
Modal
15:
Mic
Input
20k
ohms
Line
Input
50k
ohms
Echo
Receive
20k
ohms
Tape
Input
40k
ohms
Buss
Input
20k
ohms
Access
Receive,
input
module
50k
ohms
Buss
Master
module
10k
ohms
Line
1,
2,
3
Mon
100kohms
if
one
output
is
to
be
“Y”
connected
to
two
inputs,
the
total
impedance
of
the
two
inputs
must
not
exceed
the
toad
impedance,
as
mentioned
before,
and
if
it
be-
comes
necessary
to
increase
the
number
of
inputs
with
slight
exceeding
of
the
load
spec.,
you
must
check
for
drop
in
level,
loss
of
headroom,
low
frequency
response,
or
else
suffer
a
loss
in
quality,
{f
one
input
is
10,000
ohms,
another
of
the
same
10,000
ohms
will
give
you
a
total
input
impedance
(load)
of
5,000
ohms.
To
avoid
calculations
you
can
do
this
when
you
have
two
identi-
cal
inputs
to
connect
to
one
output.
Take
the
lower
value
of
the
two
input
impedances
and
divide
it
in
half.
If
the
number
you
have
is
still
7
times
the
output
impedance,
you
can
connect
both
at
the
same
time.
When
you
have
more
than
two
loads
(inputs),
just
dividing
the
lowest
impedance
by
the
number
of
inputs
will
not
be
accurate
unless
they
are
all
the
same
size
but
if
you
still
get
a
safe
load
(higher
than
7
:
1
ratio)
by
this
method,
you
can
connect
without
worry.
MATHEMATICAL
FORMULAS
If
you
must
have
exact
values,
here
are
the
formulae:
1
For
more
than
2
—-
Rx=
ab
eg
te
ote
Ri
R2
RB
Rn
Rx
=
value
of
total
load
For
2
loads
‘or
inputs
—
Rx=
nine
Ri
+
R2
Finding
Impedance
Values
on
Other
Brands
of
Equipment.
When
you
are
reading
an
output
impedance
specifi-
cation,
you
will
occasionally
see
this
kind
of
statement:
Minimum
load
impedance
=
X
ohms
or
Maximum
load
impedance
=
X
ohms
These
two
statements
are
trying
to
say
the
same
thing,
and
can
be
very
confusing.
The
minimum
load
impedance
says,
please
don't
make
the
number
of
ohms
you
connect
to
this
output
any
lower
than
X
ohms.
That‘s
the
lowest
number.
The
second
statement
changes
the
logic,
but
says
the
exact
same
thing.
Maximum
load
impedance
refers
to
the
idea
of
the
load
instead
of
the
number,
and
says,
please,
don’t
make
the
toad
any
heavier.
How
do
you
increase
the
load?

Make
the
number
lower
for
ohms.
Maximum
load
=
minimum
ohms,
so
read
carefully.
When
the
minimum/maximum
statement
is
made
you
can
safely
assume
that
the
manufacturer
has
already
done
the
“saven
times
is
best”
ratio
calculation,
And
the
number
given
in
ohms
does
not
have
to
be
multiplied.
You
can
match
the
ohmic
value
of
your
input
to
this
number
of
ohms
successfully,
but
as
always,
higher
ohms
will
be
okay
(Less
load).
7
QUICK
TEST
FOR
SAFE
LOADS
WITHOUT
USING
TEST
GEAR
tf
you
don‘t
know
the
exact
value
input
impedance
for
a
device
you
want
to
connect
there
are
still
a
couple
of
ways
to
test
it.
1,
Listen
to
the
main
signal
output
{line
out
or
Aux
out)
as
you
remove
and
re-connect
the
device
to
the
direct
out.
If
you
hear
a
drop
in
level
or
a
change
in
the.tonal
balance
of
the
sound
on
the
main
line
out,
the
device
is
likely
to
be
drawing
too
much
current
and
is
unsuitable.
lf
you
can
get
a
steady
tone
to
work
with,
you
can
read
your
VU
meter
and
make
this
measurement.
Patch
the
steady
tone
through
the
mixer
from
input
to
line
out.
Set
the
faders
so
the
tone
reads
“O"
VU
‘on
the
meter.
Now
connect
the
device
you
wish
to
check
to
the
“direct
out”
on
the
input
module
you
are
using
for
the
steady
tone,
If
the
drop
in
level
on
the
meter
is
more
than
0.5
dB,
the
device
has
too
low
a
value
of
input
impedance.
It
will
not
damage
the
mixer
to
use
it,
but
it
will
affect
the
quality
of
the
signal
on
the
main
line.
Nn
If
making
the
connection
to
the
direct
out
causes
the
main
line
signal
to
drop
6dB,
the
input
impedance
of
the
device
is
the
same
as
the
true
output
impedance.
You
should
also
know
that
to
make
the
“disconnect,
re-connect
the
load”
test
in.
section
1
above,
you
must
actually
pull
out
the
connection.
Many
devices
will
affect
a
circuit
when
the
signal
cable
is
connected,
even
if
they
are
not
plugged
in
the
power
line,
or
their
power
(AC)
switch
is
in
the
off
position.
3.
THE
MODEL
15
FROM
MIC
IN
TO
LINE
OUTS
In
our
description
of
the
seven
different
types
of
module
used
in
the
M-15,
we'll
disregard
the
physical
layout
and
follow
the
block
diagram,
or
actual
wiring
sequence.
3.1
INPUT
MODULE
All
sixteen
input
modules
are
identical
and
can
be
interchanged
without
modification.
An
additional
8
modules
can
be
added
io
the
frame
at
any
time.
The
extra
positions
are
completely
wired,
with
one
excep-
tion.
The
RMX
(remix)
position
will
be
inoperative
on
the
last
8
positions
(17-24)
because
there
is
no
provi-
sion
on
the
tape
A
or
B
circuit
for
the
extra
8
busses
necessary.
All
other
features
will
be
identical
in
the
24
input
mode.
MIC
IN
XLR
CONNECTOR
This
connector
and
the
small
amount
of
wiring
immediately
in
front
of
the
input
transformer
are
the
oniy
parts
of
the
M-15
that
use
the
3
wire
balanced
type
of
circuit.
The
Mic
in
XLR,
the
pad
of
20 dB
that
is
switch
selectable
and
the
transformer
primary
are
“balanced”.
All
circuits
thereafter
are
2
wire
“single
ended”,
one
hot
lead,
one
ground.
MIC
ATT
SWITCH
When
this
switch
is
set
to
the
left,
a
balanced
pad
lowers
the
“Mic
In"
level
by
20
dB,
Since
the
maxirnum
permissible
input
to
the
transformer
is
0
dB
(1
volt),
when
high
output
mic’s
are
used
on
very
loud
sounds,
extra
external
pads
may
be
required
to
lower
the
input
signal
to
safe
levels.
The
input
load
impedance
of
the
“Mic
In”
group
of
parts
is
20
kohms.
This
circuit
cor-
rectly
matches
50-250
ohm
low
impedance
microphones.
LINE
IN
JACK
An
RCA
jack
on
the
rear
of
each
input
module.
The
maximum
signal
you
can
apply
here
is
+28
dB
(25
volt).
The
Mic
Att
switch
does
not
affect
this
input.
The
input
impedance
is
50
kohms.
INPUT
SELECT
SWITCH
This
switch
has
3
positions,
left
selects
the
Mic
in
XLR,
center
selects
the
Line
In
RCA
jack
on
the
back
of
the
module,
and
right,
marked
“w”
(remix),
selects
as
an
input
one
of
the
“Tape
In”
jacks
on
the
buss
master
modules.
Since
each
input
module
will
receive
only
one
“Tape
In”
signal,
we'll
provide
a
chart
to
show
which
signal
goes
to
which
module.
The
“Tape
In”
A
and
B
systems
normally
feed
the
monitor
sections
on
the
buss
master
modules.
The
“s#”
{remix}
position
on
the
input
module
will
allow
you
to
route
tape
playback
signa!
to
the
input
module
for
final
mixing
without
moving
the
cabies
plugged
in
at
tape
A
or
B
to
the
input
“Line
In”
jacks,
in
addition,
selecting
this
“m”
(remix)
position
on
the
input
module
will
not
disable
the
normal
operation
of
the
monitor.

TAPE
A
JACK,
UPPER
ROW
©:
ej
H
Oi"
Gr?
OF
on
10
TAPE
8
JACK,
LOWER
ROW
Signal
will
go
to
both
circuits
at
the
same
time,
allowing
separate
use
of
the
monitor
A
and
B
outputs
as
extra
mixes.
True
stereo
echo
is
an
obvious
first
choice,
and
the
mixdown
machine
can
be
monitored
using
a
“Line
In”
position
on
the
control
room
monitor
module.
Since
the
remix
position
can
be
selected
one
module
at
a
time,
a
single
track
may
be
equalized
and
monitored
without
disturbing
“Mic
{n”
settings
on
the
whale
mix,
A
deci-
sion
can
be
made
quickly
on
the
artistic
success
or
failure
of
an
individual
part
without
the
need
to
place
the
entire
console
in
remix
mode
just
to
see
the
effect
of
corrective
equalization
on
a
single
track.
If
you
examine
the
input
module
numbers
you
will
see
that
the
Number
One
module
is
the
one
closest
to
the
“Buss
Master
1
Module.”
The
mixing
console
is
numbered
from
right
to
left
on
the
input
module
section,
but
from
left
to
right
in
the
buss
master
section.
This
system
has
been
adopted
in
order
to
keep
the
mixing
console
as
compact
as
possible
in
16
input
configuration.
Expanding
to
24
inputs
will
now
add
modules
to
the
left
of
the
ones
already
installed,
and
the
numbering
will
rernain
correct,
even
though
inverted.
Since
the
TAPE
IN
jack
on
the
buss
master
module
actually
feeds
3
separate
mixing
positions
it
will
present
a
more
severe
load
to
anything
connected
to
it
than
“Line
in“
on
the
module.
TAPE
IN's
have
an
input
load
impedance
of
40kohms,
LINE
IN‘’s
(on
the
input
module}
have
an
input
impedance
of
50
kohms.
TRIM
This
control
witl
alter
the
gain
of
the
first
amplifier
in
the
console.
It
will
affect
the
fevel
of
any
signal,
Mic,
Line,
or
#.
With
this
pot
rotated
fully
clockwise
(right-
ward),
the
maximum
gain
of
the
first
amplifier
is
48
dB.
In
this
position,
the
maximum
input
signal
before
over-
load
is
-38
dB
(0.013V).
To
improve
the
performance
of
this
first
gain
critical
stage,
for
the
M-15,
TEAC
has
elected
to
build
a
discrete
amplifier
with
FET
inputs
instead
of
using
the
standard
|.C.’s
now
available.
Sub-
stantial
improvements
in
performance
have been
realized
as
a
result.
When
the
pot
is
in
its
minimum
setting
(fully
counterclockwise
or
leftwards)
the
gain
is
reduced
to
8
dB
and
the
maximum
signal
that
can
be
handled
with-
out
overload
wil]
be
+2
dB
(1.3V}.
Remember,
these
overload
figures
refer
to
the
input
of
the
amplifier,
not
the
input
plug
or
connector,
Losses
occur,
and
pads
can
be
inserted
before
this
point.
The
maximum
signal
that
can
be
applied:
to
the
line
in
jack
is
+28
dB
(25V)
with
the
Trim
rotated
fully
leftwards,
and
-12
dB
(0.25
mV)
with
the
Trim
rotated
fully
rightwards.
OVERLOAD
L,E.D.
When
signals
high
enough
to
make
the
ACCESS
SEND
jack
output
exceed
+15dB
are
applied
to
the
INPUT
module,
this
L.E.D.
will
light
up.
Trim,
or
the
Mic
Att
pad
should
be
adjusted
until
the
L.E.D.
remains
out
when
signal
is
present.
When
recording
extremely
percussive
transient
material,
it
may
require
full
negative
trim
and
pad
to
prevent
this
L.E.D.
from
flickering
on
strong
peaks.
Changing
to
a
less
sensitive
mic
may
help.
On
the
Aux
B
Master
Module
you
will
find
a
rotary
switch
marked
NORM/MIX.
This
control
will
alter
the
sensitivity
of
the
overload
signal
L.E.D.'s
on
the
input
modules
so
that
they
can
be
used
as
a
signal
indicating
system
or
tracer.
When
this
switch
is
set
to
“MIX”
the
sensitivity
of
the
L.£.D.
driver
is
increased
by
20dB.
The
L.E.D.
will
now
show
you
which
modules
have
signal
applied
to
their
inputs.
To
again
check
for
input
overload,
you
must
switch
this
control
back
to
"NORM."
It
affects
all
input
L.E.D.'s
simultaneously.
F
ACCESSORY
SEND
—
RECEIVE
JACKS
The
high gain
provided
by
the
use
of
discrete
cir-
cuitry
in
our
new
mic
preamplifier
allows
us
to
place
a
“patch-point”
in
this
more
useful
position.
The
level
at
the
send
jack
is-10
dB
(0.3V)
and
the
output
load
impe-
dance
is
1.4k
ohms.
A
limiter
connected
to
this
point
in
‘the
M-15
circuit
can
now
be
set
to
a
range
of
compression
that
will.
not
alter
when
either
the
equalizer
(the
next
stage)
is
adjusted
or
the
input
fader
is
moved
(the
stage
after
the
EQ
amps).
This
pair
of
jacks
is
not.“normalled”
so,
when
no
device
is
bridged
from
send
to
receive,
jumpers
must
be
in
place
for
signal
to
flow
to
the
EQ
amps
and
on
through
the
console,
However,
since
all
the
mixing
controls
lie
after
the
“
Receive”
jack,
it
is
possible
to
use
“Accessory
Receive”
as
an
input,
and
by-pass
the
the
first
gain
stage.
The
only
functions
that
will
be
lost
are
the
trim
and
overload
indicators.
The
signal
quality
will
improve
slightly
but
it
will
not
be
possible
to
switch
to
“Mic
In",
“Line
In”
or
“m”
without
re-patching.
This
unorthodox
patch
is
suggested
for
final
remix
when
all
recording
has
been
completed,-and
more
time
for
patch-
ing
is
available.
Maxirnum
level
in
will
be
+18
dB,
(8
volt)
input
impedance
is
50
kohms.

EQUALIZATION
CONTROLS
The
M-15
has
6
frequency,
4
control
E.0.
divided
into
two
sections
of
two
knobs
each.
On
the
upper
sec-
tion,
1OKHz
fixed,
3kHz
or
5k
Hz
switch
selectable.
On
the
lower
section,
200
Hz
or
800
Hz,
switch
selectable,
and
75.Hz,
fixed.
The
fixed
frequency
controls
will
not
work
unless
their
frequency
select
switch
is
away
from
the
center,
or
“EQ
OFF”
position.
Either
side
will
do
but
center
is
“OFF”
for
both
knobs
in
a
section.
The
chart
below
shows
the
range
for
each
frequency,
boost
and
cut.
DIRECT
OUT
6)
(101
©
soLo
AUX
1
AND AUX
2
PRE-/POST-FADER
FUNCTION
Both
of
these
Auxiliary
Mixing
Positions
can
be
fed
from.
more
than
one
point
in
the
signal
path..To
make
their
operation
clear
we’ll
use
a
section
of
the
Biock
Diagram
to
show
the
connections.
Since
there
is
no
switch,
the
direction
of
rotation
of
the
control
will
determine
which
point
signal
will
be
derived
from.
Counterclockwise
(leftwards)
rotation
of
either
the
Aux
1
or
Aux
2
control
will
draw.
signal
before
the
input
fader.
if
you
choose
this
source,
moving
the
input
fader
will
not
affect
the
level
of
your
Aux
Mix.
This
is
useful
for
making
up
cue
mixes
for
musicians.
Nothing
is
more
frustrating
to
a
player
than
having
the
drums
suddenly
disappear
from
the
earphone
mix
during
rehearsal.
Clock-
wise
(rightwards)
rotation
of
either
the
Aux
1
or
Aux
2
control
will
draw
signal
after
the
input
fader.
This
source
is
useful
for
echo
mixes.
As
the
input
fader
is
closed,
the
echo
send
will
also
be
reduced,
“fading
out”
will
not
leave
you
with
a
“ghost”
coming
from
your
echo
return.
Each
control
has
a
detent
you
can
feel
at
“center”
allowing
you
to
be
sure
it
is
completely
“OFF”
and
drawing
no
signal
from
either
side.
PRE,
PosT
Rotate
CCW
(left)
to
increase
Rotote
CW
(right)
to
increase
oN
ON
This
type
of
control
is
called
a'"W”
pot.
Its
use
in
the
M-15
allows
us
to
eliminate
a
switch
that
would
otherwise
be
necessary
to
select
“pre”
or
“post”.
Both
circuits
may
be
set
to
the
same
side
safely,
either
pre
or
post.
You
may
have
2
postfader
echo
sends
or
2
pre-
fader
cue
systems
or
one
of
each
as
the
needs
of
the
moment
require.
Because
of
slight
differences
in
func-
tion
on
the
master
control
of
each
circuit,
we
suggest
that
you
use
Aux
1
as
your
input
cue,
and
Aux
2
as
an
echo
circuit,
but
this
is
basically
a
recommendation
not
@
command.
The
reasons
will
become
more
clear
when
we
describe
the
final
controls
for
each
function.
(See
“Aux
A
Module”,
“Aux
B
Module”
Pages
9
and
10).
INPUT
FADER
Controls
the
signal
level
of
all
prior
stages.
Faders,
also
called
pots
or
attenuators
always
cause
loss
in
order
to
control
signal
level.
Gain
stages
in
an
electronic
device
always
run
“wide
open”
at
whatever
gain
they
are
set
for,
unless
they
have
provision
for
"Trim"
or
actual
gain
adjustment.
In
the
M-15
only
two
of
the
many
amplifiers
employed
actually
have
“Trim”,
the
first
gain
stage
or
Mic
Pre
and
the
Buss
Summing
amplifier.
When
you
advance
any
straight
line
fader
on
the
M-15
you
are
just
reducing
the
loss
it
causes.
The
entire
signal
flows
to
the
next
stage
only
if
the
fader
is
“wide
open”.
or
up
all
the
way.
DIRECT
OUT
JACK
There
is
no
special
control
for
this
output
on
the
top
panel.
It is
“Hot”
all
the
time,
and
provides
an
un-
mixed
single
signal
output
of
whatever
has
been
assigned
to
the
module.
This
direct
ouput
can
be
used
for
a
variety
of
purposes.

1,
A
subsidiary
mix
can
be
made
by
using
an
accessory
mixer
fed
by
this
output.
2.
One
mic,
one
track
recording
happens
frequently,
and
using
direct
out
will
by
pass
unneeded
summing
networks
and
amplifiers.
Going
“Direct”
to
the
re-
corder
will
result
in
a
cleaner
signal.
On
the
M-15
monitoring
wiil
be
possible
by
switch-
ing
the
appropriate
monitor
section
to
“
Tape”
and
listen-
ing
to
the
recorders
electronics
instead
of
a
buss
master,
For
metering,
either
the
recorder
or
an
accessory
meter
bridge
can
be
used,
(MB-20}
Since
the
amplifier
that
feeds
this
jack
also
feeds
the
buss
assign
network
and
the
post
fader
cue
systems,
it
is
wise
to
calculate
the
total
load
carefully.
The
output
load
impedance
of
this
jack
is
1.4k
ohms.
The
load
of
the
pre-wired
circuits
restrict
the
connection
of
this
output
to
a
single
circuit
at
a
time,
unless
the
equipment
you
plan
on
connecting
here
is
known
to
have
very
high
values
for
input
impedance
{100
kohms
or
more).
SOLO
Depressing
this
pushbutton
bypasses
whatever
source
you
have
selected
on
the
control
room
monitor
module
and
substitutes
the
signal
appearing
at
this
point
in
the
input
module.
More
than
one
module
at
a
time
may
be
selected
producing
a
“Mix”
on
this
buss.
Since
this
“Mix”
goes
only
to
the
monitor
module,
all
other
line
output
functions
remain
uninterrupted
and
recording
will
not
be
affected.
The
Solo
buttons
latch,
push
again
to
release.
Whenever
any
button
is
down,
an
L.E.D
lights
on
the
control
roorn
rnodule
to
remind
you
that
the
normal
selection
function
of
monitor
has
been
by-
passed.
The
Solo
signal
is
monophonic,
but
is
distributed
equally
between
both
monitor
outputs.
You
will
be
able
to
set
your
EQ,
but
echo
return
and
stereo
placement
will
be
disabled,
~
PAN
POT
AND
BUSS
ASSIGNMENT
Each
input
rodule
may
only
feed
signal
to
four
of
the
8
buss
master
modules
at
a
time.
A
fifth
push
switch
in
the
assignment
section
marked
Buss
In
1~
4
on
one
side
and
5
~
8
on
the
other
will
transfer
the
four
outputs
of
the
switch
section
from
one
group
(Up
-
1
~
4)
to
the
other
(Down
-
5
~
8)
Depressing
more
than
one
button
will
engage
the
“Pan"
control.
This
single
knob
works
two
faders
that
are
wired
“back
to
back”.
As
you
rotate
the
knob,
one
fader
is
turned
up
as
the
other
is
turned
down.
When
the
contro!
is
“dead
center”
each
fader
is
still
reducing
the
signal
slightly
so
that
the
signal
transition
through
“center”
does
not
become
louder
as
you
“Pan”
through
it.
When
both
speakers
in
a
stereo
pair
are
producing
sound,
you
don’t
need
as
much
power
to
maintain
a
con-
stant
volume.
tf
only
one
button
is
depressed,
the
pan
control
has
no
effect
on
the
signal.
When
any
two
buttons
are
depressed,
the
tower
number
is
“
Panned”
to
full
on-when
the
control
is
turned
as
far
as
it
will
go
counterclockwise,
the
higher
is
“Panned”
to
full
on
clockwise.
The
“Pan”
logic
for
3
or
4
button
arrays
is
easiest
to
explain
with
some
drawings.
If
shaded
buttons
are
as-
sumed
to
be
down,
the
logic
is:
me
CT
oS
Typical
examples
of
multichannel
panning
Since
the
entire
pan
logic
diagram
also
transfers
to
buss
group
5~
8,
panning
signal
‘to
busses
in
separate
groups
will
not
be
possible,
As
an
example
to
.“Pan”
between
Buss’1,
and
Buss
6,
or
between
Busses
4
&
5.
MUTE
The
mute
switch
is
a
program
interrupt,
and
will
affect
your
recording.
When
depressed,
it
disconnects
the
output.
of
the
module
from
the
Buss
assign
section
and
the
Direct
Out
Jack,
However,
the
Aux
1
and
2
cir-
cuits
are
not
affected.
Cue
or
echo
functions
will
not
be
interrupted.
If
it
is
necessary
to
mute
echo
as
well
while
remixing,
the
“input
select”
switch
will
disconnect
signal
at
the
beginning
of
the
chain
as
long
as
you
have
a
posi-
tion
available
that
has
no
signal
appearing
on
its
back
panel
connector.

3.2
BUSS
MASTER
MODULE
BUSS
IN
JACKS
ee
tnput
r
These
two
R.C.A,
Jacks
allow
you
to
add
a
signal
or
group
of
signals
to
the
input
of
the
Buss
Master
Module
and
route
them
on
to
another
circuit,
if
necessary.
Because
this
connection
acts
in
the
same
fashion
as
an
external
"Y"
cable,
care
must
be
taken
in
calculating
the
true
load,
The
output
feeding
the
"Y”
will
be
affected
by
the
total
load
of
both
connections.
The
Buss
In
input
load
impedance
is
10k
ohms.
Find
the
input
load
im-
pedance
for
the
second
connection
and
see
Page’
3,
impedancé
matching,
for
the
appropriate
formulas.
10
Buss
master
BUSS
TRIM
Like
the
trim
on
the
first
gain
stage
of
the
1st
input
module.
When
the
overall
level
on
the
buss
becomes
too
high,
distortion
can
be
induced
in
the
summing
amplifier.
Reducing
the
setting
of
the
Straight
Line
Master
will
not
help.
Turning
this
“Trim”
control
counterclockwise
will
lower
the
gain
and
increase
the
headroorn
of
the
sum-
ming
amplifier,
In
extreme
cases,
it
may
be
necessary
to
reduce
the
level
of
each
input
fader.
The
maximum
gain
reduction
provided
by
the
“Trim”
control
is
approxi-
mately
20
dB.
The
normal
position
is
fully
clockwise.
ACC
SEND/RECEIVE
JACKS
Provided
for
signal
processing
of
the
entire
Buss
Output,
The
Jack
pair
is
not
connected
internally
and
a
jumper
or
a
device
must
be
completely
connected
for
signal
to
flow
to
the
next
stage.
The
output
toad
imped-
ance
of
the
Send
Jack
is
1.4kohms.
The
input
load
impedance
of
the
Receive
Jack
is
10k
ohms.
This
signal
path
(in
and
out)
is
located
behind
the
Buss
Master
Fader.
The
action
of
a
limiter
or
compressor
action
will
not
be
affected
by
moving
the
Buss
Master
Fader,
but
will
be
affected
by
“Trim.”
At
this
point
in
the
circuit
we
have
a
complete
Buss
Master
Mix.
All
functions
of
the
input
module
will
affect
the
signal
here,
all
major
and
minor
patch
points
are
behind
us,
and
as
far
as
the
recorder
is
concerned,
the
signal
is
ready
to
record
—
we
are
done,
The
only
problem
job
remaining
is:
how
do
we
hear
what
we
are
doing?
This
signal
must
go
to
Our
monitor
circuits.
So,
we
put
an
internal
con-
nection
here
to
one
side
of
a
switch:
MONITOR
A
SELECT
and,
also
to
MONITOR
B
SELECT
BUSS
MASTER
FADER
This
fader
contro!s
the
overall
level
of
signals
from
the
input
modules
and
the
echo
receive
section.
When
Buss
is
selected,
echo
receive
signal
enters
the
signal
path
here.
Other
functions
of
the
echo
assign
buttons
enter
the
monitor
at
leter
points
in
the
circuit,
See
Page
9,
Buss
Master
Module.
TAPE
AS
SOURCE
There
are
two
switches
that
seem
to
do
the
same
job,
feeding
signals
to
the
monitor
system,
This
apparent
doubling
of
function
is
provided
for
several
reasons.
Even
though
the
M-15
has
only
8
Buss
Master
Modules,
it
has
a
16
track
monitor
system,
Setting
the
monitor
select
switch
to
the
left
selects
“Buss
Master
Output”
as
a
signal.
Re-setting
to
the
right
most
position
will
now
select
“Tape”
as
a
monitor,
and
we
need
sixteen
posi-
tions
to
monitor
the
playback
of
all
sixteen
tracks.
Because
of
this
16
track
monitor
requirement,
all
moni-
tor
controls
are
doubled
and
there
are
two
apparently
identical
sets
of
controls.
When
used
as
“Buss
Master”
monitor
they
become
redundant,
but
the
two
sections
are
not
identical
in
“Tape”
mode.
Monitor
section
“A”
is
connected
only
to
Tape
in
A,
and
monitor
section
“B”
only
to
Tape
in
B.
BUSS
AS
SOURCE
tf
our
basic
16
track
setup
on
Page
13
is
used,
you
will
get
a
different
track
on
each
section
of
the
monitor
or
Buss
Master
Module
(one
for
each),
Monitor
“A"
tape
select
will
be
track
1,
Monitor
B
tape
select
will
be
track
9.
Both
Monitor
A
and
B
will
see
Buss
Master
1
when
Buss
Out
is
selected
by
their
Monitor
Select
Switches.
However,
this
switch
does
not
control
the
logic
of
signat
selection
for
the
Aux
3
or
4
circuits
immediately
above,
it
only
works
on
the
straight
line
fader
marked
“Mon
Gain”
below
it.
We
have
provided
each
section
of
our
monitor
with
an
output
RCA
Jack
on
the
back
that
can
be
regarded
as
an
8
x
2.stereo
mix
in
itself.
When
using
the
M-15
with
an
8
track
recorder,
a
great
deal
of
flexi-
bility
in
monitoring
becomes
possible
for
a
standard
8
track
setup.
See
Page
13.
MONITOR
PAN
The
Monitor
Pan
affects
only
the
monitor
mix.
It
will
not
alter
the
level
or
pan
position
on
the
Buss
Master
Output
when
input
panning
is
done
between
two
busses,
but
if
both-selected
busses
are
monitor
panned
to
the
same
side
in
your
stereo
monitor
mix,
turning
the
input
pan
control
will
produce
no
audible
result.
Input
panning
will,
in
fact,
affect
what
you
record,
but
you
won't
have
ct

any
indication
of
what
you
are
doing
unless
the”
Monitor
Pans”
on
the
two
busses
are
set
one
to
each
side.
This
fact
can
give
you
a
lot
of
trouble,
Work
through
this
part
of
the
block
diagram
carefully,
it
is
very
complex,
and
can
take
some
time
to
understand
thoroughly.
*
AUX
3
AND
AUX
4
These
two
potentially
independent
8x1
mixing
systerns
are
subject
to
somewhat
the
same
logic
as
the
monitor
A
and
B
circuits,
but
they
are
substantially
dif-
ferent
in
their
mode
of
operation
and
signal
selection.
The
rotation
of
the
Pot
itself
will
determine
the
source
of
signal.
Leftwards
(counterclockwise)
rotation
will
select
Buss
Signal
and
Level
is
controlled
by
further
left-
wards
rotation.
Rightwards
rotation
will
select
Tape
signal
“A”
on
the
Aux
3
group
of
controls
and
Tape
signal
“B”
on
the
Aux
4
group.
Further
rightwards
rota-
tion
will
raise
the
level
of
signal.
Once
again,
you
have
8
Buss
Outs,
but
16
Tape
Playbacks.
The
primary
use
of
these
two
circuits
is
“
Earphone
Cueing”
of
tape
playback
to
musicians
making
overdubs.
For
Aux
3
and
Aux
4,a
separate
Mono
Output
without
a
master
is
provided
on
the
Aux
A
(Aux
3)
and
Aux
B
(Aux
4)
Master
Modules.
ECHO
RECEIVE
SECTION
With
4
buttons
and
one
rotary
fader,
this
subsystern
is
essentially
an
independent
input
to
whatever
circuit
is
selected
by
the
switches.
Each
button
routes
the
signal
to
a
separate
point'in
the
chain.
All
push
switches
may
be
depressed
simultaneously,
or
used
singly.
The”
Buss”
switch
adds
the
signal
‘to
the
Buss
Master
before
the
Fader
and
Accessory
Receive
Jacks.
The
Mon
A
and
Mon
B
buttons
route
the
signal
to
their
appropriate
stereo
monitor
sections
prior
to
“Mon
Gain”
and
the
“Mon
Pan”
pot.
Echo,
or
other
fine
level
signal
will
then
be
affected
by
these
monitor
controls,
but
will
not
be
recorded,
The
Aux
1
button
routes
the
signal
to
a
mix-
ing
network
that
has
its
rotary
master
fader
marked
Echo
Rev,
Aux
A
on
the
Aux
A
Module.
Echo
or
8
other
line
level
signals
can
now
be
added
to
the
Aux
A
Master
permitting
an
Echo
return
to
Cue
if
the
Aux A
buss
is
used
for
an
earphone
feed.
To
get
the
signal
in
to
the-Echo
RCV
group,
use
the
Echo
RCV
jacks
on
the
Buss
Master
Modules.
Each
jack
is
provided
with
a
foldback
(or
Y
connection)
so
that
a
single
echo
device
may
be
used
to
feed
several
modules
at
once.
However,
you
should
be
aware
that
you
have
“double
loaded”
the
device
you
have
connected,
and
foad
impedance
calculations
may
prove
necessary.
*The
input
impedance
of
a
single
“Echo
RCV"
is,
without
foldback,
20kohms,
The
end
of
the
foldback
route
will
affect
the
total
value
for
input
load
impedance,
see
sec-
tion
2.
for
the
proper
formulas.
The
output
of
one
device
ray
not
be
capable
of
supplying
enough
current
to
feed
all
8
“Echo
RCV
inputs
simultaneously.
*There
are
no
amplifiers
used
to
“buffer”
or
protect
your
source
of
signal
connection
on
any
of
the
fold-
back
connections
provided
on
the
M-15.
3.3
AUX
A
MASTER
MODULE
(CUE)
This
system
is
intended
to
be
used
as
an
earphone
cue.
It
provides
a
master
fader
and
summing
point
for
the
Aux
1
on
the
Input
Modules
and
Aux
3
&
4
on
the
Buss
Master
Modules.
Mic
signals
and
tapé
playback
can
be
combined
to
produce
a
mano
mix.
All
8
echo
receive
signal
positions
may
be
added
to
this
buss
as
well
allow-
ing
either
an
“Echo
to
Cue”
function
or
additional
Sum-
ming.
The
key
to
this
sytem
is
the
Aux
Mix
Control.
“AUX
A
MIX”
CONTROL.
%
Similar
to
a
panpot,
this
rotary
controi
blends
two
sources:
into
one
signal.
Leftwards
rotation
gradually
increases
the
proportion
of
the
Aux
1
signal,
rightwards
rotation
increases
the
amount
derived
fron
the
push
switch
marked
“Aux
3”
and
“Aux
4”,
When
the
Aux
Mix
Control
is
in
the
center,
both
systems
feed
signal
to
the
Aux
A
master
equally.
If
you
consider
Aux
1
to
be
MIC
signals
and
the
switch
selected
Aux
3
and
Aux
4
systems
to
be
used
for
tape
playback,
adjusting
the
balance
be-
tween
a
singer
(new
mic
cue)
and
the
playback
of
a
partially
completed
recording
(tape
playback)
can
now
be
accomplished
by
turning
one
balance
control.
More
vocal
in
the
Cue,
turn
the
Aux
Mix
to
the
left.
More
signal
from
Tape,
rotate
to
the
right.
On
the
Block
Diagram
it
looks
like
this.
AUX
A
ECHO
RCV
co)
AUX
A
MASTER
AUX
3
AND
AUX
4
PUSH
SWITCHES
Both
of
these
may
be
down
(selected)
at
the
same
time.
If
néither
one
is
engaged,
no
signal
will
be
sent
to
the
right
side
of
the
Aux
Mix
Blend
Control.
ECHO
RCV
This
contro!
is
the
master
for
all
8
Echo
Receives
marked
“Aux
A“
on
the
Buss
Master
Echo
Receive
sec-
tion.
One
or
more
of
the
Echo
Aux
A
selects
must
be
engaged
and
signa!
brought
up
by
the
Echo
Receive
Pots
on
the
Buss
Masters
for
signal
to
flow
to
the
“Echo
RCV”
for
finai
level
adjustment
to
the
Aux
A
buss.

AUX
A
MASTER
FADER
Final
level
contro!
of
all
Aux
A
signals.
AUX
A
MODULE
BACK
PANEL
The-simplest
method
of
describing
these
connections
is
to
consider
them
in
their
physical
sequence,
frorn
top
to
bottom.
AUX
3
OUT
A
separate
output
without
a
master
for
the
Aux
3
8x1
group.
The
output
load
impedance
is
10
kohms.
The
reference
level
is
-10dB,
0.3
voit.
AUX
A
OUT
Final
output
of
the
Aux
A.
Buss:
output
load
im-
pedance
10
kohms,
Reference
level
-10
dB;
0.3
volt.
LINE
OUT,
1-4
Final
outputs
for
Buss
Masters
1
through
4.
Output
load
impedance
10kohms,
Reference
level
on
these
jacks
can
be
internally
altered
by
a
switch
inside
each
module,
LOW
=
-10
dB,
0.3
volt
HI
=
-2.2dB,
0.775
volt
When
the
M-15
is
assembled,
the
switch
is
set
at
the
Lo
position.
3.4
AUX
B
MASTER
MODULE
(ECHO)
The
primary
use
of
this
subsystem
is
as
an
echo
send.
It
is
identical
to
the
Aux
A
module
in
ail
respects
except
one.
It
has
no
echo
receive
capability.
The
knob
located
in
the
“Echo
RCV”
position
is
a
switch
control-
ling
the
input
module
overload
indicator
sensitivity,
as
described
on
Page
9.
In
the
“Norm”
position
the
input
overload
sensitivity
is
+15dB.
In
the
“MIX”
position
the
L.E.D.’s
wil!
flash
when
the
signal
reaches
the
lower
level
of
-5dB,
providing
visual
indication
of
the
presence
of
signal
on
the
input
module,
even
if
the
fader
is
all
the
way
down.
AUX
B
MIX
CONTROL
Same
as
Aux
A
Mix
Control,
but
rightwards
rotation
selects
Aux
2
pots
instead
of
Aux
1.
Leftwards
rotation
selects
Aux
3
and
Aux
4
push
switches
as
signal
sources,
Again,
as
in
Aux
A,
either
Mic
or
Playback
can
be
favored
as
a
signal.
quickly.
When
no
echo
is
needed,
this
system
can
be
used
as
a
second
earphone
mix
for
musicians.
AUX
3
AND
4
PUSH
SWITCHES
Both
may
be
depressed
at
once,
If
neither
switch
is
down,
rightwards
rotation
of
the
Aux
Mix
Pot
will
mute
the
system.
If
number
Aux
2
pot
on
the
input-side
is
open
{passing
signal),
leftwards
rotation
of
the
Aux
Mix
Pot
will
mute
the
system.
Always
check
your
sources
of
signal.
AUX
B
MASTER
This
fader
controls
the
final
level
at
the
Aux
B
Out-
put
Jacks.
CAUTION
Since
the
Aux
3
and 4
circuits
may
also
select
“Buss
Out”
as
a
signal
source,
a
circular
assignment
(feedback)
is
possible
on
this
system
if
the
Echo
Receive
Section
is
set
to
pass
Echo
Return
to
the
Master
Buss
Outputs.
Before
you
begin,
it
is
wise
to
make
sure
that
you
have
not
inadvertently
formed
such
a
loop.
Careful
thought
and
study
of
the
Block
Diagram
will
show
several
pos-
sible
causes
of
trouble.
One
switch
position
may
be
useful,
but
another
impossible
with
any
really
complex
patch.
The
many
exterior
connections
on
the
M-15
back
to
the
Aux
Systems
are
useful
and
necessary,
but
not
completely
fail
safe
as
regards
looping.
If
flexibility
is
desired,
the
risks
are
unavoidable.
Take
care!.
AUX
B
MODULE
BACK
PANEL
Quitputs
from
top
to
bottom,
as
in
Aux
A,
AUX
4
OUT
A
separate
output
without
a
master.
for
the
Aux
4,
8x
1
group.
The
output
load
impedance
is
10
kohms.
Reference
level
is
-10
dB,
0.3
volt.

AUX
B
OUT
Final
output
of
the
Aux
B
buss,
output
load
imped-
ance
is
10
kohms.
Reference
level
is
-10
dB,
0.3
volt.
LINE
OUT
5-8
Final
outputs
for
Buss
Masters
5-8.
Load
informa-
tion
and
impedances
are
identical
to
Line
Outs
1.&
4.
LOADING
ADVICE
Since
the
double
output
jacks
are
connected
to
the
same
gain
stage,
any
device
connected
to
one
pin
will
affect
the
output
capability
of
the
other
pin.
To
deter-
mine
the
true
value
of
loading
on
the
mixers
final
stage,
the
input
impedance
values
of
both
devices
must
be
con-
sidered
even
when
only
one
of
them
is
being
used.
For
this
reason
we
suggest
that
you
unplug
anything
con-
nected
to
the
final
stage
that
you
are
not
using
when
you
make
your
most
criticat
mixes.
The
output
load
impedance
of
this
stage
is
10
kohms.
It's
always
a
good
idea
to
use
as
small
an
amount
of
electronic
stages
as
you
can,
If
you
don’t
need
a
circuit
for
its
control
or
function,
bypass
it
and
your
sound
will
improve.
3.5
CONTROL
ROOM
MONITOR
MODULE
MON
A
OUTPUTS
These
RCA
Jacks
provide
a
stereo
output
without
a
master
fader
for
the
upper
monitor
section
on
the
Buss
Master
Modules.
The
output
level
is
-10
dB,
0.3
volt
The
output
load
impedance
is
10
kohms.
"CR"
MON,
L
AND
R
OUTPUTS
This
pair
of
outputs
should
normally
be
connected
to
the
control
room
power
amplifier,
although
other
uses
are
possible
as
well.
The
output
load
impedance
is
10kohms.
The
output
level
is
-10
dB,
0.3
voit.
PUSH
SWITCHES
There
are
seven
push-to-latch,
push
again
to
release
switches
on
this
module.
Directly
or
indirectly,
they
allow
you
to
monitor
all
of
the
mixing
positions
of
the
M-15.
This
circuit
is
a
mixer
in
itself
provided
with
an
active
summing
circuit.
All
of
the
push
switches
can
be
engaged
simultaneously
or
in
any
cornbination.
The
circuits
are
stereo
for
Monitor
B,
Monitor
A
and
the
3
Auxiliary
Line
In
Pairs
and
Center
Feed
Mono
for
the
Aux
A
and
Aux
B
positions.
CONTROL
ROOM
MASTER
This
rotary
contra}
provides
a
master
volume
for
the
“CR
Mon”
Stereo
Output.
SOLO
MASTER
This
rotary
control
sets
the
volume
of
the
Solo
circuit.
11
SOLO
LED.
When
one
or
more
Solo
push
switches
are
depressed
‘on
the
Input
Modules
this
L.E.D.
will
fight.
No
monitor
signal
wili
be
heard
other
than
“Solo”
until
ali
Solo
switches
are
in
the
up
position.
AUXILIARY
LINE
IN
JACKS
3
stereo
pairs
are
provided
to
allow
the
monitoring
of
2
track
recorders
or
other
subsidiary
mixers
without
the
necessity
of
disrupting
assisgnments
or
patches
elsewhere
on
the
M-15.
These
Jacks
also
feed
the
push
switches
on.
the
adjoining
Studio
Monitor
Module.
It
has
no
inputs
on
its
back
panel,
only
outputs.
3.6
STUDIO
MONITOR
MODULE
Basically
identical
to
the
Control!
Room
Module
in
its
function,
this
module-is
provided
primarily
as
a
separate
master
control
for
a
set
of
loudspeakers
in
the
studio
proper.
It
can
also
be
used
as
separate
mixer.
Its
push
switch
Jack
duplicates
the
signals
found
on
the
Control
Room
Module.
STUDIO
This
rotary
control
is
the
Studio
Master
Volume.
STUDIO
MON
L-R
OUTPUTS
For
connection
to
studio
power
amplifier,
or
other
necessary
circuits.
The
output
load
impedance
is
10k
ohms.
The
output
level
is
-2.2
dB,
0.775
volt.
MON
B
L-R
OUTPUTS
These
RCA
Jacks
provide
a
stereo
output
without
a
master
fader
for
the
Module
“B”
section
on
the
Buss
Master
Modules,
The
output
level
is
-10
dB,
0.3
volt.
The
output
load
impedance
is
10
kohms.
3.7
TALKBACK
MODULE
OSCILLATOR
FREQUENCY
SELECT
SWITCH
A
frequency
test
oscillator
is
provided
for
setting
up
tape
recorder
levels
and
checking
circuit
continuity.
Since
it
is
not
internally
connected,
a
pair
of
RCA
Jacks
are
provided
on
the
back
so
oscillator
signals:
can
be
patched
in
where
needed.
OSCILLATOR
FUNCTION
SELECT SWITCH
This
3
position
switch
determines
the
status
of
the
test
oscillator.
Left
appties
a
40 Hz
tone
to
the
slate
button,
Center
is
off,
and
Right
applies
the
output
of
the
device
to
the
rear
panel
Jacks.
TALKBACK
MICROPHONE
A
microphone:
is
built
in
to
the
top
panel
allowing
the
control
room
personnel
to
communicate
with
the
performers.
The
microphone
output
may
be
set
at
dif-
fering
levels
with
the
3
volume
controls
provided.

STUDIO
Level
control
to
the
studio
monitor
module.
AUX
A
Level
control
to
the
Aux
A
Buss.
SLATE
Level
control
to
all
Buss
Master
Outputs.
The
mo-
mentary
push
switch
group
determines
which
circuit
will
receive
the
final
output
of
the
talkback
microphone.
HEADPHONE
SELECT
SWITCH
This
switch
determines
the
source
of
signat
for
both
the
(1
watt)
back
panel
headphone
jack
and
the
(100
mW)
front
panel
headphone
jack.
The
left
position
selects
the
output
of
the
Control
Room
Module,
the
center
position
is
off,
and
the
right
position
selects
the
output
of
the
Studio
Monitor Module.
The
rotary
contro!
immediately
below
the
switch
provides
a
master
for
both
headphone
jacks.
3.8
POWER
SUPPLY
UNIT
The
M-15
uses
an
independent
power
supply
module.
Before
any
operation
can
take
place
the
multipin
con-
nector
must
be
plugged
in
and
power
apptied.
The
master
A.C.
Switch
and
all
fuses
will
be
found
in
this
outboard
module.
METER
BRIDGE
CONNECTOR
The
multipin
connector
must
be
plugged
into
the
proper
receptacle
on
the
back
of
the
mixing
console
for
the
meters
to
function.
4,
STANDARD
PATCHES
The
standard
patching
setups
described
here
are
not
rigid
commands.
Rather,
they
are
provided
with
the
hope
that
they
will
stimulate
your
imagination
when
you
have
mixing
needs
that
cannot
be
solved
with
the
Standard
Setup.
Line
Level
is
Line
Level,
whatever
the
source,
and
many
Line
Level
inputs
to
the
Model
15
offer
a
route
toa
mix
that
will
be
used
for
a
function
other
than
the
one
that
is
labelled
on
the
top
panel.
The
Jacks
on
the
back
are
there
to
be
used.
Patching
is
not
a
crime
and
may
be
used
to
improve
the
quality
of
your
12
signal
by
bypassing
unneeded
controls,
or
by
making
additional
contrat
possible
in
unorthodox
ways.
Most
people
tend
to
look
for
a
“permanent”
set
of
connections
when
they
set
up
4
mixing
system
and
it
is
true
that
the
logic
of
control
function
just
on
the
top
of
the
mixer
takes
some
time
to
become
familiar
with,
but
multichannel
recording
has
many
mixing
requirements.
A
permanent
patch
will
severely
restrict
flexibility.
Don't
be
afraid
to
re-plug.
There
is
nothing
wrong
with
the
concept.
!f
you
can
examine
the
system
needs
of
each
mode
of
operation
and
re-patch
the
M-15
to
suit,
you
can
get
better
results.
For
this
reason
we
suggest
that
you
plan
on
access
to
the
back
panel
of
the
mixer.
Don’t
set
up
the
system
in
such
a
way
that
you
“hide
all
that
mess”.
Leave
your-
self
room
to
get
at
afl
the
connectors.
You
will
need
all
the
options
you
can
get.
|f
your
Cue
or
Monitor
requirements
can
be
reduced
to
one
8
signal
group,
extra
functions
can
be
performed
with
the
mix
on
the
second
8
signal
group.
Does
the
Singer
need
all
5S
tracks
of
drums
in
the
Cue?
If
not,
a
separate
Echo
Feed
to
Cue
may
be
possible.
In
all
patching
and
connecting
of
2
wire
single
ended
circuits
two
Basic
rules
are
worth
remembering.
1.
Keep
your
cable
runs
SHORT
|
—as
short
as
possible.
Installing
a
patchbay
behind
the
engineer
will
require
at
least
20
foot
runs
and
is
not
recommended.
To
the
left
or
right
side
will
allow
much
shorter
runs,
and
wisest
of
all
is
to
use
our
PB-64
mounted
on
top
of
the
Meter
Bridge
itself.
This
location
will
permit
the
shortest
lengths
of
cable
run,
and
will
improve
your
sound.
Incidentally,
short
runs
cost
less,
also
a
bene-
fit.
TEAC
low
loss
cabie
is
available
and
its
low
capacitance
per
foot
and
superior
insulation
has
been
designed
with
systems
like
this
in
mind.
It
is
welt
worth
its
extra
cost.
The
use
of
3
conductor.
professional
cable
such
as
Belden
8H51
should
be
avoided,
Even
though
it
is
of
excellent
quality,
it
is
not
the
right
idea
for
2
wire
systems.
If
you
are
going
to
make
up
your
own
cables
we
would
suggest
our
500
ft.
bulk
rolls
or
cable
such
as
Belden
8218.
Solid
core
insulator,
low
capacity
wire
is
what
you
need.
Foam
filled
2
conductor
is
not
recommended,
as
the
center
conductor
will
cut
through
most
foam
with
time,
the
capacitance
will
go
up,
and
eventually
the
cable
will
short
circuit.
Don’t
use
it.
2.
Multiple
Output
Connections
require
impedance
matching
calculations,
Make
sure
you
are
not
asking
too
much
of
your
output
stages.
Permanently
con-
necting
several
cables
to
a
single
output
may
produce
poor
quality.
If
you
are
not
using
a
patch,
unplug
it!
Convenience
ray
cost
you
quality,
unless
you
are
sure
that
a
multiple
connection
is
well
within
safe
limits.
Use
the
section
on
impedance
matching
in
this
manuai,
abide
by
the
limitations
it
covers,
and
you
will
get
better
results.

RECOMMENDED
8
TRACK
SETUP
WITH
2
ECHO
SYSTEMS
The
monitor
System
can
now
be
divided
into
2
separate
groups
and
a
different
function
assigned
to
each.
Monitor
A
will
perform
Contrai
Room
functions
and
Buss/Tape
comparisons.
Aux
3
will
now
allow
Play-
back
Cueing
for
Overdubs.
Monitor
B
will
give
you
4
Stereo
Echo
Mix
that
is
separately
controllable
at
all
times,
and
may
be
recorded
along
with
the
Dry
Signal
if
desired.
(Re-ptug
Echo
RCV
to
the
buss
you
wish
to
use).
For
clarity,
it
is
shown
connected
only
to
Buss
5
and
6,
with
Jumpers
to
3
and
4,
Aux
4
will
provide
a
Mono
Echo
Mix
to
be
used
in
the
Earphones
so
musicians
may
hear
a
more
musically
pleasing
sound.
Route
the
Aux
4
mix
to
the
Aux
B
Master
by
depressing
the
appropriate
push
switch
on
the
Aux
B
Master
Module.
The
Aux
B
Master
will
now
act
as
a
Master
Mono
Echo
Send
when
the
individual
Aux
4
“w"
pots
are
rotated
rightwards
to
receive
signal
only
from
the
Aux
4
section.
Echo
will
also
be
possible
from
the
input
modules
of
the
M-15
if
the
Aux
B
Mix
Control
is
used
as
described
on’
Page
10.
The
Mono
Return
is
added
to
the
Cue
Buss
with
Echo
RCV
#1
Pot,
Switch
“Aux
A.
Since
each Buss
Master
Line
Out
is
double,
you
may
attach
a
2
track
to
the
spare
jack,
We
show
Buss
§
and
6
connected,
since
their
meters
are
more
or
less
centrally
located
on
the
Meter
Bridge,
but
any
two
will
serve.
If
you
work
closer
to
them
when
mixing,
use
1
and
2,
or
7
and
8.
Suit
yourself.
To
stereaecho
_
Connect
as
needed
Playback
from
8
track
Mono
echo.
Buss
cue
system
To
cue
amp
8765
432
tor
setup
Power
TEST TONE
©
©
‘raLgeack
®@
2
track
68752431)!
Stereo
echo
return
playback
To
8
track
inputs
for
mixdown
Cantro!
room
To
2
track
stereo
power
amp
mixdown
recorder
BUSS
iN
Mono
echo
return
(any
input,
return
to
cue}
a
©
bout
Cea
tnitline
et

16
TRACK
REMIX PATCH
WITH
AN
UNORTHODOX
DOUBLE
STEREO
ECHO
This
setup
completely
separates
the
16
track
moni-
tor
section
from
its
normal
function
as
a
Contral
Room
Monitor
and
converts
it
to
Stereo
Echo
Mixer
with
full
gain
and
pan,
Listening
to
the
mix
you
are
working
on
will
now
be
accomplished
by
using
either
Aux
Line
In
#1
(Buss
Output
5
and
6)
or,
Aux
Line
In
#3
(2
track
playback).
The
Aux
A
Buss
is
connected
to
a
Mona
Echo
device
and
returns
Echo
Signal
to
“Buss
In
#5".
The
Aux
B
Buss
is
connected
to
a
Mono
Echo
device
and’
return
Echo
Signal
is
connected
to
“Buss
In
#6".
Having
several
Echo
Chambers
to
work
with
will
allow
more
sophisticated
image
placement.
Very
realistic
and
satisfying
illusions
in
stereo
are
possible
by
having
signal
“Dry”
on
the
left
and
Echo
Return
from
the
signal
on
the
right.
Building
an
imaginary
“Room”
or
“Stage”
will
now
be
possible,
and
some
otherwise
unmixable
tracks
become
easy
to
make
clear
in
Stereo
when
Multi-
ple
Echo
Systems
can’
be
used
14
Assign
AUX
IN
3
for
mohitoring
2
track
mix,
AUX
IN
|
for
buss
monitoring
8
To
get
stereo
echo
send
master,
assign
MON
A,
MON
8
TALKBACK]
STUDIO
weTER
BrDoe
ps
TALKBACK
©)
®
®
Studio
power
amp
disconnected
To
stereo
echo
“To
2
track
mixdown
To
mono
echo
left
From
2
track
mixdown
To
mono
echo
right
From
16
track
playbock
6
5
2
I
10
EE.
:
2
a
CO.
.
ES
@
Ed
|
fete
Gia
©
Ad
|
[afAe
}
Alig
©
<4
|
1S
aa
ee
©
@
©
Stereo
echo
return
Mone
echo
return
Ait
monitor
A
and
8
switches
to
“tape”
Buss
Ww
OUT
LINE
IN
©®©
s
our
mae

RECOMMENDED
16
TRACK
SETUP
The
basic
function
discussed
in
this
manual
assumes.
that
you
will
need
to
play
back
what
you
have
recorded
many
times
before
final
mixes
are
made.
Since
it
is
unlikely
that
you
will
be
recording
all
16
tracks
at
one
time,
the
fact
that
the
M-15
has
only
8
buss
master
modules
is
not
a
serious
limitation.
Here
we
show
each
buss
master
connected
to
more
than
one
track,
Tracks
1
and
9
are
on
the
same
buss,
#1
and
so
forth
up
to
Buss
8
Output,
connected
to
tracks
8
and
16.
When
you
are
ready
to
mix
to
stereo,
you
will
have
to
change
your
patch
to
feed
the
2
track,
Designed
for
quick
playbacks,
the
Monitor
A
and
B
systems
eliminate
the
need
to
distrupt
the
Input
Module
settings
you
are
working
with.
Since
“Line
In"
on
the
Input
Module
is
not
used
for
playback
of
your
recorder
in
this
patch,
these
Jacks
are
available
for
any
other
unit
or
units
you
may
have.
Mov-
ing
to
“Line
In”
will,
of
course,
force
you
to
re-set
the
Input
Controls
if
you
have
been
using
a
Microphone
as
an
Input.
Only
one
Echo
System
is
shown.
Since
most
record-
ing
is
done
“dry”
or
without
Echo,
one
chamber
should
be
sufficient.
When
you
are
ready
to
mix
down,
more
Echo
Systems
are
likely
to
be
useful,
so
we
suggest
you
look
at
Patch
#3.
It
will
help
you
understand
more
about
re-mix
setups.
There
are
2
Stereo
and
2
Mono
Outputs
unused
on
this
drawing
because
their
systems
have
been
committed
to
Cue
in
Playback
and
Control
Room
Monitor.
They
are:
Mon
A
—
Stereo
Mon
8
—
Stereo
Aux
3
=
Mono
Aux
4
—
Mono
Mono
echo
send
Connect
as
needed
for
setup
FEST
TONE
©
©
POWER
TALKBACKY
4||
Q
To
studio
power
amp
To
control
room
Power
amp
6
5.
Foidback
possibie
on
To
cue
amp
447875]
lo]
tl
B
6
7
2
To
I6
track
inputs
9
4
all
I6
playback
3
From
16
track
outputs
From
echo
6 @
eae
®
2.
»
©
ECH0
¥
®
(One
chamber
folded
across
8
inputs
may
not
be
possibile
due
to
the
increased
load
of
8
circuits
on
one
echo
output.
Check
your
echo
specifications.)
uss
Bala
net
Fn
QUT
LINE
ww
15
|
|
sete
ne ne
pey
‘

Copy
this
page
and
build
your
own
monitor
patch.
Suid
pairmtiia
te
eg
see
hacepenthy
dake
&
jOpOz?
20805
2©-2©
16
@
sO!
:©£020-©
2©
i@k@*
our)
a
0
{0
20,°0
2©
i@@'.6'0
10
:
oe!
-Of02
:
2020
;
iehe.olote
«©
mate
2@
@"@"O
«©
~6,6.5
Ex)
e610
©
©
TALKBACK]
STUDIO
[CONT
ROOM)
AUX
B
16

5.
LEVEL
SETTING
AND
OPERATION
CHECK
5.1
LINE
IN
—
ACCESS
SEND
1.
Apply
a
-10
dB
(0.3V)
signal
to
the
LINE
INPUT
jack
on
back
panel
of
the
Mode!
301
Input
Module.
2.
Pull
out
the
jumper
between
ACCESS
SEND
and
RECEIVE
jacks
for
the
channel
in
which
the
above
signal
is
injected,
and
plug
in
an
AC
voltmeter
to
the
ACCESS
SEND
jack.
The
AC
voltmeter
recom-
mended
here
should
have
an
input
impedance
of
50k
ohms
or
more,
input
capacitance
less
than
20
pF,
and
maximum
sensitivity
of
-60
dB
with
a
sensitivity
selector
switch.
3.
Set
controls
on
panel
of
the
Modei
301
Input
Module
as
follows:
INPUT
select
switch:
LINE
TRIM
:
At
about
-20
4.
For
a
normal
condition
of
the
circuit,
the
ACCESS
SEND
output
should
be
-10
dB
against
a
LINE
IN
signal
of
-10
dB.
5.
If
the
output
is
not
-10
dB,
adjust
with
TRIM.
After
this
adjustment,
the
TRIM
knob
should
be
between
10
and
18
dB
under
normal
condition.
6.
!f
you
notice
any
malfunction,
refer
to
the
pream-
plifier
(Q1
~
Q6)
circuit
schematic
and
check
all
transistor
voltages
and
signal
levels.
7.
Check
all
remaining
Input
Modules
in
the
same
way.
8.
‘Measurement
of
frequency
response,
S/N
ratio,T.H.D.;
Frequency
response:
20H2z
~
20
kHz,
within
£1dB
S/N
ratio
More
than
84
dB
(using
a
weighting
network}
80dB
(measured
with
a
band-
pass
filter
—
20Hz
~
20
kHz
A
more
than
78
dB
reading
on
an
AC
voltmeter
with
a
better
than
100kHz
range
can
be
said
as
normal.
Less
than
0.03
%
{at
20
Hz
~
20kH2)
or,
:
or,
+:
T.H.D.
5.3
LINE
IN
LINE
OUT/AUX
OUT
InpuT
MODULE
Ne
mic
IN
1.
Apply
2
-10dB
(0.3V)
signal
to
the
LINE
IN
jack.
2.
Plug
in
an
AC
voltmeter
to
the
LINE
OUT
1
jack
on
rear
of
the
Model
303A
AUX
A
Module.
5.2
LINE
IN
—+
DIRECT
OUT
ono
1g
ovpecT
out
A
asaner
oes
a0
MoM
1.
Apply
a
-10dB
(0.3V}
signal
to
the
LINE
INPUT
Jack.
2.
Plug
in
an
AC
voltmeter
to
the
DIRECT
OUT
jack
for
the
channel-in
which
the
above
signal
is
injected.
3.
Set
controls
on
panel
of
the
INPUT
MODULE
as
follows:
INPUT
select
switch:
LINE
TRIM
:
To
about
~20
EQUALIZER
Set
to
center
the
3kHz
and
200
H/800
Hz
switches.
Under
this
condition,
response
will
be
flat
regardless
to
setting
of
the
10k
Hz
and
.75Hz
control
knobs,
INPUT
FADER
—
:
“O”
scale
4,
The
circuit
isin
normal
condition
if
the
DIRECT
OUT
level
is
-10
dB
against
the
LINE
IN
level
of
-10 aB.
5.
If
it
is
slightly
off
-10dB,
adjust
by
the
TRIM
knob.
For
a
normal
condition
circuit,
the
TRIM
knob
posi-
tion
should
be
between
10
and
15
dB.
6.
If
you
cannot
obtain
the
proper
reading,
check
the
circuit,
If
the
above
Item
5.1
check
shows
normal
but
the
DIRECT
OUT
level
is
incorrect,
trouble
could
be
in
the
INPUT
FADER,
and
IC's
U1
and
U4,
The
gain
of
U1-7
and
U4-7
is
1,
and
that
of
U4-1
is
10dB.
The
attenuation
of
the
INPUT
FADER
set
at
infinity
should
be:
More
than
85dB
at
30
Hz
More
than
75dB
at.
1k
Hz
More
than
58
dB
at
10
k
Hz
®
LINE
OUT
(0)
@'
sux
OUT
3.
Set
the
level
selector
switch
(S1~
S4)
on
the
PCB
of
the
AUX
A
Moduie
to-LO.
This
selector
switch
is
located
as
shown
in
Page
10.
7
Other manuals for Tascam Series
1
This manual suits for next models
1
Table of contents
Other Teac Music Mixer manuals
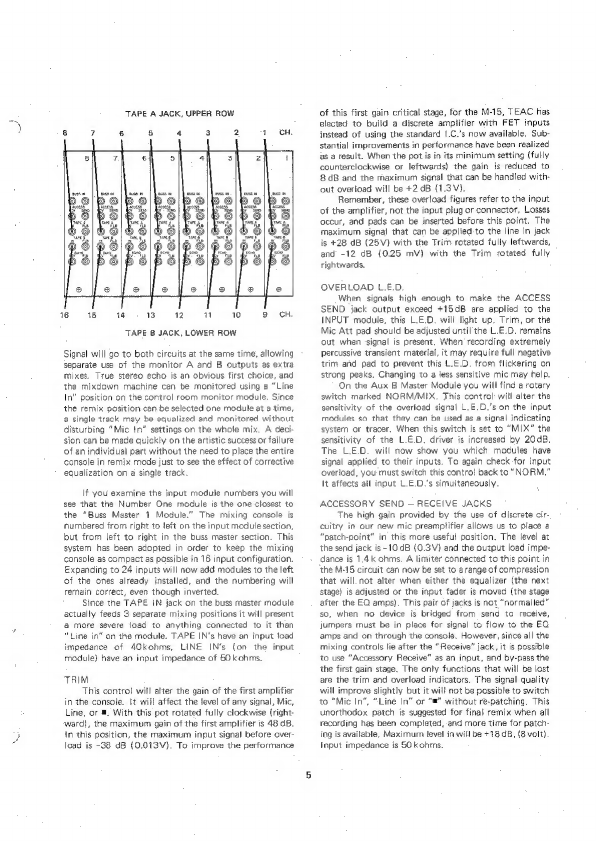