Team Kalorik TKG HC 18 User manual

Copies of the I/B. Please reproduce them without any
changes except under special instruction from Team
International BELGIUM. The pages must be reproduced and
folded in order to obtain a booklet A5 (+/- 148.5 mm width x
210 mm height). When folding, make sure you keep the good
numbering when you turn the pages of the I/B. Don’t change
the page numbering. Keep the language integrity.
Front cover page (first page)
Assembly page 1/44
Fax +32 2 359 95 50
Haarschneideset
Hair Clipper
Tondeuse
Tondeuse
Cortapelos
Máquina de Cortar Cabelo
Tagliacapelli
Strzyżarka
Masina de tuns
Strihací strojček na vlasy
TKG HC 18
230V~ 50Hz 10W
I/B Version
130510
Copies of the I/B. Please reproduce them without any
changes except under special instruction from Team
International BELGIUM. The pages must be reproduced and
folded in order to obtain a booklet A5 (+/- 148.5 mm width x
210 mm height). When folding, make sure you keep the good
numbering when you turn the pages of the I/B. Don’t change
the page numbering. Keep the language integrity.
2 TKG HC 18 - 130510
Assembly page 2/44
Fax +32 2 359 95 50
Fig. 1
Fig. 2
Fig. 3
Fig. 4
Fig. 5
Fig. 6
Fig. 7
Fig. 8
Fig. 9
Fig. 10
Fig. 12
Fig. 11

Copies of the I/B. Please reproduce them without any
changes except under special instruction from Team
International BELGIUM. The pages must be reproduced and
folded in order to obtain a booklet A5 (+/- 148.5 mm width x
210 mm height). When folding, make sure you keep the good
numbering when you turn the pages of the I/B. Don’t change
the page numbering. Keep the language integrity.
3 TKG HC 18 - 130510
Assembly page 3/44
Fax +32 2 359 95 50
WICHTIGE SICHERHEITSVORSCHRIFTEN
Lesen Sie aufmerksam die Gebrauchsanleitung, bevor Sie Ihr Gerät benutzen, und befolgen Sie
immer die Sicherheitsvorschriften und die Gebrauchsanweisung.
Wichtig: Personen (einschließlich Kinder), die aufgrund ihrer physischen, sensorischen oder
geistigen Fähigkeiten oder ihrer Unerfahrenheit oder Unkenntnis nicht in der Lage sind, das
Gerät sicher zu benutzen, sollten dieses Gerät nicht ohne Aufsicht oder Anweisung durch eine
verantwortliche Person benutzen. Kinder sollten beaufsichtigt werden, um sicherzustellen, dass
sie nicht mit dem Gerät spielen.
Kontrollieren Sie, ob die Netzspannung mit der auf dem Gerät vermerkten Spannung
übereinstimmt, bevor Sie das Gerät benutzen.
Lassen Sie Ihr Gerät niemals beim Gebrauch unbeaufsichtigt.
Überprüfen Sie regelmäßig den Zustand Ihres Gerätes und die Anschlussleitung. Bei
Beschädigung der Anschlussleitung oder des Gerätes letzteres nicht benutzen. Wenden
Sie sich an einen Fachmann P(*)P.
Benutzen Sie das Gerät nur zu Haushaltszwecken, wie in der Bedienungsanleitung
angegeben.
Tauchen Sie das Gerät niemals in Wasser oder andere Flüssigkeiten, weder zum Reinigen,
noch zu einem anderen Zweck.
Benutzen Sie das Gerät nicht in der Nähe einer Wärmequelle.
Entfernen Sie den Stecker aus der Steckdose, bevor Sie das Gerät reinigen.
Benutzen Sie das Gerät nicht im Freien und bewahren Sie es an einem trockenen Platz auf.
Benutzen Sie nur Zubehör, welches vom Lieferanten empfohlen wurde. Anderes Zubehör
stellt eine Gefahr für den Benutzer dar und das Gerät könnte dadurch beschädigt
werden.
Ziehen Sie niemals an der Anschlussleitung, um das Gerät zu bewegen. Zum Aufhängen
benutzen Sie die Aufhängeöse. Achten Sie darauf, dass die Anschlussleitung nicht
irgendwo hängen bleibt und dies zum Fall des Gerätes führen könnte. Wickeln Sie die
Anschlussleitung nicht um das Gerät oder knicken Sie sie nicht.
Benutzen Sie Ihr Gerät nicht in der Badewanne (mit den Füßen in Wasser), unter der
Dusche oder über einem gefüllten Waschbecken. Sollte Ihr Gerät trotzdem ins Wasser
fallen:
-ziehen Sie dann sofort den Stecker aus der Steckdose
-halten Sie nicht Ihre Hand ins Wasser
-lassen Sie Ihr Gerät von einem FachmannP(*) Pprüfen, bevor Sie es erneut benutzen.
Wenn Sie das Gerät im Badezimmer benutzen, so ziehen Sie bitte vorsichtshalber nach
jedem Gebrauch den Stecker.
Überprüfen Sie, ob Ihr Gerät nicht nass ist (Spritzwasser…) und benutzen Sie es nicht mit
nassen Händen.
Ziehen Sie den Stecker aus der Steckdose, wenn Ihr Gerät nicht benutzt wird oder falls Sie
es kurz hinlegen.
Stecken Sie keine Gegenstände oder Papier in das Gerät bzw. dort hinein, wo sich die
Klinge befindet.
Benutzen Sie das Gerät nicht, wenn eine der Klingen beschädigt ist. Wenden Sie sich an
einen FachmannP(*)P.
Benutzen Sie das Haarschneidegerät stets mit einem der dazugelieferten Kämme.
Benutzen Sie keinen beschädigten Kamm.
Benutzen Sie das Haarschneidegerät nicht zum Schneiden von nassem Haar. Es kann
feucht sein, aber Sie bekommen bessere Ergebnisse mit trockenem Haar.

Copies of the I/B. Please reproduce them without any
changes except under special instruction from Team
International BELGIUM. The pages must be reproduced and
folded in order to obtain a booklet A5 (+/- 148.5 mm width x
210 mm height). When folding, make sure you keep the good
numbering when you turn the pages of the I/B. Don’t change
the page numbering. Keep the language integrity.
4 TKG HC 18 - 130510
Assembly page 4/44
Fax +32 2 359 95 50
Dieses Gerät ist nicht zum dauerhaften Gebrauch geeignet. Es ist kein professionelles
Gerät. Daher sollten Sie regelmäßige Pausen einlegen. Siehe hierzu Abschnitt
„Betriebsdauer“ der Bedienungsanleitung.
P(*)PFachmann: anerkannter Kundendienst des Lieferanten oder des Importeurs, der für derartige
Reparaturen zuständig ist. Für eventuelle Reparaturen wenden Sie sich bitte an diesen
Kundendienst.
BETRIEBSDAUER
Dieses Gerät darf nicht professionell benutzt werden. Die gewünschten Pausen sollten
eingehalten werden. Bei Nichtbeachtung kann der Motor beschädigt werden. Richten Sie sich
bitte nach dem Typenschild, auf dem die maximale Betriebsdauer angegeben ist (KB xx min,
wobei xx die maximale Betriebsdauer ist). Die Pausen sollten mindestens 10 Minuten betragen.
VORBEREITUNG
Achten Sie darauf, dass das Haarschneidegerät in gutem Zustand, sauber und richtig
geölt ist. Achtung! Wenn die Klingen nicht korrekt geölt sind, wird Ihr Gerät nicht gut
funktionieren.
Legen Sie ein Handtuch um den Hals der Person, um zu vermeiden, dass Haare in den
Nacken fallen.
Die Person sollte so auf einem Stuhl sitzen, dass sich der Kopf in Brusthöhe der Person
befindet, die die Haare schneidet.
Kämmen Sie das Haar sorgfältig durch und halten Sie das Schneidegerät locker in Ihrer
Hand, damit Sie beim Schneiden stets genaue Kontrolle haben.
VERWENDUNG
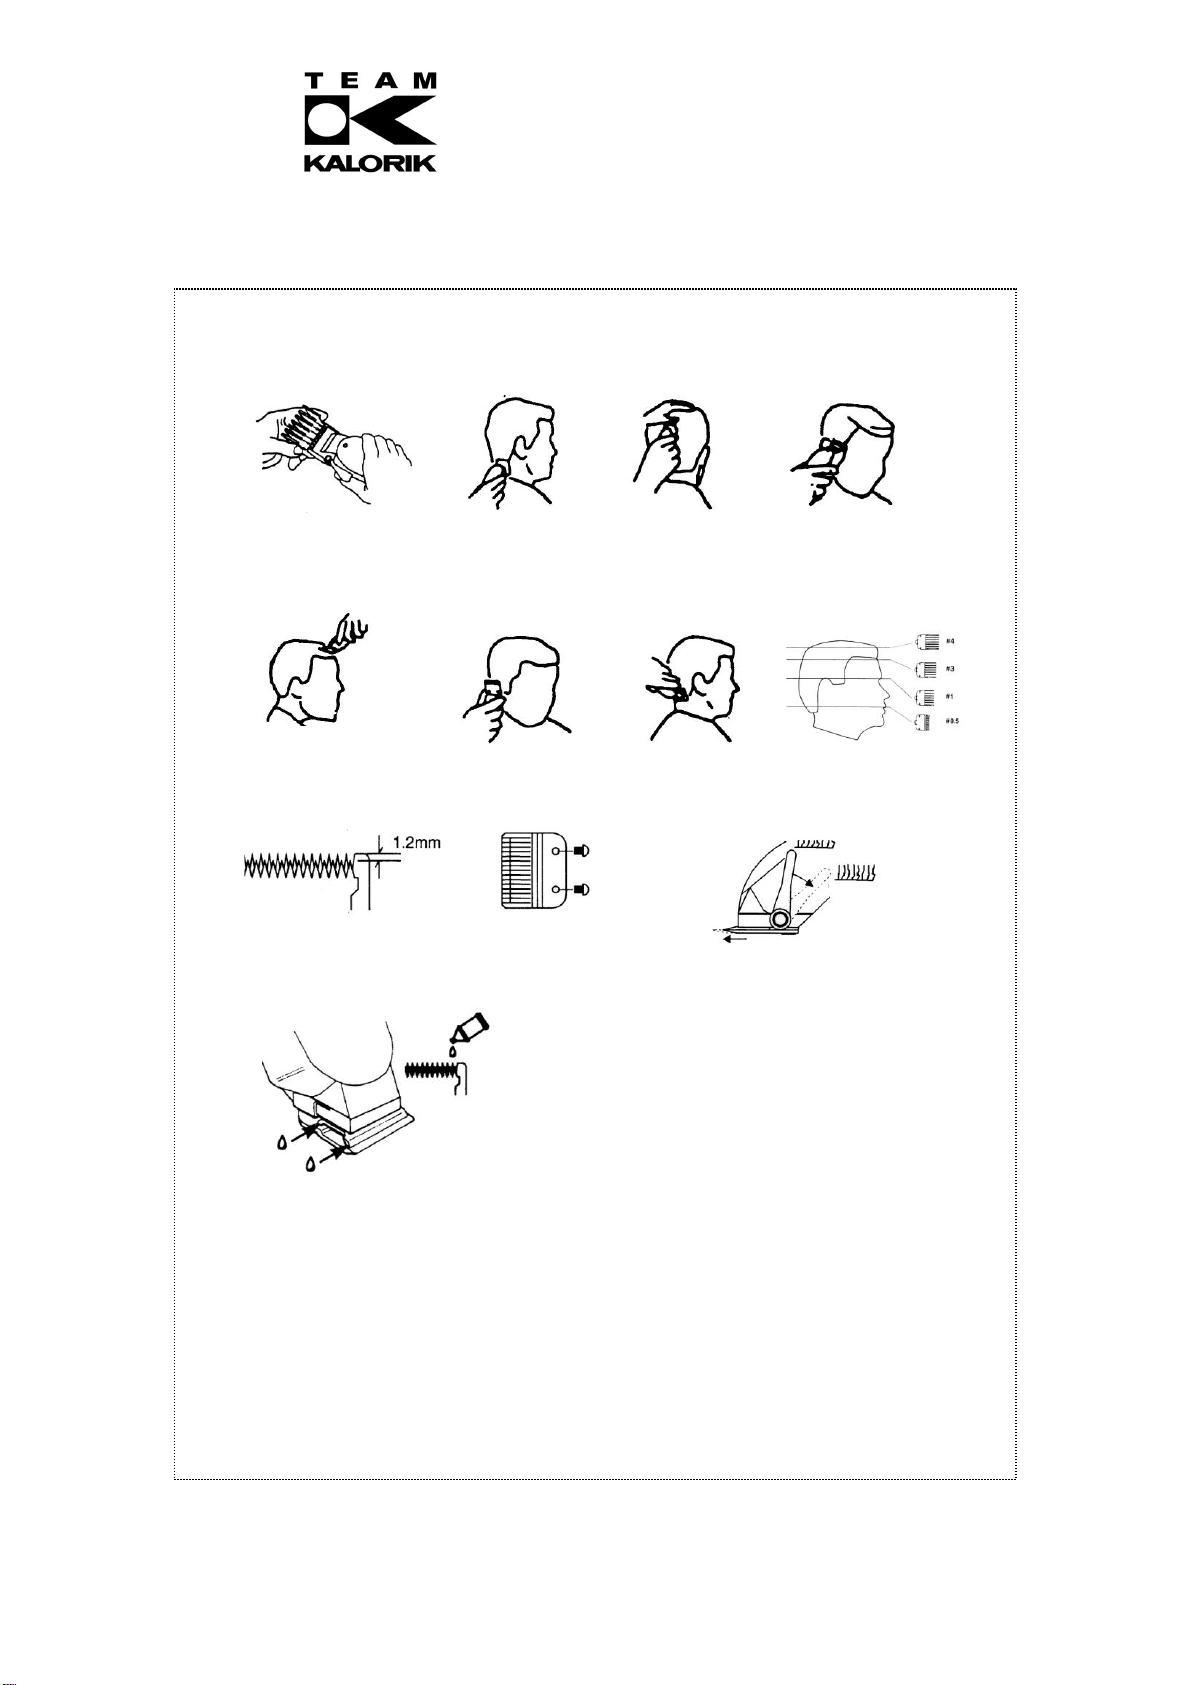
Den Kamm mit den Zacken nach oben fest in die Klingen hineindrücken (siehe Abbildung 1):
Zusatzkamm #0,5... für ca. 3 mm langes Haar
Zusatzkamm #1... für ca. 6 mm langes Haar
Zusatzkamm #3... für ca. 9 mm langes Haar
Zusatzkamm #4... für ca. 12 mm langes Haar
Schneiden Sie zunächst nur eine kleine Fläche, damit Sie sich an die Schnittlänge
gewöhnen. Wir empfehlen Ihnen außerdem, mit dem Zusatzkamm für langes Haar zu
beginnen. Danach kann bei Bedarf ein kürzerer Kamm verwendet werden.
Bei einem Einheitsschnitt das Schneidegerät niemals schnell durch die Haare führen. Das
Gerät funktioniert am besten bei seiner eigenen Geschwindigkeit. Das Haar zunächst so
kämmen, dass es natürlich fällt.
Wenn Sie den Kamm auf die Haarschneidemaschine eingestellt haben, schneiden Sie das
Haar, indem Sie die Zacken des Kammes gut gegen die Kopfhaut halten (2). Es wird
empfohlen mit kleinen Längen vorzugehen um das Stopfen-Phänomen zu vermeiden.
Dafür brauchen Sie nur den Kamm regelmäßig frei zu machen, indem Sie ihn leicht nach
außen beugen. Dann machen Sie dieselbe Bewegung, aber beginnen etwas niedriger als
vorher.
Schneiden Sie das Haar immer entgegengesetzt der natürlichen Haarrichtung. Für den
Hinterkopf, gehen Sie vom Nacken bis zum Oberteil des Kopfes (3), für die Seiten, von den
Ohren bis zum Oberteil des Kopfes (4) und für das Oberteil des Kopfes von der Stirn bis an
den Hinterkopf (5).

Copies of the I/B. Please reproduce them without any
changes except under special instruction from Team
International BELGIUM. The pages must be reproduced and
folded in order to obtain a booklet A5 (+/- 148.5 mm width x
210 mm height). When folding, make sure you keep the good
numbering when you turn the pages of the I/B. Don’t change
the page numbering. Keep the language integrity.
5 TKG HC 18 - 130510
Assembly page 5/44
Fax +32 2 359 95 50
Es wird empfohlen, das Haar regelmäßig zu frisieren. Wenn das Haar geschnitten und
frisiert ist, führen Sie die Haarschneidemaschine noch einmal schnell über das Haar, um
evtl. Strähnen zu schneiden, die aus Versehen nicht mitgeschnitten wurden.
NACHSCHNEIDEN
Zum Nachschneiden der Frisur brauchen Sie keinen Kamm. Stellen Sie den Hebel des
Gerätes (siehe nächsten Abschnitt) auf die Kurzhaarposition.
Kämmen Sie das Haar so, wie es liegen soll. Beginnen Sie mit dem Umriss des Ohrs, indem
Sie die Auflagefläche des Scherkopfes auf die Haut legen und dem Umriss des Ohres
folgen (6). Um die Koteletten und die Haare am Nacken zu schneiden, halten Sie die
Haarschneidemaschine verkehrt herum (mit der Haube gegen den Kopf), das Ende der
Klingen senkrecht zu der Haut und schneiden Sie in gewünschter Höhe (7). Wenn nötig,
bearbeiten Sie gründlich das widerborstige Haar.
Nachdem Sie ein bisschen Erfahrung gesammelt haben, können Sie mit Ihrer
Haarschneidemaschine Stufenschnitte machen, indem Sie die Höhe der Kämme einfach
ändern, je nach der Schneidezone. Aber für diese Handhabung sollten Sie genug Übung
haben, um gute Ergebnisse zu bekommen.
FLACH- UND BÜRSTENSCHNITTE
Verwenden Sie zunächst den längsten Zusatzkamm und schneiden Sie jeweils vom
Nackenende bis zum Wirbel. Halten Sie das Gerät flach gegen den Kopf und gehen Sie
langsam durch das Haar. Verwenden Sie dieselbe Technik an den Seiten, indem Sie von
unten nach oben schneiden.
Schneiden Sie das vordere Haar bis zum Wirbel gegen die Wuchsrichtung. Passen Sie dann
die Seiten an.
Für einen flachen Haarschnitt benutzen Sie einen Kurzhaarschnitt-Zusatzkamm, um das
Haar zum Nacken hin spitz zuzuschneiden. Kämmen Sie das Haar und achten Sie auf
unebene Stellen.
Die vier illustrierten Grundflächen sind Ihre “Landkarte” für einfache Do-It-Yourself-
Haarschnitte (8).
VERSTELLHEBEL
Dieser Hebel hat zwei Hauptfunktionen:
Die Schnitthöhe zu regeln. In der Position “kurzer Schnitt” (Hebel nach vorn), ermöglicht er
das Schneiden mit Kämmen oder das Schneiden von Konturen. Mit dem Hebel nach
hinten können Sie die Schnittlänge erhöhen.
Die Klingen teilweise beim Schneiden zu reinigen, indem Sie Hin- und Herbewegungen
machen, um einige Haare, die zwischen den Klingen hängen blieben, zu entfernen.
INSTANDHALTUNG
Das Schneidegerät wurde vor dem Versand sorgfältig untersucht, um sicherzustellen, dass
die Klingen gut ausgerichtet wurden.
Nach dem Reinigen oder Austauschen müssen die Klingen wieder neu ausgerichtet
werden. Damit der Verstellhebel nach vorn in der Position “kurzer Schnitt” eingestellt ist,
sollten die Spitzen der oberen Klingenzacken ca. 1,2 mm von der unteren Klinge entfernt
sein. Vergleichen Sie die Position der Klingen Ihres Gerätes bitte mit der Zeichnung (9).
Falls die Klingen nicht genau ausgerichtet sind, sollten Sie einige Tropfen Öl daraufgeben
und das Gerät ein paar Sekunden lang laufen lassen, dann ausschalten und den Stecker
herausziehen. Die Schrauben etwas lösen und die obere Klinge drehen, bis die Klingen

Copies of the I/B. Please reproduce them without any
changes except under special instruction from Team
International BELGIUM. The pages must be reproduced and
folded in order to obtain a booklet A5 (+/- 148.5 mm width x
210 mm height). When folding, make sure you keep the good
numbering when you turn the pages of the I/B. Don’t change
the page numbering. Keep the language integrity.
6 TKG HC 18 - 130510
Assembly page 6/44
Fax +32 2 359 95 50
genau ausgerichtet sind. Die Schrauben nach dem Ausrichten der Klingen wieder
festziehen (10).
Tauschen Sie die Klingen sobald Sie merken, dass sie stumpf geworden sind.
Um die Klingen zu reinigen, benutzen Sie die kleine Bürste, die mit Ihrem Gerät geliefert
wird, und wenn nötig, nehmen Sie sie vollständig auseinander.
ÖL
Die Klingen sollten regelmäßig geölt werden, damit das Gerät stets in einem guten Zustand ist
(12). Verwenden Sie kein Haaröl, Fett oder Öl, das mit Kerosin oder anderen Lösungsmitteln
gemischt wurde. Die Lösungsmittel verdunsten und es bleibt lediglich dickes Öl zurück,
wodurch die Bewegungen der Klingen langsamer werden können.
ZUBEHÖR
Ihr Gerät wird mit einem kompletten Satz Frisierzubehörteilen geliefert. Damit können Sie die
gewünschte Frisur machen: Eine Schere, ein Kamm und 4 auswechselbare Zusatzkämme, die
Sie auf Ihr Gerät montieren können. In diesem Satz gibt es auch zwei weitere Zubehörteile,
damit können Sie Ihr Gerät reinigen: ein Ölfläschchen für das Schmieren der Klingen und ein
Bürstchen, um das Haar, das zwischen den Klingen steckengeblieben ist, zu entfernen.
UMWELTSCHUTZ –RICHTLINIE 2002/96/EG
Zum Schutz unserer Umwelt und unserer Gesundheit sind Elektro- und Elektronik-Altgeräte nach
bestimmten Regeln zu entsorgen. Dies fordert den Einsatz sowohl des Herstellers bzw.
Lieferanten als auch des Verbrauchers.
Aus diesem Grund darf dieses Gerät, wie das Symbol auf dem Typenschild bzw. auf der
Verpackung zeigt, nicht in den unsortierten Restmüll gegeben werden. Der Verbraucher hat
das Recht, dieses Gerät über kommunale Sammelstellen zu entsorgen; von dort aus wird die
spezifische Behandlung, Verwertung bzw. das Recycling gem. den Erfordernissen der Richtlinie
sichergestellt.

Copies of the I/B. Please reproduce them without any
changes except under special instruction from Team
International BELGIUM. The pages must be reproduced and
folded in order to obtain a booklet A5 (+/- 148.5 mm width x
210 mm height). When folding, make sure you keep the good
numbering when you turn the pages of the I/B. Don’t change
the page numbering. Keep the language integrity.
7 TKG HC 18 - 130510
Assembly page 7/44
Fax +32 2 359 95 50
IMPORTANT SAFEGUARDS
Please read these instructions carefully before using the appliance, and always follow the
safety and operating instructions.
Important: People (including children) who are not able to use the appliance in a safe way,
due to their physical, sensorial or mental capacity or their lack of experience or knowledge,
must never use the appliance except if they are supervised by a person responsible for their
safety or if they previously received instructions concerning the safe use of the appliance.
Close supervision is necessary to prevent children from using the appliance as a toy.
Check that your mains voltage corresponds to that stated on the appliance.
Never leave the appliance unsupervised when in use.
From time to time check the appliance for damages. Never use the appliance if it shows
any signs of damage. All repairs should be made by a competent qualified electricianP(*)P.
Should the cord be damaged, it must be replaced by a competent qualified
electricianP(*)P.
Only use the appliance for domestic purposes and in the way indicated in these
instructions.
Never immerse the appliance in water or any other liquid for any reason whatsoever.
Never use the appliance near hot surfaces.
Before cleaning, always unplug the appliance from the power supply.
Never use the appliance outside and always place it in a dry environment.
Never use accessories that are not recommended by the producer. They could constitute
a danger to the user and risk to damage the appliance.
Never move the appliance by pulling the cord and never hang it by the cord, use its
hanging loop. Make sure the cord cannot get caught in any way. Do not wind the cord
around the appliance and do not bend it.
Never use the appliance in bath, shower with feet in water or above a sink filled with
water! However, should the appliance happen to fall into the water:
-immediately unplug it
-do not put your hands into the water
-make sure your appliance is verified by a competent qualified electrician P(*)P
before using it again.
When using the appliance in the bathroom, always unplug it when not in use as the
proximity of water could constitute a danger even when the appliance is switched off.
Always make sure your appliance is not wet (water splashes…) and never handle it with
wet hands.
Unplug the appliance when not in use or even if you put it down only for a moment.
Do not insert any object or piece of paper near the blade.
Do not use the appliance if one of the blades shows any kind of defect, make sure it is
verified by a qualified competent electrician P(*)P.
Always use the clippers with one of the (supplied) combs. Never use a comb which misses
a tooth or which is damaged in any way.
Do not use the clippers on wet hair. It can be lightly wet but you will get better results if you
work on dry hair.
This kind of appliance cannot function continuously; it is not a professional type of
appliance. It is necessary to make temporary stops. Check the section "Important
information" in the instruction manual.
P(*)PCompetent qualified electrician: after-sales department of the producer or importer or any
person who is qualified, approved and competent to perform this kind of repairs in order to
avoid all danger. In case of need you should return the appliance to this electrician.

Copies of the I/B. Please reproduce them without any
changes except under special instruction from Team
International BELGIUM. The pages must be reproduced and
folded in order to obtain a booklet A5 (+/- 148.5 mm width x
210 mm height). When folding, make sure you keep the good
numbering when you turn the pages of the I/B. Don’t change
the page numbering. Keep the language integrity.
8 TKG HC 18 - 130510
Assembly page 8/44
Fax +32 2 359 95 50
IMPORTANT INFORMATION
This appliance is not intended for professional use. You should follow the requested breaks.
Failure to follow this instruction carefully may result in damage to the appliance. Please refer to
the rating label for the maximum continuous usage time (KB xx min where xx is the maximum
usage time). The breaks should last at least 10 minutes.
BEFORE YOU START
Make sure that your clipper is clean, properly oiled and in perfect working condition.
Attention: if the blades are not properly oiled, your appliance will not work correctly.
Place a towel around the neck of the person whose hair is to be cut to prevent hair from
falling inside the collar.
Have the person sit on a chair so that his/her head is at your eye’s level.
Comb the hair thoroughly and hold the clipper in a relaxed, comfortable grip. This will help
you maintain an accurate cutting control.
CUTTING HAIR WITH THE ATTACHMENT COMBS
To attach the comb, hold it with teeth up and snap the comb attachment firmly to the bottom
of the clipper blade (see picture 1):
Attachment comb #0.5...leaves hair approx. 1/8" in length
Attachment comb #1...leaves hair approx. 1/4" in length
Attachment comb #3...leaves hair approx. 3/8" in length
Attachment comb #4...leaves hair approx. 1/2" in length
In order to become accustomed to the length of each attachment comb we
recommend for the first use to place the attachment comb #4 and then to reduce the
length steadily until you obtain the desired length. Afterwards, you can place directly the
comb you want.
For uniform cutting, never push or force the clipper through the hair at a fast pace. The
clipper works most efficiently when it works at its own speed.
Once you placed the attachment comb on the hair clipper, cut the hair by placing the
comb teeth flat against the scalp (2). We recommend proceeding by small lengths in
order to avoid stuffing. Therefore you only have to remove the comb regularly by bending
it lightly outward. Then make the same movement but start lower than the point you
remove the clipper in order to obtain a homogeneous length.
The cutting always happens by moving towards in the opposite side of the natural
direction of the hair. For the backside, start from the nape of the neck and go to the top
of the head (3), for the sides, from the ears to the top of the head (4) and for the top of
the head, from the forehead to the backside of the head (5).
We recommend doing the hair regularly in order to check the homogeneity of the cutting
and to replace the hair. For the same reason, once the hair is cut and done, work the hair
clipper again but quicker in order to cut the hair that would have escaped from the first
cutting. You can eventually insist on the places with defaults.
OUTLINING
Outlining requires no attachment combs. Take the clipper and push the lever (see next
paragraph) up to the close-cut position.
Comb hair into the required style. Start from the outline of the ear by placing the side of
the hair clipper on the skin and following the roundness of the ear (6). To draw the
sideburns and the nape of the neck, place the hair clipper in the wrong side (with the

Copies of the I/B. Please reproduce them without any
changes except under special instruction from Team
International BELGIUM. The pages must be reproduced and
folded in order to obtain a booklet A5 (+/- 148.5 mm width x
210 mm height). When folding, make sure you keep the good
numbering when you turn the pages of the I/B. Don’t change
the page numbering. Keep the language integrity.
9 TKG HC 18 - 130510
Assembly page 9/44
Fax +32 2 359 95 50
cover facing the head), the top of the blades perpendicular to the skin and cut to the
desired length (7). If necessary, insist on the reluctant hair.
When you get used to your hair clipper, you will be able to make layers simply by
changing the length of the combs in function of the cutting zone. These handling asks for
a special dexterity in order to obtain a correct result.
SHORT CUTS
Always cut from the back of the neck to the crown, using the longest attachment comb.
Holding it flat against the head, slowly move the clipper up through the hair. Use the same
technique for the sides.
For the front of the crown, cut the hair against the direction in which it grows. Then even it
up with the sides.
For a flat top, use a flat comb, not the attachment comb. Just cut hair on top of the head
over it. To taper hair down to the neckline, use closer cutting attachment combs. Comb
hair, check for uneven spots and outline sideburns and neckline.
The four basic areas illustrated are your "road map" to easy do-it-yourself hair cutting (8).
LEVER
This lever has two main functions:
Regulation of the cutting length because in the position short hair (lever pushed to the
front side) you can cut the length of the used combs or make outlining by pulling it to the
backside, you can make the cutting length longer (this allows middle cutting lengths
above the 4 delivered combs).
Partial cleaning of the blades when in use by to and fro motions in order to remove the
hair blocked in the blades.
MAINTENANCE
Your clipper was carefully examined before leaving our factory to ensure that the blades
were oiled and aligned.
Blades must be realigned if they have been removed for cleaning or replacement.
Therefore, as the lever is pushed to the front side in short hair position, the end of the top
blade teeth is approximately 1.2 mm away from the bottom blade. Compare your clipper
blades with the sketch (9).
If the blade alignment is incorrect, add a few drops of oil to the blades, turn the clipper on
for a few moments, turn off and unplug. Loosen screws slightly and turn the upper blade
until a correct alignment. Then tighten screws once the blades are aligned (10).
Change the blades as soon as they become blunt.
To clean the blades, use the small brush delivered with your appliance and if necessary
remove them completely.
OIL
To maintain your clipper in peak condition, the blades should be oiled every few haircuts (12).
Do not use hair oil, grease or oil mixed with kerosene or any solvent, as the solvent will
evaporate and leave the thick oil which may slow down the blades' motion.
ACCESSORIES
Your appliance is delivered with a complete set of hair accessories, which allows you to make
the desired hair cuttings: 1pair of scissors, 1 comb and 4 interchangeable combs to place on

Copies of the I/B. Please reproduce them without any
changes except under special instruction from Team
International BELGIUM. The pages must be reproduced and
folded in order to obtain a booklet A5 (+/- 148.5 mm width x
210 mm height). When folding, make sure you keep the good
numbering when you turn the pages of the I/B. Don’t change
the page numbering. Keep the language integrity.
10 TKG HC 18 - 130510
Assembly page 10/44
Fax +32 2 359 95 50
your appliance. In this set there are also two other accessories in order to clean the appliance:
an oil burette for the blades’lubrication and a small brush to remove the hair on the blades.
PROTECTION OF THE ENVIRONMENT –DIRECTIVE 2002/96/EC
In order to preserve our environment and protect human health, the waste electrical and
electronic equipment should be disposed of in accordance with specific rules with the
implication of both suppliers and users. For this reason, as indicated by the symbol on the
rating label or on the packaging, your appliance should not be disposed of as unsorted
municipal waste. The user has the right to bring it to a municipal collection point performing
waste recovery by means of reuse, recycling or use for other applications in accordance with
the directive.

Copies of the I/B. Please reproduce them without any
changes except under special instruction from Team
International BELGIUM. The pages must be reproduced and
folded in order to obtain a booklet A5 (+/- 148.5 mm width x
210 mm height). When folding, make sure you keep the good
numbering when you turn the pages of the I/B. Don’t change
the page numbering. Keep the language integrity.
11 TKG HC 18 - 130510
Assembly page 11/44
Fax +32 2 359 95 50
POUR VOTRE SECURITE
Lisez attentivement cette notice avant toute utilisation, et respectez bien à la fois les consignes
de sécurité et d'usage.
Important: Votre appareil n’est pas prévu pour être utilisé par des personnes (y compris les
enfants) dont les capacités physiques, sensorielles ou mentales sont réduites, ou des personnes
dénuées d’expérience ou de connaissance, sauf si elles ont pu bénéficier, par l’intermédiaire
d’une personne responsable de leur sécurité, d’une surveillance ou d’instructions préalables
concernant son utilisation en toute sécurité.
Il convient de surveiller les enfants pour s’assurer qu’ils ne jouent pas avec l’appareil.
Avant d'utiliser l'appareil, vérifiez que la tension du réseau correspond bien à celle de
l'appareil.
Ne laissez jamais votre appareil sans surveillance lorsque celui-ci est en fonctionnement ou
sous tension.
Vérifiez régulièrement l’état de votre appareil et s’il est endommagé de quelque façon
que ce soit, faites le vérifier et réparer par un service qualifié compétentP(*)P. Si le câble est
endommagé, il doit être obligatoirement remplacé par un service qualifié compétentP(*)P.
Utilisez l'appareil uniquement pour des usages domestiques et de la manière indiquée dans
la notice.
Ne plongez jamais l'appareil dans l'eau ou dans tout autre liquide ni pour son nettoyage ni
pour toute autre raison.
N'utilisez pas l'appareil près de sources de chaleur.
L’appareil doit obligatoirement être débranché avant de le nettoyer.
Veillez à ne pas utiliser l'appareil à l'extérieur et entreposez-le dans un endroit sec.
Ne pas utiliser des accessoires non recommandés par le fabricant, cela peut présenter un
danger pour l’utilisateur et risque d’endommager l’appareil.
Ne déplacez jamais l’appareil en tirant sur le câble, ne le suspendez pas par son câble
mais faites usage de son anneau de suspension. Veillez à ce que le cordon d’alimentation
ne puisse être accidentellement accroché et ce, afin d’éviter toute chute de l’appareil.
Évitez d’enrouler le cordon autour de l’appareil et ne le tordez pas.
N’utilisez jamais votre appareil en ayant les pieds dans l’eau (dans un bain ou sous la
douche) ou au-dessus d’un évier rempli d’eau! Si toutefois votre appareil tombe dans
l’eau:
-retirez immédiatement la fiche de la prise de courant.
-ne mettez surtout pas votre main dans l’eau.
-faites vérifier votre appareil par un service qualifié compétent P(*) Pavant de
l’employer à nouveau.
Lorsque l’appareil est utilisé dans la salle de bain, débranchez-le après usage car la proximité
de l'eau peut présenter un danger même lorsque l’appareil est arrêté.
Assurez-vous toujours que votre appareil n’est pas mouillé (éclaboussures d’eau, …) et ne
l’utilisez pas si vos mains sont mouillées.
Débranchez toujours votre appareil lorsqu’il n’est pas en utilisation même si vous le posez
pour peu de temps.
N’insérez aucun objet, feuille de papier au niveau de la lame.
N’utilisez pas l’appareil si une des lames présente un défaut, faites-le alors vérifier par un
service qualifié compétent P(*)P.
Toujours utiliser la tondeuse avec un des peignes (fournis). N’utilisez pas un peigne auquel
il manquerait une dent ou qui serait endommagé.
N’utilisez pas la tondeuse sur des cheveux mouillés. Ils peuvent être légèrement humides
mais vous obtiendrez un meilleur résultat en travaillant sur des cheveux secs.

Copies of the I/B. Please reproduce them without any
changes except under special instruction from Team
International BELGIUM. The pages must be reproduced and
folded in order to obtain a booklet A5 (+/- 148.5 mm width x
210 mm height). When folding, make sure you keep the good
numbering when you turn the pages of the I/B. Don’t change
the page numbering. Keep the language integrity.
12 TKG HC 18 - 130510
Assembly page 12/44
Fax +32 2 359 95 50
Ce genre d’appareil ne peut fonctionner de façon continue, il ne s’agit pas d’un appareil
de type professionnel. Il est nécessaire d’effectuer des pauses à intervalles réguliers.
Consultez la rubrique "Intervalles d’utilisation" du mode d’emploi.
P(*)PService qualifié compétent: service après-vente du fabricant ou de l'importateur ou une
personne qualifiée, reconnue et habilitée à faire ce genre de réparation afin d'éviter tout
danger. Dans tous les cas, veuillez retourner l'appareil auprès de ce service.
INTERVALLES D’UTILISATION
Cet appareil ne peut être utilisé de façon professionnelle. Vous devez respecter les pauses de
fonctionnement. Dans le cas contraire vous risqueriez de l’endommager. Référez-vous à la
plaque signalétique de votre appareil pour connaître la durée maximale d’utilisation continue
(notée KB xx min. où xx est la durée maximale). Les pauses de fonctionnement doivent durer
au moins 10 minutes.
AVANT DE COMMENCER
Assurez-vous que votre appareil est propre, huilé et en parfait état de marche. Attention si
les lames ne sont pas correctement huilées, votre appareil ne fonctionnera pas
correctement.
Placez une serviette autour du cou de la personne à qui vous devez couper les cheveux
pour éviter que des cheveux ne tombent dans son cou.
Faites s'asseoir la personne afin que sa tête soit au niveau de vos yeux.
Démêlez les cheveux et prenez l’appareil d’une main souple et détendue afin de mieux
contrôler la coupe.
UTILISATION
Pour réaliser l’assemblage des peignes, maintenez-les par leurs dents, insérez-les sur les lames
et finalement, pressez l’arrière jusqu’à ce que la languette vienne en butée (voir illustration 1):
Peigne #0.5... laisse 3 mm de longueur de cheveux
Peigne #1... laisse 6 mm de longueur de cheveux
Peigne #3... laisse 9 mm de longueur de cheveux
Peigne #4... laisse 12 mm de longueur de cheveux
Nous vous conseillons lors de la première utilisation et ceci afin de vous habituer aux
différentes hauteurs de coupe, de placer le peigne #4 puis de diminuer la hauteur
régulièrement jusqu’à obtenir la hauteur désirée. Par la suite, vous pourrez monter
directement le peigne correspondant à votre choix.
Pour obtenir une coupe uniforme, ne passez pas trop rapidement la tondeuse dans les
cheveux. Commencez par peigner les cheveux de façon à ce qu’ils prennent leur forme
naturelle.
Une fois le peigne positionné sur la tondeuse, coupez les cheveux en appliquant le peigne
avec les dents bien à plat contre le cuir chevelu (2). Il est conseillé de procéder par
petites longueurs afin d’éviter le phénomène de bourrage. Pour cela, il suffit de dégager
régulièrement le peigne en l’inclinant légèrement vers l’extérieur. Puis réalisez le même
mouvement mais en repartant plus bas que l’endroit où vous aviez dégagé la tondeuse
afin d’avoir une hauteur bien homogène.
La coupe se réalise toujours en avançant dans le sens opposé par rapport à l’orientation
naturelle des cheveux. Pour l’arrière, partez de la nuque en remontant vers le haut du
crâne (3), pour les côtés, des oreilles vers le haut du crâne (4) et pour le dessus de la tête
en partant du front vers l’arrière du crâne (5).

Copies of the I/B. Please reproduce them without any
changes except under special instruction from Team
International BELGIUM. The pages must be reproduced and
folded in order to obtain a booklet A5 (+/- 148.5 mm width x
210 mm height). When folding, make sure you keep the good
numbering when you turn the pages of the I/B. Don’t change
the page numbering. Keep the language integrity.
13 TKG HC 18 - 130510
Assembly page 13/44
Fax +32 2 359 95 50
Il est conseillé de coiffer régulièrement les cheveux afin de vérifier l’homogénéité de la
coupe et de replacer les cheveux. Pour la même raison, une fois les cheveux coupés et
coiffés, repassez la tondeuse de façon plus rapide afin de couper les cheveux qui
auraient échappé au premier passage. Eventuellement, insistez aux endroits qui
présentent des défauts.
DESSIN DES CONTOURS
Pour les contours, vous n’avez pas besoin d’utiliser de peigne. Poussez la manette de
réglage (voir paragraphe suivant) dans la position cheveux courts.
Peignez vos cheveux dans la forme désirée. Commencez par le contour de l’oreille en
plaçant le côté de la tondeuse sur la peau et en suivant l’arrondi de l’oreille (6). Pour
dessiner les favoris et la nuque, placez la tondeuse à l’envers (le capot orienté vers la
tête), le bout des lames perpendiculaires à la peau et coupez à la longueur désirée (7). Si
nécessaire, insistez au niveau des cheveux réticents.
Après avoir acquis une certaine expérience, votre tondeuse vous permettra de réaliser
des dégradés en changeant simplement la hauteur des peignes en fonction de la zone
de coupe mais la manipulation demande une certaine dextérité afin d’obtenir un résultat
correct.
CHEVEUX EN BROSSE ET CHEVEUX COURTS
Commencez par couper avec le plus long peigne en allant de la nuque vers le sommet
de la tête. Tenez le peigne à plat contre la tête et avancez doucement. Ensuite coupez
les côtés de la même manière.
Coupez maintenant les cheveux du front vers le sommet du crâne et égalisez avec les
côtés.
Pour les cheveux courts, n’utilisez pas un peigne ajustable.
Utilisez un des peignes détachables plus petits pour effiler la nuque. Peignez les cheveux
et vérifiez qu’il n’y a pas d’irrégularités dans la coiffure.
Les quatre régions de base illustrées vous aideront à couper correctement vos cheveux (8).
MANETTE DE REGLAGE
Cette manette a deux fonctions principales:
Ajuster la hauteur de coupe car dans sa position cheveux courts (manette poussée vers
l’avant) elle permet une coupe de la hauteur des peignes utilisés ou de réaliser les
pourtours mais en la tirant vers l’arrière, elle permet d’augmenter la hauteur de coupe
(ceci permet des hauteurs de coupes intermédiaires, en plus des 4 peignes fournis).
Nettoyer partiellement les lames en usage en effectuant des mouvements de va-et-vient
afin de se débarrasser des cheveux bloqués entre les lames.
ENTRETIEN
L’alignement et la lubrification des lames ont été vérifiés en usine.
Les lames doivent être réalignées après chaque nettoyage ou remplacement. Pour cela,
la manette de réglage étant poussée vers l’avant en position cheveux courts, l’espace
entre l’extrémité des dents de la lame supérieure et celle de la lame inférieure doit être
de 1,2 mm environ sur toute sa longueur. Comparez la position des lames de votre
tondeuse avec celle du dessin (9).
Si l’alignement est incorrect, mettez quelques gouttes d’huile sur les lames et faites
fonctionner la tondeuse un instant. Éteignez et débranchez la fiche de la prise de courant.
Desserrez les vis puis faites pivoter la lame supérieure jusqu’à ce que l’alignement soit
correct. Resserrez ensuite les vis (10).

Copies of the I/B. Please reproduce them without any
changes except under special instruction from Team
International BELGIUM. The pages must be reproduced and
folded in order to obtain a booklet A5 (+/- 148.5 mm width x
210 mm height). When folding, make sure you keep the good
numbering when you turn the pages of the I/B. Don’t change
the page numbering. Keep the language integrity.
14 TKG HC 18 - 130510
Assembly page 14/44
Fax +32 2 359 95 50
Changez les lames quand elles sont émoussées et ne coupent plus.
Pour nettoyer les lames, faites usage de la petite brosse livrée avec votre appareil et si
nécessaire, démontez-les complètement.
LUBRIFICATION
Les lames doivent être huilées régulièrement pour garder l’appareil en bon état de
fonctionnement (12). N’utilisez pas de l’huile pour cheveux, de la graisse ou de l’huile
contenant du kérosène ou du dissolvant. Les dissolvants s’évaporent et l’huile restante ralentira
les lames.
ACCESSOIRES
Votre appareil est livré avec un set complet d’accessoires de coiffure qui vous permettra de
réaliser les coupes de cheveux que vous désirez: 1 paire de ciseaux, un peigne à cheveux et
quatre peignes interchangeables à monter sur votre appareil. Deux autres accessoires font
aussi partie de ce set mais ils vous permettent d’entretenir votre appareil: une burette d’huile
pour la lubrification des lames et une petite brosse pour éliminer les cheveux accrochés aux
lames.
PROTECTION DE L’ENVIRONNEMENT – DIRECTIVE 2002/96/CE
Afin de préserver notre environnement et notre santé, l’élimination en fin de vie des appareils
électriques et électroniques doit se faire selon des règles bien précises et nécessite
l’implication de chacun, qu’il soit fournisseur ou utilisateur. C’est pour cette raison que votre
appareil, tel que le signale le symbole apposé sur sa plaque signalétique ou sur
l'emballage, ne doit en aucun cas être jeté dans une poubelle publique ou privée destinée
aux ordures ménagères. L'utilisateur a le droit de déposer l'appareil dans des lieux publics de
collecte procédant à un tri sélectif des déchets pour être soit recyclé, soit réutilisé pour
d’autres applications conformément à la directive.
Copies of the I/B. Please reproduce them without any
changes except under special instruction from Team
International BELGIUM. The pages must be reproduced and
folded in order to obtain a booklet A5 (+/- 148.5 mm width x
210 mm height). When folding, make sure you keep the good
numbering when you turn the pages of the I/B. Don’t change
the page numbering. Keep the language integrity.
15 TKG HC 18 - 130510
Assembly page 15/44
Fax +32 2 359 95 50
BELANGRIJKE VEILIGHEIDSVOORSCHRIFTEN
Lees de gebruiksaanwijzing aandachtig alvorens u uw toestel gebruikt, en respecteer altijd de
veiligheids- en de gebruiksvoorschriften.
Belangrijk: Personen (kinderen inbegrepen) die wegens hun fysieke, sensoriële of mentale
capaciteiten, of wegens hun gebrek aan ervaring of kennis, het toestel niet veilig kunnen
gebruiken, mogen dit toestel niet zonder toezicht of instructies van een verantwoordelijke
persoon gebruiken. Houd kinderen goed in het oog om te vermijden dat ze met het toestel
spelen.
Controleer of de netspanning overeenkomt met deze van het toestel vooraleer u het
gebruikt.
Laat uw toestel tijdens het gebruik nooit zonder toezicht.
Controleer regelmatig of het snoer niet beschadigd is. Gebruik het toestel niet indien het
snoer of het toestel zelf enige beschadiging zouden vertonen. Herstellingen dienen te
gebeuren door een bekwame gekwalificeerde dienstP(*)P. Een beschadigd snoer dient te
worden vervangen door een bekwame gekwalificeerde dienstP(*)P.
Gebruik het toestel enkel voor huishoudelijk gebruik en op de wijze zoals vermeld in de
gebruiksaanwijzing.
Dompel het toestel nooit onder in water of in enige andere vloeistof, noch om het te
reinigen, noch om welke andere reden ook.
Gebruik het toestel niet in de nabijheid van warmtebronnen.
Trek de stekker uit het stopcontact vooraleer u het toestel reinigt.
Gebruik het toestel niet buiten en berg het op in een droge ruimte.
Gebruik geen accessoires die niet door de fabrikant werden aanbevolen. Dit kan
gevaarlijk zijn voor de gebruiker en het toestel beschadigen.
Trek nooit aan het snoer om het toestel te verplaatsen. Hang het toestel niet op aan het
snoer, maar gebruik het ophangoogje. Zorg ervoor dat het elektriciteitssnoer nergens kan
achterhaken en daardoor de val van het toestel veroorzaken. Draai het snoer niet rond
het toestel en plooi het niet.
Gebruik uw toestel nooit in een bad, onder een douche met uw voeten in water of boven
een wastafel die met water gevuld is. Als uw toestel desondanks toch in het water zou
vallen:
-trek dan onmiddellijk de stekker uit het stopcontact
-steek vooral uw hand niet in het water
-laat uw toestel door een bekwame gekwalificeerde dienstP(*)Pnakijken alvorens
het opnieuw te gebruiken.
Wanneer u uw toestel gebruikt in de badkamer, gelieve na gebruik steeds de stekker uit
het stopcontact te trekken, want de aanwezige vochtigheid is gevaarlijk.
Controleer steeds of uw toestel niet nat is (waterspatten…) en gebruik het niet met natte
handen.
Trek de stekker uit het stopcontact als het toestel niet in gebruik is of als u het, zelfs voor
korte tijd, neerlegt.
Steek geen voorwerpen of papier in het toestel waar het mes zich bevindt.
Gebruik het toestel niet als één van de messen een beschadiging zou vertonen. Laat het
door een bekwame gekwalificeerde dienst nakijkenP(*)P.
Gebruik de tondeuse steeds met één van de bijgeleverde kammen. Gebruik geen kam
waarvan tanden zijn afgebroken of die beschadigd is.
Gebruik de tondeuse niet voor het knippen van natte haren. Het haar mag licht vochtig
zijn, maar u zal een beter resultaat behalen als u de tondeuse op droge haren gebruikt.

Copies of the I/B. Please reproduce them without any
changes except under special instruction from Team
International BELGIUM. The pages must be reproduced and
folded in order to obtain a booklet A5 (+/- 148.5 mm width x
210 mm height). When folding, make sure you keep the good
numbering when you turn the pages of the I/B. Don’t change
the page numbering. Keep the language integrity.
16 TKG HC 18 - 130510
Assembly page 16/44
Fax +32 2 359 95 50
Dit soort toestel kan niet constant functioneren. Het is immers geen professioneel toestel.
Men dient regelmatig pauzes in te lassen. Raadpleeg het hoofdstuk "Gebruiksinterval" van
de gebruiksaanwijzing.
P(*)PBekwame gekwalificeerde dienst: klantendienst van de fabrikant of de invoerder, die
erkend en bevoegd is om dergelijke herstellingen te doen zodat elk gevaar vermeden wordt.
Gelieve het toestel bij problemen naar deze dienst terug te brengen.
GEBRUIKSINTERVAL
Dit apparaat mag niet op professionele wijze gebruikt worden. U dient de gewenste pauzes
toe te passen. Bij het niet naleven kan de motor beschadigd worden. Gelieve het
signalisatieplaatje te raadplegen dat u de maximale gebruiksduur zal aangeven (KB xx min.
waarbij xx de maximale gebruiksduur is). De pauzes moeten minstens 10 minuten bedragen.
VOORBEREIDING
Let erop dat het apparaat goed onderhouden, schoon en op de juiste wijze geolied is.
Leg een handdoek om de hals van de persoon wiens haar geknipt moet worden om
ervoor te zorgen dat het haar niet in de kraag kan vallen.
Plaats de persoon wiens haar geknipt moet worden zodanig op een stoel, dat zijn/haar
hoofd zich op ooghoogte bevindt.
Kam het haar zorgvuldig door en houd het scheerapparaat losjes in de hand. Zo heeft u
bij het scheren steeds een goede controle over het apparaat.
GEBRUIK VAN DE OPZETKAMMEN
De opzetkam met de tanden omhoog vast op het lemmet drukken (zie afbeelding 1):
Opzetkam #0,5... voor ca. 3 mm lang haar
Opzetkam #1... voor ca. 6 mm lang haar
Opzetkam #3... voor ca. 9 mm lang haar
Opzetkam #4... voor ca. 12 mm lang haar
Scheer eerst een klein gedeelte wanneer u het toestel voor het eerst gebruikt, zodat u
aan de lengte van de verschillende opzetkammen kunt wennen.
Wij raden u bovendien aan voor lang haar met de grootste opzetkam te beginnen.
Daarna kunt u, indien gewenst, een opzetkam voor korter haar gebruiken.
Ga nooit te snel met de tondeuse door het haar. Houd u aan de snelheid die bij het
apparaat past.
Kam het haar daarna zodanig dat het op natuurlijke wijze valt.
Gebruik de tondeuse eerst met de grootste opzetkam en begin dan aan de zijkanten van
onderen naar boven. Houd de tondeuse zachtjes tegen het haar, waarbij de tanden van
de opzetkam plat op het hoofd liggen, en haal de tondeuse dan van het haar af; scheer
met kleine gedeelten (2+3).
Wilt u het haar korter geknipt hebben, dan dient u ofwel steviger te duwen ofwel een
andere opzetkam te gebruiken. Het knippen van het haar vereist oefening en het is
daarom aan te bevelen het haar eerst langer te laten (4).
Wanneer u de kleinste opzetkam gebruikt, kunt u het dekhaar tamelijk kort scheren. Houd
de tanden vlak op het hoofd en scheer langzaam van voren naar achteren. Het is ook
hier beter het haar in het begin langer te laten (5).

Copies of the I/B. Please reproduce them without any
changes except under special instruction from Team
International BELGIUM. The pages must be reproduced and
folded in order to obtain a booklet A5 (+/- 148.5 mm width x
210 mm height). When folding, make sure you keep the good
numbering when you turn the pages of the I/B. Don’t change
the page numbering. Keep the language integrity.
17 TKG HC 18 - 130510
Assembly page 17/44
Fax +32 2 359 95 50
NASCHEREN
Om het haar verder bij te werken heeft u geen extra opzetkam nodig. Zet de hefboom op
de stand voor kort haar.
Kam het haar zoals het moet liggen. Begin tussen de bakkebaarden en de oren. Let erop
dat de punten van de tanden zich aan de haaruiteinden bevinden. Volg de ligging van
het haar en scheer dan rond de oren (6). Houd de tondeuse bij het scheren van de
bakkebaarden en de nek omgekeerd en scheer naar onderen (7).
HET SCHEREN VAN VLAK EN KORT HAAR
Gebruik de langste opzetkam en scheer telkens van het einde van de nek naar de kruin.
Houd het apparaat vlak tegen het hoofd en ga langzaam door het haar. Gebruik
dezelfde techniek voor de zijkanten.
Scheer nu het voorste haar tot aan de kruin in tegengestelde richting, en egaliseer
daarna de zijkanten.
Gebruik voor het scheren van vlak haar een gewone kam. Scheer daarmee het bovenste
hoofdhaar. Gebruik een opzetkam voor kort haar om het haar vanuit de nek spits toe te
scheren. Kam het haar, let op oneffenheden en werk tevens de bakkebaarden en de nek
zelf bij.
De vier geïllustreerde grondvlakken zijn uw "wegwijzer" voor het eenvoudige haarknippen (8).
HEFBOOM
Door het gebruik van de hefboom worden de messen afzonderlijk gebruikt, wat hun
levensduur verlengt, en worden de haartjes die tussen de messen zitten verwijderd. Plaats
de hefboom tijdens het gebruik snel enkele keren in de posities hoog en laag.
De hefboom bevindt zich gemakshalve direct naast uw duim en zorgt ervoor dat u het
haar trapsgewijs kunt verkorten (11).
ONDERHOUD
De tondeuse wordt voor verzending uitvoerig getest om er zeker van te zijn dat de messen
geolied en goed afgesteld zijn.
Na het reinigen of verwisselen moeten de messen opnieuw afgesteld worden. De punten
van de bovenste messen moeten ongeveer 1,2 mm van de onderste messen verwijderd
zijn. Vergelijk de positie van de messen van uw apparaat met de tekening (9).
Indien de messen niet exact afgesteld zijn, kunt u een druppel olie toevoegen en het
apparaat daarna een paar seconden laten werken. Schakel het apparaat daarna uit en
haal de stekker uit het stopcontact. Draai de schroeven los om het mes af te stellen.
Daarna de schroeven weer goed vastdraaien (10).
Vervang de messen wanneer ze bot zijn.
SMERING
De messen moeten regelmatig geolied worden, zodat het apparaat in goede staat blijft (12).
Gebruik geen haarolie, vet of olie die met een oplosmiddel vermengd is. Het oplosmiddel
verdampt en het dikkere vet blijft achter, waardoor de bewegingen van de messen trager
worden.
ACCESSOIRES
Uw toestel wordt met een volledige set van accessoires geleverd: een schaar, een kam en 4
verwisselbare opzetkammen die u op het toestel moet monteren. Daarmee kunt u het

Copies of the I/B. Please reproduce them without any
changes except under special instruction from Team
International BELGIUM. The pages must be reproduced and
folded in order to obtain a booklet A5 (+/- 148.5 mm width x
210 mm height). When folding, make sure you keep the good
numbering when you turn the pages of the I/B. Don’t change
the page numbering. Keep the language integrity.
18 TKG HC 18 - 130510
Assembly page 18/44
Fax +32 2 359 95 50
gewenste kapsel maken. In deze set zijn er nog twee accessoires om het toestel te reinigen:
een olieflesje om de messen te smeren en een borsteltje om de haartjes die tussen de messen
vastzitten te verwijderen.
MILIEUBESCHERMING –RICHTLIJN 2002/96/EG
Om ons milieu en onze gezondheid te beschermen, moet afgedankte elektrische en
elektronische apparatuur in overeenstemming met welbepaalde regels weggegooid worden.
Dit vergt zowel de inzet van de leveranciers als van de gebruikers. Daarom mag uw apparaat,
zoals op het typeplaatje of op de verpakking aangegeven door het symbool , niet met
het gewone huisvuil weggegooid worden. De gebruiker heeft het recht het toestel naar een
gemeentelijk centrum van gescheiden inzameling te brengen waar het overeenkomstig de
richtlijn hergebruikt, gerecycleerd of voor andere doeleinden gebruikt zal worden.

Copies of the I/B. Please reproduce them without any
changes except under special instruction from Team
International BELGIUM. The pages must be reproduced and
folded in order to obtain a booklet A5 (+/- 148.5 mm width x
210 mm height). When folding, make sure you keep the good
numbering when you turn the pages of the I/B. Don’t change
the page numbering. Keep the language integrity.
19 TKG HC 18 - 130510
Assembly page 19/44
Fax +32 2 359 95 50
CONSEJOS DE SEGURIDAD
Lea detenidamente el modo de empleo antes de utilizar el aparato, y siempre siga las
medidas de seguridad y el modo de funcionamiento.
Importante: Las personas (incluidos niños) con incapacidades físicas, sensoriales o mentales, o
sin experiencia o conocimiento nunca deben utilizar el aparato, salvo si están bajo la
vigilancia de una persona responsable de su seguridad o si recibieron previamente
instrucciones con respecto al uso seguro del aparato.
Es necesario vigilar a los niños para que no jueguen con el aparato.
Antes de utilizar el aparato, compruebe que el voltaje de la red eléctrica coincide con el
aparato.
No deje nunca su aparato sin vigilancia cuando esté en marcha.
Compruebe de vez en cuando que el aparato no esté dañado y no utilice su aparato si
el cable o el aparato están dañados por el motivo que sea. Cualquier reparación debe
ser realizada por un servicio cualificado competente(*). Si el cable está dañado, debe ser
reemplazado por un servicio cualificado competente(*).
Utilice el aparato sólo para usos domésticos y de la manera indicada en el modo de
empleo.
No sumerja nunca el aparato en el agua o en cualquier otro líquido ni para su limpieza ni
por cualquier otra razón.
No utilice el aparato cerca de fuentes de calor.
La clavija eléctrica debe ser desenchufada antes de limpiar el aparato.
Procure no utilizar el aparato en el exterior y colóquelo en un sitio seco.
No utilice accesorios no recomendados por el fabricante, ello puede conllevar un riesgo
para el usuario y dañar el aparato.
No desplace nunca el aparato tirando del cable. No cuelgue el aparato por el cable,
utilice la anilla de enganche. Coloque el aparato sobre una mesa o un soporte lo
suficiente estable y procure que el cable no se enganche en alguna parte, a fin de evitar
posibles caídas del mismo. Evite enrollar el cable alrededor del aparato y no lo tuerza.
No utilice el aparato con los pies mojados (bañándose o bajo la ducha) o sobre una pila
llena de agua. Sin embargo, si su aparato cae en el agua:
-Retire inmediatamente la clavija de la toma de corriente.
-Sobre todo no meta la mano en el agua.
-Haga verificar el aparato por un servicio técnico cualificado(*) antes de volver a
utilizarlo.
Cuando el aparato esté utilizado en el cuarto de baño, no olvide desenchufarlo tras cada
utilización ya que la proximidad del agua representa un peligro aún cuando el aparato está
apagado.
Asegúrese de no utilizar el aparato si está mojado (salpicaduras de agua, etc.), y no lo
utilice si tiene las manos mojadas.
Desenchufe el aparato si no lo utiliza, aunque sea por poco tiempo.
No inserte ningún objeto, ni hojas de papel al nivel de la cuchilla.
No utilice el aparato si una de las cuchillas presenta algún defecto, en ese caso hágalo
verificar por un servicio técnico cualificado(*).
Utilice siempre el cortapelos con unos de los peines suministrados. No utilice nunca un
peine si le falta un diente o está dañado.
No utilice el cortapelos con el pelo mojado. No obtendría resultados satisfactorios, ya que
el aparato ha sido diseñado para cortar cabellos secos.

Copies of the I/B. Please reproduce them without any
changes except under special instruction from Team
International BELGIUM. The pages must be reproduced and
folded in order to obtain a booklet A5 (+/- 148.5 mm width x
210 mm height). When folding, make sure you keep the good
numbering when you turn the pages of the I/B. Don’t change
the page numbering. Keep the language integrity.
20 TKG HC 18 - 130510
Assembly page 20/44
Fax +32 2 359 95 50
Este aparato no puede funcionar de manera continuada, no es un aparato profesional.
Es necesario efectuar pausas a intervalos regulares. Consulte el punto "Tiempo de
utilización" en el modo de empleo.
(*)PPServicio técnico cualificado: servicio técnico del fabricante o del importador o una
persona cualificada, reconocida y habilitada a fin de evitar cualquier peligro. En cualquier
caso devuelva el aparato al servicio técnico.
TIEMPO DE UTILIZACIÓN
Para una utilización óptima de su aparato y evitar el deterioro de su motor, controle el tiempo
de utilización continuada máxima indicada en la placa de características (KB xx min. donde
xx es el duración máxima). Pausa de utilización: 10 minutos.
ANTES DE LA PRIMERA UTILIZACIÓN
Asegúrese de su aparato está limpio, perfectamente lubrificado y en perfecto estado de
funcionamiento.
Coloque una servilleta alrededor del cuello de la persona a la que vaya a cortar los
cabellos, para evitar que los mismos le caigan sobre el cuello.
Hágalo sentar en una silla, de modo que los cabellos queden a la altura de sus ojos.
Peine los cabellos para quitar los nudos, tome el aparato con la mano firme y relatada.
Esto le ayudará a controlar el corte de una manera precisa.
COMO CORTAR LOS CABELLOS CON LOS DIFERENTES PEINES
Para fijar el peine, póngalo con los dientes hacia arriba y fíjelos firmemente a la base de la
cuchilla del aparato (Fig. 1):
Peine #0.5... deja 3 mm del cabello
Peine #1... deja 6 mm del cabello
Peine #3... deja 9 mm del cabello
Peine #4... deja 12 mm del cabello
Al principio corte solo algunos cabellos, hasta que se acostumbre a los diferentes peines.
Le aconsejamos empezar con el peine que deja la mayor longitud de cabellos en primer
lugar, y utilice a continuación el peine adecuado si desea una longitud menor del
cabello.
Para cortar los cabellos de manera uniforme, no fuerce nunca el aparato. El cortapelo es
más eficaz si trabaja a su propia velocidad. Comience peinando los cabellos siguiendo
un movimiento natural.
Fije al cortapelo el peine más largo y empiece a cortar el pelo manteniendo los dientes
del peine hacia arriba paralelamente a la cabeza (2). Aconsejamos proceder por
pequeñas longitudes para evitar que el cortapelo se entupa. Para eso, suelte
regularmente el peine inclinándolo ligeramente para el exterior. Luego vuelva a hacer el
mismo movimiento empezando un poco debajo de donde soltó el peine para obtener
una longitud homogénea.
El pelo se corta siempre en el sentido contrario a su orientación natural. Para la parte
trasera, comience a cortar de la nuca hacia la cima de la cabeza (3), para los lados de
las orejas hacia la cima del cráneo (4) y para la cima de la cabeza de la frente hacia
atrás (5).
Aconsejamos peinar regularmente el pelo para verificar la uniformidad del corte e volver
a poner los cabellos en posición. Por la misma razón, una vez los cabellos cortados y
Table of contents
Languages:
Other Team Kalorik Hair Clipper manuals


