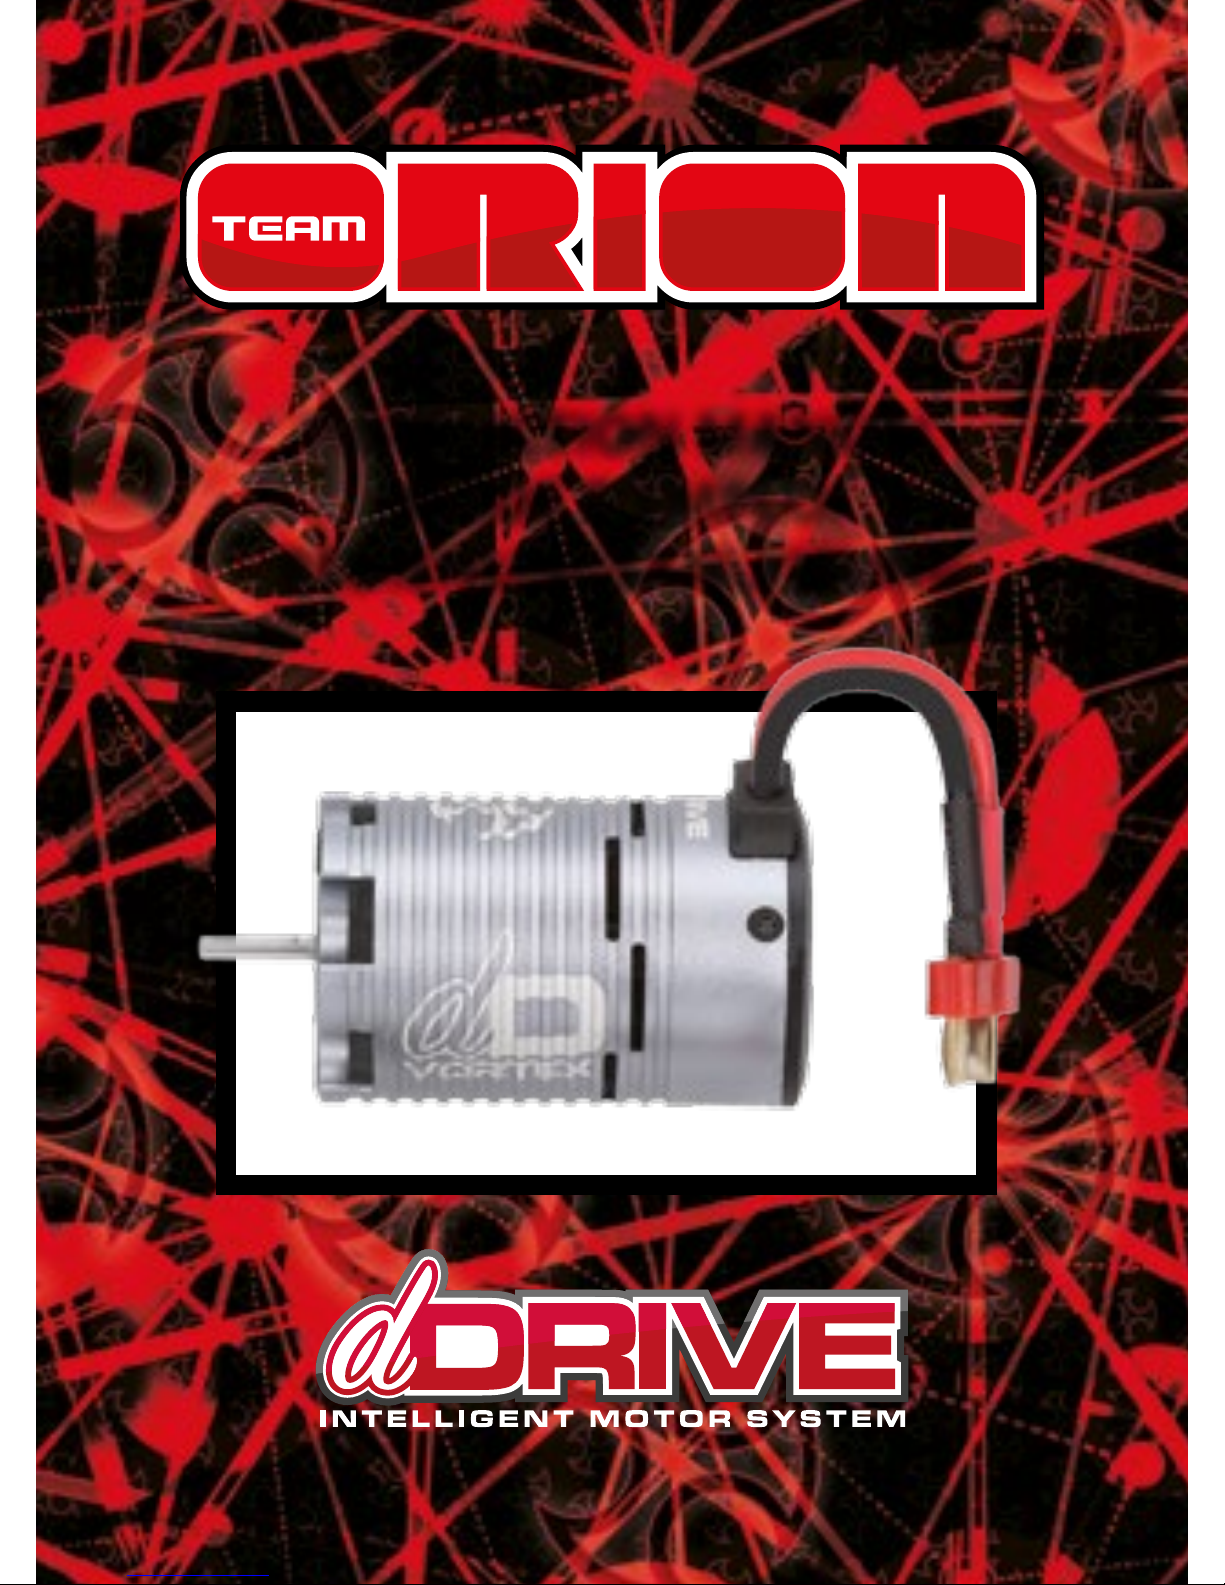
Team Orion dDrive User manual
INSTRUCTION MANUAL
MODE D’EMPLOI
BEDIENUNGSANLEITUNG

2 Copyright Team Orion © 2015
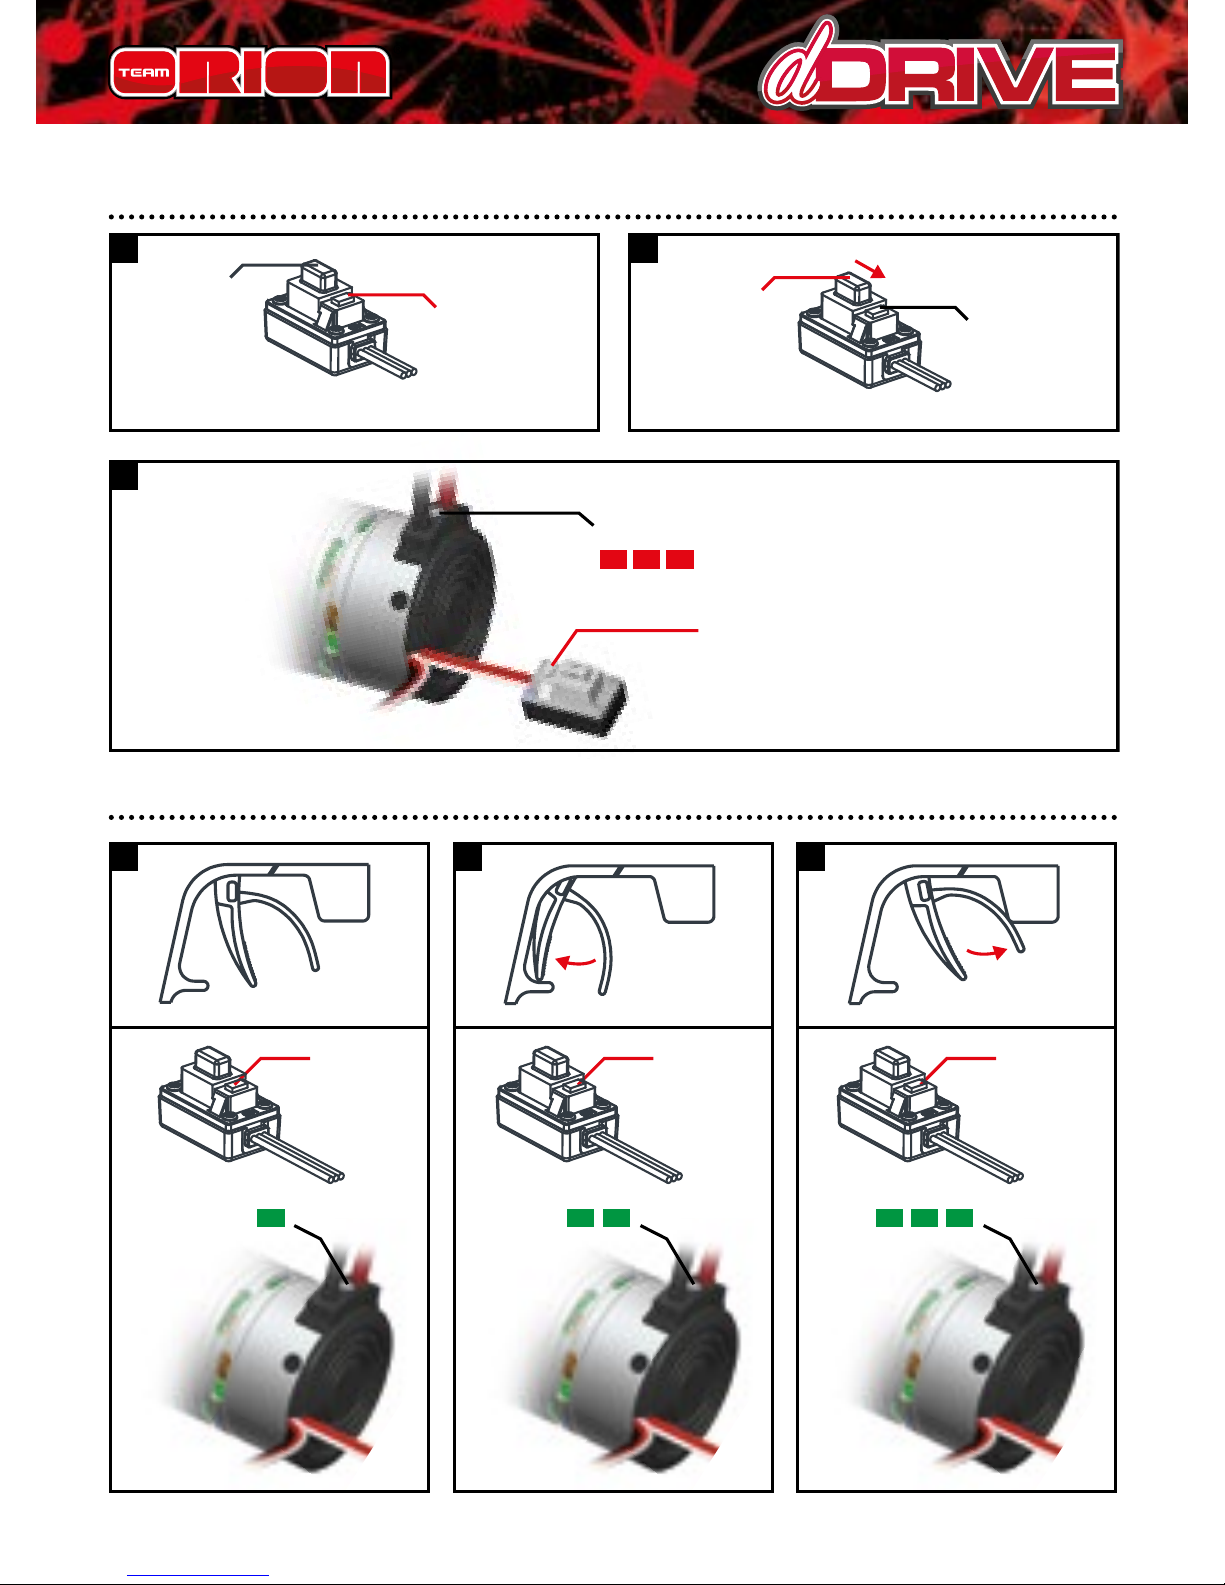
CONNECTIONS
1) Battery
2) Servo
3) Receiver
4) Switch
5) Vortex dDrive
6) Battery Connector
1
56
3
2
4
SET
ON/OFF
www.teamorion.com 3
CALIBRATION STEP 1
1
3
2
LED
ON/OFF
Press and
hold the
SET button
Switch ON Keep
pressing
the SET
button
Release as
soon as soon as
the red LED
starts to blink
LED
1 2
LED LED
3
Press
once Press
once Press
once
CALIBRATION STEP 2

4 Copyright Team Orion © 2015
PROGRAMMING YOUR ESC
2 2
33 3
1
7
4
6
5
Connect the battery
Enter Program Mode
Choose the parameter you want to change
OR Reset all programmable items
Press the
SET button
for 1s
Press the
SET button
for 5s
Press the SET button
1 time to select the
1st parameter...
...press the SET button
2 times to select the
2nd parameter etc.
Switch ON
Switch OFF
ESC to complete
the procedure
LED blinks 1 time
LED blinks
1 time
LED blinks 2 times
LED
blinks
Press the SET button
for 3s to modify
the setting of the
parameter
Press the SET button
for 3s to save the
new setting
Use the SET button
to change the setting
of the parameter.
Press 1 time
LED blinks
2 times
Press 2 times etc.
www.teamorion.com 5
AVAILABLE AND DEFAULT SETTINGS
Parameter
Setting
123456789
1. Running Mode Forward
with
Brake
Forward/
Reverse
with
Brake
2. Low Voltage
Cut-Off Threshold
No
Cut-Off 2.6V/Cell 2.8V/Cell 3.0V/Cell 3.2V/Cell 3.4V/Cell
3. Start Mode(Punch) Level1 Level2 Level3 Level4
4. Max Brake Force 25% 50% 75% 100%
More information on page 11-12-13

6 Copyright Team Orion © 2015
Thank you for purchasing a Team Orion dDrive brushless
power unit. This unique system combines the brushless
motor and ESC inside a single aluminum case. Please read
these instructions thoroughly before using your dDrive.
WARNINGS
Read the ENTIRE instruction manual to become familiar
with the features of the product before operating. This
is a sophisticated hobby product. It must be operated
with caution and common sense and requires some basic
mechanical ability. This product is not intended for use by
children without direct adult supervision. Do not attempt
disassembly, use with incompatible components or augment
product in any way. This manual contains instructions for
safety, operation and maintenance. It is essential to read
and follow all the instructions and warnings in the manual,
prior to assembly, setup or use, in order to operate correctly
and avoid damage or serious injury.
• Use extra caution in case of water exposure
• Always use only compatible batteries.
• Always power o the dDrive when not in use.
• Always disconnect the battery when not in use.
• The dDrive will become hot during use, be careful before
touching or handling it.
Failure to exercise caution while using this product could
result in product malfunction, electrical issues, excessive
heat, FIRE, and ultimately injury and property damage.
Not for children under 14 years. This is not a toy.
INSTRUCTION MANUAL · ENGLISH

www.teamorion.com 7
LIMITED WARRANTY
Team Orion warrants to the original purchaser that the
product purchased is free from defects in materials and
workmanship at the date of purchase. Team Orion reserves
the right to change or modify this warranty without notice
and disclaims all other warranties, express or implied. This
warranty is limited to the original purchaser and is not
transferable. Replacement as provided under this warranty
is the exclusive remedy of the purchaser. This warranty
covers only the products purchased from an authorized
dealer. Third party transactions are not covered by this
warranty. Proof of purchase is required for warranty
claims. Team Orion makes no warranty or representation,
express or implied, about non infringement, merchantability
or tness for a particular purpose of the product. The
purchaser acknowledges that they alone have determined
that the product will suitably meet the requirements of the
purchaser’s intended use.
Team Orion’s sole obligation hereunder shall be that it will,
at its option, repair or replace any product determined by
Team Orion to be defective in the event of a defect, this is
the purchaser’s exclusive remedy. Replacement decisions
are at Team Orion’s sole discretion. This warranty does
not cover cosmetic damage or damage due to acts of God,
accident, misuse, abuse, negligence, commercial use, or
modication of or to any part of the product. This warranty
does not cover damage due to improper installation,
operation, maintenance or attempted repair by anyone.
Team Orion will not be liable for special, indirect or
consequential damages, loss of prots or production or

8 Copyright Team Orion © 2015
commercial loss in any way connected with the product,
whether claim is based in contract, warranty, negligence, or
strict liability. Further, in no event shall the liability of Team
Orion exceed the individual price of the product on which
liability is asserted. As Team Orion has no control over use,
setup, nal assembly, modication or misuse, no liability
shall be assumed nor accepted for any resulting damage
or injury. By the act of use, setup or assembly the user
accepts all resulting liability. If you as the purchaser or user
are not prepared to accept the liability associated with the
use of this product, you are advised to return this product
immediately in new and unused condition to the place of
purchase.
Instructions for disposal of WEEE by users in the
European Union
This product must not be disposed of with other waste.
Instead, it is the user’s responsibility to dispose of their
waste equipment by handing it over to a designated
collections point for the recycling of waste electrical and
electronic equipment. The separate collection and recycling
of your waste equipment at the time of disposal will help to
conserve natural resources and ensure that it is recycled in
a manner that protects human health and the environment.
For more information about where you can drop o your
waste equipment for recycling, please contact your local city
oce, your household waste disposal service or where you
purchased the product.

www.teamorion.com 9
FEATURES
• Designed for on-road and o-road 1/10 scale cars
• Splash proof
• Forward and reverse function
• 4 pole brushless motor
• 45A ESC
• High power built-in BEC system
• Easy set-up via the setup button located on the switch
• Adjustable parameters
• Multiple protection systems: battery low voltage cut-o,
overheating, radio signal loss, stuck motor
INSTALLATION - CONNECTION
ATTACHMENT: Attach the dDrive to the car’s motor mount
using 3mm metric screws. If a motor was already tted to
your car, you will likely be able to re-use the same screws.
Adjust the motor so that there is about 0.5mm play between
the gear and pinion.
WARNING! If the motor screws are too long, you risk
shorting and damaging the motor!
GEARING: You can use the original pinion that came with
your car. However, you may also need to change the gearing
to get optimal performance. If the dDrive overheats use a
smaller pinion, if the car is slow and the motor temperature
is low, you can use a bigger pinion to increase performance.

10 Copyright Team Orion © 2015
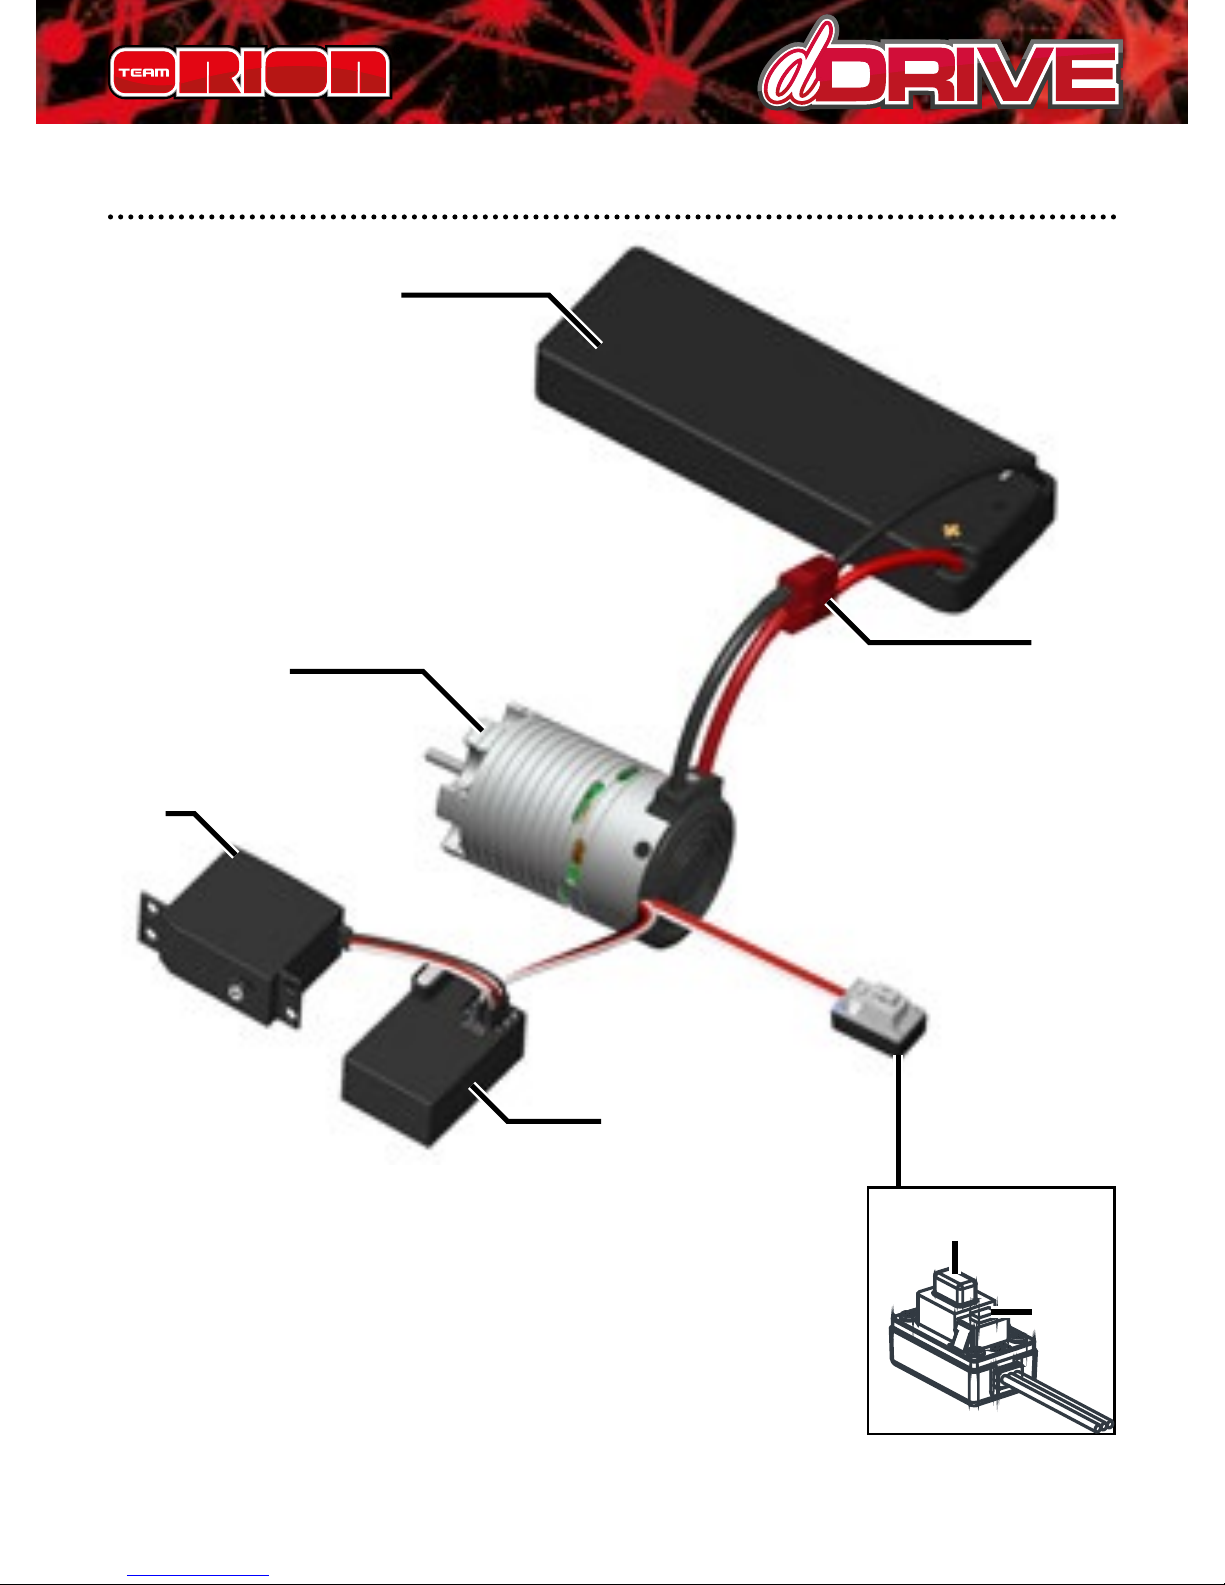
CONNECTION: The dDrive is equipped with a battery
connector, a receiver plug and a power/setup switch.
Connect the ESC receiver plug to the channel 2 of your
receiver and secure the switch with double-sided tape to the
car chassis.
BATTERY: Use a 2S LiPo 7.4V (recommended) or 6-7 cell
NiMH 7.2-8.4V battery as a power source. The battery must
be equipped with a Deans® type connector compatible
with the one installed on the ESC. Using low grade batteries,
adapters or modifying the ESC connectors, can cause loss of
performance, damage, or void the warranty.
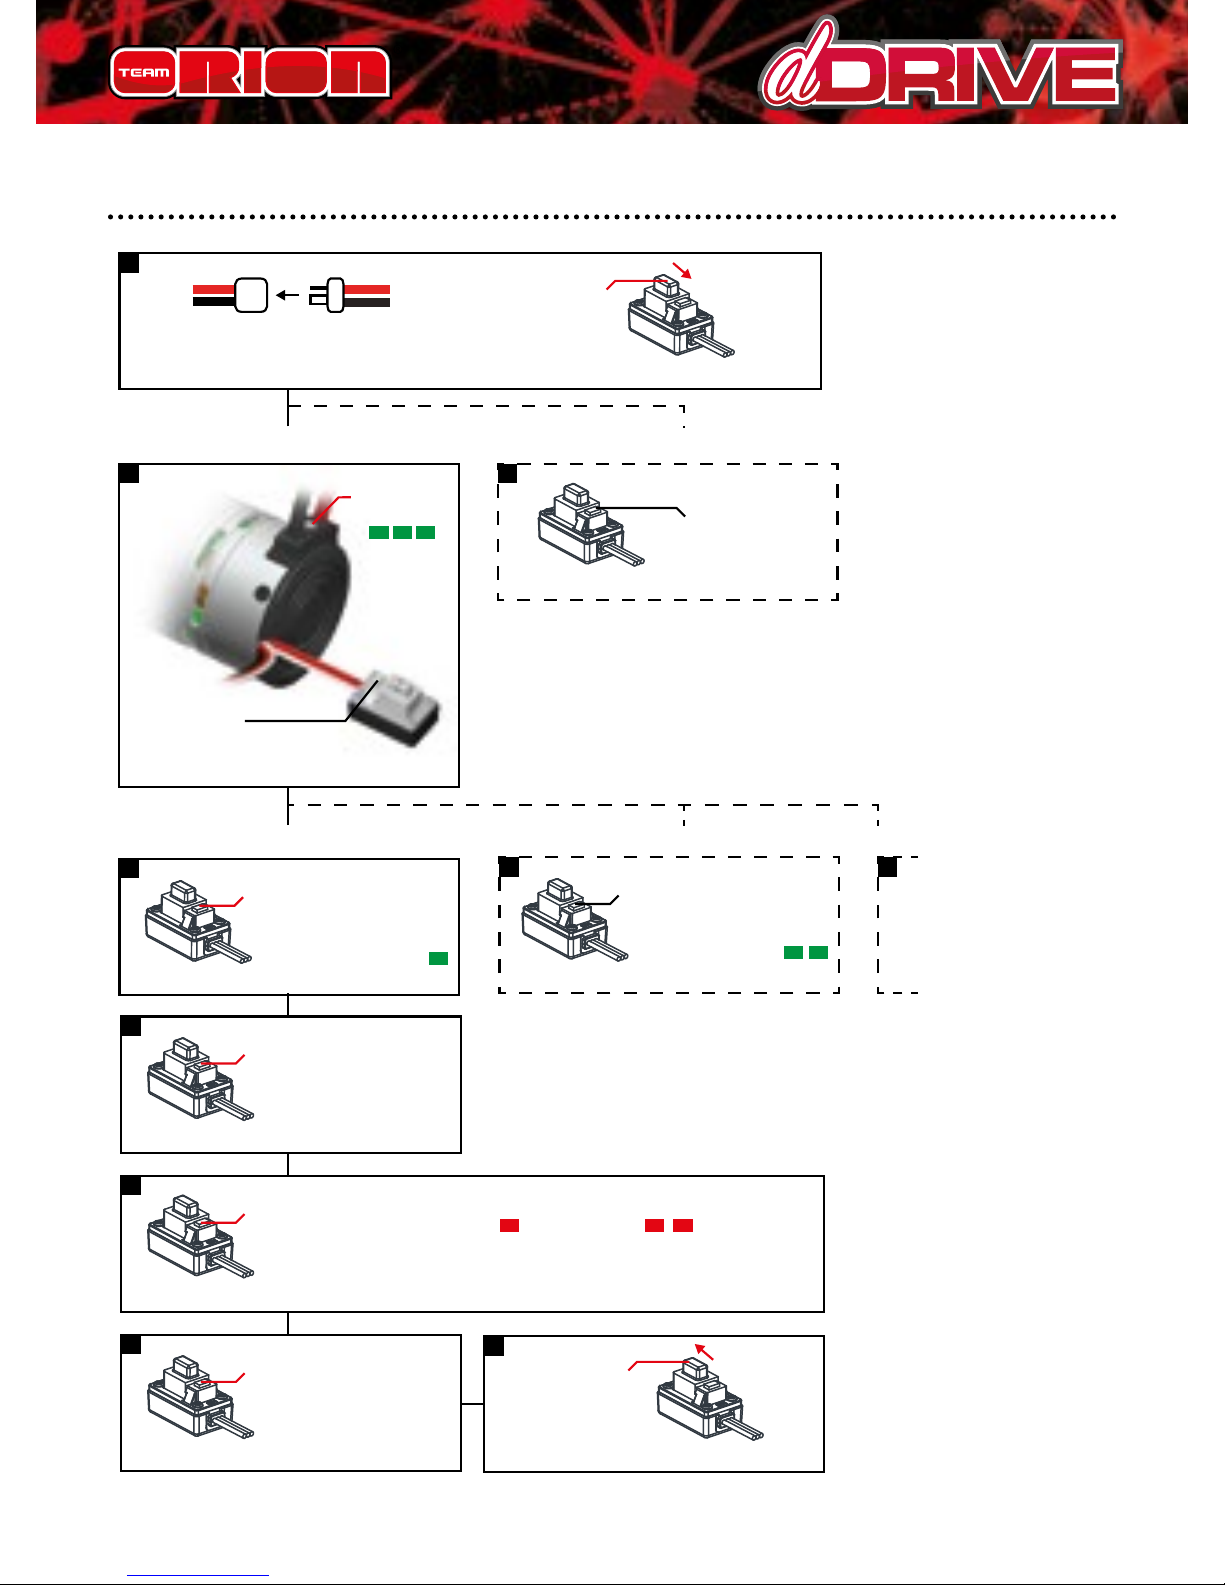
ESC CALIBRATION
In order to ensure proper function, the ESC must be
calibrated to your transmitter inputs. It is recommended to
center the trims and reset all settings inside the transmitter
before proceeding with the calibration. Follow the procedure
below to calibrate your ESC
A. Switch o the ESC and switch the transmitter on,
B. Press and hold the SET button (located on the ESC’s
switch), then switch on the ESC. Release the SET button as
soon as the red LED starts to ash.
C. Calibrate the throttle points by pressing the SET button
once after each step.
1. neutral point (1 green ash)
2. full throttle (2 green ashes)
3. full brakes/reverse (3 green ashes)
D. The motor will run 3 seconds after the last step is
completed.

www.teamorion.com 11
STATUS LED FUNCTION
• In the neutral position, no LED are lit.
• The red LED lights when the car is moving forward,
backwards or when braking.
• At full throttle the green LED is lit.
AUDIO WARNING TONES
1. Input voltage problem: ESC checks the input voltage as
it is switched on, if a problem is detected, the ESC emits
repeatedly two beeps with a 1 second pause and the
green LED ashes simultaneously (xx-xx-xx).
2. Radio signal problem: ESC checks the radio signal input as
it is switched on, if a problem is detected, the ESC emits
repeatedly a beep with a 2 second pause and the green
LED ashes simultaneously (x-x-x).
ESC ADVANCED SETUP
You can adjust certain parameters by using the SET button
located on the ESC’s switch. To adjust the parameters, follow
the procedure below.
A. Switch on the ESC.
B. Press the SET button and release it when the green LED
starts ashing.
C. Use the SET button to cycle between the various
adjustable parameters. The number of green ashes
indicates the parameter, one ash = running mode, two
ashes = low voltage cut-o and so on. The ESC will cycle
through all the adjustable parameters in a loop.
D. Once the green LED is ashing the number of times

12 Copyright Team Orion © 2015
relative to the parameter you wish to modify, press the
SET button until the red LED starts ashing, indicating the
current setting for that parameter, one ash = setting one,
two ashes = setting two, etc.
E. Press the SET button to change the current setting value,
the ESC will cycle through all the available settings.
F. Once the red LED is ashing the number of times relative
to the setting you wish to use, press the SET button for 3
seconds. The setting is saved.
G. Switch o the ESC to exit programming mode
ADJUSTABLE PARAMETERS
Running Mode
1) “Forward Only with Brake” this mode is meant for
competition use. In this mode the car can go forward and
brake, there is no reverse.
2) “Forward/Reverse with Brake” this is the basic all-around
mode. In this mode the car can go forward and reverse
and can also brake. When you move the throttle to the
reverse position while the car is moving forward, brakes
are applied until the car is fully stopped, reverse cannot
engage while the car is moving. To engage reverse, once the
car has stopped, release the brakes and move the throttle
to the reverse position again. While braking or in reverse,
if the throttle is moved to the forward position, the car will
immediately accelerate forward.

www.teamorion.com 13
Low Voltage Cut-o
This function helps to prevent battery over-discharge. The
ESC continuously monitors the battery’s voltage. If the
voltage becomes lower than the threshold for 2 seconds,
the output power is shut o and the red LED ashes twice
repeatedly.
Start mode “punch”
This parameter sets the initial throttle punch when the car
accelerates. Level1 gives a softer initial acceleration and level
9 gives a stronger initial acceleration.
Braking strength
This parameter adjusts the maximum breaking force. A
higher value provides stronger braking, but it can also
cause the wheels to lock causing loss of control of the car.
Stronger brakes make the ESC work harder and run hotter,
overloading the ESC can cause the overheat protection to
activate.
Restore Default Settings
With the throttle in the neutral position, press and hold the
SET button for 5 seconds, the red and green LED will ash
simultaneously indicating that the parameters have been
reset to the factory default values.

14 Copyright Team Orion © 2015
TROUBLESHOOTING
In case of malfunction, check the connections, settings and
installation. Make sure that the batteries are also charged
and functional.
NOTE: Using low power NiMH batteries can cause the dDrive
to overheat and have low performance. Use of LiPo batteries
is recommended.
Recommended working temperature: For optimal
performance, adjust the gearing and ESC settings so that the
outer case temperature is comprised between 60-80°C max
(140-175°F max).
Overheating and/or stutter: Make sure that the car’s
transmission runs freely. Check the gearing, use a smaller
pinion if necessary.
Low performance: Make sure that the car’s transmission
runs freely. Check the gearing, if the motor temperature is
low, you can use a bigger pinion to increase performance.
Do not use the dDrive if the case, connectors or wires are
damaged. Stop using the dDrive immediately if it overheats
excessively, melts or emits smoke.
If you are unable to solve the issue, stop using the ESC and
seek assistance from your local Team Orion reseller.
www.teamorion.com 15
CONNEXIONS
1) Accu
2) Servo
3) Récépteur
4) Interrupteur
5) Vortex dDrive
6) Connecteur batterie
1
56
3
2
4
SET
ON/OFF

16 Copyright Team Orion © 2015
CALIBRATION ETAPE 1
1
3
2
LED
ON/OFF
Maintenir
pressé
Maintenir
pressé
Enclencher
Relâcher lorsque la
LED rouge clignote
LED
1 2
LED LED
3
Pressez
une fois
Pressez
une fois
Pressez
une fois
CALIBRATION ETAPE 2
www.teamorion.com 17
PROGRAMMATION DU VARIATEUR
2 2
33 3
1
7
4
6
5
Brancher la batterie
Mode de programmation
Sélectionnez le paramètre que vous voulez modifier
Remise en configuration d‘usine
Pressez le
bouton
pendant 1sec
Pressez le
bouton
pendant 5sec
Pressez une fois pour
sélectionner le 1er
paramètre
Pressez deux fois pour
sélectionner le 2ème
paramètre
Enclencher
Eteignez le
variateur pour
compléter la
procédure
La LED
clignote
La LED
clignote
une fois
Pressez pendant
3sec pour modifier
le paramètre
Pressez pendant 3
secondes pour
sauvegarder la
modification
Modifiez le réglage
en pressant le bouton
1 pression
La LED
clignote
2 fois
2 pressions etc.
La LED clignote 1 fois La LED clignote 2 fois
OU

18 Copyright Team Orion © 2015
PARAMÈTRES
Plus d’informations aux pages 24-25
Parameter
Setting
123456789
1. Running Mode Forward
with
Brake
Forward/
Reverse
with
Brake
2. Low Voltage
Cut-Off Threshold
No
Cut-Off 2.6V/Cell 2.8V/Cell 3.0V/Cell 3.2V/Cell 3.4V/Cell
3. Start Mode(Punch) Level1 Level2 Level3 Level4
4. Max Brake Force 25% 50% 75% 100%

www.teamorion.com 19
Nous vous félicitons pour l’achat d’un système Team Orion
dDrive. Veuillez lire attentivement ce mode d’emploi avant
l’utilisation.
MISES EN GARDE
Lisez la totalité du mode d’emploi an de vous familiariser
avec les caractéristiques du produit avant de le faire
fonctionner. Ceci est un produit de loisirs sophistiqué. Il
doit être manipulé avec prudence et bon sens et requiert
des aptitudes de base en mécanique. Ce produit n’est pas
destiné à être utilisé par des enfants sans la surveillance
directe d’un adulte. N’essayez pas de démonter le produit,
de l’utiliser avec des composants incompatibles ou d’en
améliorer les performances. Ce manuel comporte des
instructions relatives à la sécurité, au fonctionnement et
à l’entretien. Il est capital de lire et de respecter la totalité
des instructions et avertissements du manuel avant
l’assemblage, le réglage et l’utilisation, ceci an de manipuler
correctement l’appareil et d’éviter tout dégât matériel ou
toute blessure grave.
• Soyez vigilants en cas d’exposition à l’eau.
• Toujours utiliser des batteries compatibles.
• Toujours éteindre le dDrive après l’utilisation.
• Toujours débrancher la batterie après l’utilisation.
• Le dDrive chaue pendant l’utilisation, faites attention
avant de le toucher ou de le manipuler.
Uniquement pour utilisateurs de 14 ans et plus. Ceci
n’est pas un jouet.
MODE D‘EMPLOI · FRANCAIS

20 Copyright Team Orion © 2015
GARANTIE LIMITEE
Team Orion se réserve le droit de modier les instructions,
les garanties et autres documents à tout moment. Cette
garantie n’est valable que pour l’acquéreur initial du produit
et n’est pas transmissible. Un échange tel que prévu par
cette garantie, n’est possible que pour l’acquéreur initial.
Cette garantie couvre uniquement les produits achetés
chez un revendeur agrée. Les transactions tierces ne sont
pas couvertes par cette garantie. Une preuve d’achat est
nécessaire pour toutes les demandes de couverture en
garantie. Team Orion ne donne aucune garantie, implicite
ou explicite, quant à la non-contrefaçon, à la qualité
marchande ou à l’aptitude du produit à une quelconque
application. L’acquéreur reconnait qu’il a déterminé seul que
le produit répondra de manière appropriée aux exigences
de l’utilisation qu’il en envisage. Dans le présent cadre, la
seule obligation de Team Orion consistera, à sa discrétion, à
remplacer tout produit qui aura été reconnu défectueux par
ses soins. Il s’agit là du seul recours de l’acquéreur en cas de
défaut. Les décisions de remplacement relèvent de la seule
discrétion de Team Orion. Cette garantie ne couvre pas les
dommages esthétiques ou les dommages dus à des cas de
force majeure, acte divin, à des accidents, à une utilisation
incorrecte ou abusive, à la négligence, à une utilisation
commerciale ou à la modication d’un quelconque élément
du produit. Cette garantie ne couvre pas les dommages
dus à une utilisation, une manipulation ou un entretien
incorrects ou encore à une tentative de réparation.
Team Orion ne saurait être tenu pour responsable d’un
Table of contents
Languages:
Popular Portable Generator manuals by other brands

BlueBuilt
BlueBuilt 919992 quick guide

Champion Global Power Equipment
Champion Global Power Equipment 92001i-EU Operator's manual

Shindaiwa
Shindaiwa DGW600DM-AC Generator user manual

Clarke
Clarke FG3000 Operation & maintenance instructions

Panasonic
Panasonic WJ-4600C operating instructions

CPE
CPE 2 STROKE GENERATOR Owner's Manual and Operating Instructions

EcoFlow
EcoFlow Smart Generator user manual

Granit
Granit POWERBAG 12048300 operating instructions

MULTIQUIP
MULTIQUIP GA-6HE Operation and parts manual

Klein Tools
Klein Tools KTB5 instruction manual

National Instruments
National Instruments NI PXIe-5450 SAFETY, ENVIRONMENTAL, AND REGULATORY INFORMATION

Power
Power SUA2000iP REV00 owner's manual


