TEC TEControl User manual

TEControl
USB MIDI Pedal Controller
User Guide

©TEControl AB
All rights reserved
The information in this document is subject to change without notice and does not repre-
sent a commitment on the part of TEControl AB. No part of this publication may be copied,
reproduced or otherwise transmitted or recorded, for any purpose, without prior written
permission by TEControl AB. All product and company names are trademarks of their re-
spective owners.
For up to date information, including documentation and software, please visit the support
pages at
http://www.tecontrol.se/products/usb-midi-pedal-controller/support
TEControl AB
Kalladalsv.42
23197 Klagstorp
Sweden

Contents
Contents iii
Introduction iv
1 Overview 1
2 A word about pedals 2
2.1 Expressionpedals................................... 2
2.2 Sustainpedals..................................... 2
3 Getting started 3
3.1 Installation....................................... 3
3.2 Defaultsettings .................................... 3
4 Configuration Utility 4
4.1 Installation....................................... 4
4.2 Howtoconfigure ................................... 5
5 Configuring your DAW and VI 7
5.1 DAW .......................................... 7
5.2 VIs ........................................... 7
6 Declaration of conformity 8
iii

Introduction
The USB MIDI Pedal Controller allows users to connect their existing analogue expression
and sustain pedals to the USB port of their computer. The USB MIDI Pedal Controller al-
lows customizing the sensitivity of the pedal and convert the signal to any MIDI CC (Con-
trol Change), Pitch Bend or Aftertouch messages, sent over the USB-MIDI class compliant
interface.
iv

1 Overview
The USB MIDI Pedal Controller is designed for musicians who want to connect standard
expression and sustain pedals to their computers and add improved expression and realism
to their performance and recordings.
The USB MIDI Pedal Controller offers enhanced controllability and flexibility by allow-
ing sensitivity shaping and assignment to any MIDI channel and either CC, pitch bend, or
aftertouch.
While the aftertouch is straight forward, we have included three pitch bend modes: pos-
itive, negative and both, where the full function is available and can be tailored with the
sensitivity curve.
The USB MIDI Pedal Controller supports both expression and sustain pedals and is con-
figurable for the two most common pedal wirings.
A monitor function simplifying the sensitivity adjustment is provided. This way users
can optimize the sensitivity to their own style of playing. The attack and decay controls can
be set from 0 to several seconds. This allows very smooth swells.
Signal processing algorithms guarantee full resolution over the configured sensor input
range. The event-driven MIDI output streaming filters out redundant data not to overflow
your MIDI input and assures lowest latency. MIDI messages are transmitted only when
input changes cause a change in the output value.
The USB MIDI Pedal Controller does not require installation of drivers or software. It
will work with the default settings straight out of the box with both Windows (XP or later)
and Mac OS (10.5 or later). A Configuration Utility is available for both Mac and Windows
and can be downloaded from our website and installed on your computer.
The input is a 1/4“ stereo (TRS) instrument jack and the output is through a USB MIDI
class compliant device that connects directly to any computer USB port.
The USB MIDI Pedal Controller is intended to be used with existing expression and
sustain pedals. No pedal is included.
1

2 A word about pedals
2.1 Expression pedals
The most common expression pedals consist of a foot-operated passive potentiometer that
has its three terminals connected to either a 1/4“ stereo (TRS) instrument jack or an in-
line cable plug. There is no established standard for expression pedals and manufacturers
use different ways to connect the potentiometer to the 1/4” stereo (TRS) instrument jack or
in-line cable plug. The two most common connections are depicted below:
The electrical resistance of the potentiometer (i.e. between CW and CCW) varies among
manufacturers but most of them have a value between 10 and 50 kΩ. It is normal for equip-
ment using expression pedals as inputs to provide a supply voltage to the pedal and receive
back as input a voltage proportional to the position of the wiper.
2.2 Sustain pedals
Sustain pedals are normally used for piano keyboards and are basically just an on/off switch
or contact closure. They use a 1/4“ mono instrument jack or in-line cable plug.
2

3 Getting started
3.1 Installation
Connect your pedal to the USB MIDI Pedal Controller and the latter to a USB port on your
computer (No software or driver installation is required). It will show as a “Pedal Controller
X.Y-ZZZZZZZZ” in your applications, where X.Y is the firmware version and ZZZZZZZZ is
the unique serial number. The device is fully functional with the default settings (although
depending on your pedal you might need to invert the jack polarity using the configuration
utility, see below)
WARNING! Only connect passive pedals to the USB MIDI Pedal Controller. Pedals that
are powered by mains supply, chargers or batteries must NOT be used. TEControl AB does
not assume any responsibility for damage to any equipment (including the Pedal Controller
itself) if these instructions are not followed.
3.2 Default settings
The USB MIDI Pedal Controller comes pre-configured with default settings and will work
straight-out-of-the box. The default settings are as follows:
•Linear sensitivity
•Input and output ranges set to maximum
•Attack and decay filters set to minimum
•MIDI Message set to Control Change
•MIDI CC11
•MIDI Channel 1
•Jack Polarity: Tip=Wiper, Ring=Supply
3

4 Configuration Utility
4.1 Installation
The Configuration Utility is required for changing the settings and is available from our
support webpage:
http://www.tecontrol.se/products/usb-midi-pedal-controller/support
Once you have downloaded the software, unzip the file and run the installer (Windows)
or drag and drop the application in your favourite location (Mac). On Windows the installer
will create a shortcut in the Start menu.
Starting the configuration Utility will show the following window
The top left part of the window (graph) shows the current sensitivity curve stored in the
controller and can be adjusted with the sliders, drop down menus and buttons located on
the right part of the window.
4

Located at the bottom of the window is a message window which reports the response
to your actions as well as potential error messages. Please, keep an eye on the messages
displayed there to detect any problems.
When started, the Configuration Utility will try to detect the Pedal Controller. If not
found, the lower portion of the window will display the message “Waiting for controller...”
indicating that you should check that the device is connected to your computer. If instead
the device is found, the window will display “Pedal Controller X.Y-ZZZZZZZZ connected”,
indicating the firmware version and serial number.
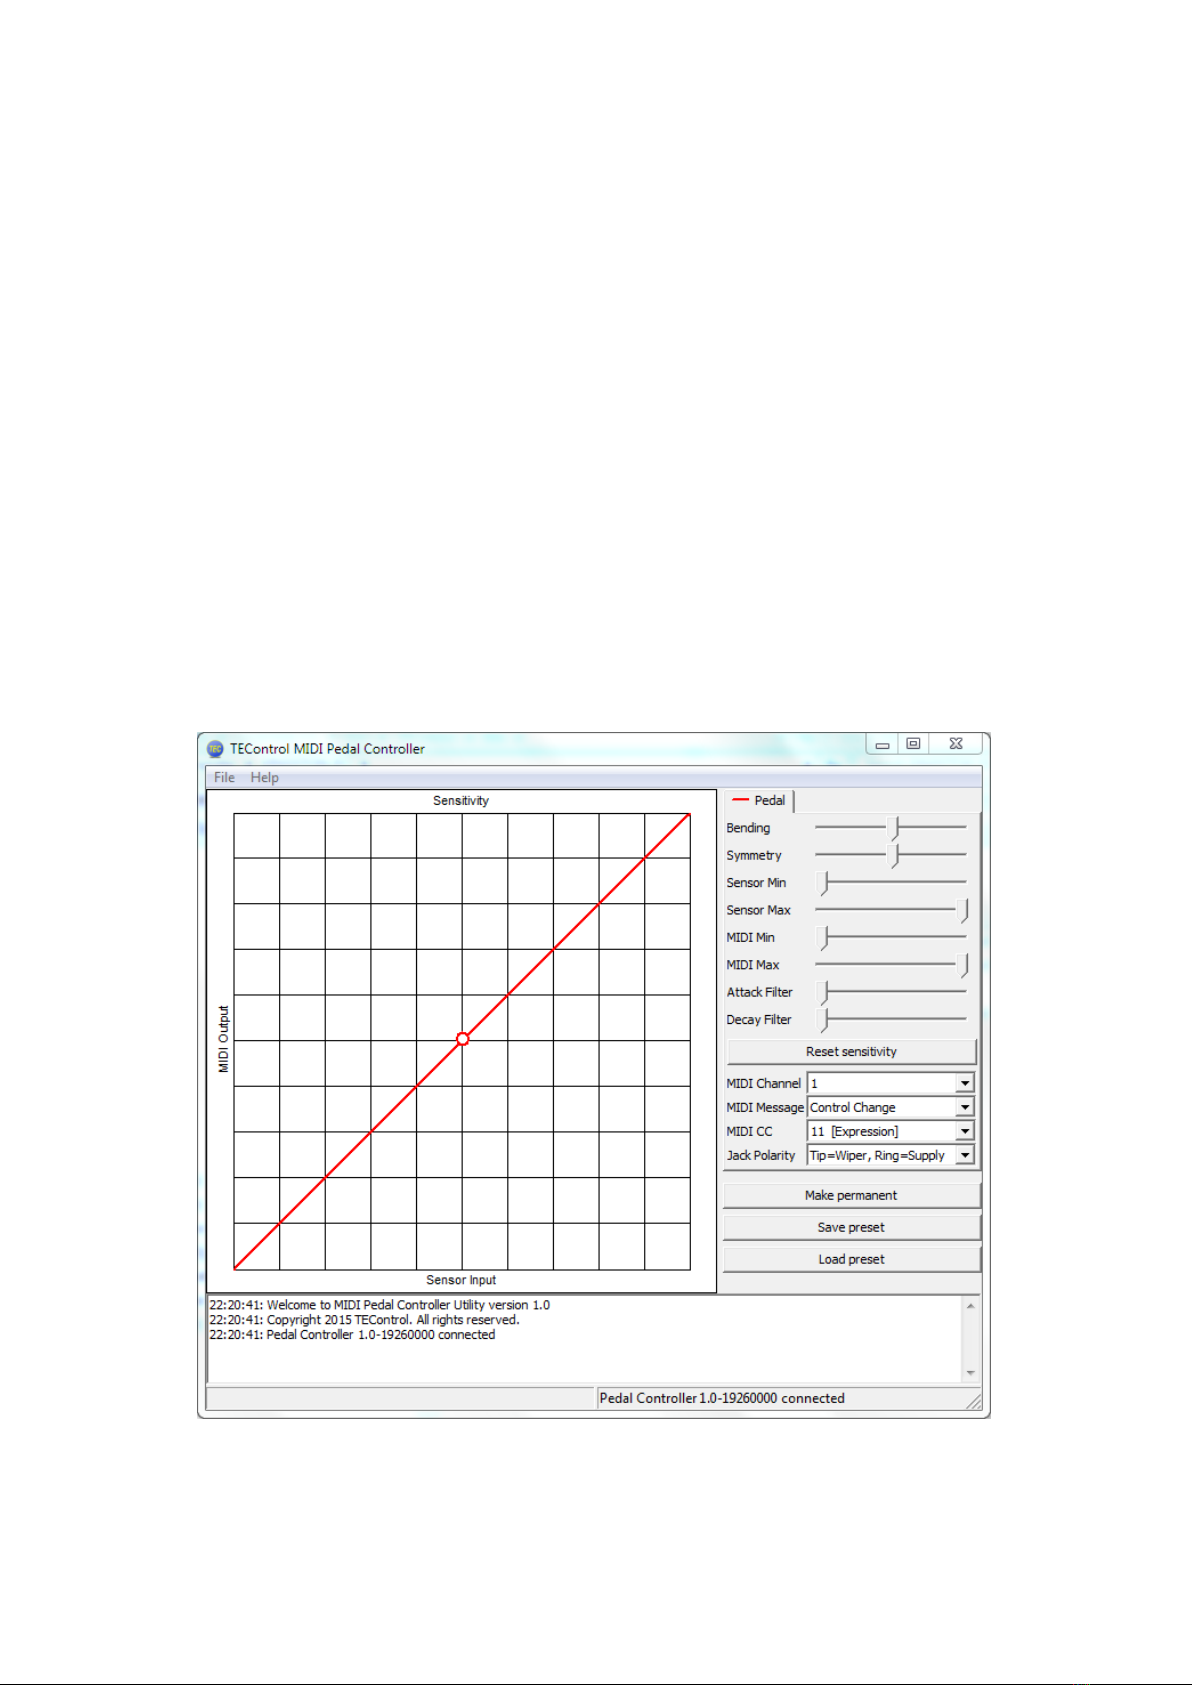
4.2 How to configure
The 8 sliders allow tailoring the response from pedal input signal to MIDI output value as
well as adjusting the attack and decay filters and the MIDI Message type, CC, and Channel.
•The Bending and Symmetry sliders change the shape of the response.
•The Input Min slider sets the lower threshold of the input signal. Any signal below
the threshold will not cause any change in the output CC value, which will remain at
the minimum output value.
•The Input Max slider sets the upper threshold of the input signal. Any signal above
the threshold will not cause any change in the output CC value, which will remain at
the maximum output value.
•The Output Min slider sets the minimum output CC value, which is output when the
signal is at or below the lower threshold. This is useful if you don’t want the CC value
to drop to zero.
•The Output Max slider sets the maximum output CC value, which is output when
the signal is at or above the upper threshold. This is useful if you want to limit the
maximum CC value to less than 127.
•The Attack and Decay Filter sliders set the respective time constants individually. Set-
ting the sliders fully left produce the fastest response (filter disabled); setting them
fully right allows time constants of several seconds. This is very useful for semi-
automatic swells.
Below the sliders there are the following additional controls:
•The Reset sensitivity button resets the sensitivity to linear with full input and output
ranges.
•The MIDI Channel drop-down list selects the MIDI channel to be used for the trans-
mission of the MIDI messages.
•The MIDI CC drop-down list selects the actual controller to be used, for example CC1
[Modulation Wheel], CC2 [Breath Control] and so on. The MIDI CC is effective only
when Control Change is selected in the MIDI Message drop-down list.
•The MIDI Message drop-down list offers, in addition to the above mentioned Control
Change, other MIDI message options such as Aftertouch, Pitch Bend Up, Pitch Bend
Down and Pitch Bend Both.
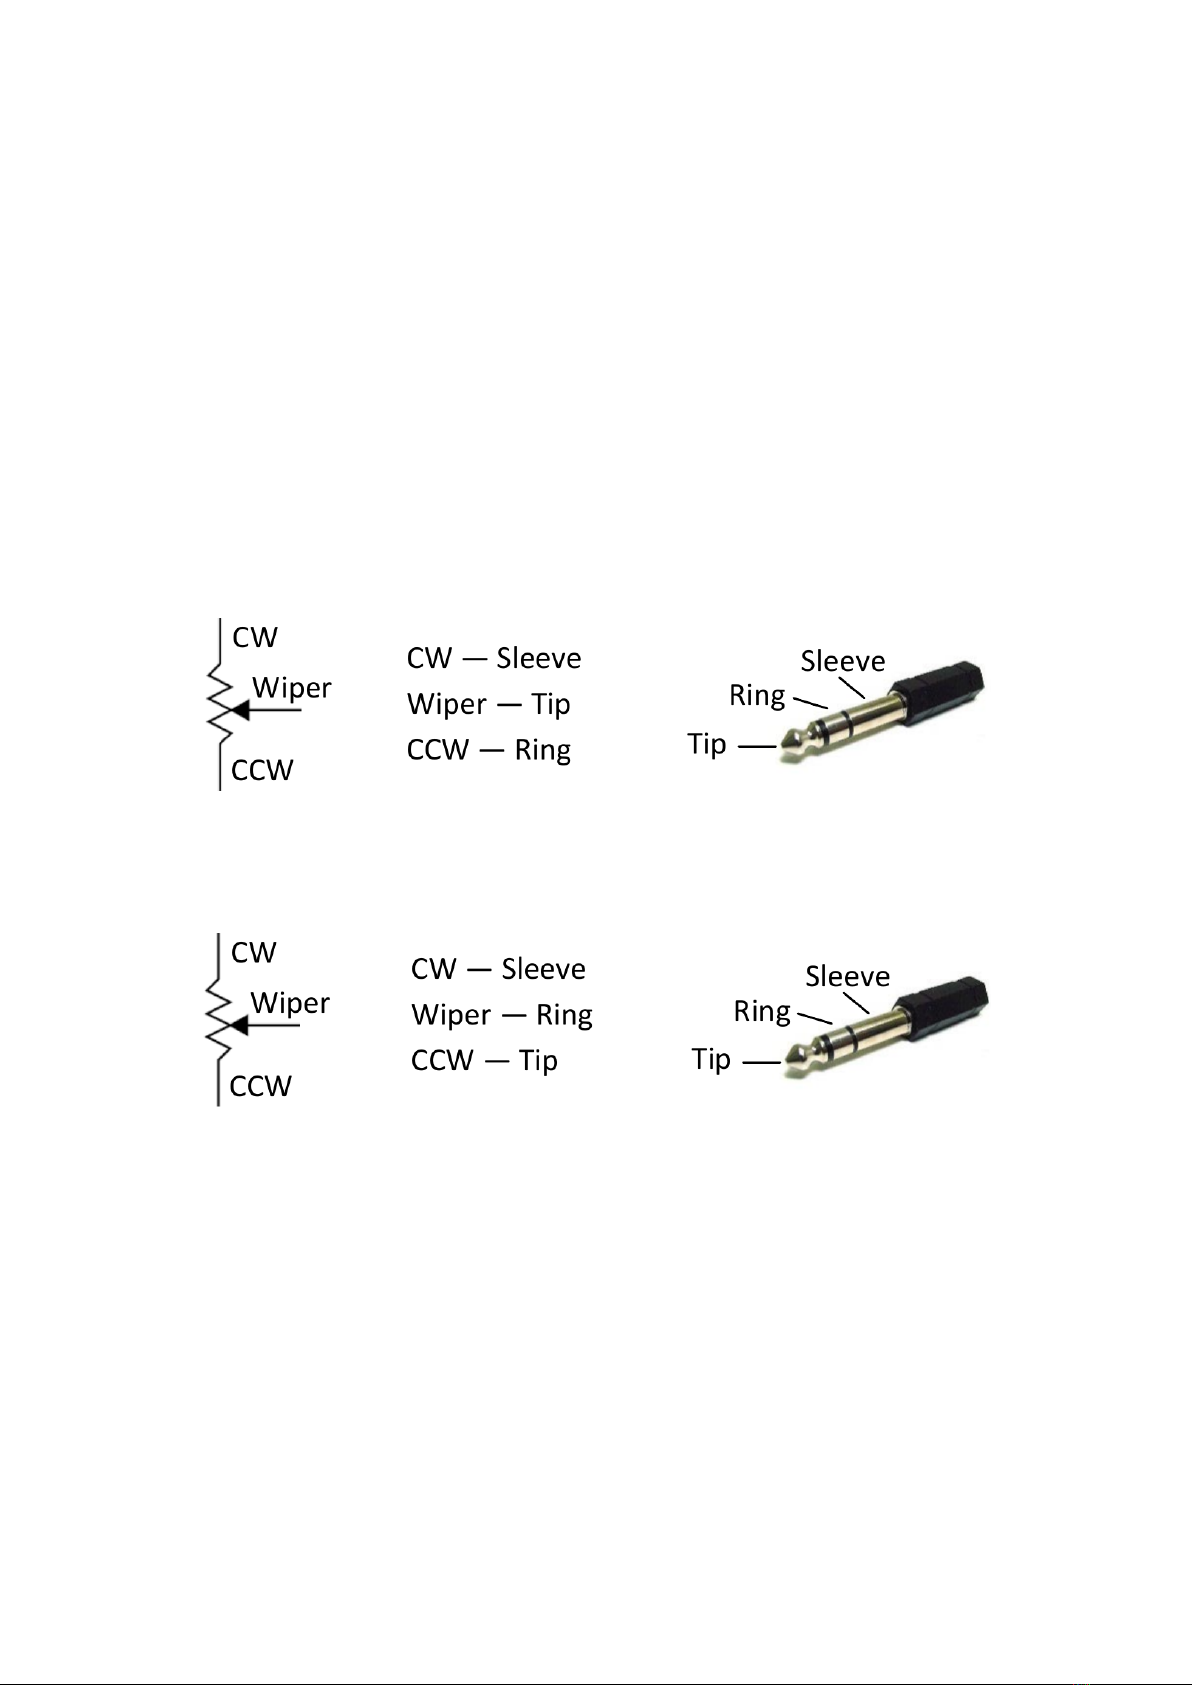
•Jack Polarity allows switching between the two different wiring configurations de-
scribed earlier in this manual. Selecting the wrong polarity will produce some signal
but will not work as expected. However it will not damage either the pedal or the
controller. If the pedal does not behave as expected, try the other polarity.
•The Make Permanent button stores the current settings in the Pedal Controller’s non-
volatile memory so that they are remembered even when the device is removed from
the computer. You can use this button as often as you wish.
•The Save Preset button allows storing the current settings in a file anywhere on your
computer, for later retrieval.
5

•The Load Preset button allows to retrieve a previously saved file and apply the settings
in it to the pedal controller. Note, the file name must end in “.tpc” otherwise it will
not be possible to select it.
•The Enable/Disable Monitor button enables a circular marker that is displayed along
the sensitivity curve and indicates the actual input. This is very useful for tailoring
the sensitivity to suit your playing style.
Note that when either Aftertouch or any of the Pitch Bend options are selected the MIDI CC
drop down is grayed out. Aftertouch is what the MIDI specification refers to as “channel
pressure”.
All changes to the settings take immediate effect but are lost when the computer is pow-
ered off or the device is removed from the computer. To store you settings permanently
in the device, use the Make Permanent button. This means your settings are remembered
when the device is unpowered. You can now move it to another computer with your favorite
settings intact.
6

5 Configuring your DAW and VI
5.1 DAW
In your DAW/player software the pedal controller must be selected as a MIDI input device
in order to work. In your DAW you must also configure the MIDI input of the track you
are playing or recording to “MIDI omni”, “All MIDI inputs” or similar function in order to
configure the track to respond to all MIDI controllers. This is necessary to allow controlling
the instrument from both keyboard and pedal controller.
Warning! According to the MIDI standard, the parameter you control in your virtual
instrument will in most cases retain the CC value it last received from the MIDI controller
and if you change the type of message you might get into a deadlock situation.
For example suppose you first set the pedal controller to CC 7 (volume); if you stop
with the pedal in the zero position the volume will stay at zero value. If you now change
the controller to some other CC, for example 11 (expression) no sound will be heard even
when you apply pedal since CC 7 (volume) is still at zero. Please, keep this in mind before
contacting us. To solve the problem either restart your sample player or try the following:
•select the CC that might be left at zero
•while applying pedal change the CC to 1 (mod wheel)
•repeat if you have more CCs left at zero.
5.2 VIs
Just as any other MIDI controller, the MIDI CC sent by the pedal controller must be matched
to a CC accepted by the VI you want to control, for instance CC7 (Volume, most instruments
respond to this) or CC11 (Expression, also available in most instruments).
Many VIs have a MIDI learn function for their controls which you can activate and then
move the pedal to send MIDI data and make the VI assign whatever CC comes from the
pedal controller to the selected parameter.
7

6 Declaration of conformity
8
Table of contents