Technik TAF-42BN User manual

TAF-42BN
AirFryer
Please read the operation manual carefully so you can
conveniently and correctly use the product.
Thank you for purchasing this appliance. Read this entire manual
before connecting the appliance on a power source to prevent
damage due to improper use. Pay special attention to the (special)
safety instructions.
TABLEOFCONTENTS
SAFETYELECTRICALPRECAUTIONS 1
SPECIALSAFETYGUIDELINES 2
BEFOREFIRSTUSE 4
OPERATINGTHEAPPLIANCE 4
OTHERSETTINGS 7
CAREANDMAINTENANCE 9
STORAGEOFAPPLIANCE 10
DISPOSALOFAPPLIANCE 10
TROUBLESHOOTING 11
TECHNICALSPECIFICATIONS 12
WARRANTY 13
1
SAFETYELECTRICALPRECAUTIONS
•A damaged power cord can cause electrical
shocks. NEVER use the appliance if it is damaged,
fallen or shows a malfunction, or if the power cord
or plug are damaged. In all these cases return the
appliance to your sales point or recognized after
sales service.
•NEVER touch the control buttons, electrical cord or
plug with wet hands, and NEVER immerse them in
water or any other liquid. They are only to be
cleaned with a damp cloth. Should they get wet
anyway, immediately pull out the plug from the
socket.
•NEVER use separate timers or remote control
systems.
•IMMEDIATELY switch off the appliance and pull
out the plug after use or when the appliance is
NOT in use, if the appliance does not function
properly and when cleaning the appliance.
•NEVER pull the power cord, only the plug
•NEVER use extension cords or sockets. Place the
appliance near a power point and connect it
directly.
•ALWAYS unroll the power cord completely. .
NEVER turn the power cord around the air fryer.
NEVER bend it or squeeze it.
•NEVER let the cord hang over the edge of the
table or the counter.
•NEVER place the power supply cord neat the heat
sources such as cookers, heaters or ovens.
•Only use the air fryer with 230 volt AC.
•In accordance with legal safety standards, the air
fryer must always be plugged into an earthed
socket.
Risk of Electric
Shock
32
•NEVER cover the ventilation grid when the appliance is operating.
•NEVER put oil in the drawer. This may cause fire.
•NEVER touch the inside or the appliance while it is operating.
•While baking, hot steam might come out of the openings of the
appliance. ALWAYS keep hands and face at a safe distance from
the steam. Also ALWAYS be careful when you remove the drawer
when the appliance is operating, steam might come out.
•IMMEDIATELY unplug the appliance if dark smokes comes out of
it. Only remove the drawer when no more smoke is coming out.
•ALWAYS place the appliance on a stable and flat surface, such as
kitchen counter or table, so that the appliance won’t move or turn
over.
•NEVER place the appliance near curtains, wall decoration,
clothing, towels or the other inflammable objects. Always make
sure to have 10cm on all sides of the appliance.
•NEVER place anything on top of the appliance.
•For your own safety, the appliance will only work if it has been
assembled correctly. Check that all parts were assembled
correctly.
•Only use this appliance to fry without oil, bake and roast food.
•NEVER leave the appliance unattended and NEVER move it
when operating.
•NEVER use accessories or spare parts from other appliances or
brands.
•Repairs may only be done by recognized repairer or service
center.
SPECIALSAFETYGUIDELINES
Fire Hazard Risk of Injury
through scalding
WARNING!
•This appliance is not intended for use by persons (including
children) with reduced physical, sensory or mental capabilities, or
lack of experience and knowledge, unless they have been given
supervision or instruction concerning use of the appliance by a
person responsible for their safety.
•Children should be supervised to ensure that they do not play with
the appliance.
•This appliance can be used by children aged from 8 years and
above and persons with reduced physical, sensory or mental
capabilities or lack of experience and knowledge if they have been
given supervision or instruction concerning use of the appliance in
a safe way and understand the hazards involved. Children shall not
play with the appliance. Cleaning and user maintenance shall not
be made by children unless they are older than 8 and supervised.
•Keep the appliance and its cord out of reach of children less than 8
years.
•This appliance is intended to be used in household. Do not use
outdoors.
•Do not use the appliance for any other purpose than described in
this manual.

54
•Remove all packaging and stickers.
•Keep all packing material out of children’s reach.
•Check the appliance and power cord for any damage. Do not
use the air fryer and return it to the sales point in case of
damage.
•Before using the air fryer for the first time, it is recommended to
clean the drawer and the basket. (See CARE AND
MAINTENANCE)
•Clean the drawer and the basket with hot soapy water and soft
sponge. These pieces are dishwasher proof.
•Ensure that the voltage marked on the appliance is the same as
your main voltage.
BEFOREFIRSTUSE
OPERATINGTHEAPPLIANCE
1. Place the appliance on a stable, flat and heat resistant surface.
Do not place the appliance on non-heat resistant surfaces.
2. Pull the cord entirely out of the cable storage.
CAUTION: Do not put oil or any other liquid on the drawer.
CAUTION: Don’t put anything on top of the appliance.
BE CAREFUL! Keep the ventilation hood away from the wall at
least 15cm.
3. Carefully pull the drawer out of the appliance.
NOTE: always completely remove the drawer from the appliance
before adding ingredients to the basket.
4. Take out the basket of the drawer.
5. Put the prepared ingredients into the basket. Place the food into
the basket.
NOTE: Do not fill the basket more than 4/5, Or the mentioned
amount indicated in the above grid. Larger quantities will give
a lesser result.
NOTE: If the ingredient becomes big after heating, count the
amount according to heated volume.
CAKE FUNCTION: put the cake dough into the baking tin, the
baking tin into the basket and place the basket in the drawer.
6. Place the basket in the drawer.
7. Put the drawer back into the appliance. Never use the drawer
without basket
CAUTION: Don’t touch the drawer during or some time after use,
as its gets very hot. Only hold the drawer by the handle.
8. Put the plug into the socket.
9. Turn the timer to the required time according to the ingredients.
Light indicator will turn on when motor starts working.
NOTE: Please push the pan into the air
fryer completely.
NOTE: Preheat the air fryer for at least
3 minutes.

76
10. Turn the temperature control knob to the required temperature.
The heating element will start working.
NOTE: The pan may have oil if you cook fatty ingredients. Be
careful for scalding injury
11. When the cooking time is finished, you will hear a short sound
signal and the appliance will switch off automatically. Remove the
drawer from the appliance and pit it in a heat resistant surface.
TIP: In order to switch off the appliance manually, turn the TIMER
knob back to 0 (zero).
12. Check if the ingredients are ready. If not, put the drawer back in
the appliance and set a few more minutes.
13. Remove the ingredients to a plate or other container using food
thongs.
TIP: It can help cook better to turn over the
ingredients during frying. Or it can have better
taste with lower temp and longer time. Please
read a cookbook reference if you have.
NOTE: The pan and grill are very hot during
operation. Do not touch them by hand.
TIPS:
Smaller ingredients often require a shorter baking time
than larger ingredients.
Shaking small ingredients during the baking process
might improve the final result. (See OPERATING THE
APPLIANCE)
Add a little bit of oil on fresh potatoes for crispier result.
Add the oil before putting the ingredients in the basket.
Bake the ingredients within a few minutes after adding
the oil.
Snacks that can be prepared in a traditional oven can
be prepared in the air fryer. Snacks or fries only meant
to be prepared in a deep fryer will not provide the
desired result.
You can use the air fryer to heat up ingredients. To do
so, see Reheat function, point 4. Use.
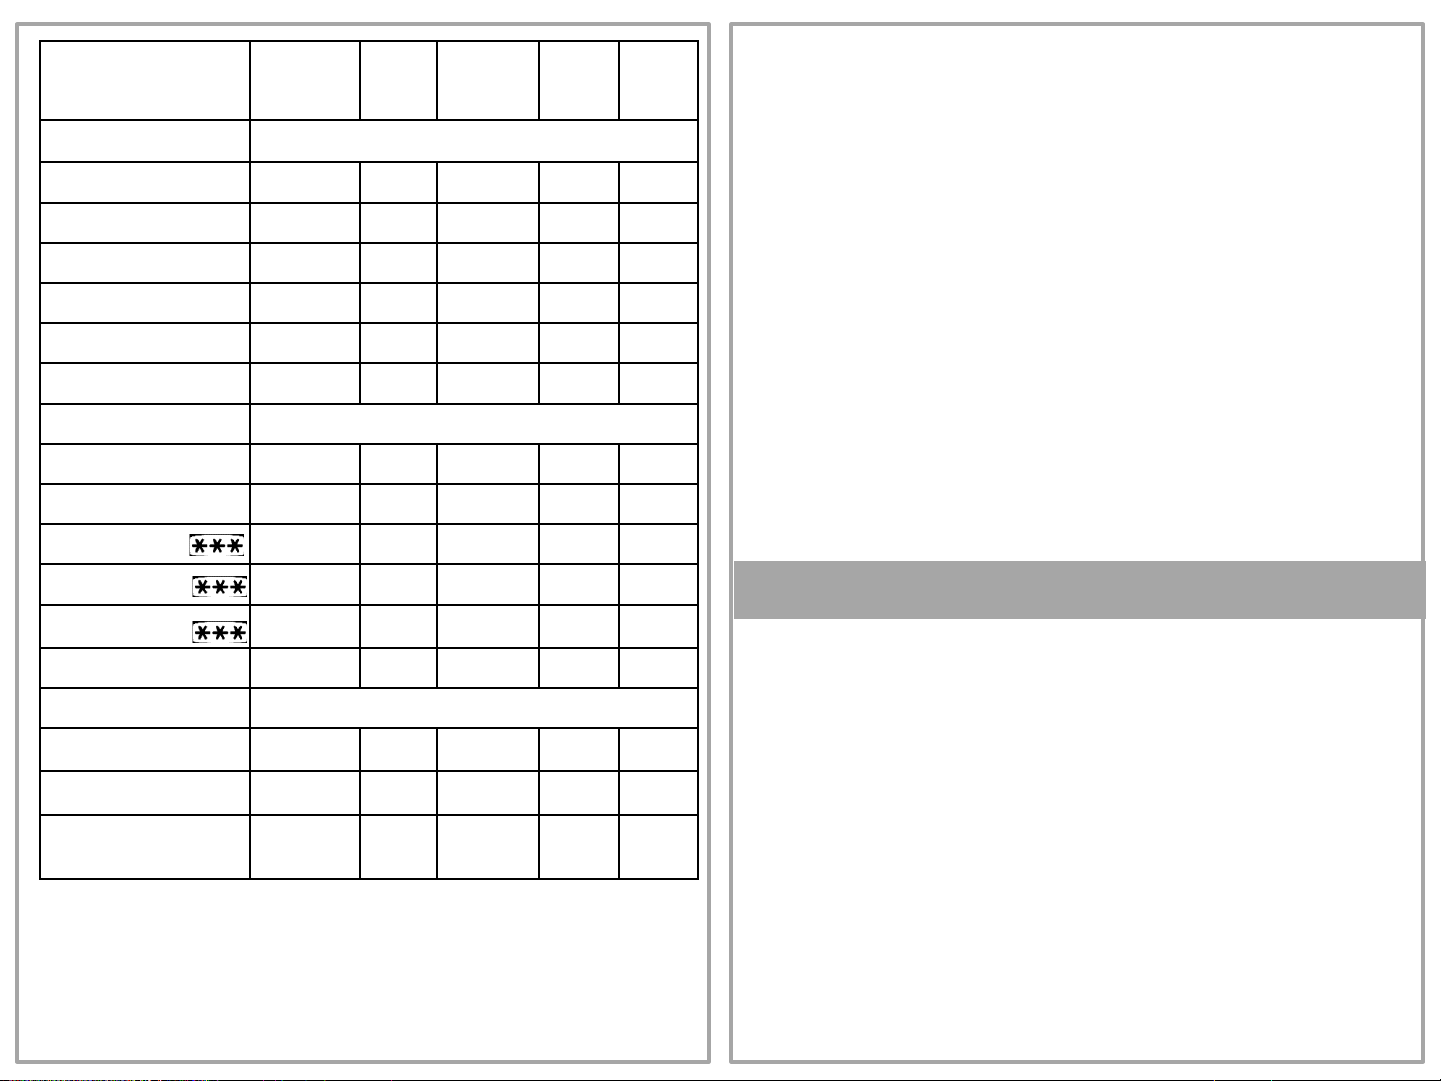
Min-Max
Capacity
(gram)
Time
(minutes)
Temperature
(OC) Shake Other
Potatoes and fries
Thin fries
300-1000 9-19
200
Shake**
Thick fries
300-1000 12-
22
200
Shake**
Homemade fries
(8*8mm)
300-1200 18-30
180
Shake**
Add 1/2
tbs oil
Potato wedges
300-900 18-24
180
Shake**
Add 1/2
tbs oil
Potato cubes
300-750 12-18
180
Shake**
Add 1/2
tbs oil
Rösti
250 15-18
180 *
Potato gratin
500 18-22
180 *
OTHERSETTINGS
98
Min-Max
Capacity
(gram)
Time
(minutes)
Temperature
(OC) Shake Other
Meat
and poultry
Steak
100-600 8-12 180
Pork
chops 100-500 10-14
180
Hamburger
100-500 7-14 180
Meatloaf
100-500 18-22
180
Drumstick
100-500 18-22
180
Chicken
breast 100-800 10-15
180
Snacks
Meat ball
240 7 200 *
Spring rolls
100-400 8-10 200
Shake**
*
Chicke
n Nuggets 100-500 6-10 200
Shake**
*
Fish
Fingers 100-400 6-10 200 *
Bread crumbed
cheese
snack 100-400 8-10 180 *
Vegetables
100-400 10 160
Cake
Quiche
400 20 190
Use
the
baking tin
Muffins
400 15 180
Use
the
baking tin
Cake
500 (Total
weight of the
dough
65 150
Use
the
baking tin
Homemade fries
For the best result we advise to use prebaked fries (e.g. frozen
fries). If you want to make homemade fries, follow steps below:
1. Peel the potatoes and cut them into fries.
2. Soak the fries in a bowl of water for at least 30 minutes,
take them out and dry them properly with some paper
towel.
3. Pour ½ spoon of oil in a bowl, add the fries and mix
carefully until all fries are equally covered with oil.
4. Remove the fries from the bowl with our hands or a kitchen
utensil so redundant oil stays behind in the bowl. Put the
fries in the basket.
NOTE: don’t pour the fries from the bowl into the
basket to avoid redundant from ending up in the
drawer.
5. Bake the fries as mentioned earlier.
NOTE: Add 3 minutes to the baking time if the appliance is cold.
NOTE:
*Check if the ingredients are suited for preparation in the oven.
** See USE –point 12
CAREANDMAINTENANCE
1. Clean the appliance after each use.
2. The drawer, basket and inside of the appliance have a non-
stick coating. Do not use metal kitchen ware or abrasive
cleaning materials to clean them. This may damage the non-
stick coating.
3. First remove the plug from the socket and let the air fryer cool
down completely before cleaning.
TIP: in order to make the appliance cool down more quickly
you can remove the drawer.
4. Only clean the housing with a moist cloth.
1110
5. The basket and the drawer can be cleaned with hot soapy
water and a cleaning brush.
TIP: the basket and the drawer are dishwasher proof
TIP: Use fat dissolver to remove stains.
TIP: If the food sticks to the basket or to the drawer; put the
basket in the drawer and let it soak for about 10 minutes in
water.
6. The inside of the appliance can be cleaned with warm water
and a soft sponge.
7. Clean the heating elements with a cleaning brush to remove
sticking residues.
STORAGEOFAPPLIANCE
1. Pull the plug from the socket and let the appliance cool down
completely.
2. Make sure all parts are clean and dry.
3. Store the cord in the cable storage and fix the cord by inserting
it into the cord fixing slot.
TROUBLESHOOTING
Problem Possible Cause Solution
The air fryer does
not work
The plug is not plugged in. Insert the plug into the socket.
The timer was not set. Turn the timer to set the desired
baking time.
There is no drawer in the
appliance
Put the drawer (correctly) in the
appliance.
The ingredients
are
not done
There are too much
ingredients in the basket.
Put smaller amount
at once in the
basket.
The set temperature is too low.
Increase the temperature.
The baking time is too short Increase baking time.
Ingredients are not
equally baked.
Some ingredients need to be
shaken halfway through the
baking process.
Shake ingredients
which are piled
up (f.ex. Fries) halfway through
the baking process.
The fried
ingredients are not
crispy.
You used snacks only suited
for a traditional or a cool zone
deep fryer.
Use oven snacks or slightly
grease the ingredients with oil
crispier.
I cannot slide the
drawer into the
appliance properly.
The re are too much
ingredients in the basket. Fill maximum 4/5 of the basket.
The basket is not correctly
placed in the drawer.
Press the basket
until you hear a
click.
White smoke
coming out of the
appliance
You’re using very greasy
ingredients.
When baking greasy
ingredients,
the redundant oil drips on the hot
drawer and cause smoke. This
will not affect the final cooking
result.
There are
come residues from
prior bakings in the drawer.
The some is caused greasy
residues heating up. Carefully
clean the drawer after each use.
Fries are fried
unequally
You used the wrong kind of
potato Use another kind of potato
Crispiness depends on the
amount of water in the fries.
Carefully dry the fries before you
grease them with oil.
The fries are not
crispy.
The crispiness
depends on the
amount of water and oil in the
fries
Cut smaller fries.
Grease with a little bit more oil.
If you still have troubles, immediately bring your appliance to your after
sales service or sales point.
DISPOSALOFAPPLIANCE
This product is subject to the provisions of
European Directive 2012/19/EC. The symbol
showing a wheelie bin crossed through indicates
that the product requires separate refuse collection
in the European Union. This applies to the product
and all accessories marked with this symbol.
Products identified with this symbol may not be
discarded with normal household waste, but must
be taken to a collection point for recycling electric
and electronic appliances. Recycling helps to
reduce the consumption of raw materials and
protecting the environment.
1312
Product Name: Technik Air Fryer
Model No.: TAF-42BN
Rated Voltage: 230V a.c.
Rated Frequency: 60Hz
Rated Power: 1580W
Capacity: 4.2L
Color: Black
Plug Type: 2-pin US Plug
Net Weight: 3.16kg
Net Dimension: 255 x 250 x 295 mm
TERMS AND CONDITIONS:
Any defect affecting the functionality of the appliance and
which occurs within one (1) year of its purchase will be repaired
free of charge provided the appliance has been used and
maintained in accordance with the instructions and has not been
abused or used improperly in any way.
The warranty shall not cover defects resulting from any of the
following:
•Normal wear and tear and improper use of the unit and
nonadherence to prescribed instruction for the normal
operation and maintenance of the unit.
•Improper fuses, faulty electrical circuitry of the customer’s
place.
•Operating the unit outside the specified voltage range.
•Negligence, tampering and/or unauthorized repair of the unit.
•Damages caused by insects/rodents, accidents, fire, flood or
other acts of God.
•Development of rust/stains/cracks in any part of the body that
is a normal consequence of operation.
The warranty is void, if the serial number of the unit is
removed, altered or defaced.
If the warranty applies, proof of purchase (e.g. sales
invoice or delivery receipt) must be presented to the authorized
service center for verification.
APPSTAR GLOBAL DISTRIBUTORS, INC. and/or its
authorized service center will exercise its best efforts in
performing the services covered by the warranty, but will not be
liable for damages, direct or otherwise arising out of delays or
failure in furnishing parts or services caused by acts of God, acts
of Government (National, Provincial or Local), labor disputes or
difficulties, failure of transportation or other causes beyond its
control, or for damages resulting from delays in performing
services covered by this warranty
In line with our policy of continuous product development
we reserve the right to change the product, its packaging or
documentation without prior notice.
WARRANTYTECHNICALSPECIFICATIONS
Table of contents
Other Technik Fryer manuals


