TECHNOLOGICAL ARTISANS PartyBlaster HP User manual


Copyright 2017, Technological Artisans, LLC.
WARNING
READ AND FOLLOW ALL
INSTRUCTIONS CAREFULLY
BEFORE OPERATING THE LASER
PROJECTION SYSTEM
Use of controls or
djustments of
perform nce or
procedures
other th n those specified herein
m y c use h z rdous r di tion exposure.
21 CFR 1040.10(h) (iv) CD
Copyright 2017, Technological Artisans, LLC.
Introduction
Congr tul tions on your purch se of the P rtyBl ster’ or ClubC t! L ser Projection
System. Your new l ser is full-sc le l ser light projection system h rnessed into
comp ct, ir-cooled, low m inten nce unit. E sy to use, the system sets up in
pproxim tely 30 minutes nd c n be mounted to st nd rd lighting truss.
The CDRH-certified system plugs into ny st nd rd household outlet with supplied
d pter. Technologic l Artis ns, LLC. h s m nuf ctured your l ser projection system to bring
you ye rs of use. Simil rly, your owner’s guide h s been designed with e sy-to-follow
expl n tions nd directions. Ple se re d ll of the instructions reg rding your P rtyBl ster
or ClubC t! L ser Projection System nd ret in this m nu l for future reference.
Th nk you for selecting P rtyBl ster! Or ClubC t
1. S fety Consider tions 6.
Service And M inten nce
2. Unp cking The L ser Projection System 7.
Technic l Specific tions
3.
Getting To Know The L ser Projection System
8.
L beling Requirements
4.
Mounting The L ser Projection System
9.
W rr nty
5. Setting Up The Be m Aperture Modules
Copyright 2017, Technological Artisans, LLC.
1. S fety Consider tions
PLEASE READ ALL INSTRUCTIONS CAREFULLY REGARDING THE SET-
UP AND USE OF YOUR PARTYBLASTER OR CLUBCAT LASER
PROJECTION SYSTEM.
Avoid direct
eye
exposure o
laser beam.
FOLLOW ALL WARNINGS AND INSTRUCTIONS.
Follow Instructions
All set-up nd oper ting instructions should be followed c refully for s fe oper tion of your
l ser system.
1. Power Source
This projection system should be oper ted only from the type of power source indic ted on
the power supply of the l ser. If you re not sure of the power t your loc tion, consult n
electrici n or your loc l power comp ny.
2. Grounding And Polariza ion
This system is equipped with pol rized ltern ting- current line plug. This plug will fit into the power outlet
only one w y. This is s fety fe ture. Never byp ss ny grounding connections on the unit---electric shock
m y result.
3. Overload of circuits
Do not overload wall outlets and extension cords as this may result in a risk of fire or electrical
shock
4. Object and liquid Entry
5. Never push objects through openings on the projection system as they may touch dangerous voltage
points or short-out parts that could result in a fire or electrical shock. Do not spill liquids of any kind
on or into the projection system.
6. Servicing
Do not ttempt to service this projection system yourself s opening or removing covers m y
expose you to d ngerous volt ge or l ser r di tion nd voids w rr nty. Refer ll servicing to
P rtyBl ster! or P rtyBl ster! or ClubC t! qu lified technici n
7.
Damage Requiring Service
Unplug the projection system from the outlet nd refer servicing to P rtyBl ster’ or ClubC t!
qu lified service personnel under the following conditions:
When the power-supply cord or plug is d m ged.
If liquid h s been spilled or objects h ve f llen into the projection system.
If the projection system h s been exposed to r in or w ter.
If the projection system does not oper te norm lly by following the oper tions instructions.
Adjust only those controls th t re covered in the oper ting instructions. An improper
djustment of other controls m y result in d m ge nd will often require extensive work by
qu lified technici n to restore the system to its norm l oper tion.
* If the projection system h s been dropped or the housing h s been d m ged.
*When the projection system exhibits distinct ch nge in perform nce - this indic tes
need for service.
Copyright 2017, Technological Artisans, LLC.

8. Power-cord Protection
Power-supply cords should be routed so th t they re not likely to be w lked on or pinched
by items pl ced upon them or g inst them, p ying p rticul r ttention to cords t outlets,
convenience recept cles, nd the point where they exit the projection system.
9. Scanners
Do not lter the sc nner modules in ny w y. Do not insert ny diffr ction unit th t is not
recommended by P rtyBl ster! or ClubC t! into the be m perture p th.
10 Pl cement Of The Unit
Pl ce the unit in n re of the ceiling where the temper ture does not exceed 84
degrees F. Temper tures bove this h ve been found to c use the l sers
perform nce to degr de. Inst ll the unit s instructed on lighting truss c p ble of
h ndling the ddition l weight of the projection system, or use the mounting yoke to
inst ll the unit on support be m. M ke sure the unit nd ll ccessories re securely
f stened so the system does not f ll c using injury.
11 Ventil tion
F ns, Slots nd openings in the unit housing re provided for ventil tion to protect it
from overhe ting nd to ensure reli ble oper tion of the projector system. To ensure
longevity of the projection system, these openings must not be blocked or covered.
12 L ser Prec utions
If exposed, the l sers short w velength poses EXTREME HAZARDS, even t gre t dist nces:
•Never expose eyes by looking directly into the l ser be m.
•Never use eyes to lign or orient the be m by looking into its source.
•Avoid exposure to direct or coll ter l r di tion from the l ser.
•M ke sure th t ALL w rning l bels re in pl ce nd e sily seen.
Copyright 2017, Technological Artisans, LLC.
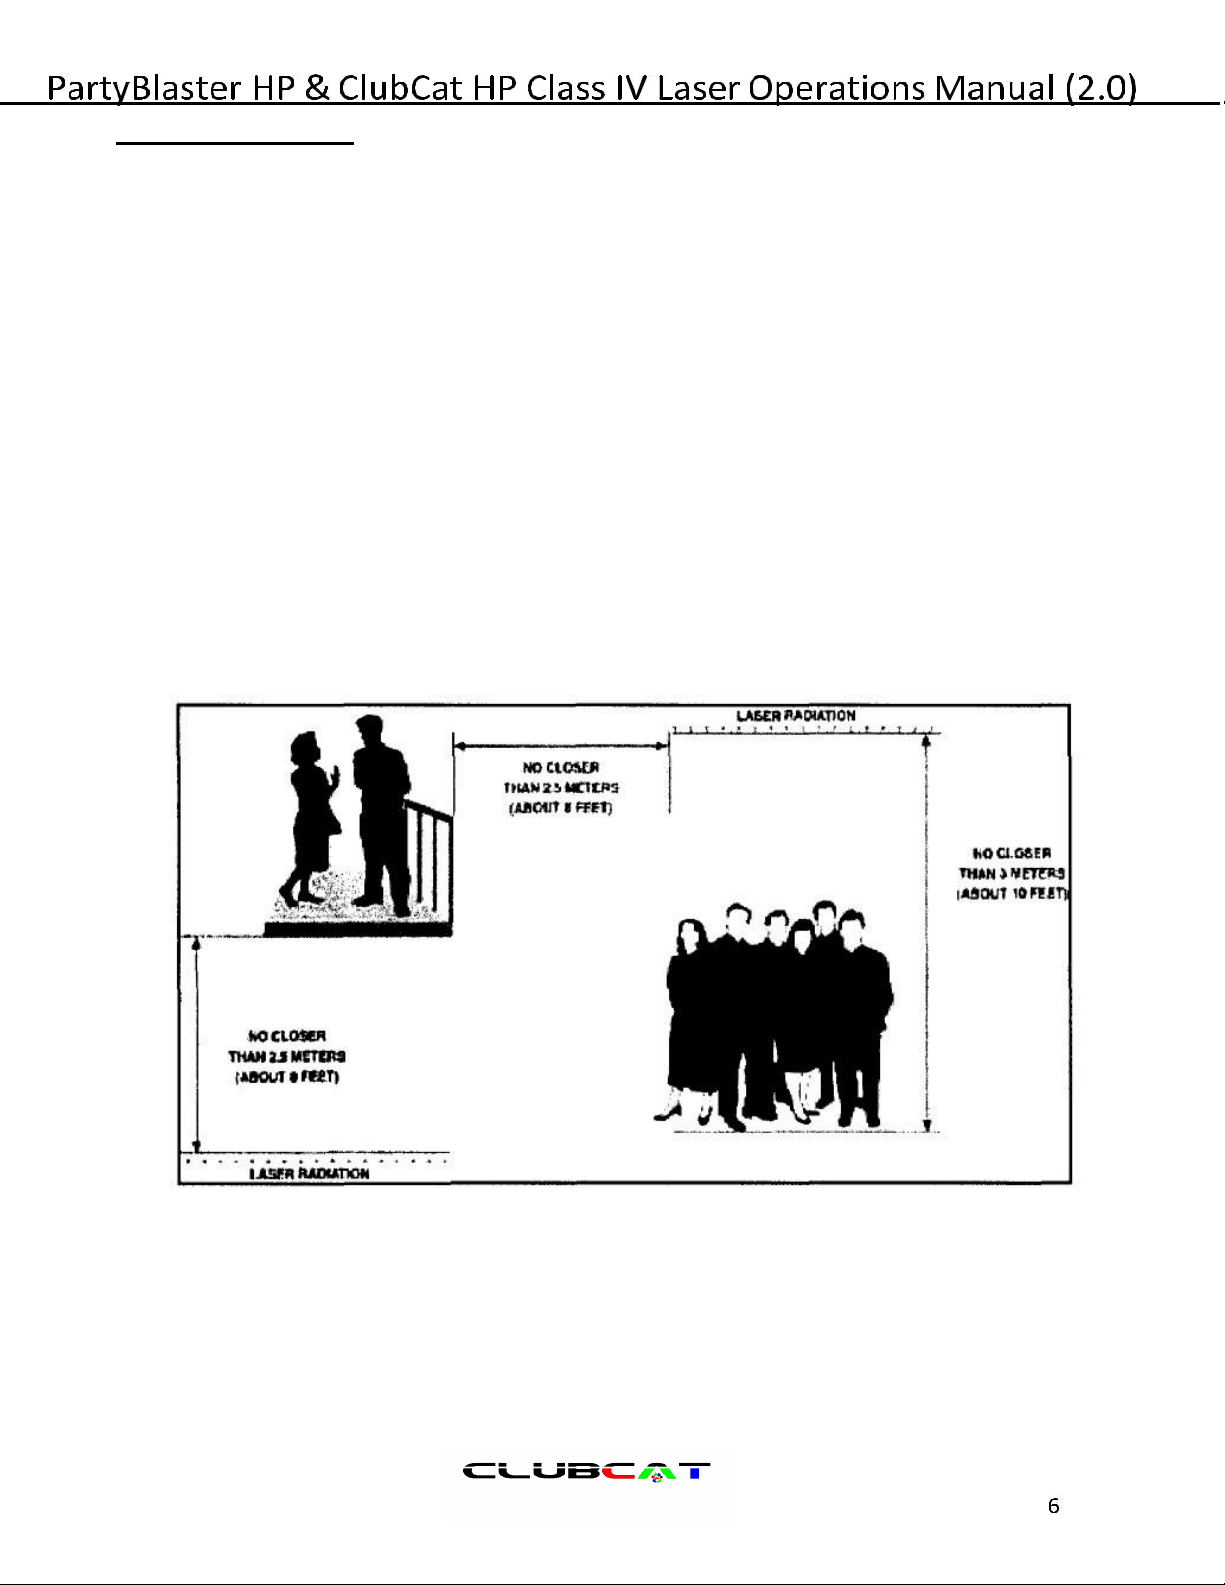
Laser Safe y
here re sever l regul tions th t must be followed when using l ser projection system. Under FDA
regul tions, ny l ser system emitting bove 1mW (such s this one) must be no closer th n 3 meters
( bout 10 feet) bove or 2.5
meters ( bout 8 feet) on the sides or below the floor ( such s through c tw lk or gr ted d nce floor) where n
udience would be, nd must be under continuous control by qu lified oper tor. If the system is not
under continuous control, double these s fety guidelines to comply with FDA st nd rds. Exercise
common sense. If you
consider the l ser be ms to be somewh t like fire rm (the bullet synonymous with the l ser be m
p th ), then it should not be difficult to elimin te the ch nce of ccident l hum n exposure to l ser
r di tion.
Alw ys h ve n oper tor present to monitor the s fety of the l ser projection system.
In the unlikely event of bounce mirror slipping, or str y be m projecting into n
re where hum n exposure m y occur, the oper tor must immedi tely shut down the
system nd correct the problem before continuing with the oper tion of the l ser
projection system. Extreme c ution must be t ken to insure th t proper s fety
procedures re used by the oper tor during set-up nd while the l ser projection
system is in use. Insure th t ll be ms re termin ted in s fe loc tion, nd void
physic l cont ct with the l ser be ms.
Copyright 2017, Technological Artisans, LLC.
As you unp ck your new l ser projection system m ke sure
th t ll p rts re included nd re not d m ged. (See
p cking slip for list of shipped items)
A few suggestions:
Be sure to s ve the box in which your projection system w s shipped. Also s ve the p cking
m teri l. In the unlikely event your new projection system must be returned it should be
tr nsported in its origin l box. Before you hook up the system, ple se t ke few minutes to:
•Complete the registr tion c rd nd send it b ck to us immedi tely.
•File your s les receipt in s fe pl ce.
•Write down the seri l number nd keep it in s fe pl ce for future reference.
Now th t you h ve unp cked your P rtyBl ster! or ClubC t! L ser Projection System nd
re d through the s fety inform tion, it’s time to become f mili r with the system.
Please Note: Tec nological Artisans is not responsible for damage, insufficient parts or
failure not reported wit in 48 ours of receipt
Copyright 2017, Technological Artisans, LLC.

EST P
1 Start Button pushing this button after all interlocks are satisfied will start
a 5second delay then the system will turn on at this point laser emission is
possible
2 Key used to release estop button
3 emote Emission indicator /interlock led led is off if all interlocks are not
satisfied led is green when all interlocks are satisfied led flashes red /green
when start button is pushed and all interlocks are satisfied led will stop
flashing and stay red after 5 second start up delay when led is red
emission is possible
4 ESTOP Button used to stop all laser emission in the event of a failure or
dangerous situation ( push to stop laser use key to release )
EST P REAR
DB9 connector connect this to the DB9 connector on the projector
Copyright 2017, Technological Artisans, LLC.
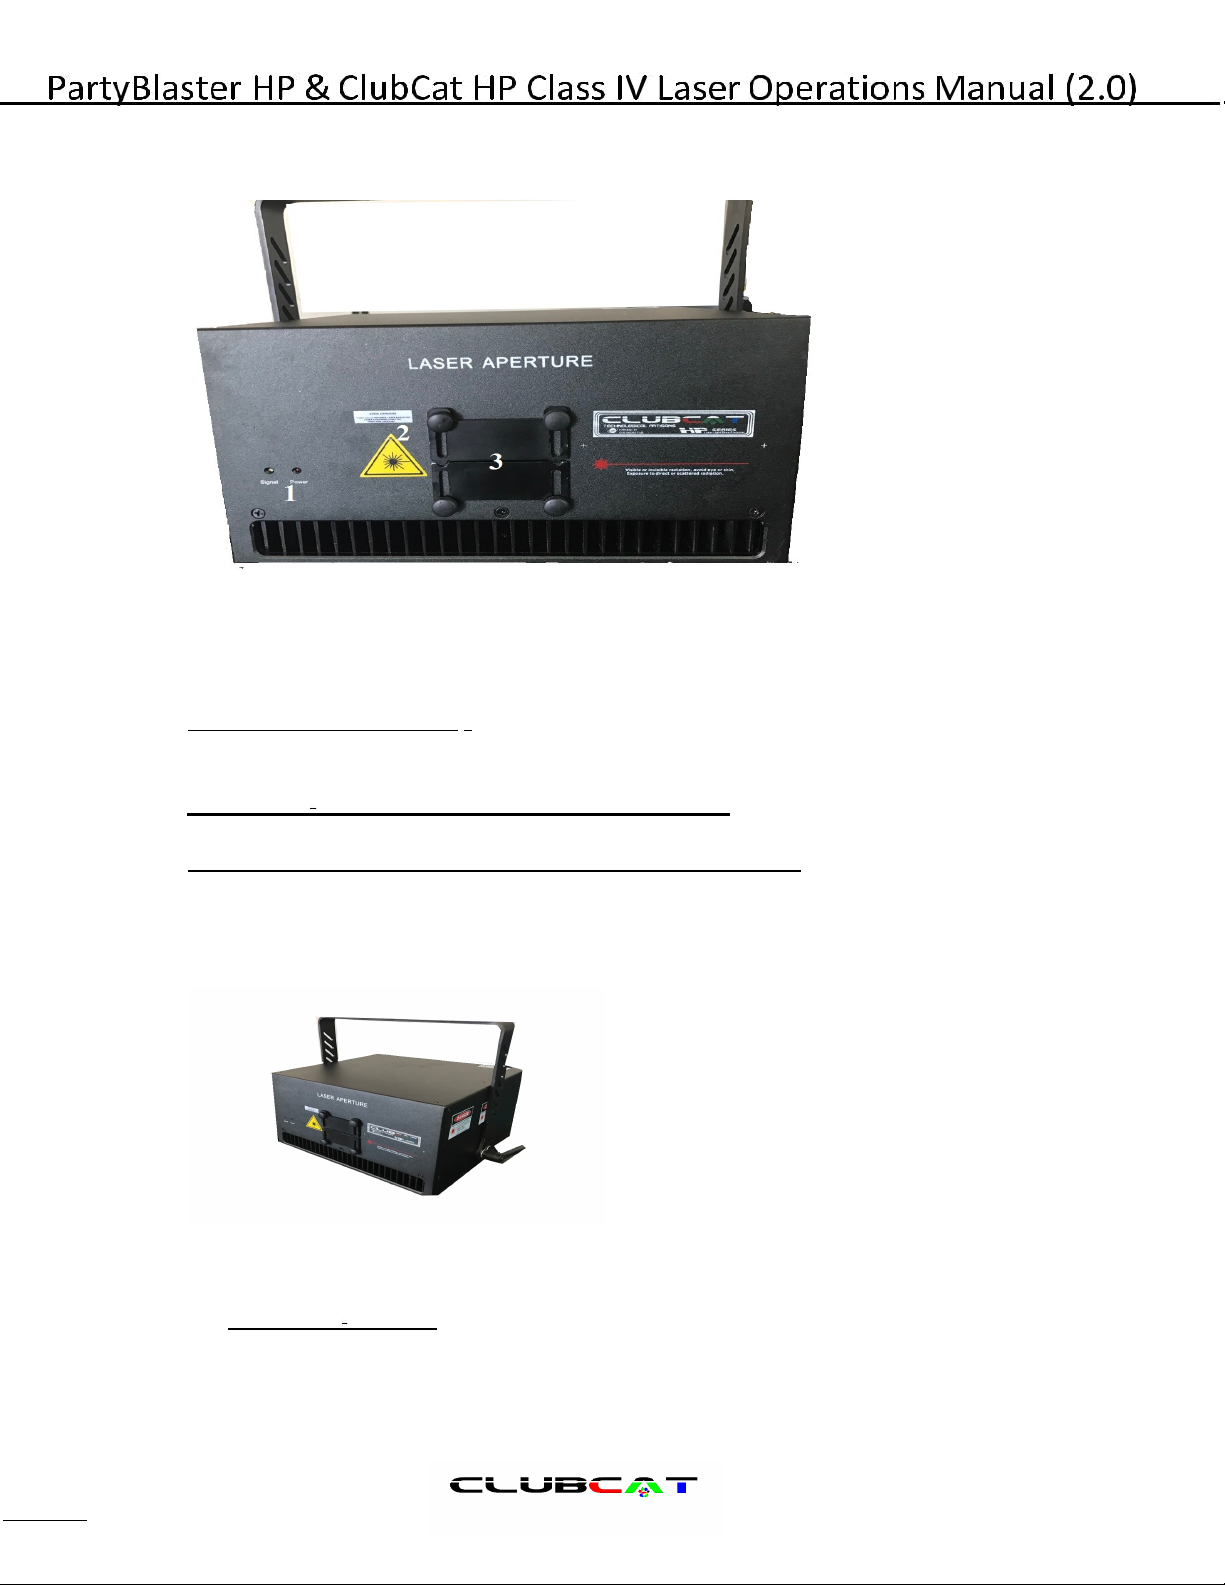
FRONT
1. Emission In icator LED - Glows red to indic te th t the power switch is
eng ged nd the l ser/s is energized nd re dy to emit l ser be ms.
2. Output Aperture an aperture warning labels L ser be ms/ re emitted from
this window, loc ted on the front of the unit.
3. Ou pu Aper ure upper and lower Cover/Baffle used to protect
sc nners/window during tr nsport tion nd lso used s s fety m sk when
slid into position just under nd bove the l ser sc n nd tightened into pl ce
Side
Classification Label Specifies the type of l ser nd power.See L beling Requirements for
more inform tion
Copyright 2017, Technological Artisans, LLC
9
This manual suits for next models
2
Table of contents


