Tecovision LED19DHRBJBD User manual

Model: LED19DHRBJBD
LED19DHRDBJBD
LED22DFRBJBD
LED22DFRDBJBD
:
LED/LCD Television


Power Cord Connection
VGA(PC) Connection
AV Connection
YPbPr Connection
Antenna Connection
HDMI Connection
USB PORT Connection
COAX Connection
9
10
10
9
8
8
11
11
Remote control instructions in ANALOGUE TV mode
Remote control setup
Select Input Source
Picture Menu
Sound Menu
Channel Menu
Feature Menu
Setup Menu
Remote control instructions in TELETEXT mode
13
12
20
20
25
23
27
32
14
42
44
45
Movie Menu
Music Menu
E-BOOK Menu
SAFETY
PRECAUTIONS
2
1PREFACE
FRONT BACK
CONNECTIONS
OF TV
4
5
REMOTE CONTROL
6
IN THE CARTON
3
7TV Operation
2
2
7
6
1
BASIC
A
INSTALL TION
8USB Operation
53
54
TROUBLESHOOTING
10
SPECIFICATIONS
11
Remote control instructions in USB mode
17
34
35
Photo Menu 41
EPG and Channel List Menu
PVR Menu
Auto Installation 18
Remote control instructions in DIGITAL TV mode
16
15
Remote control instructions in DVD mode
9DVD Operation
General Setup
Audio Setup
Preference Setup
46
48
49
2
1.
2.
3

4

5
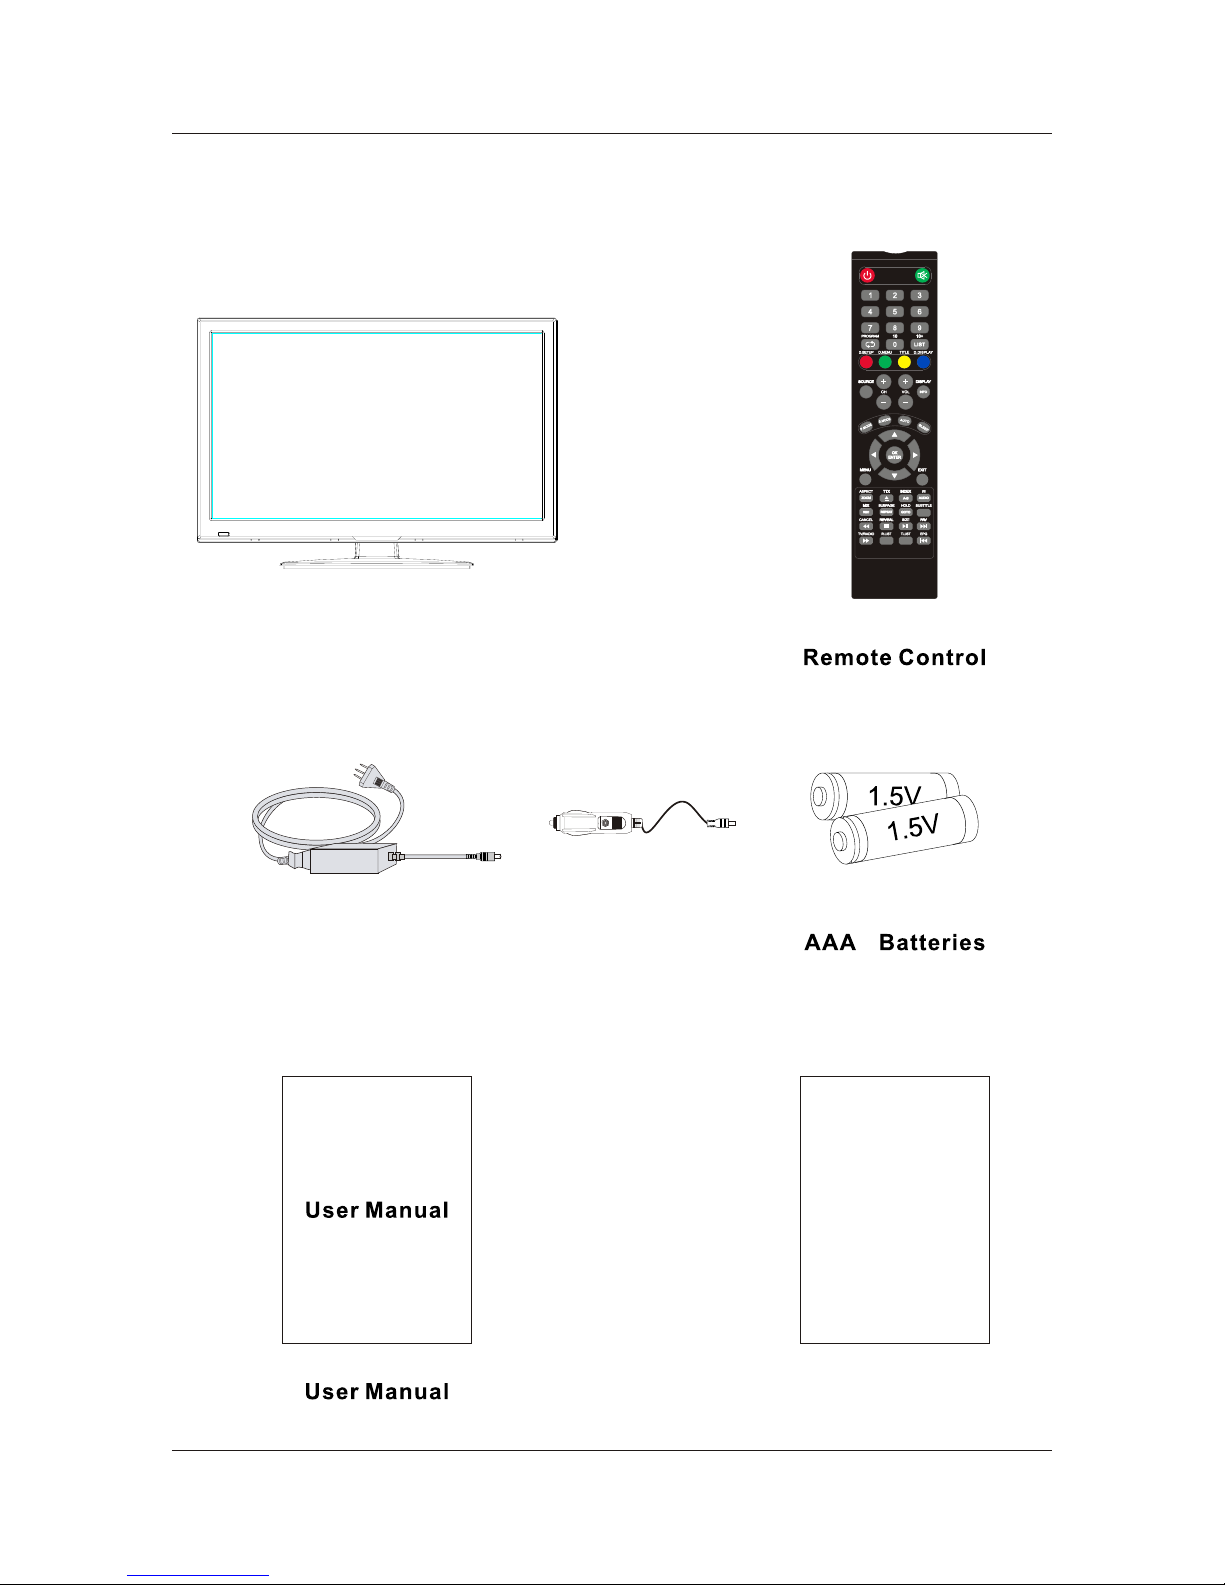
3. IN THE CARTON
6
LED TV SET
Cigar Lighter
Warranty Card
Warranty Card
Adapter
HDMI
7
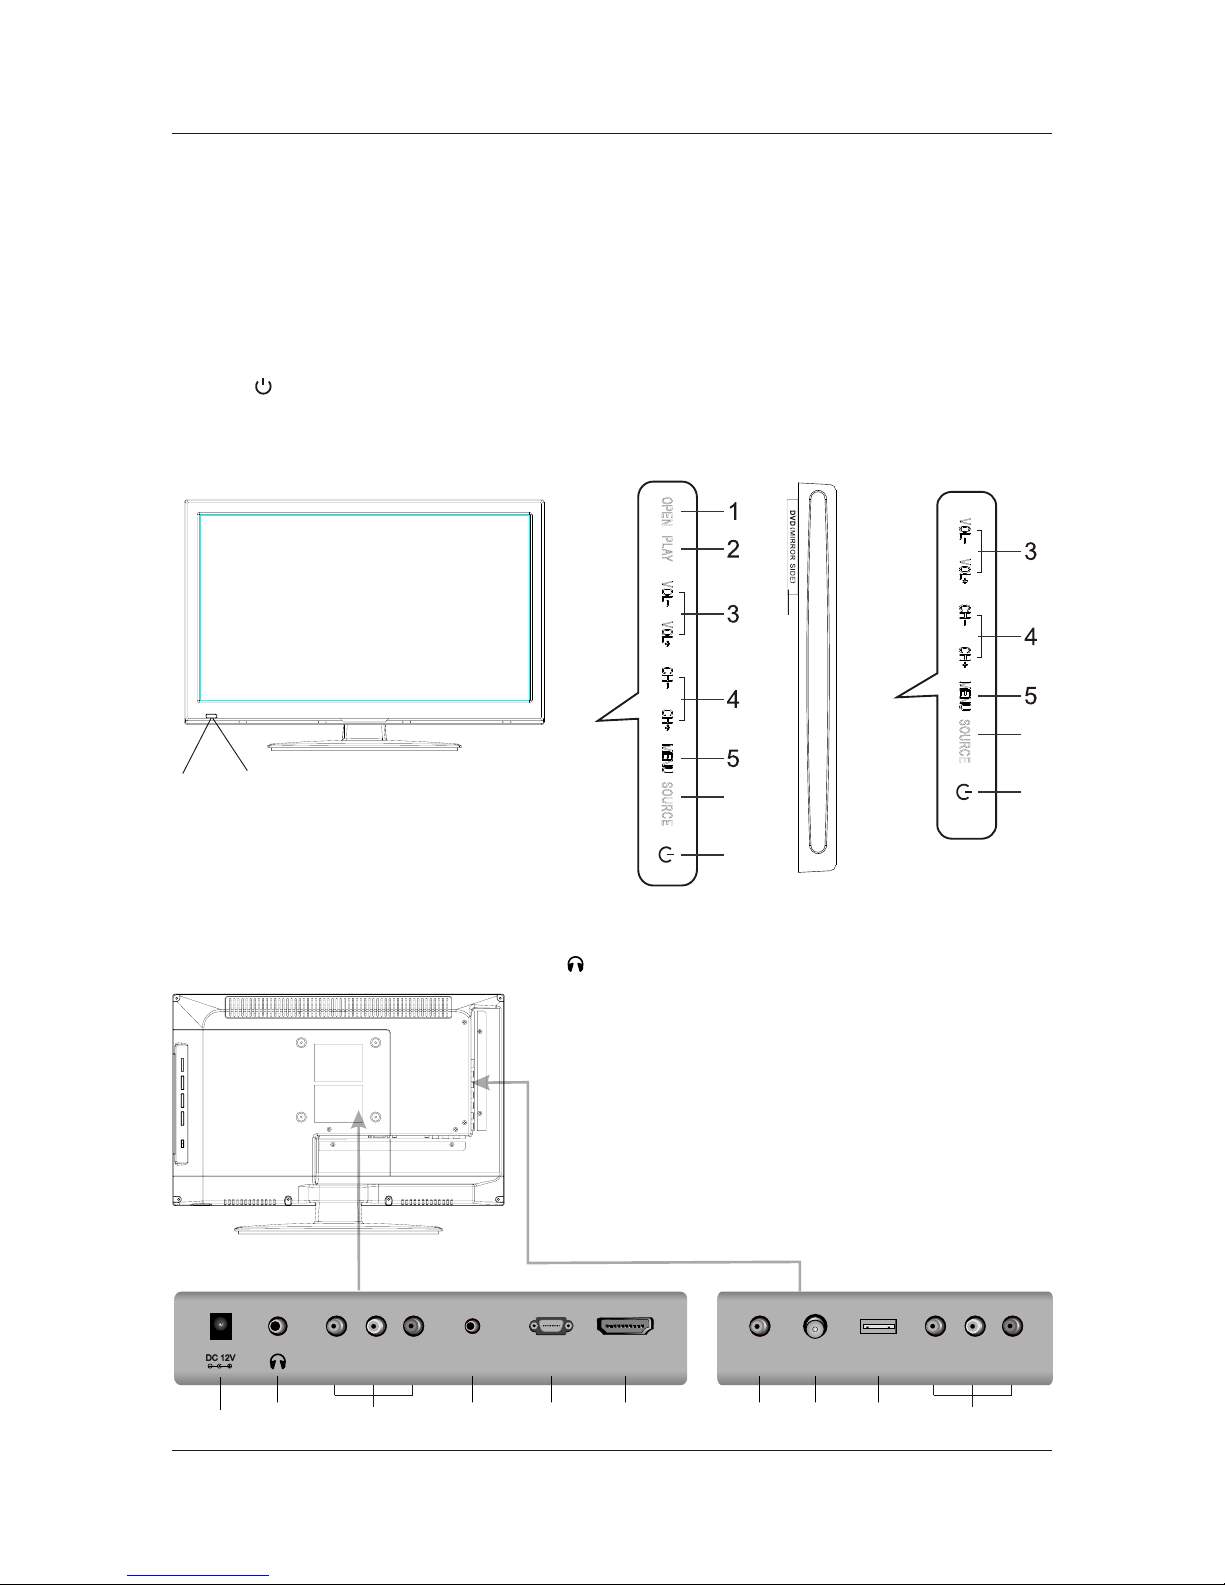
1. DC 12V: DC input socket.
/ ( ) /Audio
2. : Connect the headphone.
3. VIDEO Audio LR : Connect to the Video output
jack of DVD or VCR.
4. PC AUDIO: Connect the Audio output jack of PC.
5. VGA(PC): Connect the PC-RGB output jack of PC.
6. HDMI: Connect the HDMI output jack of DVD.
7. COAX: Connect the SPDIF receiver.
8. RF IN: Connect the antenna.
9. USB: Connect to portable usb device.
10. YPbPr: Connect the YPbPr output jack of DVD or VCR.
4. FRONT BACK CONNECTIONS OF TV
Front View
Back View and Control Connections
25
4
VGA(PC)VGA(PC)
PC AUDIO USB
RF IN RF IN
8
7
COAX
9
1. OPEN/CLOSE in DVD mode.
2. PLAY/PAUSE in DVD mode.
3. Press“VOL+”or “VOL-”to increase or decrease the sound level.
4. Press“CH+”or “CH-”to change channels.
5. Press “MENU”to bring up the main menu on the screen.
6. Press“SOURCE”to select the input source.
7. Press“ ” button to turn standby mode on or off.
8. POWER INDICATOR: show red in standby mode, show blue when your TV is switched on.
9. REMOTE SENSOR: infrared sensor for the remote control.
10.DVD: Insert a 12cm disc to the disc slot according to the label.
896
7
6
7
LED19DHRBJBD/LED22DFRBJBD
LED19DHRDBJBD/LED22DFRDBJBD
13
VIDEOVIDEO RRLL
10
YYPrPr
PbPb
6
10
(DVD MODELS ONLY)

8
5. BASIC A INSTALL TION
Power Cord Connection
Antennas Connection
To ensure good picture and sound, TV antenna system needs to be installed. The antenna system as
shown can be sourced from TV equipment shops, which will provide service for correct installation
and connection. After installation, insert the 75-ohm antenna plug into the antenna jack as shown.
75 OHM
ANTENNA
PLUG
POWER PLUG OF
ANTENNA
AMPLIFIER
OUTDOOR
ANTENNA
AMPLIFIER
VHF ANTENNA UHF ANTENNA
INDOOR
ANTENNA
AMPLIFIER
RF IN
Connect the power cord correctly as shown.
Press the STANDBY button of your TV to switch on the TV. The power indicator on the front
panel lights up in Blue or Green.
DC DC 12V 12V

HDMI
VGA(PC)VGA(PC)
PC AUDIO USB
RF IN RF IN COAX
VIDEOVIDEO RRLLYYPrPr
PbPb
Connect the VIDEO and AUDIO output jack of the DVD or VCR to the AV IN jacks on the set using
the RCA cable (Yellow [video], White and Red [left & Right audio]).
Select the AV input source using the SOURCE button on the remote control.
AV Connection
YPbPr Connection
TV BackTV Back
9
Connect the YPbPr output of the DVD or VCR to the YPbPr input on the set. The picture quality is
improved compared to connecting a regular VCR to the video input. Connect the Audio output of
the DVD or VCR to the Audio input jacks on the set using the RCA cable.
Match the jacks colors :Y is green,Pb is blue,Pr is red,Audio left is white and Audio right in red.
Select component input source with using the SOURCE button on the remote control.
DVD or VCR DVD or VCR
Video CableVideo Cable
V V R R
LL
TV BackTV Back
DVD or VCR DVD or VCR
YPbPr CableYPbPr Cable Auido Cable Auido Cable
Pr Pr
PbPb
YYLLRR
DVD or VCR BackDVD or VCR Back
HDMI
VGA(PC)VGA(PC)
PC AUDIO USB
RF IN RF IN COAX
VIDEOVIDEO RRLLYYPrPr
PbPb

HDMI
VGA(PC)VGA(PC)
PC AUDIO USB
RF IN RF IN COAX
VIDEOVIDEO RRLLYYPrPr
PbPb
VGA(PC) Connection
Connect the RGB output of the PC to the VGA(PC) jack on the set. Connect the AUDIO output of
the PC to the PC AUDIO jack on the set . Select the VGA(PC) input source with using SOURCE
button on the remote control.
Audio CableAudio Cable
AUDIOAUDIO RGB-PC OUTPUTRGB-PC OUTPUT
Y Y
10
VGA CableVGA Cable
TV BackTV Back
COAX Connection
When connected the coaxial output to your audio amplifier,playing back the discs Dolby, MPEG
contents,the coaxial output the original signal to your amplifier. Your Amplifier must have the
corresponding decoding function.
Coax CableCoax Cable
SPDIF INPUT
Audio Amplifier
Audio Amplifier Back
TV BackTV Back
HDMI
VGA(PC)VGA(PC)
PC AUDIO USB
RF IN RF IN COAX
VIDEOVIDEO RRLLYYPrPr
PbPb
HDMI
VGA(PC)VGA(PC)
PC AUDIO USB
RF IN RF IN COAX
VIDEOVIDEO RRLLYYPrPr
PbPb
11
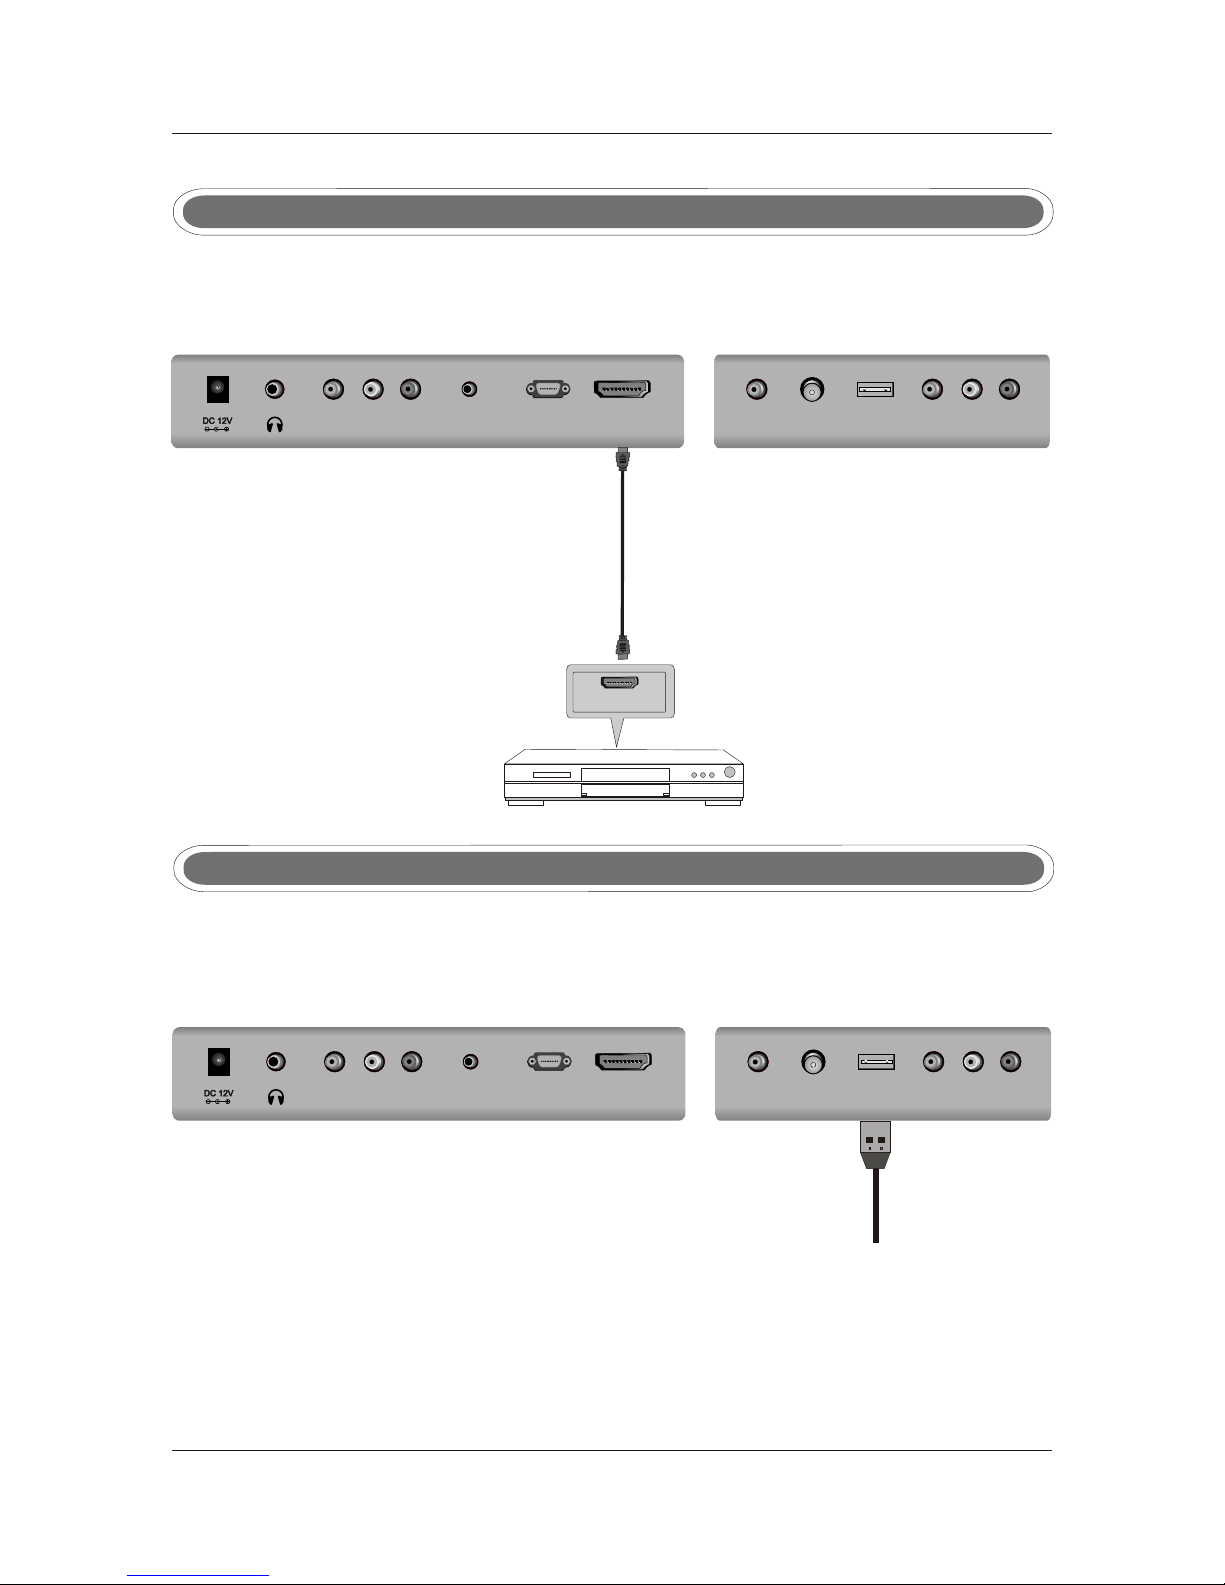
HDMI Connection
HDMI connection allows the user to transfer all audio/video/control signals through one
cable only. These signals are transferred in digital. HDMI cable is not supplied.
DVD or VCR DVD or VCR
DVD or VCR BackDVD or VCR Back
HDMI OUT
HDMI CableHDMI Cable
Insert the USB flash drive to the USB port. Select USB channel source via the SOURCE button
on the remote control.
USB PORT Connection
R
USB PO T
TV BackTV Back
TV BackTV Back
HDMI
VGA(PC)VGA(PC)
PC AUDIO USB
RF IN RF IN COAX
VIDEOVIDEO RRLLYYPrPr
PbPb

12
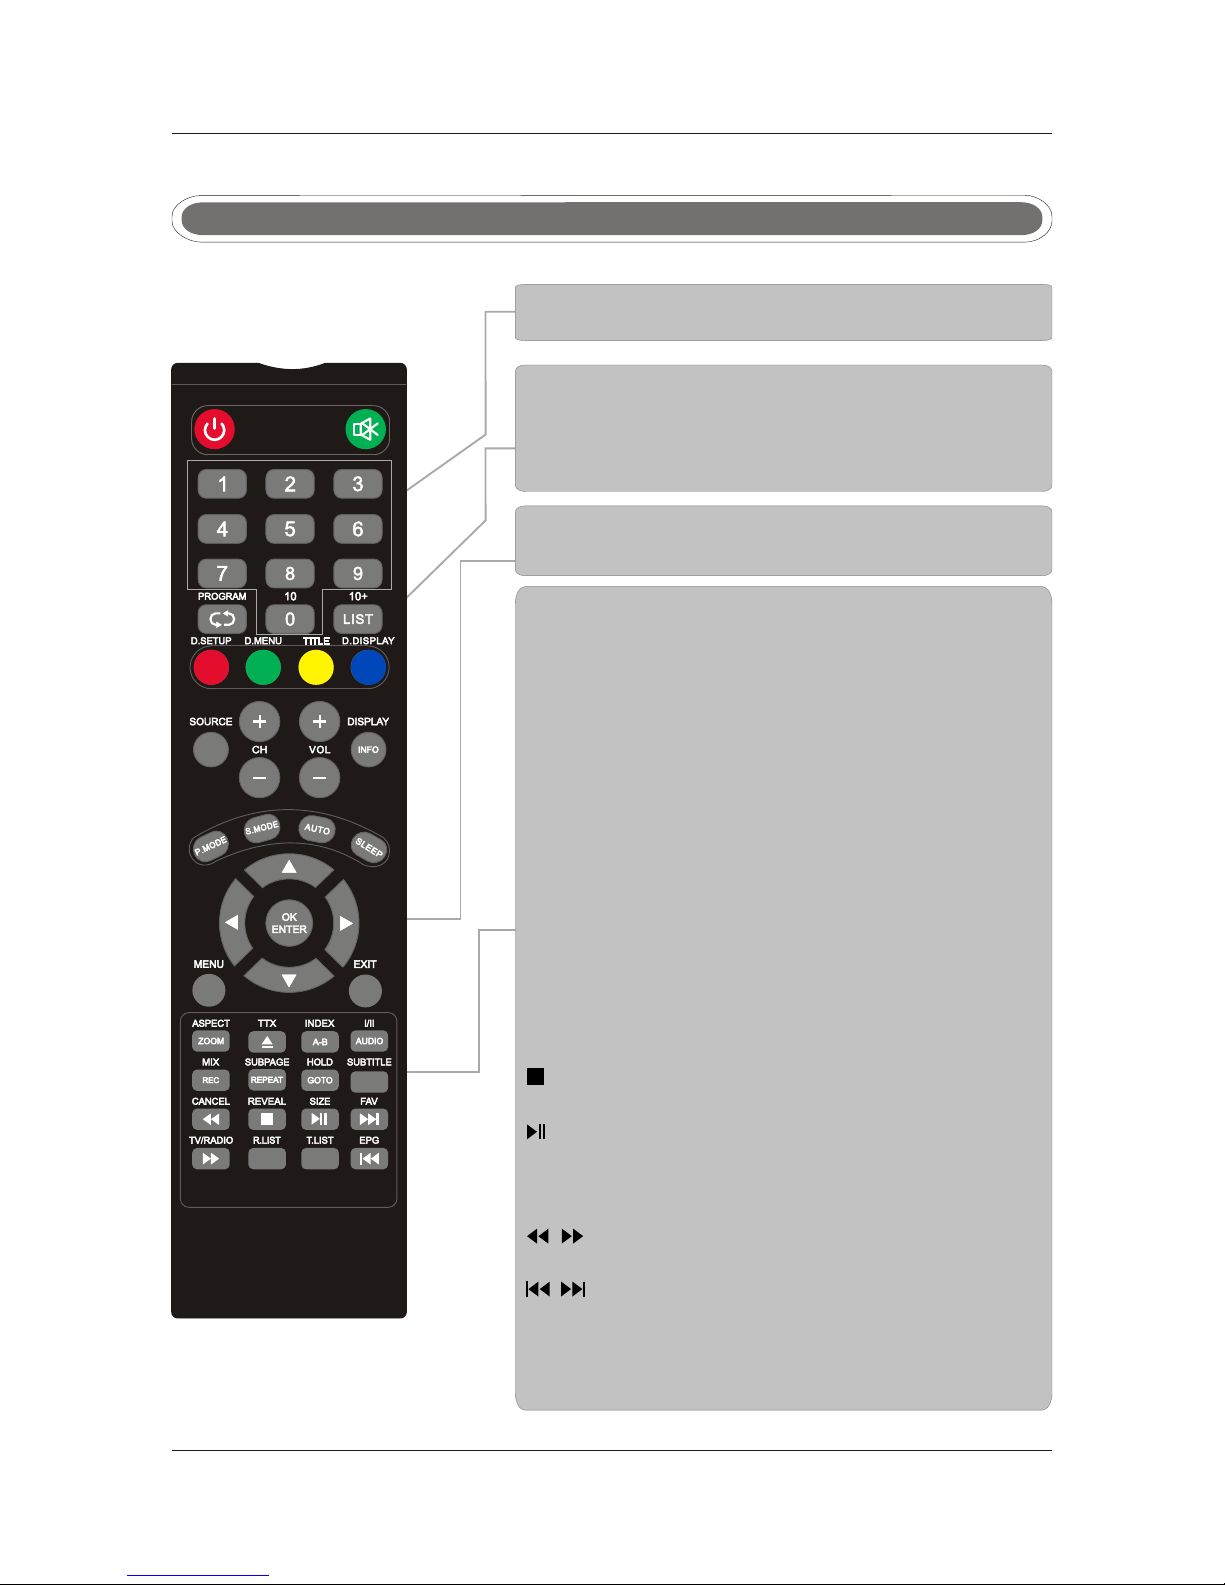
Remote control instructions in Analogue TV mode
Turn the LED TV ON or OFF.
Press to mute the sound. Press again or press VOL+ to
un-mute the TV.
NUMBER BUTTONS
Press 0-9 to select a TV channel directly when you are
watching TV. The channel change after 2 seconds.
MENU
Brings up the main TV menu to the screen.
THUMBSTICK( ▲/ ▼/◄ / ►/ OK ENTER )
Allows you to navigate the on-screen menus and
adjust the system settings to your preference.
EXIT
Exit the main TV menu to the screen.
CH+/CH-
Press to scan through channels.
VOL+/VOL-
Press to increase / decrease the sound level.
Return to the previous channel viewed.
DISPLAY
Press to display the source and channel's information.
SLEEP
Lets you select amount of time before your TV turn itself
off automatically.
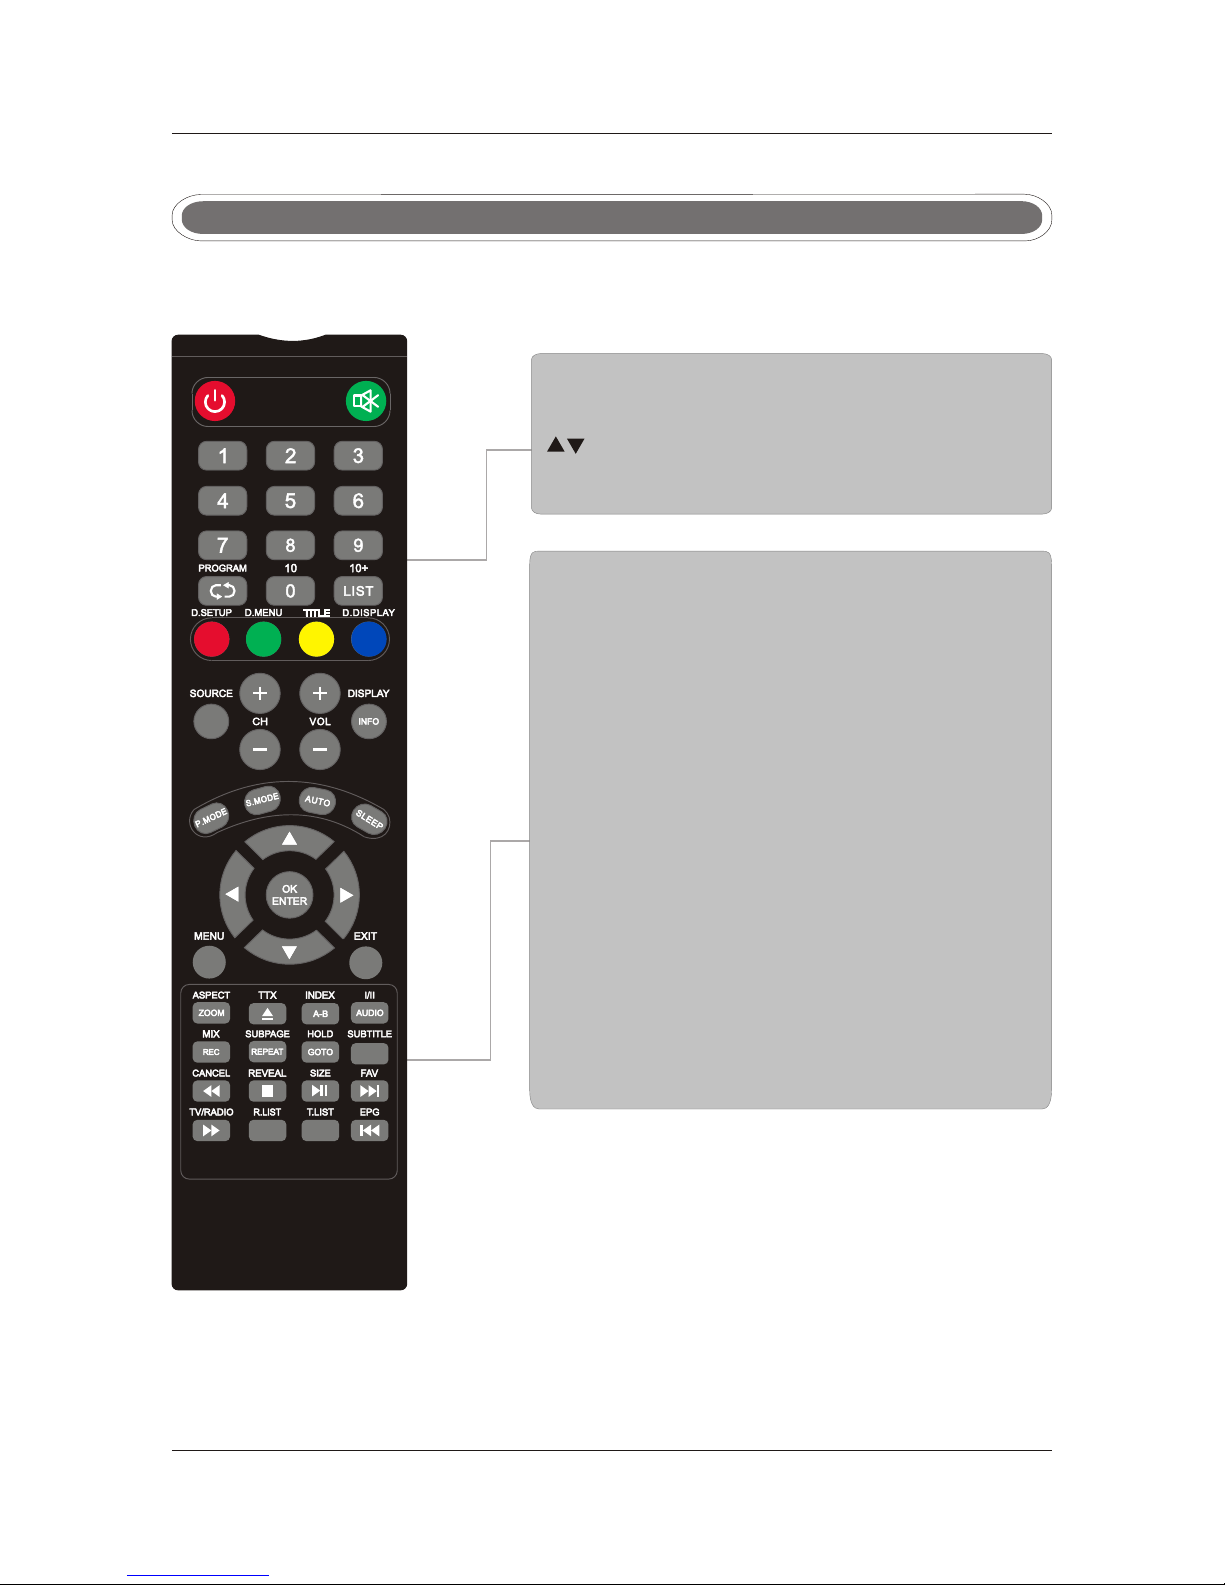
SOURCE
Press SOURCE to display the OSD input source,
Press▲▼to select an input spurce, and then press
OK to confirm.
LIST
Press to display the TV program list.
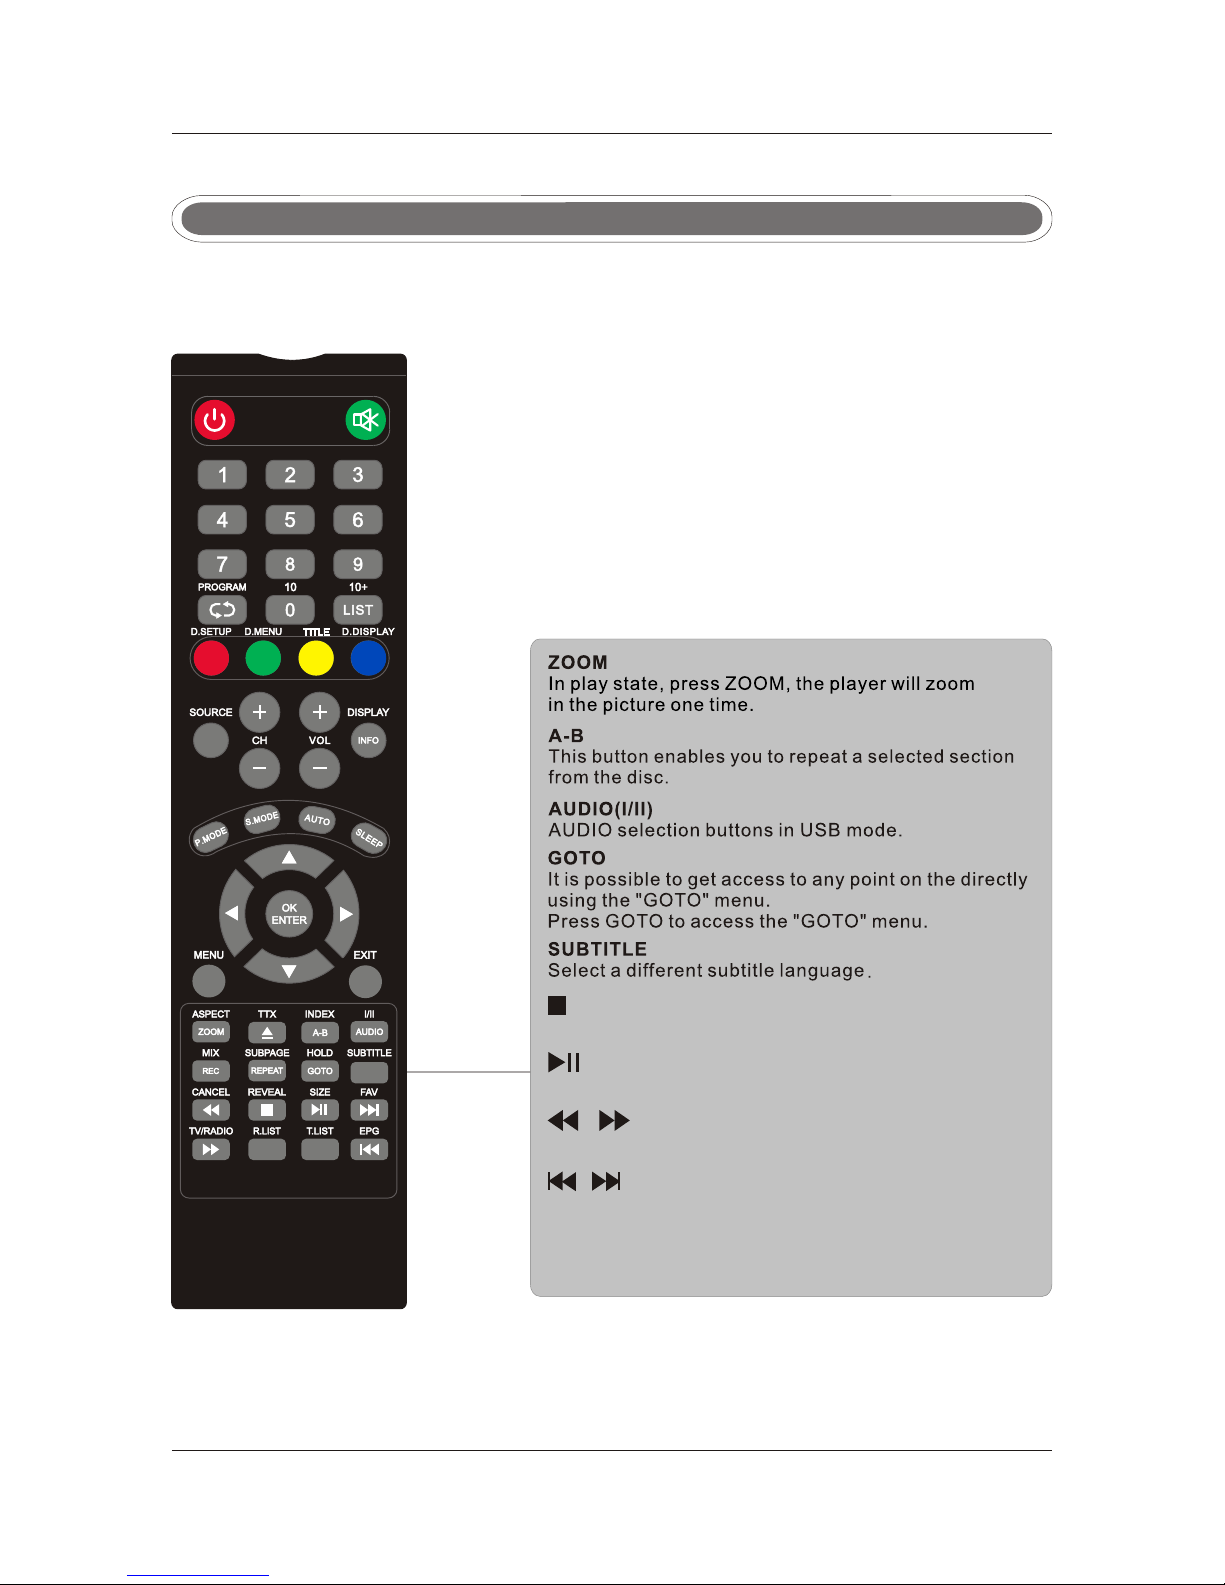
ASPECT
Selects screen display ratio.
PMODE
Press to select preset picture mode.
SMODE
Press to select preset sound mode.
AUTO
Press to do auto configuration directly(PC MODE).
I/II
Press to search the NICAM modes.
Remote control instructions in Digital TV mode
13
NUMBER BUTTONS
Press 0-9 to select a channel.
CH+/CH-
When watching a channel, changes the channel.
INFO
Press to display the source and channel's information.
LIST
Display the recorded file list.
COLOR BUTTONS
Color buttons (respectively red, green, yellow and blue)
used in a few sub-menus.
SUBTITLE
To display subtitle in DTV mode.
AUDIO
To display audio menu.
TV/RADIO
When watching a channel,allows you switch between
TV and Radio modes.
FAV
Favorite program list.
REC
Press to record the TV program in DTV mode.
EPG
Launches the EPG(Electronic Program Guide)in DTV
mode.
Stop playing or stop recording.
Fast reverse and Fast forward.
Previous / next chapter in USB mode,or play the Previous
Play or pause.
Press to enter Timeshift, the image paused and it start
record from the paused position.
(Timeshift)
/next scene of the recorded programs, jump by 30 seconds.
T.LIST
Press to display the Record Timer Schedule List.
R.LIST
Display the recorded file list.
Remote control instructions in USB mode
14
REPEAT
Press REPEAT button to select the repeat mode.
Jump to previous and next track.
Stop playing or stop.
Press to play or pause the program.
Fast backward and forward key.

DVD
TITLE
When DVD is playing,bring up the TITLE MENU.
Note: The DVD function just for LED19DHRDBJBD/LED22DFRDBJBD .
15
16
Remote co ntrol inst ructions in TELETEXT mode
TTX
Press to switch between TV and Teletext mode.
SUBPAGE
TELETEXT Subpage.
HOLD
Freeze the current page.
SUBTITLE
To display subtitle.
REVEAL
Reveal or hide the hidden words.
COLOR BUTTONS
Select 4 Preferred TELETEXT page.
INDEX
Request index page when index link is valid.
SIZE
Change the picture size.
NUMBER BUTTONS
Press 0-9 to select a teletext page.
Page up and Page down in TELETEXT mode.
CANCEL
TELETEXT cancel.
CANCEL
MIX
TV and TTX picture are mixed together in transparent
background.

17
Remote control setup
1. Open the cover.
2. Use two AAA size batteries.When inserting the batteries, make sure correct polarities “+”and “-”
marks
on the batteries line up correctly with compartment markings .
3. Replace the battery cover.
To prevent battery leakage which may result in bodily injury or damage to the remote:
1. Install all batteries correctly, and as marked on the remote control.
2. Do not mix old and new batteries, and do not mix alkaline, standard (carbon-zinc) or rechargeable
(ni-cad, ni-mh, etc.) Batteries.
3. Remove batteries when the remote is not used for a long period of time.
18
7. TV Operation
Auto InstallationAuto Installation
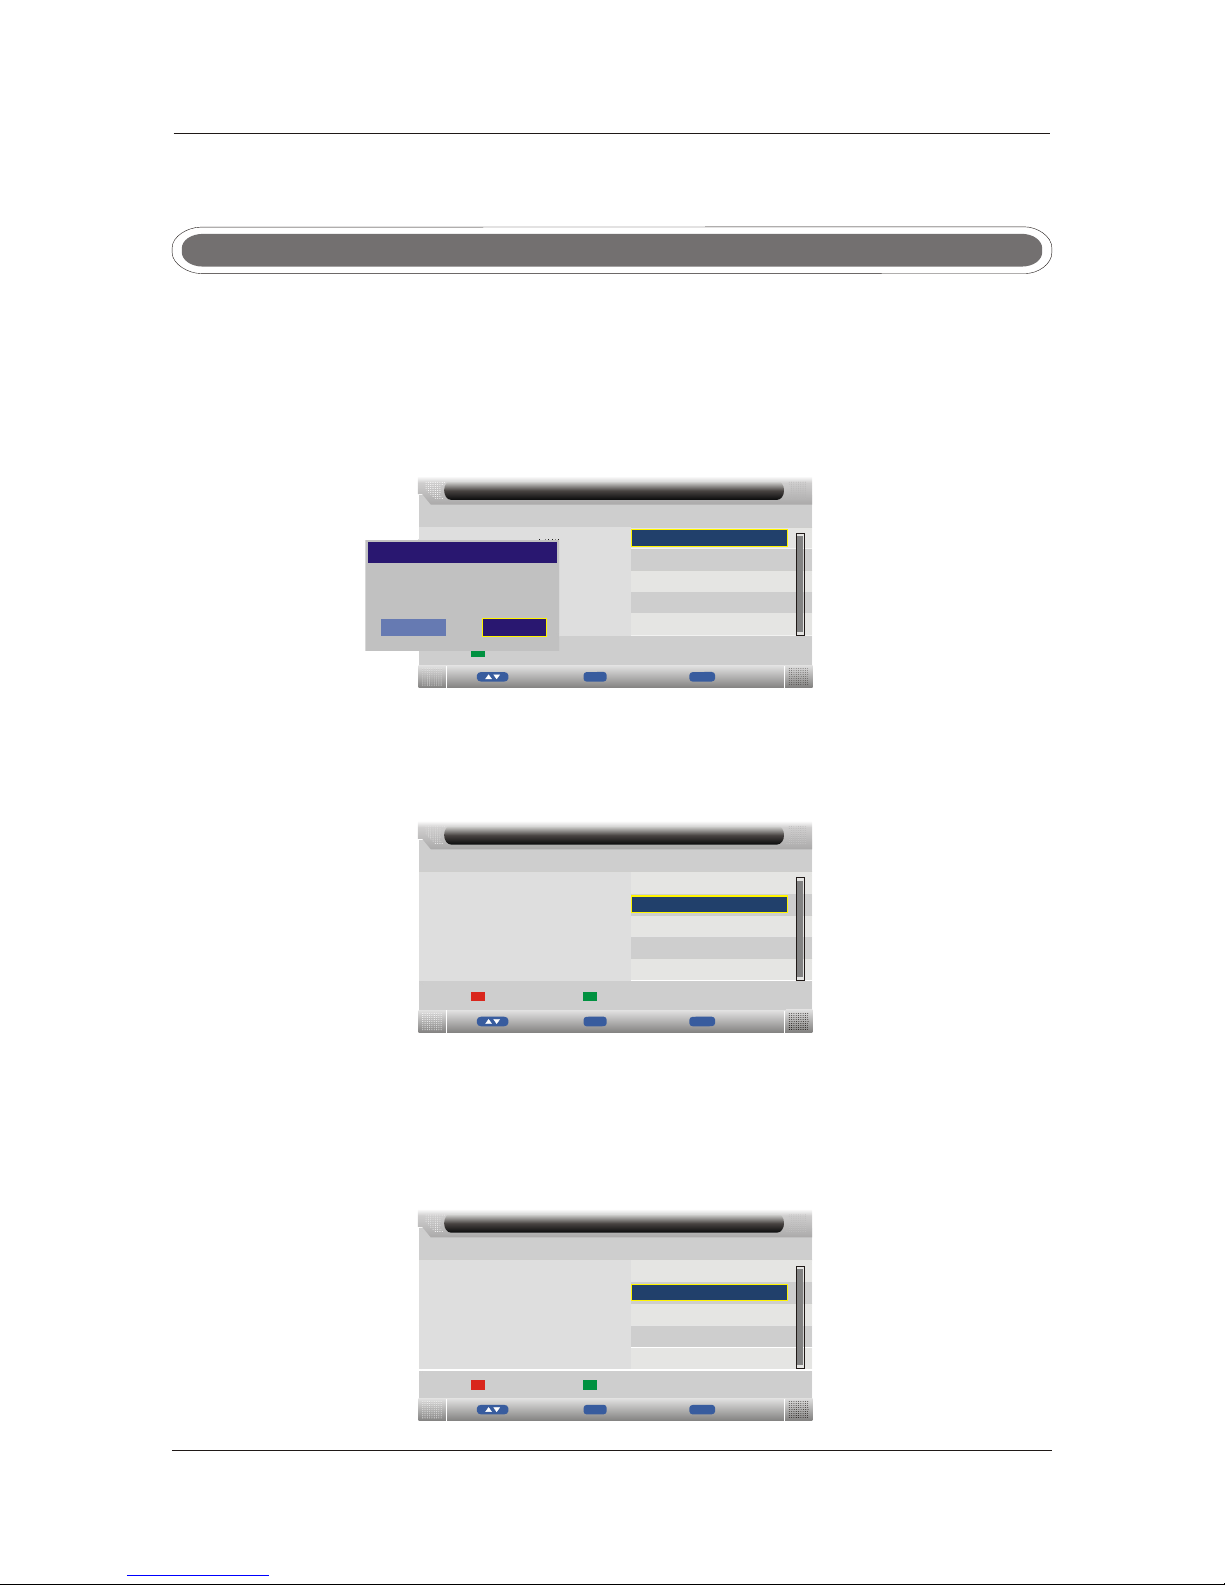
If this is the first time you are turning on the TV and there are no programs in the TV memory, the
“Auto Installation” menu will appear on the screen. There are 5 setups as follow:
Setup 1: Set up the TV Location
Setup 2: Set up the Country
Setup 3: Set up the Language
Auto Installtion
vMo eEnter Eter
nExit Eit
x
-Setup2-
New Zealand
Previous Page
Country:
Next Page
Australia
Auto Installtion
MoveEnterte
En r iEx tExit
-Setup1-
Home
Dynamic
Standard
Mild
Next Page
Home Mode:
Are you sure?
MessageMessage
OK CancelCancel
Press ▼ / ▲ button to select Home Mode in the main menu then press OK/ENTER button to enter.,
Press the green button to enter the next page and the EXIT button to exit the entire menu.
Press the green button to enter the next page, the red button to return to the previous page and the
EXIT button to exit the entire menu.
Press ▼ / ▲ button to select Language in the main menu, then press OK/ENTER button to confirm.
Press ▼ / ▲ button to select Country in the main menu then press OK/ENTER button to confirm.,
Auto Installtion
M v
o e t
En er EnterExit E it
x
-Setup3-
English
Previous Page
Language:
Next Page
Italy
Spanish
France
Germany
Press ◄ / ►button to choose OK or Cancel, press OK/ENTER button to confirm.
This manual suits for next models
3
Table of contents
Other Tecovision LCD TV manuals


