TEH LT606 User manual

Tools for Every Home
Cordless Trimmer
LT606

12
Model
Rated Voltage
Motor
No Load Speed
Compatible Battery
Collet Chuck Capacity
DC 20V
28000r/min
Brush
LB4.0Ah
LT606
6-8mm Battery Release Button
Battery
Quick Locking Clip
Depth Gauge
Lock Nut
On/Off Switch

34
ELECTRICAL SAFETY
a) Power tool plugs must match the outlet. Never modify the plug in any way. Do not use any
adapter plugs with earthed (grounded) power tools. Unmodified plugs and matching outlets will
reduce risk of electric shock.
b) Avoid body contact with earthed or grounded surfaces such as pipes, radiators, ranges and
refrigerators. There is an increased risk of electric shock if your body is earthed or grounded.
c) Do not expose power tools to rain or wet conditions. Water entering a power tool will increase
the risk of electric shock.
d) Do not abuse the cord. Never use the cord for carrying, pulling or unplugging the power tools.
Keep cord away from heat, oil, sharp edges or moving parts. Damaged or entangled cords
increases the risk of electric shock.
PERSONAL SAFETY
a) Stay alert, watch what you are doing and use common sense when operating a power tool. Do
not use a power tool while you are tired or under the influence of drugs, alcohol or medication. A
moment of inattention while operating power tools may result in serious personal injury.
b) Use safety equipment. Always wear eye protection. Safety equipment such as dust mask, non-
skid safety shoes, hard hat, or hearing protection used for appropriate conditions will reduce the
risk of personal injuries.
c) Prevent unintentional starting. Ensure the switch is in the off-position before connecting to
power source and/or battery pack, picking up or carrying the tool.
Carrying power tools with your finger on the switch or energizing power tools that have the switch
on invites accidents.
d) Remove any adjusting key or wrench before turning the power tool on. A wrench or a key to a
rotating part of the power tool may result in personal injury.
e) Do not overreach. Keep proper footing and balance at all times. This enables better control of
the power tool in unexpected situations.
f) Dress properly. Do not wear loose clothing or jewellery. Keep your hair, clothing and gloves
away from moving parts. Loose clothes, jewellery or long hair can be caught in moving parts.
g) Store idle power tools out of the reach of children and do not allow persons unfamiliar with the
power tool or these instructions to operate the power tool. Power tools are dangerous in the hands
of untrained users.
h)Maintain power tools. Check for misalignment or binding of moving parts, breakage of parts
and any other condition that may affect the power tool’s operation. If damaged, have the power
tool repaired before use. Many accidents are caused by poorly maintained power tools.
e) When operating a power tool outdoors, use an extension cord suitable for outdoor use. Use of a
cord suitable for outdoor use reduces the risk of electric shock.
f) If operating a power tool in a damp location is unavoidable, use a residual current device (RCD)
protected supply. Use of an RCD reduces the risk of electric shock.

l) Keep cutting tools sharp and clean. Properly maintained cutting tools with sharp cutting edges
are less likely to bind and are easier to control.
n) Use the power tool, accessories and tool bits etc. in accordance with these instructions, taking
into account the working conditions and the work to be performed. Use of the power tool for
operations different from those intended could result in a hazardous situation.
Have your power tool serviced by a qualified repair person using only identical replacement parts.
This will ensure that the safety of the power tool is maintained.
SERVICE
USE AND HANDLING OF THE CORDLESS
ELECTRICAL POWER TOOL
a) Charge a rechargeable battery unit using only the charger recommended by the manufacturer.
Chargers are often designed for a particular type of rechargeable battery unit. There is the danger
of fire if other types of rechargeable battery units are used.
b) Only the rechargeable battery units supplied are to be used with an electrical power tool. The
use of other rechargeable battery units may lead to the danger of injury or fire.
c) When they are not being used, store rechargeable
battery units away from paperclips, coins, keys, nails, screws or other small metal objects that
could cause the contacts to be bridged. Short-circuiting the contacts of a rechargeable battery
unit may result in heat damage or fire.
d) Fluids may leak out of rechargeable battery units if they are misused. If this happens, avoid
contact with the fluid. If contact occurs, flush the affected area with water. Seek additional medical
help if any of the fluid gets into your eyes. Escaping battery fluid may cause skin irritation or burns.
a) Ensure that the device is switched off before inserting the battery. Inserting a battery into a
power tool that is switched on may result in accidents.
b) Recharge the batteries indoors only because the battery charger is designed for indoor use
only.
c) To reduce the electric shock hazard, unplug the battery charger from the mains before cleaning
the charger.
d) Do not subject the battery to strong sunlight over long periods and do not leave it on a heater.
Heat damages the battery and there is a risk of explosion.
e) Allow a hot battery to cool before charging.
f) Do not open up the battery and avoid mechanical damage to the battery. Risk of short circuit
and fumes may be emitted that irritate the respiratory tract. Ensure fresh air and seek medical
assistance in the event of discomfort.
g) Do not use non-rechargeable batteries!
SPECIAL SAFETY DIRECTIONS FOR BATTERY-OPERATED TOOLS
a) This device can be used by children aged 8 and over and by people with reduced physical,
sensory or mental capacities or with a lack of experience or knowledge, if they are supervised or
have been instructed regarding safe use of the device and understand the resulting risks. Children
are not permitted to play with the device. Cleaning and user maintenance are not to be undertaken
by children without supervision.
b) Children should be supervised to ensure that they do not play with the appliance.
c) To charge the battery, use only the charger supplied. Risk of fire and explosion. This ensures
that the safety of the device is maintained.
d) Before each use, check the charger, cable and plug and have them repaired by qualified
professionals and only with original parts. Do not use a defective charger and do not open it up
yourself. This ensures that the safety of the device is maintained.
CORRECT HANDLING OF THE BATTERY CHARGER
56

e) Connect the charger only to a socket with an earth. Ensure that the mains voltage matches the
specifications on the charger rating plate. Risk of electric shock.
f) Disconnect the charger from the mains before closing or opening connection to the battery /
power tool / device.
g) Keep the charger clean and away from wet and rain. Do not use the charger outdoors. Dirt and
the entry of water increase the risk of electric shock.
h) Operate the charger only with the appropriate original batteries. Charging other batteries may
result in injuries and risk of fire.
I) Avoid mechanical damage to the charger. This can result in internal short circuits.
j) Do not operate the charger on a combustible surface (e.g. paper, textiles). Risk of fire due to
heating during charging.
k) If the power cable for this equipment is damaged, it must be replaced by the manufacturer, a
customer service agent of the same or a similarly qualified person in order to prevent hazards.
l) The battery of the appliance is not fully charged at the time of delivery. It therefore needs to be
fully recharged before you use it for the first time. For the first recharge cycle we recommend that
you charge the battery for about 1 hour. Slot the battery into the base and plug the battery charger
into a mains outlet.
m) When the battery is fully charged, unplug the charger from the mains and from the appliance.
Charging time is approx. 1
hour.
n) Do not charge the battery continuously since this may damage the battery cells.
Note: Repeatedly charging small capacities may damage the battery cells. Recharge the battery
only if the appliance is becoming slow.
o) Do not use the charger to charge non-rechargeable batteries.
Even if properly operating and handling this electric tool, some residual risks will remain. Due to its
construction and build, this electric tool may present the following hazards:
RESIDUAL RISKS
During operation, this electric tool generates an electromagnetic field which, under
certain circumstances, may impair the functionality of active or passive medical
implants. To reduce the risk of serious or lethal injuries, we recommend that persons
with medical implants consult their doctor and the manufacturer of their medical
implant before operating the machine.
WARNING
a) Cuts
b) Ear damage if working without ear protection.
c) Damage to your health caused by swinging your hands and arms when operating the appliance
for longer periods of time or if the unit is not held or maintained properly.
1. Hold power tool by insulated gripping surfaces, because the cutter may contact hidden wiring.
Cutting a "live" wire may make exposed metal parts of the power tool "live" and shock the
operator.
2. Use clamps or another practical way to secure and support the workpiece to a stable platform.
Holding the work by your hand or against the body leaves it unstable and may lead to loss of
control.
3. wear nearing protection during extended period of operation.
4. Handle the trimmer bits very carefully.
5. Check the trimmer bit carefully for cracks or damage before operation. Replace cracked or
damaged bit immediately.
6. Avoid cutting nails. Inspect for and remove all nails from the workpiece before operation.
7. Hold the tool firmly.
CORDLESS TRIMMER SAFETY WARNINGS
78

910
8. Keep hands away from rotating parts.
9. Make sure the trimmer bit is not contacting the workpiece before the switch is turned on.
10. Before using the tool on an actual workpiece, let it run for a while. Watch for vibration or
wobbling that could indicate improperly installed bit.
11. Be careful of the trimmer bit rotating direction and the feed direction.
12. Do not leave the tool running. Operate the tool only when hand-held.
13. Always switch off and wait for the trimmer bit to come to a complete stop before removing the
tool from workpiece.
14. Do not touch the trimmer bit immediately after operation; it may be extremely hot and could
burn your skin.
15. Do not smear the tool base carelessly with thinner, gasoline, oil or the like. They may cause
cracks in the tool base.
16. Use trimmer bits of the correct shank diameter suitable for the speed of the tool.
17. Some material contains chemicals which may be toxic. Take caution to prevent dust inhalation
and skin contact. Follow material supplier safety data.
18. Always use the correct dust mask/respirator for the material and application you are working
with.
INSTALLATION INSTRUCTION
Always be sure that the tool is switched off and the battery cartridge is removed
before carrying out any work on the tool.
WARNING
INSTALLING OR REMOVING TRIMMER BIT
Do not tighten the collet nut without inserting the bit. The collet cone may break.
NOTE
Insert the trimmer bit all the way into the collet cone.
Tighten the collet nut with the wrench or tighten the collet nut securely with the two wrenches. To
remove the bit, follow the installation procedure in reverse.
INSTALLING OR REMOVING THE TRIMMER BASE
1. Open the lock lever of the trimmer base, then insert the tool into the trimmer base aligning the
groove on the tool with the protrusion on the trimmer base.
2. Close the lock lever.
3. To remove the base, follow the installation procedure in reverse.
INSTALLING OR REMOVING THE PLUNGE BASE
Optional accessory
1. Open the lock lever of theplunge base, then insertthe tool
into the plunge base all the way aligning the grooveon the tool
withthe protrusion on the plunge base.
2. Close the lock lever.
3. To remove the base, follow the installation procedure in
reverse. 1. Lock lever
1

11 12
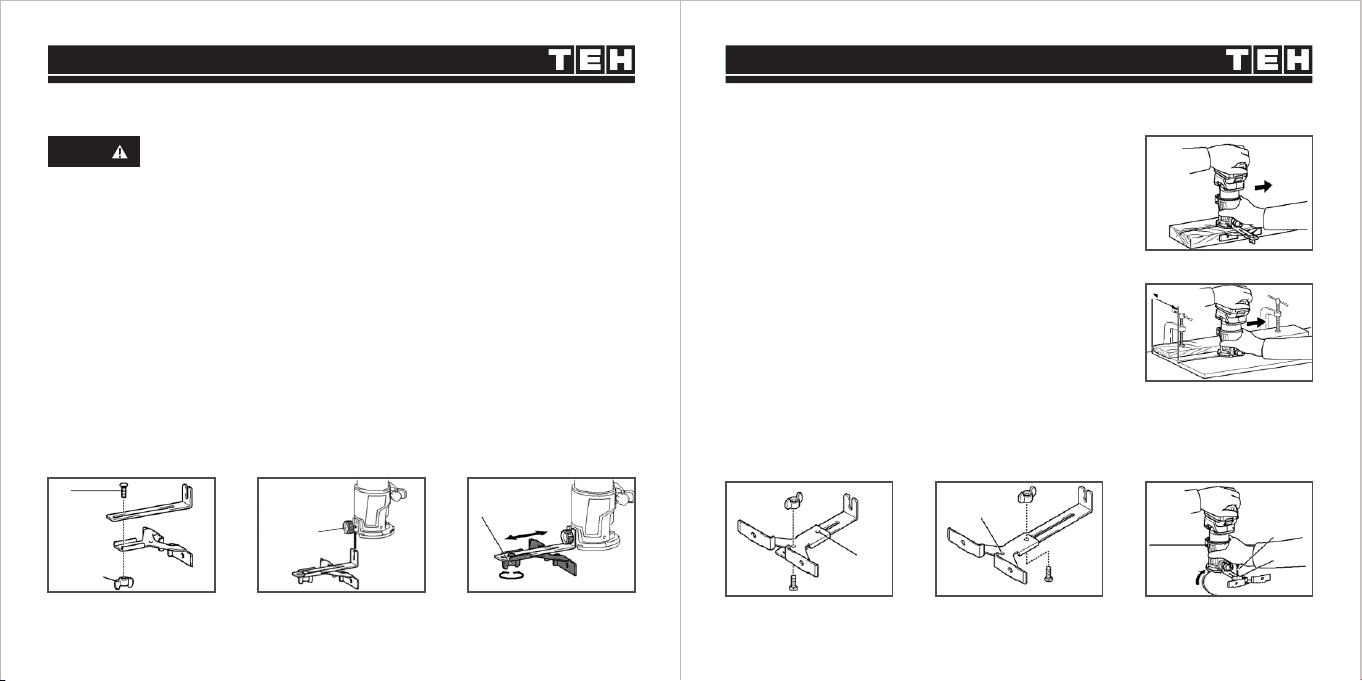
INSTALLING OR REMOVING THE
PARALLEL RULER ON THE PLUNGE BASE
Optional accessory
Insert the guide bars into the holes in the plunge base, and then
tighten the wing bolts. To remove the ruler, follow the installation
procedure in reverse.
1. Wing bolt 2. Guide bar
INSTALLING OR REMOVING THE DUST
NOZZLE ON THE PLUNGE BASE
Insert the dust nozzle into the plunge base so that the protru-sion on the dust nozzle fits in the
notch in the plunge base, and then tighten the thumb screw on the dust nozzle. To remove the
nozzle, follow the installation procedure in reverse.
OPERATION INSTRUCTION
1
2
1. Protrusion
2. Dust nozzle
3. Thumb screw
1
23
SWITCH ACTION
To turn on the tool, press the switch button and push the button forward.
To turn off the tool, push the button backward.
ADJUSTING CUTTING DEPTH
To adjust the cutting depth, open the lock lever, then move the tool base up or down.
After the adjustment, close the lock lever firmly.
If the tool is not secured after closingthe lock lever, tighten the hex nut, and then
close the lock lever.
NOTE
USING THE TOOL WITH THE TRIMMER BASE
Set the tool base on the workpiece without the trimmer bit
making any contact. Turn the tool on and wait until the bit attains
full speed. Move the tool forward over the workpiece surface.
Keep the tool base flush while moving the tool. When cutting the
edge, be sure to keep the workpiece surface on the left side of
the trimmer bit in the feed direction.
Before cutting on the actual workpiece, it is recommended to make a sample cut. The
proper feed speed depends on the trimmer bit size, the kind of workpiece, and depth of cut.
Moving the tool forward too fast may cause a poor quality of cut, or damage to the bit or
motor. Moving the tool forward too slowly may burn and mar the cutting surface.
NOTE
When using the trimmer shoe. the straight guide. or thetrimmer guide, be sure to keep it on the
right side in thefeed direction. This will help to keep it flush with the sideof the workpiece.
Since excessive cutting may causeoverload of the motor or difficulty in controllingthe tool,
the depth of cut should not be more than3 mm at a pass when cutting grooves. When you
wish to cut grooves more than 3 mm deep, makeseveral passes with progressively deeper
bit settings.
13 14
4. Move the tool with the straight guide flush with theside of
the workpiece.
1. Bolt 2. Wing nut
5. If the distance (A) between the side of the workpiece and
the cutting position is too wide for the straight guide, or if the
side of the workpiece is not straight, the straight guide cannot
be used.
In this case, firmly clamp a straight board to the work-piece
and use it as a guide against the trimmer base. Feed the tool in
the direction of the arrow.
A
USING THE STRAIGHT GUIDE
1. Assemble the straight
guide with the bolt and the
wing nut.
1. Bolt 2. Wing nut
2. Attach the straight guide to
the trimmer base with the
clamp screw.
1. Clamp screw
3. Loosen the wing nut on the
straight guide and adjust the
distance between the bit and
the straight guide. At the
desired distance, tighten the
wing nut.
1. Wing nut
Optional accessory
1
2
1
1
1. Center hole
1
2
USING THE STRAIGHT GUIDE FOR CIRCULAR WORK
1. Center hole
1
Align the center hole in the straight guide with the center of the circle to be cut. Drive a nail less
than 6 mm in diameter into the center hole lo secure the straight guide. Pivot the tool around the
nail in the clockwise direction.
1
1. Center hole
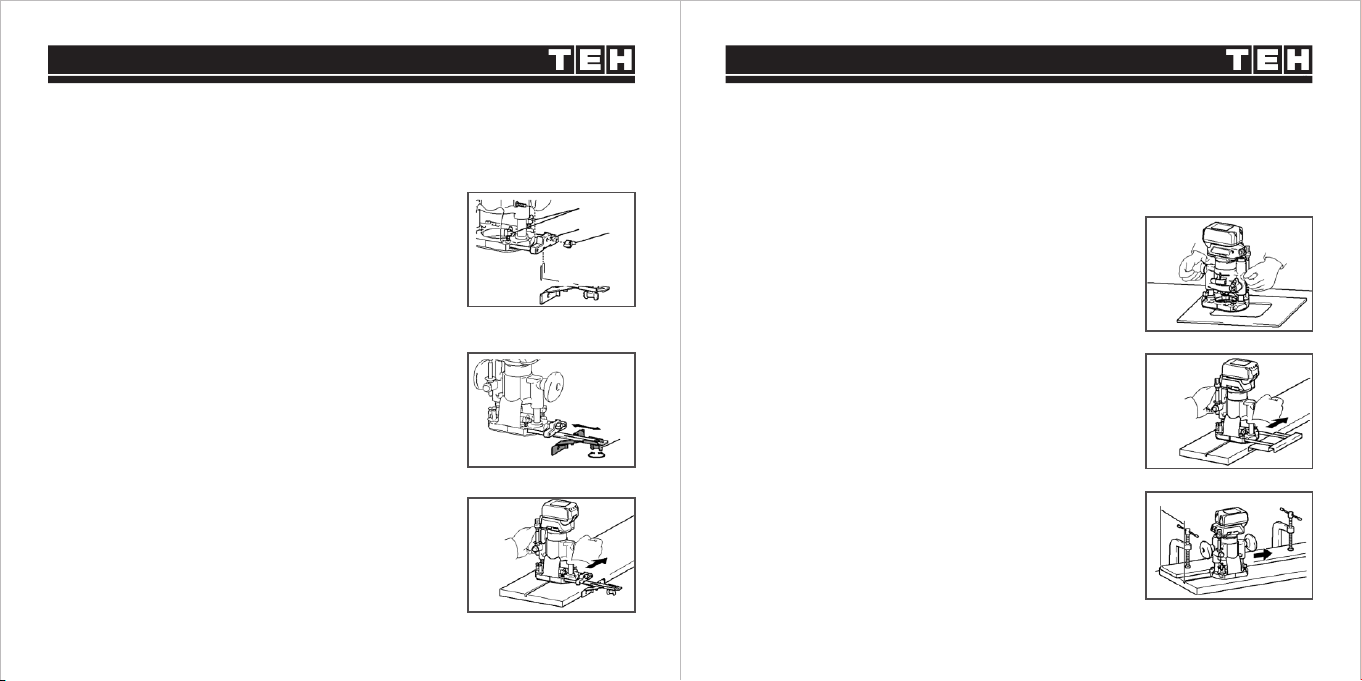
USING THE TOOL WITH THE PLUNGE BASE
Always hold the grips firmly with both hands during operation. Operate the tool in the same way as
the trimmer base.
1. Wing bolt 2. Guide holder
3. Wing nut 4. Straight guide
Using the straight guide
Optional accessory
1. Install the straight guide to the guide holder by tightening the
wing nut. Insert the guide holder into the holes in the plunge
base, and then tighten the wing bolts.
2. Loosen the wing nut on the straight guide and adjust the
distance between the bit and the straight guide. At the desired
distance, tighten the wing nut.
1. Wing nut
3. Operate the tool in the same way as the straight guide for
the trimmer base.
Using the straight guide
Optional accessory
1. Loosen the screws on the base and remove them
Place the templet guide on the base, and then tighten the screws.
2. Operate the tool in the same way as the templet guide for
the trimmer base.
Using the parallel ruler
The parallel ruler is effectively used for straight cuts when
chamfering or grooving. Adjust the distance between the bit
and the parallel ruler. At the desired distance, tighten the wing
bolts to secure the parallel ruler. When cutting, move the tool
with the parallel ruler flush with the side of the workpiece
If the distance (A) between the side of the workpiece and the
cutting position is too wide for the parallel ruler, or if the side
of the workpiece is not straight, the parallel ruler cannot be
used.
In this case, firmly clamp a straight board to the workpiece
and use it as a guide against the plunge base.
Feed the tool in the direction of the arrow.
15 16
1
23
4
1
A

17 18
MAINTENANCE
Always be sure that the tool is switched off and unplugged before attempting to
perform inspection or maintenance.
WARNING
Never use gasoline, benzine, thinner, alcohol or the like. Discoloration, deformation
or cracks may result.
NOTE
To maintain product SAFETY and RELIABILITY, repairs, any other maintenance or adjustment
should be performed by TEH Authorized or Factory Service Centers, always using TEH
replacement parts.
WARRANTY CARD
ladies/gentlemen: employer:
contact number: fax number:
contact address:
warranty record:
post code:
IMPORTANT NOTE
1. The invoice and warranty card must be presented at the time of warranty.
2. The fuselage number on the invoice is the same as the fuselage number on the warranty card.
3. Once this warranty card is issued, if it is lost, it will not be reissued. Please keep it properly.
Note: The company reserves the right to amend the above provisions and has the final interpretation right in the
case that the warranty service does not violate national laws.
Dear customers, the warranty service for purchasing TEH products is as follows:
Under normal use, within one year from the date of purchase. It is guaranteed that the damage
is caused by the quality of the tool.
The following conditions occur during the warranty period, not covered by the warranty:
a. Any valid legal document (single ticket) certifying the date of purchase
b. Any damage caused by natural wear and overload
c. Any damage caused by the use of low-priced inferior accessories
d. Any damage caused by improper carrying, transportation or storage
e. Any product that has been opened, repaired, replaced, or modified by itself
f. Any damage caused by misuse, beyond the scope of use of the tool,
and failure to use and maintain in accordance with the instructions
Table of contents
Popular Trimmer manuals by other brands

Craftsman
Craftsman 358.796330 instruction manual

Craftsman
Craftsman INCREDI.PULL 316.791700 Operator's manual

Qualcast
Qualcast QGTP25 Original instructions

Shindaiwa
Shindaiwa Heavy-duty Fixed-line Head installation instructions

Haussmann
Haussmann N1F-GT-300/4.0-B Operator's manual

Black & Decker
Black & Decker GLC3000 manual


