Telestar SSC 1 User manual

BDA TELE SSC 1 11_08 D.indd 1
01.01.1970 2:44:50 Uhr
Instructions for use
TELESTAR SSC
1

BDA TELE SSC 1 11_08 D.indd 2
01.01.1970 2:44:51 Uhr
1
Contents
1 Contents
..............................................................................................................................
2
2 Figures
...................................................................................................................................
4
3 Please read first
......................................................................................................
6
Important instructions for use
...........................................................................................
6
Disposal instructions
..............................................................................................................
7
Safety instructions
......................................................................................................................
7
Non-required time
.....................................................................................................................
7
Disposal of electrical and electronic devices.....................8
4 Connection
.......................................................................................................................
9
4 .
1
Mains connection
...........................................................................................................
9
4 .
2
External unit
............................................................................................................................
9
4 .
2
.
1
Individual operation
...............................................................................................
9
4 .
3
Connection to a TV set
............................................................................................
9
5 First installation
..................................................................................................
10
5 .
1
Language
.................................................................................................................................
10
5 .
2
Adjustment of the receiver to the
. . . . . . . . . . . . .
10
5 .
3
Station search
. . . . . . . . . . . . . . . . . . . . . . . . . . . . .
11
5 .
4
After the search...............
........................................................................................
11
6 Settings
..............................................................................................................................
11
6 .
1
Basic settings
.....................................................................................................................
12
6 .
1
.
1
OSD-language
. . . . . . . . . . . . . . . . . . . . . . . . . . .
12
6 .
1
.
2
Audio
language
. . . . . . . . . . . . . . . . . . . . . . . . . .
12
6 .
1
.
3
LNB
voltage
. ........ . . . . . . . . . . . . . . . . . . . . . . . . .
13
6 .
1
.
4
Picture format
. . . . . . . . . . . . . . . . . . . . . . . . . . . .
13
6 .
1
.
5
Video
output
. ......... . . . . . . . . . . . . . . . . . . . . . . . .
13
6 .
1
.
6
Standby
time
. . . . . ... . . . . . . . . . . . . . . . . . . . . .
13
6 .
1
.
7
TV-set type
. . . . . . . . . . . . . . . . . . . . . . . . . .
13
6 .
1
.
8
Starting channel
. . . . . . . . . . . . . . . . . . . . . . . . . .
13
6 .
2
Child lock
. . . . . . . . . . . . . . . . . . . . . . . . . . .
14
6 .
3
Setting the time
. . . . . . . . . . . . . . . . . . . . . . . . . .
14
6 .
3
.
1
Setting the local time
. . . . . . . . . . . . . . . . . . . .
15
6 .
3
.
2
Summer time
. . . . . . . . . . . . . . . . . . . . . . . . . . . .
15
6 .
3
.
3
Date and time
. . . . . . . . . . . . . . . . . . . . . . .
15
6 .
4
Antenna configuration
. . . . . . . . . . . . . . . . . . . . . .
15
6 .
4
.
1
Antenna
. . . . . . . . . . . . . . . . . . . . . . . . . . . . . . . .
16
6 .
4
.
2
Model
. . . . . . . . . . . . . . . . . . . . . . . . . . . . . . . . . .
16
6 .
4
.
3
Satellite
. . . . . . . . . . . . . . . . . . . . . . . . . . . . . . . . .
17
6 .
4
.
4
LNB type
. . . . . . . . . . . . . . . . . . . . . . . . . . . . . . .
17
6 .
4
.
5
LNB Freq
.
1
. . . . . . . . . . . . . . . . . . . . . . . . . . . . .
17
6 .
4
.
6
LNB Freq
.
2
. . . . . . . . . . . . . . . . . . . . . . . . . . . . .
17
6 .
4
.
7
22 kHz sound
. . . . . . . . . . . . . . . . . . . . . . . . . . . . .
18
6 .
4
.
8
DiSEqC
. . . . . . . . . . . . . . . . . . . . . . . . . . . . . . . .
18
6 .
4
.
9
C/Ku band control
. . . . . . . . . . . . . . . . . . . . . . .
18
6 .
4
.
10
Calculate azimuth and elevation
. . . . . . . . . .
18

BDA TELE SSC 1 11_08 D.indd 3
01.01.1970 2:44:51 Uhr
7 Operation
. . . . . . . . . . . . . . . . . . . . . . . . . . . . .
19
7 .
1
Switch on and off
. . . . . . . . . . . . . . . . . . . . . . .
19
7 .
2
Channel selection
. . . . . . . . . . . . . . . . . . . . . . . . . . .
19
7 .
2
.
1
With the help of the channel up/down keys
. . . .
19
7 .
2
.
2
With the help of numeric keypad
. . . . . . . . . . . .
20
7 .
2
.
3
With the help of channel lists
. . . . . . . . . . . . . . .
20
7 .
2
.
3
.
1
Call channel with the complete list
.
20
7.
2
.
3
.
2
Call channel with the help of favourites list
.
21
7.
2
.
3
.
3
Call channels of a specific satellite
.
21
7 .
2
.
4
Call locked channels
. . . . . . . . . . . . .
21
7 .
2
.
5
Info-box
. . . . . . . . . . . . . . . . . . . . . . . . . . . . . . . . .
22
7 .
3
Volume control
. . . . . . . . . . . . . . . . . . . . . . . . .
22
7 .
4
Selecting a different language
. . . . . . . . . . . . . .
22
7 .
5
TV/radio changeover
. . . . . . . . . . . . . . . . . . . . . .
22
7 .
6
Return to the last selected channel
. . .
23
7 .
7
Transponder Info
. . . . . . . . . . . . . . . . . . . . . . . . . .
23
7 .
8
Video text
. . . . . . . . . . . . . . . . . . . . . . . . . . . . . . . .
23
7 .
9
Subtitles
. . . . . . . . . . . . . . . . . . . . . . . . . . . . . . . .
23
7 .
10
Electronic Programme Info
EPI
. . . . . . . . . . . . .
24
7 .
11
Timer
. . . . . . . . . . . . . . . . . . . . . . . . . . . . . . . . . .
25
7 .
11
.
1
Programming the timer
. . . . . . . . . . . . . . . . . . .
25
7 .
11
.
2
Changing the timer programming
. . . . . . . . . .
27
7 .
11
.
3
Deactivating the
timer programming
. . . . . . . .
27
7 .
12
Rotating the antenna manually
(rotating system)27
8 Changing base programming
. . . . . . . . . . . .
27
8 .
1
Configuring channel lists
. . . . . . . . . . . . . . . .
28
8 .
1
.
1
Sorting the channels
. . . . . . . . . . . . . . . . . . . . . .
28
8 .
1
.
2
Deleting the channels
. . . . . . . . . . . . . . . . . . . . .
30
8 .
1
.
3
Locking the channels
. . . . . . . . . . . . . . . . . . . . .
31
8 .
2
Channel search
. . . . . . . . . . . . . . . . . . . . . . . . . . .
33
8 .
2
.
1
Network search
. . . . . . . . . . . . . . . . . . . . . . . . . .
35
8 .
2
.
2
Transponder search
. . . . . . . . . . . . . . . . . . . . . . .
35
8 .
2
.
3
Manual search
. . . . . . . . . . . . . . . . . . . . . . . . . .
37
8 .
2
.
4
After the search
. . . . . . . . . . . . . . . . . . . . . . .
37
8 .
2
.
5
Further options
. . . . . . . . . . . . . . . . . . . . . . . .
38
8 .
2
.
5
.
1
Search options
. . . . . . . . . . . . . . . . . . . . . .
38
8 .
2
.
5
.
2
Input of the satellite name
. . . . . . . . . . . . .
39
8 .
3
Factory settings
. . . . . . . . . . . . . . . . . . . . . . . . . .
39
8 .
4
Software update
. . . . . . . . . . . . . . . . . . . . .
39
8 .
5
Receiver
information
. . . . . . . . . . . . . . . . . . . . . . .
41
9
Technical terms
. . . . . . . . . . . . . . . . . . . . . . . . . .
43
10 Technical data
. . . . . . . . . . . . . . . . . . . . . .
45
11 Troubleshooting help
.. . . . . . . . . . . . . . . . . . .
47
For the daily use
. . . . . . . . . . . . . . . .
48
Your device bears the
CE-logo and fulfils all the necessary
EU-standards
.
Changes and printing errors reserved
.
Status 11/08
Duplication and reproduction only with the permission of the publisher
.

BDA TELE SSC 1 11_08 D.indd 4
01.01.1970 2:45:02 Uhr
Dear Customer,
Thank you for deciding to buy this high-quality product..
In case your DVB receiver does not work properly, it need not be defective.. Please do not return
the device immediately, call us!
Technical Hotline
for Germany: 0900-1001013
(Basic tariff 0.29 €/min from fixed line of Deutsche Telekom. During the call this tariff
cannot be reduced for the matters falling under general consultation with prior confirmation
of the caller. Tariffs for mobile phones can vary.)
for Austria
:
0
820-550
567 (0.14
€/min)
or 00 49-65
95-9003004
You can also send an e-mail to service@telestar.de or a fax to 0049-65 95-9 003 003.
In case your problem is not solved in this way, please return the device to our service centre at the
following address:
For Germany
:
TELESTAR
Service Centre, Vulkanhöhe/An
der B 410, D
54552-Dreis-
Brück
For Austria
:
GERINGER
Gesellschaft
m
b
H
.
,
Gregerstr
.
3, A-2401
Fischamend
2
Figures
Remote control
On/off
(standby)
Select channel/
data input
Page up/down in
channel list
Call menu
Channel up
confirm selection
Channel down
Show
information
for
the channel
Toggle button
TV
/radio mode
Select language
Sound off
(mute)
Menu
exit/
back
Call EPI
Call favourites
list
Increase/decrease
volume
Toggle button
TV/AV
mode
return to last
channel
Select audio
mode
Show
t
eletext/subtitles
!!Please note: the other buttons of the
remote control are without any function
!!

BDA TELE SSC 1 11_08 D.indd 5
01.01.1970 2:45:10 Uhr
Mains supply
Remote control sensor
LNB-input

BDA TELE SSC 1 11_08 D.indd 6
01.01.1970 2:45:11 Uhr
3 Please read first
>
Before you start working with the device, please check the delivery
for completeness. The delivery package contains the following:
1 receiver, 1 remote control, 1 instructions for use, 1 warranty card, 2
batteries (1.5V micro-cell AAA), 1 SCART-extension, 1 remote control
sensor.
> Insert the accompanying batteries in the battery case of the remote control
by taking into account the polarity printed on it.
> Please read first the safety instructions in Chapter 3, before you connect
the receiver.
> Chapters 4, 5 and 6 describe the connection and the adjustment of the
receiver to the external unit (mirror, LNB, ...), to the TV-set. These
settings are one-time and need to be extended only when something
changes in your external unit or additional devices are connected.
> Chapter 7 describes all the functions that are necessary for the daily
use, such as channel selection or volume setting.
> Chapter 8 contains information about how you can set new channels or
change the sequence of channels.
> Technical terms used in the instructions are explained in Chapter 9.
> The technical data are given in Chapter 10.
> Troubleshooting help is given in Chapter 11.
Important instructions for use
The use of a so-called “On Screen Display”simplifies the use of the
receiver and reduces the number of remote control buttons. All
functions are shown on the screen and can be controlled with the help
of fewer buttons. Related functions are put together as “MENU”. The
selected functions are highlighted in colour. In the lower row the
“function buttons”red, yellow, green and blue are shown
through colour bars. These colour bars represent different
functions in the individual menus, which can be triggered on the
remote control by pressing the corresponding coloured button
(“multi-purpose button”). The “function buttons”are active only
when a corresponding short description is given in the
corresponding field.
Button names and terms appearing in the OSD-menu are given in
bold in these instructions for use.
The channel space of the respectively selected channel is also shown in
the display.
Disposal instructions
The packaging of your device is made exclusively of material that can
be recycled. Please add these again to the “dual system”sorted
accordingly. Please make sure that the empty batteries of the remote
control as well as the electronic waste is not thrown in the household
garbage, but instead are disposed off properly (return to the dealer,
special waste).

BDA TELE SSC 1 11_08 D.indd 7
01.01.1970 2:45:13 Uhr
Caution! Important safety instructions
CAUTION: NEVER OPEN THE CASING TO AVOID
THE RISK OF AN ELECTRICAL SHOCK. SMALL
PARTS ARE PRESENT IN THE DEVICE, WHICH CAN
BE REPAIRED BY THE USER, IF NEEDED, TAKE
HELP OF A QUALIFIED SERVICE EXPERT.
SAFETY MEASURES:
This receiver was manufactured according to the specifications
of international safety standards. For your own safety, you
should carefully read the safety measures, before starting to
work with your new device.
The manufacturer is not liable for any damages arising
out of improper use and caused by not adhering to the
safety measures.
1. When you set up the receiver, see to it that a free space of
about 5 cm is present on all sides, so that the air can
circulate freely and the device does not get overheated.
2 Do not setup the device in a cramped space, such as in a
book shelf or similar places. Make sure that the air
circulation is not hampered, you should never cover the
ventilation slots with newspapers, table cloth, curtains, etc.
3. Do not place any burning objects e.g. a burning candle on
the device.
4. The receiver should never be exposed to liquids or
splash water. Never place objects filled with water,
such as vases, on the receiver.
5. Do not pull out the mains plug of the device to switch it
off.
6. The power cable must be connected properly. Never touch
the power cable or the plug with moist or wet hands.
7. The receiver should be operated at temperatures from 5ºC
to 40ºC. Use the device only in a moderate climate, not
under tropical conditions.
8. The batteries of the remote control should not be exposed to
extreme heat, such as direct sunlight or fire. While disposing
off the batteries, please adhere to the corresponding
environment safety guidelines.
CE-logo for the European markets
The CE-logo on this device gives you the assurance that the
device conforms to the guidelines of the EU-directive
2004/108/EC as well as to the directive for low-voltage
devices 2006/95/EC.
Non-required time
The device should be disconnected from the mains during a
thunderstorm or during longer non-required time (e.g. vacation).

BDA TELE SSC 1 11_08 D.indd 8
01.01.1970 2:45:30 Uhr
Disposal of electrical and electronic devices
This symbol on an article or on a packing indicates
that the article cannot be disposed off in the normal
household garbage. The article must be returned to a
corresponding collection centre for the recycling of
old electrical and electronic devices. By making sure
that this device is disposed off properly, you are
contributing to avoiding the harmful effects on the
environment and on human health, which can arise in
case of an improper disposal of this device. The
reuse of the raw materials contributes to the
preservation of natural resources. For more detailed
information on the disposal of this device please
contact your local authorities, waste recycling in your
area, or the dealer from whom you purchased this
device.
Connecting the DVB-receiver to a Sat-system
a. Mains connection (plug power supply)
b. Connecting the LNB with the LNB-input (LNB IN) of the DVB-
receiver.
c. Connecting the DVB-receiver with the remote control sensor of the
Scart-connection to the TV-set.
b c a
d
Rear-side of TV

BDA TELE SSC 1 11_08 D.indd 9
01.01.1970 2:45:31 Uhr
4
Connection
The references a, b, c, etc. given below refer to the
drawing given on page 8.
4.1
Mains connection
The digital receiver should be connected to the
power supply only when the device is completely
cabled with all the related components. This rules
out damages to the digital receiver or to the other
components.
a After you have made all the connections,
connect the receiver to a socket 230 V/50-60 Hz
with the help of the power supply unit.
4.2
External unit
4.2.1
Individual operation
b
Connect the LNB-input of the digital receiver
with the LNB of your external unit by using a
suitable coaxial cable. Please also note the Point
6 “Settings”.
4.3
Connecting to a TV-set
c
Connect the receiver and the TV-set, insert the
receiver in the SCART-socket of the TV. If this
is not possible mechanically, use the
accompanying adapter cable. If your TV-set is
equipped accordingly, then upon switching on
the digital receiver, it will switch automatically
to AV and hence to Sat-operation.

BDA TELE SSC 1 11_08 D.indd 10
01.01.1970 2:45:32 Uhr
5
First
installation
After you have gone through the safety instructions
and connected the device as described in Chapter 4,
switch on the device now as described in Chapter 7.
During the first commissioning of the device the menu
“Installation done”appears (Figure 5-1). Here you can
do the most important settings of the digital receiver
in an easy way.
5.1 Language
In this menu option you can select the language, in
which the on-screen displays are to be shown.
> Highlight the row of the OSD-language with the
up/down arrow buttons.
> Press the button OK. A window opens showing
the available operating languages.
> Select the desired language with the up/down
buttons and confirm with OK.
5.2
Adjusting the receiverstothe
r
eception system
You can now adjust the settings of your digital receiver
to the configuration of your antenna. From the factory
the receiver is set to the satellites ASTRA 19.2° (Port
A), Eutelsat/ Hotbird (Port B) and Türksat 1c (Port C).
If you do no
t want to receive any other satellite, you can
accept the factory setting as such by pressing the green
button.
Satellite 1
> Highlight the row SAT A with the up/down
buttons.
> Press OK. A window opens with the available
satellites.
> Select the satellite with the arrow buttons
up/down or page up/down, which you receive
with the DiSEqC-setting position A/option A and
confirm with OK.
Satellite 2
> Highlight the row SAT B with the up/down
buttons.
(Figure
5-1)
> Press OK. A window opens with the available
satellites.
> Select the satellite with the arrow buttons
up/down or page up/down, which you receive
with the DiSEqC-setting position B/option A and
confirm with OK.
10

BDA TELE SSC 1 11_08 D.indd 11
01.01.1970 2:45:32 Uhr
Satellite 3
> Highlight SAT C with the up/down arrow buttons.
> Press OK. A window opens with the available
satellites.
> Select the satellite with the arrow buttons
up/down or page up/down, which you receive
with the DiSEqC-setting position A/option B and
confirm with OK.
Satellite 4
> Highlight SAT D with the up/down arrow buttons.
> Press OK. A window opens with the available
satellites.
> Select the satellite with the arrow buttons
up/down or page up/down, which you receive
with the DiSEqC-setting position B/option B and
confirm with OK.
By pressing the green button you can save the settings
and changeover to the main menu. By pressing the
EXIT-button you then reach the TV-mode and the
factory-set pre-programmed list is activated. However,
if you wish to do a search, please proceed as described
in „5 .3 Station search”.
5.3
Station search
>
The search is started by pressing the red button
for channel search. Thereby, all the satellites set
earlier are searched automatically for channels.
Depending upon the configuration of the
receiving system, the search can take up to 20
minutes.
5.4
After the search
> After the search comes to an end, select the row
Done with the up/down arrow buttons and
confirm with OK. You now come back to the
menu for First Installation.
> The settings are saved and you come back to the
main menu by pressing the green button for
save.
6 Settings
After you have connected and started your new
receiver, you can optimise the receiver for your usage,
if necessary.
11
(Figure
6-1)
(Figure
6-2)
(Figure
6-3)
(Figure
6-4)
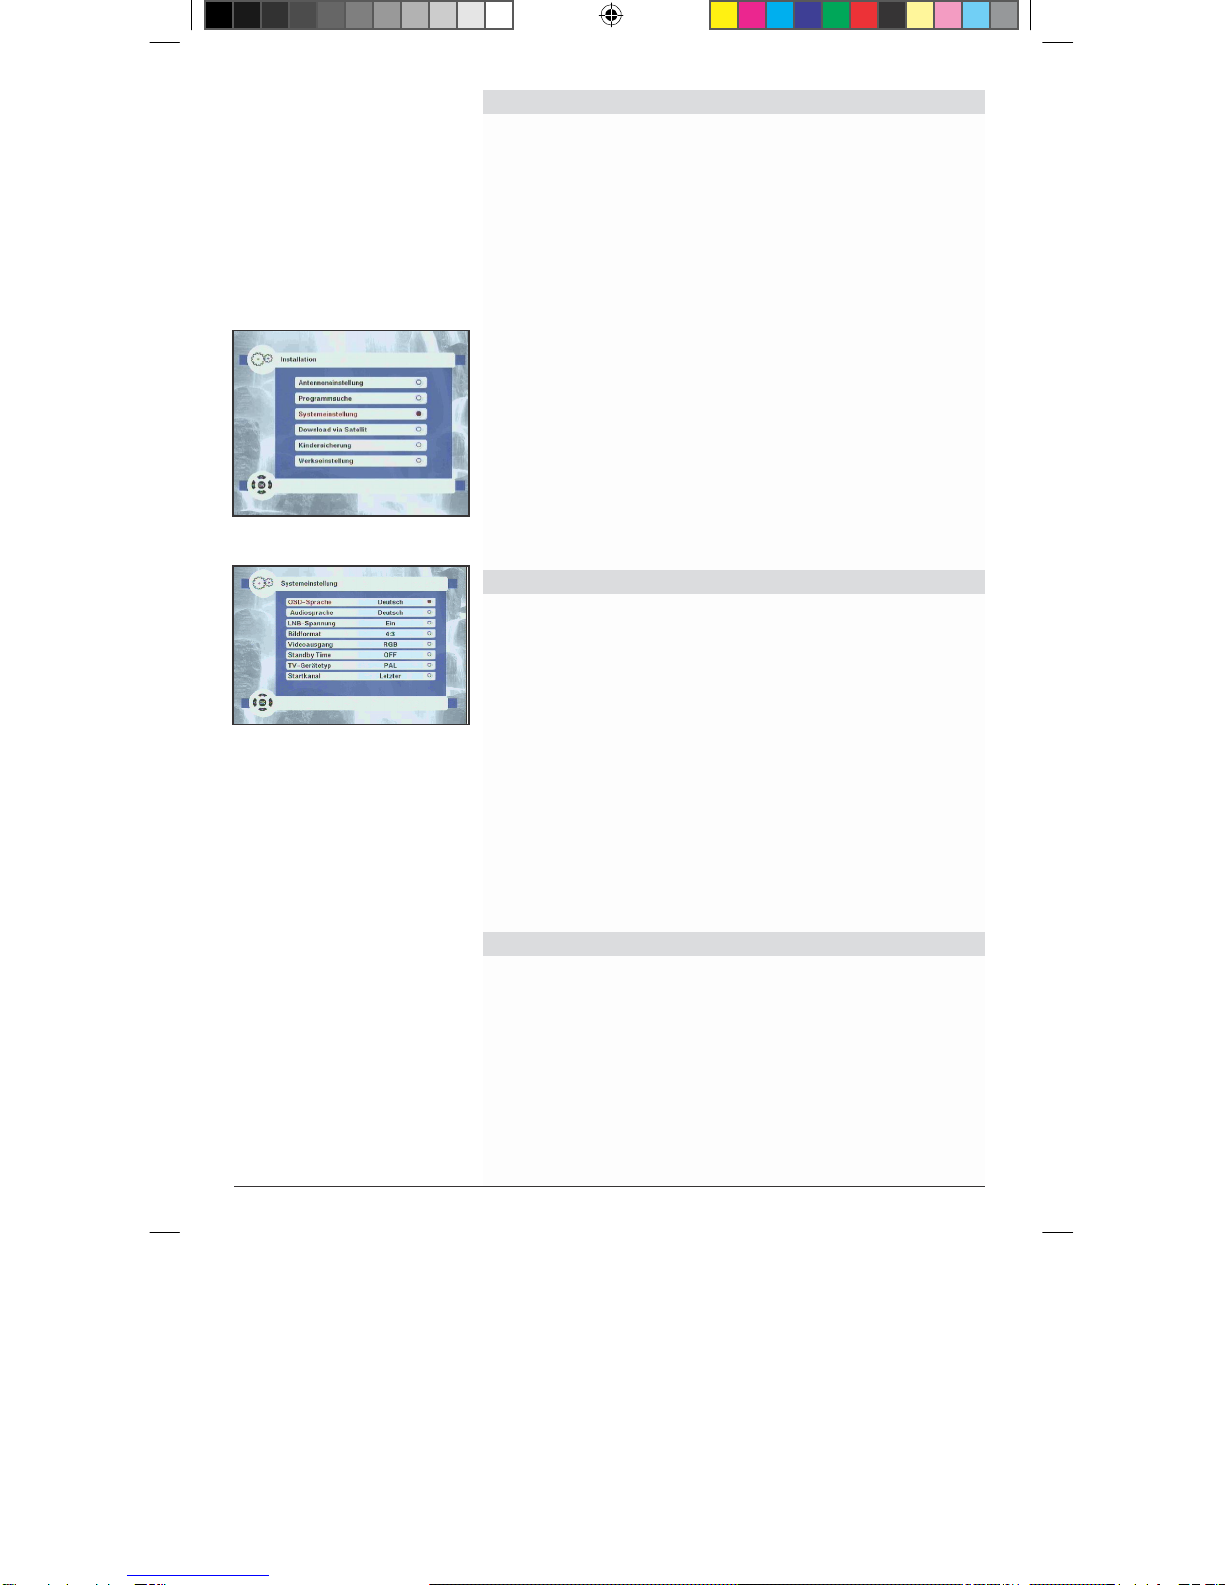
6.1 Basic settings
To be able to use your DVB-receiver optimally, you
should set it to your individual usage.
>
Open the main menu on the screen with the menu
button. (Figure 6-1).
> Select now the menu row Installation by
highlighting it with the up/down arrow button. A
window opens showing the menu options
available in the installation menu. (Figure 6-2)
> Highlight the row System Settings with the
up/down button and confirm with OK. You
are now present in the System Settings
menu (Figure 6-3).
> With the up/down buttons you can move the
marker within the menu and modify the4
individual options as described. Please pay
attention to the on-screen displays shown
when you select a menu option.
The following settings can be made:
6.1.1
OSD-language
In this menu option you can set the menu language as
per your wishes. Proceed as follows to change the OSD-
language:
> Highlight the row OSD-language with the
up/down arrow buttons.
> Press the button OK to open a window with the
available languages.
> Highlight the desired language with the help
of the up/down arrow button.
> Save your entry by pressing the OK button.
> Press the Exit button to return to the System
Settings menu.
6.1.2
Audio language
Set your preferred language in this menu option. The
language is set automatically with the help of this
function, if it is being transmitted.
> Highlight the row Audio Language with the
up/down arrow buttons.
> Press OK to open another window(Figure 6-4).
You can set here the first, second, third and
fourth language.
1

BDA TELE SSC 1 11_08 D.indd 12 01.01.1970 2:45:34 Uhr

>
Select the row First language with the up/down
button.
> Press OK to open a window with the available
languages.
> Highlight the desired language with the
arrow buttons.
> Confirm your selection with OK.
> Highlight the row OK and confirm it by pressing
OK to save your settings.
(Figure
6-5)
6.1.3 LNB voltage
In this menu option you can switch on and off the LNB
voltage with the help of the right/left arrow buttons.
6.1.4 Picture
format
Set the picture format of your TV set as 4:3, 4:3 Letter
box or 16:9 with the help of right/left arrow buttons.
With this function the picture format is adjusted
automatically to your TV-set. In case of the setting 4:3
Letterbox the picture, being transmitted in the 16:9
format, is shown without both the two black bars at the
upper and lower margin of the screen.
6.1.5 Video
output
Set FBAS or RGB in this row according to your TV set
with the right/left arrow buttons
6.1.6
Standby time
Set the time in this row, after which the device
automatically switches to passive standby.
6.1.7
TV
-
device model
Set PAL or NTSC in this row with the help of the arrow
buttons.
6.1.8
Starting channel
You can set the channel here, which your receiver
should display after being switched on.
> Highlight the row starting channel with the
up/down buttons and press OK.
A query now appears, whether you really want to
activate the starting channel.
> Highlight the row OK and press the button OK
again to open a window for selecting a starting
channel (Figure 6-5).
> You can now select a starting channel here with the
up/down arrow buttons and accept with the OK
button.
> In order that your receiver starts with the channel
last set, highlight the row Cancel and confirm it
with OK.
1

BDA TELE SSC 1 11_08 D.indd 13 01.01.1970 2:45:35 Uhr

BDA TELE SSC 1 11_08 D.indd 14
01.01.1970 2:45:37 Uhr
(Figure
6-8)
(Figure
6-6)
(Figure
6-7)
“No”starting channel is then shown in the system
settings menu.
By pressing the Exit button you come back to the menu
of user installation. Press the button Menu to completely
exit the menu.
6.2 Ch i l d l oc k
Your device is equipped with a child lock. Like this,
important functions (e.g. calling the installation menu)
can be safeguarded against unauthorised access.
Further, the channels that you have locked according to
Point 8.1.3 can be set only upon entering a four-digit
PIN-code (password).
> Open the main menu with the Menu button (Figure
6-6).
> Select the row user installation by highlighting
it with the arrow buttons. A window opens
with the options available in the Installation
menu (Figure 6-7).
> Highlight the row Child lock with the
up/down arrow buttons and confirm with OK.
You are now present in the Child lock
menu (Figure 6-8).
> Enter the password with the help of the number
buttons. (factory setting: 0000).
> To activate child lock, highlight the row Child
lock with the up/down buttons and set Yes with
the right/left arrow buttons.
> If you wish to protect the menu against
unauthorised changes, then highlight the row
Block installation and set Yes with the
right/left arrow buttons.
> You can enter a new password in the row New
Password with the numeric buttons.
> Confirm the new password in the row Confirm
password.
> Press the button EXIT to come out of the Child
lock menu.
> Press the EXIT button twice to completely exit the
menu.
6.3
Setting the time
Your device is equipped with a clock. This can be
synchronised to Greenwich Mean Time via Sat-
reception.
1

BDA TELE SSC 1 11_08 D.indd 15
01.01.1970 2:45:38 Uhr
(Figure
6-10)
(Figure
6-11)
This only needs to be corrected with respect to your
local time. For Germany, this time difference is +1
hour.
> Open the main menu with the Menu button.
> Select now the menu row Timer by
highlighting it with the up/down buttons and
pressing OK. A window now opens with the
options available in the Installation menu
(Figure 6-9).
> Select now the menu option Time with the arrow
buttons and confirm it with OK. Figure 6.10
now opens.
6.3.1 Setting the local time
> Enter in this row the difference between your
local time and GMT with the help of the
right/left buttons.
6.3.2
Summer time
> In this row select the switchover to the summer
time with the right/left arrow buttons.
6.3.3
Date and time
> If the date and time are not being shown
correctly, you can set them manually in
these rows with the help of the right/left
and the numeric buttons. With the up/down
buttons you can select year, month, date
and hour.
> To exit the Timer menu, press the Exit button
thrice.
6.4
Antenna configuration
After you have set your receiver as you want, you can
now also set the receiver to your antenna, if needed.
Ex-factory your receiver is pre-programmed to
ASTRA and EUTELSAT with Universal-LNB (see
Annexure for technical terms). These channels are
received after the start-up without any further
settings.
If you wish to receive other satellites or use a
different LNB, set your receiver to your desired data
as follows:
> Open the main menu with the Menu button.
(Figure 6-11)
> Highlight the row user installation with the
up/down arrow button.
(figure
6-9)
1

BDA TELE SSC 1 11_08 D.indd 16
01.01.1970 2:45:39 Uhr
(Figure
6-12)
(Figure
6-13)
> Confirm by pressing OK.
> Highlight the row Antenna Configuration with the
up/down buttons.
> Confirm with OK. The menu Antenna Configuration
appears. (Figure 6-12)
The following settings can be made in this sub-menu:
6.4.1
Antenna
You can store a total of 16 different antennas (satellite positions).
> Select one of the 16 possible antennas in
this menu option with the right/left button.
6.4.2
Type
> Set here with the right/left buttons, whether
you receive the satellites with a fixed antenna
(standard) or with a rotating system (DiSEqC
1.2).
Caution!
If you have selected the setting DiSEqC 1.2
(operating a digital receiver at a rotating system with
a DiSEqC 1.2 motor), you must first set the east and
the west borders. Like this, mechanical damages to
the reflector by an obstacle are avoided. If the
obstacles (chimney, wall, etc.) are present in the
rotating range of the reflector, it must then be
observed while setting the east-west borders. If no
obstacle is present in the rotating range of the
reflector, then define the borders in such a way that
the reflector can be rotated a little beyond the
outermost satellites to be received.
Setting the east-west borders
>
Press the green button to open the menu for setting
the borders. The row East demarcation is highlighted.
(Figure 6-13).
> Rotate the reflector now by pressing the
left-arrow button to the maximum possible
or the desired east-position.
> A query appears after the OK button is pressed.
> Save the east border with OK. The row West demarcation
is now highlighted.
> Rotate the reflector now by pressing the right-
arrow button to the maximum possible or the
desired west-position.
1

BDA TELE SSC 1 11_08 D.indd 17
01.01.1970 2:45:39 Uhr
> A query appears upon pressing the OK button.
> Save the West-border with OK.
Delete East-West borders
If you call the menu for setting the borders when the
East-West borders are already set, the row DiSEqC
demarcation is highlighted.
> To delete the available borders, press the OK
button and confirm the query that follows once
again with OK.
> Exit the menu by pressing the Exit button.
6.4.3
Satellite
> Select the row Satellite with the up/down
buttons and confirm with OK. A window now
appears with the different satellites.
> Set either one of the pre-programmed satellites
with the up/down arrow or select one of the
freely programmable satellite Newsat01 to
Newsat14 and confirm with OK.
6.4.4 LNB
Type
> Enter in this row the LNB type you are using
with the left/right arrow buttons. The following
are available for selection: LNBF, Uni-Cable
and Normal for manual input of LNB data.
If you have entered Normal in LNB-Type, further
settings can then be made.
6.4.5 LNB
Freq. 1
> Highlight the row LNB Freq. 1 with the
up/down buttons and confirm with OK. Select
the LNB frequency 1 to be set from the list and
confirm with OK.
6.4.6 LNB
Freq. 2
> Highlight the row LNB Freq. 2 with the
up/down buttons and confirm with OK. Select
the LNB frequency 2 to be set from the list and
confirm with OK.
> Press the button Exit after you have made all the
settings.
> To save the settings, confirm the query that now
appears with OK.
1

1
BDA TELE SSC 1 11_08 D.indd 18
01.01.1970 2:45:48 Uhr
Example:
A B
Position
Output
A B
Option
Output
A B
Position
Output
6.4.7
22
kHz-sound
> Enter in this row with the help of left/right
buttons, whether you want to add the 22 kHz
control signal.
6.4.8
DiSEqC
DiSEqC (Digital Satellite Equipment Control) is a
digital control signal for controlling the DiSEqC-
compatible components via the antenna line. If your
external unit has DiSEqC-components, you must
activate the DiSEqC-control. Four switching criteria of
the DiSEqC-control can be selected in the menu. Your
device is pre-programmed such that ASTRA is
received on port 1 and Eutelsat on port 2 of a multi-
switch. In case the switching matrix of your receiving
system has a different structure or if you want to
receive other satellites, you can adjust the receiver to
your receiving system.
> In case you are not using any DiSEqC-
components, deactivate the DisEqC-control
(none) with the left/right buttons. When using
the DiSEqC-components set one of the
DiSEqC-positions port A, port B, port C or port
D. These are assigned to the DiSEqC-switching
criteria as per the following table.
Position
Option
Sat
1
A
A
Sat
2
B
A
Sat
3
A
B
Sat
4
B
B
6.4.9
C/Ku
band
control
> In this menu option you can set a C/Ku-band
switching signal with the left/right buttons.
6.4.10
Calculate
azimuth
and
elevation
To be able to align your satellite antenna correctly to a
satellite, you need the azimuth and elevation angle for
your location. Your receiver offers you the option for
calculating these values.
> Open the menu Antenna Configuration as described in
Point 6.4.
> Press the red button for Antenna alignment help.
Table of contents
Other Telestar Receiver manuals


