Teletec international Minicom 6000 Plus User manual

USING YOUR
MINICOM 6000 PLUS™
305-009754
Teletec International, Ltd. 01234 756026 (Voice)
Cranfield Innovation Centre 01234 756027 (Text telephone)
University Way 01234 756028 (Fax)
Cranfield Technology Park
Cranfield
Bedfordshire MK43 OBT www.teletec.co.uk
Fourth edition
First printing
May 2007
© 1999-2007 Ultratec, Inc.
is a registered trademark of Teletec, Inc.
Turbo Code is a registered trademark of Ultratec, Inc.
Minicom 6000 Plus and Auto ID are trademarks of Ultratec, Inc.
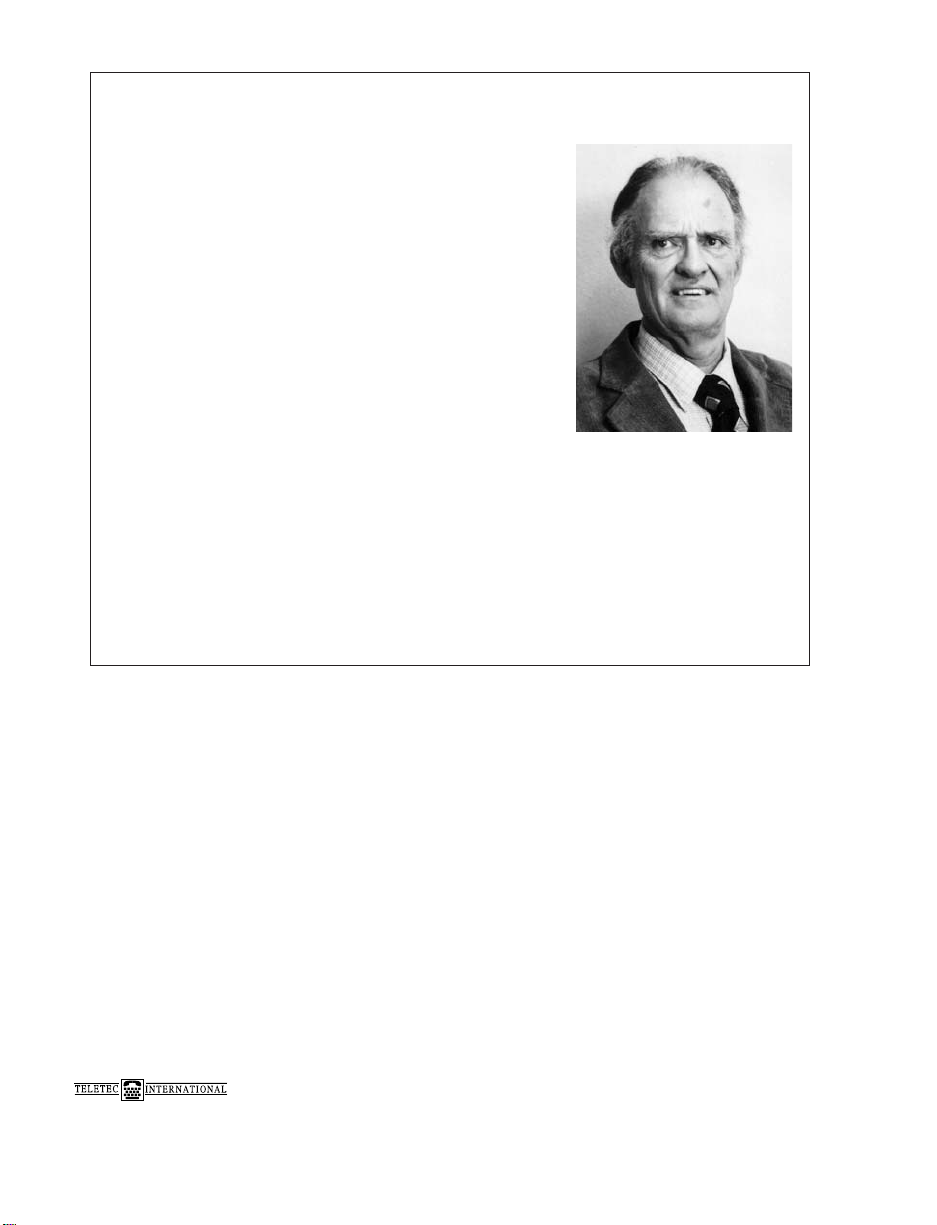
Acknowledgement
In 1963, Dr. Robert H.Weitbrecht, an
American physicist who was deaf, developed
an acoustic coupler that could send and
receive teletypewriter signals over the
telephone lines. His invention, the
Weitbrecht Modem, enabled people who
are deaf to use the telephone for the first
time.
While modern technology now makes it
possible to build advanced microcomputer
devices like your new Ultratec text
telephone, the Weitbrecht modem remains
the major technological break-through that
began telecommunications for the deaf. Ultratec wishes to
acknowledge the importance of Dr.Weitbrecht’s contribution to the
welfare of people who are deaf the world over.
Dr. Robert H. Weitbrecht,
1920–1983, inventor of the
first TTY modem.

CONTENTS
Contents 1
Safety Instructions 4
CHAPTER 1 Introduction 5
Special Features 5
Overview of the Minicom 6000 Plus 6
Function Keys 7
CHAPTER 2 Setup 11
Selecting a Location 11
Making Connections 12
Setting the Clock + /OPTIONS 13
CHAPTER 3 Basic Calling 15
Making a Call in Direct Connect + /DIAL 15
About the Signal Light and Display 16
Dialling Tips 17
Answering a Call in Direct Connect 18
Acoustic Calling and Answering 19
CHAPTER 3 Advanced Calling 21
Auto ID™21
The Printer 22
The Built-In Help Feature + /HELP 23
Turbo Code®23
Conversation Memory 25
The Greeting Memo + /GREETING 27
The Voice Announcer + /ANNOUNCER 27
Wait for Response + + 28
Changing to Another Text Telephone + + 28
Three-Way Calling + + 28
Transferring a Call + /DIAL 29
Sticky Keys 30
1Ctrl
FShiftCtrl
CShiftCtrl
WShiftCtrl
SpacebarCtrl
4Ctrl
HCtrl
1Ctrl
9Ctrl
CONTENTS • 1

CHAPTER 5 VCO and HCO Calling 31
Direct Connect Setup for VCO or HCO 31
Using Different Codes for VCO/HCO 32
Using VCO in Direct Connect 32
Using HCO in Direct Connect 33
Using VCO or HCO in Acoustic Mode 33
CHAPTER 6 Using TextDirect 34
CHAPTER 7 Auto-Answer 37
How Auto-Answer Works 37
About Auto-Answer Memory 37
Setting Up Auto-Answer + /AUTO-ANSWER 38
Turning On Auto-Answer + /AUTO-ANSWER 39
Interrupting Auto-Answer 40
Turning Off Auto-Answer 40
Reading Auto-Answer Messages 40
Changing the Outgoing Auto-Answer Memo + /AUTO-ANSWER 42
Auto-Answer Options 42
Retrieving Messages Remotely 43
CHAPTER 8 Memos 45
Saving a Memo + /MEMO 45
Sending a Memo + /SEND MEMO 47
Editing Memos + /MEMO 48
Clearing Memos 48
Printing Memos + /MEMO 49
CHAPTER 9 Directory 51
Saving a Telephone Number + /DIRECTORY 51
Editing a Number + /DIRECTORY 53
Clearing Numbers in the Directory 53
Printing Directory Numbers + /DIRECTORY 54
Back SpaceCtrl
Back SpaceCtrl
Back SpaceCtrl
6Ctrl
6Ctrl
5Ctrl
6Ctrl
+
=
Ctrl
Esc
Esc
Esc
+
=
Ctrl
+
=
Ctrl
2 • CONTENTS

CHAPTER 10 Options 55
Setting the Print Case + /OPTIONS 55
Setting the Print Size + /OPTIONS 56
Setting the Display Mode + /OPTIONS 56
Setting Pulse Dialling + /OPTIONS 57
Setting the Auto-Answer Rings + /OPTIONS 57
Selecting an Auto-Answer Memo + /OPTIONS 58
Setting the Auto-Answer Password + /OPTIONS 58
Selecting a Greeting Memo + /OPTIONS 59
Turning Off Printing of the Date and Time + /OPTIONS 59
Setting the Date and Time + /OPTIONS 60
Changing the Relay Voice Announcer Number + /OPTIONS 60
Turning Off Turbo Code + /OPTIONS 61
Turning Off Auto ID + /OPTIONS 61
Turning Off Interrupt + /OPTIONS 61
Changing CCITT Seek Time + /OPTIONS 62
Turning Off the Auto-Answer Relay Voice Announcer + /OPTIONS 62
CHAPTER 11 Codes 63
Using EDT Code 63
Using CCITT Code 64
Using Baudot Code 67
Using the Danish Gateway 68
CHAPTER 12 Service 71
Replacing the Printer Paper 71
About the Batteries 72
Troubleshooting 74
Repair 76
CHAPTER 13 Specifications 77
European Union Declaration of Conformity 79
Index 81
9Ctrl
9Ctrl
9Ctrl
9Ctrl
9Ctrl
9Ctrl
9Ctrl
9Ctrl
9Ctrl
9Ctrl
9Ctrl
9Ctrl
9Ctrl
9Ctrl
9Ctrl
9Ctrl
CONTENTS • 3

4 • SAFETY INSTRUCTIONS
SAFETY INSTRUCTIONS
SAVE THESE INSTRUCTIONS!
Important safety instructions
When using your Minicom 6000 Plus™, basic safety
precautions should always be followed to reduce the
risk of fire, electric shock, and injury to persons.
1. Read and understand all instructions.
2. Follow all warnings and instructions on the
Minicom 6000 Plus.
3. Unplug the Minicom 6000 Plus from the wall
socket before cleaning. Do not use liquid or
aerosol cleaners. Use a damp cloth for cleaning.
4. Do not use the Minicom 6000 Plus near water,
for example, near a bath, kitchen sink, laundry
tub, in a wet basement, or near a swimming
pool.
5. Do not place the Minicom 6000 Plus on an
unstable trolley, stand, or table. The minicom
may fall, causing serious damage to the
Minicom 6000 Plus.
6. The Minicom 6000 Plus should be operated
only from the type of power source indicated on
the marking label. If you are not sure of the type
of power supply to your home, consult your
dealer.
7. Do not allow anything to rest on the power
cord. Do not locate the Minicom 6000 Plus
where people can walk on the cord.
8. Do not overload wall sockets and extension
cords. This overloading can result in a fire or
electric shock.
9. To reduce the risk of electric shock, do not take
apart the Minicom 6000 Plus. Send it to a
qualified service person when service work is
required. Opening or removing covers may
expose you to dangerous voltages or other risks.
Incorrect re-assembly can cause electric shock
when the minicom is subsequently used.
10. Avoid using a telephone (other than a cordless
type) during an electrical storm. There is a
remote risk of electric shock from lightning.
11. Unplug the Minicom 6000 Plus from the wall
socket and refer servicing to qualified service
personnel under the following conditions:
(a) When the power supply cord or plug is
damaged or frayed.
(b) If liquid has been spilled into the minicom.
(c) If the minicom has been exposed to rain or
water.
(d) If the minicom does not operate normally.
Adjust only those controls that are covered by
the operating instructions. Improper adjustment
of other controls may result in damage and will
often require extensive work by a qualified
technician to restore the minicom to normal
operation.
(e) If the minicom has been dropped or
damaged.
(f) If the minicom works very differently from
the way you expect it to.
12. Do not use the minicom to report a gas leak in
the vicinity of the leak.
Battery safety
Caution: To reduce the risk of fire or injury to
persons, read and follow these instructions:
1. Use only the type and size battery specified in
the battery instructions for your unit.
2. Do not dispose of the batteries in a fire. Cells
may explode. Check with your local council for
possible special disposal instructions.
3. Do not open or mutilate the batteries. Released
electrolyte is corrosive and may cause damage
to the eyes or skin. It may be toxic if swallowed.
4. Exercise care in handling batteries in order not
to short them with conducting materials such as
rings, bracelets, and keys. The battery or
conductor may overheat and cause burns.

INTRODUCTION
CHAPTER
1
Special Features
Welcome to the Minicom 6000 Plus™minicom (text telephone) from Ultratec.
Your new minicom has the following special features:
A Ring Indicator that tells you when someone is calling.
Turbo Code®communication protocol. This feature transmits signals to other
Turbo Code-equipped minicoms as fast as you can type. Turbo Code also lets you
interrupt the other person’s typing.
Auto ID™alerting system. Auto ID automatically alerts the answering party that
you are calling by minicom.
A Relay Voice Announcer that sends a voice message to tell callers to use the
Typetalk service.
Other features that make calling quick and easy are the following:
•Auto-Answer answers calls while you are gone and plays back messages
when you return or when you call from another minicom.
•Call progress displays RING or ENGAGED to let you know what is
happening on the telephone line.
•Keyboard dialling from the keyboard or memory.
•Call transfer and conference calling.
•32k memory—enough to save hundreds of Memos, telephone numbers,
and your conversations to review.
•Normal, bold or wide print sizes.
•Automatic printing of the date and time on conversations saved in
memory.
•Sticky Keys, a feature that allows typing with only one finger if necessary.
INTRODUCTION • 5

6 • INTRODUCTION
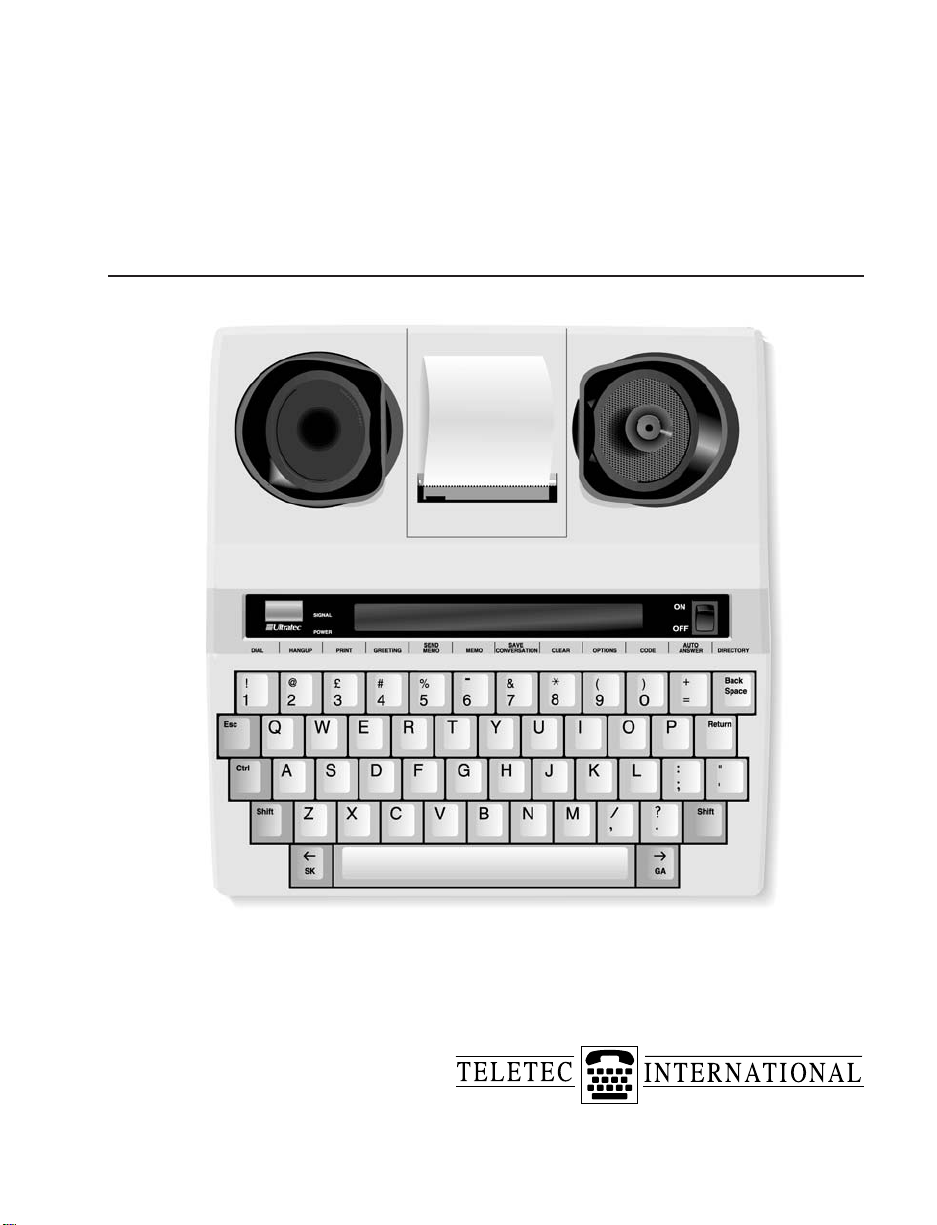
Overview of the Minicom 6000 Plus

Function Keys
Use the function keys to tell the Minicom 6000 Plus to do something or to change
a setting. For example, use the Greeting function key ( /
GREETING
) to send
the Greeting memo. Or, use the Options function key ( /
OPTIONS
) to set the
time and date.
Hold Down the Control Key to Use Function Keys
You must hold down the key and then press the function key to use a
function. For example, to dial, hold down the key while you press the
/
DIAL
key.
NOTE: If you have difficulty pressing two keys at one time, see Sticky Keys on
page 30.
Press the Escape Key to Quit a Function
When you use a function, you can use the key alone to quit whatever you
are doing. Changes are saved.
Esc
Esc
1
Ctrl
Ctrl
Ctrl
9
4
INTRODUCTION • 7

Diagram of Function Keys
This diagram shows the most important functions on the Minicom 6000 Plus.
8 • INTRODUCTION
ANNOUNCER

INTRODUCTION • 9
GA
Complete List of Function Keys
Dial + /
DIAL
Dials a telephone number p. 15
Hangup + /
HANGUP
Hangs up the telephone line p. 18
Print + /
PRINT
Turns the printer on and off p. 22
Greeting + /
GREETING
Sends the Greeting memo p. 27
Send Memo + /
SEND MEMO
Sends a Memo p. 47
Memo + /
MEMO
Saves, edits or clears a Memo p. 45
Save + /
SAVE CONV.
Saves a conversation as a Memo p. 26
Conversation
Clear + /
CLEAR
Clears all or part of memory p. 26
Options + /
OPTIONS
Changes settings p. 55
Code + /
CODE
Changes codes p. 63
Auto-Answer + /
AUTO-ANSWER
Turns on Auto-Answer p. 37
Directory + / Saves telephone numbers p. 51
DIRECTORY
Help + /
Help
Explains how to use functions p. 23
Relay Voice + /
RELAY VOICE
Turns on Relay Voice Announcer p. 35
Announcer + / Turns on the Voice Announcer p. 27
ANNOUNCER
Interrupt + Interrupts other person’s typing p. 24
Time + Displays/prints date and time p. 13
Wait for + + Flashes Ring Indicator when p. 28
Response on-hold ends
Three-way + + Uses three-way calling p. 28
calling telephone service
Change to + + Changes from Turbo Code to p. 29
Baudot Baudot code
Remain + /
REMAIN
Shows space in Memo/Directory memory
p. 46
Sensitivity + /
SENS.
Improves Baudot reception p. 74
Change to + + Puts call on hold to change to p. 28
another text another text telephone
telephone
CShiftCtrl
SCtrl
RCtrl
BShiftCtrl
FShiftCtrl
WShiftCtrl
TCtrl
ICtrl
SpacebarCtrl
VCtrl
HCtrl
Back SpaceCtrl
+
=
Ctrl
0Ctrl
9Ctrl
8Ctrl
7Ctrl
6Ctrl
5Ctrl
4Ctrl
3Ctrl
2Ctrl
1Ctrl
10 • INTRODUCTION

SETUP
SETUP • 11
The Minicom 6000 Plus is simple to set up. You will need a mains power socket
to plug in the AC adapter and either: (1) a connection to a standard telephone
line or, (2) access to a telephone.
The best way to use the Minicom 6000 Plus is to plug it into a standard telephone
line. This is called direct connect. See Selecting a Location below for more
information on direct connect. If you cannot plug the Minicom 6000 Plus into a
standard telephone line, you can also make and answer calls by placing a
telephone handset in the Minicom 6000 Plus’s acoustic cups.
Selecting a Location
The Minicom 6000 Plus requires a standard (analogue) telephone line, the kind
found in most homes. Some businesses use digital telephone systems. To use the
Minicom 6000 Plus with a digital system, use only the acoustic cups. Do not
connect the Minicom 6000 Plus directly to the telephone line of a digital
telephone system. If you wish to use direct connect, some modifications can be
made to the digital system. If you are not sure of the type of telephone line you
are using, contact your telephone installer.
Select a location to set up the Minicom 6000 Plus where:
✔There is a mains power socket nearby
✔There is a phone jack nearby
✔Cords will not cross walkways
✔The Ring Indicator is easily visible
✔The surface it is set on is stable
✔The area is protected from excessive heat or humidity
CHAPTER
2
12 • SETUP
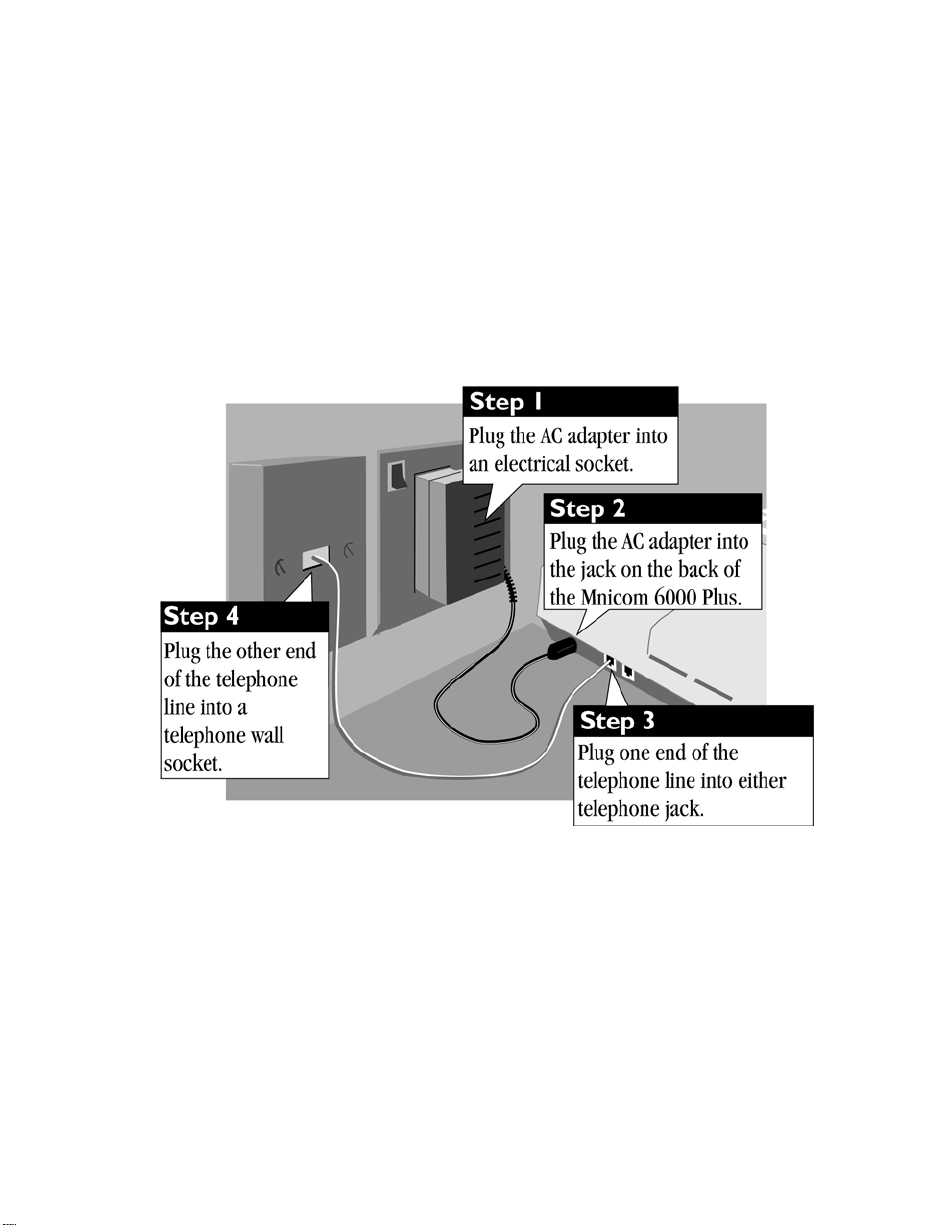
Making Connections
Pull the plastic tab out of the battery compartment on the bottom of the Minicom
6000 Plus before you plug in the AC adapter. The Ring Indicator will not work if
the tab is not removed and the batteries are not fully charged.
The AC adapter supplies electricity to the Minicom 6000 Plus and charges the
batteries. You should leave the adapter plugged in at all times. New batteries will
be fully charged after 24 hours. Once fully charged, batteries will provide about
90 minutes of normal use without electrical connection. For more information on
using battery power, see About the Batteries on page 72.
The illustration above shows how to set up for direct connect. This means the
Minicom 6000 Plus is plugged directly into the telephone line. In direct connect,
you can dial from the keyboard and use Auto-Answer.
If, for some reason, you cannot plug a telephone line into the Minicom 6000
Plus, you can connect by putting a telephone handset in the acoustic cups. See
Acoustic Calling and Answering on page 19 for more information.
The Minicom 6000 Plus comes set up for tone dialling, which is used by most
telephone lines. If your line uses pulse dialling, make sure the minicom is set up
for that. For more information, see Setting Pulse Dialling on page 57.
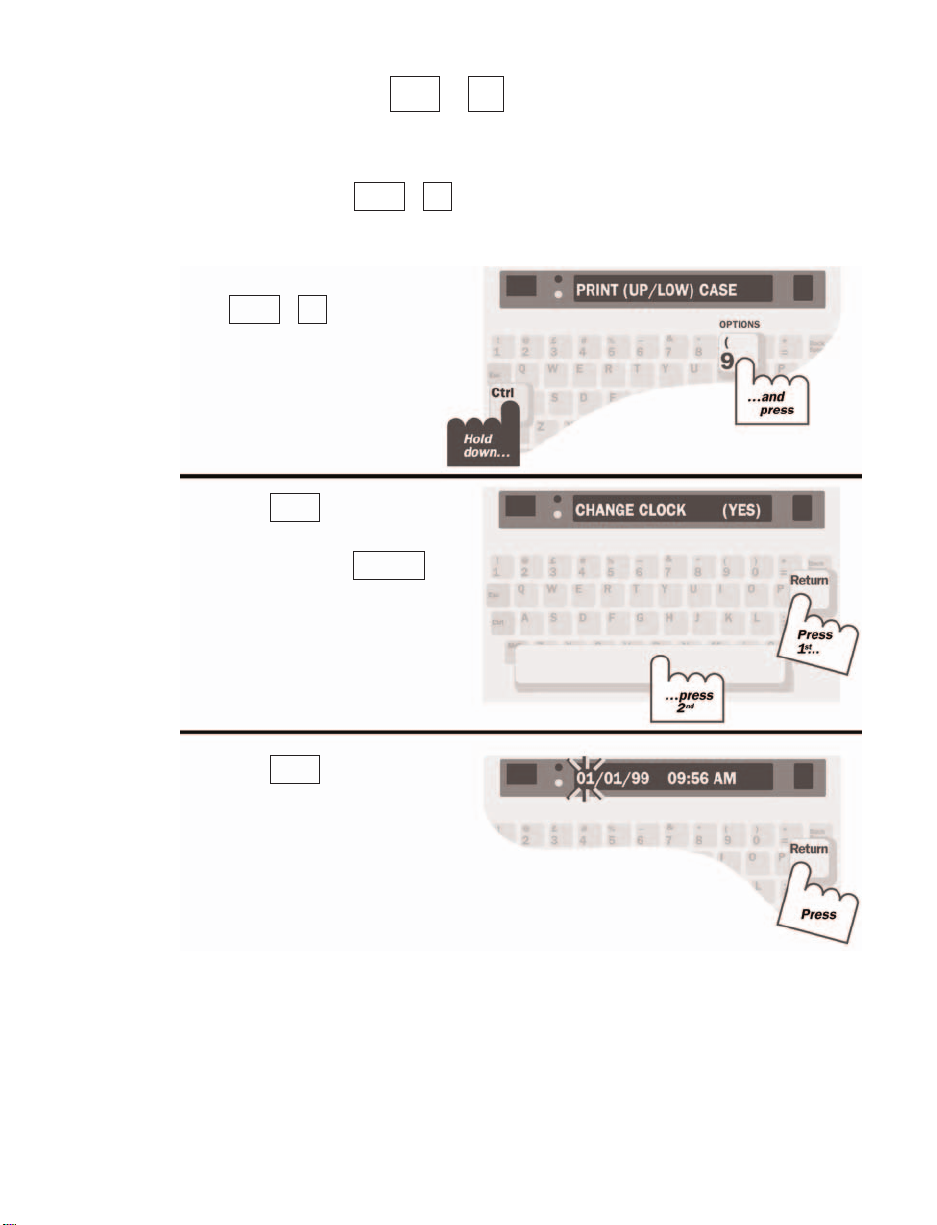
Setting the Clock +/OPTIONS
The clock feature displays the date and time at the beginning of each
conversation, at the beginning of each Auto-Answer message and whenever you
press the Time key ( + ). You must set the clock after you plug in the
Minicom 6000 Plus to display the correct date and time.
TCtrl
9
Ctrl
SETUP • 13
1. Press the Options key
(+/
OPTIONS
).
PRINT (UP/LOW) CASE is
displayed.
2. Press until you see
CHANGE CLOCK (NO).
Then, press the to
change the setting to (YES).
3. Press . The date and
time are displayed with the
day flashing.
Return
Spacebar
Return
9Ctrl
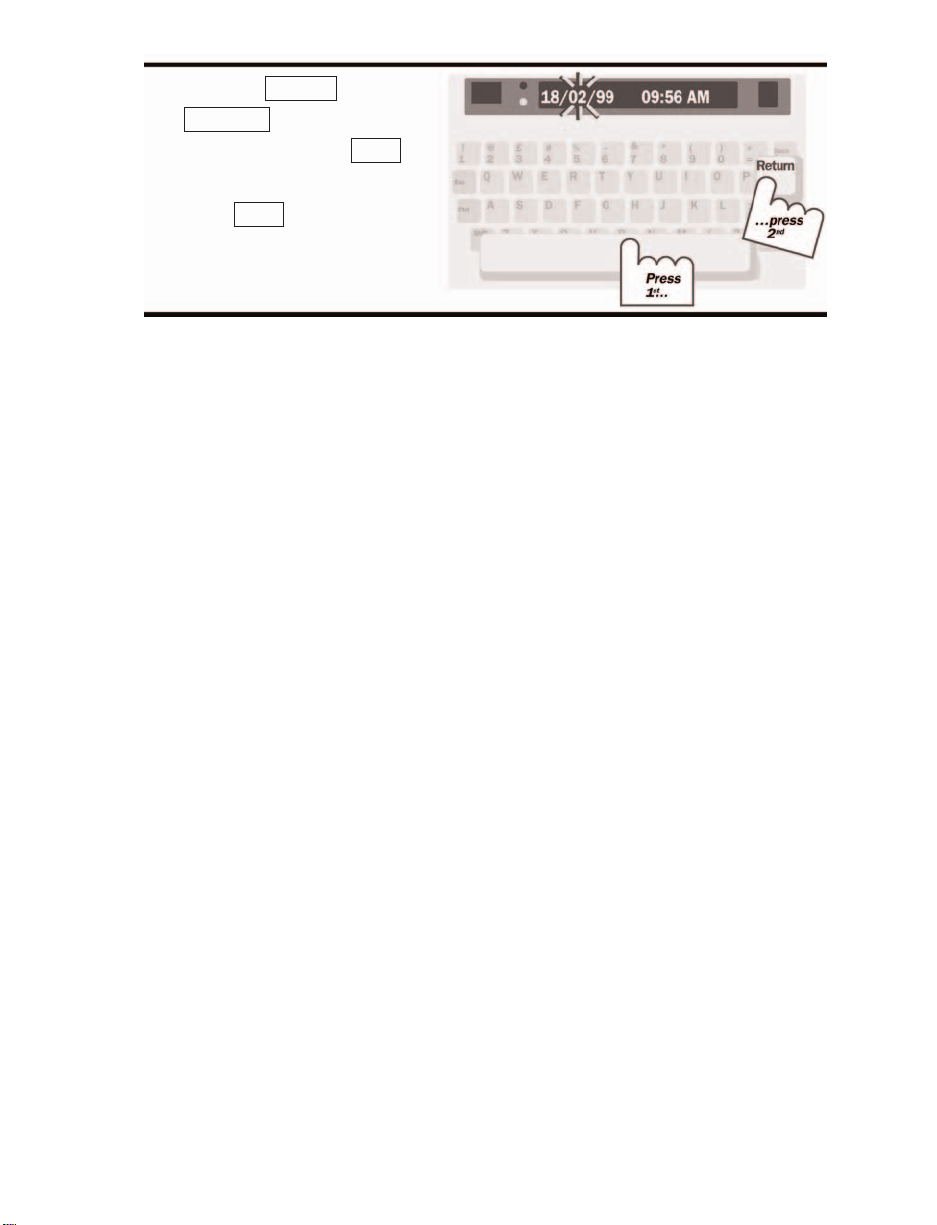
4. Press the or the
key to set the
month. Then, press to
move to the next setting.
Press when you finish
to save changes and exit this
menu.
Esc
Return
Back Space
Spacebar
14 • SETUP
BASIC CALLING
BASIC CALLING • 15
CHAPTER
3
This chapter covers the basics of making and receiving minicom calls.
Making a Call in Direct Connect + /DIAL
1
Ctrl
1. Turn on the Minicom 6000
Plus.
2. Hold down the key
and press the /
DIAL
key.
1
Ctrl
3. Type the telephone number
you are calling. Then, press
to dial the number.
While typing, you can use the
key to correct
mistakes.
4. When you see an answer on
the display, type a greeting.
Turn off the Minicom 6000
Plus when you are finished
with your call.
Back Space
Return
16 • BASIC CALLING
About the Signal Light and Display
The Signal light and the display show what is happening on the telephone line
(the display shows call progress in direct connect only). The following chart
explains what you see.
Signal Light Display Telephone Line
Stays on Dial tone
before dialling
Stays on No connection
after dialling
Flashes quickly ENGAGED Engaged
after dialling
Slow flashing RING Ringing
Irregular blinking The other person is picking up
the handset, speaking or sending
Voice Announcer message.

Dialling Tips
Special Dialling Characters
You may need to type a ‘9’ or other number to reach an outside line if you are
using the Minicom 6000 Plus in an office. The exact method of dialling will
depend on your local telephone system. Dialling a text telephone call should be
the same as dialling a voice call.
Use a comma to put in a one-second pause.
For example:
9,01234 756026
Use an ‘!’ for a timed break recall. A timed break recall is used in a voice mail
system or to transfer a call.
You cannot use ‘*’ and ‘#’ with pulse dialling.
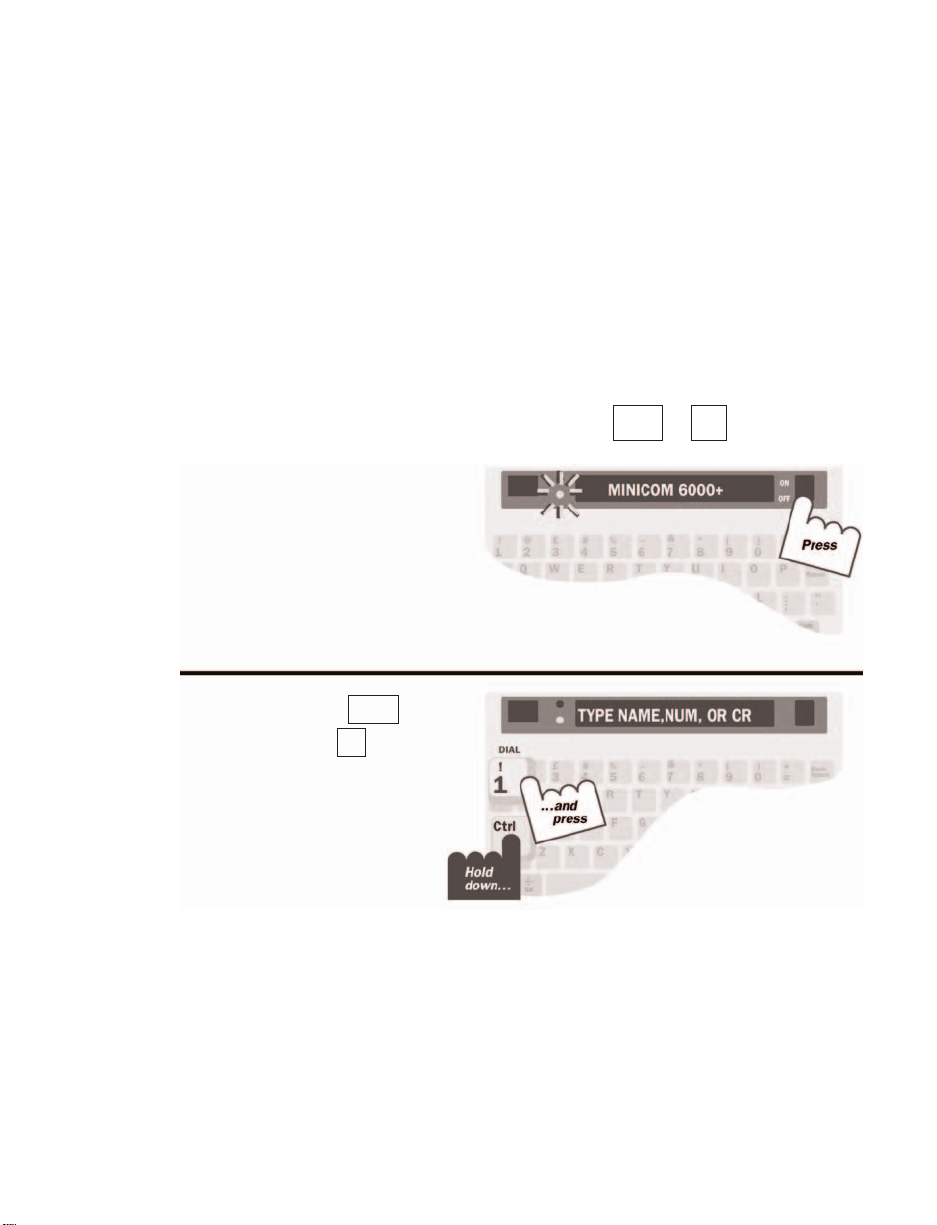
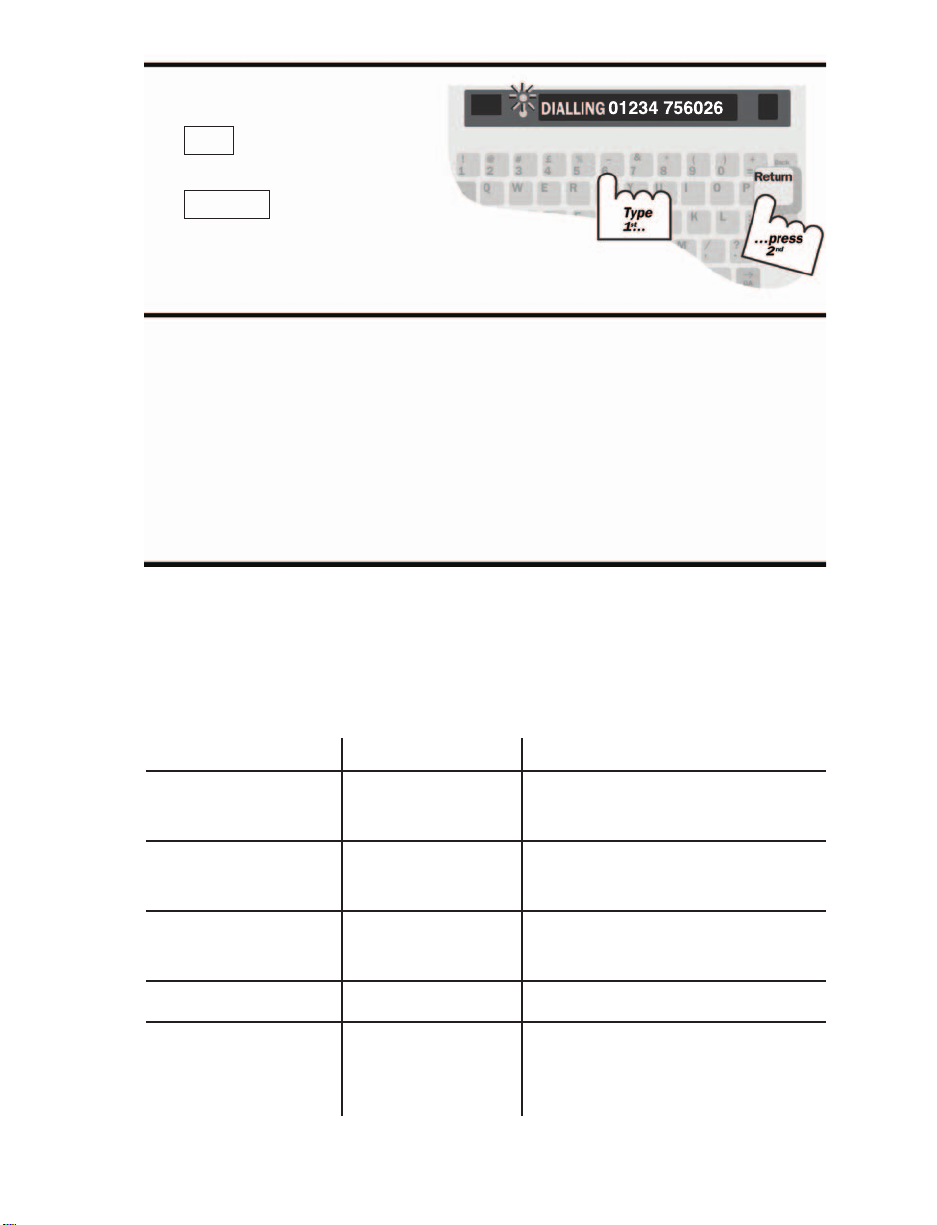
Redialing the Last Number + /DIAL
Follow these steps to redial the last number you dialled:
1. Press the Dial key ( + /
DIAL
). TYPE NAME, NUM, OR CR is
displayed.
2. Press .
Dialling from the Directory + /DIAL
You can dial from the Directory if you have numbers saved. Follow these steps to
dial from the directory:
1. Press the Dial key ( + /
DIAL
). TYPE NAME, NUM, OR CR is
displayed.
2. Type a name or press the to review the list of Directory names.
3. Press when you find the name you want.
Return
Spacebar
1Ctrl
1Ctrl
Return
1Ctrl
1Ctrl
BASIC CALLING • 17
Table of contents


