TeleType GPS WorldNav 3500 Installation manual
All rights reserved. No parts of this work may be reproduced in
any form or by any means - graphic, electronic, or mechanical,
including photocopying, recording, taping, or information
storage and retrieval systems - without the written permission
of the publisher.
Products that are referred to in this document may be either
trademarks and/or registered trademarks of the respective
owners. The publisher and the author make no claim to these
trademarks.
hile every precaution has been taken in the preparation of
this document, the publisher and the author assume no
responsibility for errors or omissions, or for damages resulting
from the use of information contained in this document or from
the use of programs and source code that may accompany it. In
no event shall the publisher and the author be liable for any
loss of profit or any other commercial damage caused or alleged
to have been caused directly or indirectly by this document.
3500 Hardware User Guide
© 2010 TeleType GPS
All manuals and user guides at all-guides.com
all-guides.com
Contents
© 2010 TeleType GPS
3
Table of Contents
Part I Getting Started
6
61 Disclaimer
82 Accessories
93 Hardware Features
124 Specifications
Part II Basic Operation
16
Part III Main Menu
20
211 GPS
212 Bluetooth
233 Music
244 Video
255 Photo
266 Ebook
277 GPS Info
288 Setting
Part IV Troubleshooting
30
All manuals and user guides at all-guides.com

Part I
3500 Hardware User Guide
6
© 2010 TeleType GPS
1 Getting Started
1 1 Disclaimer
Use the orldNav at your own risk. To reduce the
risk of unsafe operation, please carefully review
and understand this user manual.
It is the user's responsibility to use this product
prudently. This product is intended to be used only
as a navigational aid and must not be used for any
purpose requiring precise measurement of
direction, distance, location, or topography.
Statistics provided such as trip time are best
estimates and may not accurately reflect true
conditions.
The Global Positioning System (GPS) is operated by
the United States Government, which is solely
responsible for its accuracy and maintenance. The
system is subject to changes which could affect the
accuracy and performance of all GPS equipment.
All manuals and user guides at all-guides.com
© 2010 TeleType GPS
7
Getting Started
For use in vehicles, it is the sole responsibility of the
operator of the TeleType GPS orldNav to place
and secure the GPS unit so that it will not interfere
with the vehicle operating controls and safety
devices, obstruct the driver's view of driving
conditions, or cause damage or personal injury in
the event of an accident. Do not mount the
TeleType GPS orldNav in a place where the driver
or passengers are likely to impact it in an accident
or collision. The mounting hardware supplied by
TeleType Co. is not warranted against collision
damage or the consequences thereof.
It is the sole responsibility of the driver of the
vehicle to operate the vehicle in a safe manner, to
maintain full surveillance of all driving conditions at
all times, and not become distracted by the GPS
system to the exclusion of safe driving practices. It
is unsafe to operate the controls of the GPS system
while you are driving. Failure by the driver of a
vehicle equipped with a TeleType GPS system to
pay full attention to operation of the vehicle and
road conditions while the vehicle is in motion could
result in an accident or collision with property
damage and personal injury.
3500 Hardware User Guide
8
© 2010 TeleType GPS
IN NO EVENT SHALL TELETYPE CO BE LIABLE FOR
ANY INCIDENTAL, SPECIAL, INDIRECT OR
CONSEQUENTIAL DAMAGES, HETHER RESULTING
FROM THE USE, MISUSE, OR INABILITY TO USE THIS
PRODUCT OR FROM DEFECTS IN THE PRODUCT.
SOME STATES DO NOT ALLO THE EXCLUSION OF
INCIDENTAL OR CONSEQUENTIAL DAMAGES, SO
THE ABOVE LIMITATIONS MAY NOT APPLY TO YOU.
1 2 Accessories
Before using the GPS, make sure you have all of the
accessories listed below. If any of the accessories
are damaged or missing, contact TeleType.
1 Bluetooth Earpiece with AC power
2 Battery Power (12 v direct to battery power)
3 USB Cord
4 Handle Bar Mount
5 Hardware User Guide
6 orldNav Software Guide
7 Quick Installation Guide
All manuals and user guides at all-guides.com
© 2010 TeleType GPS
9
Getting Started
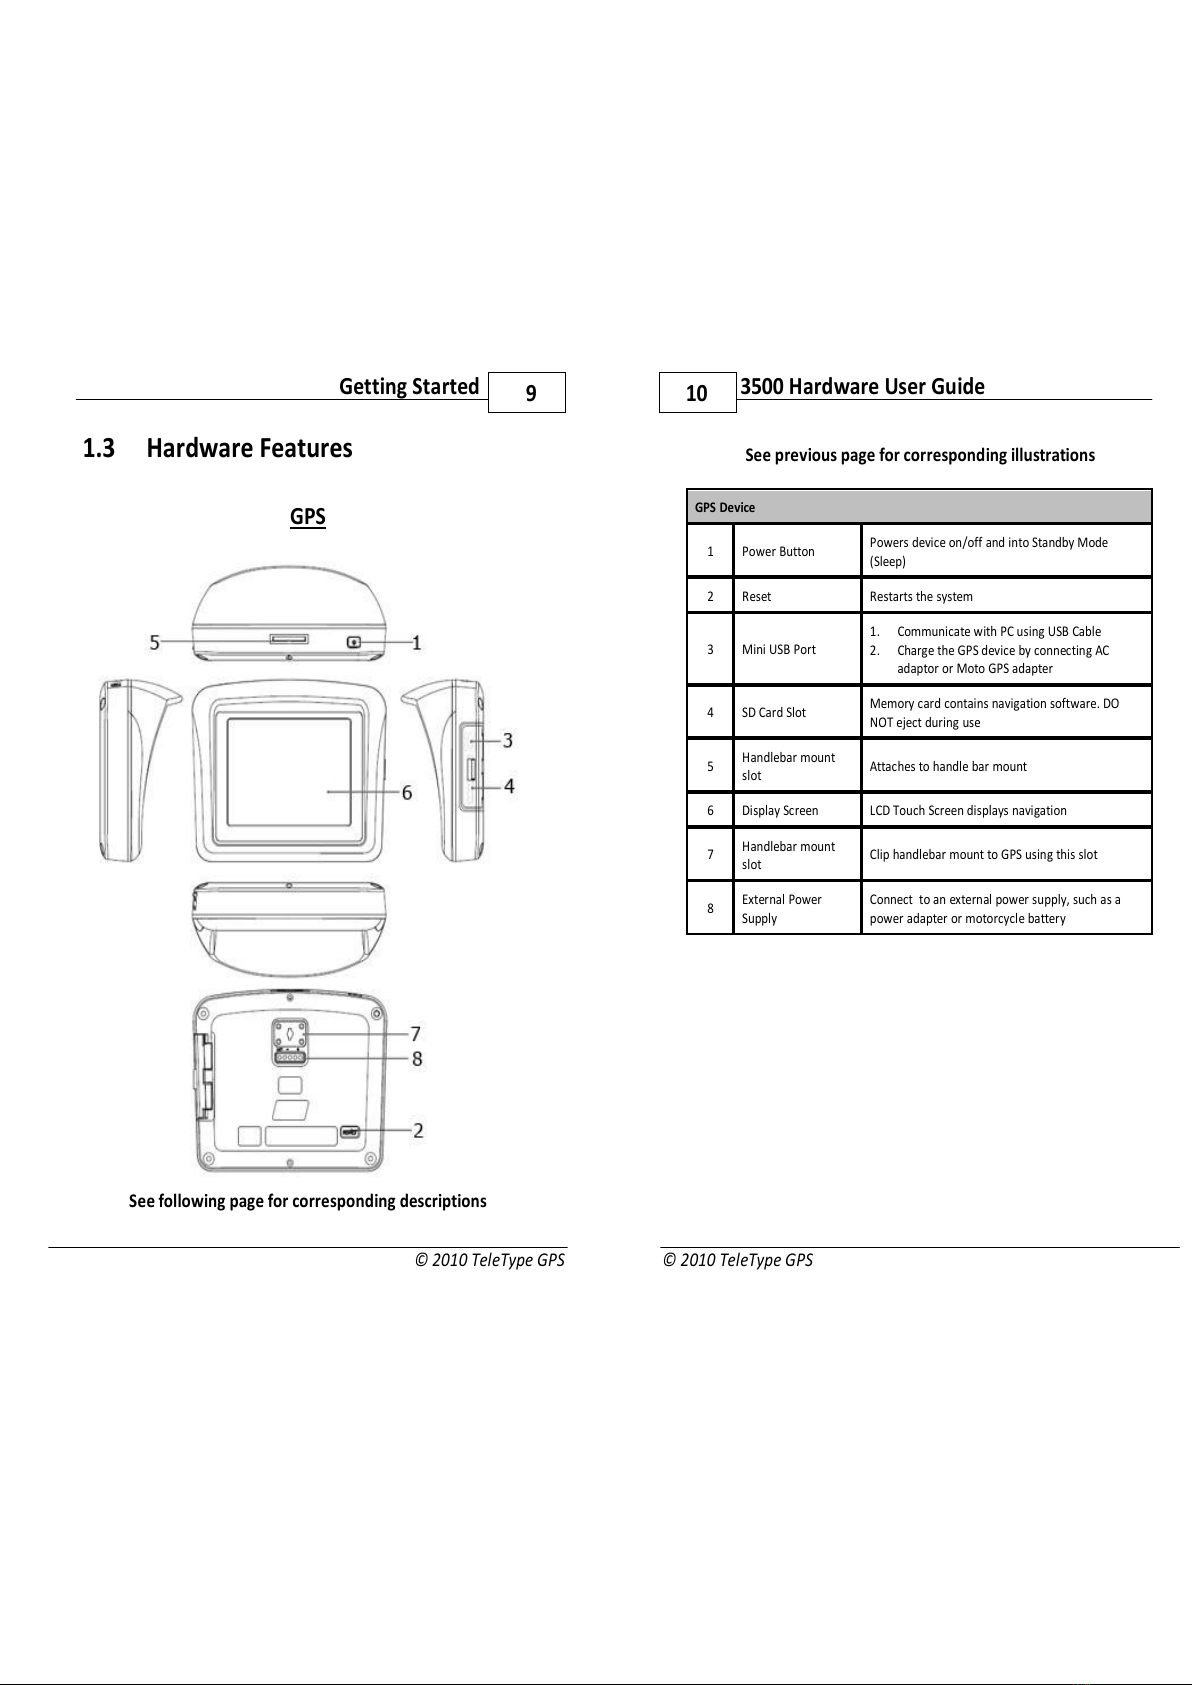
1 3 Hardware Features
GPS
See following page for corresponding descriptions
3500 Hardware User Guide
10
© 2010 TeleType GPS
See previous page for corresponding illustrations
GPS Device
1 Power Button Powers device on/off and into Standby Mode
(Sleep)
2 Reset Restarts the system
3 Mini USB Port
1. Communicate with PC using USB Cable
2. Charge the GPS device by connecting AC
adaptor or Moto GPS adapter
4 SD Card Slot Memory card contains navigation software. DO
NOT eject during use
5Handlebar mount
slot Attaches to handle bar mount
6 Display Screen LCD Touch Screen displays navigation
7Handlebar mount
slot Clip handlebar mount to GPS using this slot
8External Power
Supply
Connect to an external power supply, such as a
power adapter or motorcycle battery
All manuals and user guides at all-guides.com
© 2010 TeleType GPS
11
Getting Started
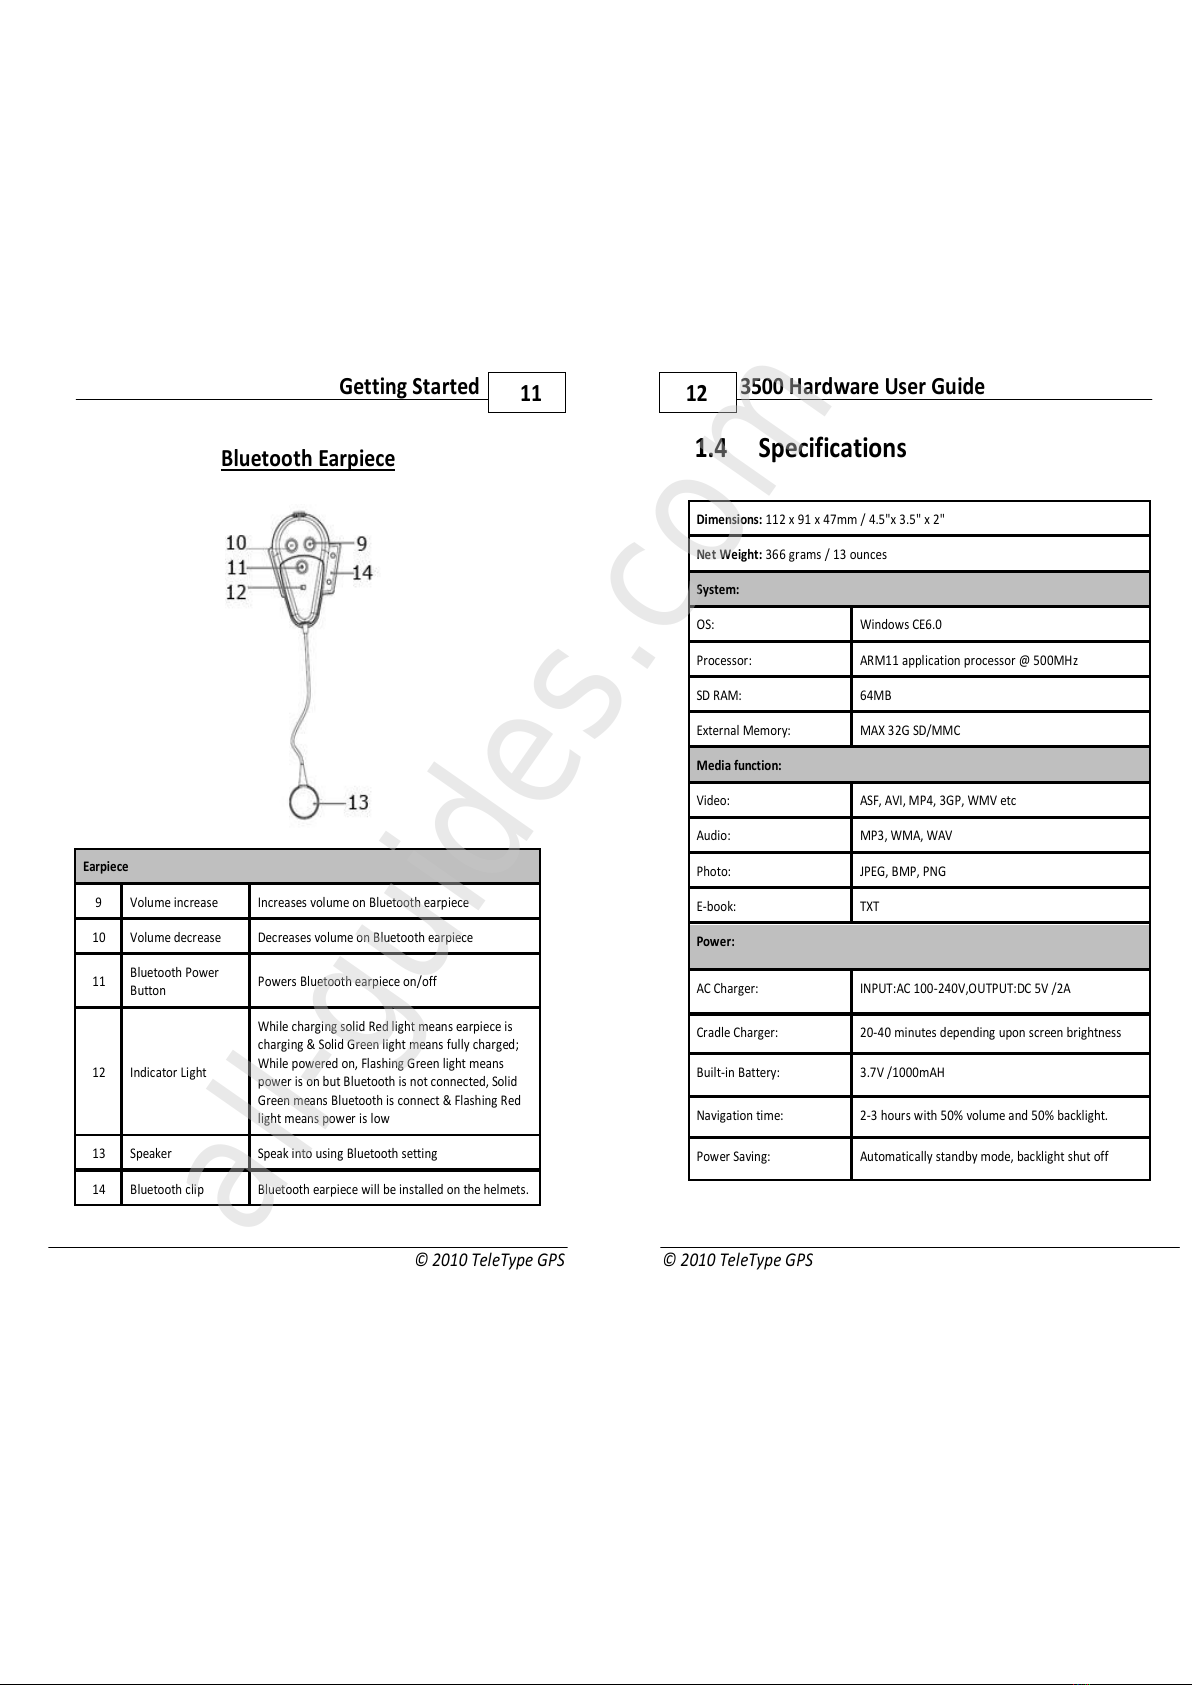
Bluetooth Earpiece
Earpiece
9 Volume increase Increases volume on Bluetooth earpiece
10 Volume decrease Decreases volume on Bluetooth earpiece
11 Bluetooth Power
Button Powers Bluetooth earpiece on/off
12 Indicator Light
hile charging solid Red light means earpiece is
charging & Solid Green light means fully charged;
hile powered on, Flashing Green light means
power is on but Bluetooth is not connected, Solid
Green means Bluetooth is connect & Flashing Red
light means power is low
13 Speaker Speak into using Bluetooth setting
14 Bluetooth clip Bluetooth earpiece will be installed on the helmets.
3500 Hardware User Guide
12
© 2010 TeleType GPS
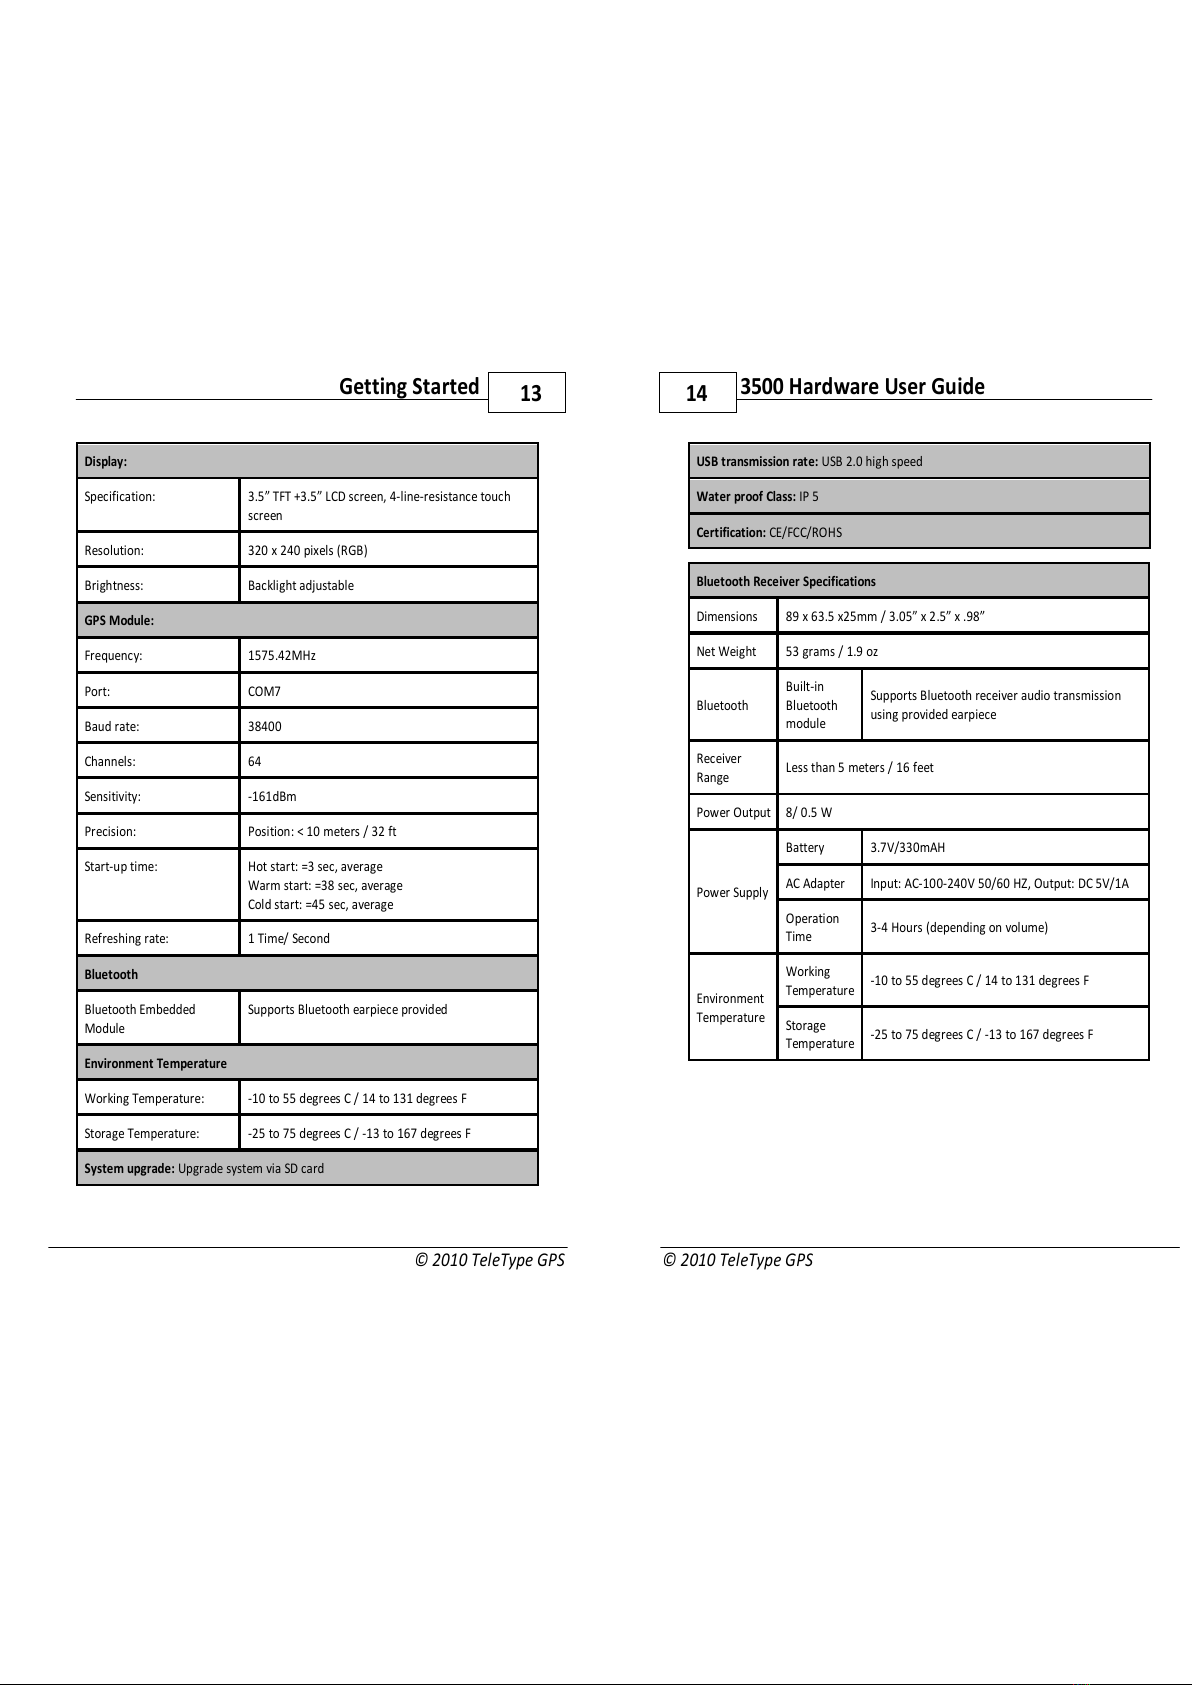
1 4 Specifications
Dimensions: 112 x 91 x 47mm / 4.5"x 3.5" x 2"
Net Weight: 366 grams / 13 ounces
System:
OS: indows CE6.0
Processor: ARM11 application processor @ 500MHz
SD RAM: 64MB
External Memory: MAX 32G SD/MMC
Media function:
Video: ASF, AVI, MP4, 3GP, MV etc
Audio: MP3, MA, AV
Photo: JPEG, BMP, PNG
E-book: TXT
Power:
AC Charger: INPUT:AC 100-240V,OUTPUT:DC 5V /2A
Cradle Charger: 20-40 minutes depending upon screen brightness
Built-in Battery: 3.7V /1000mAH
Navigation time: 2-3 hours with 50% volume and 50% backlight.
Power Saving: Automatically standby mode, backlight shut off
All manuals and user guides at all-guides.com
all-guides.com
© 2010 TeleType GPS
13
Getting Started
Display:
Specification: 3.5” TFT +3.5” LCD screen, 4-line-resistance touch
screen
Resolution: 320 x 240 pixels (RGB)
Brightness: Backlight adjustable
GPS Module:
Frequency: 1575.42MHz
Port: COM7
Baud rate: 38400
Channels: 64
Sensitivity: -161dBm
Precision: Position: < 10 meters / 32 ft
Start-up time: Hot start: =3 sec, average
arm start: =38 sec, average
Cold start: =45 sec, average
Refreshing rate: 1 Time/ Second
Bluetooth
Bluetooth Embedded
Module
Supports Bluetooth earpiece provided
Environment Temperature
orking Temperature: -10 to 55 degrees C / 14 to 131 degrees F
Storage Temperature: -25 to 75 degrees C / -13 to 167 degrees F
System upgrade: Upgrade system via SD card
3500 Hardware User Guide
14
© 2010 TeleType GPS
USB transmission rate: USB 2.0 high speed
Water proof Class: IP 5
Certification: CE/FCC/ROHS
Bluetooth Receiver Specifications
Dimensions 89 x 63.5 x25mm / 3.05” x 2.5” x .98”
Net eight 53 grams / 1.9 oz
Bluetooth
Built-in
Bluetooth
module
Supports Bluetooth receiver audio transmission
using provided earpiece
Receiver
Range Less than 5 meters / 16 feet
Power Output 8/ 0.5
Power Supply
Battery 3.7V/330mAH
AC Adapter Input: AC-100-240V 50/60 HZ, Output: DC 5V/1A
Operation
Time 3-4 Hours (depending on volume)
Environment
Temperature
orking
Temperature -10 to 55 degrees C / 14 to 131 degrees F
Storage
Temperature -25 to 75 degrees C / -13 to 167 degrees F
All manuals and user guides at all-guides.com
Part II
3500 Hardware User Guide
16
© 2010 TeleType GPS
2 Basic Operation
Turning on and off
Turn your GPS on by pressing the Power button for
at least two seconds. Power off by pressing the
Power button then selecting Power Off. To enter
Sleep Mode, press the Power button and select
Sleep Mode.
Hardware Reset
Occasionally, you may need to perform a hardware
reset when your GPS stops responding or appears
to be "frozen" or "locked up". You can perform a
hardware reset by pressing the RESET button
located on the back of the device.
Power Supply
In addition to a built-in lithium battery, you may
power the GPS by connecting directly to your
motorcycle's battery (hardwire) or through a DC
power (cigarette lighter) converter.
All manuals and user guides at all-guides.com
© 2010 TeleType GPS
17
Basic Operation
Handlebar Mount
Attach your GPS securely to the handlebar of your
motorcycle or moped, making sure not to block
your line of sight. (Note: GPS is compatible with
RAM™ window mount)
Memory Card
This device supports secure digital (SD) cards up to
32 GB. Be sure the card is securely inserted before
use and quit any applications in use before
ejecting.
Touch Screen
Your GPS features an LCD touch screen, allowing
you to move the screen using your finger (glove
friendly). Press the desired icon or location on the
map to move the screen.
Bluetooth
To hear the voice instructions (or listen to music)
your GPS will use the Bluetooth earpiece provided
for sound. The Bluetooth earpiece will be installed
in your helmet.
All manuals and user guides at all-guides.com
Part III
3500 Hardware User Guide
20
© 2010 TeleType GPS
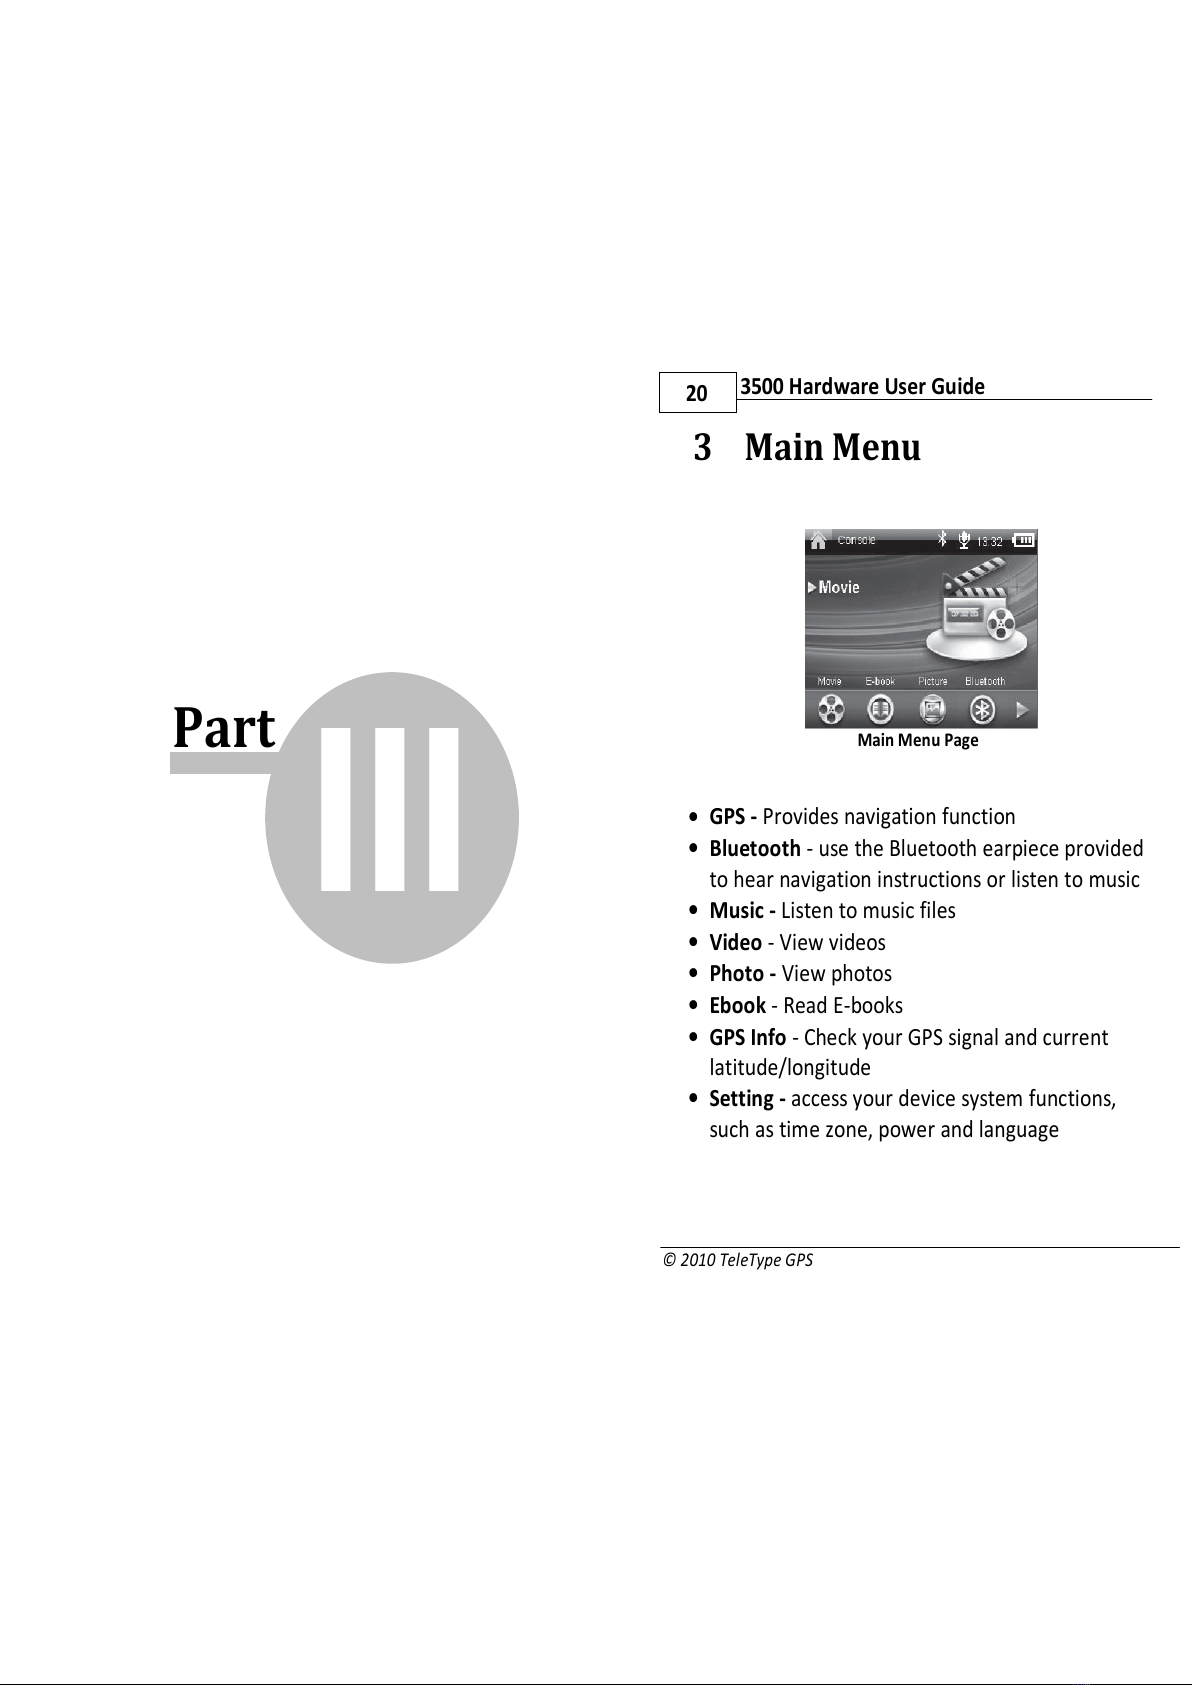
3 Main Menu
Main Menu Page
•GPS - Provides navigation function
•Bluetooth - use the Bluetooth earpiece provided
to hear navigation instructions or listen to music
•Music - Listen to music files
•Video - View videos
•Photo - View photos
•Ebook - Read E-books
•GPS Info - Check your GPS signal and current
latitude/longitude
•Setting - access your device system functions,
such as time zone, power and language
All manuals and user guides at all-guides.com
© 2010 TeleType GPS
21
Main Menu
3 1 GPS
Please carefully read the orldNav Software Guide
(separate booklet) for navigation instructions.
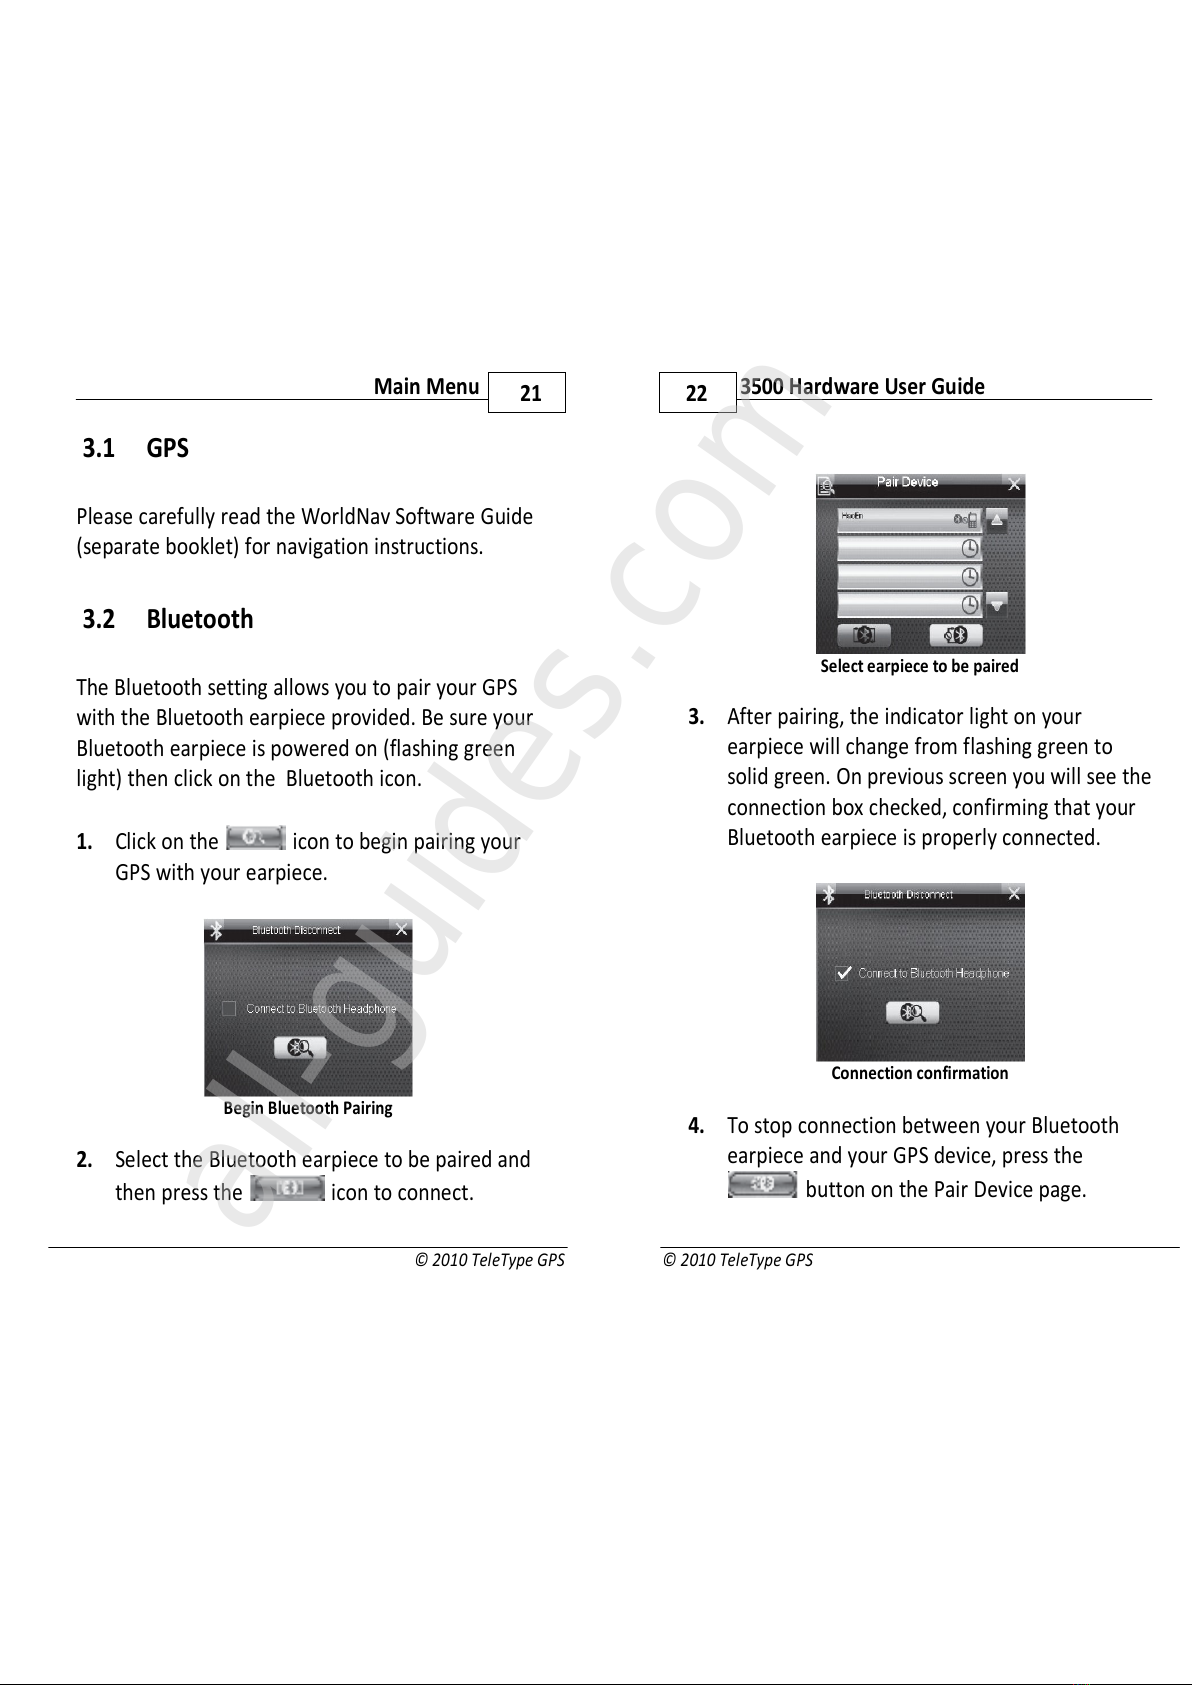
3 2 Bluetooth
The Bluetooth setting allows you to pair your GPS
with the Bluetooth earpiece provided. Be sure your
Bluetooth earpiece is powered on (flashing green
light) then click on the Bluetooth icon.
1 Click on the icon to begin pairing your
GPS with your earpiece.
Begin Bluetooth Pairing
2 Select the Bluetooth earpiece to be paired and
then press the icon to connect.
3500 Hardware User Guide
22
© 2010 TeleType GPS
Select earpiece to be paired
3 After pairing, the indicator light on your
earpiece will change from flashing green to
solid green. On previous screen you will see the
connection box checked, confirming that your
Bluetooth earpiece is properly connected.
Connection confirmation
4 To stop connection between your Bluetooth
earpiece and your GPS device, press the
button on the Pair Device page.
All manuals and user guides at all-guides.com
all-guides.com
© 2010 TeleType GPS
23
Main Menu
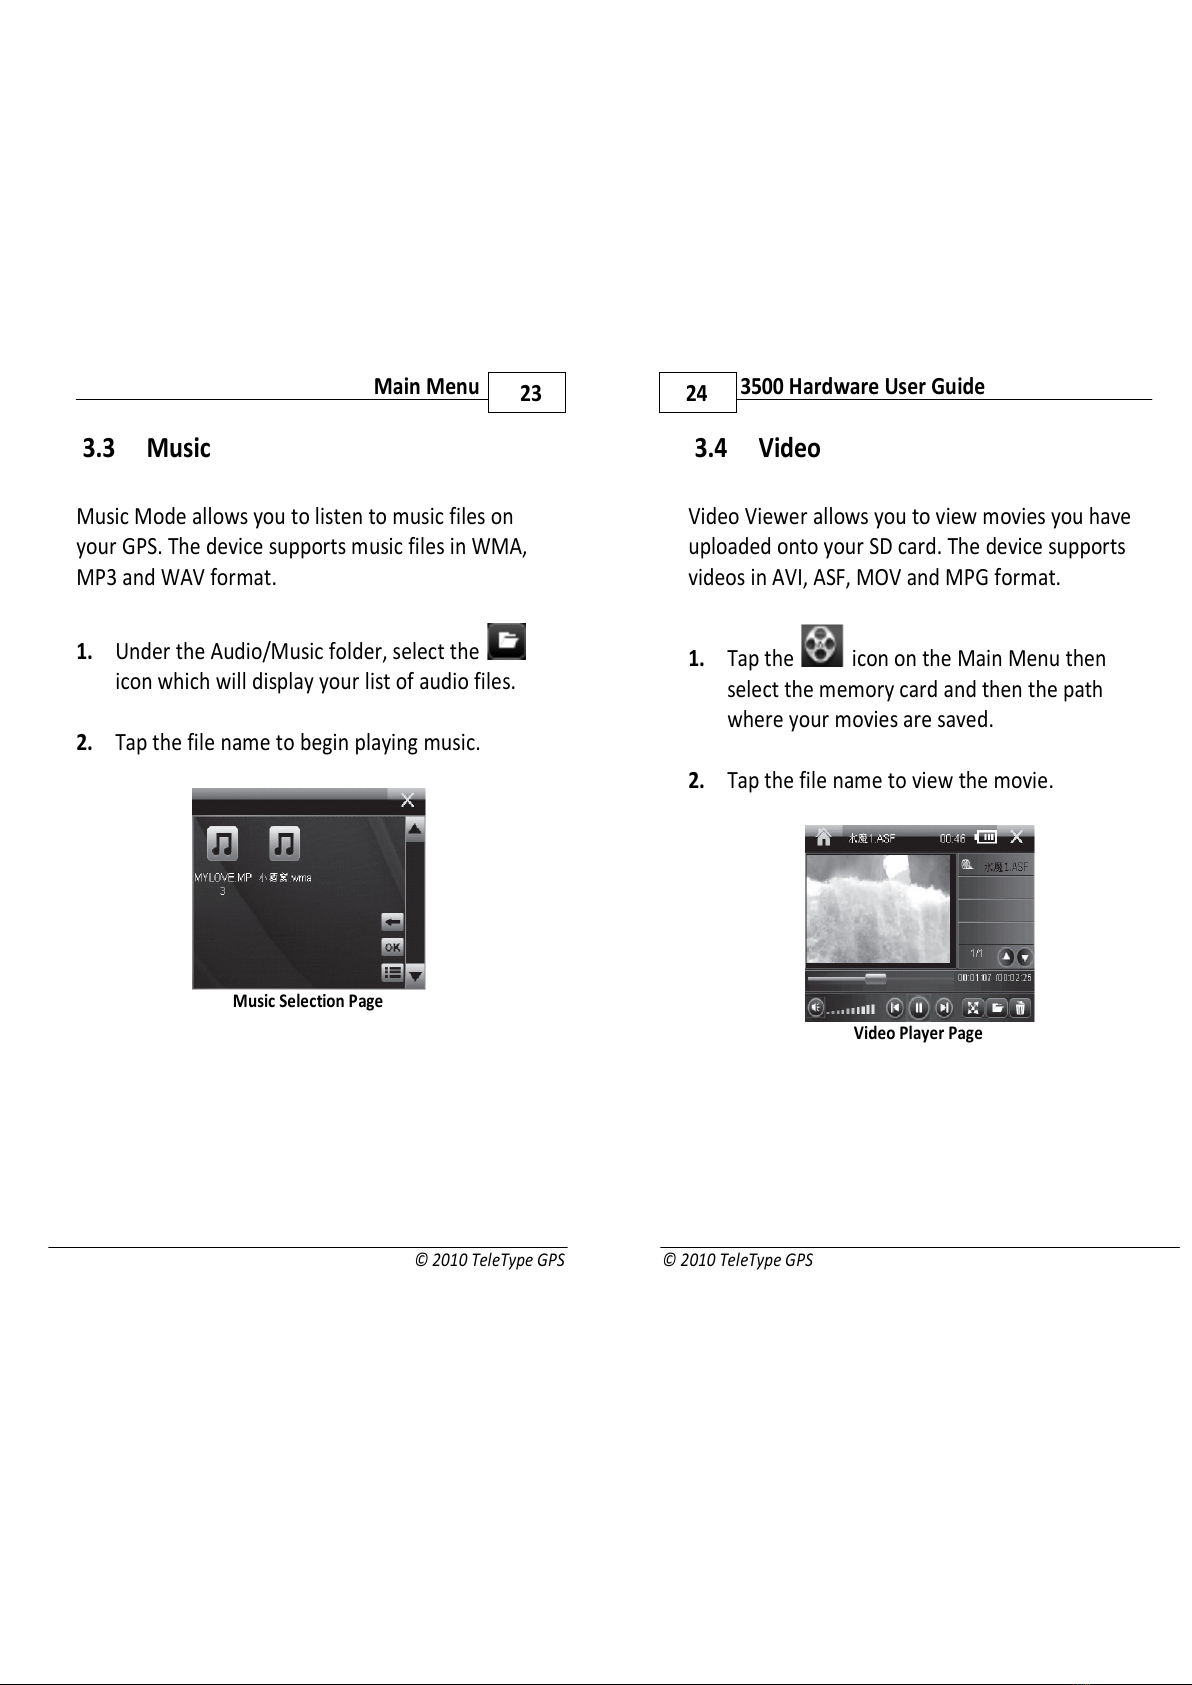
3 3 Music
Music Mode allows you to listen to music files on
your GPS. The device supports music files in MA,
MP3 and AV format.
1 Under the Audio/Music folder, select the
icon which will display your list of audio files.
2 Tap the file name to begin playing music.
Music Selection Page
3500 Hardware User Guide
24
© 2010 TeleType GPS
3 4 Video
Video Viewer allows you to view movies you have
uploaded onto your SD card. The device supports
videos in AVI, ASF, MOV and MPG format.
1 Tap the icon on the Main Menu then
select the memory card and then the path
where your movies are saved.
2 Tap the file name to view the movie.
Video Player Page
All manuals and user guides at all-guides.com

© 2010 TeleType GPS
25
Main Menu
3 5 Photo
Photo Viewer allows you to view photos you have
uploaded onto your SD card. The device supports
photos in JPG, PNG, and BMP format.
1 Tap the icon on the Main Menu then the
memory card and then select the path where
your photos are saved.
2 Tap the file name to display the photo.
Photo Viewer Page
3500 Hardware User Guide
26
© 2010 TeleType GPS
3 6 Ebook
Ebook Reader allows you to read E-books you have
uploaded onto your SD card. The device supports
E-books in TXT format.
1 Tap the icon on the Main Menu then the
memory card and then select the path where
your E-books are saved.
2 Tap the file name to begin reading.
Ebook Reader
All manuals and user guides at all-guides.com

© 2010 TeleType GPS
27
Main Menu
3 7 GPS Info
You can check your GPS signal strength, current
latitude/longitude and current satellite-time
information. You can also select "GPS Reset" to
clear your current satellite connection and
reacquire a signal.
GPS Monitor Page
3500 Hardware User Guide
28
© 2010 TeleType GPS
3 8 Setting
Setting Page
•Time Zone Setting - allows you to set your
current time zone
•Preferences - allows you to set the system
language, volume, as well as screen brightness
and sleep timer
•Clock - set the current date and time
•System - view the system information for your
device
•Screen Calibration - lets you adjust the screen
calibration setting
•USB Setting - select between "charge" and
"online" mode when the GPS is connected to a
PC via the USB cord
All manuals and user guides at all-guides.com
Part IV
3500 Hardware User Guide
30
© 2010 TeleType GPS
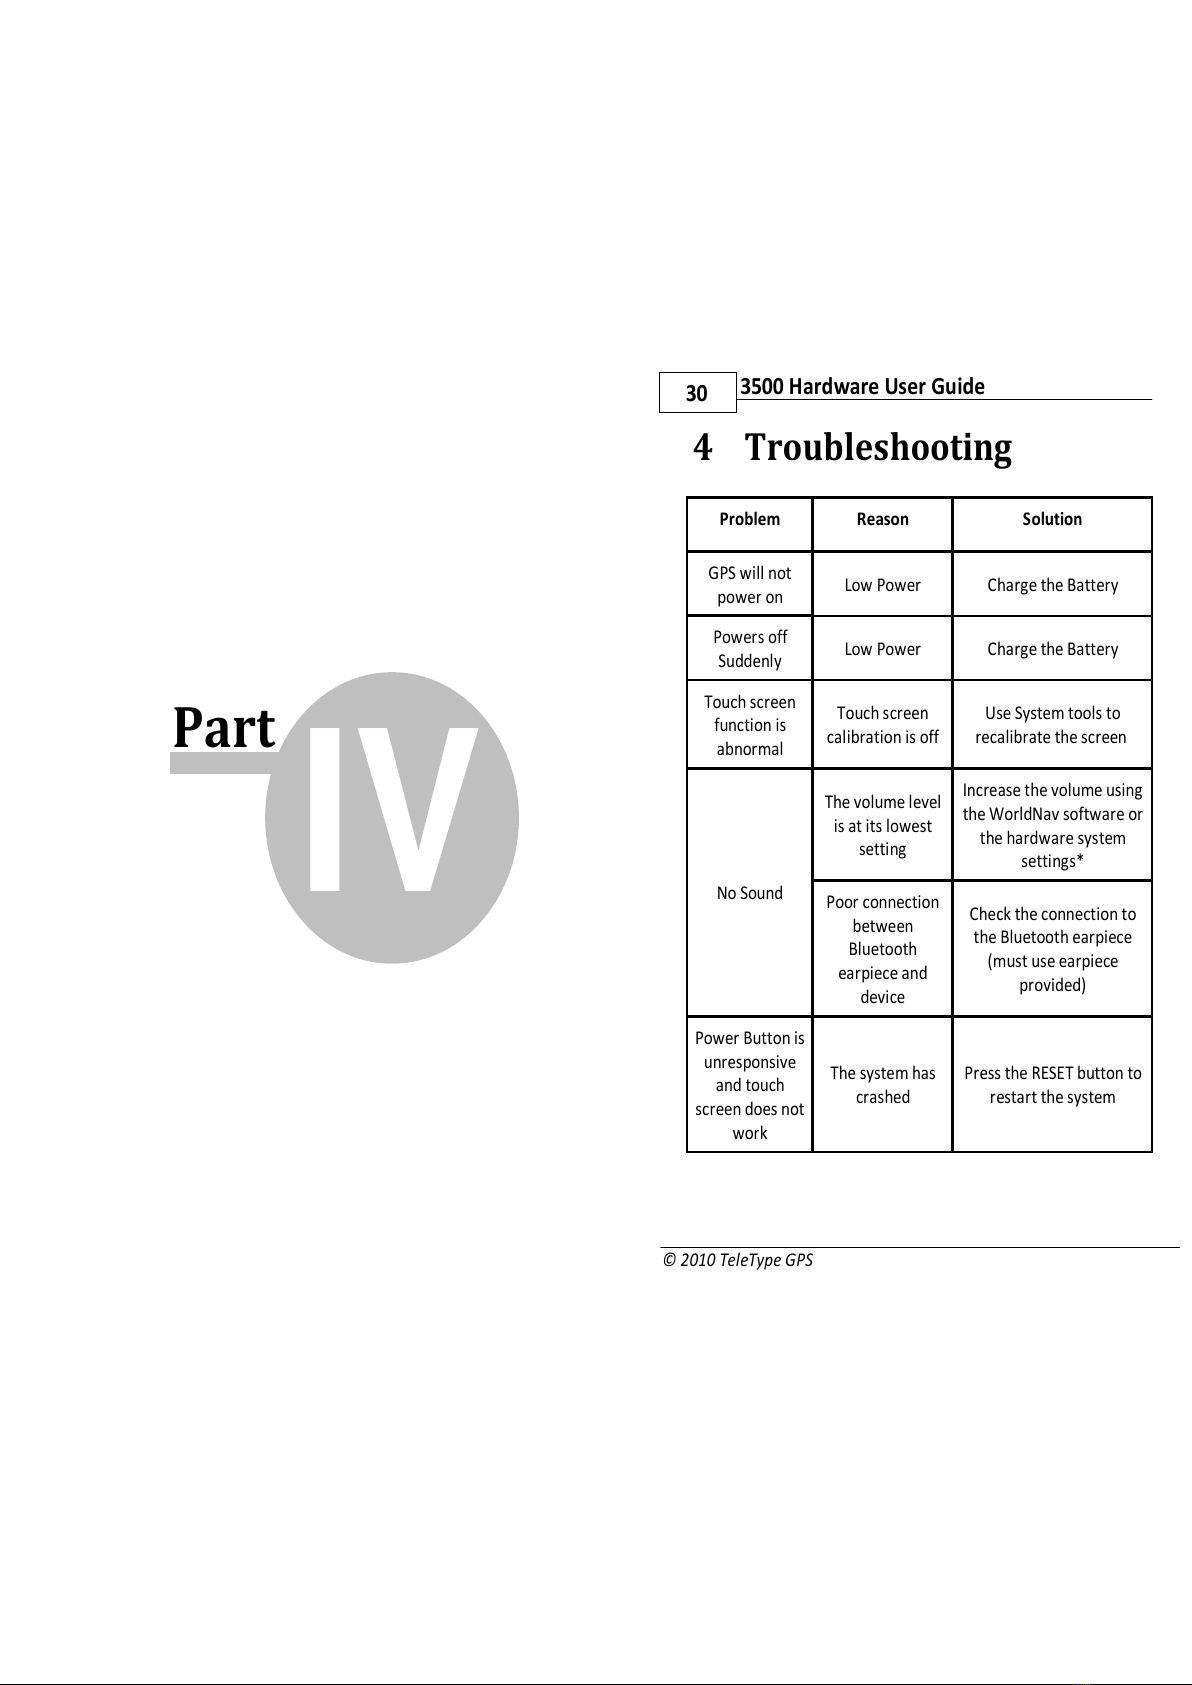
4 Troubleshooting
Problem Reason Solution
GPS will not
power on Low Power Charge the Battery
Powers off
Suddenly Low Power Charge the Battery
Touch screen
function is
abnormal
Touch screen
calibration is off
Use System tools to
recalibrate the screen
No Sound
The volume level
is at its lowest
setting
Increase the volume using
the orldNav software or
the hardware system
settings*
Poor connection
between
Bluetooth
earpiece and
device
Check the connection to
the Bluetooth earpiece
(must use earpiece
provided)
Power Button is
unresponsive
and touch
screen does not
work
The system has
crashed
Press the RESET button to
restart the system
All manuals and user guides at all-guides.com
© 2010 TeleType GPS
31
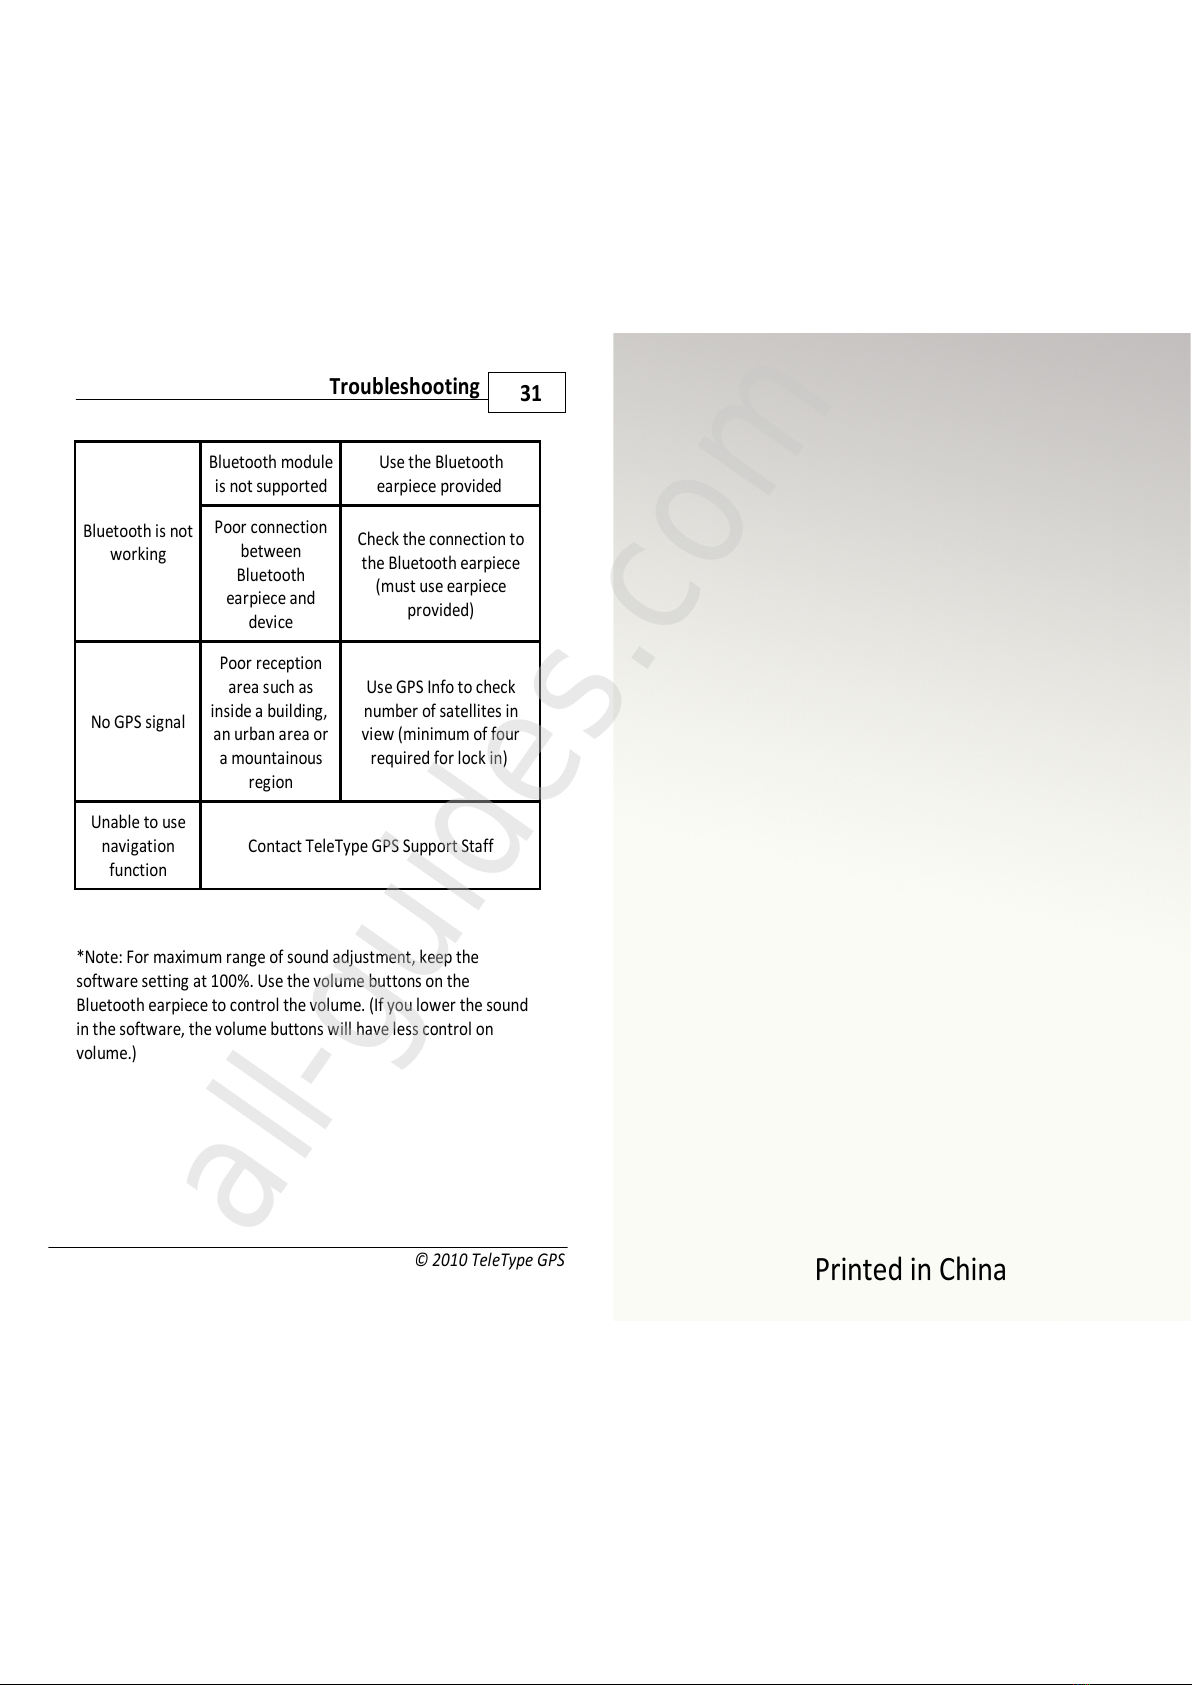
Troubleshooting
Bluetooth is not
working
Bluetooth module
is not supported
Use the Bluetooth
earpiece provided
Poor connection
between
Bluetooth
earpiece and
device
Check the connection to
the Bluetooth earpiece
(must use earpiece
provided)
No GPS signal
Poor reception
area such as
inside a building,
an urban area or
a mountainous
region
Use GPS Info to check
number of satellites in
view (minimum of four
required for lock in)
Unable to use
navigation
function
Contact TeleType GPS Support Staff
*Note: For maximum range of sound adjustment, keep the
software setting at 100%. Use the volume buttons on the
Bluetooth earpiece to control the volume. (If you lower the sound
in the software, the volume buttons will have less control on
volume.)
Printed in China
All manuals and user guides at all-guides.com
all-guides.com
Table of contents
Other TeleType GPS GPS manuals


