Telstar TCL002110MD User manual

OLLA COCIMIENTO LENTO
TCL002110MD

OLLA COCIMIENTO LENTO
TCL002110MD
3
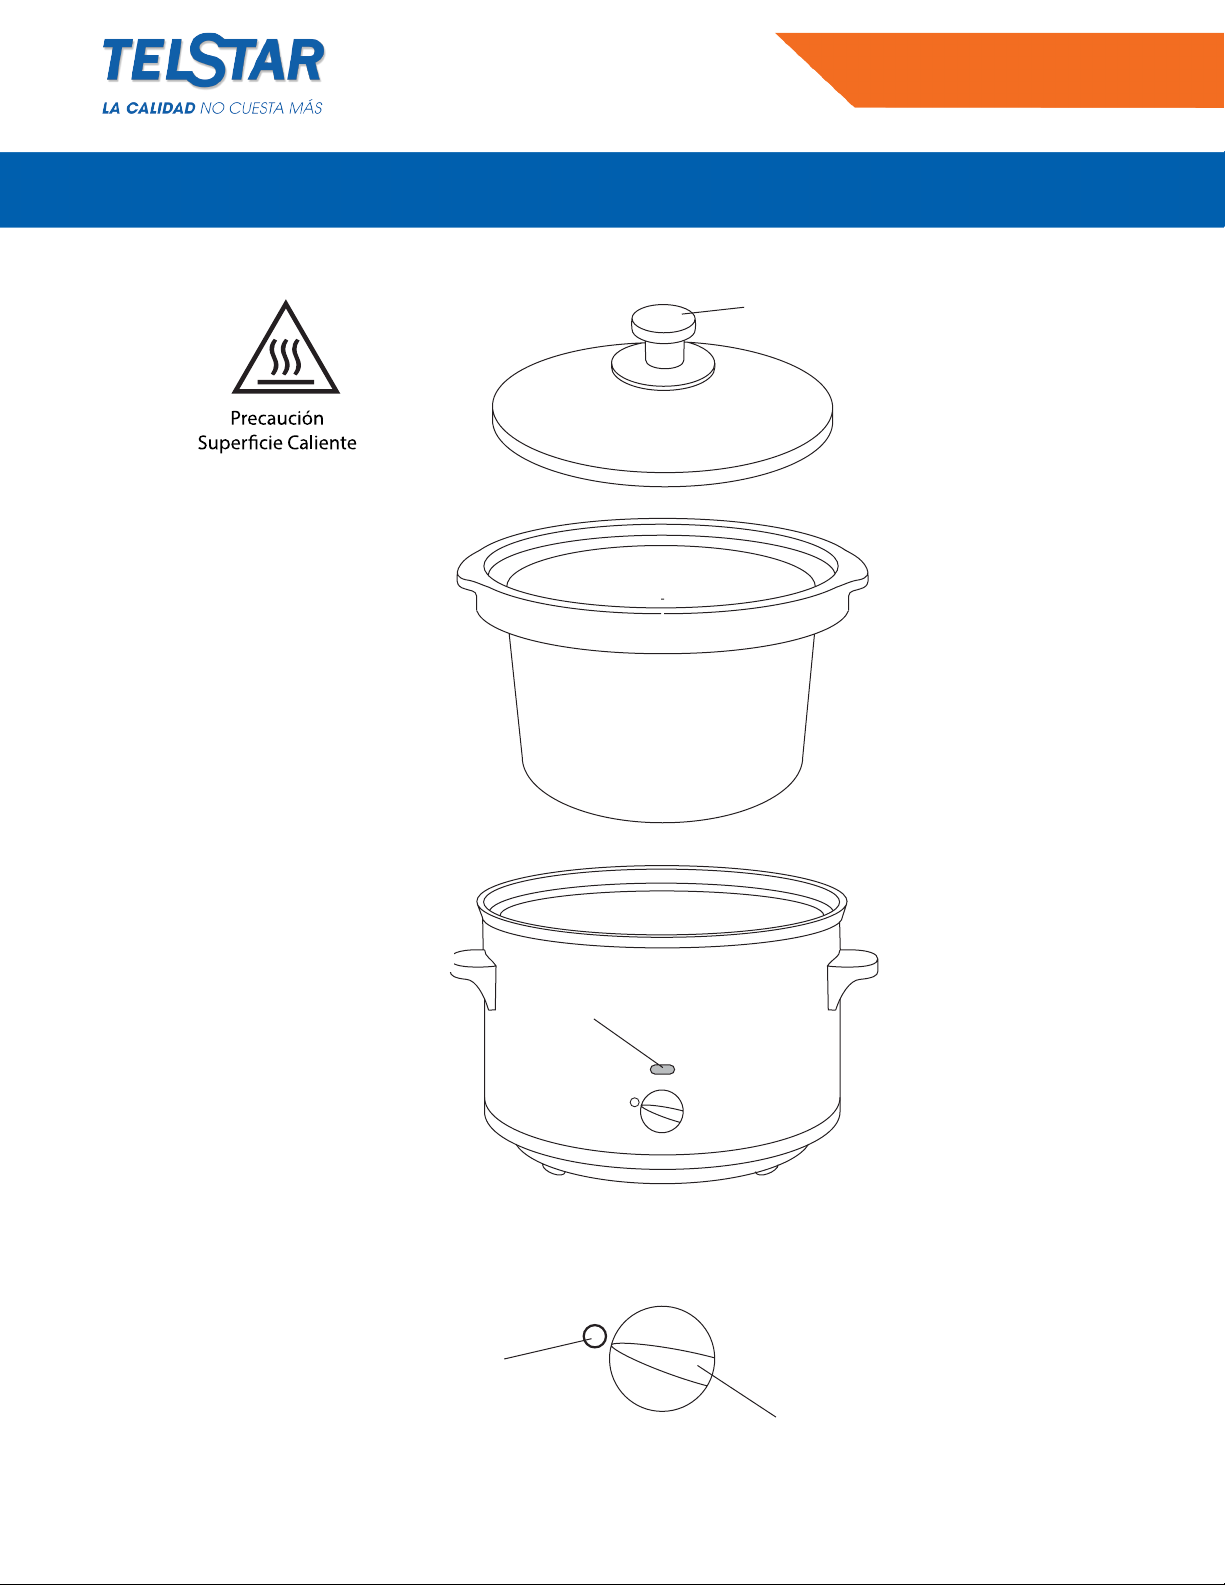
Tapa de pomo
Tapa
Olla de cocinar
Manija M anija
Luz
BajoA lto
Caliente
Bajo Alto
Caliente
Control
Apagado
Manija

OLLA COCIMIENTO LENTO
TCL002110MD
4
Lea las instrucciones, guárdela, y repáselos cuando encienda el aparato. Remueva todos los empaques an-
tes de usar
A. IMPORTANTE
1. Este aparato puede ser utilizado por niños de 8 años y personas de más edad, personas con alguna
discapacidad o falta de experiencia y conocimiento si son supervisados /instruidos adecuadamente y
entienden los niveles de peligro involucrados.
Los niños no deben de jugar con este aparato. El limpiar y hacer el mantenimiento del aparato no debe de
ser hecho por ningún niño, a menos de que tenga a alguien mayor vigilándolo. Mantenga el aparato y el
cable fuera del alcance de los niños de 8 años.
2. Si el cable está dañado, debe de ser reemplazado por el fabricante o un agente de servicio, o similares
calicados, para evitar accidentes.
3. No sumerja el aparato en ningún líquido
4. Las supercies de este aparato se calientan
5. Usted puede hervir frijoles deshidratados (alubias rojas) por al menos 10 minutos antes de adicionarlos a
la olla de cocimiento lento. Pueden ser venenosas si se comen crudas o con un bajo cocimiento.
6. Deje un espacio de al menos 50mm alrededor de todo el aparato.
7. No cubra el aparato o ponga, o ponga algo encima del aparato.
8. No ponga la olla caliente en una superce fría o en agua fría, podría quebrarse.
9. No use la olla con otro aparato
10. Desenchufe el aparato cuando no se esté usando, antes de moverlo o lavarlo.
11. No use accesorios o adjuntos aparte de los que se les dan.
12. No use la olla para ningún otro propósito que el descrito en este instructivo.
13. No opere este aparato si esta dañado o funciona mal.
PARA USO DOMESTICO
• Antes de usarlo por primera vez
Remueva todos los empaques y lave la olla de cocimiento lento, para remover el polvo de fabrica, etc.
Benecios de la olla de cocimiento lento
Salud: La gentil acción de cocina reduce el daño a las vitaminas y retiene una mayor cantidad de nutriente
y sabores.

OLLA COCIMIENTO LENTO
TCL002110MD
5
Economía : Largo, lento cocinando puede poner tiernos los más baratos, duros cortes carne, y usa como un
cuarto de la energía de el mas pequeño anillo en la estufa regular.
Conveniencia: Prepare los ingredientes la noche anterior, póngalos en cocimiento lento en la mañana antes
de ir trabajar y tenga una deliciosa comida esperándolo cuando regrese a casa.
La olla de cocimiento lento está controlado por un swich de 4 posiciones, las posiciones son:
Apagado
Bajo Para un “cocimiento lento tradicional”. Usted debe de precalentar la olla, en el cocimiento lento alto
por al menos 20 minutos antes de cocinar en bajo.
Alto Para un “cocimiento rápido”, use la olla de cocimiento lento como una estufa de estofado eléctrica.
Mantenga un ojo en ella, y asegúrese que la comida no se seque. Si usted observa que la comida se está
secando agregue agua caliente, no fría o podría romper la olla.
Caliente Para mantener la comida caliente – pero solo después de que este cocinada para que se
mantenga caliente en la olla de cocimiento lento.
Precaución No use el modo “Caliente” para calentar la comida, usted no matara los microbios.
1. Descongele la comida completamente ante de adicionarla a la olla de cocimiento lento.
2. Dore la carne y saltee los vegetales en un sartén, no en la olla.
3. No use la olla de para cocinar afuera de cualquier cosa que no sea la olla de cocimiento lento.
4. No use la olla en “Bajo” sin antes precalentar la olla de cocción, en la olla de cocimiento lento, o ponga
en modo “Alto” por al menos 20 minutos.
5. Remoje las petit poas y frijoles deshidratados por al menos 8 horas antes de ponerlo en la olla de co-
cimiento lento, para suavizarlos.
Precaución Hierva los frijoles deshidratados alubias rojas) por al menos 10 minutos antes de agregarlos a la
olla de cocimiento lento. Pueden ser venenosos si están crudos o bajos de cocción.
B. EL INTERRUPTOR
C. GENERAL

OLLA COCIMIENTO LENTO
TCL002110MD
66
6. No necesita remojar las lentejas antes de cocinarlas.
7. Guarde los ingredientes preparados con anterioridad en contenedores en la nevera. No los ponga en la
olla de cocimiento lento o el la olla dentro del refrigerador.
8. Los vegetales de raíz, tubérculos, o bulbos (zanahorias, papas, cebolla) toman mucho tiempo para coci-
narse así que córtelos en rebanadas de 5mm, en julianas, bastones o cuadrados y saltéelos gentilmente por
2 o 3 minutos antes de agregarlos a la olla de cocimiento lento.
9. Todos los vegetales (incluidos los deshidratados) deben de ser sumergidos en agua para cocinarlos.
10. Cuando cocine con arroz, use al menos 150ml más por cada 100 gramos de arroz. Hemos encontrado
que el “Arroz-Fácil” tiene mejores resultados.
11. La pasta no es apropiada para el cocimiento lento, se vuelve muy suave. Si su receta requiere de pasta,
esta debe de ser puesta 30 o 40 minutos antes de servirla.
PREPARACIÓN
12. Decida cuándo va a querer empezar a comer cuando empiece a cocinar.
13. Si quiere empezar a comer a la 6 pm, usted debe de empezar a cocinar a las 8 am, busque una receta
que tarde unas 8 horas o 10 horas. Si usted cocimiento lento en el modo “lento”, usted debe de agregar una
hora extra, el tiempo no hace casi diferencia, mientras este tenga suciente liquido puede cocinarlo todo el
tiempo que este necesite, solo prevenga que se seque.
14. Prepare su comida de acuerdo a la receta.
15. Ponga la olla de cocimiento lento en un supercie estable, nivelada y resistente al calor.
16. Revise que la olla de cocimiento lento este apagada. Enciéndala.
17. Conecte la olla de cocimiento lento del enchufe de la pared.
18. Ponga la olla la olla dentro de la olla de cocimiento lento y encaje la tapa.
19. Ponga el controlador en “Alto”, déjela que precaliente por unos 20 minutos.
20. Mientras espera dore la carne y saltee los vegetales en un sarten.
21. Hierva el líquido de cocinar en un sartén. Si usted usa algún tipo de salsa agréguela al sartén y quítela
antes de que hierva.
22. Llenar la olla de cocimiento lento.
23. Cuando acaben los 20 minutos, remueva la tapa (guantes de cocina) y póngalo en una supercie resis-
tente al calor.
24. Ponga la carne y los vegetales dentro de la olla de cocción y agregue el liquido caliente.
25. Escoja el Modo
26. Ponga el control en “Bajo” para una cocción lenta tradicional, o en “Alto” como si usted estuviera usando
una olla de estofados eléctrica.

OLLA COCIMIENTO LENTO
TCL002110MD
7
27. La luz se encenderá, cuando el cocimiento inicie.
¿TERMINADO?
28. Cuando el tiempo de cocimiento este terminado:
A) Si usted desea servir la comida inmediatamente, ponga el control en “Apagado” y desconecte del
enchufe.
B) Si usted no está listo para servir, ponga el control “Caliente”, para mantener la comida caliente antes
de servir.
PARA SERVIR
29. Revise que la olla cocimiento lento este apagada.
30. Utilizando los guantes para horno, remueva la tapa, y ponga en una supercie resistente al calor.
31. Lo mejor es agarrar un cucharon y sacar la comida a un plato.
32. No mueva la olla de cocimiento lento, por que el cable podría atascarse en algún lugar.
33. Usted debería de usar guantes de cocina para levantar la olla completa con la tapa, pero está caliente
y pesada, así que tenga cuidado.
TIP
Limpiarla puede ser más sencillo si usted remueve la comida cocinada inmediatamente de la olla de co-
cimiento, luego llene de agua a temperatura caliente.
SALSA/SALSA PESADA
EL cocimiento lento retiene la mayoría de los líquidos mas que un cocimiento normal. Esto tiende a incremen-
tar la cantidad del líquido de cocina, soltar las salsas o las salsas pesadas. Para permitir esto, las salsas deben
ser inicialmente más espesas de lo normal. Cualquier cosa que deba de ser salteada puede ser sazonada
enharinada, o espesada antes.
MANTENIMIENTO Y CUIDADOS
1. Apague, y desconecte la olla de cocimiento lento.
2. Usando los guantes de cocina, remueva la tapa y la olla de cocimiento en una supercie para cosas cali-
entes.
3. Si usted no tiene intenciones de lavarlo inmediatamente, llene la olla de cocimiento con agua caliente, de
otra manera el calor residual puede cocinar los restos de comida, haciendo que eventualmente sea más
difícil de removerlas.

OLLA COCIMIENTO LENTO
TCL002110MD
8
4. No enjuague la parte de afuera de la olla de cocimiento lento. La base es porosa, así que si se sumerge en
agua, puede causar que se expanda y se quiebre cuando está caliente.
5. Lave la tapa con agua caliente y jabonosa, usando únicamente un pedazo de tela o una esponja, cuan-
do este enjuagado y seco completamente. No use paletas escurridoras.
6. Todas las otras supercies, internas y externas, deben de ser limpiadas con un pañito húmedo. Usted puede
usar líquido limpiador si es necesario.
7. Seque todas las supercies antes volverlo a utilizar o para guardarla.
8. Después de un tiempo de usar el esmalte de la olla de cocimiento puede desarrollar “cuarteado “, una red
de pequeñas grietas. Estas marcas son superciales, y no deben de preocupar.
9. Usted debe de querer meter a lavar la olla de cocimiento lento y la tapa, dentro del lavaplatos, pero no
recomendamos esto. El ambiente agresivo dentro del mismo puede afectar los acabados. Todos los daños
deben de ser cosméticos, y no deberían de afectar la funcionalidad de la olla.
10. No sumerja el cuerpo de la olla de cocimiento lento en agua o ningún líquido.
11. No ponga el cuerpo de la olla de cocimiento lento en el lavaplatos.
12. No use limpiadores abrasivos o solventes.

9
SLOW COOKER
TCL002110MD

10
SLOW COOKER
TCL002110MD
Read the instructions, keep them safe, pass them on if you pass the appliance on. Remove all packaging
before use.
A. IMPORTANT SAFEGUARDS
Follow basic safety precautions, including:
1. This appliance can be used by children aged from 8 years and above and persons with reduced physical,
sensory or mental capabilities or lack of experience and knowledge if they have been supervised/instructed
and understand the hazards involved. Children shall not play with the appliance. Cleaning and user mainte-
nance shall not be done by children unless they are older than 8 and supervised. Keep the appliance and
cable out of reach of children under 8 years.
2. If the cable is damaged, it must be replaced by the manufacturer, its service agent, or someone similarly
qualied, to avoid hazard.
3. Don’t immerse the appliance in liquid.
4. The surfaces of the appliance will get hot.
5. You must boil dried beans (e.g. red kidney beans) for at least 10 minutes before adding them to the slow
cooker. They’re poisonous if eaten raw or under-cooked.
6. Leave a space of at least 50mm all round the appliance.
7. Don’t cover the appliance or put anything on top of it.
8. Don’t put a hot cookpot on a cold surface or into cold water, it may crack.
9. Don’t use the cookpot with any other appliance.
10. Unplug the appliance when not in use, before moving and before cleaning.
11. Don’t use accessories or attachments other than those we supply.
12. Don’t use the appliance for any purpose other than those described in these instructions.
13. Don’t operate the appliance if it’s damaged or malfunctions.
HOUSEHOLD USE ONLY
• BEFORE USING FOR THE FIRST TIME
Remove all packaging and clean the slow cooker, to remove manufacturing dust, etc.
The benets of slow cooking
Health The gentle cooking action reduces damage to vitamins and retains more of the nutrients and avours

11
SLOW COOKER
TCL002110MD
economy of the nutrients and avours. Long, slow cooking can tenderise cheaper, tougher cuts of meat, and
uses about a quarter of the power of the small ring on the average hob.
convenience Prepare the ingredients the night before, put them in the slow cooker in the morning, before you
leave for work, and have a delicious meal waiting for you when you get home.
The slow cooker is controlled by a 4-position switch. the positions are:
off
low for traditional “slow cooking”. You must preheat the cookpot, in the slow cooker, on high for at least 20
minutes before cooking at low.
high for “fast cooking”, using the slow cooker as an electric stewpot. Keep an eye on it, to make sure that the
food doesn’t dry out. If it looks like drying out, add hot water, not cold water – you might crack the cookpot.
warm for keeping food warm – but only after it has been cooked to readiness in the slow cooker.
caution Don’t use the warm setting to heat food up – you won’t kill the bugs.
1. Thaw frozen food completely before adding it to the cookpot.
2. Brown the meat and sauté the vegetables in a pan, not in the cookpot.
3. Don’t use the cookpot for cooking anywhere other than inside the slow cooker.
4. Don’t cook on the low setting without rst preheating the cookpot, in the slow cooker, on the high setting
for at least 20 minutes.
5. Soak dried peas and beans for 8 hours (or overnight) before cooking, to soften them.
warning boil dried beans (e.g. red kidney beans) for at least 10 minutes before adding to the slow cooker.
They’re poisonous if eaten raw or undercooked.
B. THE SWITCH
C. GENERAL

12
SLOW COOKER
TCL002110MD
6 You don’t need to soak lentils overnight.
7 Store ingredients prepared beforehand (e.g. the night before) in containers in the fridge. Don’t put the slow
cooker or the cookpot into the fridge.
8Root vegetables, tubers, and bulbs (carrots, potatoes, onions) take much longer to cook than meat, so cut
them down to about 5mm (¼ inch) thick slices, sticks or dice, and sauté them gently for 2-3 minutes before
adding to the cookpot.
9 All vegetables (including dried veg) must be immersed in the cooking liquid.
10 When cooking with rice, use at least 150ml (¼pt) of cooking liquid for each 100g (4oz) of rice. We’ve found
that “easy-cook” rice gives the best results.
11 Pasta isn’t suitable for slow cooking, it becomes too soft. If your recipe requires pasta, it should be stirred in
30-40 minutes before the end of the cooking time.
PREPARATION
1. Decide when you want to eat and when you want to start cooking.
2. If you want to eat at 6 p.m., and you need to start cooking at 8 a.m., nd a recipe that takes 8-10 hours.
If you’re slow cooking at low power, an extra hour or so at the end of the cooking time doesn’t make much
difference, as long as there’s sufcient cooking liquid to prevent the food drying out.
3. Prepare the food in accordance with the recipe.
4. Sit the slow cooker on a stable, level, heat-resistant surface.
5. Check that the slow cooker is off – turn the control to 0.
6. Plug the slow cooker into a wall socket (switch the socket on, if it’s switchable).
7. Put the cookpot into the slow cooker, and t the lid.
8. Turn the control to high, and leave the slow cooker preheat for 20 minutes. 20 Meantime, brown the meat
and sauté the vegetables in a pan.
9. Boil the cooking liquid in a pan. If you use a tinned cooking sauce, add it to the pan before bringing it to
the boil.
FILL THE COOKPOT
10. When the 20 minutes is up, remove the lid (oven gloves) and put it on a heatproof surface.
11. Put the meat and vegetables into the cookpot and add the boiling cooking liquid.
CHOOSE THE MODE
12. Turn the control to low for traditional slow cooking, or to high, if you’re using it as an electric stewpot.

13
SLOW COOKER
TCL002110MD
13. The light will come on, and cooking will start.
FINISHED?
14. When the cooking time is over:
A) if you want to serve the food right away, turn the control to 0, unplug the slow cooker (switch the socket
off rst, if it’s switchable)
B) if you’re not ready to serve, turn the control to warm, to keep the food warm till you’re ready to serve
SERVING
15. Check that the slow cooker is off – turn the control to 0.
16. Using oven gloves, remove the lid, and put it on a heatproof surface.
17. It’s best to ladle the food from the slow cooker into serving dishes or plates. 30 Don’t carry the slow cooker,
the trailing cable may catch on something.
18. You may use oven gloves to lift the cookpot, complete with the lid, but it’s hot and it’s heavy – so take care.
19. You’ll nd that cleaning the cookpot is much easier if you remove all the food as soon as it’s cooked, then
ll the cookpot with warm water.
TIP
Cleaning can be made much easier if you immediately remove all the cooked food from the cooking pot,
then ll it with warm water.
GRAVY/SAUCE
Slow cooking retains more of the juices than normal cooking. This tends to increase the volume of cooking
liquid, and thin the sauce or gravy. To allow for this, sauces should initially be thicker than normal. Anything to
be sautéed could be tossed in seasoned our beforehand, to thicken the gravy/sauce.
CARE AND MAINTENANCE
1 Switch off (0), and unplug the slow cooker (switch the socket off rst, if it’s switchable).
2 Using oven gloves, remove the lid and the cookpot and put them on a heatproof surface.
3 If you don’t intend to wash up right away, ll the cookpot with warm water, otherwise residual heat may
bake food debris on to the cookpot, making its eventual removal more difcult.
4 Don’t soak the exterior of the cookpot in water. The base is porous, so it may soak up water, which may then
expand, and crack the cookpot when it’s heated.

14
SLOW COOKER
TCL002110MD
5 Wash the lid and cookpot in hot soapy water, using a cloth or sponge, then rinse and dry thoroughly. Don’t
use scouring pads.
6 All other surfaces, internal and external, should be wiped with a damp cloth. You may use a little washing-up
liquid, if necessary.
7 Dry all surfaces thoroughly before re-using the slow cooker or storing it away.
8After some time in use, the glaze on the cookpot may develop “crazing”, a network of small cracks. This
marking is supercial, and should not be a cause for concern.
9 You may wash the cookpot and lid in a dishwasher, but we don’t recommend this. The harsh environment
inside the dishwasher may affect the surface nishes. Any damage should be cosmetic, and should not affect
the functionality of the cooker.
10 Don’t immerse the body of the slow cooker in water or any other liquid.
11 Don’t put the body of the slow cooker in a dishwasher.
12 Don’t use harsh or abrasive cleaners or solvents.


SLOW COOKER
TCL002110MD
Table of contents
Languages:
Other Telstar Slow Cooker manuals

Popular Slow Cooker manuals by other brands


Crock-Pot
Crock-Pot CSC038 instruction manual

Russell Hobbs
Russell Hobbs 25570 manual

Hamilton Beach
Hamilton Beach 33147 - Programmable 4.5 Qt. Slow Cooker use & care

Bella
Bella 13698 instruction manual

Bella
Bella TRIPLE SLOW COOKER AND SERVER Instruction manual & recipe guide

Bellini
Bellini BTSSC70 manual