TeraValue NewGen 5 Series User manual
TeraValue Co.,Ltd
Suite 509, Kyounggi Venture Bldg., Korea Design Center, #344-1
Yatap-1dong, Bundang-Go, Sungnam-Si, Kyounggi-Do, Korea
Tel : 031-788-7374 / Fax : 031-788-7857
http://www.teravalue.com
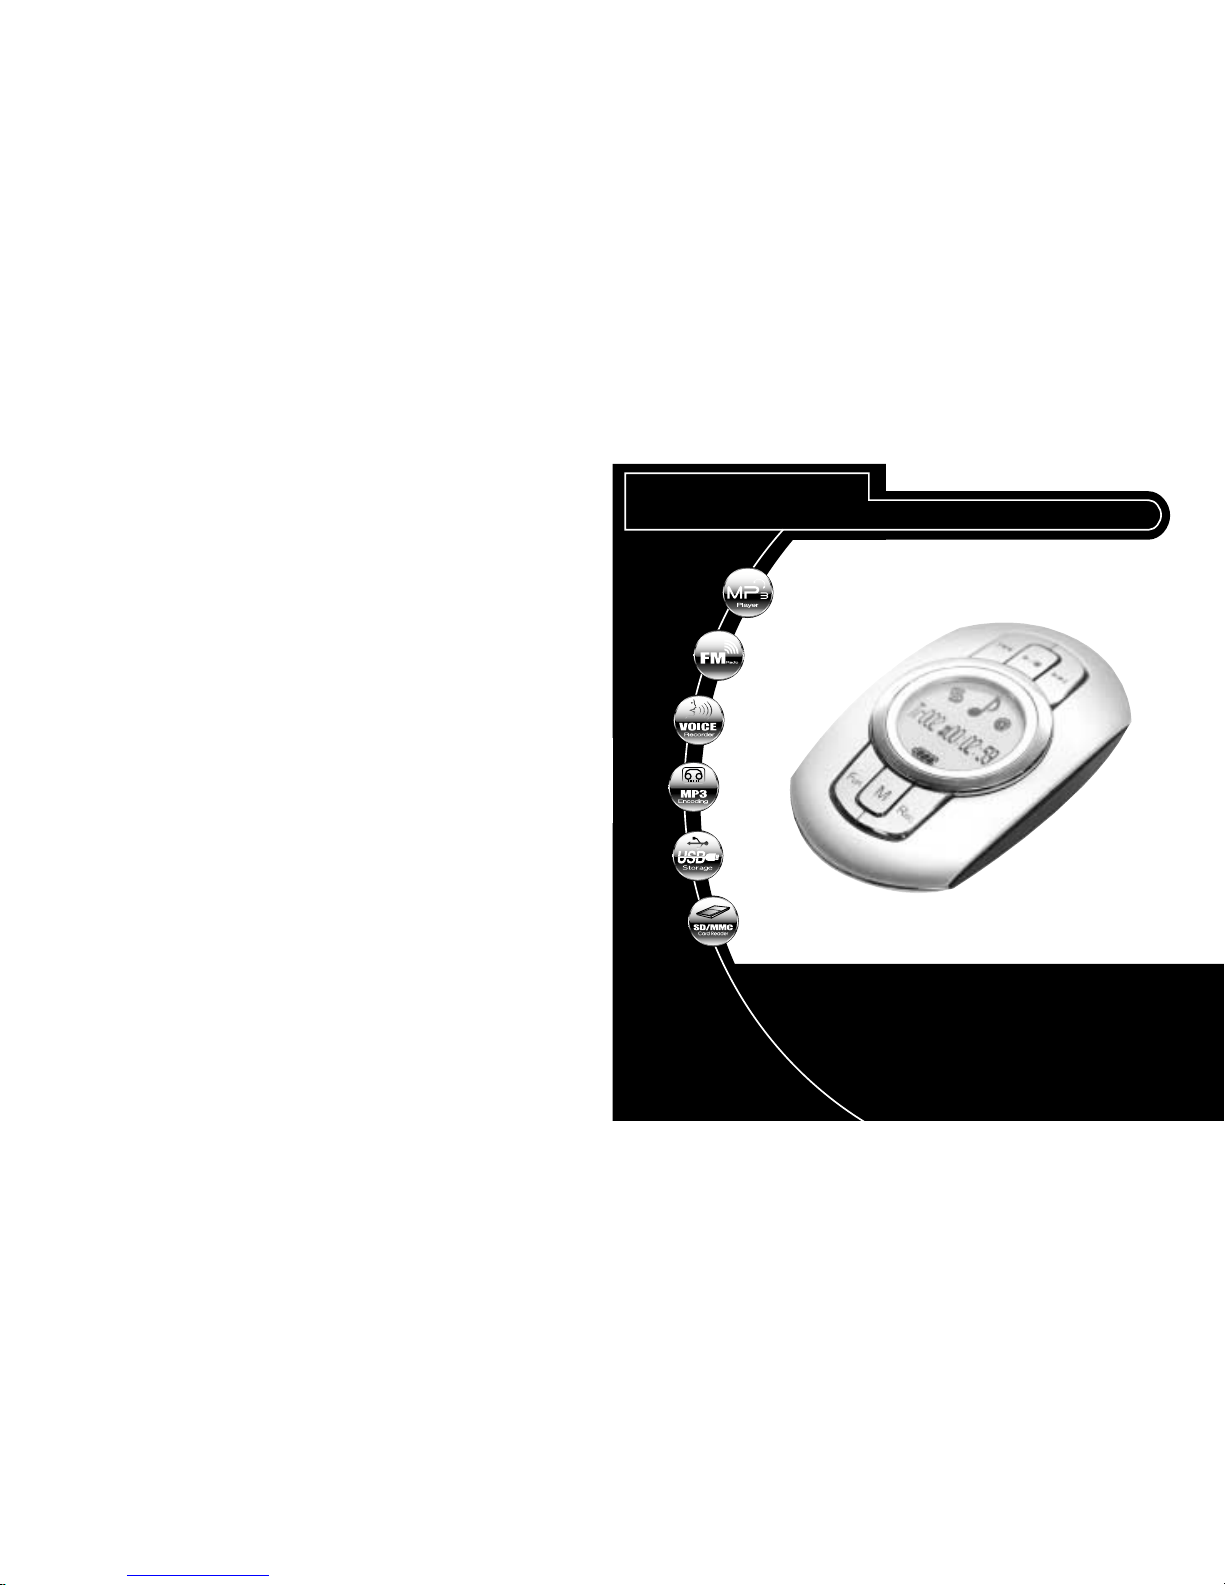
NewGen 5 Series
Users Guide
Thank you for purchasing NewGen 5 Series of TeraValue.
MP3 Player / FM Radio / Voice Recorder
※※
If you are a Windows 98 user, install Windows 98 driver
first before using NewGen 5 Series.
For safe use of NewGen 5 Series, Please thoroughly read
this User Guide before using NewGen 5 Series.
T
TeraValue
NewGen5 Series
TeraValue

2
CCoonntteennttss
1
CCooppyyrriigghhttNNoottiiccee
TeraValue reserves all copyrights of this Users Guide. Copying
and using partial or entire part of this Users Guide without
permission of Teravalue is strictly prohibited.
NewGen 5 Serise is a trademark of Teravalue
CopyrightⓒTeravalue. All right reserved
▷▶ 4
- Disconnecting the USB cable while upgrading the firmware will
cause a critical damage to the product.
- For Win98 OS, install Win98 driver included in the provided CD
before using the product.
- If the user formats a memory in PC Window, a critical damage
may be caused in this device. You must format it in a dedicated
Format S/W
◐◐Notes

4
PPrroodduuccttSSaaffeettyyPPrreeccaauuttiioonnssCChheecckkiinnggCCoonntteennttssaannddAAcccceessssoorriieess
AXE-type Stereo Earphone Carrying Bag Necklace
※Accessory items may be added or changed according to functional improvement.
Installation CD USB Cable Encoding Connection Cable
Battery (One AAA-size Battery) User Guide
112233
4455
7788
1122
66
▶Basic Contents
▶Option Parts
3
Do not put magnetic cards such as
debit cards or gift cards near the
product.
Connecting the USB port while the
product is operating may damage
the product. Before connecting the
USB port, turn off the product.
Avoid direct sunrays, rainwater,
sand, and other materials that can
cause mechanical shock to the
product.
Storing the product in a dusty, hot,
humid or soot-covered place may
cause a product breakdown.
Do not repair, dissemble, or remodel
the product at your own choice.
Protect the product from sever shock
and vibration, and do not drop the
product.

6
FFeeaattuurreessooffNNeewwGGeenn55SSeerriieess
5
PPrreeccaauuttiioonnssbbeeffoorreeuussiinnggtthhiissddeevviiccee
External Memory SD/MMC Card
-It is easy to extend the memory capacity.
-Extensible to 1GB / TN550 (512MB) + 512MB SD/MMC Card.
Excellent for Language Study
-
The user can select the playing speed.
- The
useful functions for language study such as automatic repetition and count setting are supported.
Removable Disk Driver
-
When the product is connected to the PC, It is automatically recognized as a removable disk.
-
With the memory card (SD/MMC) extension slot, the user can easily extend the memory capacity.
- This device can be used without any separate management S/W.
- By connecting the device to the PC through the USB cable, it can be used as a
removable
disk.
without any separate battery.
Robust Encoding
- By connecting the product to an external stereo system or a telephone, the user can record data.
- Robust MP3 direct encoding.
- Sync Function - Various encoding options are supported for CD - recording.
Unlimited Folders
-
The user can unlimitedly create folders and store music files by category - artist, album, genre, etc.
Necklace Type
-
NewGen 5 adopted a fine design to meet new generation's taste, and it is super-light and easy to carry.
- It is supper-light(46g : including batteries) and easy to carry.
Firmware Upgrade
- By upgrading the firmware, the user can upgrade product functions as well.
- Check library in the website of TeraValue to add and upgrade product functions.
Maximum 7-line LCD
- 7Line Wide Graphic LCD adopted.
- Sharpness and brightneess are controllable.
Voice function (VAD / Silence level / Bit Rate Setting)
- Record various soundds including voice.
- Meximum recording ime : about 70 hours (when extending the memory to 1GB)
Macintosh Support
- Supporting Mac OS Version 8.1 Over
Do not cut, dissemble, or heat the battery, and do not put the battery in a fire.
(An electrolyte from the battery such as alkaline liquid may contact user's eyes or may result
in heating and explosion.)
If not using the product for a long time, take out the battery from the body.
When an electrolyte leaked from the battery, clean inside the battery cover.
When smoke is found or heating is generated resulting in deformation of the
product, promptly take out the battery.
◐Cautions When Using the Battery
Do not insert foreign materials
besides the SD/MMC into the
SD/MMC slot.
When carrying this device in a
pocket or wearing it around the
neck, be careful not to get bruise or
hurt other people.
Connecting the USB Port
--
When downloading the
firmware, never disconnect
the USB cable.
Note

8
7

10
WWiinn9988IInnssttaallllaattiioonn
9
▶Step 1 : Insert the provided installation CD into the -ROM.
▶Step 2 : Click the install 98.bat file in the M-8OO Series folder
▶Step 3 : Connect the USB cable.
(After connecting the USB cable,the removable disk is displayed in the PC as shown
in the following figure.)
Intenal removable disk External removable disk
※For Win98 OS, intall Win98 driver included in the provided CD to use removable
disk before using it
Setting Window 98 drive
TIP - By using the intall 98.bat, the user can install WIndow 98 and firmware upgrade drive
TIP - Windows 2000/Me/XP/Mac 8.1 over
The removable disk is automatically recongnised without installation CD

12
11
14
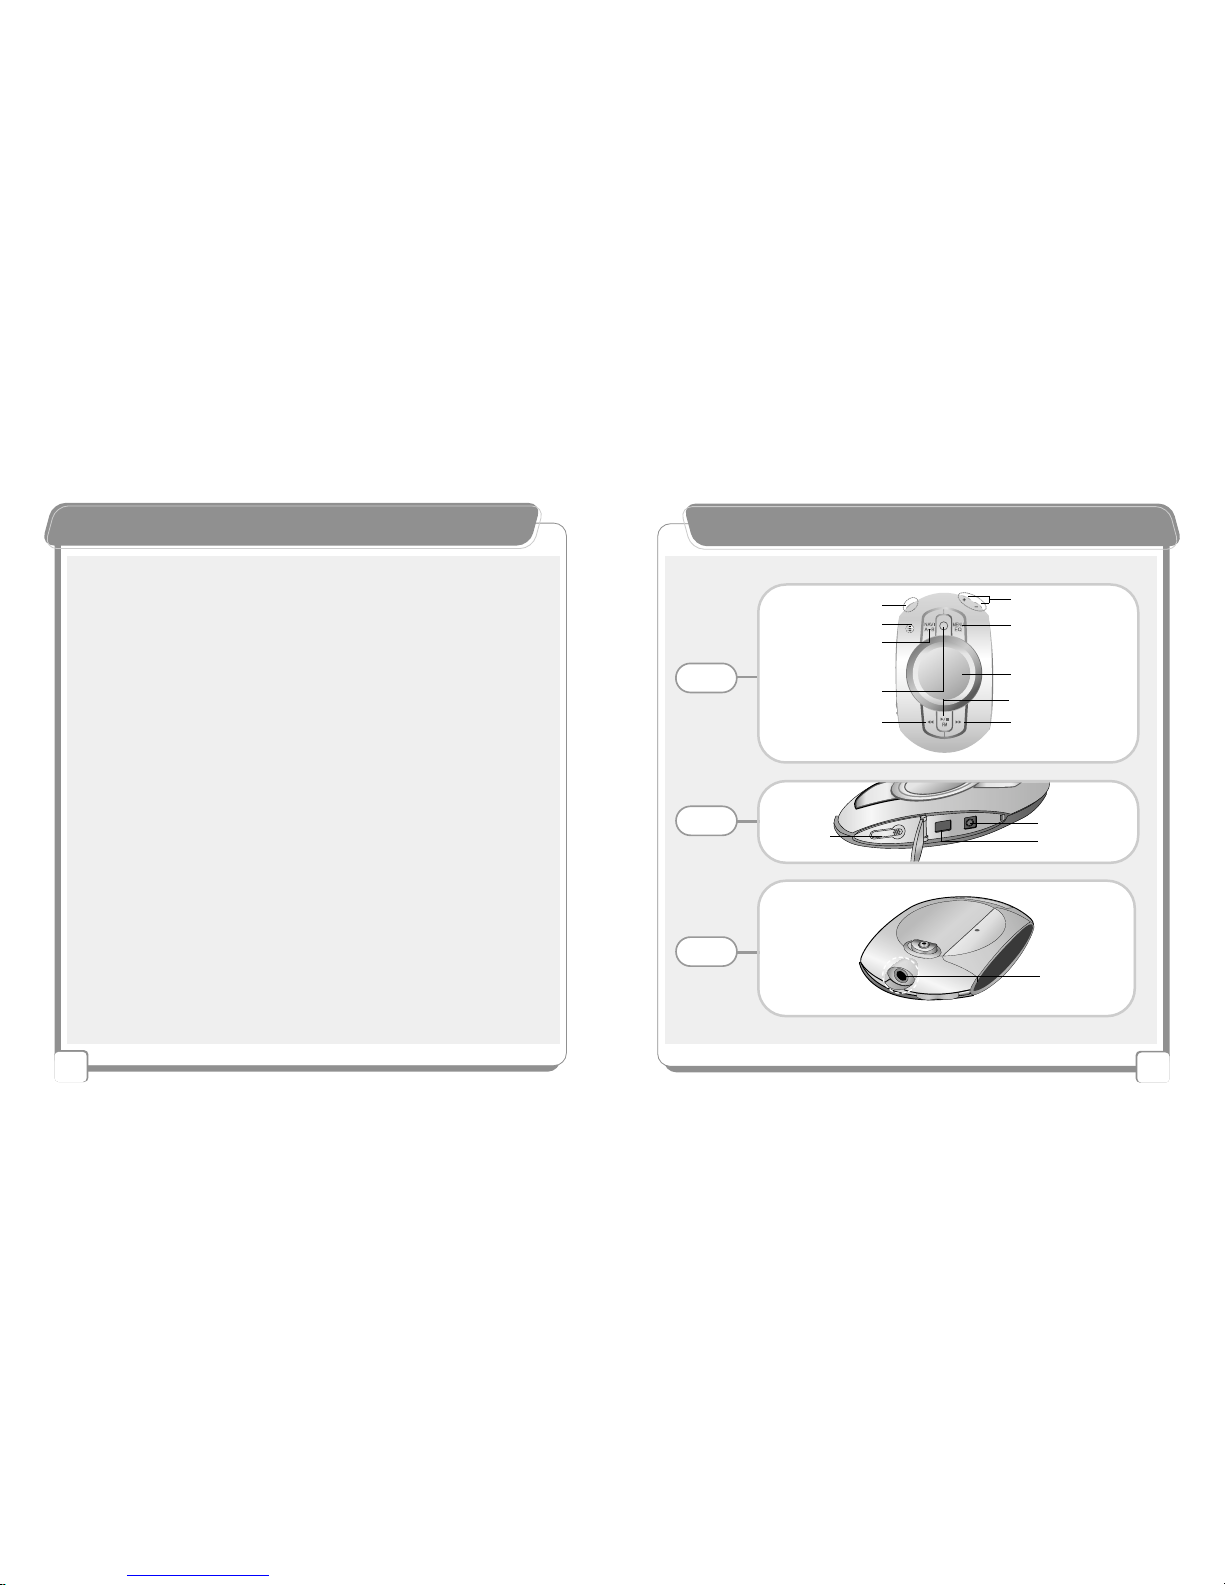
NNaammeeooffEEaacchhPPaarrtt
13
Earphone Jack
REW
(Previous / Fast REW)
Record
NAVI/A+B
(Search and Section/Phrase
Repetition)
Built-in Mic
LCD Display
Play / FM /Stop /Pause
Menu and EQ
FF
(Next / Fast Forward)
Power On/Off Volume
Front
Side
Top
Line In Connection
USB Connection
Hold Switch

16
BBaassiiccOOppeerraattiioonnFFuunnccttiioonn
15
NNaammeeooffEEaacchhPPaarrtt
①Power On (Press Power button for 2 seconds or more to turn on the power.)
Power Off (Press and release power buttton for 2 seconds to turn off the power)
②Volume Control, Menu Selection, and Navi File Search
③All NAVI Folder Search, A-B Section Repetition, Automatic Phrase Repetition (Play State)
④Recording Start/Stop
⑤
Return to Menu (Stop State) / Equalizer (Play State)
⑥LCD Indicates the operation status and menu setting status.
⑦Previous / Fast Forward / Down FM Frequency / Menu Selection
⑧Play / Stop / FM Radio
⑨Next Track / Fast Rewind / Up FM Frequency / Menu Selection
②
⑤
⑦⑨
③
⑥
①④
⑧
1. Open the
battery cover
as shown in
the figure.
2.Insert the
battery. “-” side
of the battery
must be facing
the necklace.
1. 2. ++
--
(※Note: Insert the battery after turning off this device.)
▶Inserting the Battery
L
C
D
SD/MMC Card Slot Battery Cover Necklace Ring
Rear
※To efficiently use the battery and maximize the using time......
- Take out the battery when this device is not used for a long time.
- Control the LCD brightness level on the menu. (Refer to page _.)

18
LLiisstteenniinnggttooMMPP33FFiilleess
17
LLiisstteenniinnggttooMMPP33FFiilleess
【Check and Prepare Before Playing MP3 Files】
【Basic Instruction】
Check the remaining battery.
(The smaller the remaining battery is, the less the number
of displayed bar is.)
Check the earphone location.
(Insert the earphone into the
corresponding port in the upper part.)
Put the Hold switch in Off position.
▶Power On/Off ▶Fast Rewind
Previous
Fast
Rewind
Next
Fast
Forward
▶Fast Forward
Pressing
Shortly~
Pressing
long~
Pressing
Shortly~
Pressing
long~
▶Equalizer ▶Pause▶Volume Control
※For other MP3 functions, refer to page ____.
By pressing the button
for 2 ~ 3 seconds while
playing the file, the user
can temporarily stop
playing.
Press the button for 2 ~ 3
seconds while playing the
file to enjoy various kinds of
sound effects.
▶Play/Stop
2~3seconds
2~3seconds
Nor →Normal Clac →Classic
Live →Live Pop →Pop
Rok →Rock Tec →Techno
Jaz →Jazz
On~
Play~
Stop~
Off~
- Go to Memory Sel in Stop state before
playing music, and make a setting by
pressing +/- buttons.
INT FLASH -
Internal memory
EXT CARD -
External memory
※Note - If there is no folder or file in the memory,
"No Files!!" is displayed.
※The user can listen to seperate sings saved in
internal / external memories.
TIP - Select Memory Sel.
2.
20
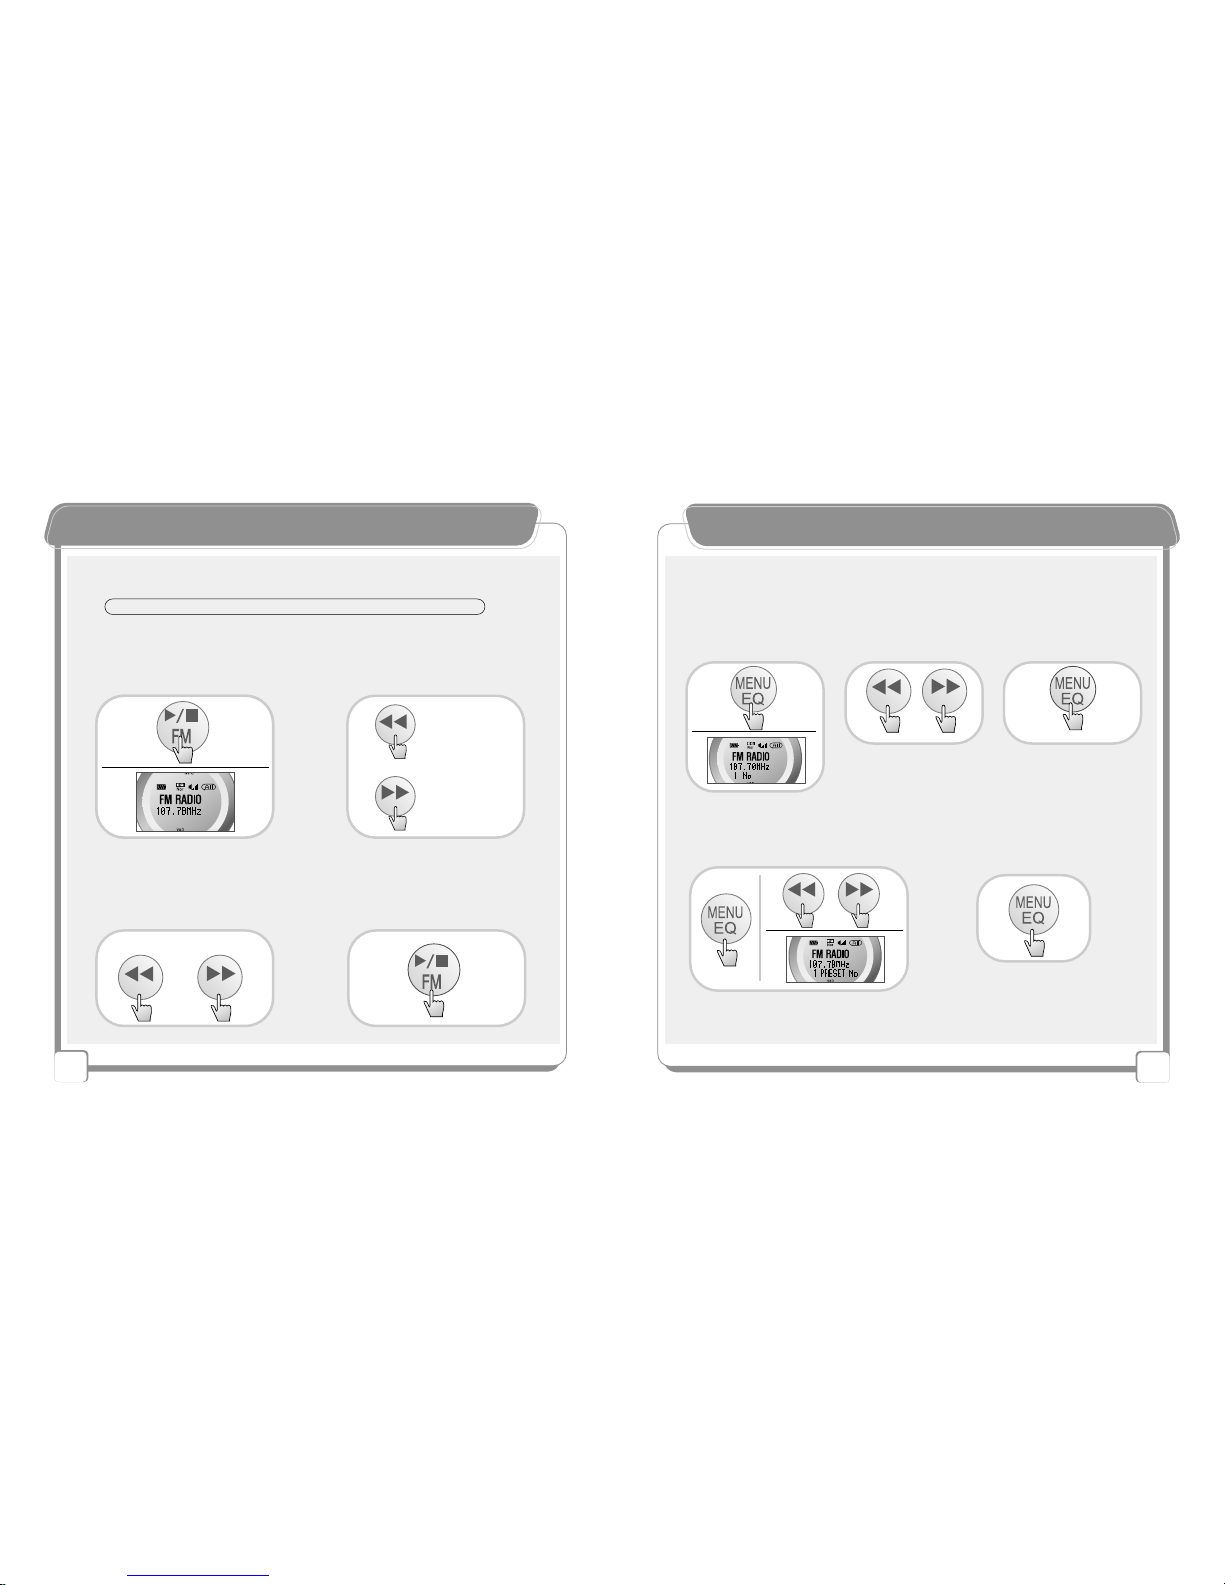
FFMMPPrreesseettMMooddee
19
LLiisstteenniinnggttootthheeFFMMRRaaddiioo
▶Turning off the Radio
▶Turning on the Radio
By pressing the button shortly, the
user can go search radio channels.
By pressing the button for a while,
the user can automatically search
radio channels.
▶Continuous Searching Channels
▶Searching the Channel
By pressing the button for a while
in Stop state, the user can go to
FM Radio menu.
▶FM Mode
By shortly pressing the button again,
the user can go to previous MP3 /
Voice Recording standby state.
Pressing
Shortly~
DOWN~
UP~
Pressing Long
~
Pressing Long~
※"Preset No" message on the LCD means that the channel was saved and the user can
listen to the channel.
※Preset numbers are from 1 ~ 20. In other words, maximum 20 channels can be saved.
▶After searching the FM
channel, press Menu key
for a while (around 4
seconds).
▶After searching the
channel number by
pressing buttons, choose
the channel number.
▶Press the Menu key for
a while (around 4
seconds) again to save the
channel in the chosen
number.
1.
1.
3. 4.
▶By shortly pressing the Menu key again,
you can check preset radio channels.
1.
3.
▲▲Saving the Radio Channel
▲▲Checking Preset Radio Channels
▶To go to the initial FM state,
shortly press the Menu key again.
2.
4seconds
2.
-
Please select the FM Mode from MENU and set MONO / STEREO / AUTO by using +/-key
TIP - AUTO setting may be automatically changed according to FM receiving type.
4seconds
Pressing for
3 seconds
or more~
Pressing Shortly
~
DOWN ~
UP~
Pressing Shortly
~

22
RReeccoorrddiinnggWWhhiilleeLLiisstteenniinnggttooFFMMRRaaddiioo
21
FFMMPPrreesseettMMooddee
Without selecting a menu, the user can freely change and set channel presetting.
▲▲Changing the Frequency
5.
Previous Channel
Saved preset #
Saving preset #
▶Before starting recording,
control the volume. ▶By shortly pressing
Record button while
listening to FM radio, the
user can start recording.
▶To stop recording,
shortly press Record
button.
LCD (1 PRESET)
3.2.
▶To view information of
the recorded file, press
Record button, or to play
the file, press Record
button again.
1.
4.
2. 3.
■Pause
(To temporarily stop
recording, press Record
button for 2 ~ 3 seconds.
2~3seconds
Pressing
Long
~
4. 6.
1.
7.
Pressing
Shortly~
Pressing
Long
~

24
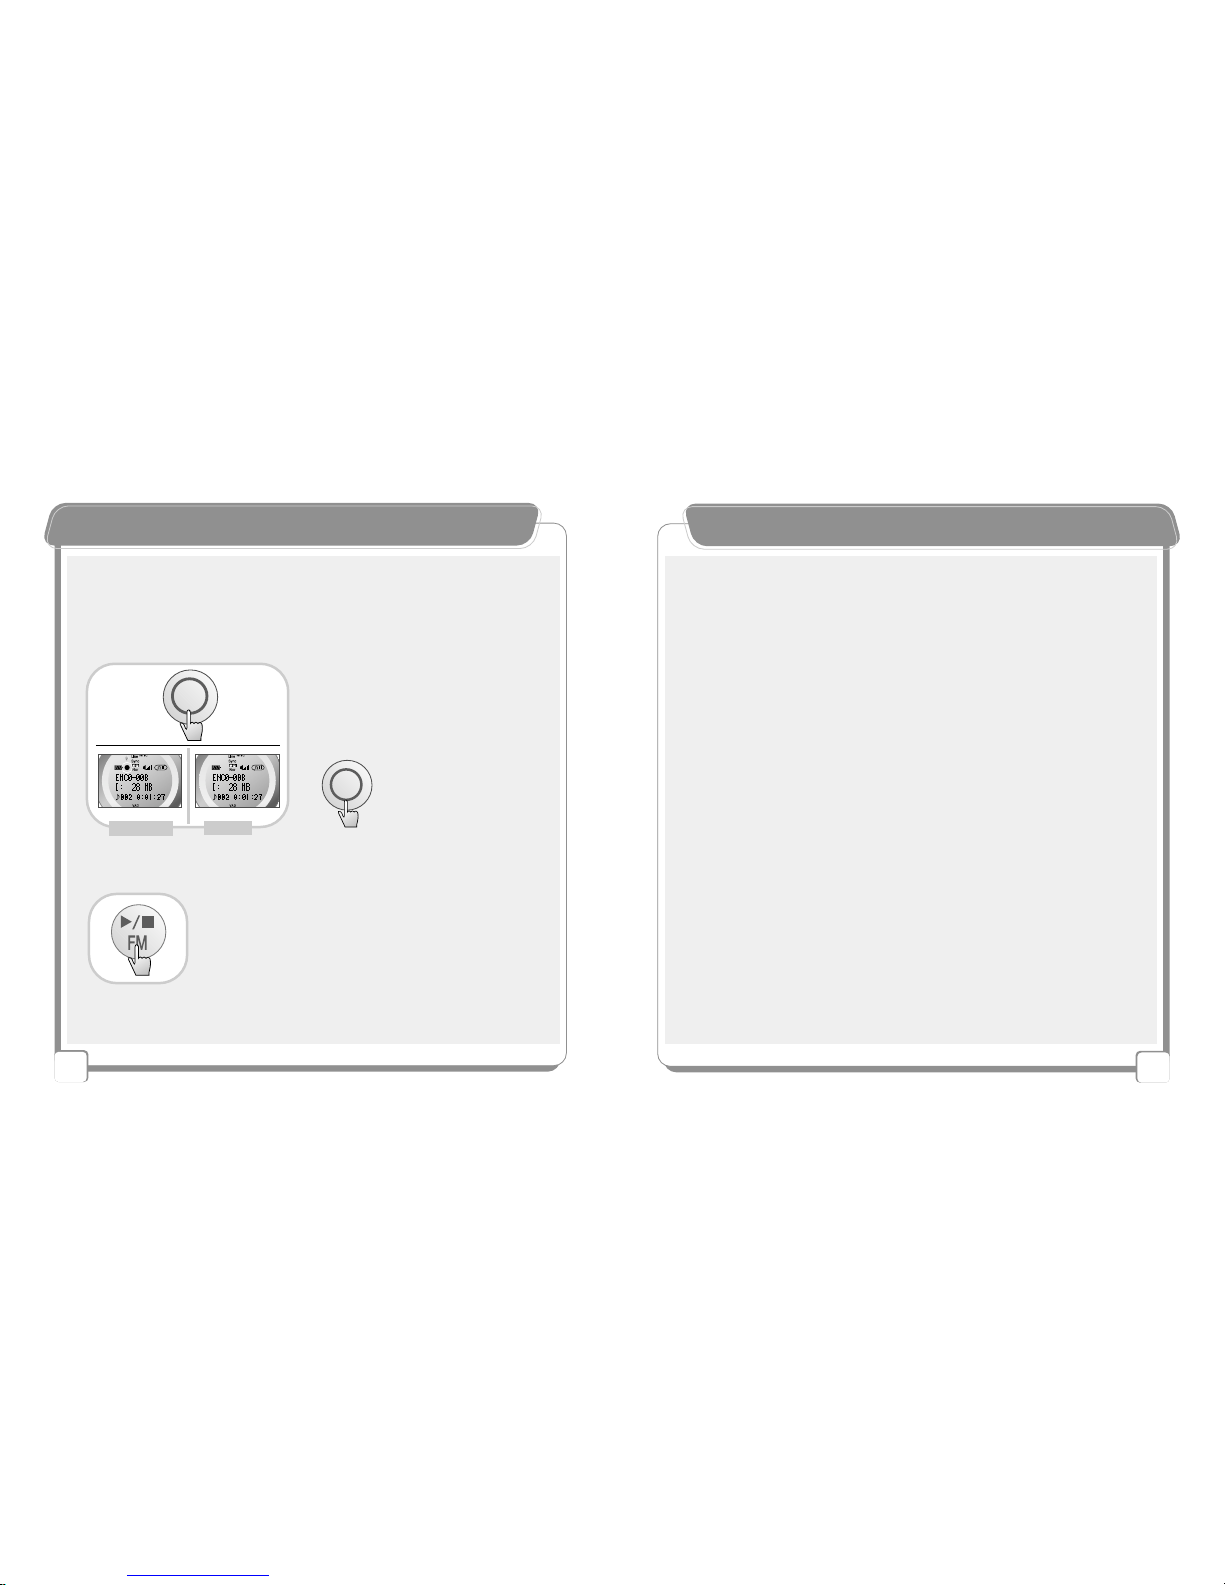
EEnnccooddiinnggffrroommEExxtteerrnnaallDDeevviicceess
23
VVooiicceeRReeccoorrddiinngg
【Basic Function】
-Press the button to start recording in Stop state. To stop recording, press the
button again.
-Checking and Listening to Recorded Voice
To display the file name of recorded voice, press the button.
To play the file, press Play button again.
▶AUDIO
▶MP3
【Connecting the Product with an External Device
Using a Ja ck】
【Things to Check Before Starting Encoding from an
External Device】
【Things to Check Before Starting Recording 】
▶Select MIC in Music Source menu. (Refer to Page ___.)
▶For normal recording, select VAD On from Music Source menu.
(Refer to Page ___.)
▶Before recording, control the volume.
※
Before recording, thoroughly read lower functions relating to voice recording. (Refer to Page ___.)
■Pause
※Press the button for 2 ~ 3
seconds while playing the file
to temporarily stop playing.
2~3seconds
PauseRecording
※Before recording, thoroughly read lower functions relating to external device recording.
(Refer to Page ___.)
22..55Ø
33..55Ø
-
Select "Line In" from Music Source menu. (Refer to Page ___.)
-
Select 1 Sync / Sync Off / Sync On in Sync menu.
-
Select 32KHz / 44.1KHz / 48KHz in Sample Frequency menu.
-
Select Low / Middle / High in Silence Level menu.
-
Select Mode / Stereo / Joint Stereo in the Channel Mode.
-
Control the volume in Line In Volume menu.
TIP - During encoding, increase the volume of the external device. When the
Line In volume is high, encoding is made at a high volume as well.
TIP - When line in encoding from an external
device, the sound quality is impoved.
26
25
EEnnccooddiinnggffrroommEExxtteerrnnaallDDeevviicceess
▶After turning on the external device,
press the button in Stop state to start
recording. To stop recording, press the
button again.
-Checking and Listening
To display the file name of recorded voice, press the button.
To play the file, press Play button again.
【Encoding from External Devices】
When encoding,
the indicated part
blinks on the LCD.
Stop
Recording
※Press the button for 2 ~ 3
seconds while playing the file
to temporarily stop playing.
■Pause
2~3seconds

28
NNaavviiggaattiioonnMMooddee((FFiilleeFFoollddeerrSSeeaarrcchh
27
NNaavviiggaattiioonnMMooddee((FFiilleeFFoollddeerrSSeeaarrcchh))
Language Study
Example) Selective Language Listening
※By setting this part, the user can listen
to only English files.
Language
Study Folder
English Folder
Japanese Folder ABCD
(Language Study File)
Recording Lectures
Example) Selective Lecture Listening
※By setting this part, the user can
listen to only files in Economics
folder.
TIP - If the user selected Economics folder but there is no file, nothing will be played.
Lecture Recording
Folder Economics Folder
Politics Folder
Management Folder
1 2 3 4
(Lecture-recorded File)
【Unlimited Folders 】
Listening to Music
Example) Selective Music Listening
TTIIPP- If the user selected Music Folder but there is no file, nothing will be played.
Music Folder
Artist A Folder
Artist B Folder
Artist C Folder
1 2 3 4
(Music File)
※By setting this part, the user can
repeatedly listen to only Artist A's songs.
【Searching NAVI Folders 】
【Setting a Folder in the Internal/External Memory】
▶File search (+/- Button)
Continuous Search
▶To save the folder file and exit
▶Lower Folder▶Upper Folder
Icon(Internal)
Folder
File
※Search menu does not support file-playing function.
Icon(External)
File
(
Go to Memory Sel menu in Stop state, and set the Int Flash (internal memory) or the Ext
Card (external memory) by using +/- buttons.
)
TIP - If there is no external memory, "No File!!" message will be displayed.
The external card
TIP - If the user selected the folder but there is no file, nothing will be played.
Folder
30
OOtthheerrFFuunnccttiioonnss
29
OOtthheerrFFuunnccttiioonnss
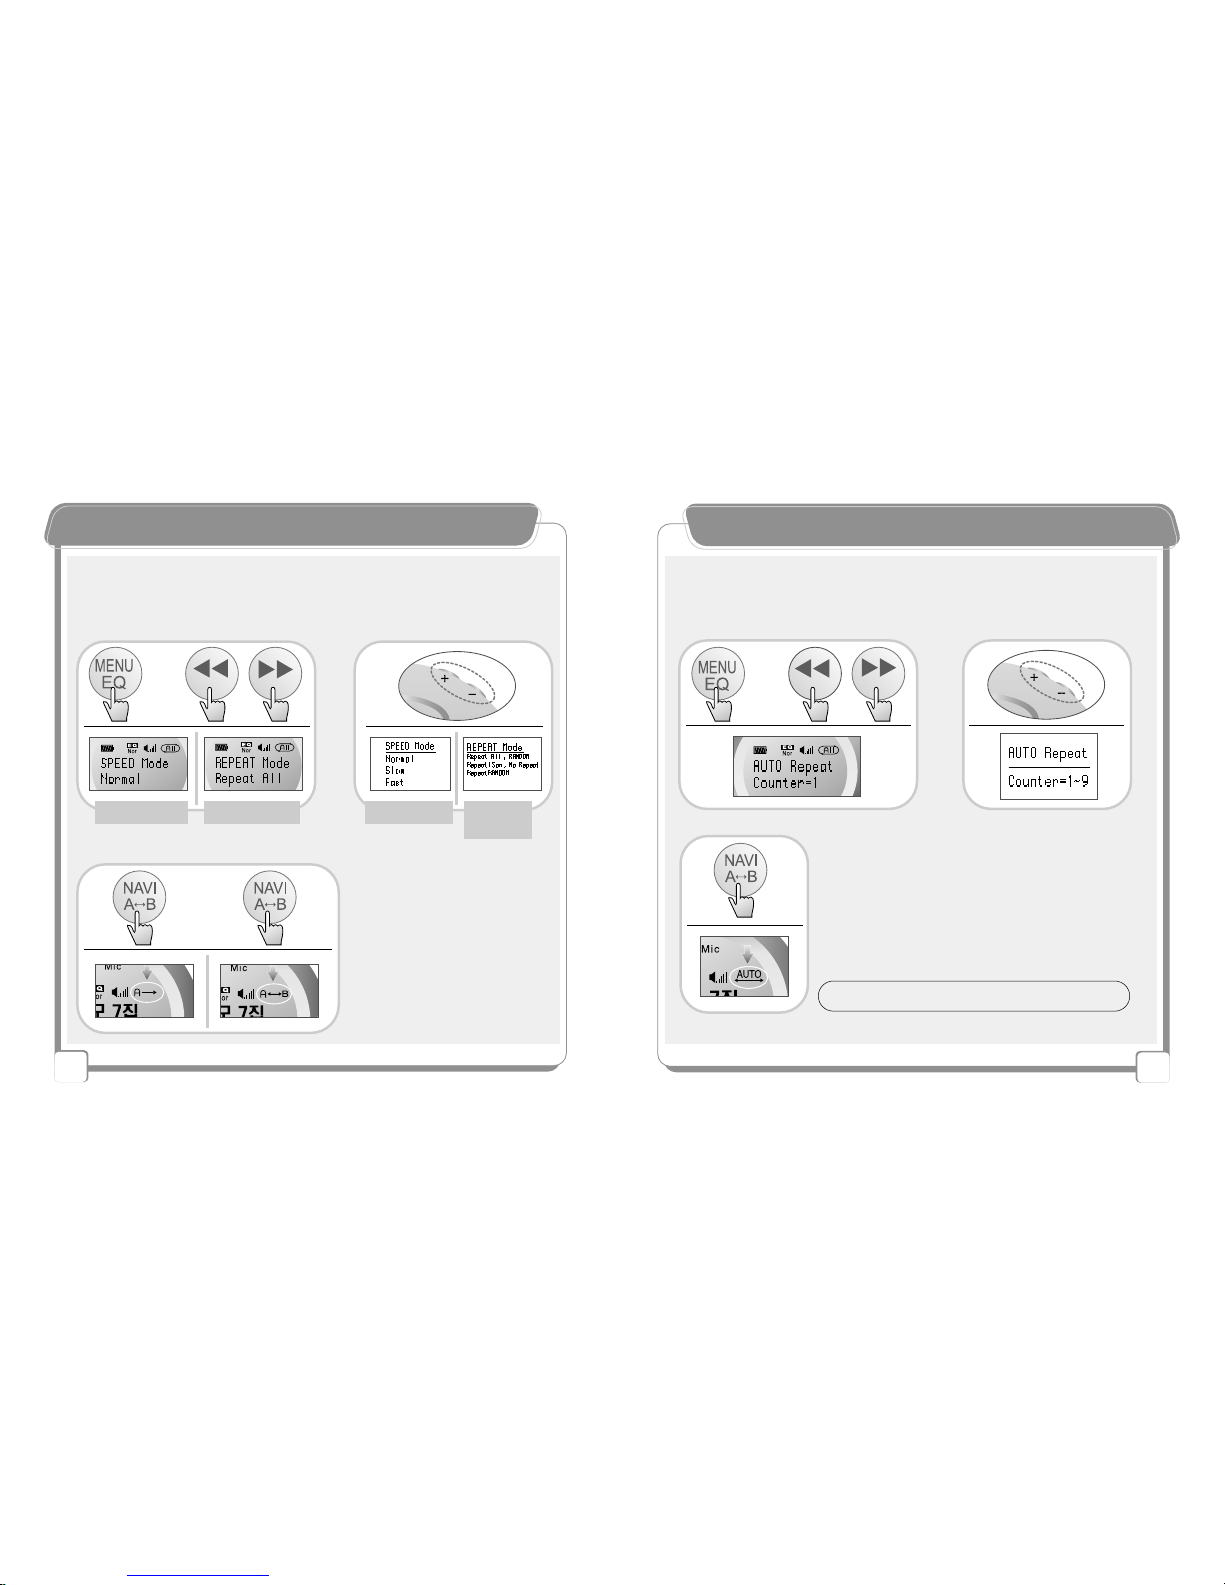
Playing Speed / Repetition
(Go to Menu Mode in Stop state, and make a setting by pressing +/- buttons.)
【MP3 / Voice / FM Recording / Encoding 】
▶
Playing Speed
▶Repetition Mode ▶Playing Speed ▶Repetition
Mode
Section Repetition
A. Shortly press the button at the starting
point of the repetition section during
playing.
B. Shortly press the point at the ending
point of the repetition section during
playing.
Start
~
End
~
A. B. (Press the button for a while at the starting point of the
repetition section during playing.)
-Setting the repetition count of the phrase (from one to nine)
(Go to Auto Repect Mode in Stop state and make a setting by pressing +/- buttons.)
Language Study
Pressing
Long~
-Continuous Repetition of the Phrase (Auto)
TIP - By continuously playing/repeating each phrase, the use can
easily study a foreign language.

32
OOtthheerrFFuunnccttiioonnss
31
OOtthheerrFFuunnccttiioonnss
Setting Silence Level (Adjusting the Sensitivity of the External Music
Source)
-In VAD On state, the user can record voice with various music
source sensitivity settings.
(Go to VAD Mode in Stop state, and set VAD On/Off by pressing +/- buttons.)
(Go to Silence Level in Stop state, and set Low / Middle/ High by pressing +/- buttons.)
【Voice Recording】
- The user can select the recording sound quality by bit rate.
-The higher the frequency is, the higher the recording sound quality is.
Normal sound-quality recording
Long-time recording
High sound-quality recording
Short-time recording
32 / 40 / 48 / 56 / 64 / 80 / 96 / 112 / 128 / 160 / 192 / 224kbps
Bit Rate (Selecting the Recording Sound Quality)
Setting Sample Frequency
※When voice-recording is made, symbols blinks on the LCD.
※Select MIC from Music Source menu before recording.
VAD (Voice Activity Detection)
- When no sound input is made, NewGen 5
enters into Pause state and resumes recording when voice input is made.
32KHz
Low Frequency 44.1KHz
(Normal Frequency Setting) 48KHz
High Frequency
(Go to Sample Frequency menu in Stop state, and set 32KHz / 44.1KHz / 48KHz by
pressing +/- buttons.)
TIP - The default bit rate is 128KHz.
34
OOtthheerrFFuunnccttiioonnss
33
OOtthheerrFFuunnccttiioonnss
32KHz
Low Frequency 44.1KHz
(Normal Frequency Setting) 48KHz
High Frequency
(Go to Sample Frequency menu in Stop state, and set 32KHz / 44.1KHz /48KHz by
pressing +/- buttons.)
-The higher the frequency is, the more similar the MP3 file is to the original
sound in case of encoding from an external device.
Setting Sample Frequency
-When encoding from an external device, the user can encode by setting the
silence level of the music source.
Setting Silence Level
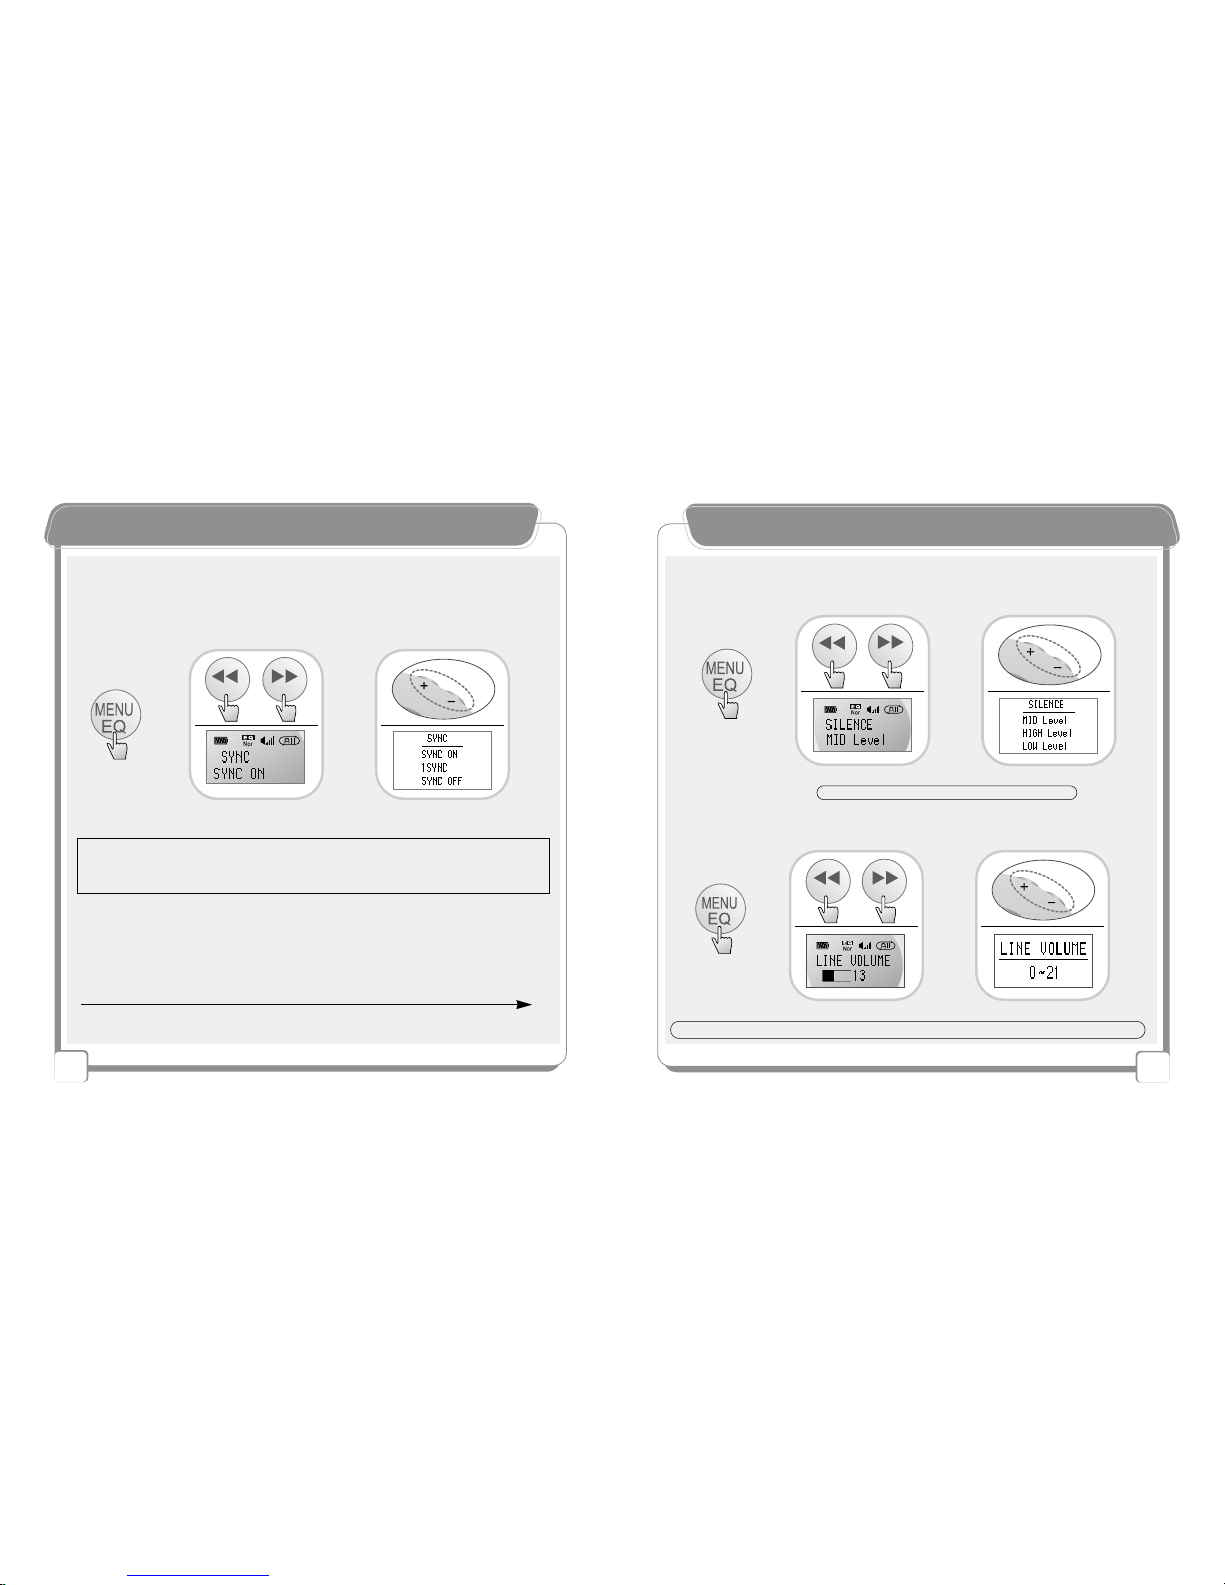
▶1 SYNC -
Automatically stops after encoding one track.
▶SYNC ON - Encodes all tracks by dividing them into each track and encoding them into each file.
▶SYNC OFF -
Encodes all tracks as a single file.
(Go to Sync menu in Stop state, and set 1 Sync / Sync On / Sync Off by pressing +/- buttons.)
Setting Sync Function
- When encoding from an external CD player, the user can automatically encode each track.
【Encoding from an External Device】
-Select Line from Music Source menu before encoding from an external device.
※According to the silence level setting, Sync function may have difference performance during encoding.
(Go to Silence Level menu in Stop state, and set Low / Middle/ High by pressing +/-
buttons.)
Setting Line In Volume
(Go to Line In Volume menu in Stop state, and set the volume by pressing +/- buttons.)
TIP-When the external device or the Line In volume is high, encoding is made at a high volume as well.
TIP - In case of normal encoding, set tthe middle level.
36
OOtthheerrFFuunnccttiioonnss
35
OOtthheerrFFuunnccttiioonnss
※If a wrong language setting was made, broken characters may be displayed on the LCD.
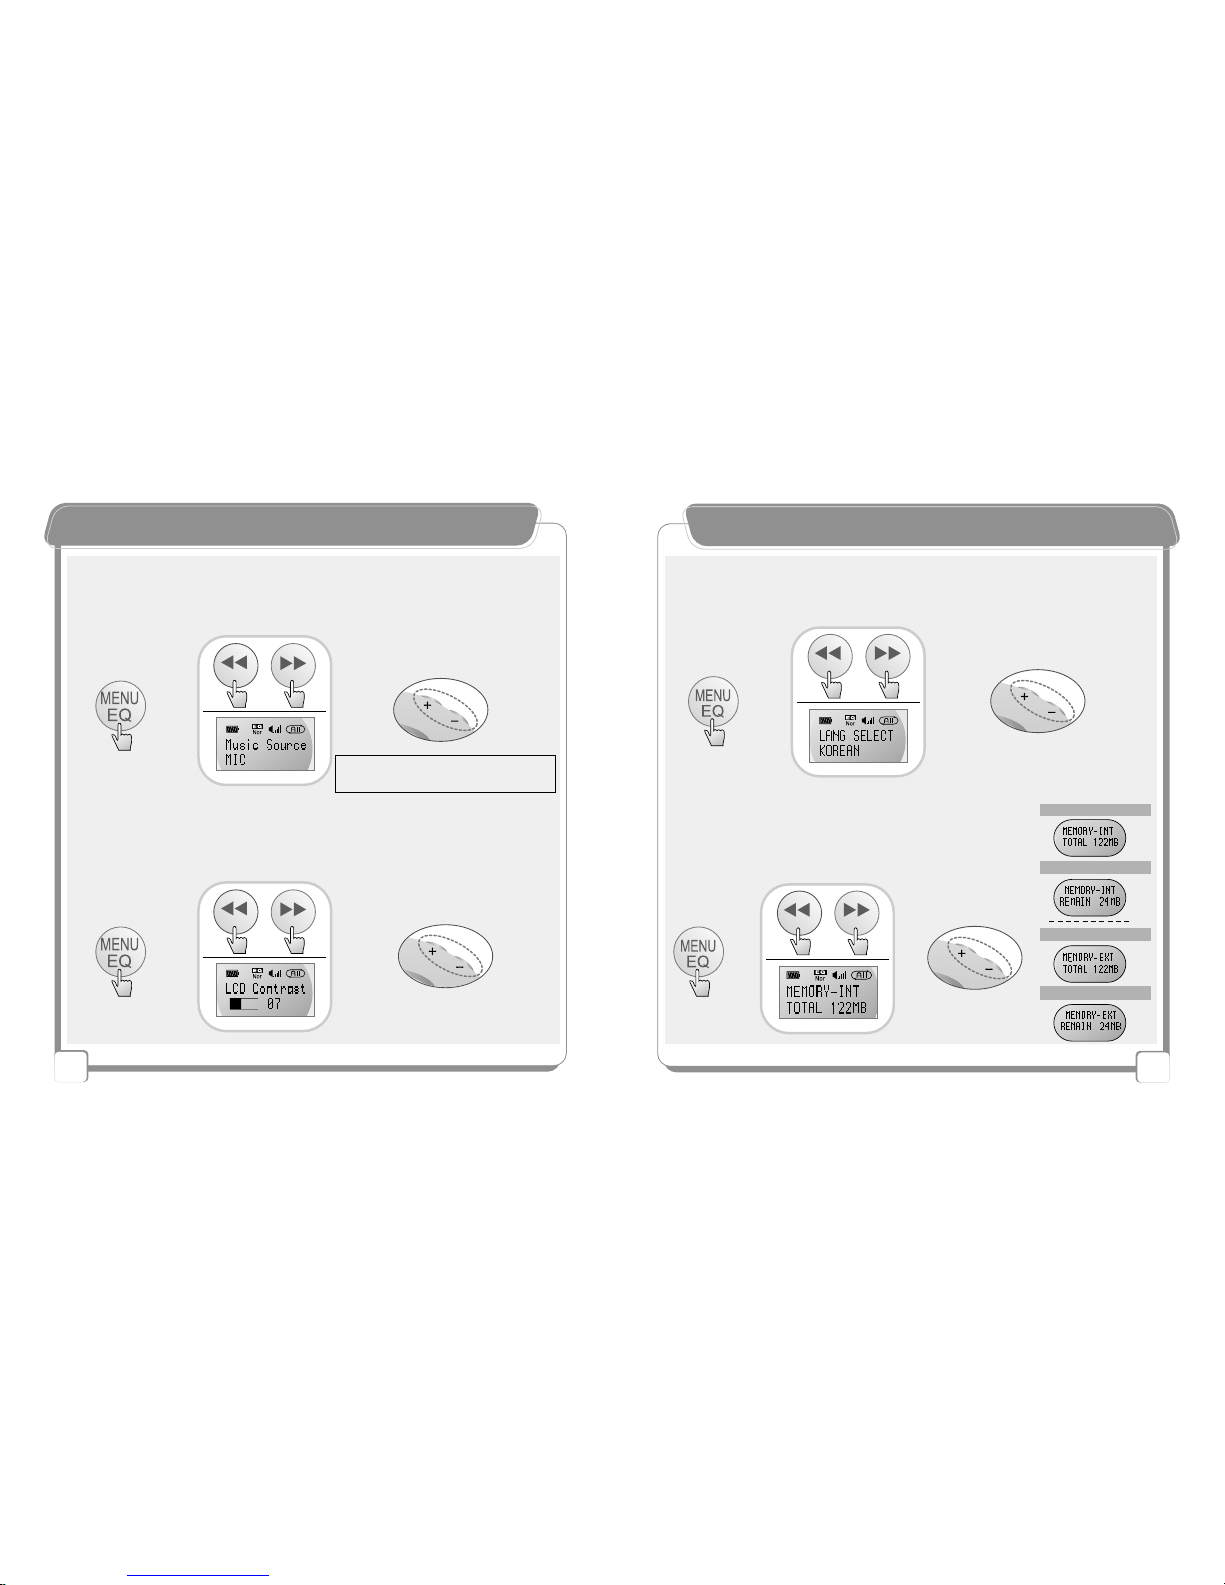
【Language Selection 】
Korea/English/Japanese/Chinese(Simplified/Traditional)
【LCD Shapness / Brightness Level】
▶Control the brightness
level by pressing +/-
buttons.
▶Select LCD Contrast
from the menu.
▶Select the language
by pressing +/-
buttons.
▶Select LANG Select
from the menu.
【Internal/External Memory Capacity】Internal Memory Capacity
Available Memory Space
Extended Memory Capacity
Available Memory Space
▶Check the current
memory capacity by
pressing +/- buttons.
▶Select Memory Int from
the menu.
【MUSIC SOUCE 】- Select it before voice recording / external encoding
▶Select Line In /
MIC by pressing +/-
buttons.
▶Select Music Source
from the menu.
※LINE IN -To encod from an external device
MIC-To record voice

38
OOtthheerrFFuunnccttiioonnss
37
OOtthheerrFFuunnccttiioonnss
※Formatting the memory in the PC may cause a critical damage to This device.
Format the memory only in the device and the dedicated format S/W.
【Memory Form at】
【File / Folder Erase】
▶Select Format / Low Format from the menu.
(Formatting may take around 10 minutes.) ▶Select Yes
by pressing
Play button.
Format Low Format
Format (Fast initialization format)
Low Format (Slow complete initialization format)
1. Fully insert the SD/MMC into the slot.
2. Remove the SD/MMC into the arrow direction as shown in the figure.
※Before inserting or removing the SD/MMC, turn off the power.
1. 2.
【Functions and Using Method of the SD/MMC】
Erase 1 File / Folder Erase
▶Select Erase 1 file / Erase ALL
from the menu. ▶Press the
Play button to
delete a file.
FOLDER ERASE
ERASE 1 fiile
Table of contents
Other TeraValue MP3 Player manuals


