Terrano terrano-x User manual
Quick Start Guide EN ES

2|
Thank you for choosing the TERRANO-X. We hope you will enjoy using it. For additional product information,
please download the full user guide at www.terranosystems.com/manuals.
Your Terrano Team
CONTENTS OF BOX
IMPORTANT: If you purchased the double pack, your retail box will include two sets of each component listed except
for the Quick Start Guide.
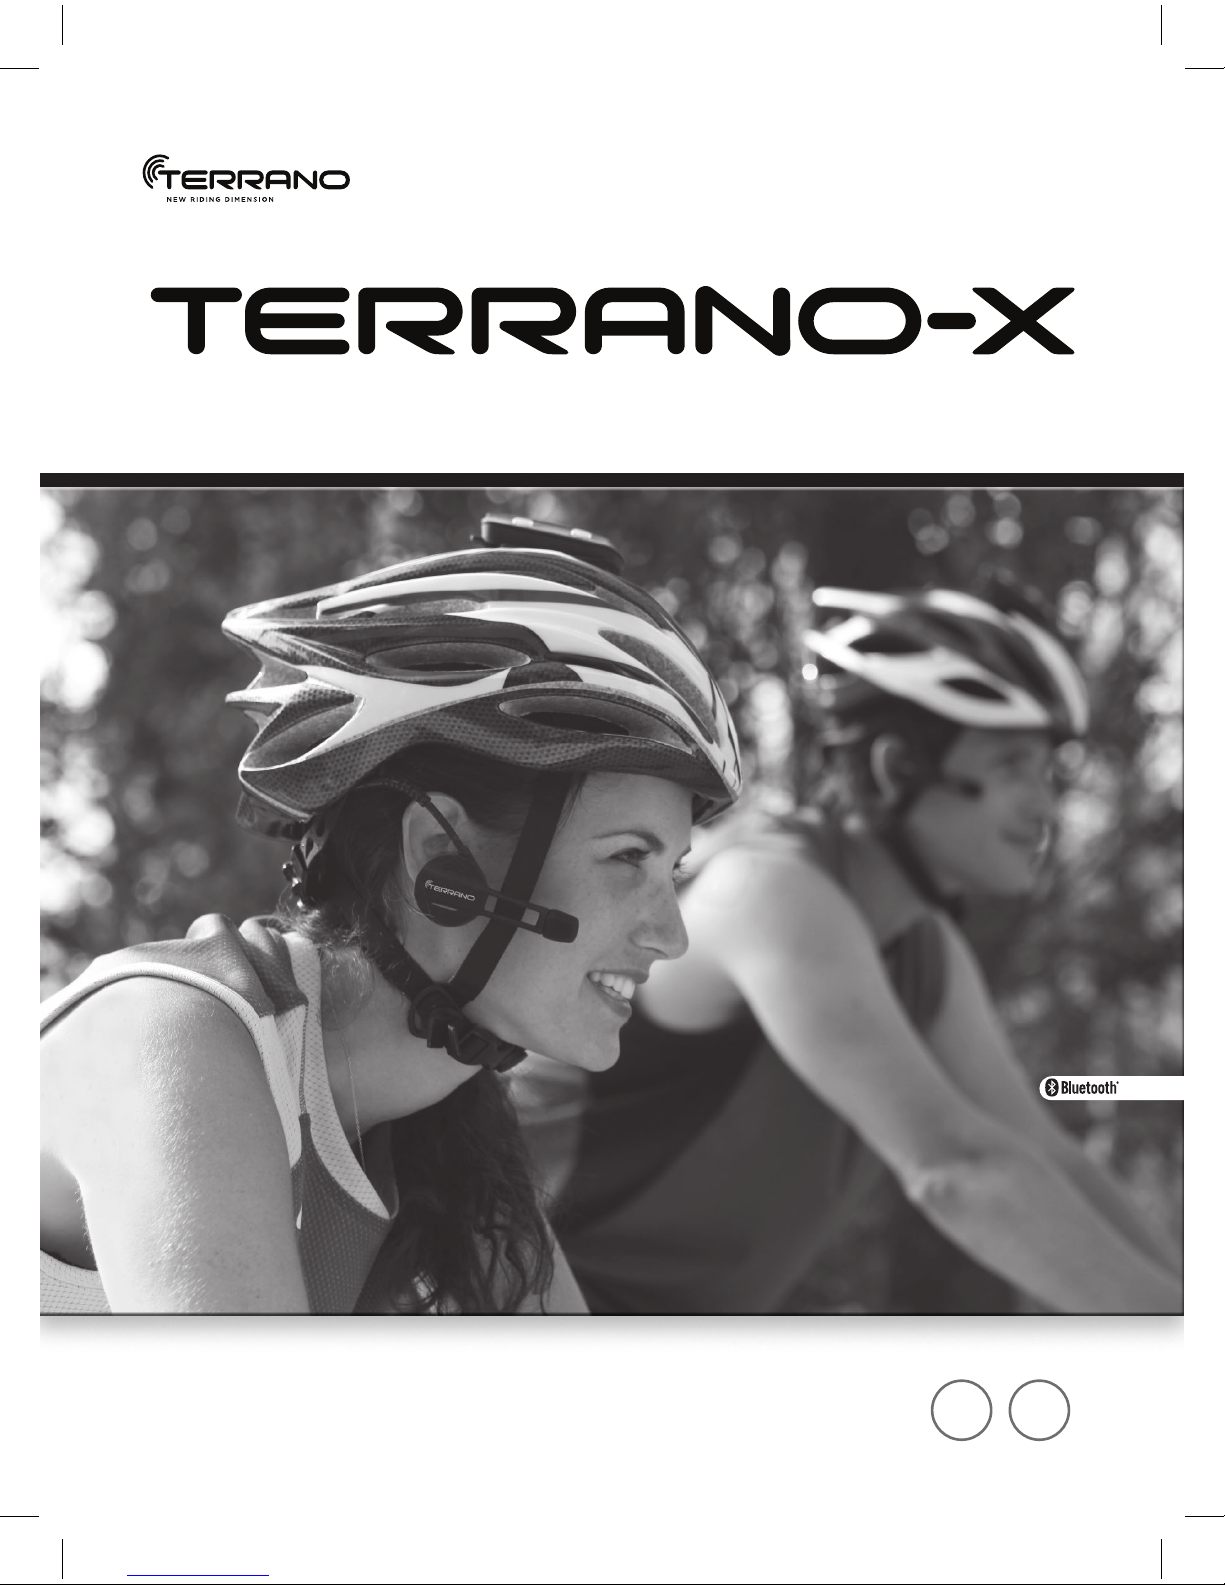
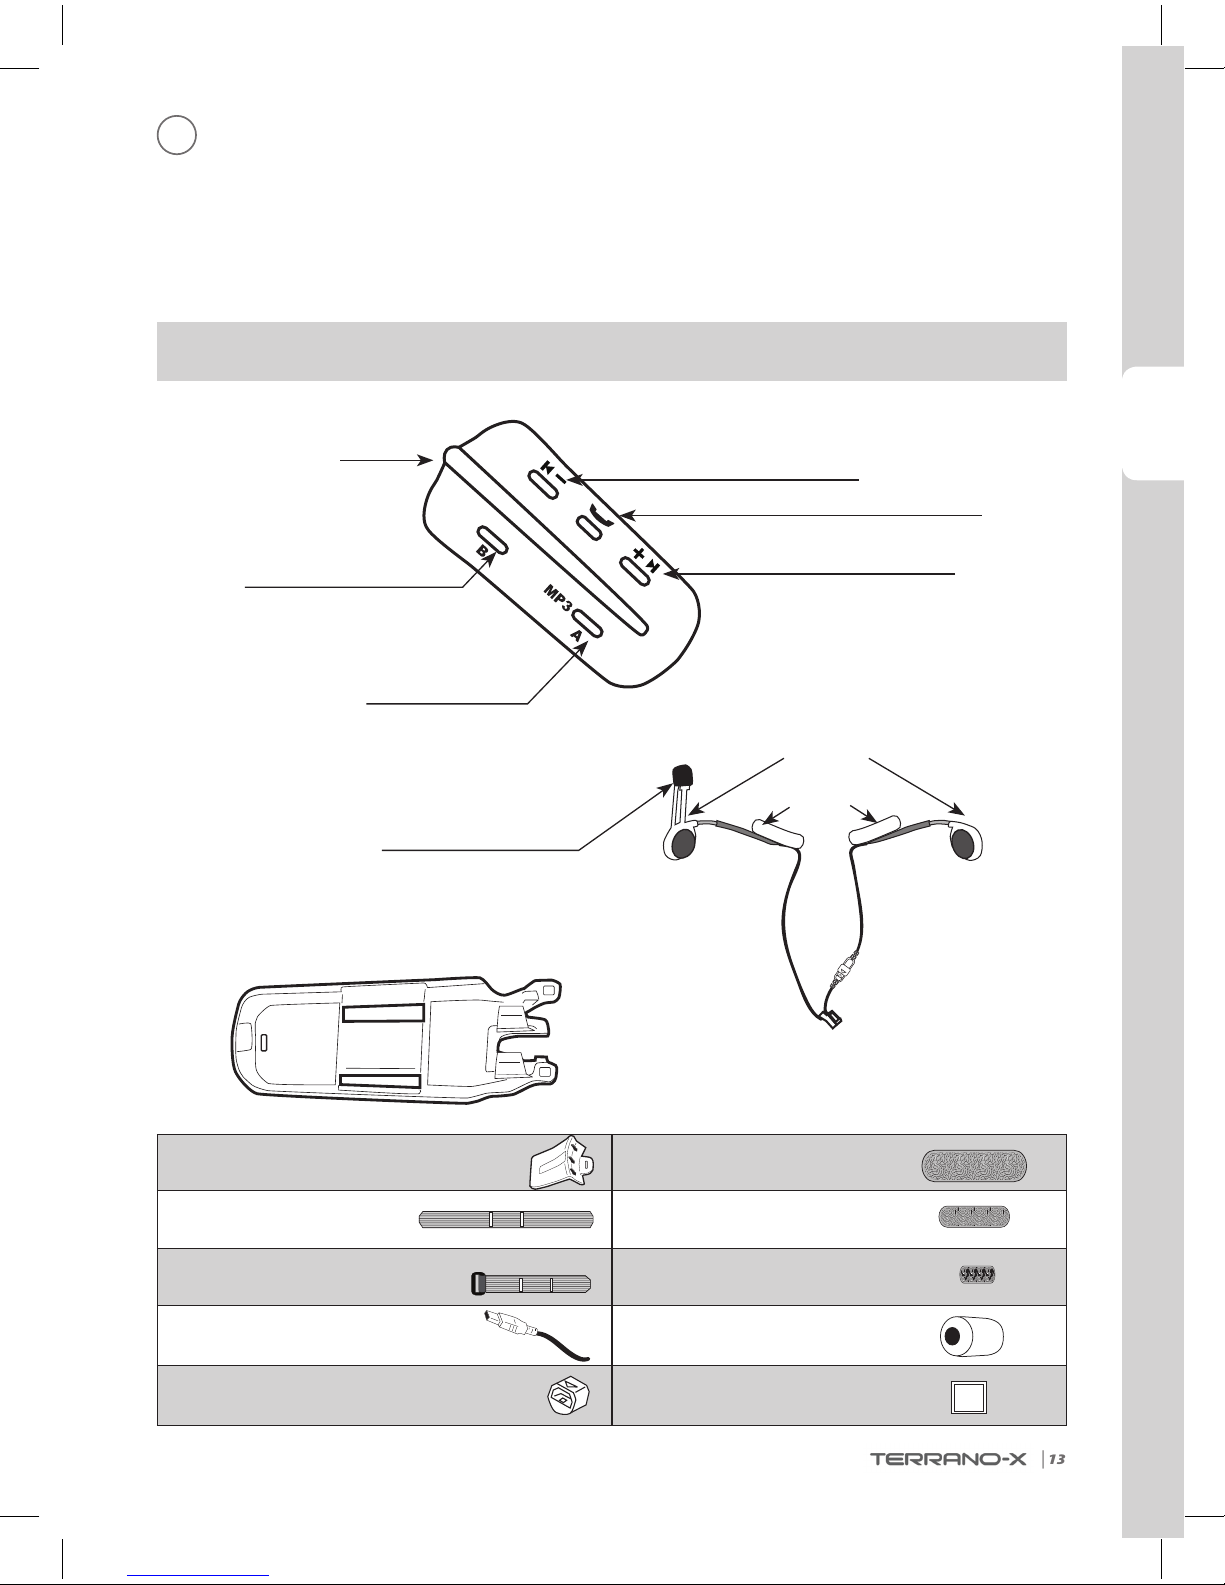
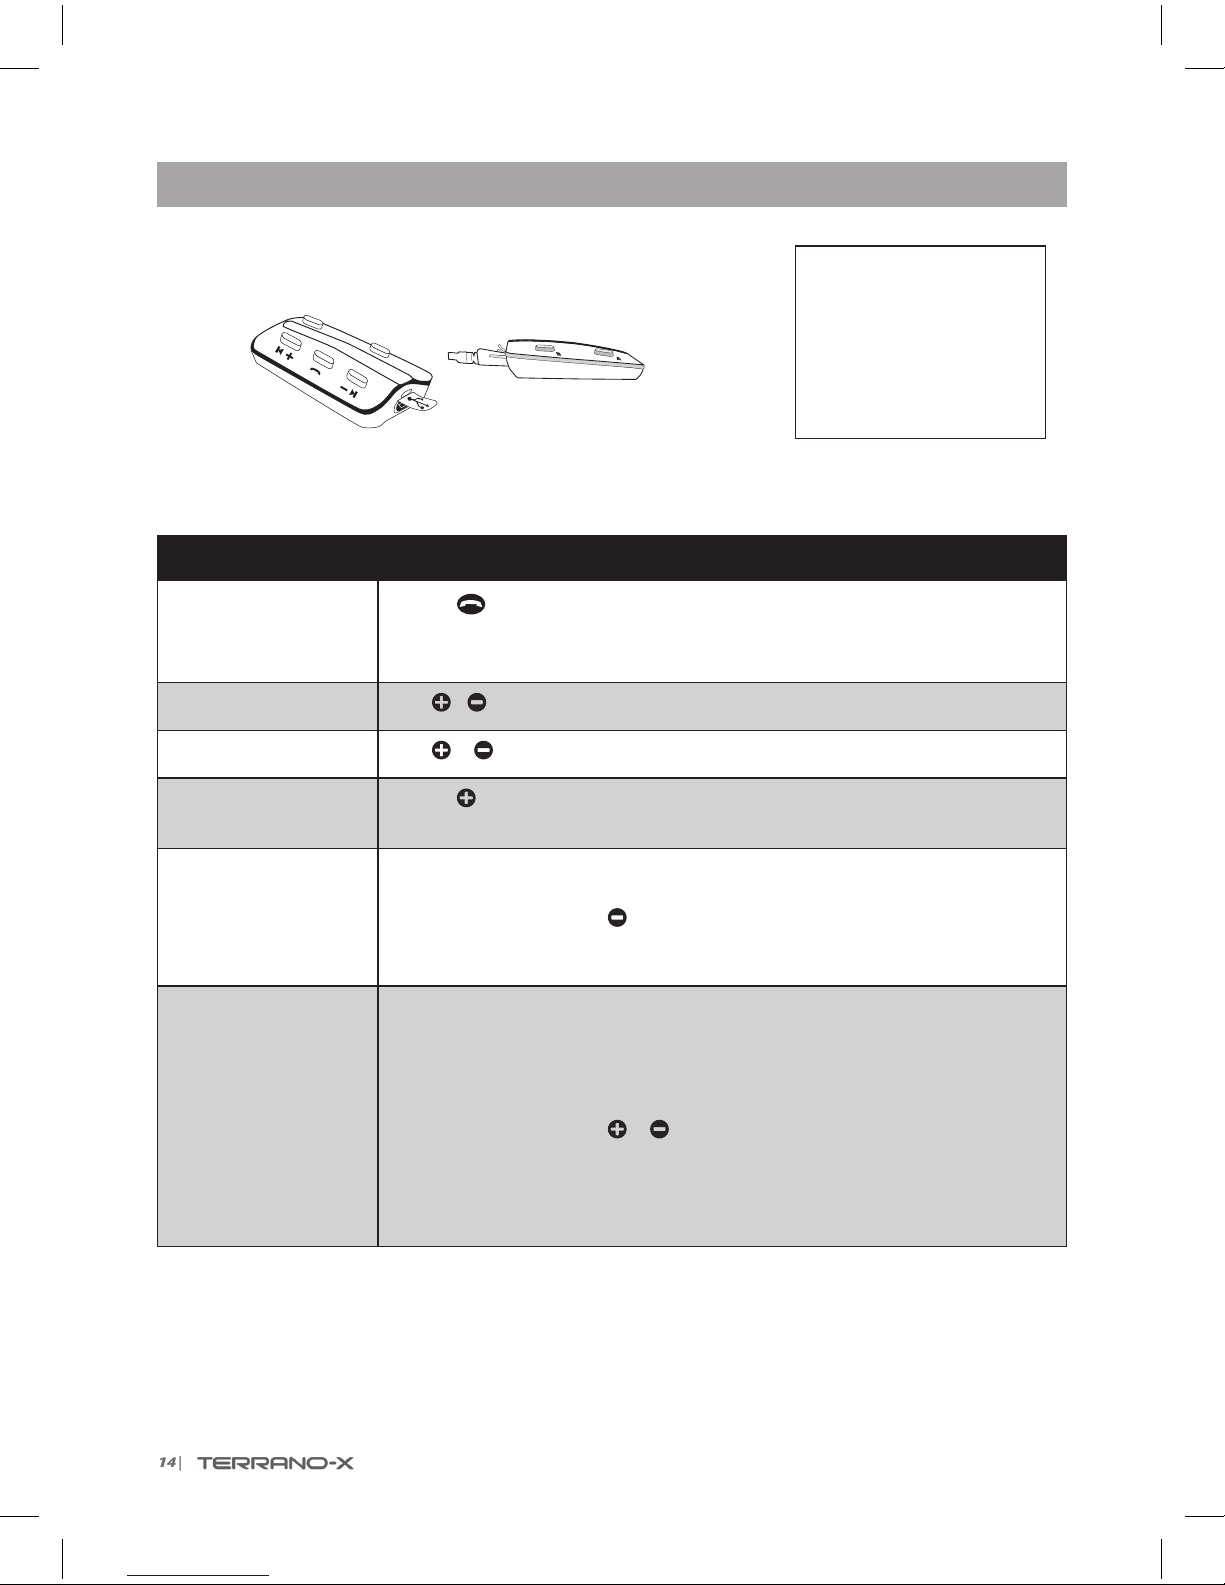
TERRANO-X
Channel B Button
• Connects to Channel B / D
Volume Down / Rewind Button
USB cable jack
Mobile Phone Button – Receive / Reject / Pairing
Volume Up / Forward Button
Channel A Button
• Connects to Channel A / C
• MP3 Button
Cradle
Audio Kit
Velcro helmet
mount
Audio Kit Connector
Two speakers
Noise canceling microphone
Spoiler 4 Large Velcro pads
Long strap 4 Small Velcro pads
Short buckle strap 4 Adhesive pads (to hold the
speaker wires on the helmet lining)
USB charging cable Microphone sponge
Silicone Cap Pre-moistened Alcohol Pad
Alcohol
Pad
EN
ENGLISH
|3
CHARGINGTHE BATTERY
Use the USB cable to charge the unit for at least 3 hours before initial use.
Channel“B”/
Channel“D”
Channel “A”/ Channel “C”
While charging, the RED LED turns on. When charging is complete, the LED
will turn o.
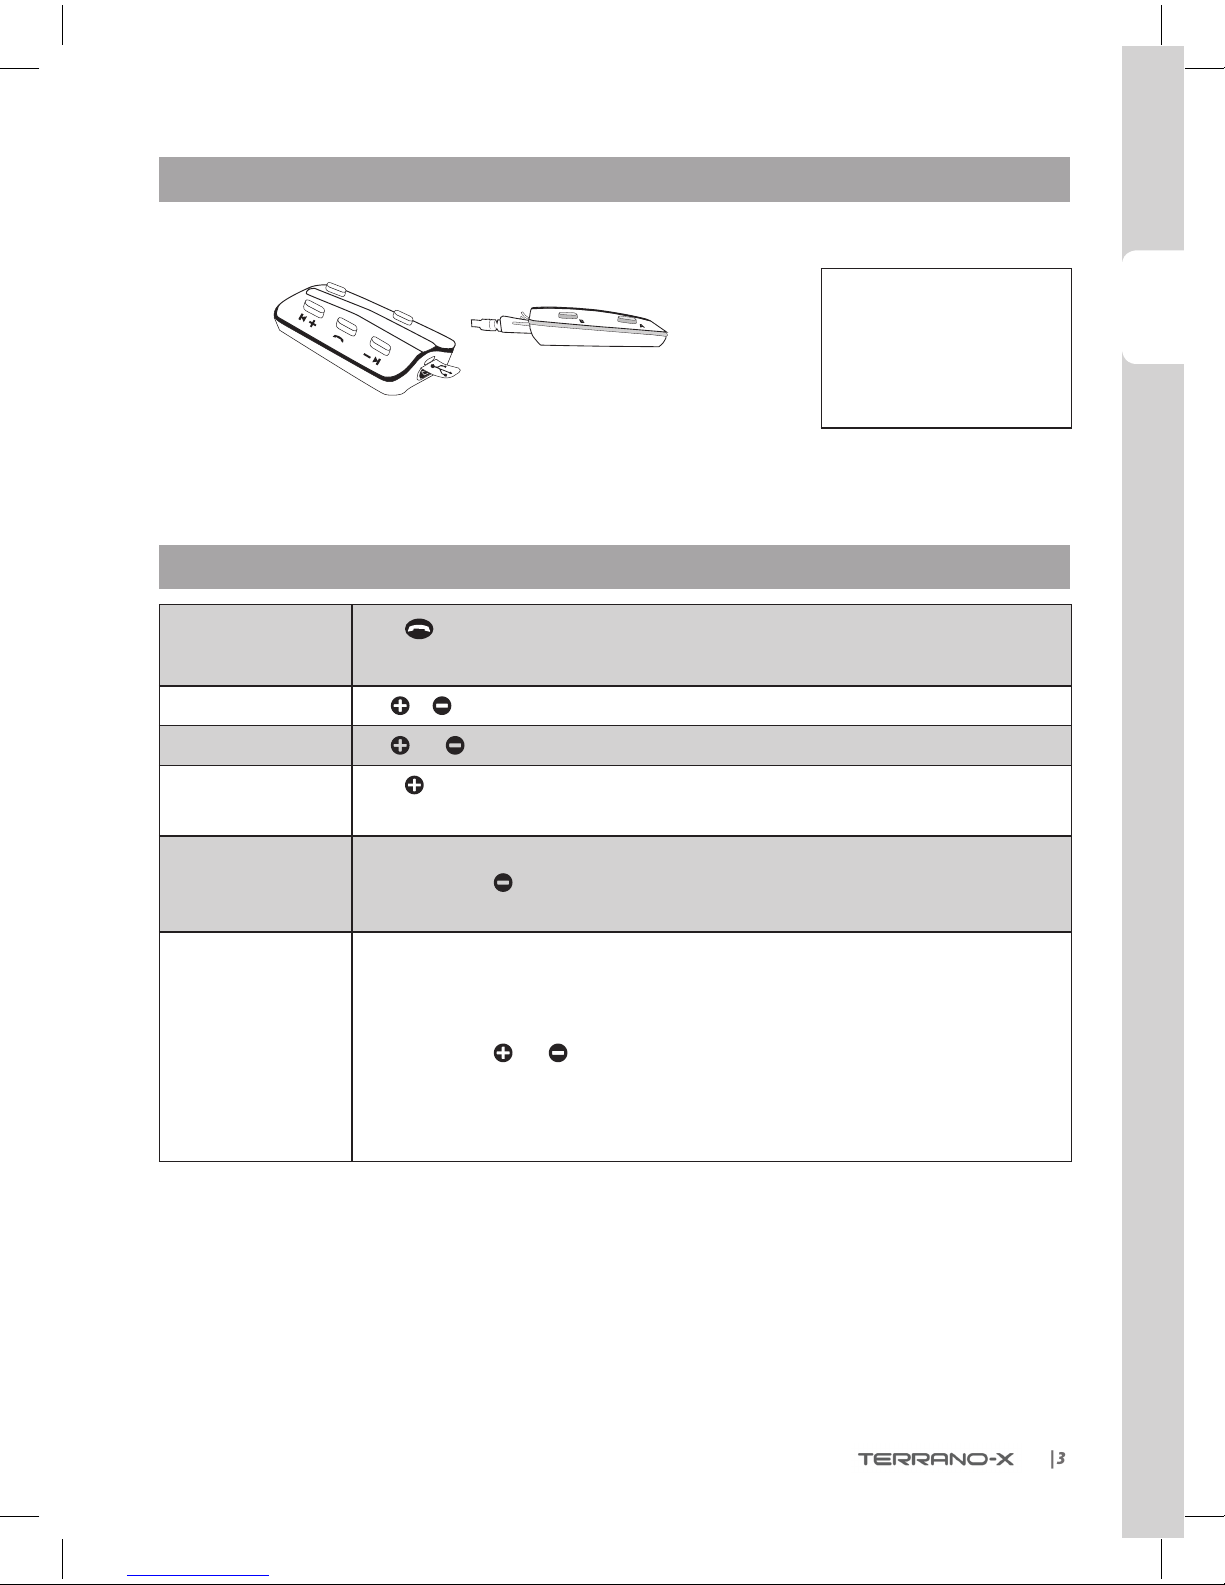
GENERAL FUNCTIONS
Power ON/ OFF Press for 2 seconds
• ON: 3 BLUE ashes, Ascending tone • OFF: 3 RED ashes, Descending tone
Volume Tap or to adjust and set volume of current audio source
Mute Tap and simultaneously
Battery Check Press for 2 seconds and check the LED color:
• BLUE = Full charge • PURPLE = Half charge • RED = Almost empty
Automatic Volume
Adjustment
(Default: Enabled)
Automatic volume adjustemnt according to ambient noise and riding speed.
In Standby, press for 5 seconds
• Enabled: BLUE ash for 2 seconds • Disabled: RED ash for 2 seconds
Voice Activation
(Default: Regular)
Voice activation can be customized to make it more or less sensitive. Voice activation for
Intercom calls can also be turned OFF.
You can choose between ‘Regular’ and ‘High’ sensitivity. If you experience diculties starting
a conversation, change the setting to ‘High’:
In Standby, press and simultaneously for 2 seconds.
• Regular:BLUE ash for 2 seconds
• High:PURPLE ash for 2 seconds
• O:RED ash for 2 seconds
The TERRANO-X is waterproof
and dustproof. However,
when in use, the silicon cover
should be kept tightly closed
to prevent moisture from
entering the unit.
4|
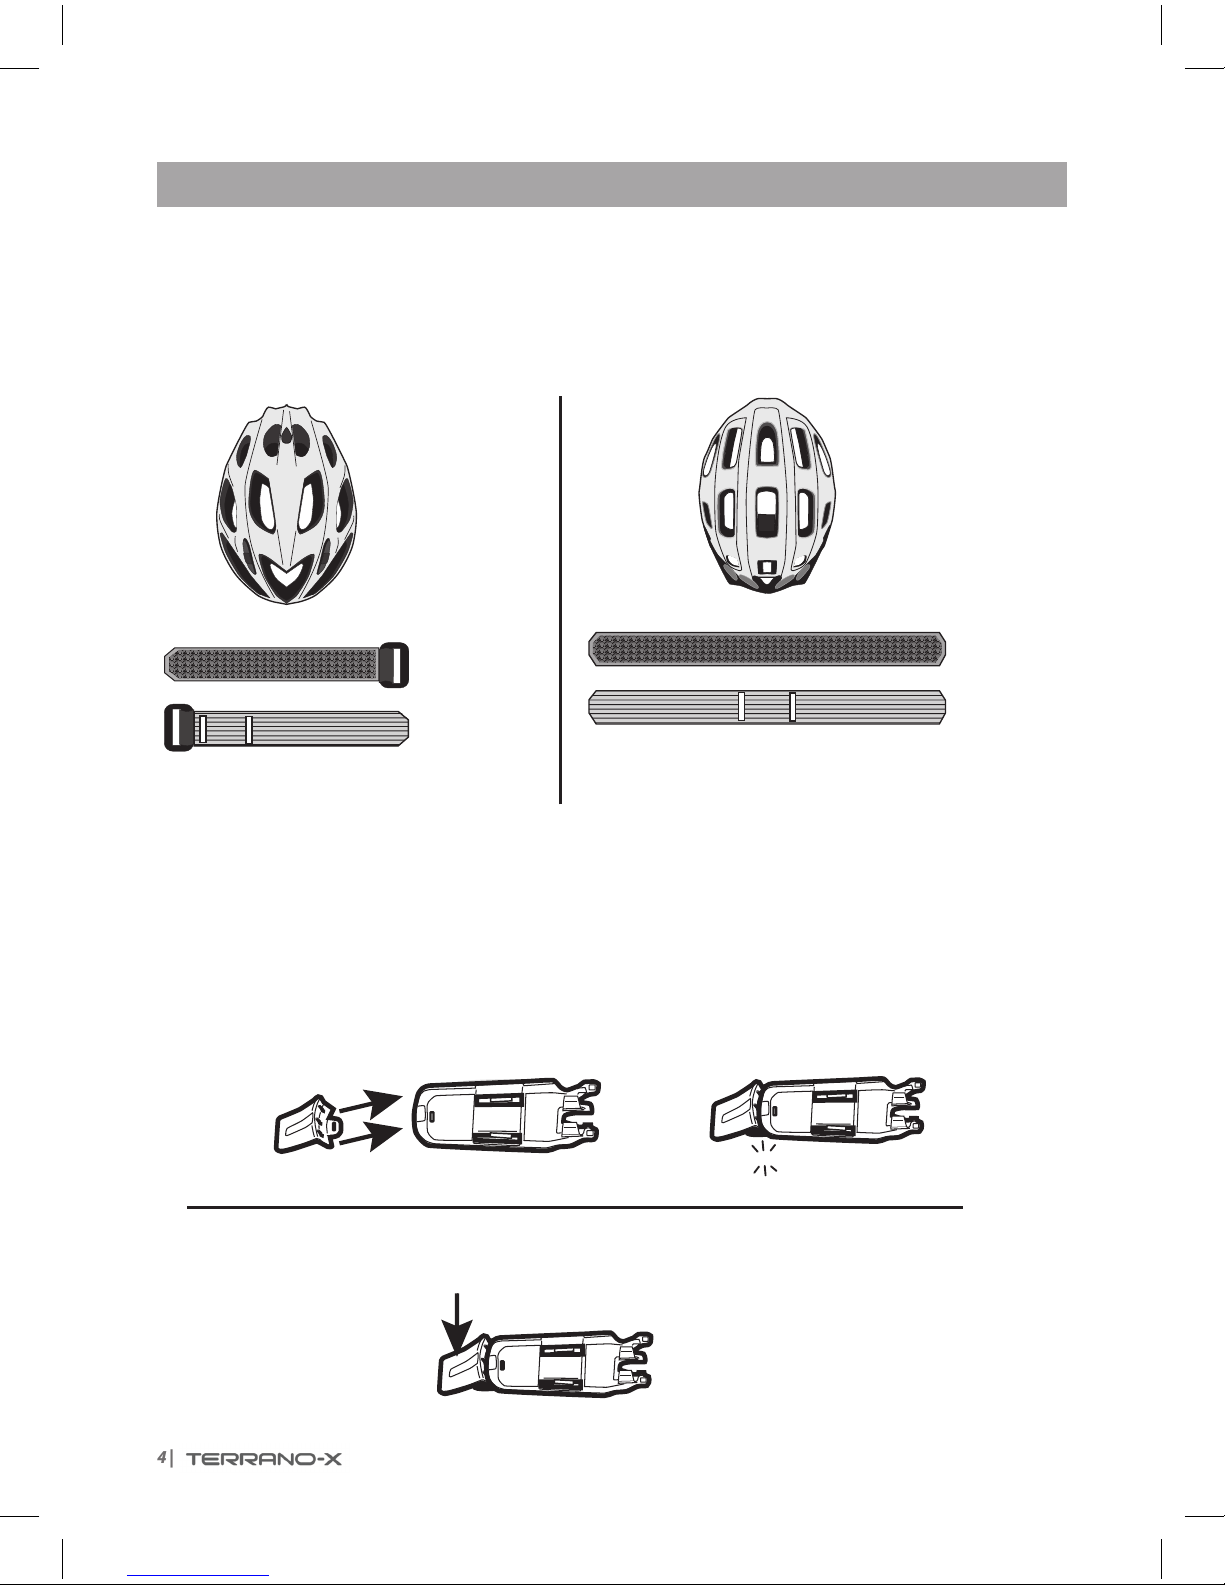
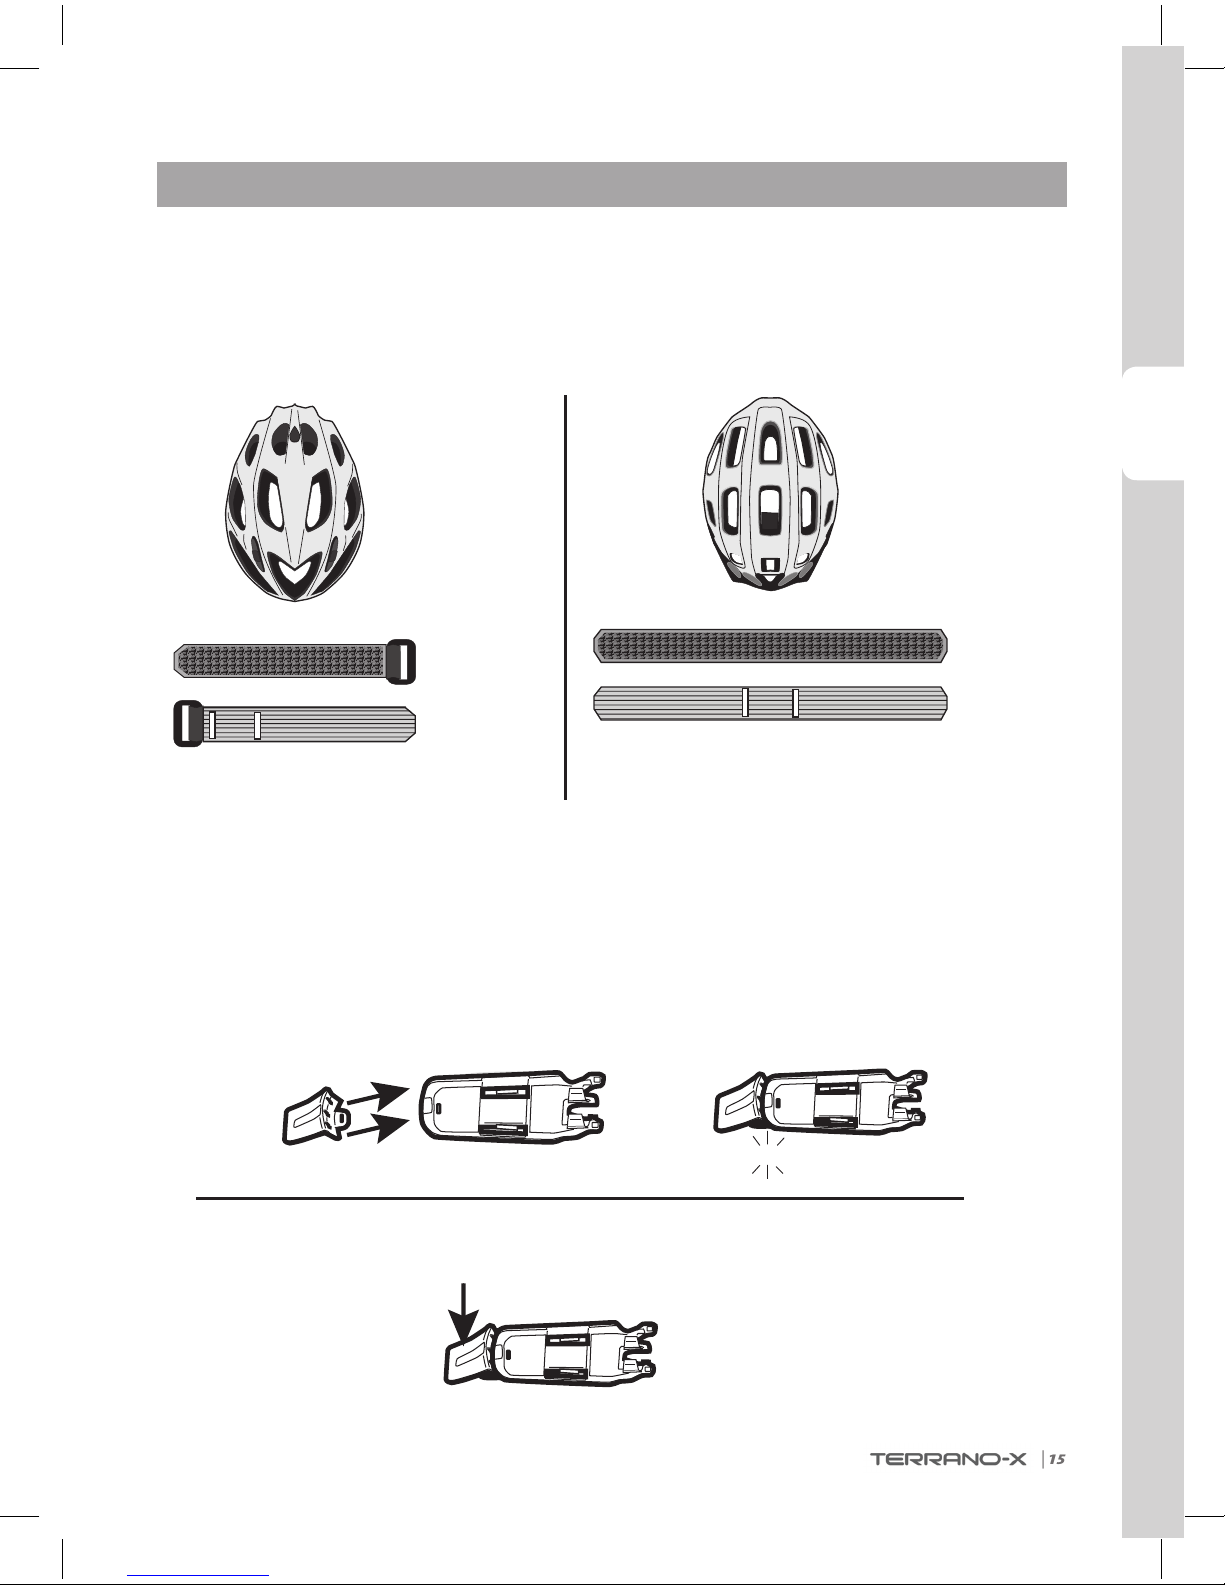
ASSEMBLY ON A HELMET
Helmet Type 1:
O-center vents
Helmet Type 2:
Center vents
(go to page 5) (go to page 6)
Short Buckle Strap
Long Strap
Velcro Side
Smooth Side
Velcro Side
Smooth Side
Front Front
Back
Back
➊ ➋
CradleSpoiler
Optional Spoiler
Deflect branches or other objects
Press here
Connect the Spoiler
Remove the Spoiler
CradleSpoiler
CLICK!

ENGLISH
|5
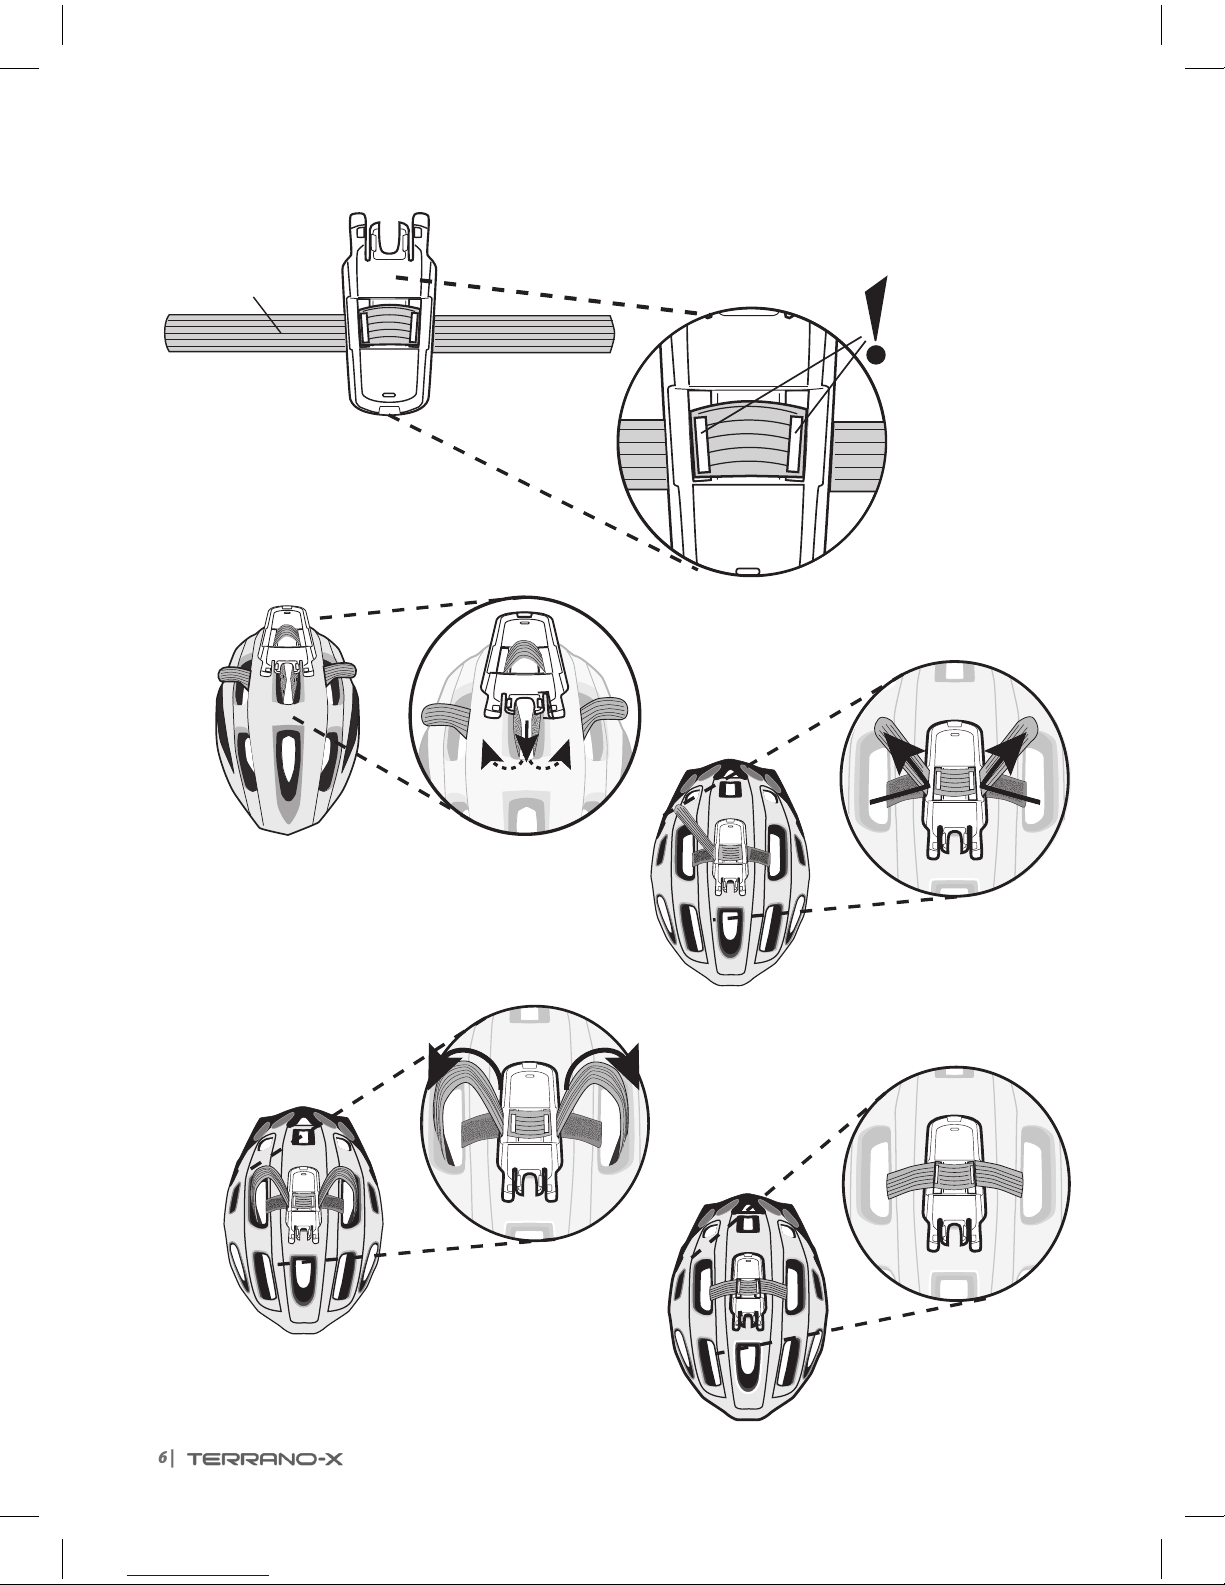
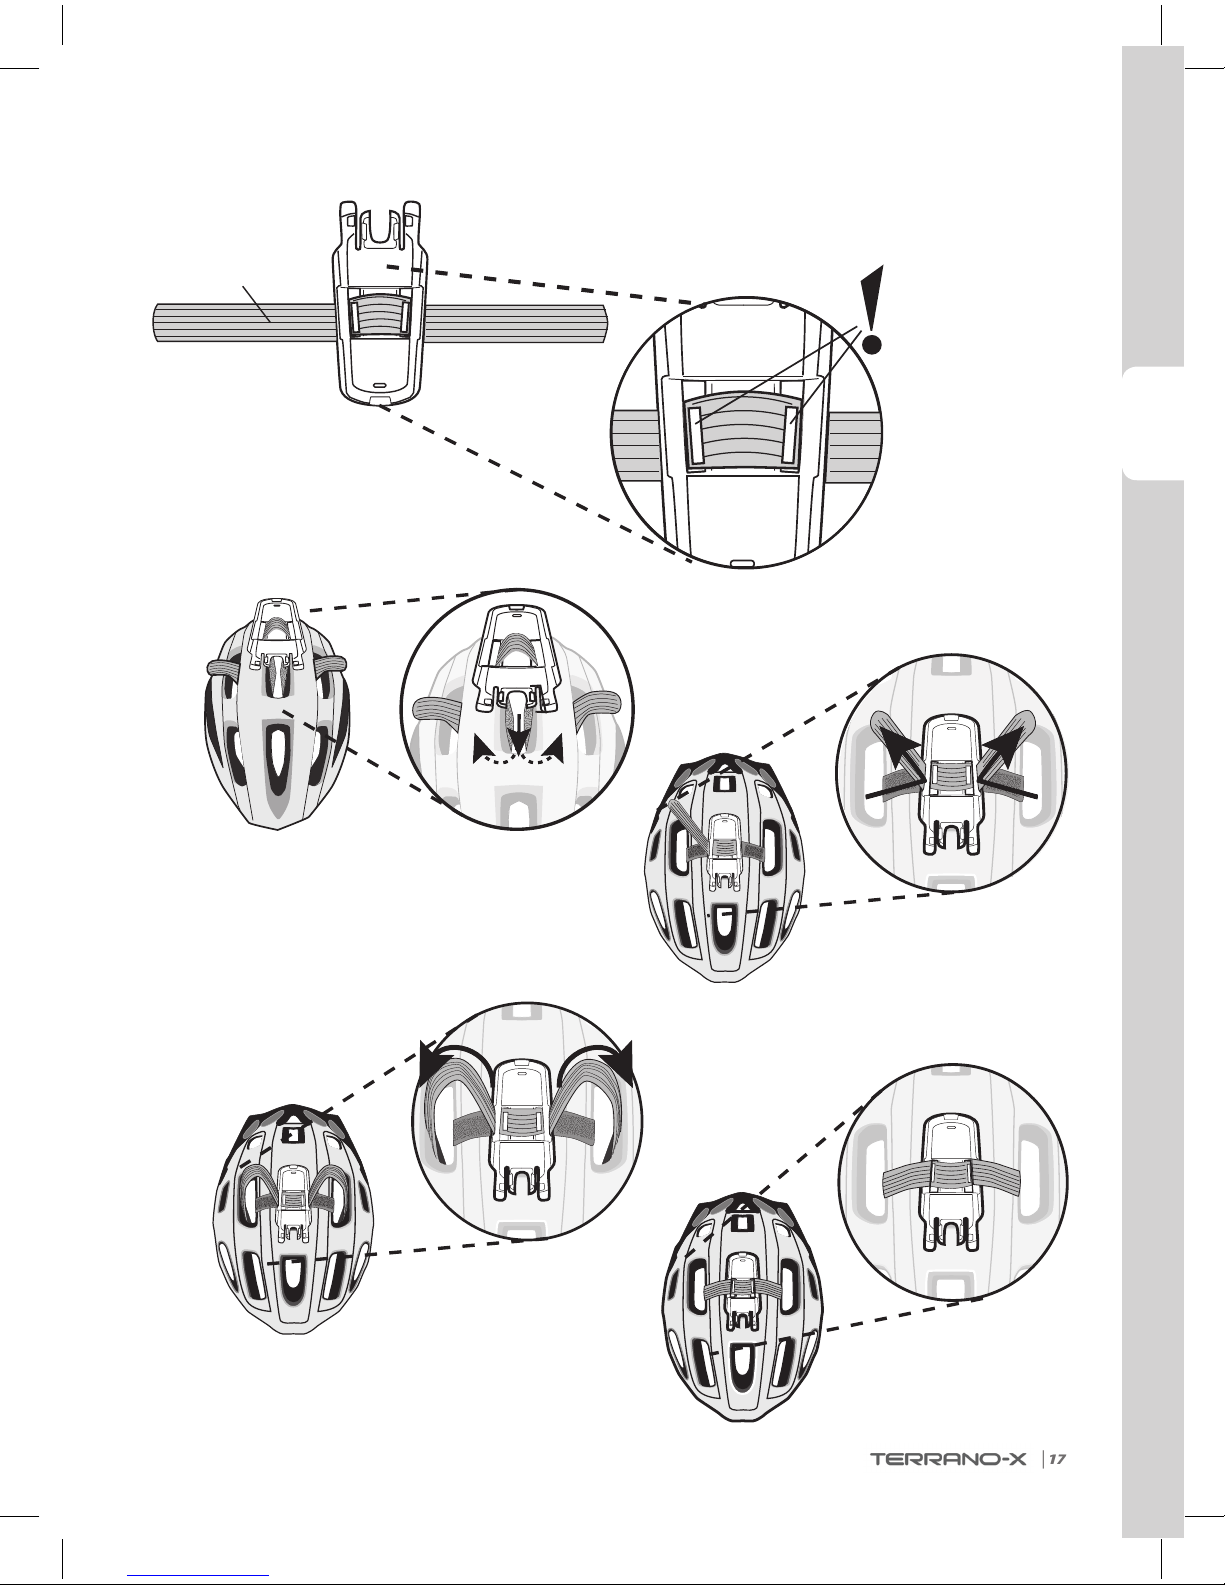
➋
➊
Back
Front
Front
Back
Velcro Side
Cradle (Top)
FLIPTHE CRADLE
Helmet Type 1
Cradle
(Bottom)
Short Buckle Strap
Smooth Side
Continue on page 7
6|
➊
➋
➌
➍
Front
Back
Front
Back
Front
Back
Helmet Type 2
Back
Front
Cradle
(Top)
Long Strap
Smooth Side

ENGLISH
|7
➊
➋➊
Alcohol
Pad
Back
LargeVelcro Pads
WaitTEN
minutes
Preview:
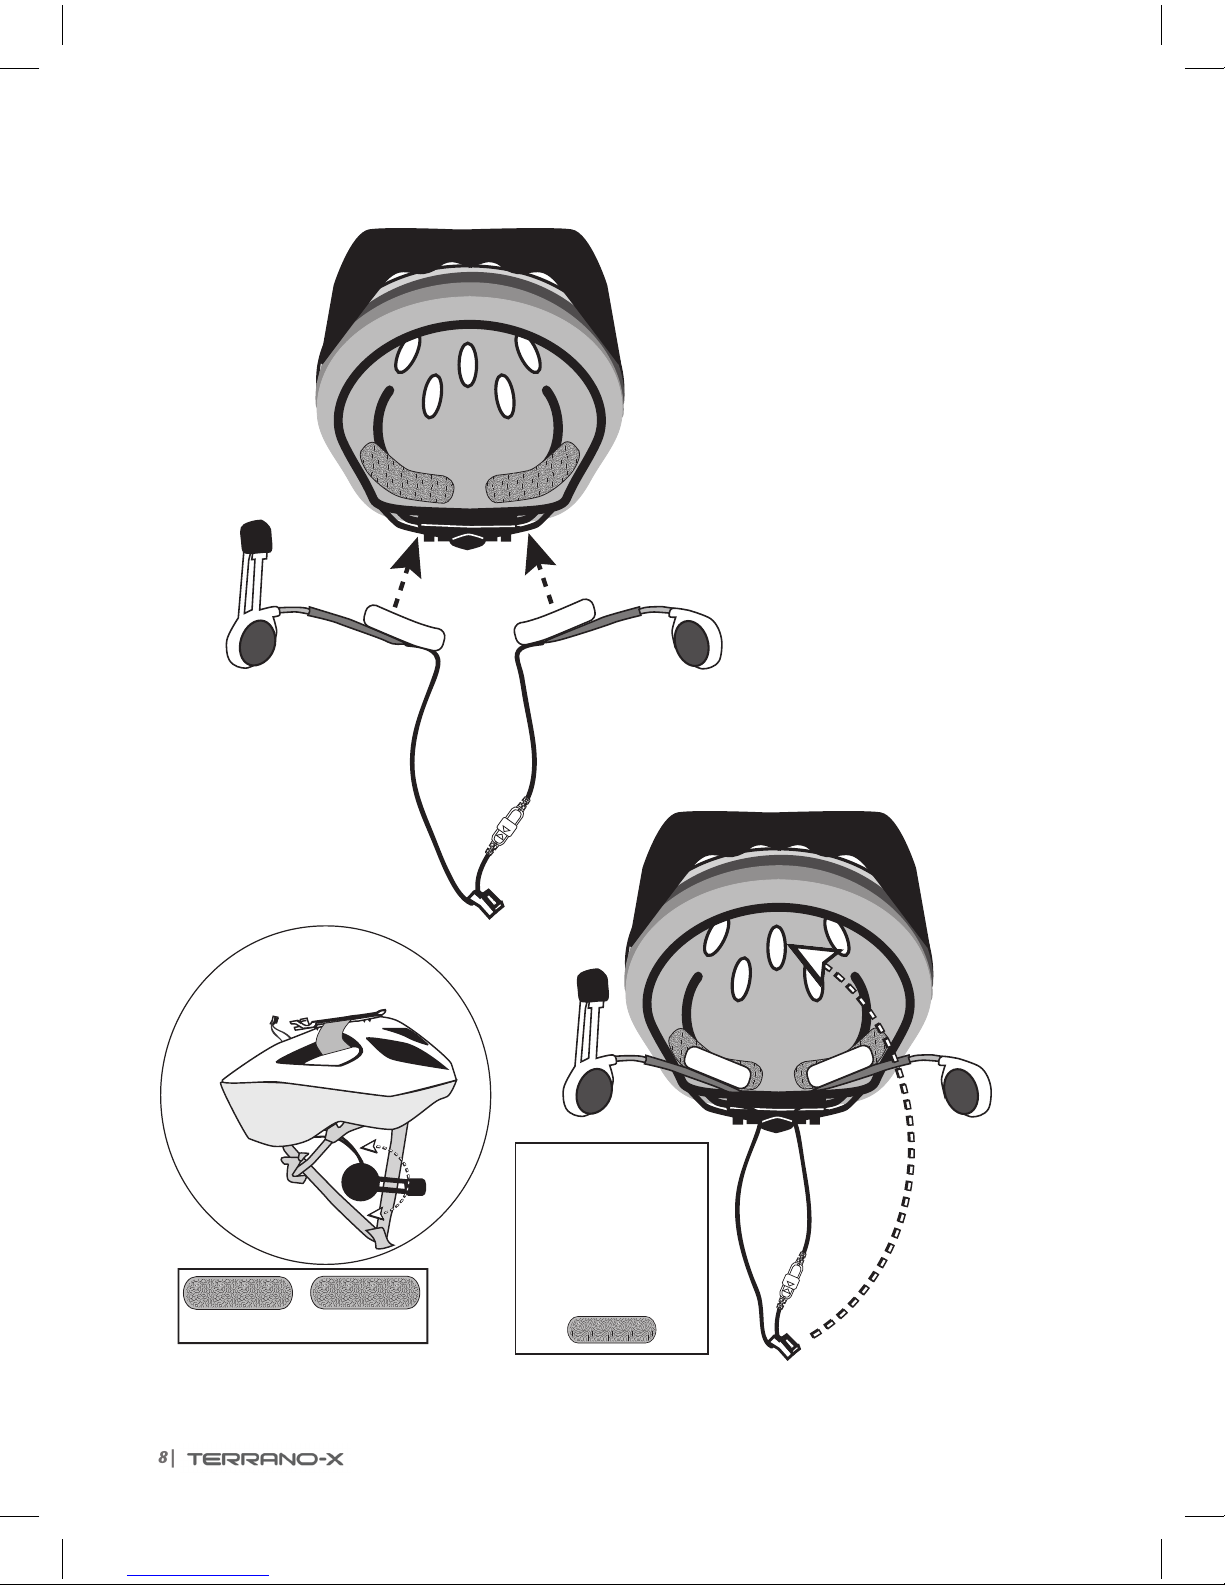
Final Audio Kit Position
Attaching the Left Speaker
(Optional)
NOTE: Using two speakers inside the helmet may be prohibited
in certain jurisdictions. If you wish to use two speakers, you
should connect the left speaker to the audio kit as shown below. Cradle
Audio Kit
Connector
Inner helmet view
Front
Position the Audio Kit
R L
SmallVelcro Pads
(optional)
Alcohol Pad
(optional)
R
INSTRUCTIONS:
1. Remove any existing
stickers.
2. Optional: Use the Alcohol
Pad to clean the exact spot
on the helmet.
3. Position and attach the
adhesiveVelcro Pads.
Position the Velcro pads
8|
➋
➌
SpareVelcro Pads
Back
If needed, use the
adhesive pads
to hold the speaker
wires in a
comfortable
location
Inner helmet view
Front
Back
Inner helmet view
Front
Audio Kit
Cradle
Audio Kit
Connector
Audio Kit
R L
R L
R
ENGLISH
|9
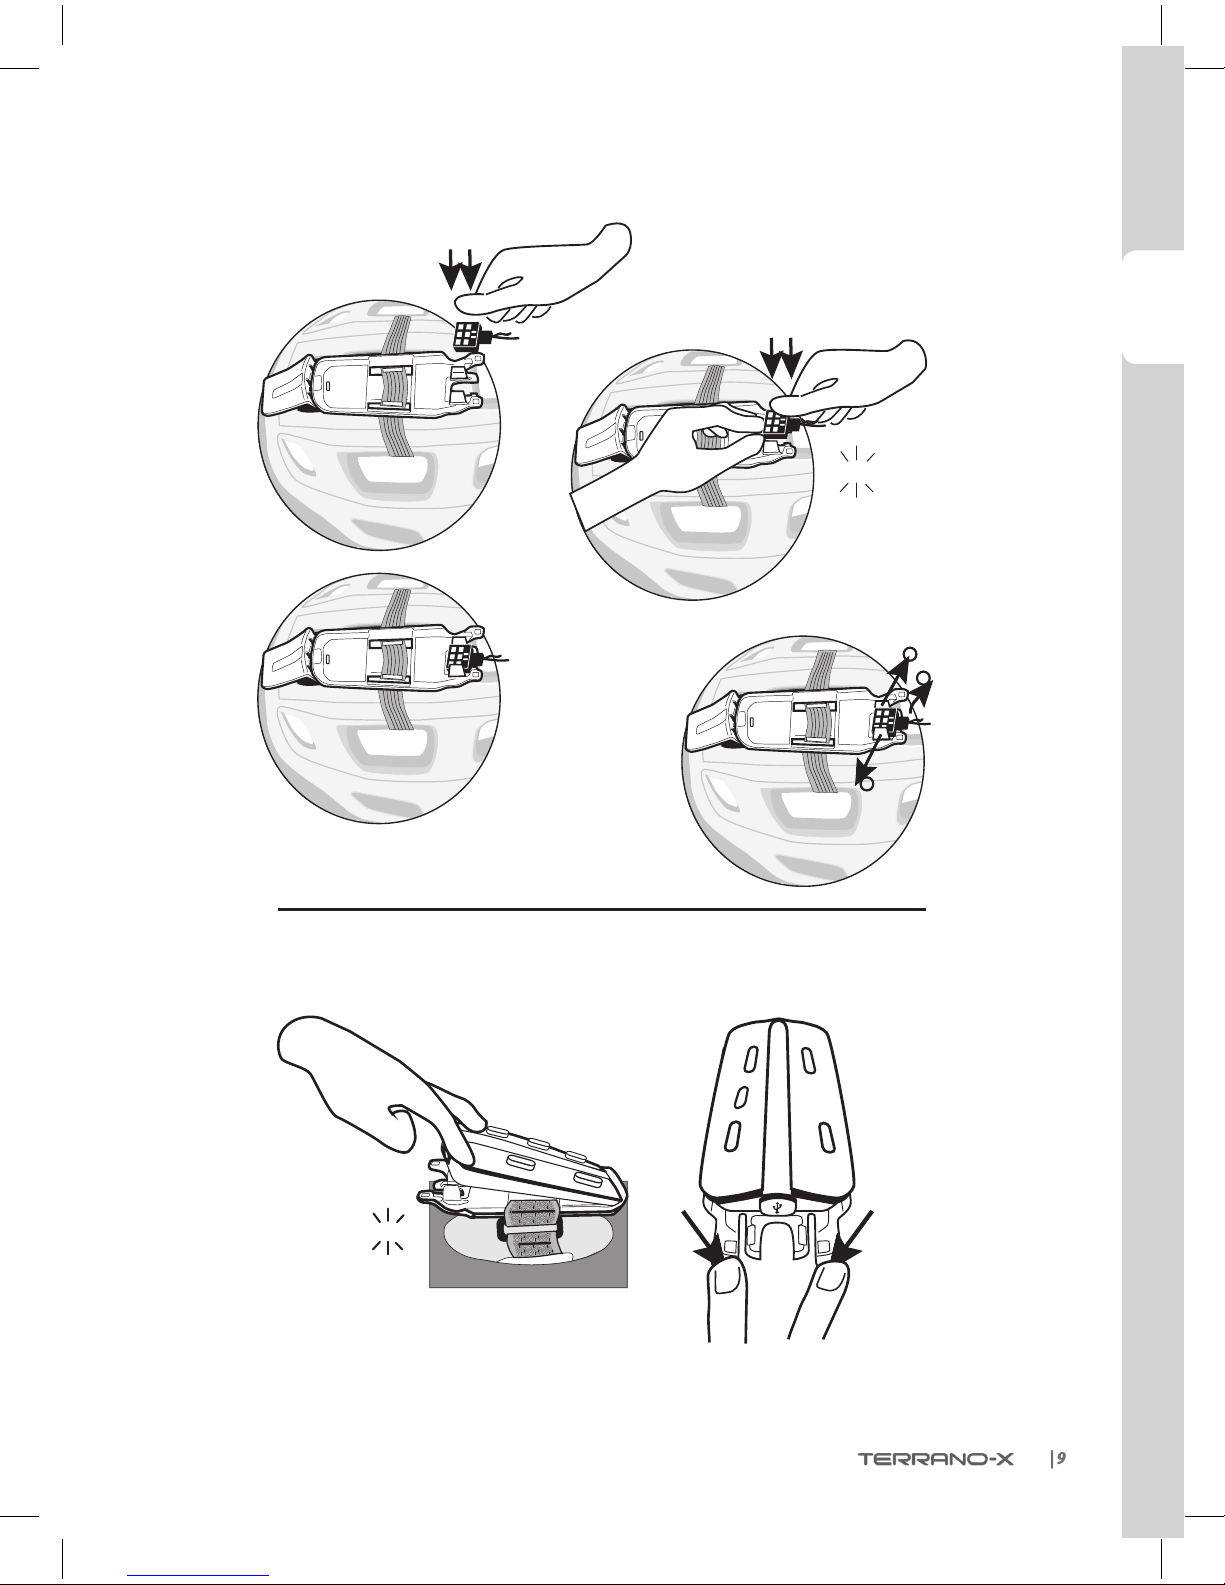
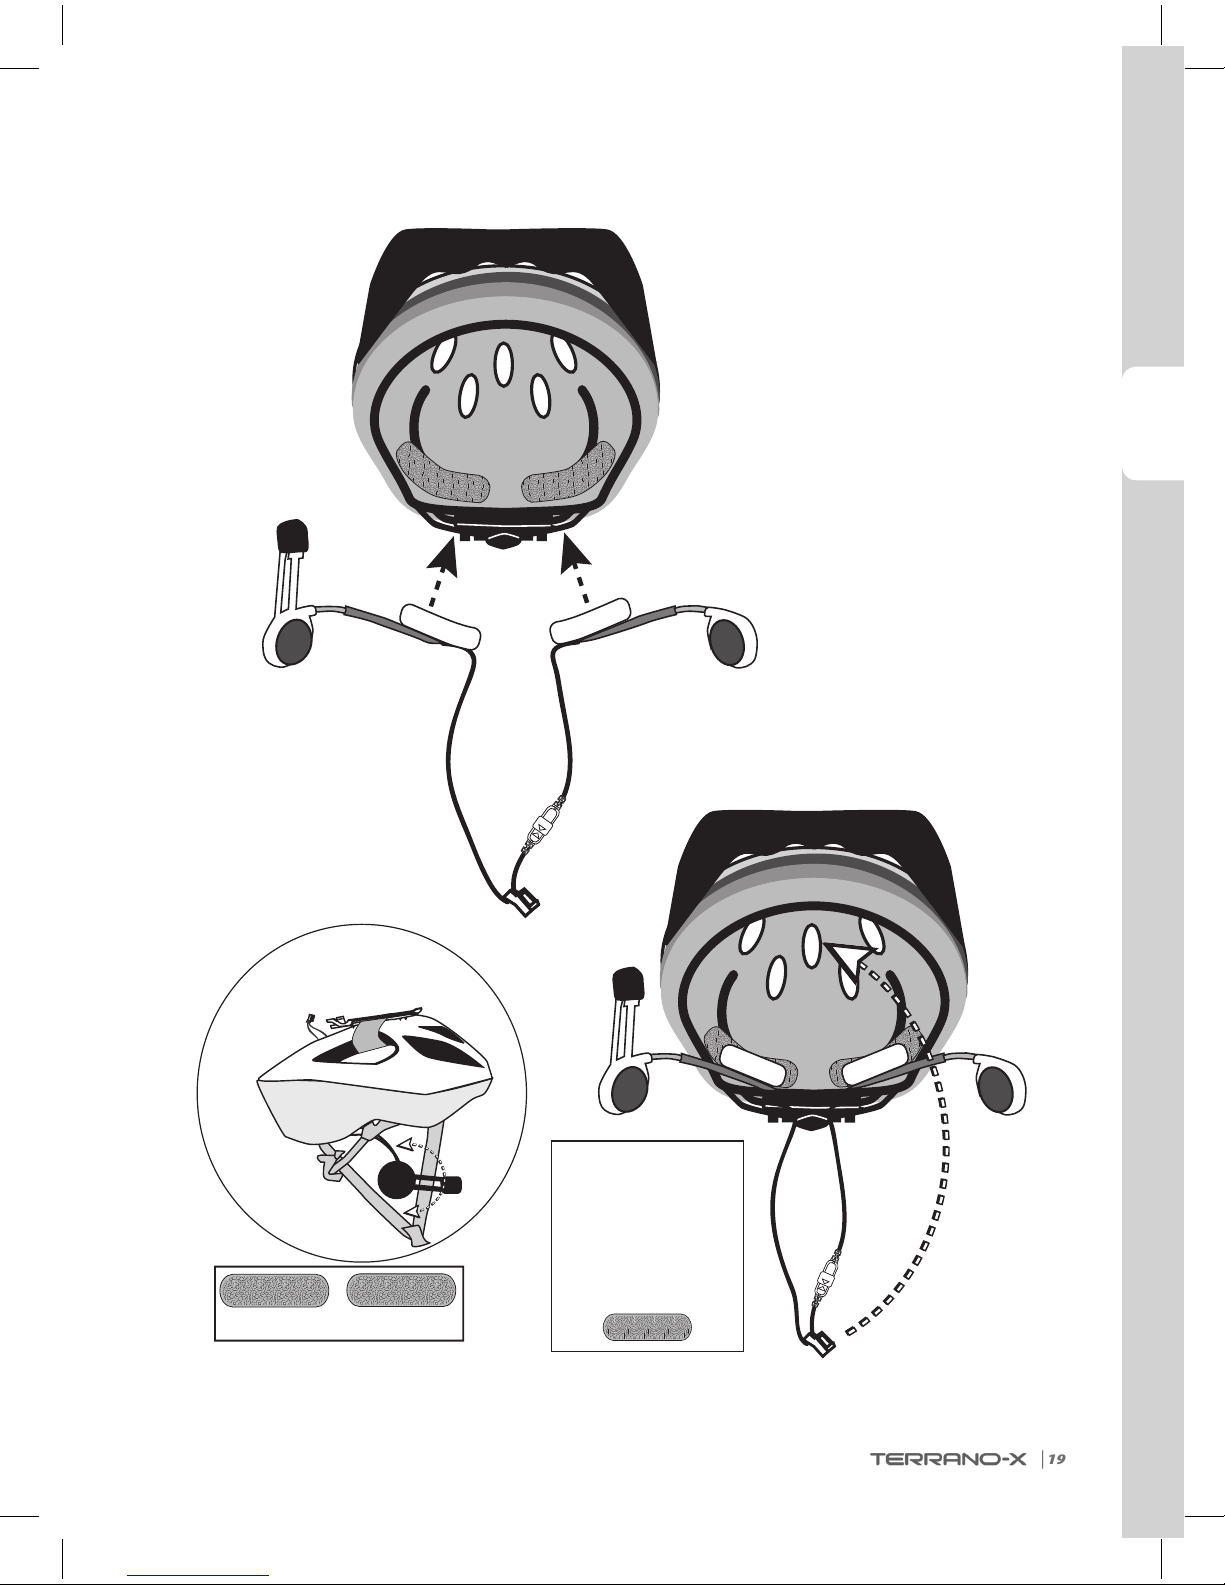
➍
➏
➎
1
2
1
Release the
Audio Kit
Connect the Audio Kit
Attach the Headset Release the
Headset
CLICK!
CLICK!
10|
INTERCOM
The TERRANO-X gives you smooth and continuous intercom communication with other riders
at a range of up to 1,640 ft. / 500 m (subject to terrain). Intercom communication (one on one)
is possible between up to ve riders, i.e you and four other TERRANO-X users, through the
available channels (“A”, “B”, “C” or “D”). For more details see the full User Manual online.
To chat with another TERRANO-X user via Intercom, rst pair the TERRANO-X devices to each other.
Pairing is a one-time process. Once paired, the TERRANO-X units will automatically recognize each other
whenever they are at close range.
If you have purchased the double pack, both units are factory-paired to communicate via their respective Channel
“A” Buttons. If for any reason you have to pair them again, OR if you purchased a single TERRANO-X and wish to pair
with a second unit to make Intercom calls, proceed as follows:
INTERCOM PAIRING
1. Make sure both units are near each other and in Standby or just after power on (BLUEashevery3seconds).
2. Choose the Intercom Channel you wish to pair (see table below) and enter Intercom Pairing mode by pressing
the relevant buttons for 5 seconds until the LEDs begin ashing rapidly.
INTERCOM CHANNEL PRESS BUTTON(S) FLASHING LED COLOR
“A” RED
“B” BLUE
“C” and PURPLE
“D” and PURPLE
3. Enter Intercom Pairing mode on the second unit, and after a few seconds, both units will show a solid
LED for 2 seconds, indicating that they are paired.
4. If Pairing is not completed within 2 minutes, the units will return to Standby and you can try pairing
again.
USING THE INTERCOM
VOICE CONNECT MANUAL CONNECT
Start Intercom Call with Channel “A” and “B”
Say any word loudly into the microphone
(Call ends automatically after 30 seconds of silence)
Start / End Call with Channel “A”: Tap
Start / End Call with Channel “B”: Tap
Start / End Call with Channel “C”: Double-tap
Start / End Call with Channel “D”: Double-tap

ENGLISH
|11
BLUETOOTH DEVICES: MOBILE PHONES AND MUSIC PLAYERS
PAIRING A BLUETOOTH ENABLED DEVICE
1. Make sure your phone or music player is ON and its Bluetooth mode is activated.
2. With your Terrano-X in Standby mode, press for at least 6 seconds. The TERRANO-X will rst
ash RED. Continue to hold the button until the RED and BLUE lights begin rapidly alternating.
3. Search for Bluetooth devices on your phone or MP3 player. After a few seconds the “TERRANO-X” will
appear as a discovered device. Select it. If prompted for a PIN or Passkey, enter 0000 (four zeros).
4.Your phone or music player will conrmthat pairing hassucceededand the LED on the TERRANO-Xwill
beginashingslowlyinBLUE.
• If Pairing is not completed within 2 minutes, the TERRANO-X will return to Standby mode.
• Not all Bluetooth mobile phones can broadcast Bluetooth stereo music (A2DP), even if the phone has an MP3 player
function. Consult your mobile phone’s User Manual for more information.
• After pairing, you may need to tap to connect the TERRANO-X to the phone.
USING YOUR MOBILE PHONE
Answer a call Tap orspeak anyword loudly into the microphone
Reject a call Remain silentfor15seconds, or press for 2 seconds
End a call Tap
Voice Dial*
(if supported by phone) Tap and follow the prompt from the Mobile
Redial* Tap twice
Reconnect Tap
INTERCOM CONFERENCE MODE
Add or Remove Rider “A” or “B”
to/from a phone call Tap or
while on a phone call
*This feature is not available during intercom or mobile calls
LISTENING TO MUSIC
Control available from most smartphones and music players - Bluetooth stereo (A2DP) and remote control
feature (AVRCP)
Play Press for 2 seconds Next track Press for 2 seconds
Pause/Stop Press for 2 seconds Previous track* Press for 2 seconds
*With some phones you may need to repeat this action

12|
TROUBLESHOOTING
Reboot If the unit stops responding, reset it by turning it o and then on again (press for 2 seconds
)
.
Reset Pairing
(Deletes all paired
devices)
1. In Standby, press for 6 secs until LED ashes RED/BLUE.
2. Press for 2 seconds until LED ashes 5 times in PURPLE.
SUPPORT
www.terranosystems.com
suppor[email protected]
NOTICES
Federal Communications Commission (FCC) / Industry Canada (IC) Statement
15.21
You are cautioned that changes or modications not expressly approved by the part responsible for compliance could void the user’s authority to operate
the equipment.
15.105(b)
This equipment has been tested and found to comply with the limits for a Class B digital device, pursuant to part 15 of the FCC / IC rules. These limits are
designed to provide reasonable protection against harmful interference in a residential installation. This equipment generates, uses and can radiate radio
frequency energy and, if not installed and used in accordance with the instructions, may cause harmful interference to radio communications. However, there
is no guarantee that interference will not occur in a particular installation. If this equipment does cause harmful interference to radio or television reception,
whichcan bedetermined byturning the equipment o and on, the useris encouraged totry to correct the interference byoneor more ofthefollowingmeasures:
• Reorient or relocate the receiving antenna.
• Increase the separation between the equipment and receiver.
• Connect the equipment into an outlet on a circuit dierent from that to which the receiver is connected.
• Consult the dealer or an experienced radio/TV technician for help.
Operation is subject to the following two conditions:
1) this device may not cause interference and
2) this device must accept any interference, including interference that may cause undesired operation of the device.
FCC/IC RF Radiation Exposure Statement:
This equipment complies with FCC/IC radiation exposure limits set forth for an uncontrolled environment. End users must follow the specic operating
instructions for satisfying RF exposure compliance. The antenna used for this transmitter must not transmit simultaneously with any other antenna or
transmitter, except in accordance with FCC / IC multi-transmitter product procedures.
European CE Notice
The TERRANO-X is in conformity with the following essential requirements of Council Directive 1999/5/EC (referred to as R&TTE Directive): Articles 3.1a, 3.1.b
and 3.2. The Product is manufactured in accordance with Annex II of the above directive.
Declaration of Conformity (DOC)
The TERRANO-X is compliant with and adopts the Bluetooth® Specication 2.1 and has successfully passed all interoperability tests that are specied in the
Bluetooth® specication.However,interoperability betweenthedeviceandother Bluetooth®-enabledproductsisnotguaranteed.
ESPAÑOL
|
13
Gracias por elegir el TERRANO-X. Esperamos que disfrute con su uso. Por favor, descargue la guía del usuario
completo en www.terranosystems.com/manuals.
Su equipo Terrano
CONTENIDO DEL ESTUCHE DE VENTA
Si compró el Kit de TERRANO-X , su estuche de venta incluirá dos unidades de cada componente, enumerado a
continuación, a excepción de la Guía Rápida.
TERRANO-X
Botón del CANAL B
• Conecta al Canal B / D
Botón para Bajar Volumen/Retroceder
USB
Botón del Móvil – Contestar llamadas/
Rechazar llamadas/Emparejar
Botón para Subir Volumen/Adelantar
Botón del CANAL A
• Conecta al Canal A / C
• Botón para el MP3
Soporte
Kit de Audio
Base de Velcro para
el Casco
Conector del Kit de Audio
Dos Parlantes
Micrófono de cancelación
de ruido
Alerón 4 Almohadillas Velcro Largas
Correa Larga 4 Almohadillas Velcro Cortas
Correa Corta con Hebilla 4 almohadillasadhesivas (parasostenerloscables
delosparlantesenel interiordelcasco)
Adaptador de Cable USB Esponja para el Micrófono
Tapón de silicona Toallita pre-humedecida
Alcohol
Pad
ES
14|
CARGAR ELTERRANO-X
Use el cable USB para cargar la unidad por mínimo 3 horas previo al
uso inicial.
Channel“B”/
Channel“D”
Channel “A”/ Channel “C”
Durante la carga, la luz Roja permanecerá encendida.
Al completarse la carga, la luz Roja se apagará.
FUNCIONES GENERALES
Encendido / Apagado
Presione por 2 segundos
• Encendido: 3 destellos AZULES + tono ascendente
• Apagado: 3 destellos ROJOS + tono descendente
Volumen Pulse o para ajustar el volumen de la fuente de audio activa
Silenciamiento Pulse y simultáneamente
Indicador del
Nivel de la Batería
Presione por 2 segundos. Luz:
• Azul = Totalmente cargada • Púrpura = Medio descargada • Roja = Casi descargada
Ajuste Automático
del Volumen
(Por defecto: ACTIVADO)
Permite el ajuste automático del volumen, de acuerdo al ruido del ambiente y a la
velocidad de conducción.
En Modo de Espera, presione por 5 segundos.
• Activado: destello AZUL de 2 segundos • Desactivado: destello ROJO de 2 segundos
Activación por Voz
(Por defecto: Regular)
La activación por voz se puede personalizar, para lograr que sea más o menos sensible.
La activación por voz para las llamadas del intercomunicador, también puede ser
completamente desactivada.
Si tiene dicultades para iniciar una conversación, cambie la conguración a ‘Alta’ de la
siguiente manera:
En Modo de Espera, presione y simultáneamente por 2 segundos.
• Regular:destello AZUL por 2 segundos
• Alta: destello PÚRPURA por 2 segundos
• Desactivado: destello ROJO por 2 segundos
El TERRANO-X es un
dispositivo a prueba de agua y
polvo. Sin embargo, mientras
está en uso, la cubierta de
silicona debe mantenerse bien
cerrada en todo momento
para impedir la entrada de
humedad a su TERRANO-X.
ESPAÑOL
|
15
INSTALACIÓN
Casco Tipo 1:
Rejillas de Ventilación
Fuera de Centro
Correa Corta con Hebilla
Correa Larga
Lado delVelcro
Lado Liso
Lado delVelcro
Lado Liso
Casco Tipo 2:
Rejillas de Ventilación
al Centro
Parte delantera Parte delantera
Parte trasera
Parte trasera
Soporte
Soporte
Alerón
Alerón
Alerón Opcional
Desvía las ramas u otros objetos
Presione aquí
Desconexión del Alerón
Conectar el Alerón
¡CLIC!
(ir a página 16) (ir a página 17)

16|
➋
➊
Casco Tipo 1
Soporte
(Abajo)
Correa Corta con Hebilla
Parte trasera
Parte
delantera
Lado Liso
Parte delantera
Parte trasera
Soporte (Arriba)
Lado delVelcro
Continúe en la página 18
VOLTEAR EL SOPORTE
ESPAÑOL
|
17
➊
➋
➌
➍
Casco Tipo 2
Parte
delantera
Parte trasera
Parte
delantera
Parte trasera
Parte
delantera
Parte trasera
Parte
delantera
Parte trasera
Soporte
(Arriba)
Correa Larga
Lado Liso

18|
➊
➋➊
Alcohol
Pad
Vista Preliminar: Posición Final
del Kit de Audio
Parte trasera
AlmohadillasVelcro Largas
Soporte
Conector del
Kit de Audio
Vista del interior del
casco, parte delantera
Der. Izq.
Espere DIEZ
minutos
Instalación del Kit de Audio
Colocación de las Almohadillas Velcro
AlmohadillasVelcro Cortas
(opcional)
Toallitas
de Alcohol
(opcional)
Der.
Nota:
1. En primer lugar, retire
cualquier adhesivo existente
2. Opcional: Utilice laToallita de
Alcohol para limpiar el lugar
exacto en el casco.
2. Coloque y je las Almohadillas
deVelcro adhesivas
Fijando el Parlante Izquierdo
(Opcional)
NOTA: El uso de dos parlantes dentro del casco puede estar
prohibido en ciertas jurisdicciones. Si desea usar dos parlantes,
debe conectar el parlante izquierdo al kit de audio como se
muestra a continuación
ESPAÑOL
|
19
➋
➌
Parte trasera
Conector del Kit de Audio
Vista interior del casco
Parte delantera
Parte
trasera
Si es necesario, utilice
las almohadillas
adhesivas para
sostener los cables del
parlante en un lugar
cómodo.
Conector del
Kit de Audio
AlmohadillasVelcro de repuesto
Vista interior del casco
Parte delantera
Der. Izq.
Der. Izq.
Der.
Soporte
Conector del
Kit de Audio

20|
➍
➏
➎
1
2
1
Separación
del Kit de
Audio
Fijación de la Unidad de Control
Separación
de la Unidad
de Control
Conexión del Kit de Audio
¡CLIC!
¡CLIC!
Other manuals for terrano-x
1
Table of contents
Languages:


