Teryair EW 1103-110V Instruction Manual

High Pressure Washers
Models Descriptions IMPA Number
EW 1103-110V Electric High Pressure Washer, 110Bar, 110V-1ph, 2.2kW 590857
EW 1103-220V Electric High Pressure Washer, 110Bar, 220V-1ph, 2.2kW 590852
EW 1106-220V Electric High Pressure Washer, 110Bar, 220V-3ph, 2.2kW 590853-OLD
EW 1106-440V Electric High Pressure Washer, 110Bar, 440V-3ph, 2.2kW 590854-OLD
EW 1706-220V Electric High Pressure Washer, 170Bar, 220V-3ph, 4.4kW 590853
EW 1706-440V Electric High Pressure Washer, 170Bar, 440V-3ph, 4.4kW 590854
EW 200-220V Electric High Pressure Washer, 200Bar, 220V-3ph, 5.5kW 590855
EW 200-440V Electric High Pressure Washer, 200Bar, 440V-3ph, 5.5kW 590856
Read this manual carefully before installing, operating or servicing this equipment. It’s the responsibility
of the employer to ensure this manual is read by the operator. Please preserve this manual.
is document is issued with Product Serial No
Operation and Maintenance Guide

FF-MM-391-REV - 01
Page 2
Operation and Maintenance Guide High Pressure Washer Series
Table of Contents
3 Technical Data
3 OperangandSafetyInstrucons
5 IntendedandProhibiveuse
6 UnPacking
7 Assembly&Diassembly
10 SafetychecksbeforeandaeroperangtheHighPressureWasher
11 Maintenance
13 ExplodedViewpfHighPr.Pump110Bar
14 ExplodedViewpfHighPr.Pump170Bar/200Bar
15 Repair Kit
16 Troubleshoong
17 ListofMainPartsofHighPressureWasher
18. WarrantyCard-TermsandCondions.
19 ProductInstallaonandRegistraon
FF-MM-391-REV - 01
Page 3
Operation and Maintenance Guide High Pressure Washer Series
Following symbols are used throughout this manual.
Warning: If not followed could cause personal injuries
Caution: If not followed could result in damage to High Pressure Washer.
Operating and Safety Instructions
Warning
is manual must be read and
the operating instructions carefully followed,
because of the high pressure developed, severe
injuries can be caused by negligent operation
Warning
Use only for high pressure cleaning, do not use for any
other application
Caution
Do not run the high pressure washer without a
proper and adequate supply of water connected.
Insucient water supply will cause damage to
the seals in a few minutes of use.
Warning
Safety and protective clothing, eyewear, headgear, ear pro-
tection, gloves and footwear to be worn during operation
of this High Pressure Washer. Please see Table C at end of
this section.
Warning
Completely turn o the High Pressure Washer
and disconnect water supply line before attemp-
ting any service. Read Assembly and Disassemb-
ly instructions.
Caution
Source of power must contain ELCB (Earth leakage Cir-
cuit Breaker) to be present from where the power is to be
taken
IMPANo. 590857 590852 590853-Old 590854-Old
ModelNo. EW1103P - 110V EW1103P - 220V EW1106P-220V EW1106P-440V
PowerSupply Single Phase, 110V,
60 Hz
Single Phase, 2200V,
60 Hz
ree Phase, 220V,
60 Hz
ree Phase, 440V,
60 Hz
PoweConsumption 3 HP (2.2 KW) 3 HP (2.2 KW) 6 HP (4.4 KW) 6 HP (4 KW)
WorkingPressure 110 Bar 110 Bar 110 Bar 110 Bar
FlowCapacity 11.7 ltr/min 11.7 ltr/min 11.7 ltr/min 11.7 ltr/min
PumpNumber Pe200 Pe200 Pe200 Pe200
OverallDimensions 97 x 51 x 76 cm 97 x 51 x 76 cm 97 x 51 x 76 cm 97 x 51 x 76 cm
Weight 50 Kgs 50 Kgs 53 Kgs 53 Kgs
Technical Data
IMPANo. 590853 590854 590855 590856
ModelNo. EW1706P-220V EW1706P-440V EW200P-220V EW200P-4400V
PowerSupply ree Phase, 220V,
60 Hz
ree Phase, 440V,
60 Hz
ree Phase, 220V,
60 Hz
ree Phase, 440V,
60 Hz
PoweConsumption 6 HP (4.4 KW) 6 HP (4.4 KW) 7.5 HP (5.5 KW) 7.5 HP (5.5 KW)
WorkingPressure 170 Bar 170 Bar 200 Bar 200 Bar
FlowCapacity 15.2 ltr/min 15.2 ltr/min 16.5 ltr/min 16.5 ltr/min
PumpNumber Pe250 Pe250 Pe250 Pe250
OverallDimensions 97 x 51 x 76 cm 97 x 51 x 76 cm 107 x 61 x 84 cm 107 x 61 x 84 cm
Weight 60 Kgs 60 Kgs 74 Kgs 74 Kgs

FF-MM-391-REV - 01
Page 4
Operation and Maintenance Guide High Pressure Washer Series
Safety wear mandatory while operating high pressure washer
Eye and face and ear protection must be worn at all
times during operation of the High Pressure Washer.
ere is a chance of ying debris from the jobsite
and the quality of wear should be such to protect
against such ying debris such as akes of the re-
moved layer.
Suitable heavy duty gloves must be worn at all times
during operation.
Eye and face and ear protection must be worn at
all times during operation of the High Pressure
Washer. ere is a chance of ying debris from
the jobsite and the quality of wear should be
such to protect against such ying debris such as
akes of the removed layer.
Suitable heavy duty gloves must be worn at all
times during operation.
Warning.
Operators under 18 not allowed to operate this High
Pressure Washer. Operators must be made familiar with
the instructions in this manual before attempting to
operate the High Pressure Washer. Ensure that job site
is clear of bystanders. e high pressure jets are capable
of causing serious injury do not direct spray on people
or animals. Do not spray electried equipment.
Warning
While starting operation and also during operati-
on there is a considerable kickback force from the
lance due to the high energy generated, be aware
of this at all times and keep a rm control on the
direction of the spray jet. Always use both hands
to operate the gun
Caution
Use only genuine Teryair or Teryair approved
accessories
Warning
is High Pressure Washer is not designed for use
in an explosive environment
Warning
Medical attention
Personnel who sustain injuries caused by high pressure
jets MUST be given immediate hospital attention. It‘s
important to apprise the medical attendants of the
manner in which the injury has been caused, namely a
high pressure jet.
Caution
Keep the gun trigger locked when not operating.
Warning
Completely turn o the High Pressure Washer and dis-
connect water supply line before attempting any ser-
vice. Read Assembly and Disassembly instructions.
Caution
Source of power must contain ELCB (Earth leaka-
ge Circuit Breaker) to be present from where the
power is to be taken

FF-MM-391-REV - 01
Page 5
Operation and Maintenance Guide High Pressure Washer Series
Intended and Prohibitive use
Intended use
Biological growth from concrete or steel constructions
Hard caked mud from construction machinery like dozer tracks.
Paint, dirt, mud from walls and oors
Oil and grease from High Pressure Washer.
Dirt, paint from sea going vessels.
Prohibitive use
Any use in an explosive atmosphere is prohibited
Use on materials containing asbestos is prohibited
Use by an underage, untrained or operator who is under the inuence of drugs or alcohol.
Use with non genuine spare parts or accessories is prohibited
Use with safety devices un functional or in need of service is prohibited
Do not use with hot water, this High Pressure Washer is for use with cold water.
FF-MM-391-REV - 01
Page 6
Operation and Maintenance Guide High Pressure Washer Series
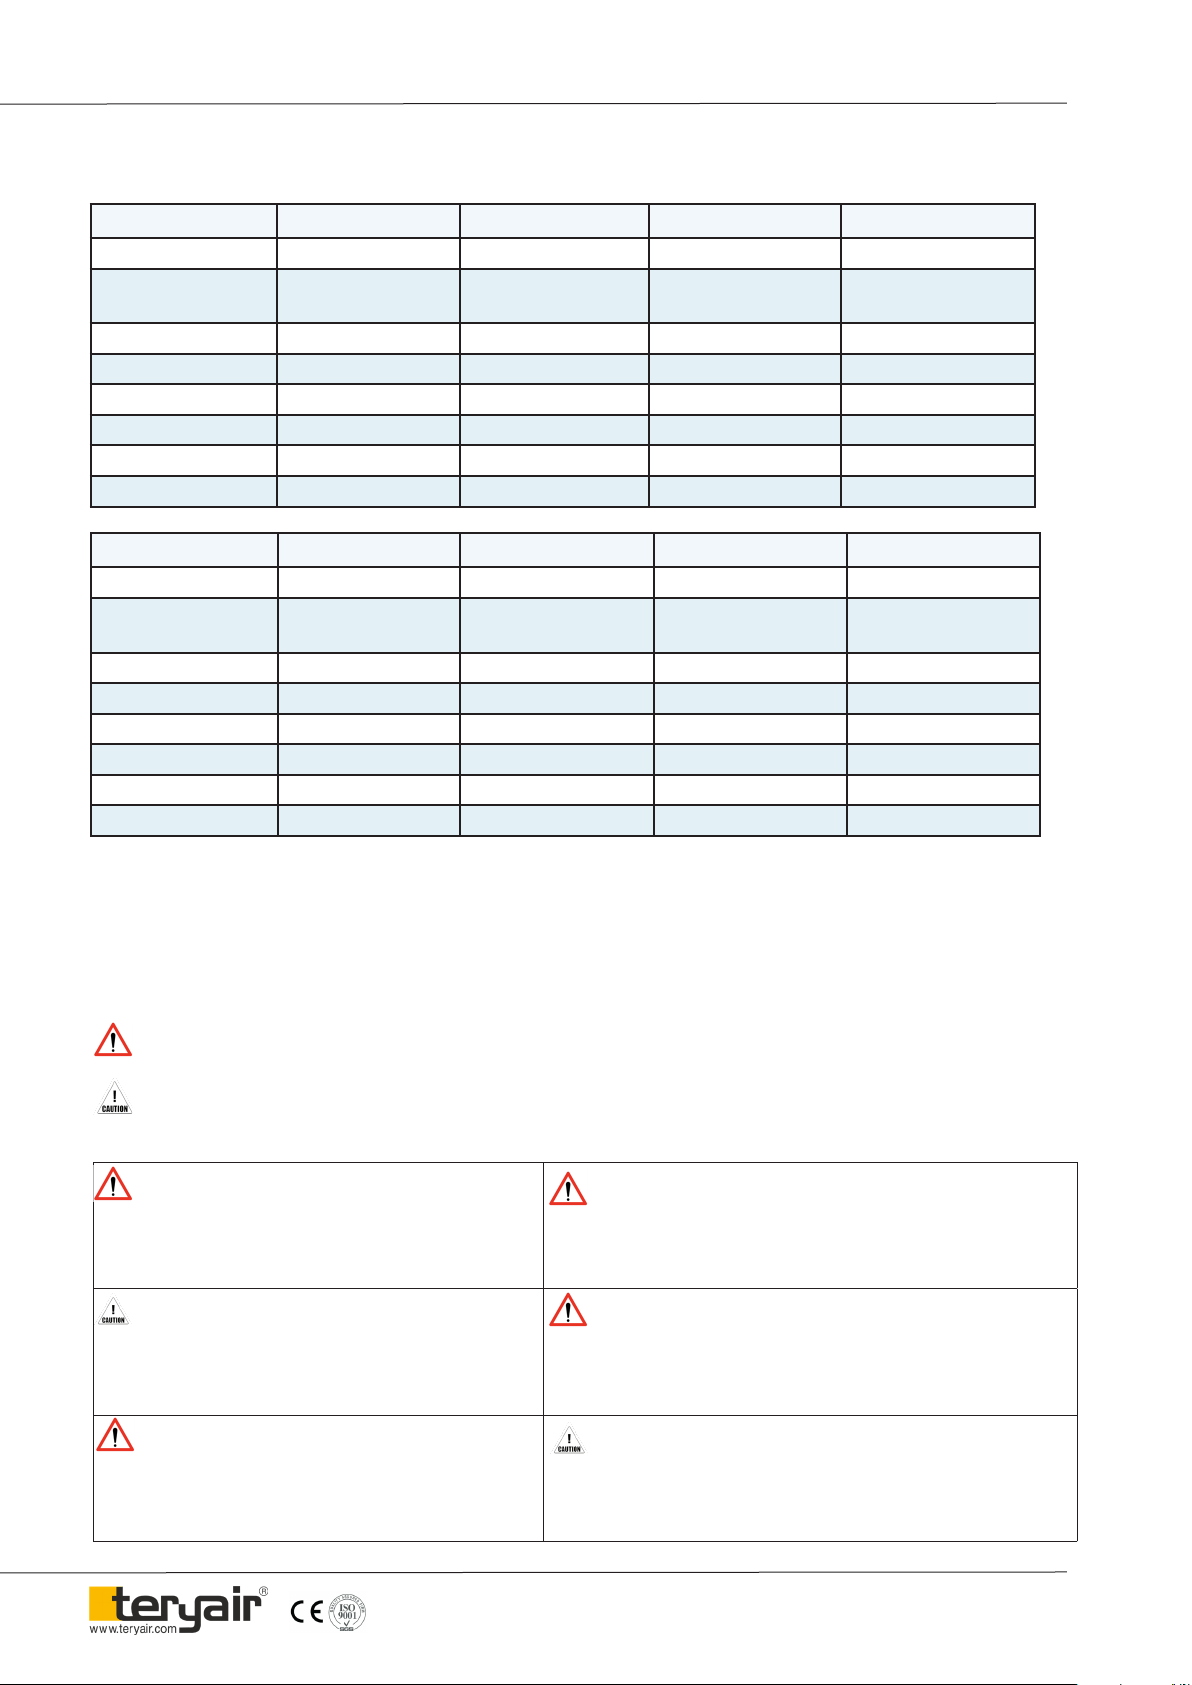
Un Packing
Identify all the components as shown earlier, contact your supplier if any parts are missing or dam-
aged.
Be aware that minor visual dierences may be noticed between actual motor/frame/pump and High
pressure hoses because this components vary depending on the model ordered. is illustration is for
identication only.
Unless specially requested the motor, pump and frame are factory tted to each other.
Product Main Components and Description
Sr. No Description Quantity Instructions & Remark
1Gun 1 no -
2Lance 1 no -
3 Handle with Nozzle Sets & MCB NO/OFF switch 1 Set -
4 Trolley with Motor and H.P. Pump 1 Set -
5 Suction Pipe with Strainer 1 Set -
6 Chemical suction pipe with Strainer 1 Set -
7 High Pressure Hose Complete with end ttings 1 Set -
8 Breathing Cap 1 Set User has to remove Oil plug and replce with breathing Cap is
MUST.
9 Holding Bracket with Fasteners 1 Set -
10 Spanner and Screwdriver Set 1 Set -
FF-MM-391-REV - 01
Page 7
Operation and Maintenance Guide High Pressure Washer Series
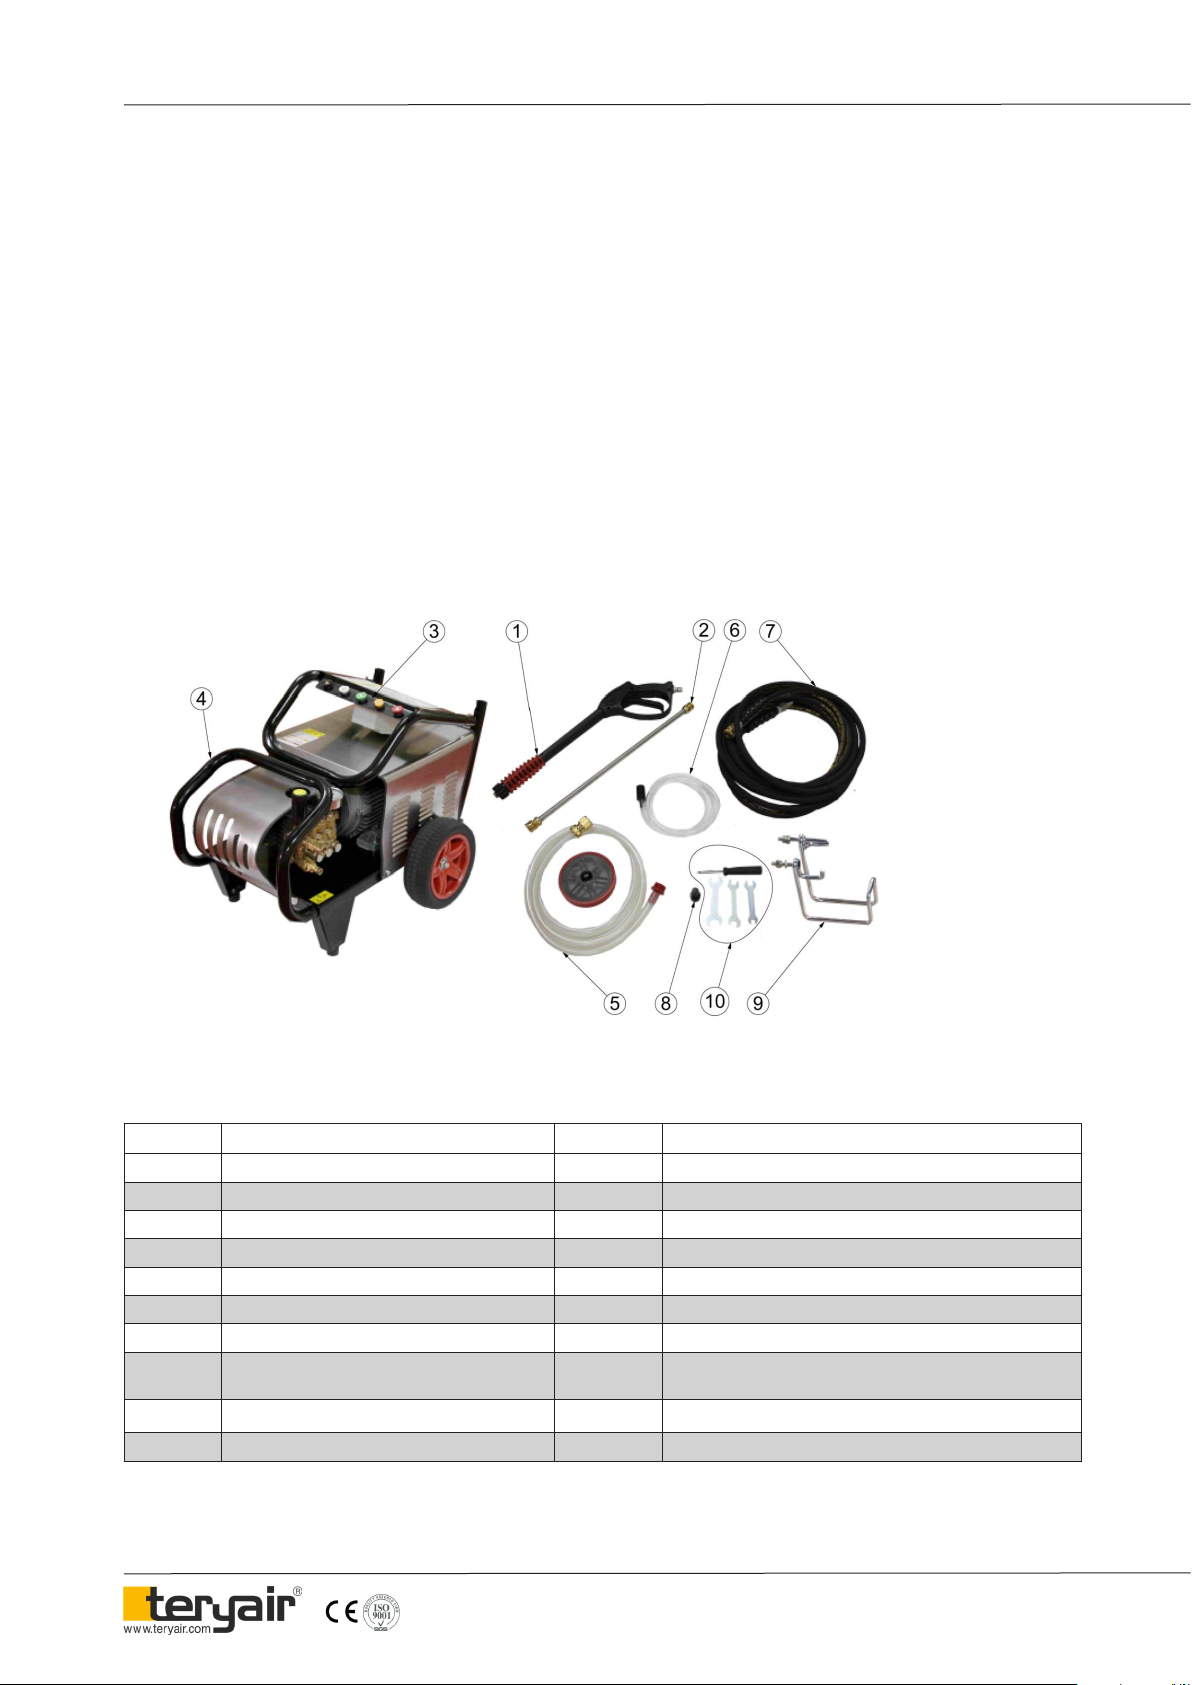
5. Connect high pressure hose to gun
6. Connect other end of high pressure hose to
upper connector on pump as shown
7. Connect the water inlet hose to the lower
connector on pump.
11. Connect the spray tip to the gun lance
Caution
12. Always engage trigger lock on gun before
connecting/changing spray tip. Pull back
collar and remove existing spray tip if any.
Insert desired spray tip and click back collar.
13. Connect the electric motor cable (see table D
for correct motor number)
14. Check that the electrical voltage and
frequency are consistent with what is
mentioned on the electric motor nameplate.
15. e motor must be grounded properly.
16. Please ensure that the necessary thermal
overload protection and short circuit
protection has been installed prior to the
starting of the high pressure washer.
17. Place the High Pressure Washer on a
level ground and ll up the pump oil
level to ½ the sight glass.
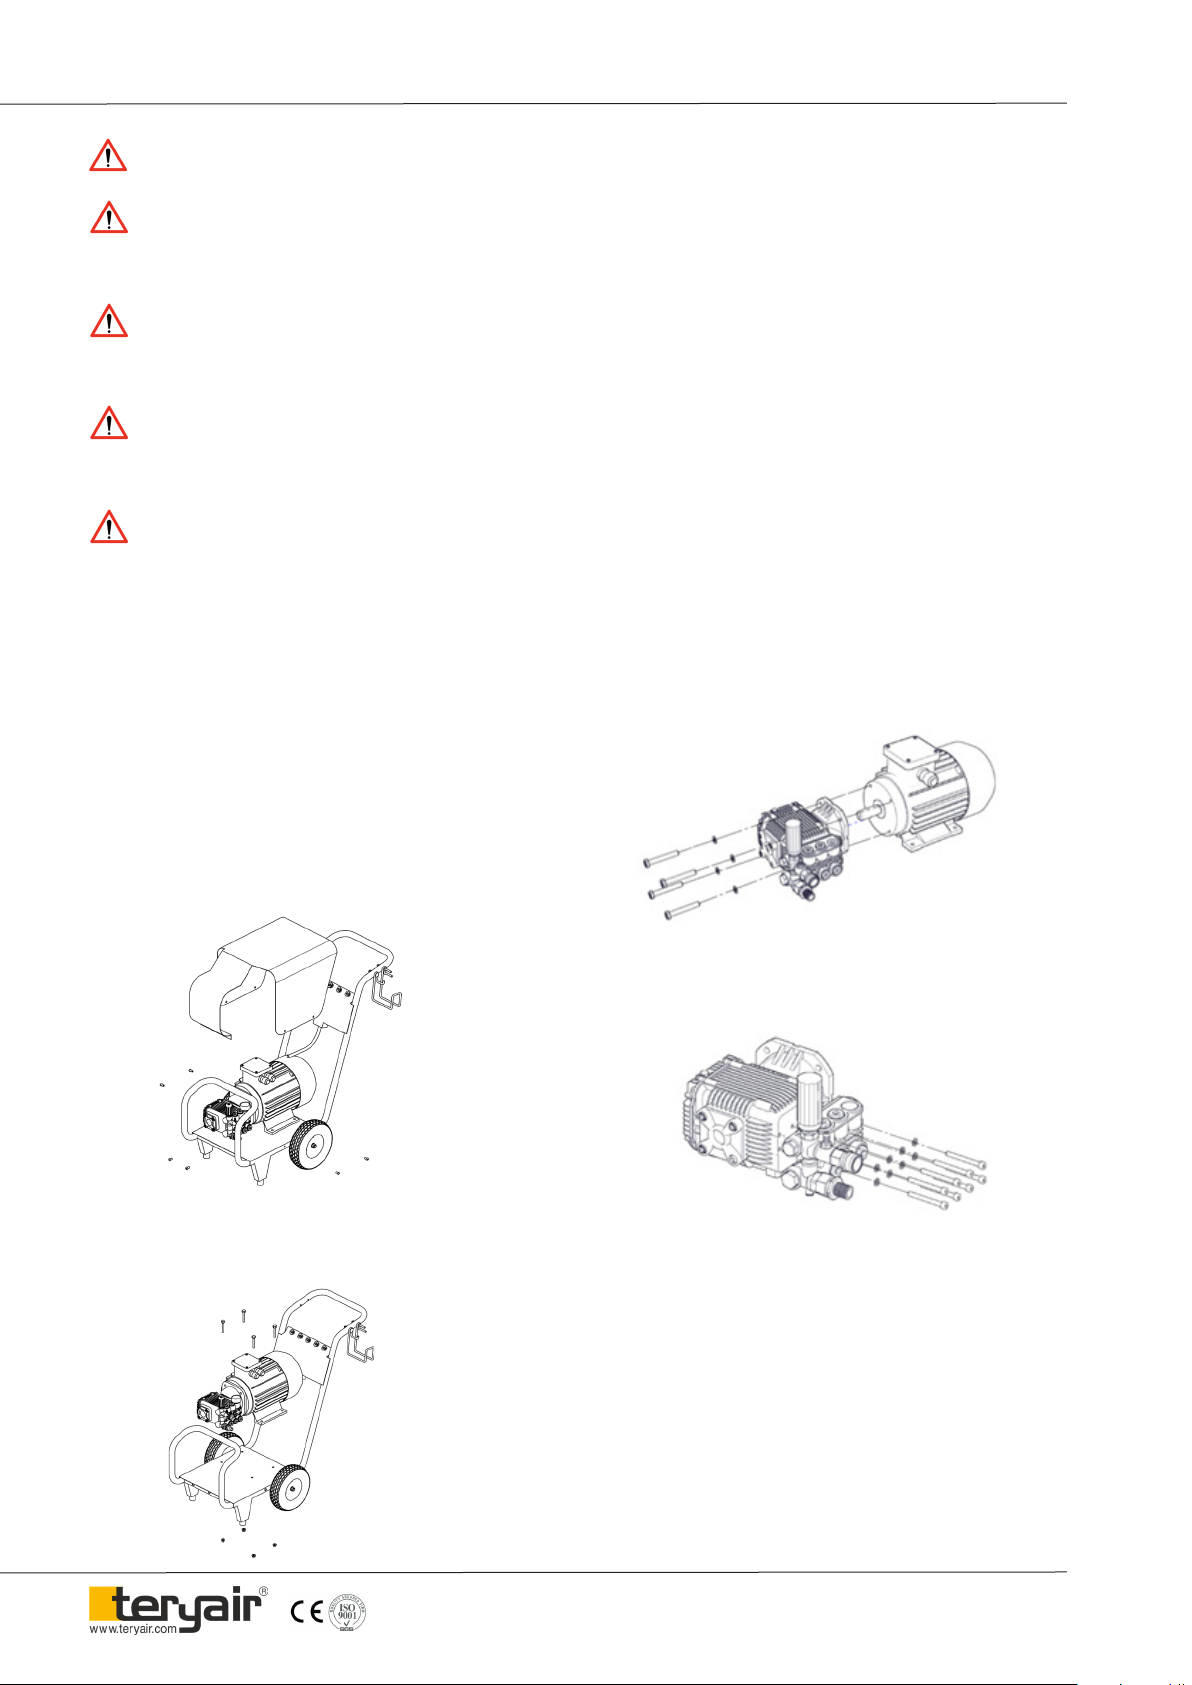
Assembly & Diassembly
1. e motor and the pump are factory tted to the
Trolley
2. Connect the Handle to the frame
3. Connect the hoses to the Pump (see table A for
correct High Pressure hose) ( see table A for
correct Pump Number)
4. Connect gun to lance
8. Connect other end of water inlet hose to a
water supply source.
Caution
9. Water supply source must provide a
minimum of 20 litres/min ow at least 20
psi of pressure. Insucient water supply can
damage the pump pre maturely.
10. Attach the gun hook to frame

FF-MM-391-REV - 01
Page 8
Operation and Maintenance Guide High Pressure Washer Series
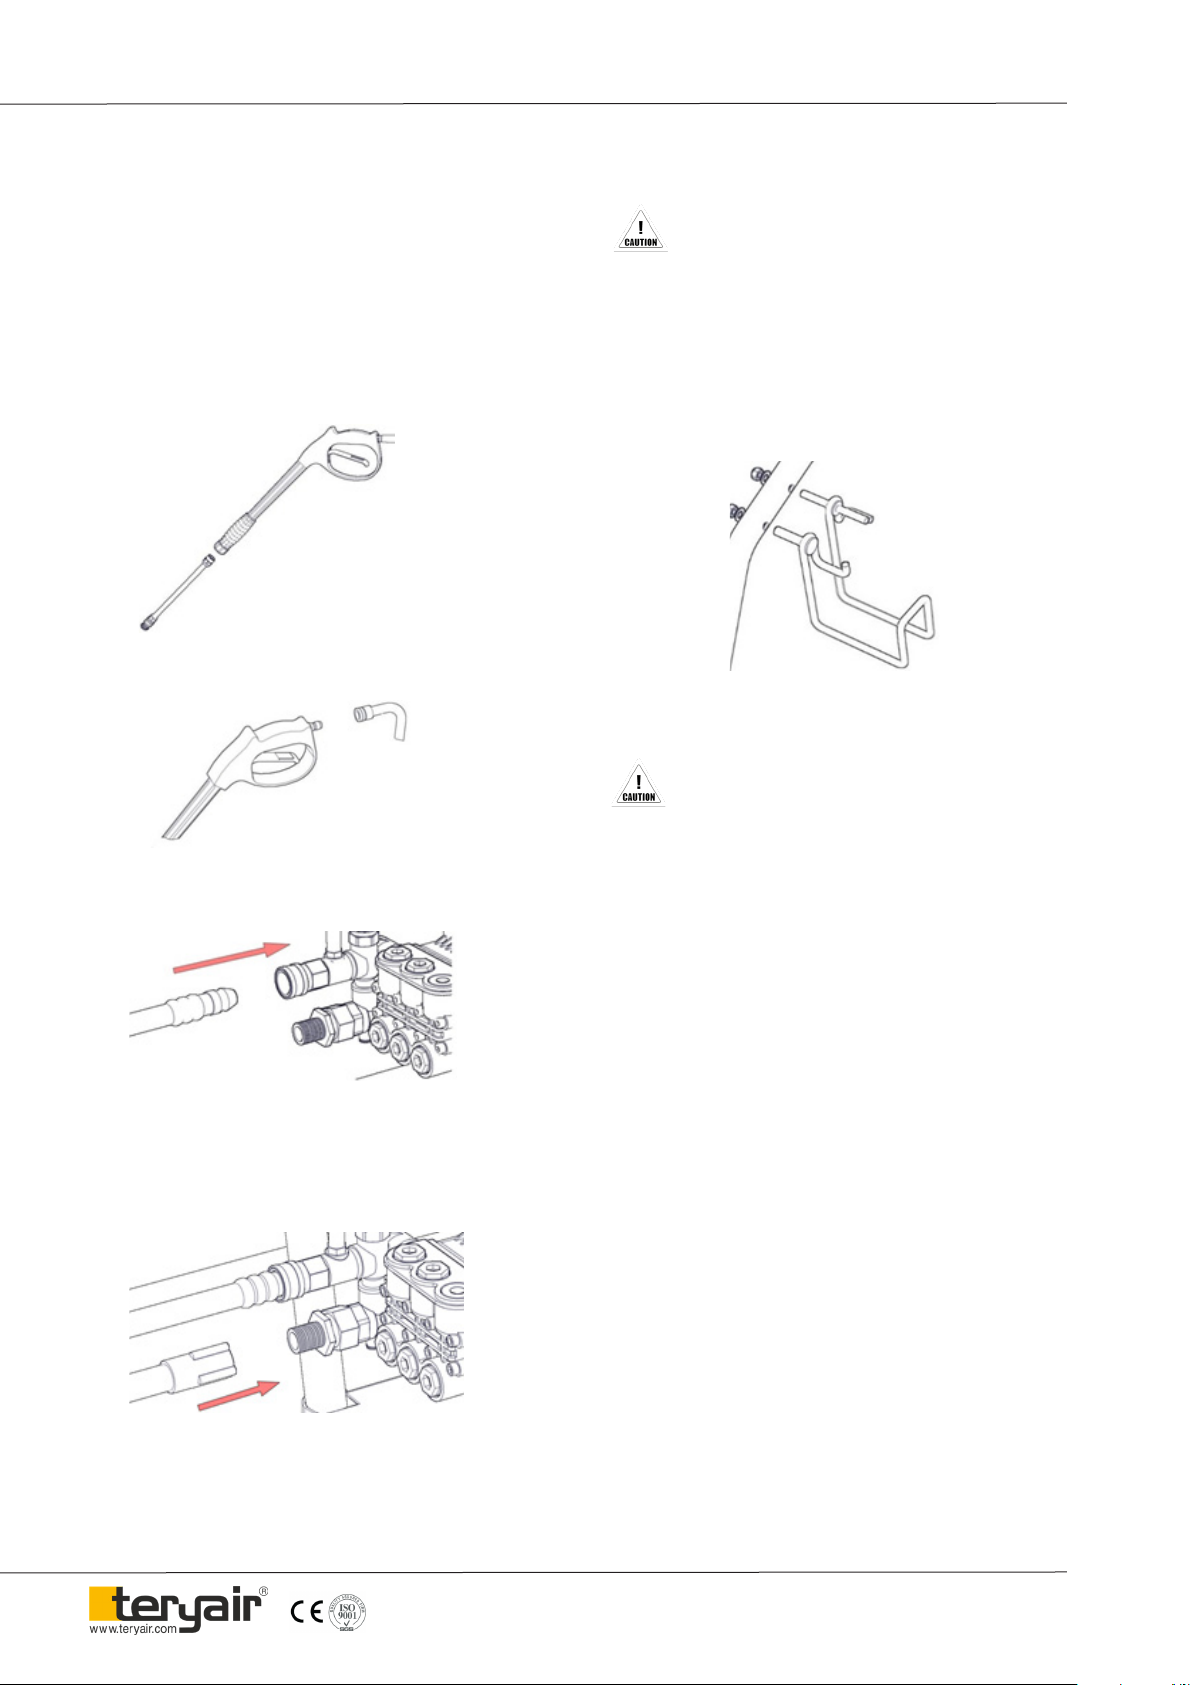
Fill lubricating oil
Make Sure that the tted oil plug is removed. Fill lubricating oil 10W15 up to half way mark of Oil
Indicating Glass window.
And Fit Breathing cap provided with pump. Do not t Oil Plug.
Caution – a) If oil plug tted aer lling oil instead of breathing cap- Pump will over heat during use
and will damage all internal parts of pump and machine will stop working / developing pressure.
b) If oil is lled fully in pump up to top / maximum level of Oil indicating window, there will be no
space for breathing of oil during use and pump will be over heated which will damage pump internal
parts.
Ok Level
Make Sure to ll Oil in the pump as shown below befor start.
Plug (Red Colour) For Transportation
Purpose Only To Replace With
Breathing Cap (Shown As Above)
Breathing Cap
Excess Oil Level Low Oil Level

FF-MM-391-REV - 01
Page 9
Operation and Maintenance Guide High Pressure Washer Series
18. Types of nozzle provided as shown & can be
use according to user requierment.
Spray Tip detail
Electric motor connection detail
FF-MM-391-REV - 01
Page 10
Operation and Maintenance Guide High Pressure Washer Series
Safety checks before and after operating the High Pressure Washer
Lubrication.
• e oil sump in the Pump unit should contain
SAE15W40 / 10W15 grade oil.
• Ensure that the oil is at the half level by looking at the
transparent window.
• If the number of hours has crossed y, drain out the
oil by opening the Oil drain plug at the end of the pump
housing. Re x the plug and open theBreathing oil cap to
top up oil to the correct level (Refer g on page 11). ereaf-
ter repeat aer every 500 hours of use or whenever the level
of oil has dropped or looks contaminated.
Check list before starting the High Pressure
Washer
• Check safety wear mentioned earlier in warnings.
• Check the hoses, especially the high pressure hoses for
damage or leaks.
• Make sure that the electrical supply voltage and
frequency match the motor. Refer electrical connection
detail on page 5 for termination.
• Make sure that the High Pressure Washer is grounded
properly
• Make sure that the electrical cables are not damaged and
all the connectors between gun, lance, hoses and pump
are secure.
• Make sure that the lter cone on the water supply in place
• Turn on the water supply.
Changing spray nozzle tips
• Choose appropriate nozzle.
• Engage the trigger lock
• Pull back the collar
• Remove spray tip
• Install desired tip,
• Release collar
• Tug on tip to ensure proper seat
Cleaning solution injection
• All Teryair high pressure washers have a facility of
injection of Cleaning Fluids to aid in the cleaning
process. ere are several brands & types of cleaning
solutions available in the market today. Whichever you
choose make sure it designed for use in high pressure
washer. It should say so on the level, if it does not say it,
don’t use it.
Warning: Never use bleach or bleach based products
as they can damage the pump.
• Once you have your cleaning solution is ready to go,
check to make sure that injector tube is securely attached
to the pump as shown.
Starting the High Pressure Washer
• Hold the gun securely with both hands, ( the gun will kick
back when rst started )
• Switch on the electricity, and depress trigger of the gun to
start the jetting.
• Adjust the output pressure as required by the pressure
regulator.
• en insert the other end into the cleaning
solution.
• A pressure washer will only siphon cleaning
solution when in low pressure mode. So a low
pressure soap nozzle must be use on the gun +
lance ( Refer Spray tip detail on page 5).
Caution
• Aer cleaning Fluid application it is
recommended to disconnect the injection
system to allow clean water to rinse through
the system for few minutes.
Bypass mode-In bypass mode, the pump
reticulates the water because the trigger of the spray gun
is not being pulled. If unit is le in bypass mode For more
than two minutes, the water temperature will rise to a
dangerous Level and could damage internal components
of the pump.
Note- Any damage to pump due to these causes will not
be covered under Warranty.
FF-MM-391-REV - 01
Page 11
Operation and Maintenance Guide High Pressure Washer Series
Warning keep distance from gun tip to job at least 8
inches.
Warning: is high pressure washer is a high powered
High Pressure Washer and it is imperative that it must
be operated by a competent and trained operator. See
warnings
Warning: is high pressure washer is a high powered
High Pressure Washer and it is imperative that it must
be operated by a competent and trained operator. See
warnings
Warning: e high pressure washer needs a constant
supply of water during operation, any starvation of
water to the High Pressure Washer will result in
overheating and quick damage to High Pressure Washer.
Warning: With the motor running and the jetting o,
the high pressure water circulates in the circuit. DO
NOT pause jetting for more than TWO minutes.
Instead shut down the high pressure washer see
“Shutting down” later in this section.
Shutting down
• DO NOT turn o water source before switching o the
motor.
• Switch o motor or remove the plug from mains.
• Turn o the water source.
• Pull the lance trigger to relieve any residual water pressure
Storage
• Disconnect the gun from the high pressure hose and the
hose from the pump.
• Hold gun vertically and depress trigger to remove all
residual water from the gun and lance.
• Drain the hose too in a similar way.
• Remove the water supply hose and drain.
• Run the pump for ten seconds to eject any residual water
that may have remained in.
• Store in a clean and dry place.
Servicing the Pump
Follow instructions in “Shutting Down” section earlier in the
manual.
Dis assemble the hoses and the electrical cable from the High
Pressure Washer.
Dis assemble the cover from the trolley by opening the six
screws as shown below.
Maintenance
Dis assemble the pump from the motor.
Dis assemble the un pump housing valve assembly
from the pump. (refer exploded view page)
Proceed to disassemble the Pump and pump
Remove bolts (13) to dismantle pump housing (10)
valve from the pump.
Dis assemble the motor and pump from the trolley
by opening the bolts and nuts as shown below

FF-MM-391-REV - 01
Page 12
Operation and Maintenance Guide High Pressure Washer Series
Dis-Assembly insrtructions for High Pre. Washer
1. Remove the Plugs (14) & take out vale kits (15). ere
are total 6 plugs & 6 valve kits (3nos on front side &
3nos on top side of pump housing. Now observe it for
wear and tear (if found replace it with new one)
2. Remove the Bolts & washers (13 & 12) to dis assem-
ble pump hsg. from body (1) to Remove the Seal kits
(17) from the Pump Hsg.(10). ere are total 3 sets of
seal kit for 3 pistons & observe it for wear and tear (if
found replace it with new one).
3. Using spanner open the QC tting with chemical
injector (11).
4. Open the unloader valve assembly (22) by opening it’s
side Bolt using spanner.
5. Pull out unloader valve cap (16) from the unloader
valve assembly(22).
6. Open the inlet assly. (23) by opening it’s side Bolt
using spanner.
7. Open inlet adaptor (25) using spanner from inlet assem-
bly (23) & remove inlet Strainer (24). Observe strainer
for chock up (If chock up found it can be cleaned manu-
ally or replace it with new one).
8. Open the inlet nipple (26) using spanner from inlet adap
tor (25).
9. 9. Before further proceeding for any further assembly,
Open the Drain plug (5) and drain the Oil from the
Pump Body(1).
10. Open Screws (18) and remove the Oil seal (19), Flange
(20) and O-ring (21). Observe it for wear and tear or
leakages (if found replace it with new one).
11. Open Screws (7) and remove the Side Cover (20) and
O-ring (21), Observe it for wear and tear or leakages (if
found replace it with new one).
12. Open Screws (6) to remove End cover (4) and end cover
O-ring (3), Observe it for wear and tear or leakages (if
found replace it with new one).

FF-MM-391-REV - 01
Page 13
Operation and Maintenance Guide High Pressure Washer Series
Exploded View pf High Pr. Pump 110 Bar
Bill Of Material High Pressure Pump - EW110 Bar
Illu. No. Description Qty.
1 Pump Body 1
2 PLUG (RED) with O-Ring 1
3 O- Ring for End Cover 1
4 End Cover 1
5 Drain Plug 1
6 Bolt for End Cover 4
7 Bolt for Said Cover 4
8 Said Cover 1
9 O-Ring Said Cover 1
10 Pump Housing (Brass) 110Bar 1
11 QC with Chemical Injector 1
12 Washer For Pump Hsg. 8
13 Bolt For Pump Hsg. 8
14 Plug with O-Ring for Pump Hsg. 6
15 Valve With O-Ring 6
Illu. No. Description Qty.
16 Cap For Pressure Regulator 1
17 Seal Kit (Set of 5 pcs) 3
18 Bolt For Flange 4
19 Oil Seal For Flange 1
20 Flange 1
21 O-Ring For Flange 1

FF-MM-391-REV - 01
Page 14
Operation and Maintenance Guide High Pressure Washer Series
Exploded View pf High Pr. Pump 170 Bar / 200 Bar
Bill Of Material High Pressure Pump - EW170 Bar / EW200 Bar
Illu. No. Description Qty.
1 Pump Body 1
2 PLUG (RED) with O-Ring 1
3 O- Ring for End Cover 1
4 End Cover 1
5 Drain Plug 1
6 Bolt for End Cover 4
7 Bolt for Said Cover 4
8 Said Cover 1
9 O-Ring Said Cover 1
10 Pump Housing (Brass) 170 Bar / 200 Bar 1
11 QC with Chemical Injector 1
12 Washer For Pump Hsg. 8
13 Bolt For Pump Hsg. 8
14 Plug with O-Ring for Pump Hsg. 6
Illu. No. Description Qty.
15 Valve With O-Ring 6
16 Cap For Pressure Regulator 1
17 Seal Kit (Set of 5 pcs) 3
18 Bolt For Flange 4
19 Oil Seal For Flange 1
20 Flange 1
21 O-Ring For Flange 1
22 Unloader Valve Assy 1
23 Inlet Assy 1
24 Inlet Strainer 1
25 Inlet Adopter 1
26 Inlet Nipple 1

FF-MM-391-REV - 01
Page 15
Operation and Maintenance Guide High Pressure Washer Series
Repair Kit
Description Images EW110 Bar EW170 Bar /
EW200 Bar Qty / Assembly
Seal
Replacement Kit 644 97 02 642 97 42 x 3 Sets
Valv e
Replacement Kit 644 97 03 642 97 43 x 6 Sets
FF-MM-391-REV - 01
Page 16
Operation and Maintenance Guide High Pressure Washer Series
Troubleshooting
Serial No Causes Remedial Action
1e motor does not turn aer energizing A loose connection
Check connections and retry
2e motor hums but does not turn
Low voltage
Check voltage and verify correct and re try
Pump is stuck
Service Pump see Maintenance section
3Pump is noisy
Pump is sucking air along with water
Check hose ttings
Valves are tight
Service pump
Bearings worn
Service Pump
4 Low pressure when new
Water supply not adequate
20 litres per min at 20 PSI recommended
Leak in high pressure hose tting
Check use sealant tape if needed.
Nozzle obstructed
Clean Nozzles, see maintenance section
Water lter is clogged
Clean and ensure clean supply
Defective un loader valve
Service Pump
Air in hose
Switch o motor, disconnect water hose from pump inlet
and allow water to ow removing air bubbles, reconnect.
5Cleaning solution not getting sucked
Cleaning solution lter clogged
Clean or replace
Wrong Cleaning uids
See section
Cleaning solution residue clogging the pump
Service pump
6Low pressure aer normal use Pump needs service
Service Pump
7Water leaking at Gun Check hose ttings
Use sealant tape or replace ttings
8Water leaking at Pump
Check ttings
Use sealant tape or replace ttings
If not solved
Service Pump
9Oil Leaking at Pump Seals or O rings worn
Service Pump
10 Pump pulsates Clogged nozzle
Clear nozzle

FF-MM-391-REV - 01
Page 17
Operation and Maintenance Guide High Pressure Washer Series
Illustration
Number EW1103-110V EW-1103-220V EW-1106-220V EW-1106-440V
59.08.57 59.08.52 59.08.53-OLD 59.08.54-OLD
1 500mm lance 500mm lance 500mm lance 500mm lance
2 2.2kW-110V-1ph 2.2kW-220V-1ph 2.2kW-220V-3ph 2.2kW-440V-3ph
3 Pe200 Pe200 Pe200 Pe200
4 F1 F1 F1 F1
5 Standard Nozzle Set Standard Nozzle Set Standard Nozzle Set Standard Nozzle Set
67mm ID X 10mtr Plastic
Hose
7mm ID X 10mtr Plastic
Hose
7mm ID X 10mtr Plastic
Hose
7mm ID X 10mtr Plastic
Hose
7 6.5mmID X 1.5mtr 6.5mmID X 1.5mtr 6.5mmID X 1.5mtr 6.5mmID X 1.5mtr
8 15mmID X 3mtr 15mmID X 3mtr 15mmID X 3mtr 15mmID X 3mtr
9Cover Cover Cover Cover
10 MCB - ON/OFF Switch MCB - ON/OFF Switch MCB - ON/OFF Switch MCB - ON/OFF Switch
Illustration
Number EW-1706-220V EW-1706-440V EW-200-220V EW 200- 440V
59.08.53 59.08.54 59.08.55 59.08.56
1 500mm lance 500mm lance 500mm lance 500mm lance
2 4.4kW-220V-3ph 4.4kW-440V-3ph 5.5kW-220V-3ph 5.5kW-440V-3ph
3 Pe250 Pe250 Pe250 Pe250
4 F3 F3 F3 F3
5 Standard Nozzle Set Standard Nozzle Set Standard Nozzle Set Standard Nozzle Set
68mmID X 10 Mtr Steel
Braided hose
8mmID x 10 Mtr Steel
Braided hose
8mmID x 10 Mtr Steel
Braided hose
8mmID x 10 Mtr Steel
Braided hose
7 6.5mmID X 1.5mtr 6.5mmID X 1.5mtr 6.5mmID X 1.5mtr 6.5mmID X 1.5mtr
8 15mmID X 3mtr 15mmID X 3mtr 15mmID X 3mtr 15mmID X 3mtr
9Cover Cover Cover Cover
10 MCB - ON/OFF Switch MCB - ON/OFF Switch MCB - ON/OFF Switch MCB - ON/OFF Switch
List of Main Parts of High Pressure Washer
FF-MM-391-REV - 01
Page 18
Operation and Maintenance Guide High Pressure Washer Series

FF-MM-391-REV - 01
Page 19
Operation and Maintenance Guide High Pressure Washer Series
User requested to ll this warranty card aer installation of product for its intended use.
Product Installation and Registration
Note :- User is requested to email this duly lled and signed product registration to our
company email – service@teryair.com, within 3 days from the date of Installation and start
of use, along with proof of purchase scan copy. In absence of this receipt. Warrenty start date
will be assumed as date of rst sales from factory.
Product Model No :--
Product Sr. No :--
Date of Installation for use - :-
Customer Name / company Seal -
With Address.
Contact Person Name & Contact Details:-
Signature of Customer / User
Authorized Personnel :-

FF-MM-391-REV - 01
Page 20
Operation and Maintenance Guide High Pressure Washer Series
is page is intentionally
Le blank.
This manual suits for next models
7
Table of contents


 Owner's instructions")


