Tesla M7 3G User manual

USER MANUAL
TABLET M7 3G


3
ENG
Important Notice
1. Before using your tablet, please read all the information provided in
this user manual so that you can use this product safely and correctly.
2. Our company reserves the copyright of this manual, any duplication
or interpretation of the full or partial manual for commercial activities is
forbidden.
3. The content provided in this manual is based on the latest available
information. The products are subject to change without notice. Our
company assumes no responsibility for any errors or incidences
caused by the misinterpretation of the manual. For additional product
information, visit our company’s website.
4. Our company assumes no responsibility for personal data loss,
damage and other indirect damage caused by misuse of software
and hardware, product repairs performed by unauthorized personnel,
battery replacement or other accidents.
Thank you for purchasing Tesla Tablet!

4
ENG
This manual includes important information on safety precautions and
proper use of this product. To prevent accidents, please make sure that you
have read this manual carefully before using the product.
•Do not expose the tablet to extremely low or high temperatures (40ºC) or
to any environment where the air is too cold, too hot, too humid or has too
much dust. Keep Tesla Tablet out of direct sunlight.
•Do not drop, bend, puncture, insert foreign objects or place heavy objects
on your tablet as sensitive components inside the device may become
damaged. Do not shake the TFT display as it may become damaged and
unable to play correctly.
•When using headphones, do not keep the volume on high as this may lead
to permanent hearing damage.
•Do not turn off the device or unplug it from the PC during software updates
or during the uploading and downloading process as this may lead to data
loss or program error.
•Our company will not be responsible for data loss due to intentional or
accidental damage caused to the device, maintenance, or other reasons.
•Do not clean the tablet with detergent or any cleaning product containing
chemicals or other liquids in general to avoid causing damage and
corrosion. If cleaning is necessary, use a dry cloth or paper towel.
•Please do not use this device at gas stations, near fuels or chemicals or in
the vicinity of explosive operation places. Do not use the tablet in places
where they are not allowed to be used, such as airplanes.
•Do not use this product while driving or operating any type of vehicle. In
many countries, this is considered illegal and can result in fines and even
imprisonment. If you are using the tablet while outside, pay attention to
your environment, especially while crossing the street.
•The product is not waterproof. Do not immerse your tablet in water or
leave it in a location where it can get saturated with water or other liquids.
In case water or other liquids come into contact with the device, shut it off
immediately and do not turn it back on until it dries out completely.
Our company reserves the right to make any improvements and upgrades
to this product. No further notice will be provided about any variations of the
specifications and design of this product.
Precautions

5
ENG
•7 inch HD TFT capacitive screen, 1280x800
•Supports a built-in 0.3MP front camera and 2MP rear camera (optional);
•Supports microphone recording function.
•Supports USB mouse, keyboard, bluetooth headset, USB peripherals.
•Supports the OTG function, support U-disc, portable hard disc by OTG to
transfer data. (While connecting to a portable hard disc, DC power must
be connected to the supply power of the product; otherwise the tablet will
crash due to insufficient power supply)
•Multiple network access to the Internet. WiFi enables you to enjoy the
Internet anywhere, anytime.
•Gravity sensor (G-sensor). In addition to toggling between portrait (veritical)
and landscape (horizontal) screen layout, you can also install additional
software to extend this function.
•With Google Android intelligent operating system and multiple software
extension functions, you can personalize your application space
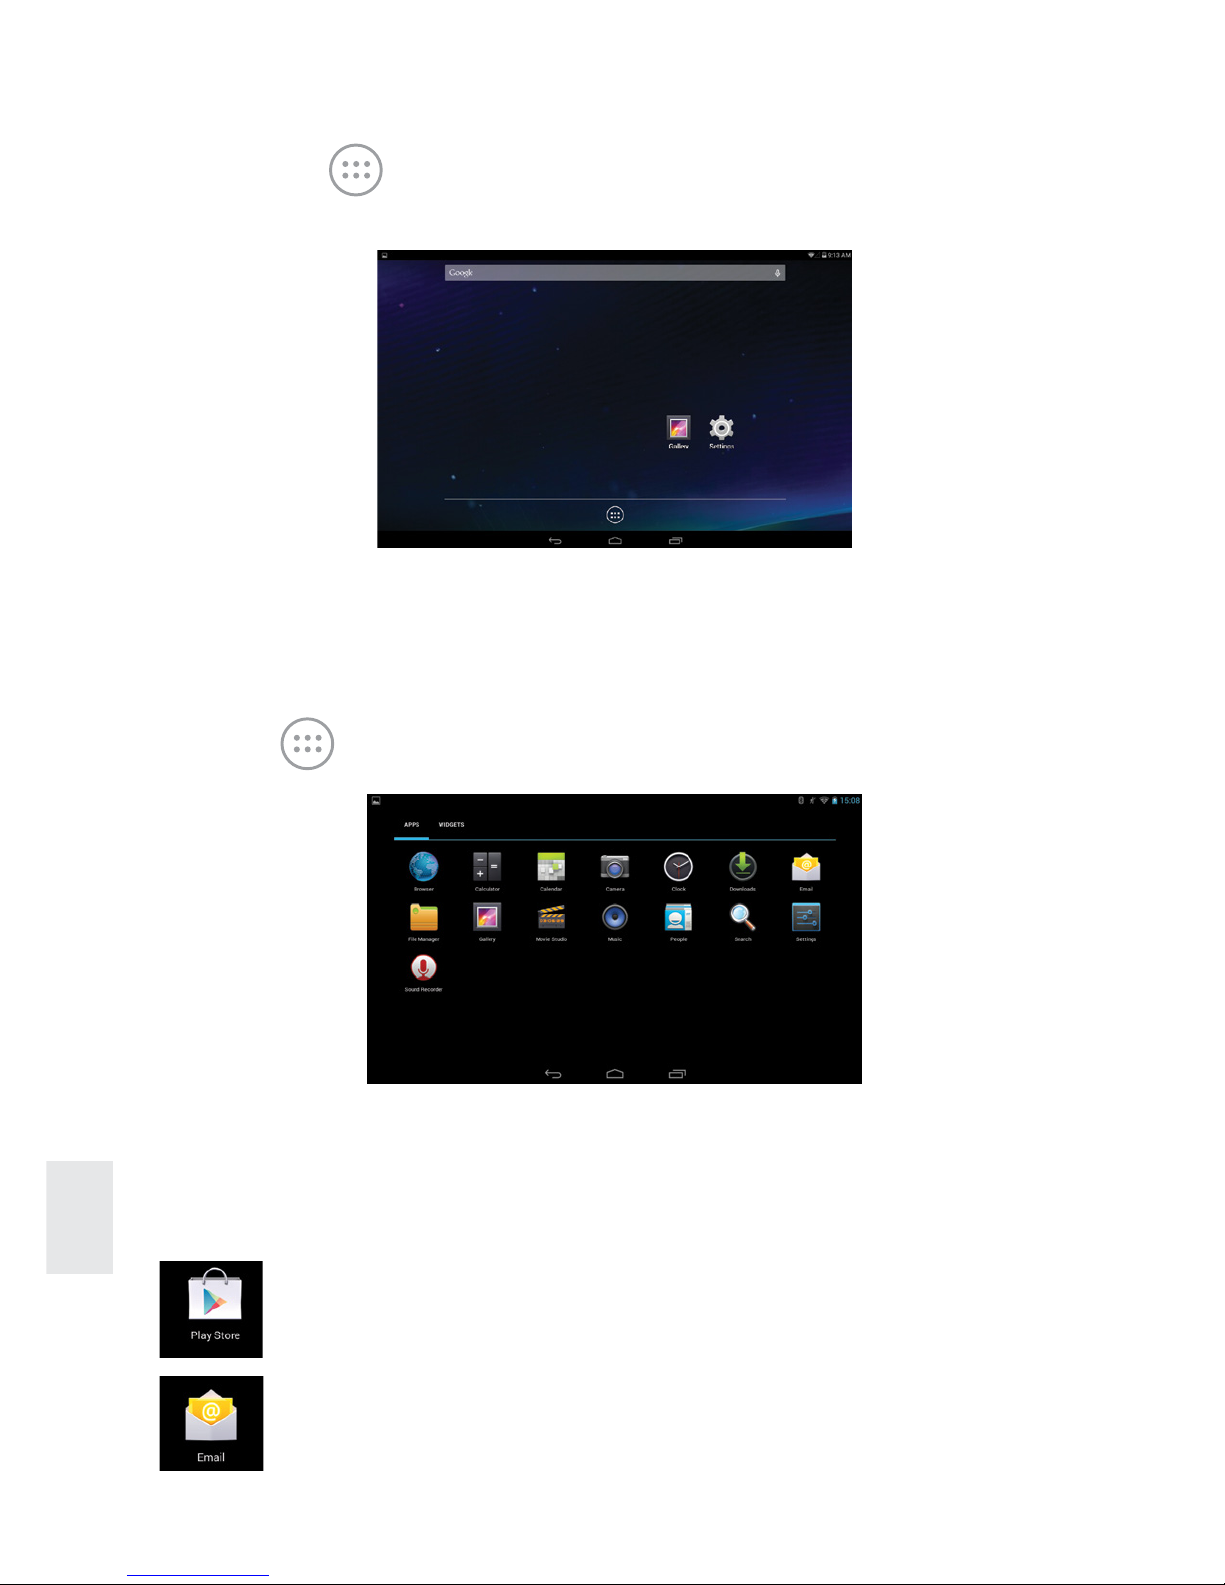
•The device supports application installation, enabling you to download and
install a variety of software from Google Play store in your MID.
•This product offers applications for business and entertainment, such as
e-mail, word, website browsing, news, instant messaging, financial, blog,
games, videos, stock market, weather report , mobile TV, maps, fun, etc.
•Supports MP3, M4A, WMA, APE, FLAC, AAC, MID, WAV, AMR, OGG, etc.
•Supports full HD video decoding (2160P, 1080P, 720P, 480P); video
formats: MKV, AVI, RM/RMVB, WMV, 3GP, MOV, MP4, ASF, MPG, DAT,
VOB, FLV, etc.
•Supports JPG, JPEG, BMP, PNG, etc. formats image browsing.
•Supports MicroSD Card, with a capacity of up to 32GB.
•Personalized settings: adjustable screen brightness, key tone on/off,
change wallpaper, etc.
•Supports multiple languages
•More functions could be added by updating Firmware
Main functions

6
ENG
Appearance and Buttons
12
8 9
6
5
4
3
7
8
1. USB Port: Micro USB 5 Pin data cable supports external U-disc,
MP3, MP4, wired mouse, 3G wireless Internet card, etc
2. Earphone Jack
3. Power Button: Hold down this button to turn tablet On/Off,
press button for a short period of time to lock the screen.
4. Volume+: Volume up
5. Volume -: Volume down
6. MicroSD Card slot
7. SIM card slot
8. Front 0.3MP camera
9. Telephone receiver

7
ENG
Power On/Off and unlock
When the tablet is off, hold down the power button for about three
seconds to turn the tablet on. It will take some time for the tablet to turn on,
please wait.
Drag the unlock icon to the camera icon on the left to take a photo.
Drag to the right towards the unlocking icon to unlock the tablet.
Energy-saving and locking mode: When you are not using the tablet for a
certain period of time, the system will automatically enter the energy-saving
mode.
Press the power button to start the system.
Slide the unlock icon to unlock your tablet.
Notes: While the tablet is in the energy saving mode, the main operations
won’t stop, only the LCD screen will be off, showing a black screen. Music
or film will continue to play.
Quick Start
Power Off: Hold down the power button for about 5 seconds. The
screen will show the power off option. Select “Power off” option, confirm
your choice and the system will automatically turn off. Select “Cancel” to
cancel “power off” operation.

8
ENG
Battery and Charging
Before using the tablet for the first time, you should charge the battery for
approximately 8 to 12 hours.
Please use the charger approved by our company for charging. Before
charging, insert the miniport of the adaptor into the DC jack and the other end
into the power socket. While the device is being charged, the battery icon will
show the charging status. Please do not disconnect the charger until the device
is fully charged. The battery icon will show when the device is fully charged.
Computer Connection & File Transfer
When the device is connected to a computer with a USB cable, the top status
bar will show that a USB has been connected. By default, the device will
automatically charge when connected to a computer. If you are connecting
to an external mobile hard disk, you need to pull the automatic running list at
the top status bar; you will then see a “USB connected” option. Click the
option, show USB status switch interface. According to the note icon in the
bottom right “Open USB storage equipment”, switch into USB storage
status. At this time, you can access the external hard disk. Click the icon
again to disconnect the USB cable and go back to the charging mode.
Using the Touch Screen
There are various operation methods. You can view the main screen, menu
and application program.
Click
When you want to use the keyboard on the screen or open an application on
the Home page, use your finger to click on the desired item.
Press
When you want to open an available option, a shortcut or an application on
the Home page, use your finger to press the item on the screen.
Quick swipe
Quickly move your finger across the surface of the screen, without pausing
when you first touch (so you don’t drag something instead).
Drag
Touch and hold an item for a moment and then, without lifting your finger,
move your finger on the screen until you reach the desired position.
G-Sensor
This product has a G-sensor function. After accessing the function in the
Settings, rotate the device 90 degrees; the screen will automatically shift into
a vertical or horizontal position depending on the position of your device.

9
ENG
Descriptions of the icons located on the main home page screen.
Home screen
Hold down the power button. Slide the unlock icon to access the Home
screen as the pictures below show. In this interface, you can open programs
and perform other tasks.
Using the Main Interface & Icons
Google search Settings
Back All Apps
Battery icon Camera
The current
system time
Return to the
home screen
WiFi signal
Display
Recent apps

10
ENG
Play Store
Download and install a new application.
Manage applications installed on the device.
E-mail
Send and receive e-mail
Add, move or delete desktop icons
Click the icon to access the function menu list, which shows a list of all
applications. By holding and dragging the icon will copy it on the desktop.
To delete an icon from the main screen, press it with your finger. The deleting
icon Xwill appear above. Drag the icon you want to delete to the X.
Shortcut Key
Press the icon to access a fully functional menu as it is shown below:
All icons are displayed in the window. Pressing any icon can enter into the
relative function interface. The following are the simple introduction with the
relative icon:

11
ENG
Browser
Open the browser to surf the Internet.
Music Player
For instructions on how to use the music player, please refer
to Introduction-Music.
Calculator
Preform mathematical operations.
Gallery
For instructions on how to use the Picture Browser, refer to
Introduction-Gallery.
File Manager
View all the files and catalogues.
Calendar
View calendar and calendar settings.
Video Player
Start the video player. For instructions on how to use the video
player, please refer to Introduction-Video.
Recording
Make a voice recording. For instructions on how to use the
Recorder, refer to Introduction-Recording.
Alarm clock
Set the alarm clock.
Camera
For instructions on how to use the Camera, refer to
Introduction-Camera.
Settings
Access device settings.

12
ENG
Network Settings
Press the shortcut icon in the main interface, choose “Setting/Wireless
and Network” to access the network setting interface:
WiFi Connection
Touch the main interface shortcut, select “Internet connection manager”,
touch “WiFi settings”, enter WiFi setting interface, select “WiFi” to turn the
WiFi on.
After WiFi is opened, it will automatically search for wireless Internet. A list of
available wireless networks will appear. Tap the wireless Internet network of
choice, enter a password and connect.
3G Connection
External USB dongle 3G card
First, connect the USB 3G card to the product through a OTG-USB cable.
The system will detect the device and automatically switch the mode. Then
enter “Setting / WiFi and Network”, select “Mobile Network” and the
system will connect to the network automatically.
Webpage browser
Set up the network according to the
instructions provided.
Click on the shortcut on the main home
page screen. Select “browser”, click the
“Menu” button, pop-up browser settings
menu; Click “Start” pop-up address bar,
enter the URL to be determined. Open web
page; slide your finger up and down to view
other parts of the page. Drag web pages,
the bottom of the browser will appear zoom
button; you can click it to browse the Web.
Internet
Before connecting to 3G, please turn off WiFi.
Before connecting to 3G, please make sure your device has enough
battery life or is connected to a DC charger. Using 3G consumes more
power. When you are not using 3G, unplug the dongle to save power and
extend battery life.
When WiFi is running, your device will use up more power. When you are
not using WiFi, turn it off to extend the life of your battery.

13
ENG
Bookmarks manager
•Saving a web page to bookmarks
To add a web page URL to your bookmarks list, click “Menu” to select
“Bookmark”, then click “Add bookmark”. Click “Yes” to confirm.
•Opening bookmarks
In the interface of the browser, click “Menu” to select “Bookmark”,
select the bookmark that you want and open it.
•Edit bookmarks
Click “Menu” to select “Bookmark”, then click and press bookmark to
open the menu option. Select the bookmark that you would like to edit,
select “Edit bookmark” to edit it, and click “Yes” to confirm.
Open a new browser window
•Open new browser window
Click “Menu”, select “New window” to open a new browser window.
•Switching the browser window
In the browser window, click “Menu” and click “Window” to open a new
browser window.
Change your browser homepage
Click “Menu” and open the browser settings menu; click “More” and
then click “Setting”; click “Setting homepage” in the Settings interface,
then enter URL and click “Yes” to save it.
Browser settings
First click “Menu”, then click “More”, and finally click “Setting” to change
browser settings.
E-mail
You can receive and send e-mails using your tablet. There is an E-Mail
Settings guide in the application program. The device can add POP3 OR
IMAP e-mail accounts of regular WEB e-mail servers (Yahoo, Gmail, Hotmail).
Notes: Before setting up your e-mail account, please ensure that you have
a properly working Internet connection and that the time on the device is
correct.

14
ENG
E-mail Settings Guide
Click the shortcut icon on the main home page. An E-mail Settings guide
will pop up.
Click “Next”, enter your e-mail address and password of your e-mail
account. Click “Next”; select your e-mail form (POP3 or IMAP). Click “Next”
to check whether e-mail sending and receiving servers can be used or not.
Enter the account name and e-mail name, click “Finish”. If your e-mail
account has been set up correctly and you have e-mails, they will show up
in your inbox automatically.
Receiving and sending e-mails
Click on the shortcut icon on the main home page, select icon “E-mail” to
access your Inbox. Your Inbox will automatically refresh with new e-mails.
In the Inbox, click “Menu”, click “Write” to create a new e-mail message.
Enter the recipient’s e-mail address, subject of the e-mail and type up your
message. If you want to add an attachment, click “Menu”, click “Add
attachment” and select file to add to the e-mail. Then click “Send” to send
your e-mail.
Note: If you have more than one e-mail account, and want to send an e-mail
using a specific account, first choose the account and then write the e-mail.
Delete E-mail account
You can delete the POP3 OR IMAP e-mail account from your e-mail program.
Click on the shortcut icon on the main home page, select “E-Mail” icon to
access your Inbox, click “Menu”, then click “Account”. Choose the account
you want to delete, click “Delete account”, then click “Yes” to confirm that
you want to delete the account.
Instant message
You can send instant messages through the built-in “Google Talk” or
“Mobile QQ” or other applications.

15
ENG
Music
Select the music icon, enter music list, select files that you want to play, as it
is shown in the image below:
List music files by artist
List music files by album category
List all song files
See recently added music files
See files that are playing currently
/ Previous / next song, rewind / fast-forward;
you can also click the progress bar to fast forward/rewind.
/
Play/Pause music
Play songs randomly
Repeat all songs
Main Interface

16
ENG
Video
Choose the Video Player icon , click to view the video list. Select video
to enter the video playing screen. Click to play a video.
Click on the progress bar in the video to access the fast forward/rewind
function.
Gallery
Click the icon in the main interface in to the photo browser list, hold
down video files until the icon appears in the video list, and click to
delete the video files.
Click “cancel” to cancel the chosen function. Select a picture file, view the
interface in full-screen picture, click on the upper right corner of the screen
to open the Settings menu. Click to bring up a sub-menu: slide show,
edit, rotate left, rotate right, crop, set picture as, details.

17
ENG
Camera
Select the camera icon, enter camera mode.
Self-timer photos
When in self-timer photo mode, click to take the picture. The picture
will be automatically saved to DCIM/Camera menu. The files will be named
by year, month, day, hour, minutes, second. Click the icon to browser
through all photos
Self-timer videos
When in self-timer video mode, click to enter recording mode; click
to begin recording. After you stop recording, the video file will be saved
automatically, and then go back to camera status. The video will be saved to
DCIM/Camera menu and the files will be named by year, month, day, hour,
minutes, second. Click the icon to browse through all videos.
Click the “Home” key to go back to the main interface.
Recording
Click the recording icon to access the recording interface.

18
ENG
Click to start recording. After you are finished recording, click
again, and a pop up box will ask you to select whether you want to keep this
recording or not. You can click to play the recording and click to
stop playing the recording. Select “Save” to save the file or select “Cancel”
if you don’t want to save the file.
Files will be saved in the “recordingxxxxx.3gpp” format in Files Manager.
Calculator
Click the application program icon in the main interface to enter the
application program management interface; select and click the icon to
enter calculator interface.
Clock
In the main interface, click the icon to enter the application list interface.
In the time setting interface, select the clock icon (see below). Click
icon to enter the interface for setting the time:

19
ENG
In the interface for setting the time, click to enter alarm settings (as
shown below). Here you can create, set and delete alarms.
In the alarm interface, you can click the display time to set the alarm clock
time. Click the icon to open the alarm clock.
File Manager
In main interface, click the File Manager icon . Select [MicroSD Card] or
[Local Disk], [Mobile Disk] to expand the drop-down folders and related files.
Here you can copy, move, paste or rename files. Click on a single folder or
file, the Edit dialog box will pop up with choices to delete, rename, copy,
paste and send e-mail.

20
ENG
OTG Function
External USB Mouse & Keyboard
Using the MicroSD Card
This product has the OTG function. It can support a USB disk and other
devices like MP3, MP4, self-powered hard disk, etc.
This product will automatically detect a USB device after connecting to it via
an OTG cable. You can have access to the USB device files.
After a mouse is connected, the mouse pointer will appear on the screen.
The button on the left is used to confirm a section, the button on the right
to return to the previous screen and the middle slider to slide up and down
the page.
Note: Some keys cannot work on this device. The keyboard code will be
revised as per definition of Android system. We recommend a standard USB
keyboard to be used.
This product comes with a MicroSD Card slot. It supports reading files
on the MicroSD Card. Insert a MicroSD Card into the tablet. To eject the
MicroSD Card, push the card in and release; the MicroSD Card will pop
out automatically and you can remove it at this time. This product supports
MicroSD Cards from 1GB to 32GB.
Tips:
•Please insert the MicroSD Card into the card slot correctly.
•While the MicroSD Card is being used (such as reading, copying, etc.), do
not eject the card as this will result in data errors.
•Avoid using the card in high temperatures or high humidity environment.
•Keep the memory card away from liquid or corrosive materials.
Note: If you are having difficulties ejecting the MicroSD Card, you can use a
pair of tweezers to pull it out slowly and carefully.
If the battery is low or if the DC charger is not charging, please do not
use the OTG function, or the device may turn off automatically due to
low power.
Table of contents
Other Tesla Tablet manuals